HJM RADIANT User manual

Version:HJM2307
RADIANT

Contents
Manual Use Instruction.............................................................................................................................. 3
Product Overview....................................................................................................................................... 4
Assembly Instructions............................................................................................................................... 7
Battery Charging...................................................................................................................................... 21
Operation....................................................................................................................................................25
Cautions and Warnings........................................................................................................................... 31
Maintenance...............................................................................................................................................41
Troubleshooting........................................................................................................................................47
Assembly Instruction Support...............................................................................................................49
2
Welcome to the HJMBIKE family!
Thank you for your purchase of our products. We feel honored for your support and trust.
HJM team is engaged in e-bike manufacturing and innovation. We are devoted to providing cost-
effective e-bikes and high-quality services. Green, healthy lifestyle is what we pursue and joyful
transportation mode is what we offer.
Now, before enjoying the easy ride with your new RADIANT ebike, please read this manual carefully
and follow the instructions when assembling and operating the bike.
If you have any questions after reading this manual, please refer to our website, or contact us by e-
mail.
Website: www.hjmbike.com
Email: support@hjmbike.com
1

Manual Use Instruction
This manual contains details of the product, assembly procedure, operation method, maintenance as
well as some useful tips for users.
It is necessary to read through the manual carefully before you start to use your new ebike. You should
pay the most attention to all tips, suggestions, cautions, and warnings to ensure your safety and enjoy
each ride. Please always keep it for future reference even if you have read it. The ebike is expected to
be your powerful partner and friend after years with your endless love and care.
The content in this manual is subject to change or withdrawal without notice. You can refer to our
website for the latest version. The purpose of this manual is to inform you of the safe ways to operate
the bike. However, it is impossible to promise your safety in any riding conditions and/or unexpected
situations. Any risks occurred should be the responsibility of the rider.
Any other questions, please get in touch with us via our website/e-mail.
3
Product Overview
Components & Accessories
4
NO
Accessory name
NO
Accessory name
NO
Accessory name
1
Saddle
12
Rim
23
Headset
2
Seat post
13
Hub motor
24
Stem
3
Seat post clamp
14
Chain
25
Throttle
4
Rear rack
15
Crank set
26
LCD display remote
5
Rear light
16
Pedal
27
Bell
6
Rear fender
17
Tire
28
LCD display
7
Brake rotor
18
Front brake
29
Shifter
8
Freewheel
19
Front wheel axle
30
Brake lever
9
Rear brake
20
Suspension fork
31
Frame
10
Rear derailleur
21
Front fender
32
Battery
11
Kickstand
22
Front light
33
Controller

Specification
Electronic
Components
Battery
48V15Ah Li-Ion battery
Fork
Aluminum alloy hydraulic
suspension front fork
Chain
KMC chain
Charger
48V3A operating during 110V
to 240V AC power outlets
Frame
6061 aluminum alloy
Tires
26"x2.35" tire
Hub Motor
500W brushless gear motor
Derailleur
Shimano 7-speed
Rims
Star Circle, alloy, 36H
Controller
48V18A brushless controller
Freewheel
Shimano 7-speed freewheel
Fenders
Black PVC front and rear,
full coverage
Pedal assist
0-5 pedal assist
Gearing
1-7 speed
Spokes
12-gauge stainless steel
Throttle
Half twist throttle
Brake
Tektro 180mm front and rear
Crank Set
170mm forged alloy
Display
48V display with switch
Brake lever
Tektro comfort grip levers with
motor cutoff switch and
integrated bell
Pedal
Pedal with reflectors
Headlight
LED 48V waterproof cable
Handlebars
Custom formed aluminum
Saddle
Velo leather comfort seat
Rear Light
Integrated taillight with brake
indicator
Stem
SM-A191-8
Seat Post
27.2x350mm
USB Ports
/
Grips
Hand sewn grips
Kickstand
Single-leg aluminum alloy


Step 4
Install the front wheel
1.
Remove the front fork plate with a 10mm wrench.
2.
Put the e-bike on safe, flat ground. You can use the hard foam from the carton box to put on the
bottomof the fork to avoid damage caused by the friction between the front fork and the ground.
3.
Prepare the wheels. There are two wheels hub protections on the two sides of the wheel. please rotate
and
remove them.
4.
Install the front wheel. Lift the front of the e-bike and put the wheel in the middle of the front fork. pay
attentionthat the brake rotor on the wheel and disc brake on front fork are on the same side. Install the front
wheel
axle into the front fork fluted legs and ensure the brake rotor is smoothly placed in the disc brake.
7. Attach the fender bracket to the front fork.
Use a 5mm Allen wrench to loosen the bolts of the front fender bracket hose clamp and fix the hose clamp to
the proper position of the front fork, make the clearance between the fender and tire evenly,be careful not to
install the wire harness into the hose clamp, Ensure the fender is centered and torque all mounting bolts to the
recommended torque value, 6 N m. (Refer to the table of Recommended Torque Value on pages 19)
8. When properly installed, the front wheel should be at the center of the front fork, the brake rotor should be
between the brake pads in the brake caliper, and the quick-release lever should be fully secured. Ensure that
the front wheel and quick release lever are properly secured before moving on to the next step.
5.
Locate the quick release lever, which put into accessory box during shipment. Open the lever and remove the
thumb nut and one cone spring (opposite to the lever). Keep the washer and other cone spring in place on the lever
side.
6.
Install the lever into the front wheel axle. Insert from either side is OK. Next, re-install the cone spring
pointing
towards the wheel hub, then thread the thumb nut onto the lever and turn tightly with lever open.
Then close the
lever by hand without touching the brake rotor.
11
NOTICE
·
Never touch the brake rotor, especially when the wheel and/or bike is in motion, or serious injury could
occur.
·
Hand oils can cause squeaking and decrease brake performance; do not touch the brake rotor while
inspecting, opening, or closing the quick-release lever.
12
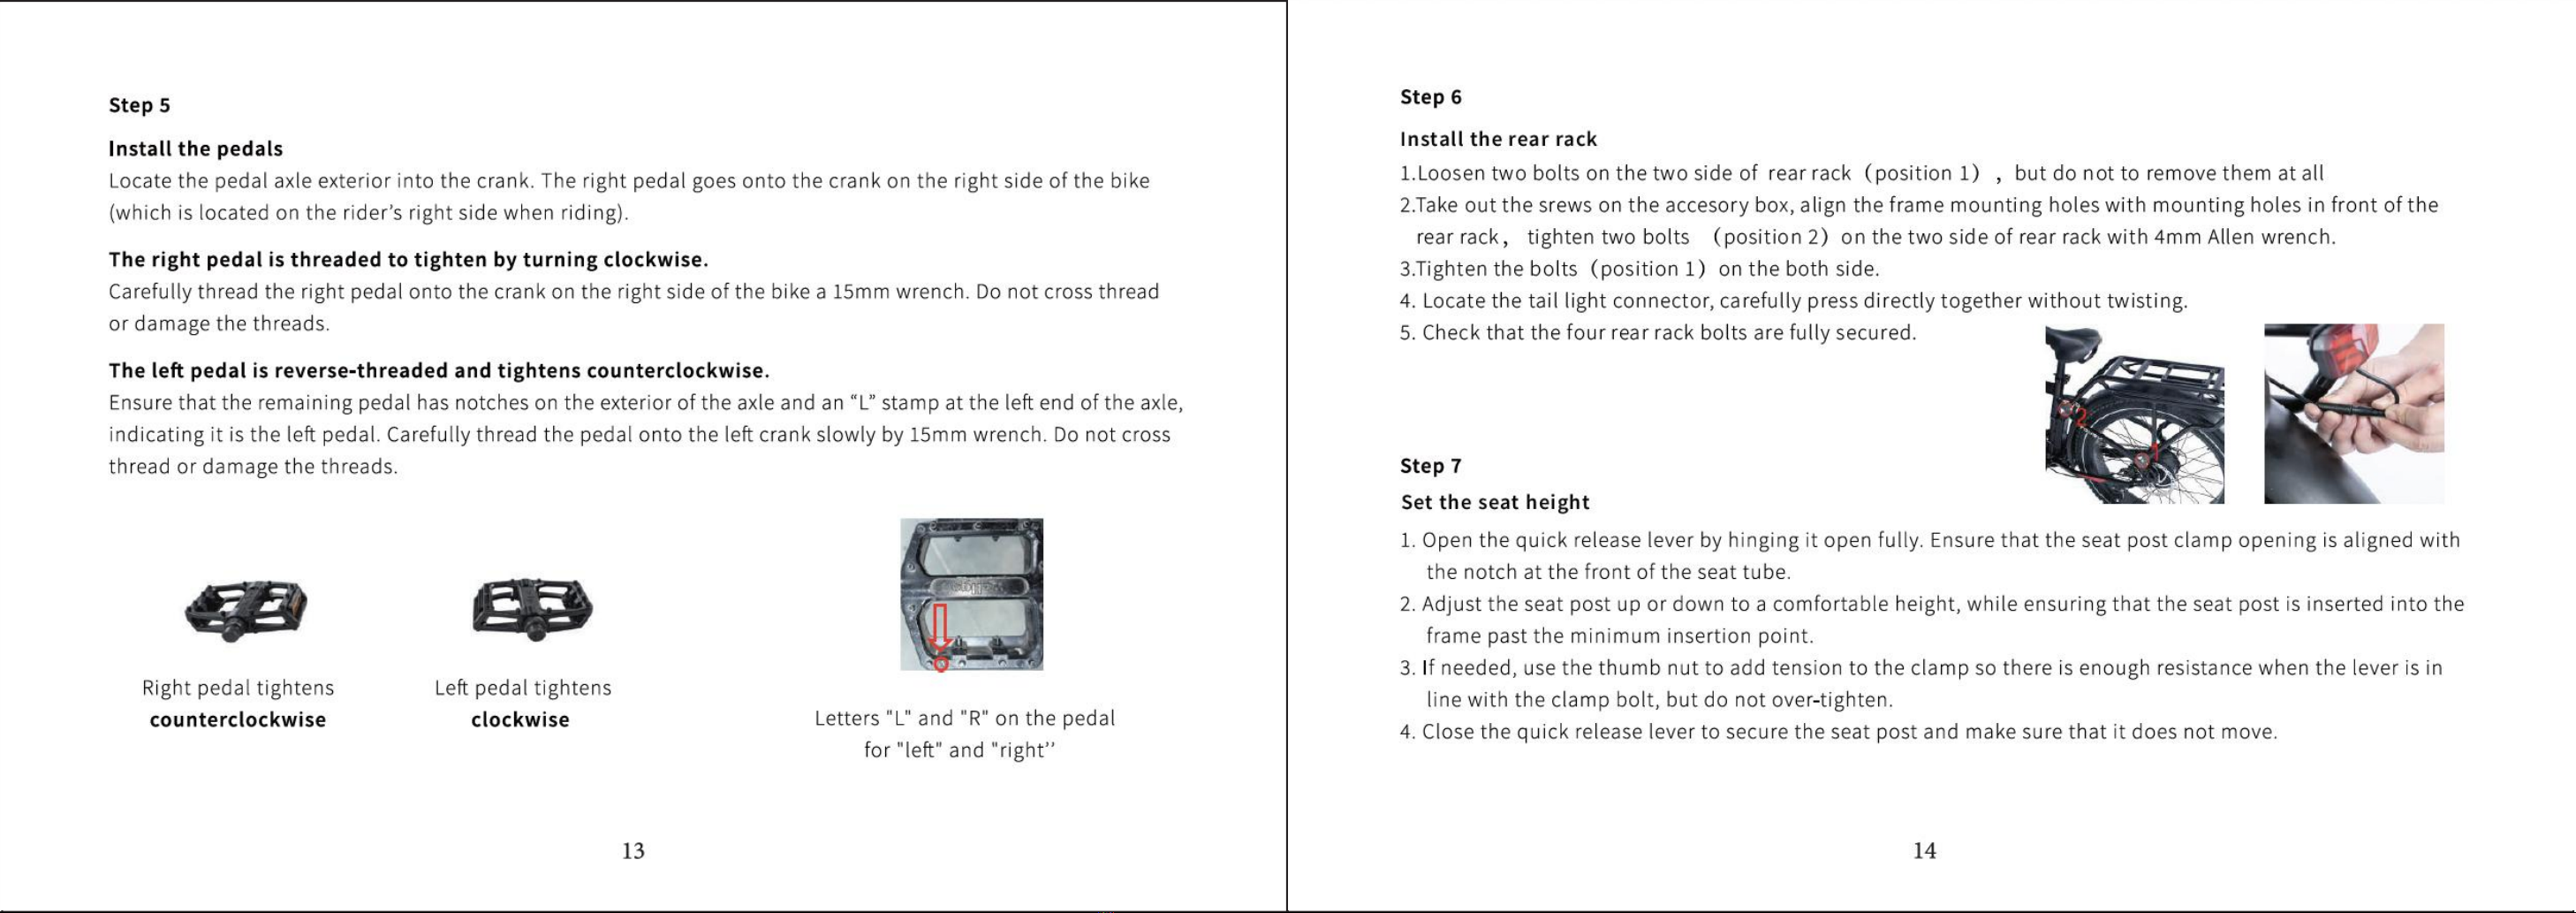
Install the rear rack
1.
Loosen two bolts on the two side of rear rack (position 1), but do not to remove them at all
2.
Take out the screws on the accessory box, align the frame mounting holes with mounting holes in front of
therear rack, tighten two bolts (position 2) on the two side of rear rack with 4mm Allen wrench.
3.
Tighten the bolts (position 1) on the both side.
4.
Locate the tail light connector, carefully press directly together without twisting.
5.
Check that the four rear rack bolts are fully secured.
Set the seat height


NOTICE
NOTICE
·
Adjusting the Suspension Fork
The suspension fork can move up and down up to 80 mm to cushion bumps in the riding surface, which can make
r
i
d
i
ng
o
n
a
r
o
ugh
r
o
a
d
o
r
t
r
a
i
l
s
m
oo
t
h
e
r
a
nd m
o
r
e
c
o
m
f
o
r
t
a
b
l
e
.
I
n
a
dd
iti
o
n
,
d
e
p
e
nd
i
ng
o
n
a
r
i
d
e
r
²
s
p
r
e
f
e
r
e
n
c
e
,
t
h
e
suspension fork can be locked out as a rigid fork, which will typically yield higher pedaling efficiency.
The lockout lever 1 located on top of the right side of the suspension fork, can be turned counterclockwise
until
it
s
t
o
p
s
t
o
l
o
ck
o
u
t t
h
e
s
u
s
p
e
n
s
i
o
n
f
o
r
k
²
s
m
o
ti
o
n
c
o
mp
l
e
t
e
l
y
.
T
o
un
l
o
ck
t
h
e
l
o
c
ko
u
t
l
eve
r
,
t
u
r
n
t
h
e
k
n
o
b
c
l
o
ckw
i
s
e
until it stops. When the lockout lever is unlocked, resistance can be adjusted by turning.
The pre-load adjustment knob 2 is located on the top of the left side of the suspension fork. To soften the ride,
reduce resistance by turning the pre-load adjustment knob counterclockwise, in the
direction of the small ”-” on the knob. To make the suspension stiffer when going
over bumps, add resistance by turning the pre-load adjustment knob clockwise, in the
direction of the small ”+” on the knob.
Step 9
Check before riding
•
Check the battery to ensure it*s locked
•
Operate the electrical system when the battery has been adequately charged and the battery is secured
to the mounting receptacle on the frame
•
Check hardware to ensue all is tightened properly following recommended torque values and
components are secured before moving on to the next step.
•
Do not extend any components including the handlebar stem, seat post, or seat saddle beyond any
minimum insertion marking etched into the components.
•
Check carefully and make sure the bike is assembled securely. Otherwise, bike damage, serious injury,
or even death could occur.
Step 10
Review the remainder of the manual.
0nce the bike has been assembled following the instructions above, read, understand, and follow the
procedures outlined in the remainder of the manual before operating the bike.
If you are unsure about the assembly steps or the assembly video is not available, please
contact HJM bike for help, or consult a certified local bike mechanic for assistance.
17 18

Continued
Rear Dropout Area
Derailleur Cable Pinch Bolt
6-8
Rear Dropout Area
Kickstand Mounting Bolts
8
Bottom Bracket and Crank Area
Bottom Bracket and Lockring
45
Bottom Bracket and Crank Area
Crank Arm Bolt into BB spindle
35
Bottom Bracket and Crank Area
Pedal into Crank Arm
35
Bottom Bracket and Crank Area
Chainring Bolts
10
Bottom Bracket and Crank Area
Controller Mounting Bolts
6
Fenders
All Fender Mounting Bolts and Hardware
6
Recommended Torque Values
19 20
Hardware Location
Hardware
Torque Required
(Nm)
Handlebar Area
Handlebar Stem Clamp Bolts
15
Handlebar Area
Handlebar Stem Face plate Bolts
6-8
Handlebar Area
Brake Lever Clamp Bolt
6
Handlebar Area
Shifter Clamp Screw
3
Brakes
Caliper Adapter to Frame
6-8
Brakes
Caliper to Adapter
6-8
Brakes
Brake Cable to Caliper Clamp
6-8
Brakes
Brake Rotor to Hub
7
Seat post area
Seat Angle Adjustment Bolt
18
Rear Dropout Area
Rear Axle Nuts
45
Rear Dropout Area
Rear Torque Arm Bolt
5
Rear Dropout Area
Derailleur Bash Guard Mounting Bolts
5
Rear Dropout Area
Derailleur Hanger Mounting Bolt
6
Rear Dropout Area
Derailleur Mounting Bolt
10

NOTICE
Battery Charging
Charging will be indicated by the charge status light:
Red light indicates that the battery’s charging; Green
light indicates that the battery’s fully charged. You can
also see the charging status on LCD display.
There is a USB port on the battery, which can be used
to charge your phone or other electronic product.
Charging Procedure
1.
Check the charger, charger cables and battery for damage before each charge.
2.
Always charge in a safe place with suitable environment.(as stated below)
3.
The battery can be charged both when it is located inside of the frame or when you take it out of the frame.
When battery is located inside of the frame:
a.
Turn ebike power off.
b.
Locate charging port on the left side of the frame and remove the rubber cover.
c.
Plug the charger into the charging port first; then connect it to a power outlet (AC 180V-240V, 47-G3H7).
When the battery is outside of the ebike:
a.
Use the key to unlock battery and pull it out of the frame.
b.
Place battery in a secure place and plug the charger into the charging port first; then connect it to a power
outlet (AC 180V-240V, 47-G3H7).
c.
Unplug the charger from the outlet, then the charging port.
d.
After full charge, remember to put the battery back into the frame and most importantly lock it with the key.
21
When Installing the Battery into the Bike
•
Do not force the battery onto the battery mount; carefully align and gently push the battery down onto the mount.
•
Ensure that the battery has been properly secured to the bike before each use. Verify that the battery is in a
locked position.
When Charging
•
A safe place with suitable environment should be cool, dry and indoors away from direct sunlight, dirt, or
debris. And it is away from potential to strip on the charging cords and possible damage to the bike, battery,
or charging equipment while parked and/or charging. Always charge the battery when the surrounding
temperature is between 10°C-25°C (50°F-77°F).
•
Ensure that the battery and charger are not damaged before charging. If you notice anything unusual while
charging or experience substantial reduction in range, please stop charging and usage of the bike.
•
Charging the battery normally takes 3-7 hours. The charging time varies depending on distance traveled,
riding characteristics, terrain, payload, battery age, etc.
•
Remove the charger from the battery within one hour after the indicator light turns green. The charger is
designed to automatically stop charging when the battery is full, but unnecessary wear of the charging
components could occur if the charger is left attached to the battery and a power source for longer than 12
hours. Detach the charger within one hour, or as soon as possible, once the green light indicates a complete
charge to avoid unnecessary wear of charging components.
•
Never charge a battery for more than 12 hours at a time.
•
Do not leave a charging battery unattended.
•
The battery should be recharged after each ride so that it is ready to go full range for the next ride.
22

When the Battery Is Removed
•
Be careful not to drop or damage the battery when lifting the battery of f the frame or when it is loose from
the bike.
•
Do not turn the bike on if you are riding it without the battery installed, or else damage to the electrical
system could occur.
Charger Safety Information
•
The charger should only be used indoors in a cool, dry, and ventilated area on a flat, stable, hard surface.
•
Always charge your battery when the surrounding temperature is between 10°C-25°C (50°F-77°F).
•
Avoid contact between the charger and any liquids, dirt, debris, or metal objects.
•
Do not cover the charger while in use.
•
Store and use the charger in a safe place away from children and away from potential damages caused by falling.
•
Fully charge the battery before each use to ensure that it is ready to perform to its best ability every ride, to
extend the life of the battery, and to reduce the chance of over-discharging the battery.
•
Do not charge the battery with any chargers other than the one originally supplied by the HJM Bikes or a
charger designed for your specific bike and purchased directly from HJM Bikes.
•
The charger works on 180V-240V, 47-G3H7 standard home AC power outlets and automatically detects and
accounts for incoming voltage. Do not open the charger or modify voltage input.
•
Do not yank or pull on the cables of the charger. When unplugging, carefully remove both the AC and DC
cables by pulling on the plastic plugs directly, not pulling on the cables.
•
The charger is designed to get hot when operating. If the charger gets too hot to touch, you notice a strange
smell, or any other indicator of overheating, discontinue charging immediately and contact HJM Bikes
Product Support.
Long-Term Battery Storage
If you intend to store your bike for more than two weeks at a time, follow the instructions below to maintain the health and
longevity of your battery.
•
Charge (or discharge) the battery to approximately 75% charged.
•
Power off the battery and leave it locked to the frame. Alternatively, you can unlock and remove the battery
from the frame for storage.
•
Store the battery in a dry, climate-controlled, indoor location where the temperature is between 10°C-
25°C (50°F-77°F).
•
Check on the battery every month, and if necessary, use the charger originally supplied with the bike to charge
the battery to 75% charged.
•
If you have not used the ebike for a long time, please remember to charge the ebike every three months.
Remember discharge before charging. If you have not charge the ebike regularly, the battery will be damaged quickly.
23 24
NOTICE
Operation
•
Read and understand all sections of this entire manual before operating the bike for the first time. There are
important safety warnings throughout the whole manual that MUST be followed to prevent dangerous situations,
accidents, damage to the bike, damage to property, injury, or death.
•
Users must follow the instructions and warnings in this manual for safety reasons. Do not attempt to operate your
bike until you have adequate knowledge about controlling and operating the bike. Damage caused by failing to
follow instructions is not covered with warranty and could result in dangerous situations, accidents, injury to you
and others, damage to the bike/property, injury, or death.
•
Users must become accustomed to the bike’s power control system before operating. The twist power assist
mechanism allows full power to be activated from a stop, and inexperienced users should take extra care when first
applying the twist power assist. The pedal assistance feature is also a powerful option, and users should thoroughly
research and understand how to operate it before first use. Not familiarizing yourself or practicing the operation of
the power system on your bike can lead to damage, serious injury, or death.
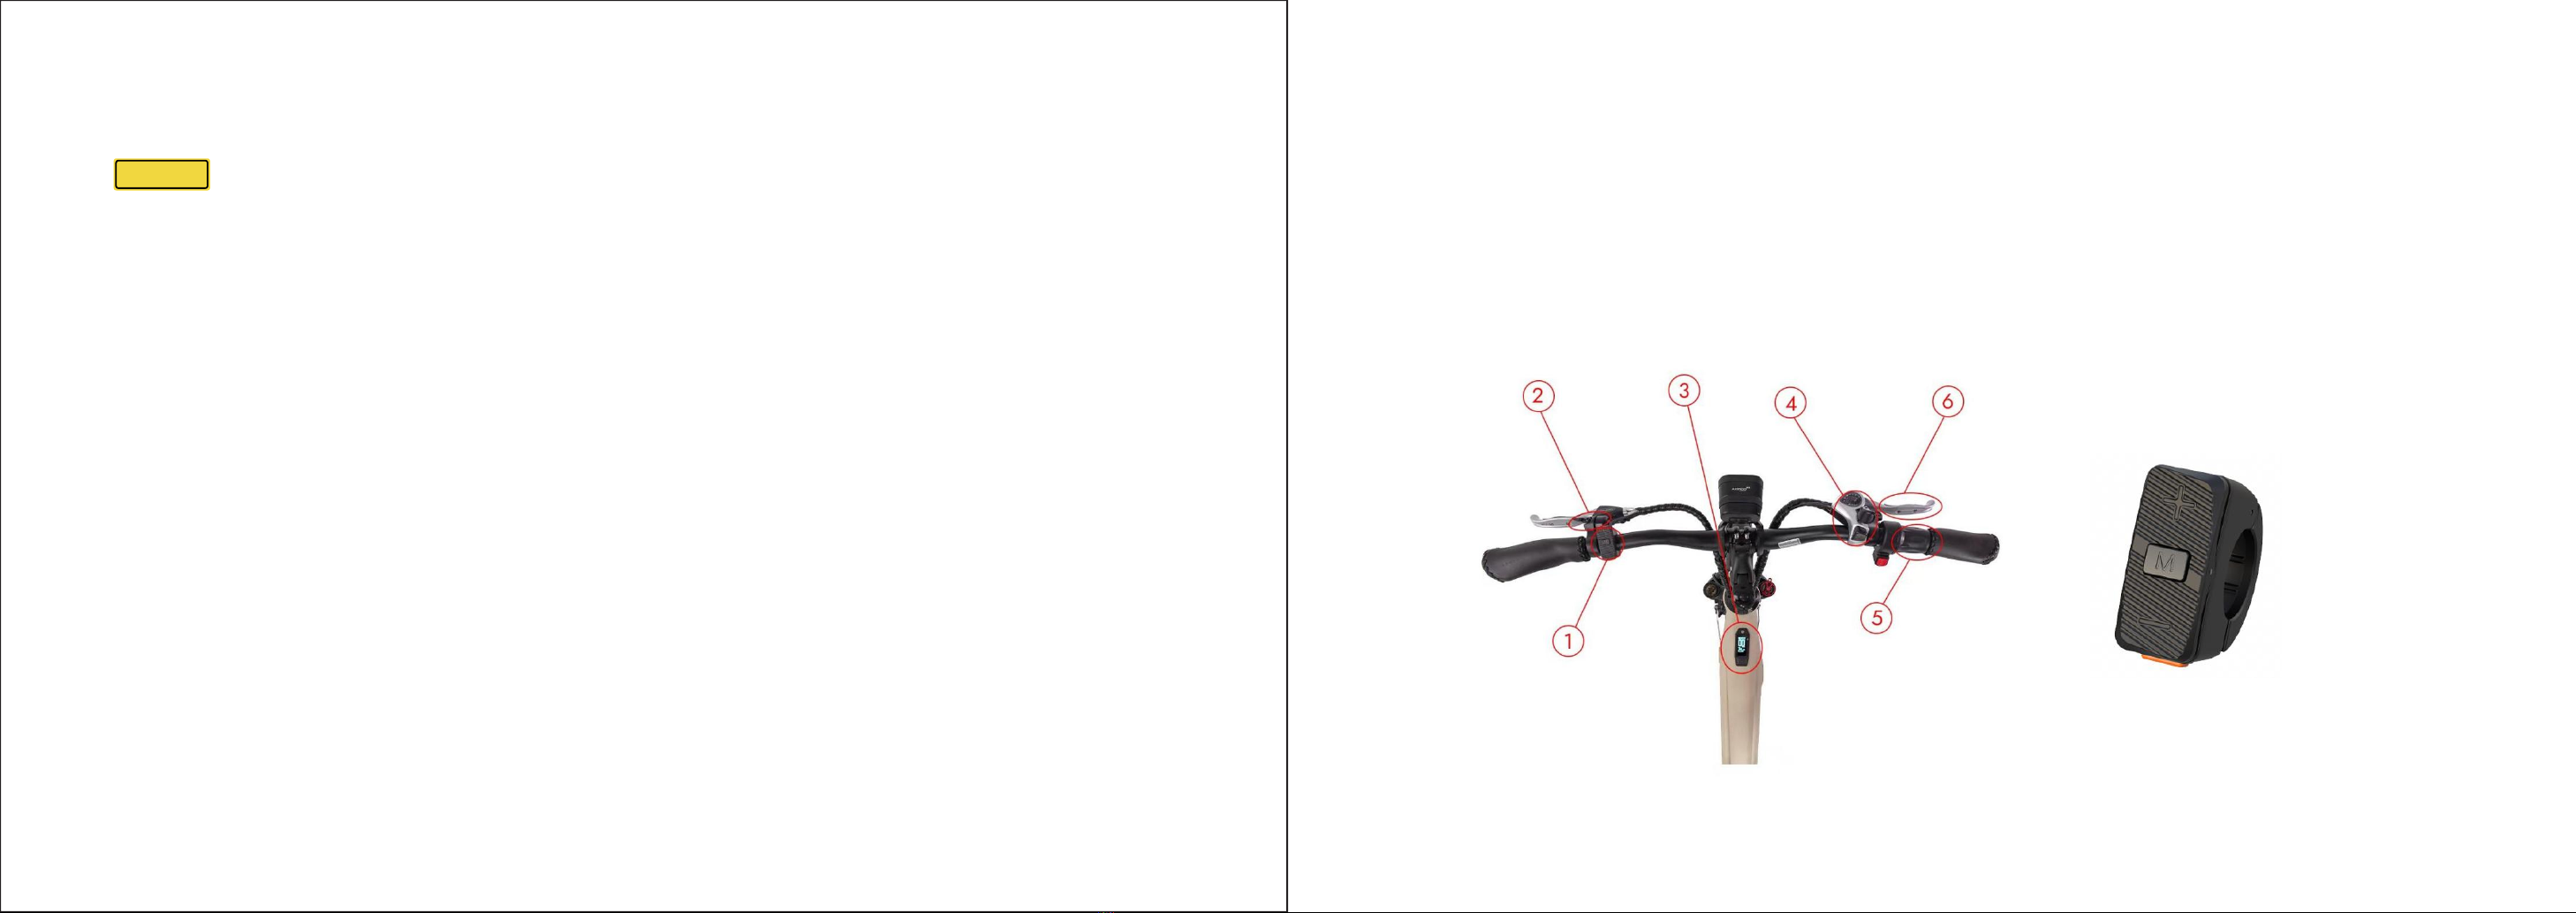
Handlebar Features
1. LCD Display Remote
2. Bell
3. LCD Display
4. Shifter
5. Throttle
6. Brake lever
Refer to the LCD Display instructions on how to perform various operations with these buttons.
25 26

LCD Display Function Overview
The LCD display offers a variety of features to suit your riding needs, including:
1.Four buttons for convenient operation
2.Power-on password function
3.Metric/imperial unit selection switch
4.Speed display: real-time speed (SPEED), maximum speed (MAX),
average speed (AVG)
5.Five levels of pedal assist control: gears 0-4
6.Six-level battery indicator with low voltage warning and battery
management system (BMS) information display
7.Headlight indicator (requires controller support)
8.Mileage display: trip mileage (TRIP), total mileage (ODO)
9.Trip time display
10.UART/CAN communication interface
11.6km/h power-assisted walking function
12.Fault code indication
The LCD display is equipped with five buttons on the corresponding operating unit:
27
Routine Operation
1. Power on/off
Long press(2 seconds) to power on/off the display. If there is no operation on the instrument for 5 minutes
(speed is 0), it will automatically power off.
2.
PAS level selection
Press / to switch PAS level of electric bicycle. There are a total of 5 modes: 0/1/2/3/4. By default, when the
instrument is powered on, it starts in mode 1. When the display shows 0, it indicates no assist mode is selected.
3. Display interface switching
When the display is powered on, short press to switch between trip mileage (TRIP), trip time (TRIP TIME),
average speed (AVG), maximum speed (MAX), total mileage (ODO).
4. Power-assisted walking mode
Press and hold for 2 seconds to activate the power-assisted walking mode. The electric bicycle will travel at a
fixed speed of 6 km/h and the display shows . Release to exit the power-assisted walking mode.
The Power-assisted walking mode can only be used when pushing the electric bicycle, please do not use it while riding.
28
Power on/off
Function
[+]Key
[-]Key

NOTICE
5. Light on/off
Long press for 1 second to turn on the headlight (requires controller support), and the display will show the
headlight indicator icon lighting up. Long pressing again for 1 second will turn off the headlights, and the
headlight indicator icon will go off.
6. Battery level display
The Battery level is shown as 5 bars. When the battery level reaches the low voltage warning value, only a
flashing battery frame icon is displayed, reminding the user to charge immediately.
7. Error code display
The display can alert the whole vehicle failure. When the controller detects the failure, the controller
transmits the display information, and the interface displays the failure code. The interface is shown as
follows:
When the error code appears on the display, please troubleshoot the problem in time, the electric bicycle will
not be able to drive normally after the problem occurs.
29 30
Please refer to the table below for a detailed definition of the error code:
Error Code
Definition
Troubleshooting
04
Throttle doesn't turn back to zero position
Check if the throttle return to zero position
05
Throttle failure
Check throttle
07
Overvoltage protection
Check the voltage of the battery
08
Failure of motor's hall signal wire
Check the motor
09
Failure of motor's phase wire
Check the motor
11
Failure of the controller's temperature sensor
Check the controller
12
Failure of the current sensor
Check the controller
13
Failure of the temperature of the battery
Check the battery
14
Failure of the temperature of the motor
Check the motor
21
Failure of the speed sensor
Check the position of the speed sensor
22
Failure of the BMS communication
Check the battery
30
Communication failure
Check the connector of the controller
Precautions
Pay attention to all the general operating when using the products and do not plug and unplug the display while
it is powered on.
◆
Avoid bumping the display as much as possible.
◆
Please do not change the parameter settings at will, otherwise normal riding cannot be guaranteed.
◆
If display does not work properly, please contact our customer service as soon as possible.
◆
There may be differences between the physical products and this manual due to normal upgrade. Please
refer to the physical products.

Cautions and Warnings
General Operating Rules
•
When riding, obey the laws applicable in your area as any other vehicles.
•
For additional information regarding traffic/vehicles laws, contact the road traffic authority in your area.
•
Try to predict the unexpected such as opening car doors or cars backing out of driveways.
•
Be careful at intersections when preparing to pass other vehicles or other cyclists.
•
Familiarize yourself with all features and operations of the bike by HJMBIKE. Practice and become
proficient at shifting gears, applying brakes, using power assist system, and using twist power assist in a
controlled setting before riding in riskier conditions.
•
Check your local rules and regulations before carrying cargo.
•
When braking, apply the rear brake first, then the front brake.
•
Maintain a comfortable stopping distance from all other objects, riders, and vehicles. Safe braking distances
vary based on factors such as road surface and lighting conditions.
31
Safety Warnings
•
All users must read and understand this manual before riding their bike. Additional manuals for individual
components should also be reviewed before installing or using those components.
•
Ensure that you comprehend all instructions and safety notes/warnings.
•
Ensure that the bike fits you properly before first use. You may lose control or fall if your bike is too big or too small.
•
Always wear an approved bicycle helmet when riding a bike . Failure to wear a helmet when riding may result in
serious injury or death.
•
Ensure that the handlebar grips are undamaged and properly installed. Loose or damaged grips can cause you to lose
control and fall.
•
0ff-road riding requires close attention and specific skills because there are potential conditions that could
cause hazards. Wear appropriate safety gear and do not ride alone in remote areas. Check local rules and
regulations about whether off-road ebike riding is allowed.
•
Do not engage in extreme riding. This includes but is not limited to jumps, stunts, or any behaviors that exceed
your capabilities. Although many articles/advertisements/catalog depict extreme riding as admirable, it is not
recommended nor permitted, and you can be seriously injured or killed if you perform extreme riding. Bikes
•
and their components have strength limitations, and extreme riding, including but not limited to jumps, stunts, etc.,
should not be performed as it can damage your bike’s components and/or cause or lead to dangerous riding situations in
which you may be seriously injured or killed.
•
Failure to perform and confirm proper installation, compatibility, proper operation, or maintenance of any component or
accessory can result in serious injury or death.
•
After any incident, you must consider your bike unsafe to ride until you consult with a certified bike
mechanic for a comprehensive inspection for all components, functions, and operations of the bike.
32

• Locking up your bike is recommended so that your bike is secure and the chance of theft is reduced. We do
recommend you to take appropriate precautions to keep your bike safe from theft.
•
Do no
t
p
ark
,
s
t
or
e,
or
tr
ansport
y
our
bik
e
on
a
r
ack
no
t
designed
f
or
the
bik
e
²
s
size
and
w
eight
.
• Use a rack compatible with the width of tires of your bike. Some racks may not accommodate all tire widths.
• Avoid transporting E-bikes on a vehicle rack during rain, as this may cause water damage to the electrical
components.
Wet Weather
Toury is a waterproof ebike, but never immerse or submerge this product in water or any other liquid as the
electrical system may be damaged.
• In wet weather you need to take extra care when operating this bike.
• Decrease riding speed to help you control the bike in slippery conditions.
• Brake earlier since it will take brakes longer to slow down than when operated in dry conditions.
• Be more visible to others on the road. Wear reflective clothing and use approved safety lights.
• Road hazards are more difficult to see when wet; proceed with caution.
Night Riding
It is recommended to not ride at night. Ride at night only when it is necessary.
• Wear reflective and light-colored clothing.
• Slow down and take familiar routes with street lighting, if possible.
• Ensure that tyre wall, pedal, and other reflectors are properly installed, positioned, clean, and unobstructed.
• Use a properly functioning lighting set comprised of a white front lamp and red rear lamp.
34
NOTICE
•
Always use the lowest assist level until you are comfortable with the bike and feel confident in controlling the
power.
•
Any aftermarket changes to your bike that are not approved could void the warranty and create an unsafe riding
experience.
•
Take extra care while riding in wet conditions. You should slow down and increase braking distances. Feet or
hands slip more easily in wet conditions and could lead to serious injury or death.
The throttle is very sensitive, when you turn on the ebike system, and you are not riding, please be careful not to
touch the throttle, which may cause you fall forward and cause injury or death.
Parking, Storage, and Transport
Please follow these basic parking, storage, and transportation tips to ensure that your bike is well taken care of both on
and off the road.
•
When pushing or carrying the bike manually, turn off the power to avoid accidental acceleration from the motor.
•
Turn the power and any lights off to conserve battery.
•
Ensure that the battery is locked to the frame when the power is off, or use the key to remove the battery and bring
it with you for safety reasons.
•
Park indoors when possible. If you must park outdoors in rain or wet conditions, you should leave your ebike outside
for only a few hours and then park it in a dry location as soon as possible to allow the entire system to dry out.
Compared to a regular bike, an ebike used in wet conditions needs more frequent maintenance to
prevent rust and corrosion to make sure that all systems are working safely.
33
•
Locking up your bike is recommended so that your bike is secure and the chance of theft is reduced. We do
recommend you to take appropriate precautions to keep your bike safe from theft.
•
Do
not park, store, or transport your bike on a rack not designed for the bike²s size and weight.
•
Use a rack compatible with the width of tires of your bike. Some racks may not accommodate all tire widths.
•
Avoid transporting ebikes on a vehicle rack during rain, as this may cause water damage to the electrical
components.
Wet Weather
Joyrider is a waterproof ebike, but never immerse or submerge this product in water or any other liquid as the electrical
system may be damaged.
•
In wet weather you need to take extra care when operating this bike.
•
Decrease riding speed to help you control the bike in slippery conditions.
•
Brake earlier since it will take brakes longer to slow down than when operated in dry conditions.
•
Be more visible to others on the road. Wear reflective clothing and use approved safety lights.
•
Road hazards are more difficult to see when wet; proceed with caution.
Night Riding
It is not recommended to ride at night. Ride at night only when it is necessary.
•
Wear reflective and light-colored clothing.
•
Slow down and take familiar routes with street lighting, if possible.
•
Ensure that tire wall, pedal, and other reflectors are properly installed, positioned, clean, and unobstructed.
•
Use a properly functioning lighting set comprised of a white front lamp and red rear lamp.
34

Note for Parents and Guardians
As a parent or guardian, you are responsible for the activities and safety of your child. The ebike is not designedfor
use by children. If you are carrying a passenger in a child safety seat, they must also be wearing a properly
fitted and approved helmet.
Components Notice
Carrying Loads
Total maximum payload: 135kg(298lb), includes the weight of the rider as well as cargo, passengers
and riding tools.
Optional rear rack maximum payload: 25 kg (55 lb)
Optional front rack maximum payload: 15 kg (33 lb)
You MUST hold onto the bike when loading passengers or cargoes. The kickstand is not designed to be used for
loading passengers or cargoes. Do not assume the bike is stable and balanced when using the kickstand. Always
hold onto the bike when passengers or cargo are being loaded.
Never leave the bike unattended with a child on the bike. Ensure that the child is taken with you when you look
away or walk away from the bike, otherwise the bike could tip over and cause serious injury or death.
35
Carrying Cargo
Carrying a cargo load involves additional risks, which requires special attention and care. Braking, acceleration,
and balancing are all significantly affected by the cargo loaded on the e bike. To safely operate your ebike
while carrying cargoes, you must get used to the differences in braking, steering, balance, etc that come with the
extra weight.
•
Ensure that your loads are properly secured and check periodically that nothing loosens or at risks of interfering
with any moving components, or touching or dragging on the ground.
•
Hills that are normally easy to climb and descend without cargo can become challenging and dangerous once cargo is
loaded onto the bike, as the extra weight affects steering, braking, balancing as well as the amount of power it takes to
go uphill.
•
With the user’s ability to safely operate the ebike. Serious injury or death can occur if the user²s ability to safely operate
the ebike is compromised by the cargoes or passengers on board.
36

Electrical System
The electrical system of your e bike offers various levels of power assistance for different operating
c
onditions
and
user
s'
pr
e
f
er
enc
es.
It
is
critic
al
tha
t
y
ou
f
amiliarize y
our
self
with
all
aspec
t
s
o
f
y
our
e
bik
e’
s
elec
tric
al
system and check if everything is working correctly before each ride. The front and rear brake levers contain motor
cutoff switches. They disable the hub motor's assistance. Both levers should be checked if they are working correctly.
When choosing higher power assist level, hub m otor should provide smooth, gradual acceleration of engine's power.
Should the power assist, lighting or motor levels function abnormally, intermittently, or not work at all, please stop
the using your ebike immediately and contact our support team for assistance.
Brake System
Do not use the front brake by itself. Apply the rear brake first, and then the front brake. Ensure that brakes function
normally and all components of the braking system are properly secured without any damage. When you fully
squeeze the brake levers, ensure that neither the front nor the rear brake lever touches the handlebars. Add tension
to the brake cables or take your bike to a certified bike mechanic to have the brakes
repaired when you face any
problems.
Derailleur
Because the derailleur is easy to damage, after assembling the ebike, first check whether the protection of
derailleur is bent, if you find the protection of derailleur is bent, you can take it perpendicular to the ground
by hand
.
Tires and Wheels
Your wheels should always spin straight and must be repaired or replaced if they wobble from side to side or up
and down when spinning. If your wheels are loosened, which could happen after use, we recommend having a
certified bike mechanic to tune the wheels of your e bike. Do not attempt to tune wheels or tighten spokes unless
you have adequate knowledge, tools, and experience. Ensure the tires and inner tubes to be in good working
condition with the correct amount of air pressure as indicated on the tire sidewall and without any visual damage.
Always replace tires and inner tubes if they have punctures, cuts, or damages before your rides. Tires without the
correct amount of air pressure could reduce performance, cause tires to wear faster, and make riding your bike
dangerous.
Suspension, Handlebar, Grips
The suspension fork should be properly adjusted for your weight and terrain. Make sure that the handlebar
and the handlebar stem are properly aligned, fitted to the user, and secured to their corresponding, recommended
torque values. Handlebar grips should not move easily at the ends of the handlebar. Loose, worn, or damaged
handlebar grips should be replaced before rides.
37 38
Table of contents
Other HJM Scooter manuals


