Kaabo Mantis 48V 13Ah User manual

USER MANUAL
Mantis
Ningbo Kaabo Technology Co., Ltd.
Add: 3rd Floor, Building B3, Shanshan New Energy Base, NO. 238 Yunlin Middle
Road, Haishu District, Ningbo Zhejiang,China
Tel: 0086-0574-88321118
Email: [email protected]
Web: www.kaabo.com

BEFORE YOU START TABLE OF CONTENTS
This product is an electric scooter, used for short distance walking, please
use this product under safe road.
It is important to read through, understand, and adhere to all the
instructions and safety warnings in this manual before charging and
operating this scooter.
Upon receiving and opening your box, please inspect the contents for signs of damage or loose
screws from transport. If something doesn’t feel right, please take a few pictures and contact your
place of purchase immediately.
Your scooter comes with a 180-day limited warranty against manufacturing defects. In case of any
issues beyond this time frame, we will still help you but we may need to charge a fee for spare
parts or repairs.
If you have purchased your scooter from a dealer other than kaabo.com, please contact them
first in case of any issues. If you still need help or you have purchased directly from
kaabo.com, please feel free to contact us with any questions or concerns.
Make sure you understand and adhere to local rules and regulations for riding electric scooters.
Riding an electric scooter comes with inherent risks and hazards. To minimize risk of falling or
being injured, make sure you understand how to safely operate and control this scooter.
Always use good judgement, common sense, and protective gear.
BEFORE YOU START................................................................................................................................................... 3
TABLE OF CONTENTS................................................................................................................................................ 4
GENERAL SAFETY WARNINGS................................................................................................................................5
MANTIS OVERVIEW................................................................................................................................................... 6
What’s in the Box...................................................................................................................................... 6
Technical Specifications........................................................................................................................... 6
Key Components.......................................................................................................................................7
CHARGING AND BATTERY SAFETY....................................................................................................................... 8
Charging the Mantis................................................................................................................................. 8
Battery Maintenance................................................................................................................................ 8
Battery Disposal........................................................................................................................................ 9
Charging Warnings and Battery Safety Warnings................................................................................ 9
OPERATIONS..............................................................................................................................................................11
Assembling the Mantis.......................................................................................................................... 11
Folding your Scooter.............................................................................................................................. 12
Your First Ride......................................................................................................................................... 12
Braking Correctly.....................................................................................................................................13
Mechanical Disc Brake Check – Mantis 18.2Ah...................................................................................13
Hydraulic Disc Brake Check – Mantis PRO 24.5Ah............................................................................. 14

1
2
DISPLAY & KEY SETTIN
..G
....
S..........................................................................................................................................14
Driving Mode Selection............................................................................................................................. 14
Display Settings – Mantis 18.2Ah.............................................................................................................16
Display Settings – Mantis PRO 24.5Ah.................................................................................................... 19
SCOOTER MAINTENANCE & TRANSPORT
............................................................................................................20
DECLARATION OF CONFORMITY............................................................................................................................ 20
MANTIS OVERVIEW
What’s in the Box:
GENERAL SAFETY WARNINGS
Always wear a helmet and protective safety equipment.
Wear closed shoes without heels and ensure your laces are tied.
Do not ride with more than one rider or exceed the weight limit of
120kg/265lbs in any other way. Only use your scooter in line with its intended
purpose.
Check your scooter for any loose parts or screws, flat tires, signs of damage or excessive wear
before every ride. Stop operation immediately and contact your place of purchase if something
does not feel right.
Check your scooter for any loose parts or screws, flat tires, signs of damage or excessive wear
before every ride. Stop operation immediately and contact your place of purchase if something
does not feel right.
Start riding slowly to familiarize yourself with the operation of your scooter. Start in first gear and
slowly try out the brakes. Always slow down when riding over bumps or on rough road conditions.
Keep the scooter away from children. It is not a toy. Riders must be age 16+ only.
Do not use your electric scooter in heavy rain, or on surfaces covered by more than ½ inch of
water. Do not submerge the scooter in liquid or let any liquid near the battery or electrical
components.
Do not lend your scooter to anybody unfamiliar with its operation. Ensure any new riders are
familiar with these instructions and are wearing proper safety gear.
Once riding in public space, you are subject to the risks faced by all traffic participants just like
when you are riding a bike.
Other traffic participants may not obey traffic regulations or may ride carelessly.
The faster you ride your scooter, the longer it will take you to stop.
The scooter may slip on slippery surfaces leading to subsequent injuries to the rider. Pay special
attention crossing train tracks and/or when it is wet.
oAlways use caution, adapt your speed to road and traffic conditions and keep distance from
other traffic participants.
Watch out for pedestrians. Do not use your scooter in any way that could harm pedestrians. Slow
down when you are passing them to avoid accidents.
You must follow all local traffic rules and regulations.
Matters needing attention:
1. The braking distance will be extended in wet weather
2. Different materials and components may react differently to wear or
fatigue. If the intended life of a component has been exceeded, it may
suddenly break, thus potentially causing harm to the user. Cracks, scratches
and discoloration in areas susceptible to high stress indicate that the
component has outlived its service life and should be replaced."
3. Please check the light and road conditions when using at night.
Rated Capacity: 48V 18.2AH Input: 54.6V 2A
WARNING! Please turn off the vehicle when charging
WARNING! Don't charge the flooded scooter and check with a professional
WARNING! Don't charge the scooter when no one is present or while sleeping Don't charge the WARNING!
Don't charge the scooter when you find an electric shock and check with a
Professional
WARNING! Don't charge or leave the battery storage under a high-temperature above 45 degree
WARNING! Don't touch the charging port with the wet hands
WARNING! Do not charge near fire
Electric scooter
(with detached handle bar)
01
Charger
User Manual
Tool

1
2
Technical Specifications

3
4
Key Components
MANTIS 10
MANTIS 10
MANTIS 8

5
6
CHARGING AND BATTERY SAFETY
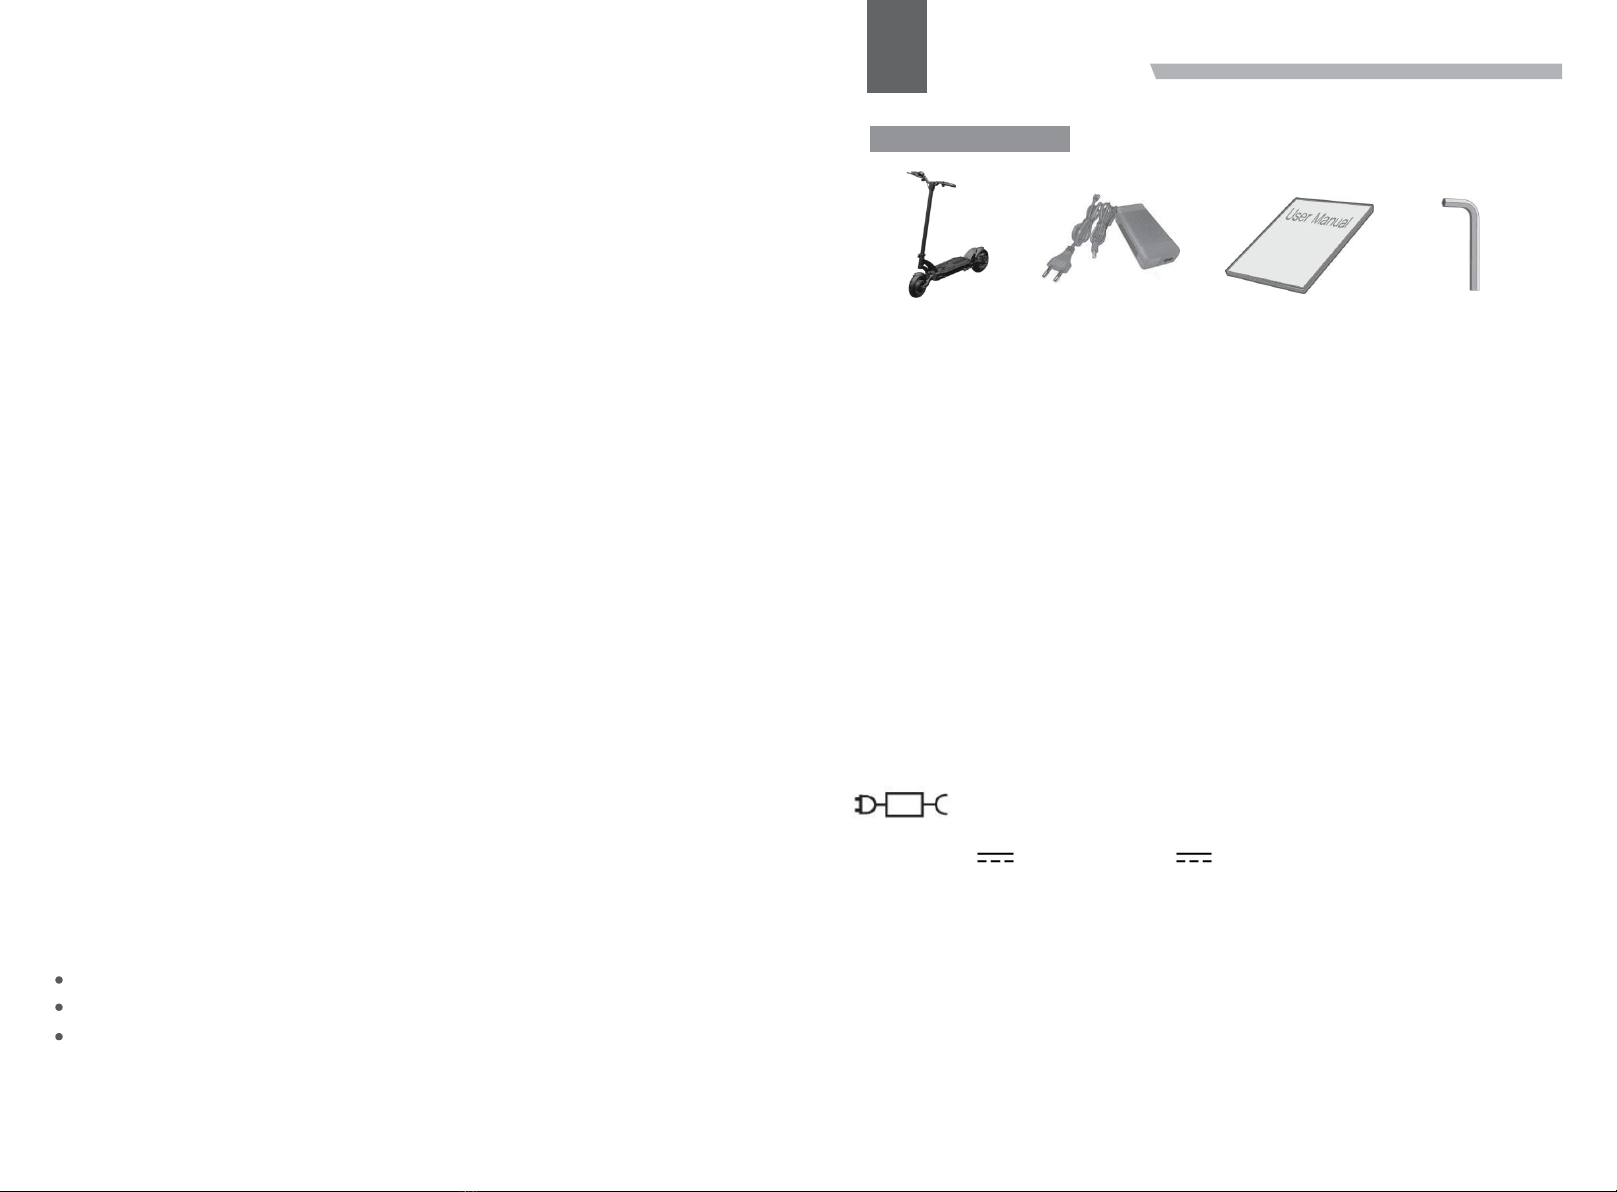
Charging the Mantis:
1. Turn your scooter off
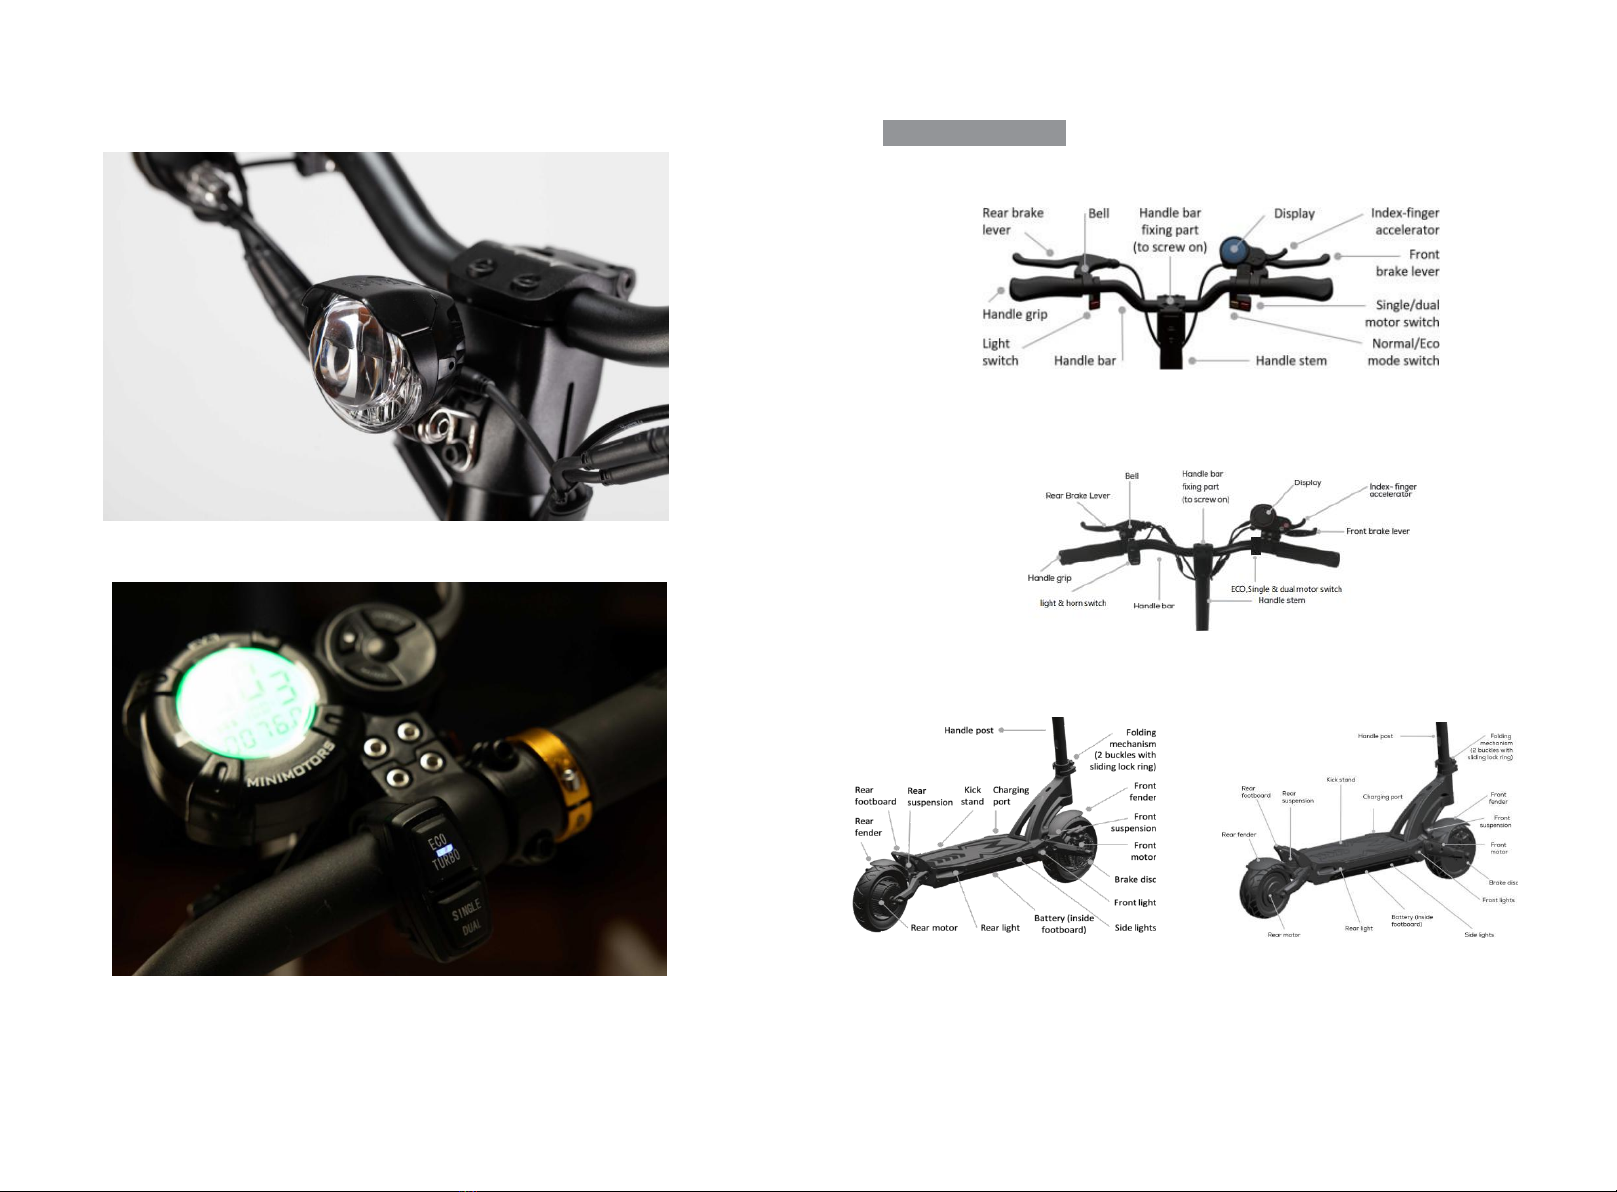
2.Locate the charging port
3.Open the charging port cover
4.Connect the charger to the scooter’s charging port
5.Plug in the charger to the wall power outlet
The LED on the charger will turn red while charging and turn green when the scooter is ready for
use. Remove the charger and cover the plug. Charging time with the included 2A charger is 7-9
hours for the Mantis 18.2Ah version, and 10-12 hours for the Mantis PRO 24.5Ah version.
Battery Maintenance
We suggest to charge your scooter after every use. This is not required but recommended.
A lithium-ion battery is a consumable device. Please replace with a new battery once capacity
drops below 50% of what you experienced initially. Contact your place of purchase for a
replacement.
Make sure the battery is charged and that the scooter is turned off before storing your scooter for
extended periods at a time.
Store your scooter in a dry and cool place. Do not keep it outdoors or in outdoor sheds for
extended periods of time, as excessive cold temperatures, heat, sunlight, rain, or other
environmental conditions may impact safe operation and reduce the scooter’s lifespan.
Charge your battery at minimum every 3 months to prevent it from running completely empty.
Once the battery runs completely empty due to slow discharge while in storage, it may have to be
replaced.
Batteries perform poorly at low temperatures. For instance, if the temperature is around 0°F
(-18°C), battery capacity reduces by 50%. Capacity will restore to normal when temperatures rise.
Battery life and riding ranges will vary depending on usage, climate, conditions, rider weight,
and/or riding style, proper care, and maintenance.
Battery Disposal
Do not dispose of your battery by way of landfilling, incineration, or household trash.
We recommend disposing your battery through a local recycling program suitable for lithium-ion
batteries. Contact your local waste management service for more information.
Mishandling of used batteries may do tremendous harm to the environment. You must abide by
local laws and regulations to properly dispose of used batteries.
Charging Warnings and Battery Safety Warnings
Use caution when using outlets to prevent electric shock.
Do not leave the charger plugged in for extended period of times (>24 hours).
Only charge your scooter in a safe, clean, and dry environment. Keep the charger and scooter
away from inflammable materials as they may get hot.
Only use the original battery packs and the original charger supplied with your electric scooter.
Contact your place of purchase if you need a replacement. Use of other models or brands may
not be safe.
Do not touch any part of the USB charging prongs and keep them away from metal objects to
prevent short circuiting which may result in battery damage or physical injuries, and/or death.
Do not place the battery in direct contact with heat or near high temperatures. Do not expose the
battery to direct sunlight. Do not leave the scooter in a car where the battery might get hot.
Do not pierce the battery with sharp objects. Do not subject it to impact or force.
Stop charging if the battery fails to recharge within the approximate charging time. This will
prevent the battery from overheating, rupturing, or igniting.
Do not charge the battery in temperatures below 32°F (0°C) or above 104°F (40°C) as this can
hamper performance, result in breaking, overheating, rupturing, or igniting and could cause
personal injury or property damage.
Do not charge your scooter if the charging port on the scooter is damaged or wet. Do not charge
if there is excessive heat, odor or leakage coming from the battery or it looks abnormal in any
way.
If the battery leaks and you accidentally get in touch with the liquid, rinse immediately and
thoroughly with water and then seek medical care.
Never attempt to disassemble, modify, perform repairs or maintenance on the battery. You run
the risk of damaging the protective and safety components that prevent incidents, personal injury
or property damage.
Mishandling or misuse of the battery can result in lower performance, shorter lifespan, rupturing,
igniting, or other incidents and could increase the risk of serious personal injury.
Do not discharge the battery using any other product than the scooter it comes with. Doing so
could result in damage to the other product or the battery, and reduced lifespan of your scooter.
The battery could overheat, rupture, or ignite and cause personal injury or property damage.
02

7
8
OPERATIONS
Assembling the Mantis
Carefully open the box and take the scooter out with both hands. Do not pull the steering bar
out by itself, as it is attached to the rest via the cable work. Also pay attention not to lose the
metal plaque with the fluid logo which you will need to screw on to secure the steering bar to the
scooter.
1. Place the scooter on the floor and secure it by pulling out the kickstand
2. Lift the handle post into a vertical position. Pay attention as the
steering bar is not yet fixed to the handle post but only loosely
connected via the cablework.
3. lide the locking ring downwards. This prevents the handle post from
moving out of its vertical position.Close the two quick release buckles
around the locking ring and ensure the buckles are tight. Before every
ride, make sure the buckles are locked tightly around the locking
ring.
4. Place the steering bar onto the handle post and screw the metal
plaque (with fluid logo) onto it with the four screws provided. For the
most comfortable riding position, we recommend you place the
handlebar in the most upward position when tightening the screws.
Folding your Scooter
1. Loosen the quick release buckles and slide the locking ring upwards.
2. Fold the handle post downwards until it touches the scooter’s deck and attach it to the hook in
the rear of the board. This will lock the handle post in folded position and enable you to carry your
scooter with one hand while folded.
Your First Ride
Before using your scooter, make sure to visually inspect it for any signs of damage or loose
parts/screws. Every scooter is individually tested before shipping from the factory, but we
recognize that it has travelled far and in rare cases, it can get damaged during transport. If
something does not feel right, contact your place of purchase before riding your scooter.
Pull the brake levers and ensure there is sufficient tension on the brakes BEFORE your first and
any subsequent ride.
Ensure you have sufficient run way ahead of you. Do not use the scooter indoors.
Put both of your hands on the handle bar.
Step with one foot on the scooter, kick it lightly with your other foot to bring it slightly in motion.
Step with your second foot onto the board, hold on tight and pull the accelerator. Do prepare for
strong acceleration and start slowly.
Braking Correctly
The Mantis scooter has dual front and rear disc brakes.
For braking, use the rear brake (the left braking lever on the handle bar) first for decelerating
before engaging the front brake (the right lever) to come to a full stop.
When travelling at higher speeds, exercise caution when braking as the brakes are sensitive.
This is especially true for the front brake as you risk falling over the handle bar if your center of
gravity is too high while performing a hard stop with the front brake alone.
Mechanical Disc Brake Check – Mantis 18.2Ah
Pull the brake lever and ensure there is sufficient tension on the disc brake before riding. Check
frequently to ensure brakes are working properly.
In case there is not sufficient tension on the brake, you can tighten it a little with the barrel
adjuster (the plastic turning bolt at the end of the brake cable, just before it enters the caliper):
To increase brake tension, turn the barrel adjuster backwards so that the caliper arm moves closer
to the barrel adjuster.
Don’t forget to tighten the nut afterwards so that the barrel adjuster stays safely in place.
If this does not do the trick or you have any doubts or concerns, please contact a local bike shop
for help or reach out to your place of purchase.
Hydraulic Disc Brake Check – Mantis PRO 24.5Ah
Pull the brake lever and ensure there is sufficient tension on the disc brake before riding. Also
check integrity of hydraulic systems frequently and ensure no leakage of oil to be certain brakes
are working properly.
03

9
10
DISPLAY & KEY SETTINGS
Turn Signal / Mode Switch
The switch has the following functions: light, turn signal, and horn button.
When the light button is pressed, the front and rear deck light will turn on.
When the turn signal button is pressed, the front and rear deck light will turn on
and flash. When the horn button is pressed, the horn will start to work.
When multiple buttons are pressed, the priority for the function from highest to
lowest is turn signal, brake, and then light.
Driving Mode Selection
Located underneath the main display on the right side of the handle bar,
you can find two switches to control driving modes:
The ECO/TURBO switch regulates the power of your scooter. By pressing down the button, ECO
mode is activated, which will reduce torque and top speed to maximize range. When the button is
not pressed, TURBO mode is activated and there is no restriction of power.
The SINGLE/DUAL switch toggles between single or dual motor drive. By pressing down the
button, DUAL motor drive is activated. When the button is not pressed, SINGLE (rear) motor drive
is activated.
For Maximum range, select ECO mode and SINGLE motor drive. For maximum power and speed,
select TURBO mode and DUAL motor drive.
Display Settings – Mantis 18.2Ah
The Mantis scooter is equipped with the following display:
Gear change. To change the gear (1=slow, 2=medium, 3=fast), while the scooter is powered ON,
press the POWER button to enter gear setting mode. Press MODE to switch between gears. To
return to operating mode either press POWER or wait for 2 seconds.
Speedometer: Shows the speed at which you are travelling.
Battery Indicator: Shows the level of your battery. Charge your scooter frequently, and do not let
it run out of battery. As a rough guideline, charge at or below 2 bars.
Power Button: To turn the scooter on or off press the button for 2 seconds.
Accelerator: Pull to accelerate. The stronger you pull, the faster it accelerates. The scooter is
delivered in “Non-Zero Start” setting (Kick-And-Go is ON), i.e. the accelerator only works if the
scooter is already in motion.
Mode Button: Press to select various display options:
MODE
COMMENT
TIME
Time since powering on the scooter.
TRIP
Distance travelled since powering on the scooter.
ODO
Total distance travelled.
VOL
Current battery voltage.
CH2:00
Charging mode. Time (2 hours) scooter stays ON (overrides auto
-switch off) so you can use the display’s USB port to also charge
things e.g. your phone.
Detailed P-settings mode. To access P-settings to make various advanced changes, press
POWER [3] and MODE [5] simultaneously for 2 seconds.
Scan through the P-settings using the MODE button. To select a P-setting in order to make
changes, press the POWER button. Change the value (up or down) using the MODE (Up) and
POWER (Down) buttons. To return to the P-settings menu after changing a value, wait 2 seconds.
To return to operating mode, wait a further 2 seconds.
04

11
12
Display Settings
Mantis PRO 24.5Ah
The Mantis PRO scooter is equipped with the following LCD display:
Cruise Control. Cruise control allows you to maintain your driving speed automatically without
continuing to hold down the accelerator. In order to enter Cruise Control, activate it first in the
P-settings [P6].
While driving, keep the accelerator steady for a few seconds until Cruise Control kicks in and
scooter travels at a constant speed without driver holding down the accelerator. When you
activate the brakes Cruise Control will be cancelled. CAUTION: Ride in a position where you can
immediately access the brake to cancel Cruise Control if necessary.
Speedometer: Shows the speed at which you are travelling.
Battery Indicator: Shows the level of the battery. Charge your scooter frequently, do not let it
run out of battery. As a rough guideline, charge at or below 2 bars.
Gear: Shows the selected gear.
Gear selector: Press to set gear (1=slow, 2=medium, 3=fast).
Power Button: To turn the scooter on or off, press button for 2 seconds.
Accelerator: Pull to accelerate. The stronger you pull, the faster it accelerates. The scooter is
delivered in “Non-Zero Start” setting (Kick-And-Go is ON). The accelerator only works if the
scooter is already in motion.
Mode Button. Press to select various display options:
MODE
COMMENT
TIME
Time since powering on the scooter.
TRIP
Distance travelled since powering on the scooter.
ODO
Total distance travelled.
VOL
Current battery voltage.
CHA
Number of times battery has been charged (only full discharges
are counted)
Detailed P-settings mode. To access P-settings to make various advanced changes, press MODE
[7] for 2-3 seconds.
Switch through the P-settings using the MODE button [7]. In order to change a P-setting press
GEAR button [4]. To return to operating mode, wait a few seconds.
05
P-SETTINGS
P0
Tire diameter (8 for mantis 8, 10 for mantis 10). Do not change.
P1
Controller shut-down voltage. Default set to 52V (minimum is 48V – we recommend 52V to preserve battery life).
P2
Motor magnetic pole setting. Default is 30. Do not change.(Mantis 10)
Motor magnetic pole setting. Default is 20. Do not change.(Mantis 8)
P3
Speed signal selection. Default is 0. Do not change.
P4
Distance / speed unit. 0=km, 1=miles
P5
Start setting. 1=non-zero start (Kick-and-Go), accelerator won’t work if scooter is not in motion; 0
=immediate start (CAUTION while using this)
P6
Cruise control. 0=cruise control OFF, 1=cruise control ON.
P7
Initial acceleration. 0=soft, 1=strong.
P8
Electric (regenerative) braking (E-ABS). 0=E-ABS off, 1=E-ABS on
PA
Clear total distance travelled (ODO).
PB
Scooter auto-turn off time in minutes.
PC
Display brightness (1=low, 2=medium, 3=high)

13
14
P-SETTINGS
P0
Tire diameter (8 for mantis 8, 10 for mantis 10). Do not change.
P1
System voltage. Default 60V. Do not change.
P2
Motor magnetic pole setting. Default 15. Do not change.(Mantis 10)
Motor magnetic pole setting. Default 10. Do not change.(Mantis 8)
P3
Speed signal selection. Default is 0. Do not change.
P4
Distance / speed unit. 0=km, 1=miles
P5
Start setting. 1=non-zero start (Kick-and-Go), accelerator won’t work if scooter is not in motion; 0
=immediate start (CAUTION while using this)
P6
Cruise control. 0=cruise control OFF, 1=cruise control ON. Advanced riders only.
P7
Initial acceleration. 0=strong power, 5=least power.
P9
Motor torque. 1=50% of max. torque, 2=75% of max. torque, 3=max. torque
PA
Electric (regenerative) braking strength (E-ABS). 0=None, 1=Weak, 2=Medium, 3=strong.
PB
Display brightness (0=off, 5=highest illumination)
PC
Scooter auto-turn off time in minutes (1-30 minutes).
PD
ABS (anti-lock braking system) setting. 0=ABS off, 1=ABS on (as in a car, the brake engages
and disengages rapidly to prevent the wheel from blocking)
WARNING: Due to increased vibration and force and on scooter components when using
ABS, frequently check that all bolts are properly fastened.
Cruise Control. Cruise control allows you to maintain your driving speed automatically without
continuing to hold down the accelerator. In order to enter Cruise Control, activate it first in the
P-settings [P6].
While driving, keep the accelerator steady for 3-5 seconds until Cruise Control kicks in and scooter
travels at a constant speed without driver holding down the accelerator. When you activate the
brakes, Cruise Control will be cancelled. CAUTION: Ride in a position where you can immediately
access the brake to cancel Cruise Control if necessary.
SCOOTER MAINTENANCE & TRANSPORT
Never perform maintenance on this product while the unit is powered on or charging. Always
power off before performing maintenance. Do not attempt to perform repairs or modify the
scooter but contact your place of purchase or refer to a professional repair facility.
Clean stains on your scooter’s body with a damp cloth. Do not use alcohol, gasoline, kerosene, or
other corrosive and volatile chemicals. Do not wash with high pressure cleaners. Make sure the
scooter is turned off and unplugged during cleaning and ensure no moisture enters the charging
port.
When transporting your scooter, please take into account that it contains lithium-ion batteries
that are considered a hazardous material.
Always exercise caution and follow applicable rules and regulations when transporting your
scooter. It is very likely that you will not be allowed to take your scooter and battery on an
airplane.
NOTE:The parts and screws in the 1.2.3.4.5 positon shown in the fiqure,in order to prevent
metal fatiqure accidents,please replace these 5pcs screws after each year or reach 5,000
kilometres.please check or replace these parts at the nearest after-sale maintenance store.
Regularly check the wheels, brake pads, and vulnerable parts of the wires, and replace them
in time.
Self-tightening nuts and other self-tightening fasteners may fail, please contact the dealer
for replacement in time.
It is forbidden to modify or repair the vehicle without authorization.
NOTE: INFORMATION, SPECIFICATIONS, WARNINGS AND ALL OTHER DETAILS INCLUDED IN
THIS MANUAL ARE SUBJECT TO CHANGE AT ANY TIME, WITHOUT PRIOR WRITING. INQUIRE
WITH THE VENDOR'S AFTER-SALES DEPARTMENT FOR MORE INFORMATION.

15
MEMO
06
This manual suits for next models
4
Table of contents
Other Kaabo Scooter manuals

Kaabo
Kaabo Wolf Warrior GT Series User manual

Kaabo
Kaabo Wolf Warrior 11 User manual

Kaabo
Kaabo Skywalker 8 User manual

Kaabo
Kaabo WOLF WARRIOR X User manual

Kaabo
Kaabo MANTIS KING GT Product information sheet

Kaabo
Kaabo SKYWALKER 8 36V/10.4A User manual

Kaabo
Kaabo Wolf Warrior 25Ah User manual

Kaabo
Kaabo Mantis User manual