HM Digital HydroMaster HM-500 User manual
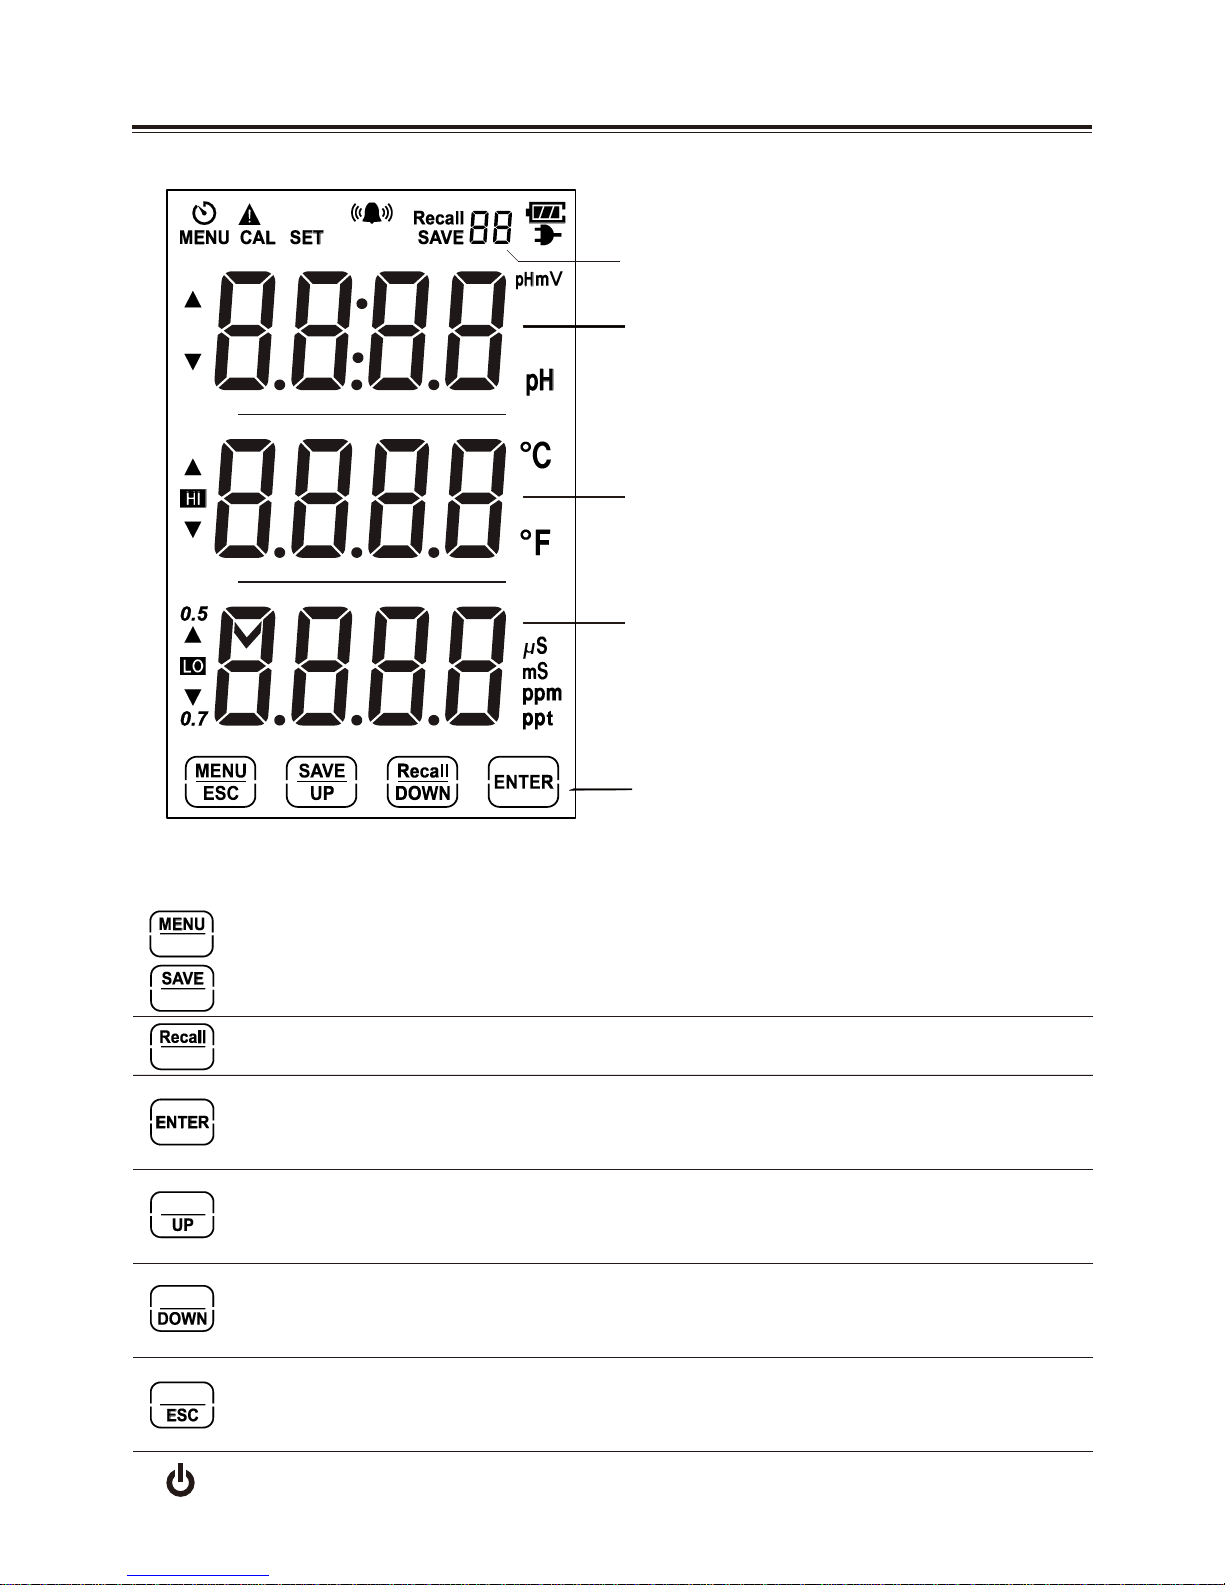
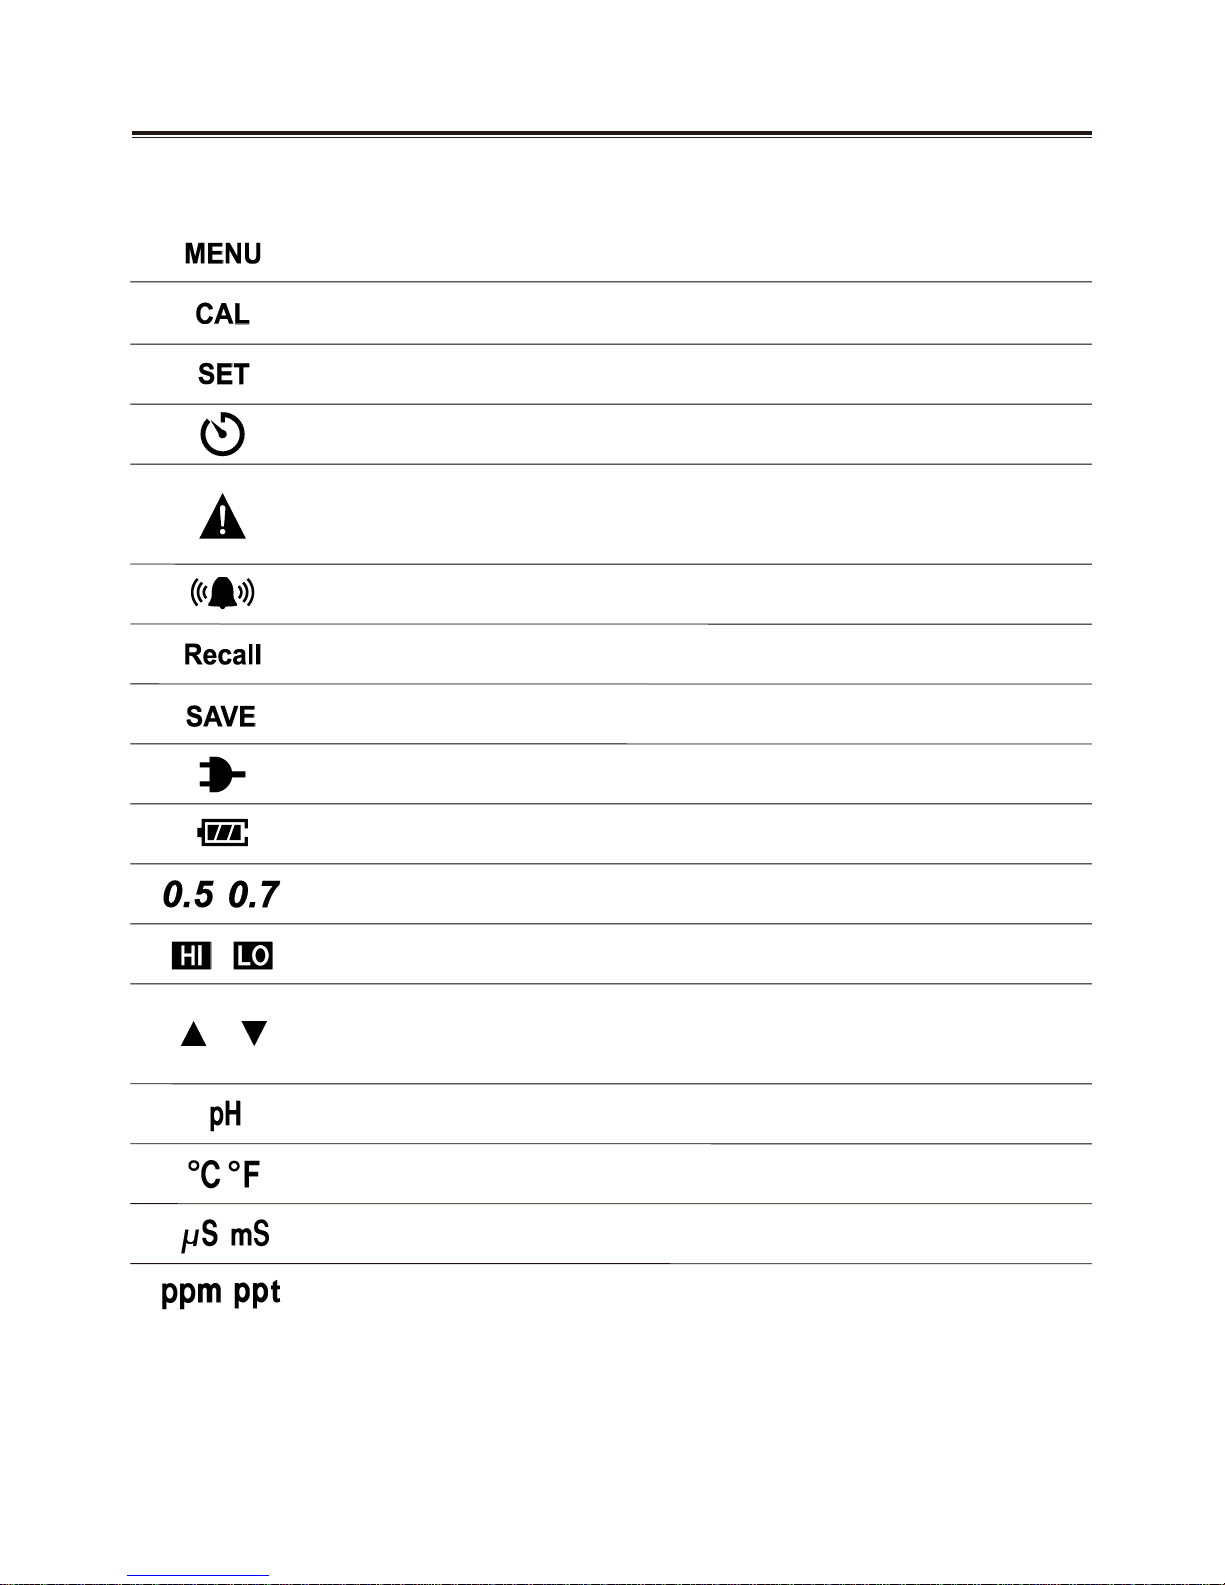
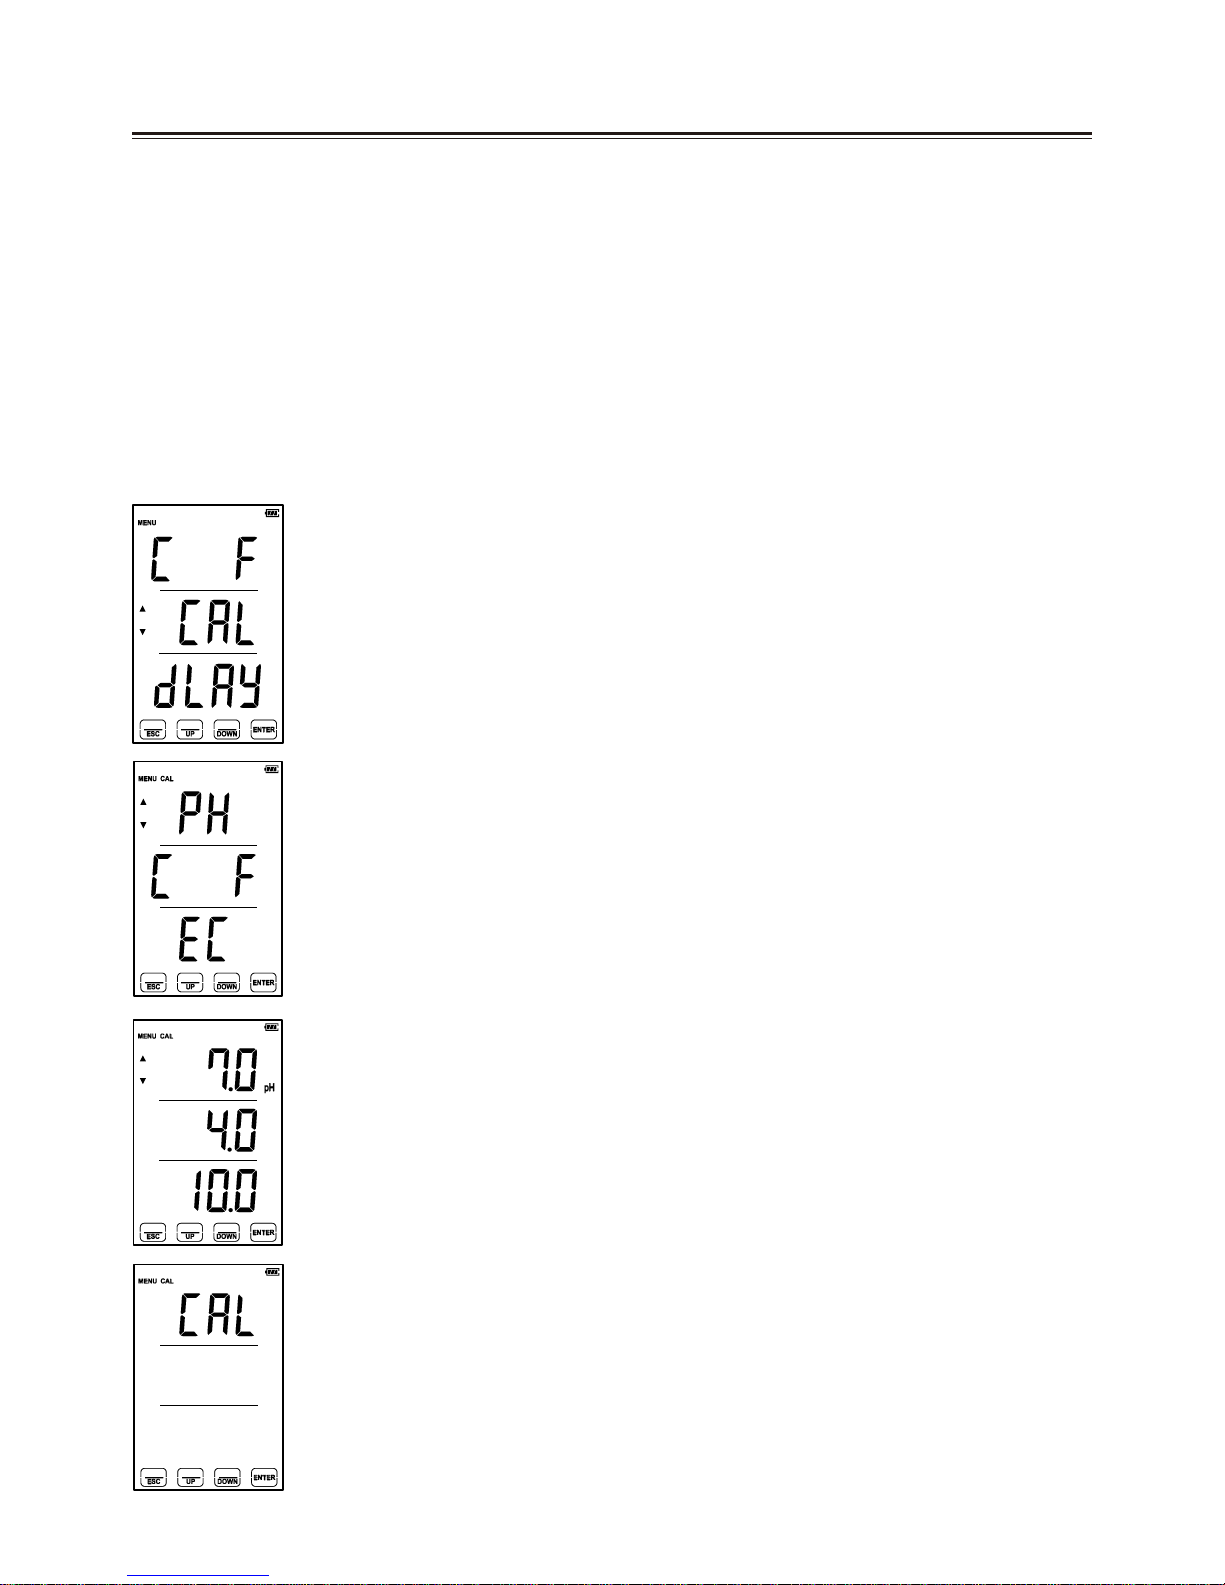
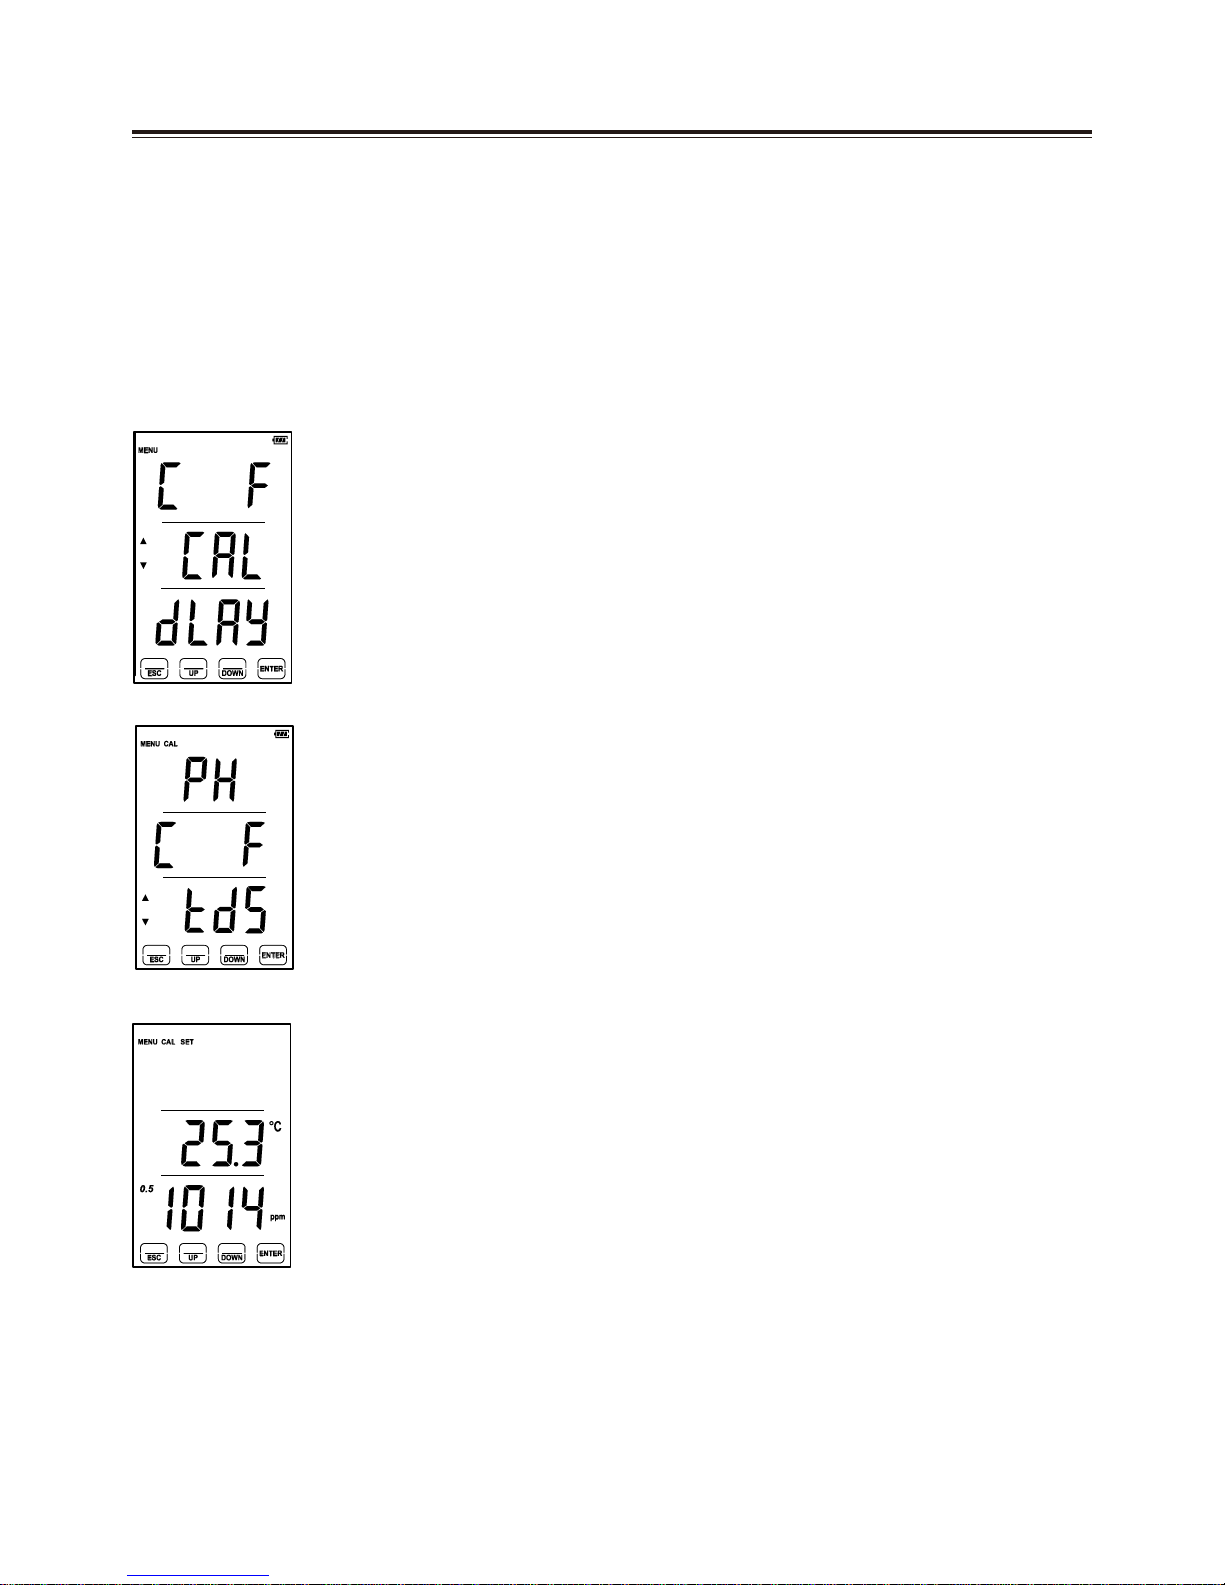
USER’S GUIDE
HydroMaster
HM-500

TABLE OF CONTENTS
1. INTRODUCTION ..................................................................................... 2
A. Overview ................................................................................................. 2
B. What’s Included ....................................................................................... 2
C. Housing Description ................................................................................. 2
D. Specification ............................................................................................ 3
E. LCD Display ............................................................................................ 4
F. Switch and Keypad Controls ...................................................................... 4
G. Icon Description ...................................................................................... 5
2. pH CALIBRATION, CARE & MAINTENANCE .................................... 6
A. pH Information & Maintenace .................................................................... 6
B. pH Operation ........................................................................................... 6
C. pH Calibration .......................................................................................... 7
3. EC/TDS CALIBRATION & MAINTENANCE ........................................ 8
A. EC/TDS Basic Information .......................................................................... 8
B. EC/TDS Maintenance ................................................................................. 9
C. EC/TDS Operation .................................................................................... 9
D. EC/TDS Calibration ................................................................................. 10
E. EC/TDS Temperature Reading Calibration ................................................... 12
4. DATA STORAGE ................................................................................... 13
A. Saving Your Readings ............................................................................. 13
B. Recalling Saved Readings ........................................................................ 13
A. Delete All Saved Data ............................................................................ 13
5. ALARM SETTINGS ............................................................................... 14
6. ALARM SOUND & DELAYING YOUR ALARM ............................... 15
7. ALARM SETTING DEFAULT VALUE DATA ....................................... 15
8. CLEARING SAVED DATA .................................................................... 16
9. BATTERY CHARGING INSTRUCTIONS ............................................ 16
10. WARRANTY ........................................................................................ 17
11. CONTACT INFORMATION ............................................................... 18
1

1. INTRDUCTION
A. Overview
Thank you for purchasing the HM-500 (HydroMaster), by HM Digital.
The HM-500 monitors pH, Electrical Conductivity (EC), Total Dissolved Solids (TDS)
and temperature with very high accuracy. This instrument can be calibrated with
various buffer solutions, and is equipped with automatic buffer recognition for user
convenience. The touch-screen LCD makes it user-friendly, and features automatic
light detection making it easy to view in dark environments.
B. What’s Included
ㆍ1 HydroMaster Monitor
ㆍ1 Wall mount bracket
ㆍ1 EC/TDS/Temp Sensor
ㆍ1 PH Probe
ㆍ1 USB Power adapter & cable
ㆍ2 Sensor holding clips
ㆍ1 PH-STOR, PH-4, PH-7, C-1000ppm liquid packet
ㆍ1 User’s guide
C. Housing Description
Power Button
1.LCD
Alarm
Upper Stand
Lower Stand
EC/TDS Cable Insert
pH Cable Insert
USB Power Insert
Auto Backlit Sensor
2

D. Specifications
1. Measurement Range
• pH: 0.00 - 1pH 4.00
• Temperature: 0 - 55 °C / 32 - 130 °F
• TDS: 0 - 9999 ppm / 0 - 10.00 ppt
• EC: 0 - 9999 µS / 0 - 20.00 mS
2. Automatic Temperature Compensation Range (ATC)
• ATC: 0.0 - 60.0 °C
3. Accuracy
• pH: ± 0.1 pH
• Temp: ± 1 °C / ˚F
• EC/TDS: ± 2 %
4. Measurement Scales
• pH: pH
• Temp: °C / °F
• TDS: ppm & ppt (NaCl) 0.5 scale / ppm & ppt (442™) 0.7 scale
• EC: µS / mS
5. Resolution
• pH: 0.1 pH
• Temp: 0.1°C / 0.1 °F
• TDS: ppm: 0.1ppm (0 - 99.9ppm) / 1 ppm (100-999ppm) / 10ppm (1000-9990 ppm)
ppt: 0.01 ppt (0.01 - 10.00 ppt)
• EC: µS: 0.1 µS (0 - 99.9 µS) / 1 uS (100 - 999 µS) / 10µS (1000-9990 µS)
mS: 0.01 mS (0.01 - 20.00 mS)
6. Data Storage: Up to 20 readings
7. Auto Shut-Off: After 5 minutes (While in Battery mode)
8. Alarm: Adjustable Set Point (See section 5)
9. Power Source: AC 110 V - 240V / Rechargeable Lithium Ion Battery
10. Service Environment: 0 - 50 °C / RH 80 %
11. Display: LCD Touch Screen controls with Auto Backlit lighting
12. Probe: ABS with Electrodes Conductivity Sensor / Single Junction Ag/AgCl pH Sensor
13. Sensor Cable: 2m (80 inch) shielded and Coaxial Cable
14. Dimensions: Approx. 8 x 4 x 1.4 inches / 20 x 11 x 3.6 cm
15. Weight: 15.2 oz (0.43 Kg) for body / 5 oz (140 g) for two probes (without case)
3

E. LCD Screen Display
F. Switch and Keypad Controls
pH Readings
Temp Readings
EC/TDS Readings
Saved Data Numbers
Touch Screen Buttons
Touch 3 seconds to change from the home screen mode to menu.
Quick touch to save readings while in the home screen mode.
Touch for 3 seconds to recall saved data.
Touch for 3 seconds to turn off back light or touch to turn light on.
Also used to save device settings and both measurement calibrations.
Raises numeric values when adjusting settings or calibration.
Also moves selection cursor up when in menu mode.
Lowers numeric values when adjusting settings or calibration.
Also moves selection cursor down when in menu mode.
Exits to the main menu when in menu mode.
Also cancels settings or calibration.
Turns the power on/off. Also changes the EC/TDS scale being used.
4

G. Icon Description
5
Changes to menu mode from the home screen
Calibration Mode Indicator
Alarm setting indicator and for making corrections
Alarm Delay Indicator
pH meter sensor is unstable
Device needs maintenance
Out of range alarm indicator
Recalls saved data and measurement readings
Saving data
Device is in charging mode
Battery life indicator
NaCl and 442 Conversion factor indicators
High and low alarm indicator
Alarm out of range
Arrow cursors in Menu Mode
pH readings indicator
Temperature scale Indicators
EC scale indicators.
TDS scale indicators.

2. pH CALIBRATION, CARE & MAINTENANCE
A. pH Information & Maintenance
[The pH electrode included with the HydroMaster (HM-500) has been carefully
handcrafted. For optimal performance and probe longevity, carefully follow the
instructions below.]
• The life of a pH electrode will depend on how it is used and maintained.
(It is backed by a 6 month factory warranty)
• Inside the glass bulb of the pH sensor is a Potassium Chloride (KCl) solution.
It is also in the cap of the pH sensor.
After usage, always store the probe in the sensor cap. For long-term use,
purchase a KCl solution and use it for storage.
• Always keep the electrode wet. If the electrode dries it may shorten its life
and the pH reading may not be as accurate. If this is the case, immerse the
electrode in KCl storing solution for a minimum of 2 hours to re-saturate.
• Rinse the electrode with clean water or distilled water (if available) between
or after measurements to eliminate cross contamination of solutions.
[Warning]
• Avoid direct sunlight or heat.
• Do not touch the glass part of the electrode with your hands or hard
materials.
• Exposure to highly basic or acidic solutions, extremely high and/or low
temp water may cause damage to the electrode, thereby shorten its life.
• If the measuring time of the pH meter slows down or if the pH reading is
unstable, it’s most likely time to change the electrode.
• When wiping the electrode with a dry cloth, be careful of static electricity,
as it may delay pH readings.
B. pH Operation
1. The HM-500 is factory calibrated. However, we recommend initially
re-caibrating the instrument before 1st usage and then once a month
thereafter.
2. Remove the sensor cap. Be careful not to spill KCl storage solution from
the cap.
3. Immerse the electrode in the solution you would like to measure and stir
gently to remove air bubbles surrounding electrode. (Air bubbles can
affect accuracy of pH readings).
4. Measurements take between 10-60 seconds to stabilize.
6

7
1. From HOME SCREEN, press and hold the [MENU] button
for 3 seconds to select [MENU] mode.
2. Once in [MENU] mode use the [DOWN] key, and select
“CAL”, then press [ENTER] key.
3. The CAL screen will appear “PH”, “C F” , and “EC”.
Select “PH” by pressing the [ENTER] key to enter pH
calibration mode.
4. The values“7.00”, “4.00”, “10.00”will appear on the screen.
Immerse the pH electrode in pH 7.00 buffer solution and
wait.
5. Move the cursor to “7.00” by using the [UP/DOWN] keys,
and touch [ENTER] to start pH 7.00 calibration.
6. After calibration has begun, “C..CA..CAL” will blink in this
order across the screen.
7. The word “End” will appear on the screen after 2-30 seconds
when calibration is complete. If there’s a problem with the
electrode “Err” will blink three times on the screen and will
automatically return to the pH calibration menu.
8. Once this is completed, repeat calibration for pH 4.00 or pH
10.00 following steps 1-5 (except select pH 4 or pH 10 in step 5).
[Warning]
• Calibration is required when replacing the electrode or after long-term
(inactive) storage to ensure accurate readings.
• Calibrate 1st to pH 7.00 then pH 4.00, or pH 10.00 buffer solutions, based
on your application.
C. pH Calibration

3. EC/TDS CALIBRATION & MAINTENANCE
A. EC/TDS Basic Information.
EC (Electrical Conductivity) and TDS (Total Dissolved Solids) are closely related.
TDS measures the concentration of dissolved solids within water or a nutrient
solution.
TDS is calculated by sending a charge in the water which measures the
electrical conductivity of that solution, and is then converted to TDS using the
following conversion factors:
[Conversion Factors]
• 442™ (or 0.7 Factor): developed by Myron L, to simulate natural water (river, lake,
or drinks). The 442™ is named after the three main ingredients of the solution:
40% sodium bicarbonate, 40% sodium sulfate, and 20% sodium chloride.
• NaCl (or 0.5 Factor): Stands for sodium chloride. This solution is widely used in
the Water Market.
EC (µS, mS) does not require the usage of a conversion factor – the factor is used
only when converting EC data to TDS.
[EC, TDS Available Mode]
The HM-500 includes the following scales and modes:
•Two different EC measuring scales: microsiemens (µS) and millisiemes (mS).
1000 µS equals 1 mS.
• Two different TDS measuring scales and modes: PPM (Parts Per Million) and
PPT (Parts Per Thousand), both available in 0.5 & 0.7 scale 1000 ppm equals
1 ppt.
[EC, TDS and Automatic Temperature Compensation (ATC)]
• Temperature plays an important role when measuring EC or TDS. If the temperature
of the calibration solution you’re using is higher than 25°C (77°F), the device will
read measurements that are higher than normal. In comparison, if the temperature
is lower than 25°C (77°F), the device will read measurements lower than normal.
Thus, the international standard measurement requires an EC or TDS reading at
25°C (77°F).
• Since maintaining temperature of the solution you are measuring at 25°C (77°F) can
be difficult, the HM-500 includes an Automatic Temperature Compensation (ATC)
function that converts the reading to reflect that of 25°C (77°F).
8

B. EC/TDS Electrode Maintenance.
• Avoid direct sunlight or heat.
• Do not touch sensor pins of the electrode with your hands or sharp materials.
• Scratching electrodes will cause corrosion.
• To clean contaminated sensor, please use alcohol with a soft cloth to clean
and then rinse with clean water or distilled water (preferably). Gently shake
off excess water or blot-dry with dry cloth, and store probe with cap on.
• When reading the EC/TDS of different solutions, rinse the electrode with
water (preferably distilled) when necessary. REMEMBER: dirty sensors can
affect accuracy of future readings. Using the electrode the recommended
temperature range for use is 1-50°C (33.8-122°F).
[Warning]
• Higher Temps will damage the electrode.
• Do not use probe in rapidly changing temperatures - Will cause damage.
• Physical shock to probe may cause damage.
C. EC/TDS Operation.
1. To select the scale you would like to measure in (EC/TDS), press (single
touch) the [ON/OFF] button key on top of device (µS, mS, ppm .5 or .7, and
ppt .5 or .7. - The default scale setting(unit of measurement) when power
ing on the device is µS (micro siemens).
2. Immerse the sensor of the electrode in the solution you would like to test
and stir gently to remove air bubbles surrounding it.
3. Wait for the temperature to stabilize in order to obtain the most accurate
reading.
4. If would like to change between EC/TDS modes during operation. (see step 1)
5. Rinse electrode with clean (preferably distilled or RO) water between/or after
use for maximized accuracy and elimination of cross contamination solutions.
[Warning]
• When measuring for EC/TDS place the sensor at the center of the solution.
Placing sensor at the edge or bottom of the solution container may cause
inaccurate readings.
• We recommend using glassware (beaker/flask) to avoid electronic static
interference. The electrode is very sensitive to static electricity.
9

10
D. EC/TDS Calibration.
The HM-500 is factory calibrated to a 1000ppm NaCl (.5) solution, (2000µS).
1. Select desired EC/TDS measurement scale. (1000ppm is used in the example
below). If needing to measure TDS with a NaCl standard solution, please
change the scale to ppm-0.5 (NaCl) conversion factor before calibration.
2. With device on, press and hold [MENU] key for 3 seconds
to select [MENU] mode.
3. Use [DOWN] key and select “CAL” mode. Select by
pressing [ENTER]
4. ”PH”, “C F”, “TDS” will now appear the screen.
Use [DOWN] key and press [ENTER] to select “tds”
calibration mode.
5. Immerse the sensor into testing solution.
Gently stir to remove air bubbles around electrode.
(This can cause interference).

11
6. Once the reading stabilizes, use the [UP/DOWN] key to
change reading to desired calibration point.
CAUTION: Pressing and holding the key will change the
reading at a faster rate.
7. After calibration has begun, “C..CA..CAL” will blink in this
order across the display screen.
8. Once the calibration is completed, “End” will blink 3 times
on the screen, indicating the desired calibration has been
saved. The screen will then go back to the calibration menu.
The device is now calibrated.
9. Touching the [ESC] key will navigate back 1 screen at a time.
Calibration mode / then Menu mode, then HOME SCREEN.
(If the reading is unstable or the sensor is not connected
properly to the instrument, the “Err” sign will appear and
blink 3 times on the screen and then return to the
calibration menu.)

E. EC/TDS Temperature Reading and Calibration.
The Temperature sensor is located on the bottom of the EC/TDS electrode.
When calibrating temperature, do so with solution with known temperature
value only.
[To Select ˚C or ˚F]
1. Press [MENU] for 3 seconds to enter menu mode
2. Select “C F” mode, then press [ENTER]
3. Once in ˚C or ˚F mode use [UP/DOWN] key to select desired Temp “C” or “F”
and press [ENTER] -> “End” will appear.
4. Press ESC to go to MENU mode. Once there to next step, use [DOWN] and
select CAL -> Press ENTER for calibration.
[To Calibrate Temp]
1. Immerse EC/TDS sensor into solution and wait for temperature to stabilize.
2. Press [MENU] for 3 seconds to enter menu mode.
3. Use [DOWN] key to move cursor to “CAL”mode. Select by pressing
[ENTER]
4. ”PH”, “C F”, “EC” will now appear. Use [DOWN] key to move cursor to
“C F”. Press [ENTER] to select Temperature calibration mode.
5. On the center of the screen, the current temperature reading will appear.
6. Use the [UP/DOWN] key to change the temperature to the known
temperature and press [ENTER] to start calibration.
7. After calibration has begun, “C..CA..CAL” will blink in this order across the
display screen and then “End” will blink 3 times confirming calibration is
complete.
8. Touching the [ESC] key will navigate back 1 screen at a time.
Calibration mode / then Menu mode, then HOME SCREEN.
12

4. DATA STORAGE
The HM-500 can store and recall up to 20 consecutive readings.
A. Saving Your Readings.
1. With power on, immerse the sensor(s) into the solution for measurements.
2. After the reading has stabilized, press the [SAVE] key.
3. On the right upper corner of screen, the “SAVE” icon will appear and the
number of the saved reading will blink indicating the data is being saved.
4. While saving, the [MENU] key changes to [ESC] on the screen. If you need to
cancel the current saving of data, touch the [ESC] key to cancel.
5. The instrument does not save data continuously. You can only save a new
reading when the “SAVE” icon disappears.
6. Since the device can save up to 20 readings, when saving your next reading
(21st) the data of your (1st) saved reading will be deleted. The (21st) saved
reading will appear as #20
7. The number in the upper right corner displays the current number of saved
readings or the current reading your are recalling when in [RECALL] Mode.
B. Recalling Saved Readings.
1. Touch the [Recall] key and hold for 3 seconds. This will recall all the saved
readings.
2. Use the [UP/DOWN] keys to scroll through and select saved readings.
3. You can choose to delete last stored reading by simultaneously pressing and
holding both the [UP] & [DOWN] keys for 2 seconds. This can only happen
when viewing last stored reading.
4. Press [ESC] at any time to navigate back to HOME SCREEN.
C. Deleting All Saved Data.
1. Starting from Home Screen mode, touch the [MENU] key and hold for 3
seconds to enter menu mode.
2. In MENU mode use the [DOWN] key and select “CLr” on the screen. Press
[ENTER].
3. Select “SAVE” on the screen -> press [ENTER] “Cont” will appear and be
flashing. Select [ENTER] to delete all readings -> “End” will appear.
(This is asking if you want to continue).
13

5. Alarm Setting
The HM-500 features two different alarm functions that allow you to input high
and low settings and will alert you with a beeping sound when the pH, EC/TDS
and temperature readings reach those corresponding settings.
Alarm Settings.
Please Note: Setting High and Low alarm values for pH, Temperature,
and EC/TDS is done using the same method.
1. Press and hold the [MENU] key for 3 seconds to enter menu mode.
2. Use the [DOWN] key and select the “SET” display on the screen.
Press [ENTER]. “PH”, “C F”, and “EC” or “tds” will now appear on the screen.
3. Use [UP/DOWN] key to select whichever parameter you wish to set the
alarm for. Press [ENTER] key to enter that parameter’s alarm setting menu.
(We will use “PH” for this example)
4. On the top of the screen, you will see “PH”, and “oFF” twice below with “HI”
and “LO” icons adjacent to the “oFF” options.
5. Use [UP/DOWN] key to select [HI] or [LO] alarm range and press [ENTER].
6. Once the “HI” alarm icon has been selected “HI” and “oFF” will blink
simultaneously.
7. Use the [UP/DOWN] keys to turn “on” or “off” the High alarm.
8. Change ”off” to “on”, and press [ENTER] to enter the alarm range setting
mode.
9. The default alarm value of pH 7.00 and the “HI” icon will blink at the same
time.
10. Use the [UP/DOWN] keys to set the High alarm range to the desired value
and touch [ENTER] to save it. (NOTE: If the pH low alarm setting is set at pH
4.00 regardless if it’s on or off, then pH High alarm range cannot be lowered
below 4.01 pH. If you would like to lower the high alarm, you must first lower
the pH Low alarm below pH 4.00 to change desired High alarm pH range.)
11. To turn off the set alarm, simply change “on” to “off” by touching the
[UP/DOWN] keys and then touch the [ENTER] key.
12. “End” will blink 4 times and the alarm will be turned “off” as it exits to the
pH alarm “Hi”, “Lo” selection screen.
13. Once the desired alarm values have been set, you will see “End” blink 4
times. After the alarm data is saved, press [ESC] to get to previous menu.
14

6. Alarm Sound & Delaying Your Alarm
A. Alarm Sound.
The HM-500 has 3 different alarm types.
Alarm Options:
o Cont : Continuous alarm
o AL10 : 10 second alarm every 10 min.
o Mute : Mute
1. Press [MENU] key for 3 seconds.
2. Use the [DOWN] keys and select “Beep” press -> [ENTER].
3. “Cont”, “AL 10”, “Mute” will be displayed on the screen. Select the desired
alarm type by using the [UP/DOWN] key and select by pressing [ENTER].
“End” will blink 4 times indicating selection has been saved.
NOTE: Once the alarm is set, touching any key on the display screen can turn
off the alarm temporarily, but the alarm icon will not disappear.
B. Delaying Your Alarm
NOTE: The purpose of the delay is to delay alarms from sounding off while setting your
alarms or setting up your tank.
1. From main screen press and hold [MENU] button for 3 seconds.
When in Menu mode use your [DOWN] button to “DLAY” menu option
-> press [ENTER].
2. Using the [UP] or [DOWN] button, you will have the option to select “d-15”
(delay alarm for 15 minutes), “d-30” (delay alarm for 30 minutes) or “oFF”
(No delay). Press [ENTER] to select and [ESC] to return to previous screen.
7. Alarm Setting Default Value Data
15
HI HI 30.0℃HI 80.0℉
LO 4.0pH LO 15.0℃LO 60.0℉
HI 7000uS HI 3000ppm HI 5000ppm
LO 1000uS LO 500ppm LO 500ppm
HI 7.00mS HI 3.00ppt HI 5.00ppt
LO 1.00mS LO 0.50ppt LO 0.50ppt
7.0pH Temp - ℉
TDS
442
ppm
ppt
Alarm Setting Default Values
mS
uS
EC
pH Temp - ℃
TDS
Nacl
ppm
ppt

16
8. Clearing Saved Data
Data Clear Options:
o SAVE : Delete all the Saved Readings data.
o AL : Delete all the alarm ranges.
o CAL : Reset to factory calibration.
This will delete any previously saved calibrations
1. Press and hold [MENU] key for 3 seconds.
2. Use [DOWN] key to "CLr" option. Press [ENTER]
3. “SAVE”, “AL”, “CAL” will now appear on the screen.
4. Select the desired data reset option with [UP/DOWN] keys, then
press [ENTER]
5. “Cont” will blink at the bottom of the screen. This is asking if you
wish to continue. To DELETE saved data press [ENTER].
Once pressed you cannot stop data from being deleted.
Alarm types, saved data (readings), and calibration set by user will default back
to the original factory default settings.
9. Battery Charging Instructions
Caution when using the USB Adapter:
• The charging time for the HydroMaster is about 5 hours. However, it will take
longer if the device is in use while charging,
• Please check the USB port to ensure that you connect the USB device
properly.
• To avoid the risk of electric shock or fire, do not touch the USB adapterwith
wet hands and keep it away from damp areas.
• Please use a UL Certified USB Adapter in order to avoid damaging the
device due to the risk of over current.
USB Adapter Specification: Input: 100-240VAC 50/60Hz and 1.5A
Output: 5V ==== 2000mA
• If there is a lot of dust or debris on the USB charger or inside of the USB
insert port, the device may not charge properly. If this happens, wipe them
with a soft cloth.

9. WARRANTY
1. HydroMaster (HM-500): Three Year Limited Warranty
2. pH Probe (SP-P5): Six Month Limited Warranty
The HydroMaster (”HM-500”), manufactured by HM Digital, Inc.
(“the Company”) is warranted to the purchaser against defective materials and workmanship
for three (3) years from the date of purchase.
**The pH probe (SP-P5) and EC probe (SP-C5) are warranted to the purchaser against
defective materials and workmanship for six (6) months from the date of purchase.**
What is covered: Repair parts and labor, or replacement at the Company’s option.
Transportation charges for repaired or new product to be returned to the purchaser.
What is not covered: Transportation charges for the defective product to be sent to the
Company. Any consequential damages, incidental damages, or incidental expenses, including
damages to property. This includes damages from abuse or improper maintenance such as
tampering, wear and tear, water damage, or any other physical damage. The warranty does
not cover water damage to the HydroMaster or SP-P5 due to parts not securely closed.
Products with any evidence of such damage will not be repaired or replaced.
How to obtain warranty performance: Attach to the product your name, address, description
of problem, phone number, and proof of date of purchase, package and return to:
HM Digital, Inc.
ATTN: Returns
5819 Uplander Way
Culver City, CA 90230
U.S.A.
Implied Warranties: Any implied warranties, including implied warranties of merchantability
and fitness for a particular purpose, are limited in duration to 3 years from date of purchase.
Some states do not allow limitations on how long an implied warranty lasts, so the above
limitation may not apply to you. To the extent any provision of this warranty is prohibited by
federal and state law and cannot be preempted, it shall not be applicable. This warranty
gives you specific legal rights, and you may also have other rights, which vary from state to
state.
NOTE: Warranties are product-specific. Third-party products and products deemed by HM
Digital as “accessories” are not covered under warranty. Third-party products include, but are
not limited to, batteries and fittings. Accessories include, but are not limited to batteries,
lanyards and cases.
17

9. Contact Information
HM Digital, Inc. is a leading manufacturer of professional water testing
instruments that tests for EC, TDS, pH, ORP, temperature and volume.
Our products include handheld meters, in-line monitors, controllers,
sensors, calibration solutions and more.
Commercial/Industrial & Personal Applications:
• Agriculture
• Alternative Health
• Aquariums & Aquaculture
• Car & Window Washing
• Carbon Filtration
• Deionization
• Distillation
• Food & Coffee Services
• Hydroponics
• Pools & Spas
• Pharmaceutical & Medical
• Reverse Osmosis
• Water Bottling
• Water Purification
• Water Treatment
Contact us:
If you need help with your device,
feel free to reach out:
Main: 800.383.2777
Tel: 310.410.3100
Fax: 310.410.3106
Email: [email protected]
Visit us:
www.hmdigital.com, www.tdsmeter.com
18
Table of contents
Other HM Digital Measuring Instrument manuals

HM Digital
HM Digital COM-100 User manual

HM Digital
HM Digital TDS-3 User manual

HM Digital
HM Digital FLM-3 User manual

HM Digital
HM Digital CommPro Series User manual

HM Digital
HM Digital COM-300 User manual

HM Digital
HM Digital DM-1 User manual

HM Digital
HM Digital COM-100 User manual

HM Digital
HM Digital PH-200 User manual
Popular Measuring Instrument manuals by other brands

Macherey-Nagel
Macherey-Nagel NANOCOLOR Advance Operating instruction

Bender
Bender ISOMETER isoRW425 quick start guide

Anton
Anton Sprint eVo user manual

Rice Lake
Rice Lake DIGI DS-520 Operation manual

Klein Tools
Klein Tools IR2000A instruction manual

Paradyne
Paradyne FrameSaver SLV 9x24 Series installation instructions