HMF Leofant 32 ABB2570 User manual

© HMF, 48336 Sassenberg-Füchtorf Page 1
Instruction manual
Dam-former
LEOFANT 32 ABB2570
Producer
HMF Hermeler Maschinenbau GmbH
Lohmannstr.4
D –48336 Sassenberg-Füchtorf
Telefon:0049 (0) 54 26 / 53 84
Fax: 0049 (0) 54 26 / 53 85
Internet: www.hmf-hermeler.de

© HMF, 48336 Sassenberg-Füchtorf Page 2
Dear Customer!
The dam-former Leofant 32 ABB2570 is a product of high quality coming from the
Hermeler company.
Please read carefully and follow the instruction manual to be able to use all the
advantages of your new machine.
We have to refuse warranty claims, which are attributed to operating errors.
Please give us the following information’s in each case of ordering replacement parts:
1. Machine number
2. Type
3. Construction year
Machine number, type and construction year are hammered into the identification plate
at the right front side of the machine. Descriptions “left” or “right” are always meant in
moving direction.
You have to apply only original spare parts of our company.
Specifications
Type
Dam-former
Leofant 32 ABB2570
Total width
~ 2650 mm
Total height
~ 1390 mm
Total length (without
additional parts)
~ 1650 mm
Total weight
~1600 kg
Needed power
~ 120 PS
Propulsion:
mechanical by PTO drive
shafts
Width of the dam top
300-600 mm
Lower width of the dam
800-1300 mm
Height of the dam
300-800 mm
Right of technical modifications reserved

© HMF, 48336 Sassenberg-Füchtorf Page 3
Contents
1. Preamble 4
2. General remarks 4
2.1 Attention! 4
3. Accident prevention 5
3.1 Security and accident prevention instructions 5
3.2 Warning and instruction signs 6
4. Remarks to the road safety 8
5. Using possibilities 8
6. Functioning 8
7. Starting up 9
7.1 Mounting to the tractor 9
7.1.1 Adjustments 9
7.2 Milling of an asparagus dam 9
7.3 Reworking of the asparagus dam 12
8. Maintenance and care 13
8.1 Lubrication points 14
8.2 Resetting and changing of the sticks 15
8.3 Maintenance of the propulsion 15
8.4 In case of longer breaks between using 15
Assembling instruction for the sticks 16
EG-declaration of conformity 17

© HMF, 48336 Sassenberg-Füchtorf Page 4
1. Preamble
This instruction manual is valid for the dam-former Leofant. It is made for the
persons who work with this machine and it gives you advices for the use, the
adjusting and the operation of the dam-former Leofant.
Texts and pictures are neutral as far as possible. To differences it is drawn the
attention by picture headings or text tips.
Take the advice for the right servicing and maintenance of your machine, then you
will achieve a constant operational readiness and long life span of the
dam-former Leofant.
If they also allow to carry out regular inspections by your professional workshop.
Omissions in the servicing or wrong service lead to achievement decrease and
bring time delays. Use by right service and careful care our many years'
experiences in construction and development of machines for the asparagus
cultivation, then your Leofant will always perform good work.
2. General Remarks
2.1 Attention!
All people who would use, care or control the dam-former Leofant have to read,
comprehend and pay attention to the instructions of this instruction manual to
avoid danger.
Especially pay attention to the “Security and accident prevention instructions”.
The use of spare parts, accessories and additional devices which do not come
original from HMF and are not checked and released from HMF, constructively
given qualities of the HMF machine or her functional ability negatively change and
thereby affect the active and/or passive safe driving as well as working security
(accident protection), is not permitted.
For damages, in this respect by the use of Non-HMF-Original-Spare Parts,
accessories and additional devices every liability is excluded from HMF.
Technical designations, measures and weights are non-binding. We reserve
ourselves changes in the course of the technical development and mistakes. In
front, behind, right and left is valid always in direction of the traffic.
© HMF, 48336 Sassenberg-Füchtorf Page 5
3. Accident prevention
This sign on the machine or in the instruction manual draws your attention to the
security advices. If you don’t pay attention to it, there is danger for your life and
serious injuries. Please observe all rules and instructions and give them to all other
users, too!
3.1 Security and accident prevention instructions
For your own security
Please test all functions of the machine before starting to work, to be ready for
working with the machine!
The operation of the machine is done by the driver of the tractor and happens
while sitting on the driver’s seat. Further persons have to be removed out of the
dangerous range of the machine.
Attention! Between tractor and machine there is danger of contusion. It is not
allowed to stay in the dangerous area.
Before every use do switch the handles for the lifter and the PTO shaft to „0“.
Approximately 10 hours after starting up you have to check and - if necessary -
tighten all screws and bolts! This is especially important for the wheel-bolts.
While adjusting the working depth the front tins may tumble down after loosen the
fixing screw. There is danger of contusion!
Never do workings of maintenance, service, cleaning or repair while the engine is
running!
All protection installations ever have to be mounted duly!
Attention! Even the stationary milling rotors are dangerous and can do injuries, too.
Therefore you have to wear protection gloves while all working at the rotors (for
example resetting of the sticks)
Additional to the instructions for accident protection written above the generally
accepted rules of technical, work medical and traffic security advices are valid, like them
of the professional associations.

© HMF, 48336 Sassenberg-Füchtorf Page 6
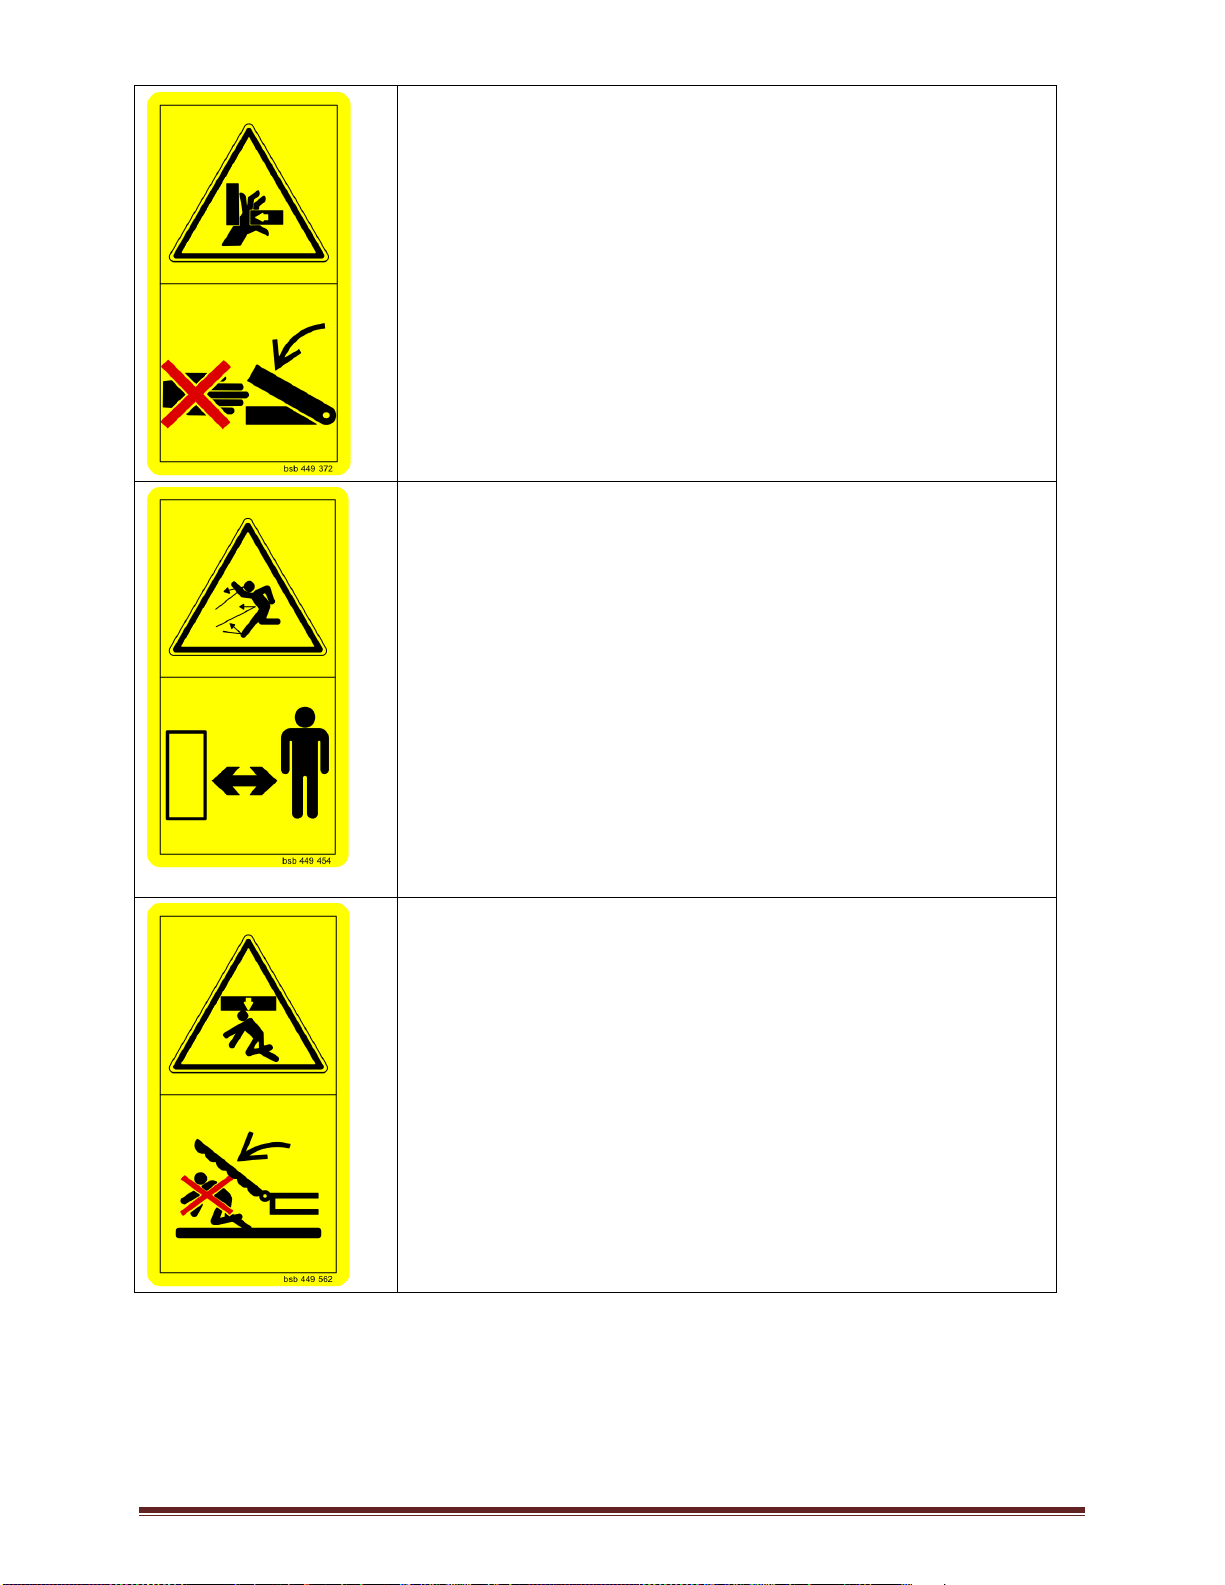
3.2 Warning and information signs
Generally this is very important:
a) Please comply exactly with all warnings and signs!
b) Give all security instructions also to all other users of this product!
c) Please keep all signs and warning signs in good condition or replace them if
necessary!
Please read instruction manual and security advices before
starting on!
In case of all maintenance and working of repairs stop the
motor and remove the ignition key.
Don’t stay in the working area while using the lifter!
While using the machine it is not allowed to stay between
the tractor and the machine!
Don’t touch machine parts until they don’t move any longer!
Don’t open protection appliances while using the machine or
while the engine is running!
NEVER touch revolving parts!!!
Don’t stay near the revolving rotors and never touch moving
machine parts!
Wait until they don’t move any longer!
© HMF, 48336 Sassenberg-Füchtorf Page 7
There is danger of contusion!
Caution!
There is danger of hurled-out pieces while machine is
running! Pay attention to keep a safe distance to the
machine!
Don’t stay in the swerving area of the machines!

© HMF, 48336 Sassenberg-Füchtorf Page 8
4. Remarks to the road safety
While using public roads and ways the combination of tractor and asparagus dam-
former must fulfil the rules of road traffic.
You have to pay attention to the maximum axle load and the maximum load capacity on
the tire of the tractor gets not overstepped.
You have to prevent the machine from swinging while the driving by fixing the lower
fixing points.
After the working you have to prevent that the public streets will be polluted with soil.
5. Using possibilities
The dam-former Leofant has to be used only as agreed. You can build with the dam-
former Leofant in one or in several processes asparagus dams. This machine is also
suitable for re-building the dams during the harvesting-season.
6. Functioning
With our dam-former Leofant you can build every form of a dam desired with every kind
of soil. Two counter-rotating double-stars of screwed square sticks make sure the
evenly, clod-free building of the asparagus dam. The dam-formers are adjustable in the
height and in the width. The asparagus dam is build up from bottom to top and therefore
it is very solid and durable against heavy rain. With two adjustable supporting wheels
you have a regular depth control. Metal soil leveller mounted behind the supporting
wheels make the driving lines optimally level.

© HMF, 48336 Sassenberg-Füchtorf Page 9
7. Starting up
Please check up before the starting up, whether the machine is delivered completely.
Parts, which are delivered separately, have to been mounted before the first using. All
lubrication points have to be lubricated; all gliding pieces have to be fitted intensively
with grease or oil.You have to check the content of oil before the first using.
For using with a tractor of more than 120 HP, we recommend the use of „Carter
SH 320“ High performance oil. You have to change the oil at least once per year!
7.1 Mounting to the tractor
7.1.1 Adjustments
Before starting the adjustments you have to pay attention to the fact, that the dam-
former Leofant has to hang horizontally behind the tractor and that the lower links are
uniform in the length.
Mount the dam-former Leofant to the 3-point link of the tractor.
Please adjust the length of the top link that the machine is hanging in its
working position, lowering about 5cm to the wheels, behind the tractor.
You have fix the lower links in that way that while working on the field a
tolerance of 1 cm on both sides is possible.
Now put on the PTO shaft. The minimum covering of the profile pipe may not be
remained under 250mm.
The guarding and protection installations of the PTO shaft have to be
mounted and to be good condition. Damaged parts have to be replaced
immediately.
7.2 Milling of an asparagus dam
You have to do the following adjustments to mill an asparagus dam:
The front tins (optional) should have been adjusted the way that they loosen the
soil in the driving line of the tractor. The working depth has to be adapted to the
sticks on the rotors.
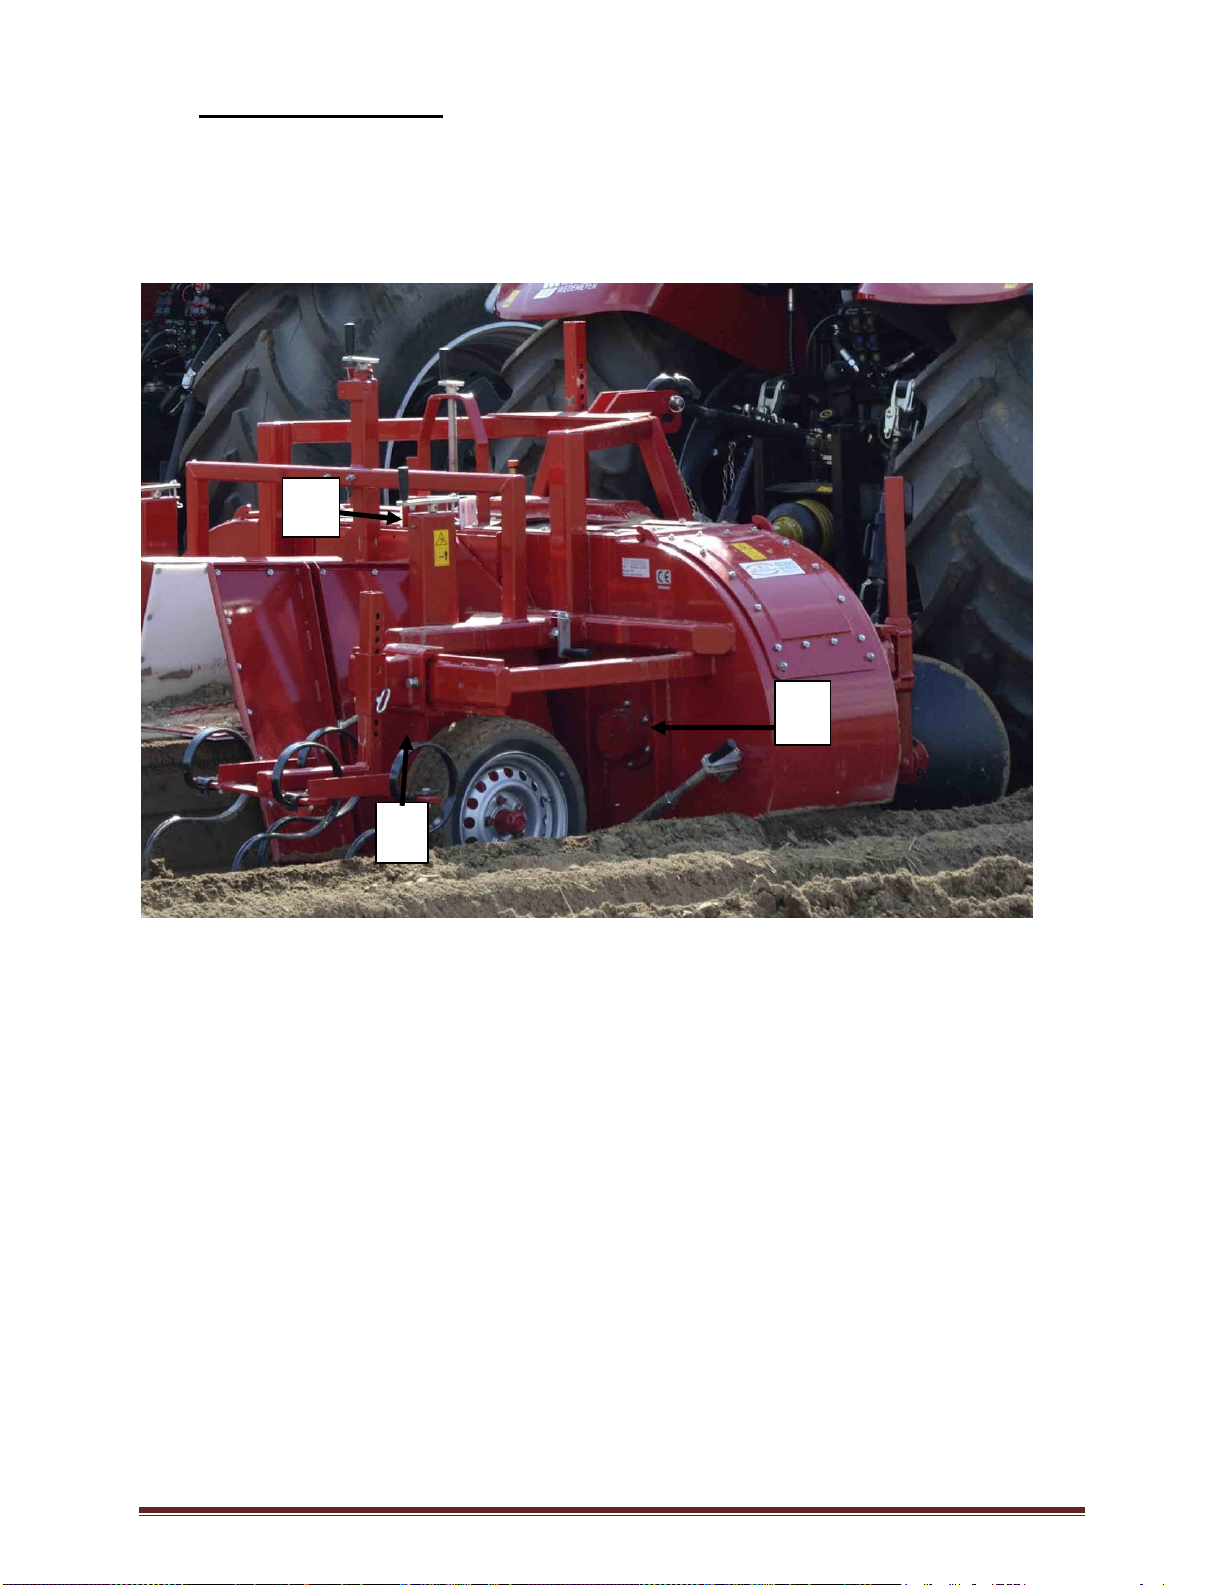
The supporting wheels (image 3, p.: 5) may be adjusted in the height from 0-300
mm infinitely variable. The chosen adjustment depends on the desired height of
the asparagus dam.
The soil which is thrown by the rotors to the middle will build a trapezium-shaped
dam by the dam-former.
The width of the bottom of the dam can be adjusted infinitely variable from 900 to
1300 mm by adjustment-spindles (image 3, pos.: 4).
At the top you can adjust the width by the turning points (image 3 pos.: 1) from 300
mm to 600 mm.
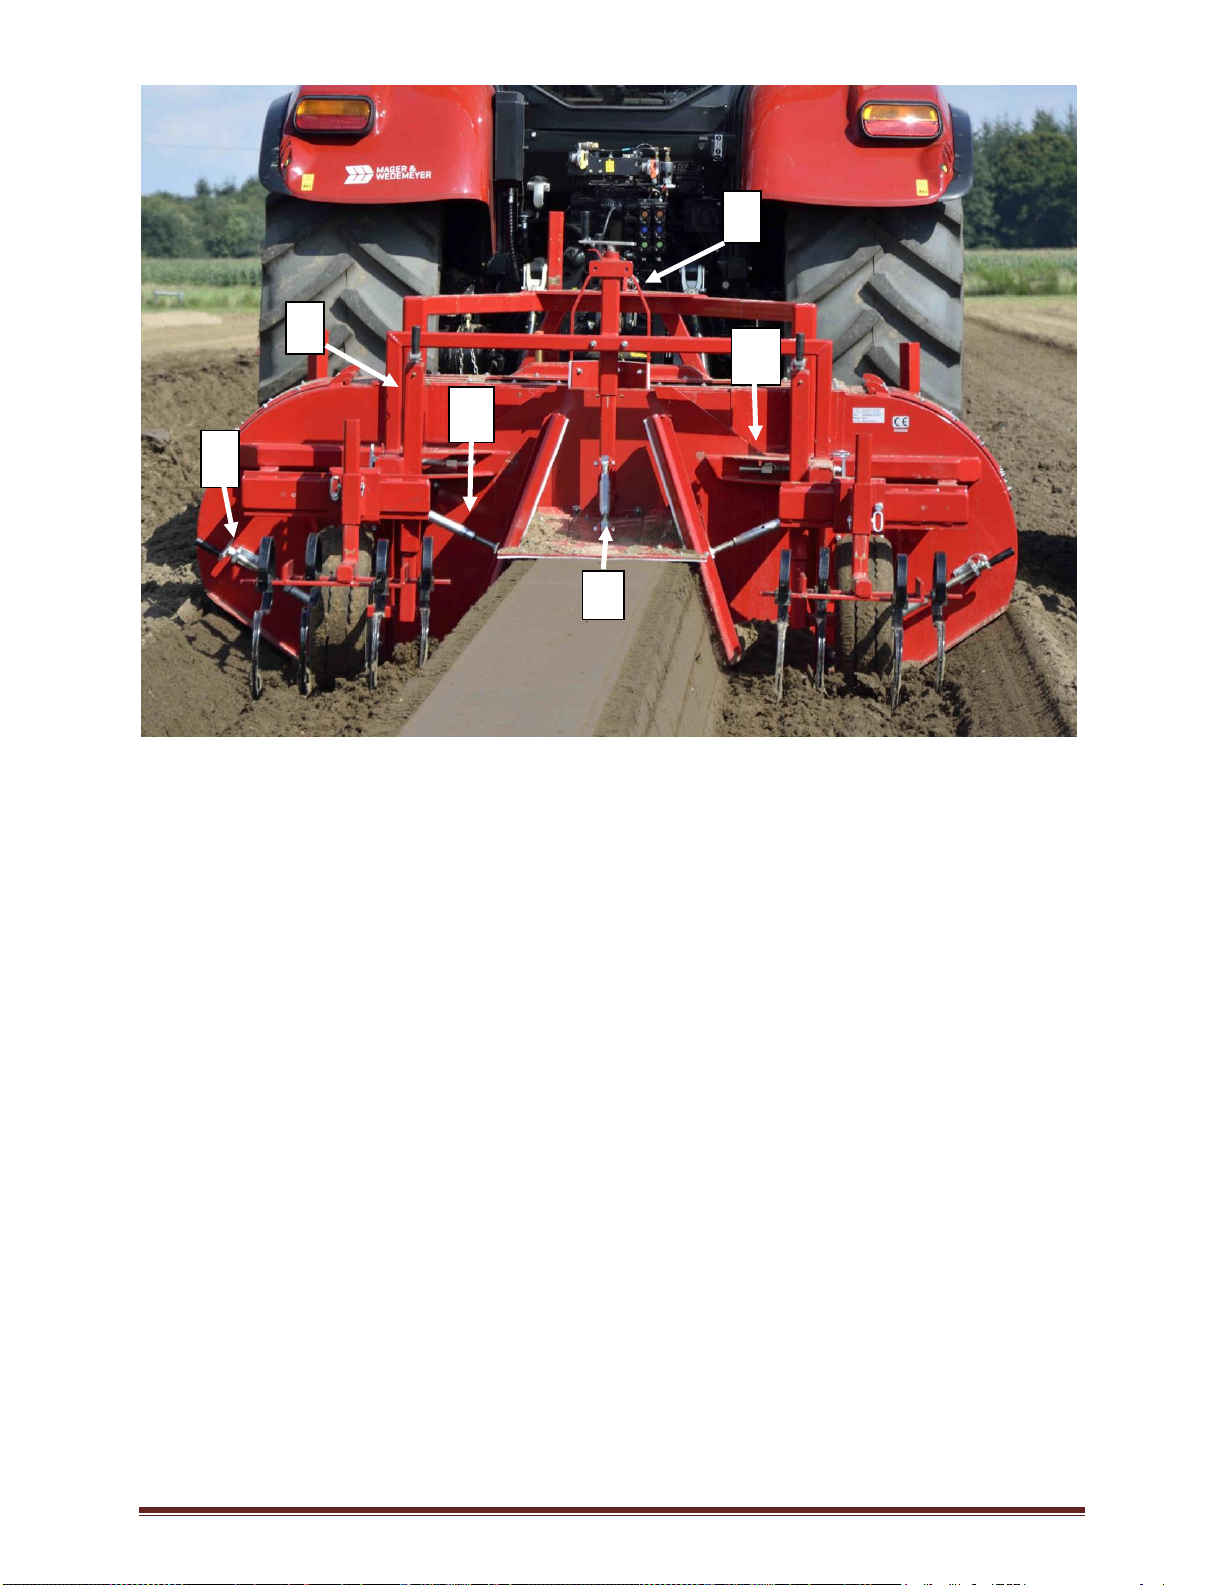
© HMF, 48336 Sassenberg-Füchtorf Page 10
Image 3: Adjustment possibilities of the dam-former
You can adjust infinitely variable from 300-800 mm the height of the dam you wish
by the help of the spindle (image 3 pos.: 6). Due to that fact also the width of the
top of the dam is changing. The changing of the dam height by this spindle has no
effect on the compression in the dam.
With another spindle (image 3, pos. 2 and 3) you can adjust the compression
inside the dam.
The front tins (optional) should have been adjusted in a position to loosen and
level the area directly beneath the bottom of the dam.
Working order: You should build the dams of your asparagus field in order of
building every second dam at first. Afterwards you build the dams between, that
way you avoid getting the tractor and the dam former in a slant.
The speed should have been adapted to the structure of the soil, but it should not
be more than 4-6 km/h.
6
4
3
5
2
1

© HMF, 48336 Sassenberg-Füchtorf Page 11
How to adjust the dam former:
Adjust the front tins (optional) concentric to the driving track of the tractor.
Adjust the backside dam forming plates approximately to the dimensions desired:
Adjust the desired height of the dam by the spindle (image 3, pos.:6).
Adjust the desired upper dam width by moving the fulcrum, if necessary. (image 3,
pos.: 1).
Adjust the bottom dam width. You should pay attention to the sides of the dam not
to be adjusted too steep.
Now build with the dam former a dam of 5 m length, the dam should not be filled
fully. If this is not the result, you should adjust the supporting wheels longer, until
the result is satisfactory.
When the machine is adjusted in this way, you should turn the supporting wheels
now each one turn higher.
Now you should check the form of the dam again.
A further modification of the dam height has now to happen simultaneously at the
adjustment for the wheels (image 3, pos.:5) and at the spindle for the aperture
(image 3, pos.: 6).
Please mind that an overcrowding inside the machine leads to a higher need of
power and a quicker obsolescence of the sticks.
In this way you build now the dam above the first asparagus line, then the one
above the third asparagus line, then the fifth, and so on: you leave every second
line. After having done like that, you can start to work on the left over lines. (By this
working method you will avoid having different quantities of soil on both sides of
each dam.)
Adjustment for the dams between the ones you made at first:
For the building of the dams between the ones you made first, it might be necessary to
correct the adjustments a few for to get the same height of the dam.
© HMF, 48336 Sassenberg-Füchtorf Page 12
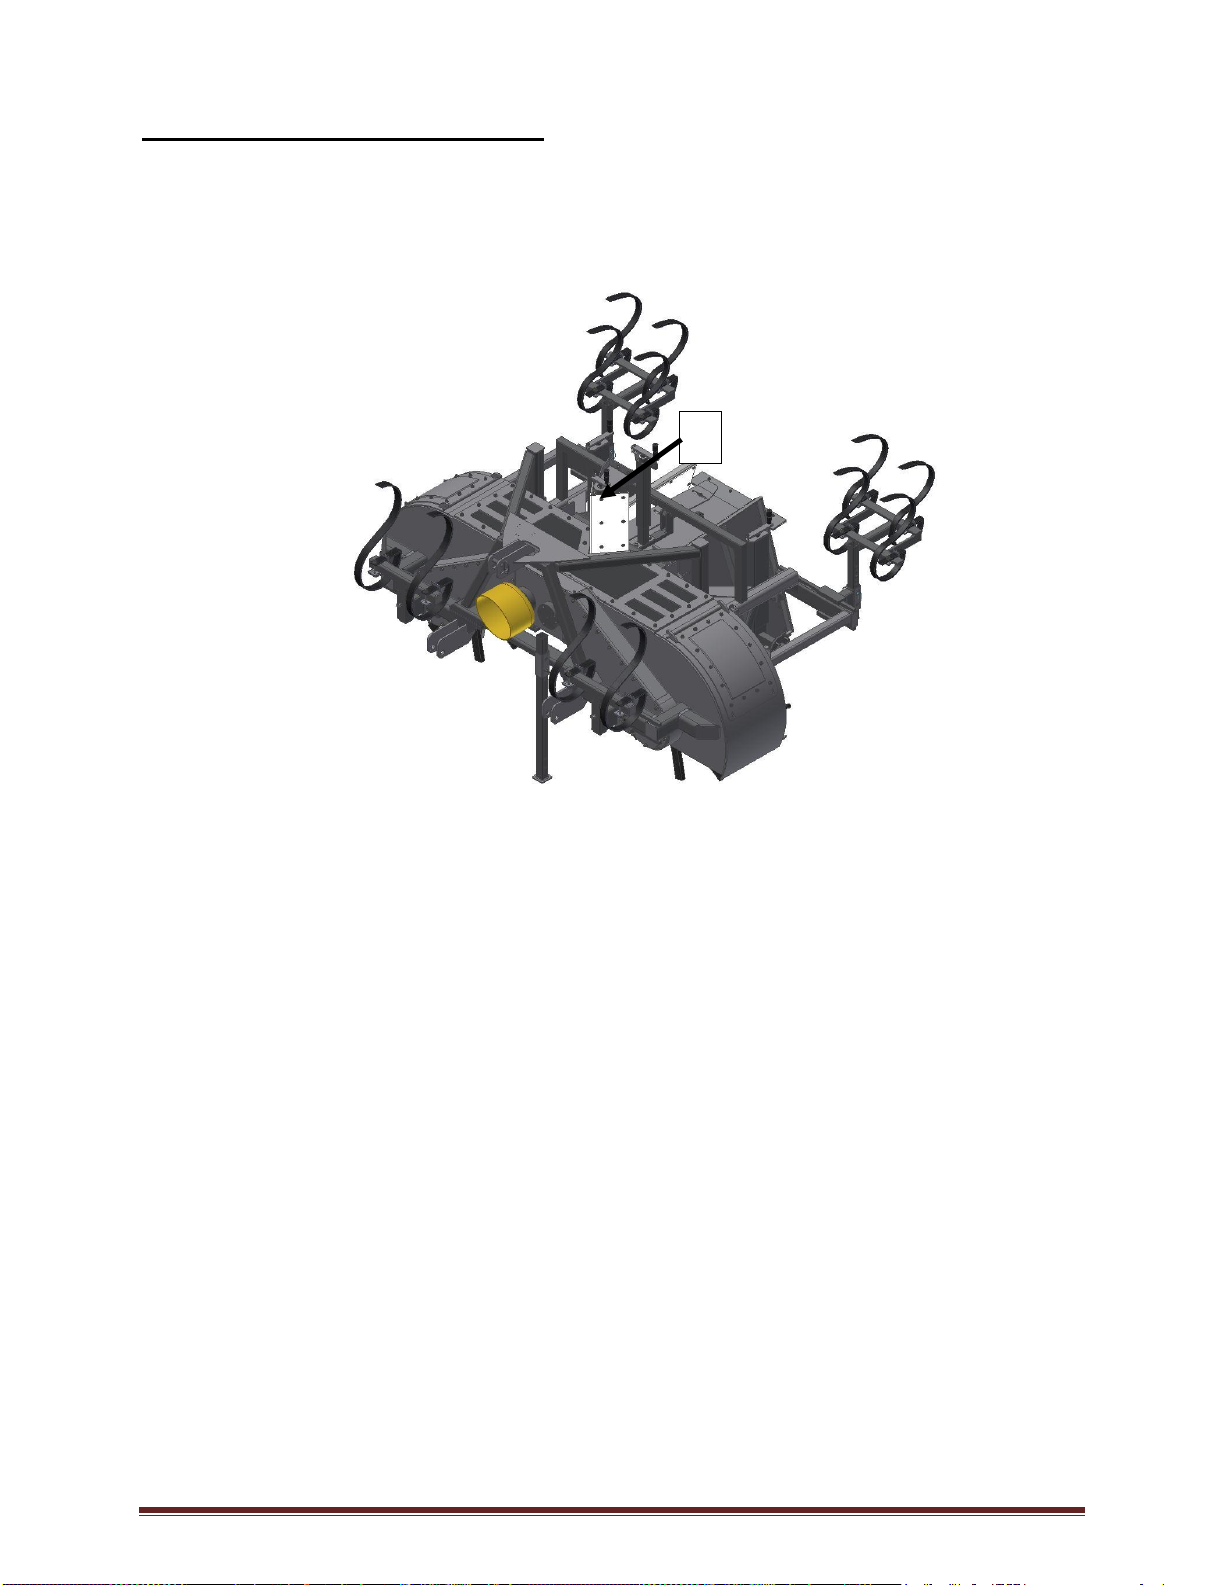
Adjustment instructions Leofant 32
The dam-former Leofant 32 has got a triangle (Nr. 1). This triangle (Nr.1) spreads the
soil on the whole width of the dam-former. You have to pay attention to the following
instructions to work successful with it:
The lower end of this triangle should be adjusted approx. 2-5 cm above the edge of the
dam former (Nr. 2). By having this adjustment the triangle is able to spread the soil
inside machine to the sides, if there is too much soil. If the triangle is adjusted too high,
the upper side of the dam will not be even. Then the dam often is not completely filled
up with soil, even if there is enough soil inside the machine.
1

© HMF, 48336 Sassenberg-Füchtorf Page 13
7.3 Reworking of the asparagus dam
During the harvest time reworking or postdamming of the asparagus dam can be
necessary for the purpose of weed control and closing of the insertion holes.
For this purpose the dam former Leofant can be equipped with dam-loose.
Besides, the following is to be followed:
With the help of the provided fixing clips both dam-loose in the crossbeams are
screwed on between the lower hitching plates, whereby working height and
distance of the loose are given by the dam form.
The lateral tine carrier is pivotable, so that the dam-loose can be adapted to the
inclination of the dam flanks.
Fundamental the spring tines must be adjusted so that the upper layer of dry sand
trickles down to the dam sole. The following spike drums mix the dry ground when
raising the dams with damp soil and there results a new more stable dam.
8. Maintenance and care
After the first 10 working hours you absolutely have to check the nuts at the
wheels and - if necessary tighten them again.
The tire pressure has to be checked once a month. (p = 2bar).
Once a year you have to do an oil-change.
You have to do the following maintenance and service workings for to reduce the
obsolescence of the dam-former Leofant:
2
The machine should not be used
horizontally, but slightly tilted
backwards. Therefore the backside
sticks work in an area that has not
yet been worked in by the front
sticks. If you use the machine
horizontally, the front sticks are
doing 80% of the whole work in the
ground.
© HMF, 48336 Sassenberg-Füchtorf Page 14
8.1 Lubrication points
The regular intervals for lubrication and maintenance have to been absolutely
respected. The lubrication points (image 4.1 and 2) and the PTO shaft have to been
lubricated every 20 hours.
Image 4
While re-lubrication there might get some lubricant into the soil, the ground water
or into the feed. Therefore we recommend on principle the using of biodegradable
lubricants!
1
2
3

© HMF, 48336 Sassenberg-Füchtorf Page 15
8.2 Resetting and changing of the stick
The sticks (approx. 350 mm long) are screwed to the both stick-rotors. In case of
approx. 30 mm of obsolescence of the sticks you have to unscrew them at the rotor
and set them on one position further to the outside. After 2 hours of work you should
check and tighten the screws in the rotor in driving direction right to the back, in the
rotor in driving direction left to the front.
8.3 Maintenance of the propulsion
Before the first introduction the oil level must be checked!
The propulsion has to been checked of leakage and filling quantity after 20 hours
of working.
At the front of the dam-former Leofant there is the gearbox, in which you find the
propulsion for the driving and for the rotors.
Every 20 working hours you also have to check this for leakage and filling quantity.
The quantity of the oil is enough, when you can see the oil in the looking glass
while the machine is standing horizontally.
If necessary, fill up with gear oil CARTER SH 320. With use of a tractor with more
than 120 HP, we recommend the use of “CARTER SH 320” High quality oil.
Change the oil once a year.
The filling quantity is 10 –12.5 L at each side.
8.4 In case of longer breaks between using
Clean up the dam-former Leofant, do the lubrication as described in this instruction
manual (see lubrication plan p. 7) and spray with oil.
Front this (optional), back tins and dam forming metals (not on the plastic) have to
been spread with grease after the cleaning.
Damages in the lacquer have to been repaired.
If you have a cardan shaft with slipping clutch, then you have to remove the air
after longer non-using.

© HMF, 48336 Sassenberg-Füchtorf Page 16
ASSEMBLING INSTRUCTION FOR THE
STICKS OF THE DAM-FORMER LEOFANT
Standard
PLEASE PAY ATTENTION!
Dam-former in moving direction right
(You have to see the screw with the bolt)
Dam-former in moving direction left
(You have to see the heads of the screws.)
Please tighten again the screws of the sticks
after 2 hours of working.
HMF Hermeler Maschinenbau GmbH Füchtorf

© HMF, 48336 Sassenberg-Füchtorf Page 17
HMF Hermeler Maschinenbau GmbH
Lohmannstr. 4, 48336 Füchtorf
Telephone: 05426/53 84 Telefax: 05426/5385
EG-declaration of conformity
Concerning EG-directive 89/392/EWG
The enterprise
HMF Hermeler Maschinenbau GmbH,
Lohmannstr. 4, 48336 Füchtorf,
declares in exclusive responsibility, that the product
Dam-former Leofant 32 2570
to which this declaration refers, is satisfying the relevant elementary requirements of security and
health of the EG-directive 89/392/EWG in the version of the third modified directive 93/68/EWG
of 22th July 1993.
For the appropriate conversion of the mentioned EG-requirements of security and health there
were applied to the following rule(s) and technical specification(s):
EN 292 part 1+2, EN 294, EN 60204 part 1
(Name and/or number and date of publication of the rule(s) and/or technical specification(s))
Füchtorf ,........................... ..................................................
(Name, position und signature)
Table of contents
Other HMF Farm Equipment manuals


