HMM smartLAB profi User manual

D31420-08-01-02_R4_27/10/2011
User Manual
HMM Diagnostics GmbH
D-69221 Dossenheim, Germany
www.hmm.info
Upper Arm Blood Pressure Monitor
with wireless data transfer module
Please read the user manual carefully before
the rst use.


3
Inhalt
I. Introduction
Product description 5
Normal variations of your blood pressure 6
II. Your smartLAB®pro+
Display & functions 7
Specications 8
Information: 10
III. Setup & operating functions
Making the device ready for operation 11
Setting time, date and average 12
Setting up the wireless data transfer 14
Connecting the cuff to the monitor 19
Applying the cuff 19
Body posture during measurement 20
Measurement 21
Displaying stored values 22
Deleting measured values 24
IV. Miscellaneous
Assessing high blood pressure for adults 26
Troubleshooting 31
Maintenance 32
Explanation of symbols 32
Guidance and manufacture’s declaration – electromagnetic
emission for all equipment & systems 33
Guidance and manufacture’s declaration – electromagnetic
immunity for all equipment & systems 34

4
Guidance and manufacture’s declaration – electromagnetic
immunity for ME EQUIPMENT 36
DPA technology for a more accurate measurement 38
Measure-during-ination 39
Warranty: 39

5
I. Introduction
Thank you for having decided for our smartLAB®pro+ blood pressure
monitor for the upper arm. Our device enables you to control your
blood pressure and your pulse rate very easily. Furthermore. You
can store your values by an internal measured data storage. The
classication by colors of the measured values on the side of your
device enables you to interpret your values immediately.
Please read carefully the instructions before your use the
smartLAB®pro+ blood pressure monitor for the rst time.
Product description
Blood pressure and heart rate can be identied automatically and
without any invasive method by an integrated pressure sensor
technology and by an oscillometric measurement method. Blood
pressure, pulse rate and (possible) irregular heartbeats can be seen
on the LCD display. You can store the last 60 results (2 user proles)
with date and time. In addition to that you can see the average of the
last 3, 4 or 5 measurements. Your smartLAB®pro+ blood pressure
monitor can also indicate the average of the measurements you did in
the mornings/ evenings as well as the average for all results.
* For more information on hFon or hLine Terminal go to www.hmm.info

6
ANT+ wireless data transfer
Thanks to the integrated ANT module all results can be transmitted to
their receiver (laptop, personal computer, hFon) in order to interpret
your measured values.
The smartLAB®pro+ blood pressure monitor is an ANT+ Device, which
supports the ANT+ protocoll (version 1.0) and is compatible with
receive terminal s, which support the ANT+ protocoll.
Normal variations of your blood pressure
Many factors inuence your blood pressure such as physical exercises,
excitement, stress, nutrition, drinking, smoking and other activities
(including measuring your blood pressure). For this reason you almost
never get the same results.
Your blood pressure is subject to permanent variations – day and
night. The highest values are usually in the day, the lowest usually at
midnight. Usually your blood pressure starts increasing after 3 a.m.
and reaches its highest value in the daytime when you are awake and
active.
For this reason we recommend to measure your blood pressure every
day at the same time under the same circumstances. Please relax 3 to
5 minutes between the measurements so that your blood circulation
can start again in your arm. It is very rare that you get identical
measured values when you measure your blood pressure several times
subsequently.
7
ENGLISH
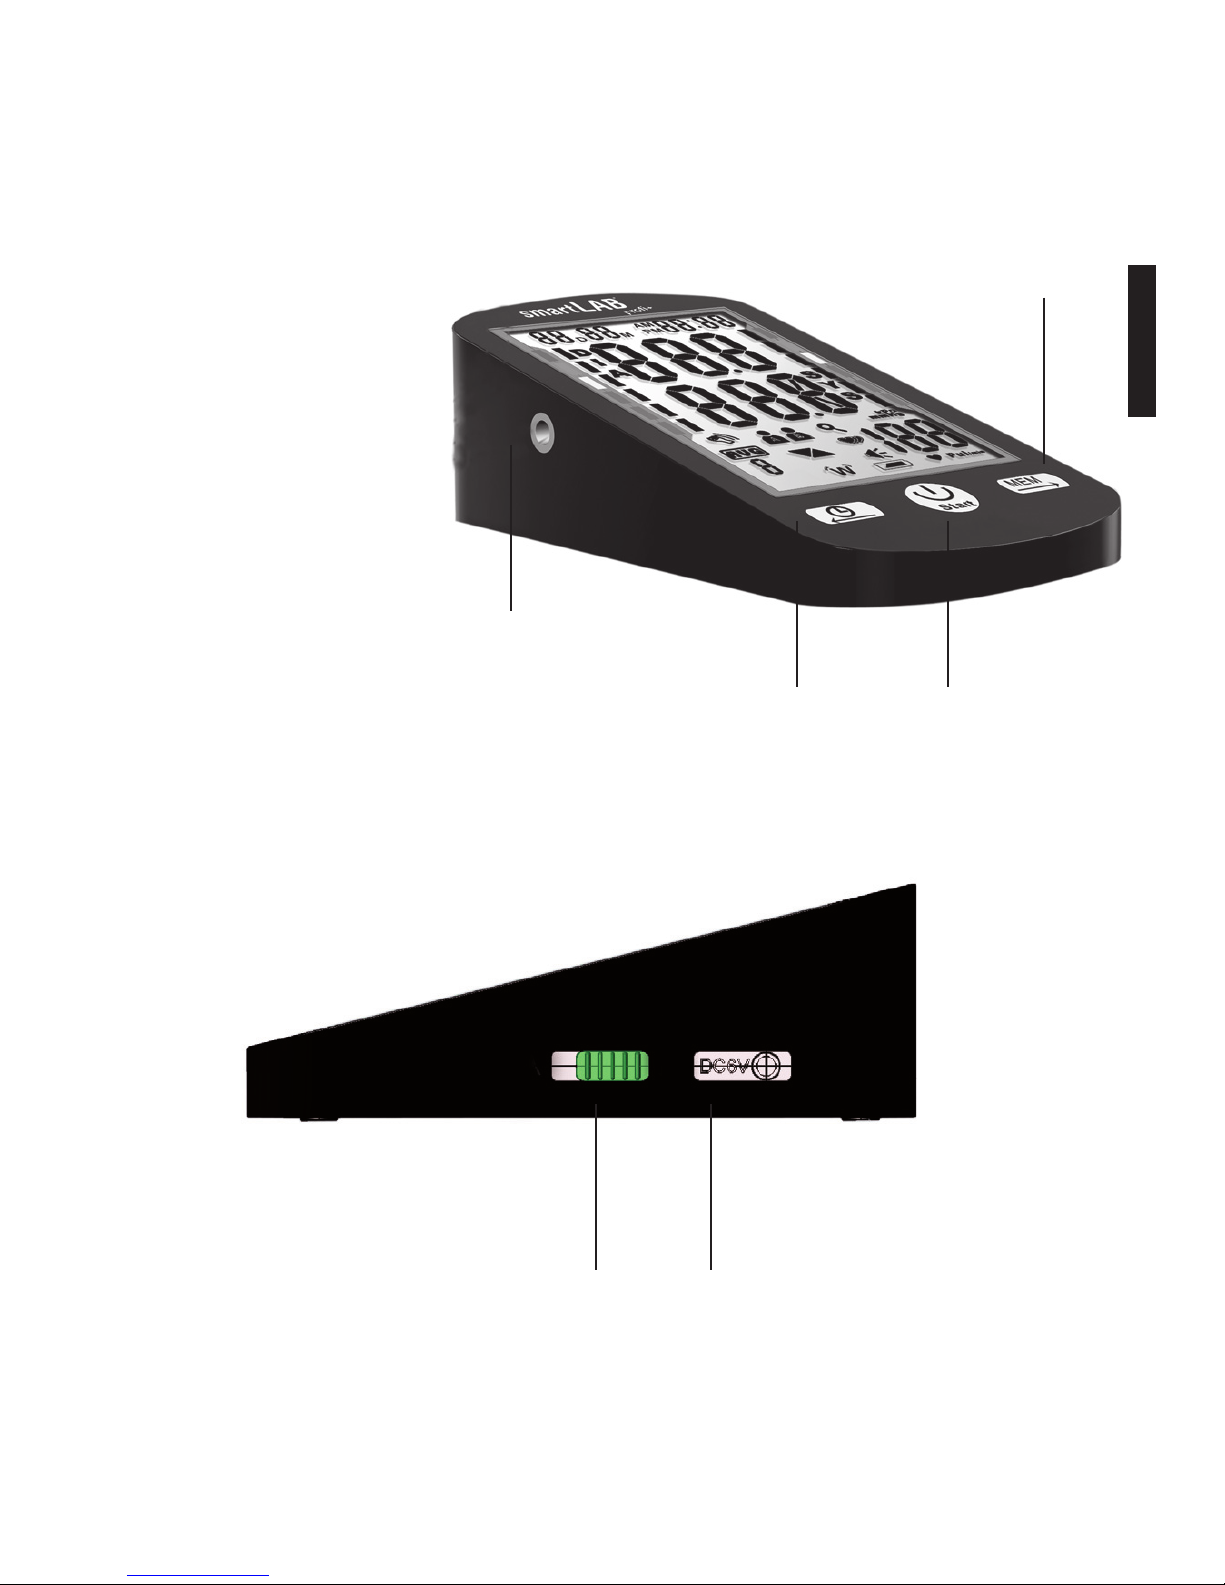
II. Your smartLAB®pro+
Display & functions
Port for the blood pressure cuff
Setting/ left arrow key On/off start
Measured data storage/
right arrow key
Button to choose the user pro-
le (A or B)
External electricity supply
(DC 6V)
8
Specications
1. device type: smartLAB®pro+
2. classication: class II, type B
3. size of device: 170 mm x 100 mm x 60 mm
4. size of cuff: 550 mm x 150 mm
5. weight: 330 g (without batteries)
6. measurement method: oscillometric, automatic
ination and measurement
7. storage capacity: 60 values with date and time (2
user proles)
8. batteries: DC 6V or 4 „AAA“ batteries or alternative
CD adapter
9. blood pressure range: 30 - 280 mmHg
10. accuracy of measurement: ±3 mmHg
11. range of heartbeat/ pulse rate: 40 - 199 / min
12. operating conditions - temperature: 5°C ~ 40°C
13. operating conditions – air humidity: < 80%
14. storage temperature: -20°C~55°C
15. conditions for air humidity when storing: < 95%
16. external pressure: atmospheric, 86 kPa ~ 106 kPa
17. durability of the batteries: about 2 months when
using 3 minutes per day
18. material cuff: Terylene (surface), Nylon (part of
sticking), PVC (internal part + tube)
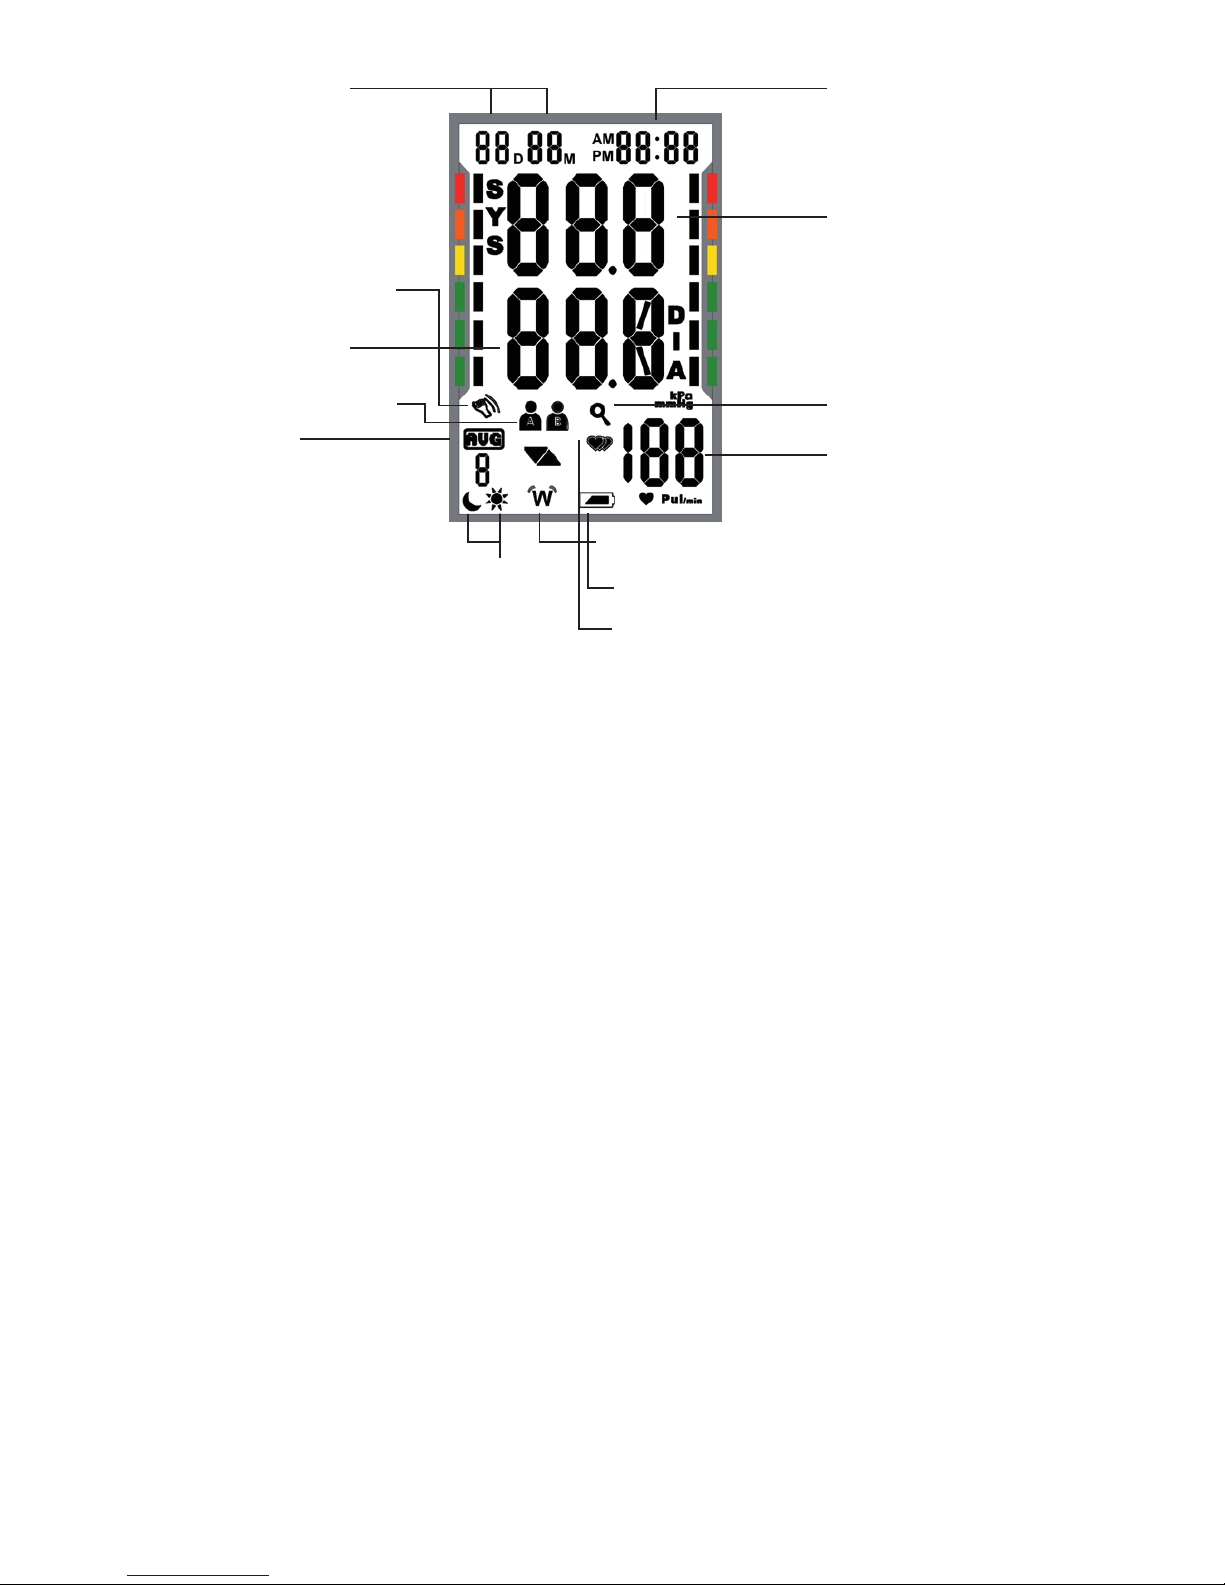
19. communication / data transfer: ANT wireless
Day/month/
year
Time
Systolic
Diastolic
Average
values
Average in the morning, in the
evening, total average
Data transfer
Low battery
Pulse
Memory mode
User prole A / B
Irregular heartbeat
Warning „wrong
measurement because
of movement of the
arm“

9
ENGLISH
Contents
1 smartLAB®pro+ blood pressure monitor
1 comfort cuff (size: 22-42 cm)
1 User manual
1 smartLAB® wallett
1 smartLAB® blood pressure passport
4 „AAA“ batteries

10
Information:
1. Please relax 5 minutes before measuring.
2. The arm cuff should be placed on top of the elbow (please refer to
the indication on the cuff)
3. Do not move or speak when measuring.
4. Please always use the same arm.
5. Please relax 3 to 5 minutes between the measurements so that your
blood circulation can start again in your arm.
6. When you do not use the device for one month or more please
remove the batteries in order to prevent them from discharging
automatically.
7. The device is dedicated for adults with an arm circumference from
22 - 42 cm and not for children or infants.
8. The device works according to its specications even in case of
general cardiac arrhythmia as well as arterial or ventricular cardiac
brillation.
9. The blood pressure values measured by this device are comparable
to the values identied by skilled persons using arm cuff and
stethoscope and they range within the required limitations of
the American National Standard for electronic or automatic
sphygmanometer.
10. Please avoid strong magnetic interferences such as mobile phone,
microwaves etc.
11
ENGLISH
III. Setup & operating functions
Making the device ready for operation
• Please open the cover of the battery case on the back side of the
device.
• Please insert the „AAA“ batteries according to the required
polarity.
• Then close the cover of the battery case.
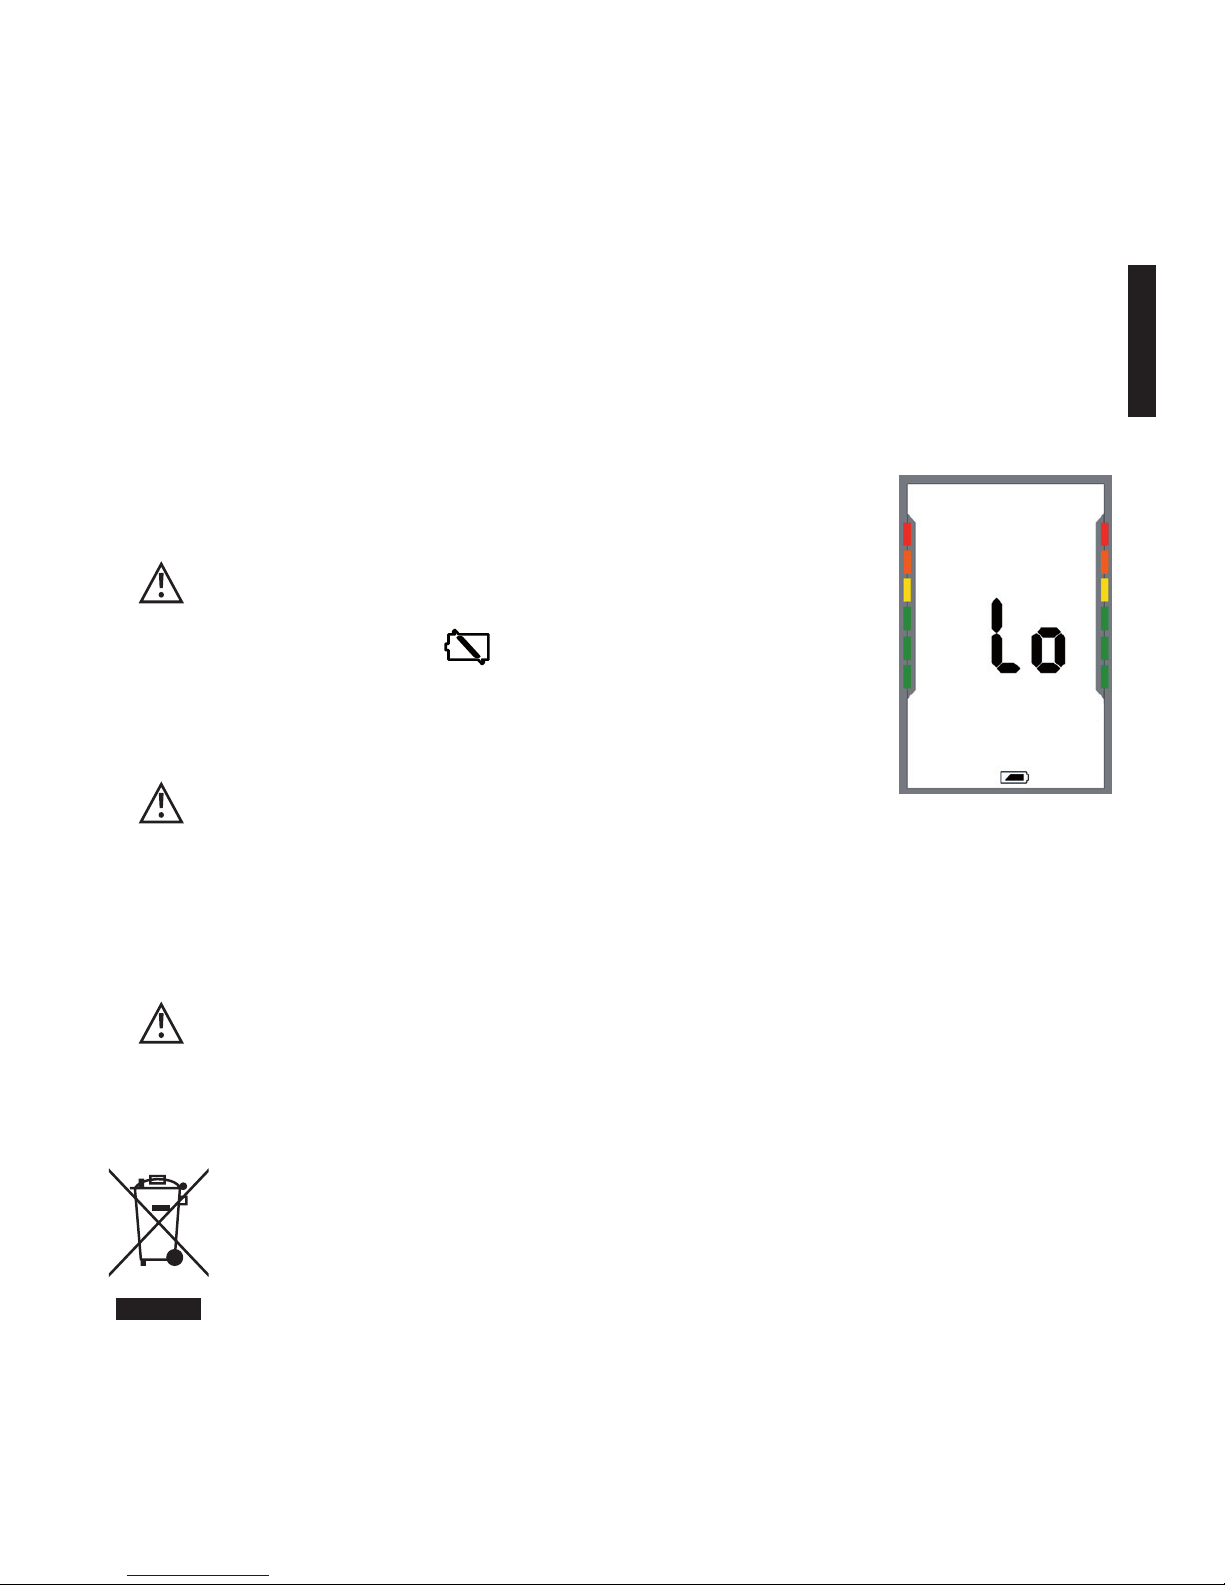
When the display shows the symbol for
low batteries please change them
all (see picture 1).
Please do not use rechargeable
batteries for this device.
When you do not use the device for one month or more
please remove the batteries in order to prevent them
from discharging automatically.
Measurement device, batteries and arm cuff have to be
disposed of according to the local regulation.
pict. 1

12
Setting time, date and average
Setting date and time from your device is important for using
storage or transfering results onto your computer.
The smartLAB®pro+ blood pressure meter uses a special function
to automatically set usersettings and function setup. A receiving
device (z.B. HMM hFon® oder hFon® Collect) that supports this function
is required.
The advantage of this automatic function is that you don‘t have to
setup the device manually. When there is a receiving device, after
rst-use or changing batteries, date, time and usersettings will be
set automatically in less then 4 minutes.
Now, data will be requested every hour. Information about batte-
rie status also is attached. So the receiving device receives battery
status and Information, if the device is in range. All this makes it
possible for the service-provider to offer a better service.
Please press the left arrow key more than 3 seconds to set date
and time. The mode starts now with the current year that you
have to choose by the arrow keys. Press button „On/Off START“
to conrm.
pict. 2

13
ENGLISH
After that you can choose the month. The display shows the letter “M”
(picture 2a). Use the arrow keys and conrm with the button „On/Off
START“.
Then you have to choose the right day (display shows „D“). Use the ar-
row keys for your choice and conrm with the button „On/Off START“.
After that you have to choose between „12h“ (am/pm) and „24h“.
Use the arrow keys to conrm (pict. 2b). If you chose “12h”, “AM” and
“PM” will ash on the Display, this will not happen in the “24h” clock
mode. Conrm your choice with the button „On/Off START“.
Then you can continue by setting the hour (use the arrow keys, see
pict. 2c). If you choose the mode “12h” the time is indicated by the
number 1 – 12 with “am” (morning) and “pm” (afternoon). Conrm
your choice with the button „On/Off START“.
pict. 2a
pict. 2b

14
Finally set the minutes in the same way (use the arrow keys and con-
rm your choice with the button „On/Off START“).
pict. 2c
After that you can choose (3,4 or 5 measurements) the average of your
measured values. Please use the arrow keys for your choice (pict. 2d)
and conrm with the button „On/Off START“. Your smartLAB®pro+
will then calculate the average results, based on your settings.
pict. 2d
Then the device starts again with the current year. You can stop the
setting by using the button „On/Off START“ for more than 3 seconds.
Your smartLAB®pro+ blood pressure monitor has an integrated ANT+
module. It enables you to transmit your measured values to your
personal computer, your laptop or your mobile phone (e.g. our HMM
hFon*). After that you can store, analyze and process your data with
the correspondent software.
What does ANT mean?
ANT is a wireless transmission standard for your measured values. You
need a module for your transmitter as well as for your receiver to use
this technology.
Setting up the wireless data transfer
15
ENGLISH
The Advantage of ANT+ is that equipment with ANT+ technology can
connect with other manufacturers receiving devices. smartLAB®pro+
supports the ANT+ protocoll for blood pressure meters (Version 1.0).
Please press „On/Off START” more than 5 seconds for the setting of
your wireless transmission („ANT mode“). In this mode you can set
the following items:
• Data transfer of the last measured value (dc)
• Data transfer of all values stored by the device (dc. A)
• Automatic data transfer of the last measured values (1 Au)
• Automatic data transfer of all values stored by the device (dAu)
• Pairing (setting of the communication with the receiver) (htb)
• Heart Beat (automatic settings of meter)
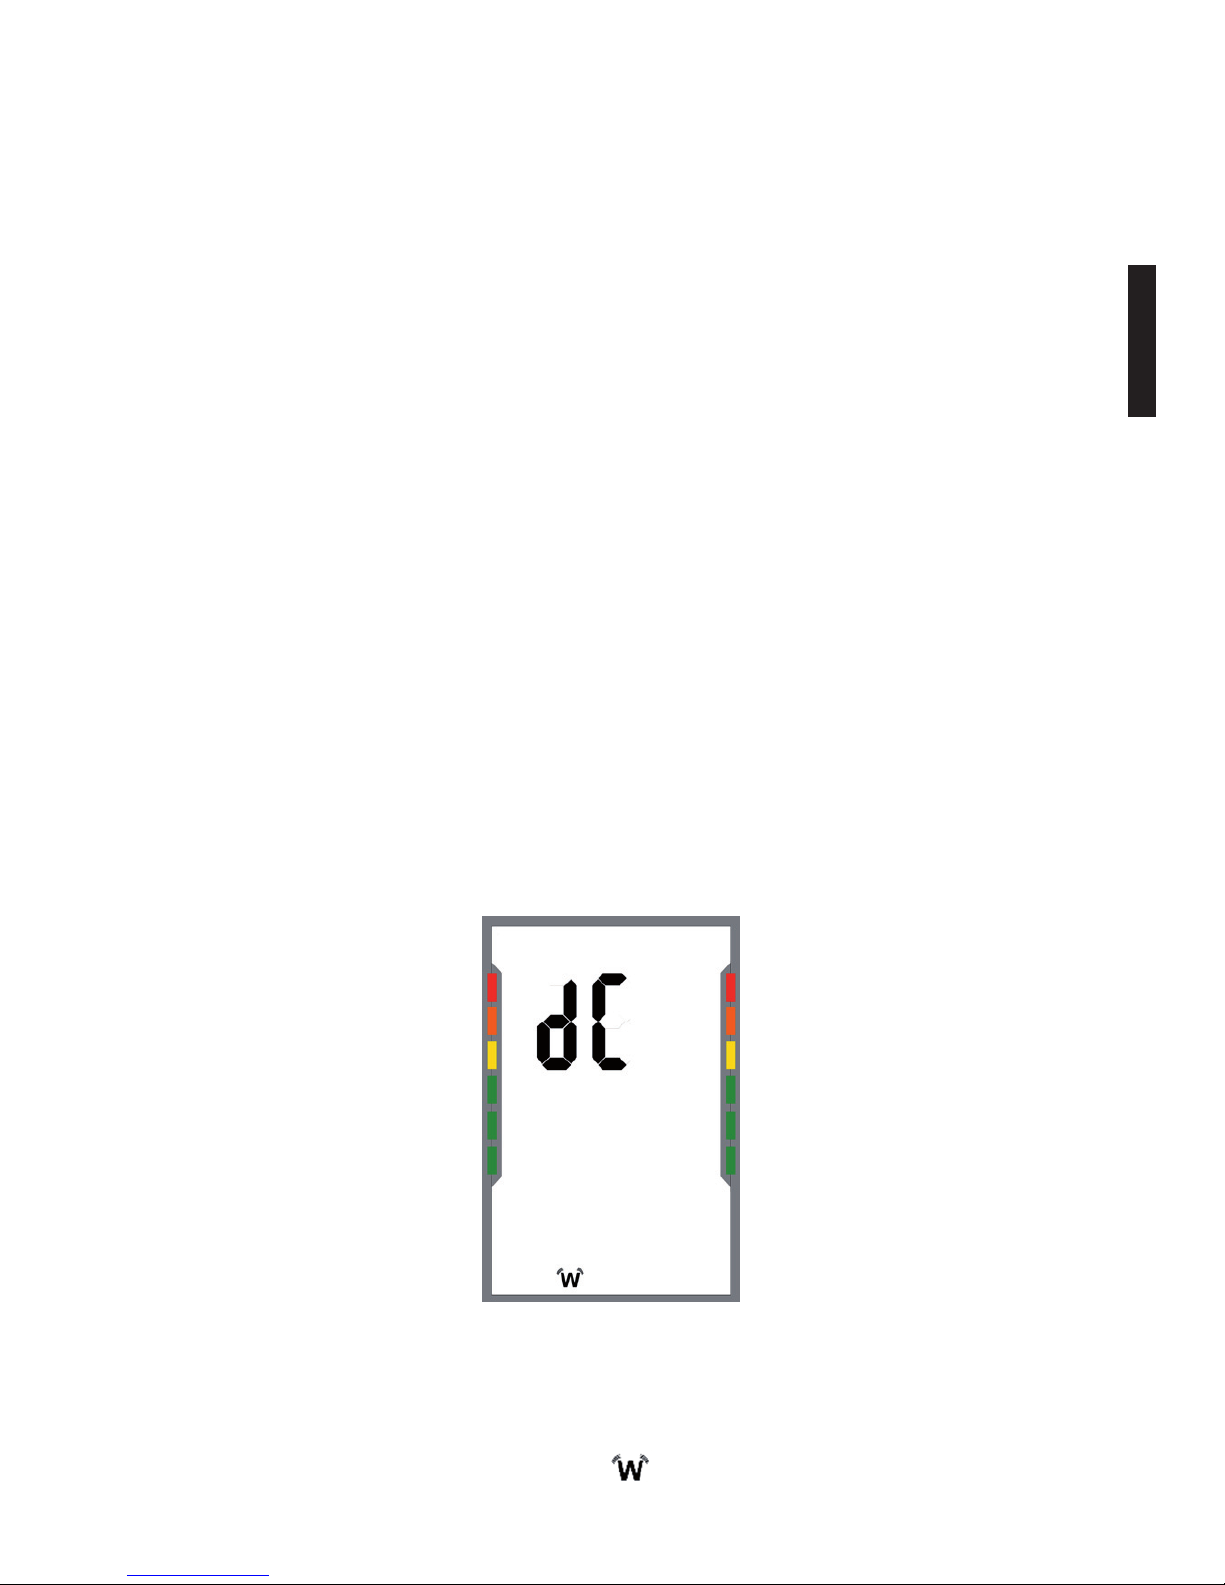
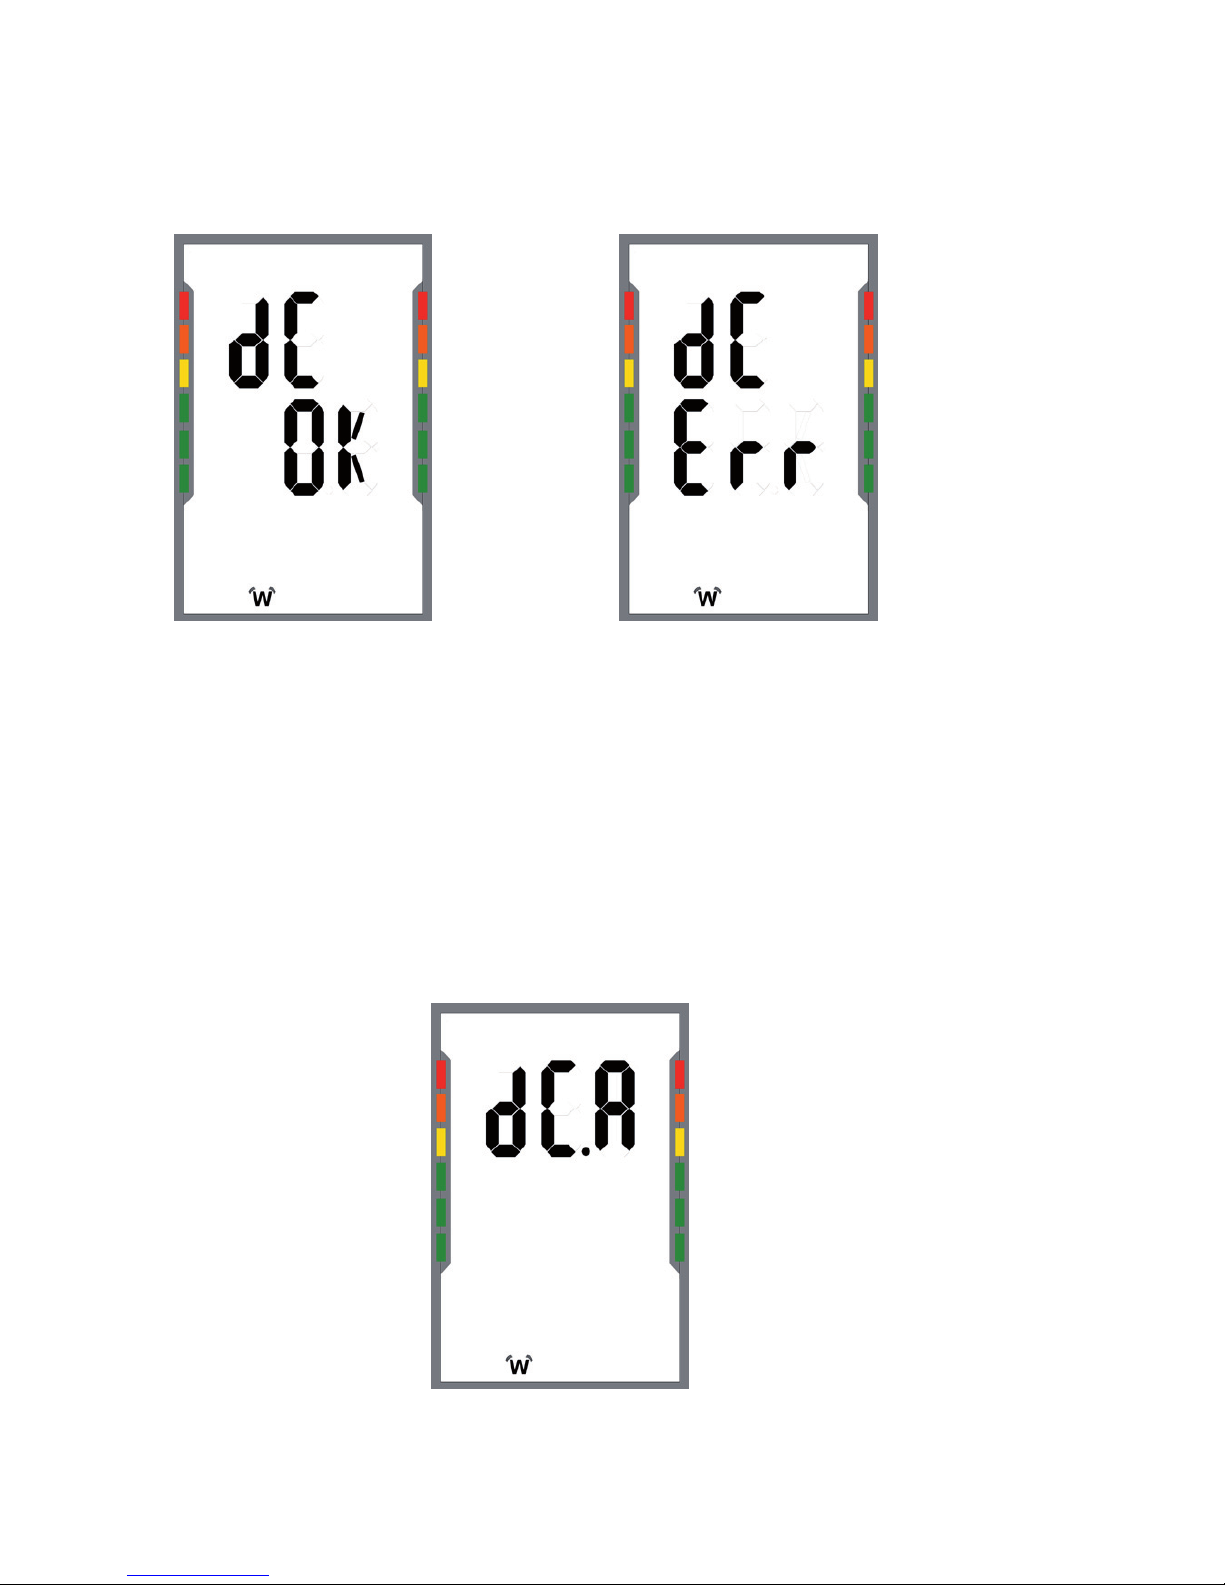
Data transfer of the last measured values (dc):
When you enter the ANT mode the display shows the data transmissi-
on of the last measured values (see pict. 3).
You can start the data transfer by pressing the left or right arrow key.
Your smartLAB®pro+ is going to try to transmit the last measured
values to your receiver (laptop, personal computer, hFon). The symbol
for the wireless data transmission is blinking in the display. If the
* For more information on hFon or hLine Terminal go to www.hLine.eu
pict. 3
16
data transfer was successful you can see the symbol (see pict. 3a).
In case the value could not be transmitted the corresponding symbol
appears on the display (see pict. 3b).
Please proceed by pressing the button „On/Off START“.
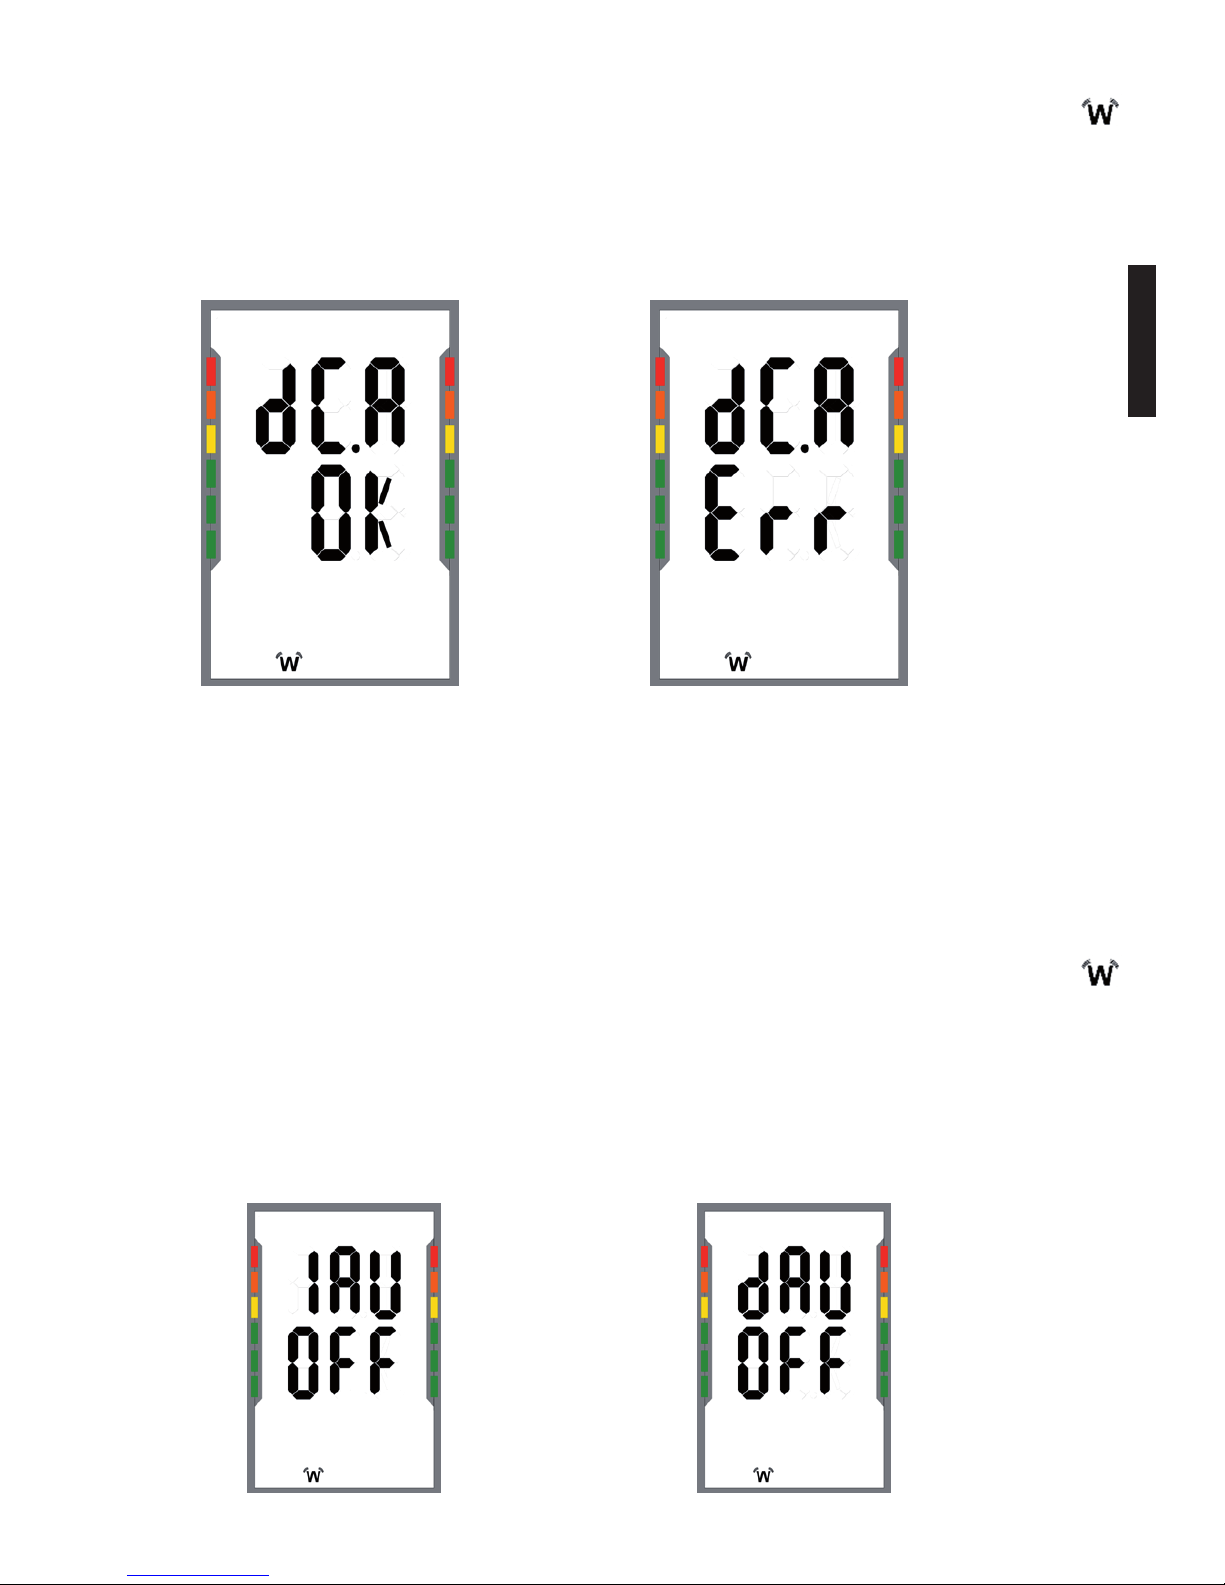
Data transfer of all measured values stored by the device (dc.A):
You can start the data transfer by pressing the left or right arrow key.
Your smartLAB®pro+ is going to try to transmit all measured values
to your receiver (laptop, personal computer, hFon).
pict. 3a pict. 3b
pict. 3c
17
ENGLISH
When you start the transfer of all data the corresponding symbol
in the display starts blinking. A successful data transfer is conrmed
by the symbol you can see in picture 3d. In case the data transfer was
not successful you will see the symbol of picture 3e.
Please press “On/Off START” to proceed to the next setting mode.
Automatic data transfer of the last measured values (1AU):
Please make your choice: Do you want the latest measured value auto-
matically to be transferred, turn the option either ON or OFF with the
arrow keys. If the mode is turned ON, the correspondent symbol
appears with every data transfer (see pict. 3f). Press “On/Off START”
to conrm your choice. All new measurements will then be sent out
automatically, when you are in reach of your receiving device (laptop,
personal computer, hFon).
pict. 3d pict. 3e
pict. 3f pict. 3g

18
Automatic data transfer of all values stored by the device (dAU):
Please make your choice: Do you want all unsent values stored on the
device to be automatically transferred to the partner device, turn the
option either ON or OFF with the arrow keys. If the mode is turned ON,
the correspondent symbol appears with every data transfer (see
pict. 3g). Press “On/Off START” to conrm your choice. All unsent
measurements will then be sent out automatically, when you are in
reach of your receiving device (laptop, personal computer, hFon).
Pairing (establishing a connection with a receiving device)
(PAr):
The pairing function is necessary to establish a connection between
the device and the receiving device. This guarantees that only the
receiving device can receive data from smartLAB®pro+ . It is
recommended to turn off this function after successful pairing. The
PIN Code for enabling communication is „8888“.
With the arrow keys you can either turn these setting options on (ON)
or off (OFF). Press „On/Off START“ to conrm your choice. The setting
(ON) is set by default.
Heart Beat (setting the device automatically) (htb):
The Heart Beat function is able to set the device automatically.
Every 3 minutes the device trys to connect to the receiving device
(the receiving device has to be compatible with this function). Was
the connection successful, the device will be set automatically. This
applies to all users. Another advantage is that, with this function, the
device sends its battery status to the receiving device, which can alert
the user when the battery should be changed.
With the arrow keys you can either turn these setting options on (ON)
or off (OFF). Conrm your choice by pressing „On/Off START“. The
setting (ON) is set by default.

19
ENGLISH
Abb. 3h Abb. 3i
Connecting the cuff to the monitor
Insert the cuff tubing connector into the
socket of your smartLAB®pro+ on the left
side of the monitor (see pict. 5). Make sure
that the connector is completely inserted
to avoid air leakage during blood pressure
measurements.
Applying the cuff
• Place the cuff around a bare arm 1-2cm above the elbow joint
(see. pict. 6)
• While seated, place palm upside in front of you on a at surface
such as a desk or table. Position the air tube in the middle of your
arm in line with your middle nger.
• Pull the cuff end through the metal loop (the cuff is packaged
like this already), turn it outward (away from your body) and
tighten it and close the Velcro fastener.
• The cuff should fit comfortably, yet snugly around your arm. Y o u
should be able to insert one finger between your arm and t h e
cuff.
pict. 5
pict. 6

20
Note:
• Use the same arm for each time you measure.
• Do not move your arm, body or the monitor and do not move t h e
rubber tube during measurement
• Stay quiet and calm for 5 minutes before blood pressure
measurement
• If the cuff becomes dirty, remove it from the monitor and clear
it by hand in a mild detergent, then rinse it thoroughly in cold
water. Never dry the cuff in clothes dryer or iron it.
Body posture during measurement
Sitting Measurement – Recommended Position
• Sit upright
• Place palm upside in front of you on a at
surface such as a desk or table, with your
elbow resting on a chair or table.
• The cuff should be at the same level as
your heart.
• Place your arm on the monitor’s plastic case as shown in the
picture, to aid maintaining a correct and still arm position.
Lying Down Measurement
• Lie on your back.
• Place your arm straight along your side
with your palm upside.
• The cuff should be placed at the same level
as your heart
• In case you move your arm and the monitor
is not able to measure correctly, the symbol appears on the
display.
This manual suits for next models
1
Table of contents
Other HMM Blood Pressure Monitor manuals


