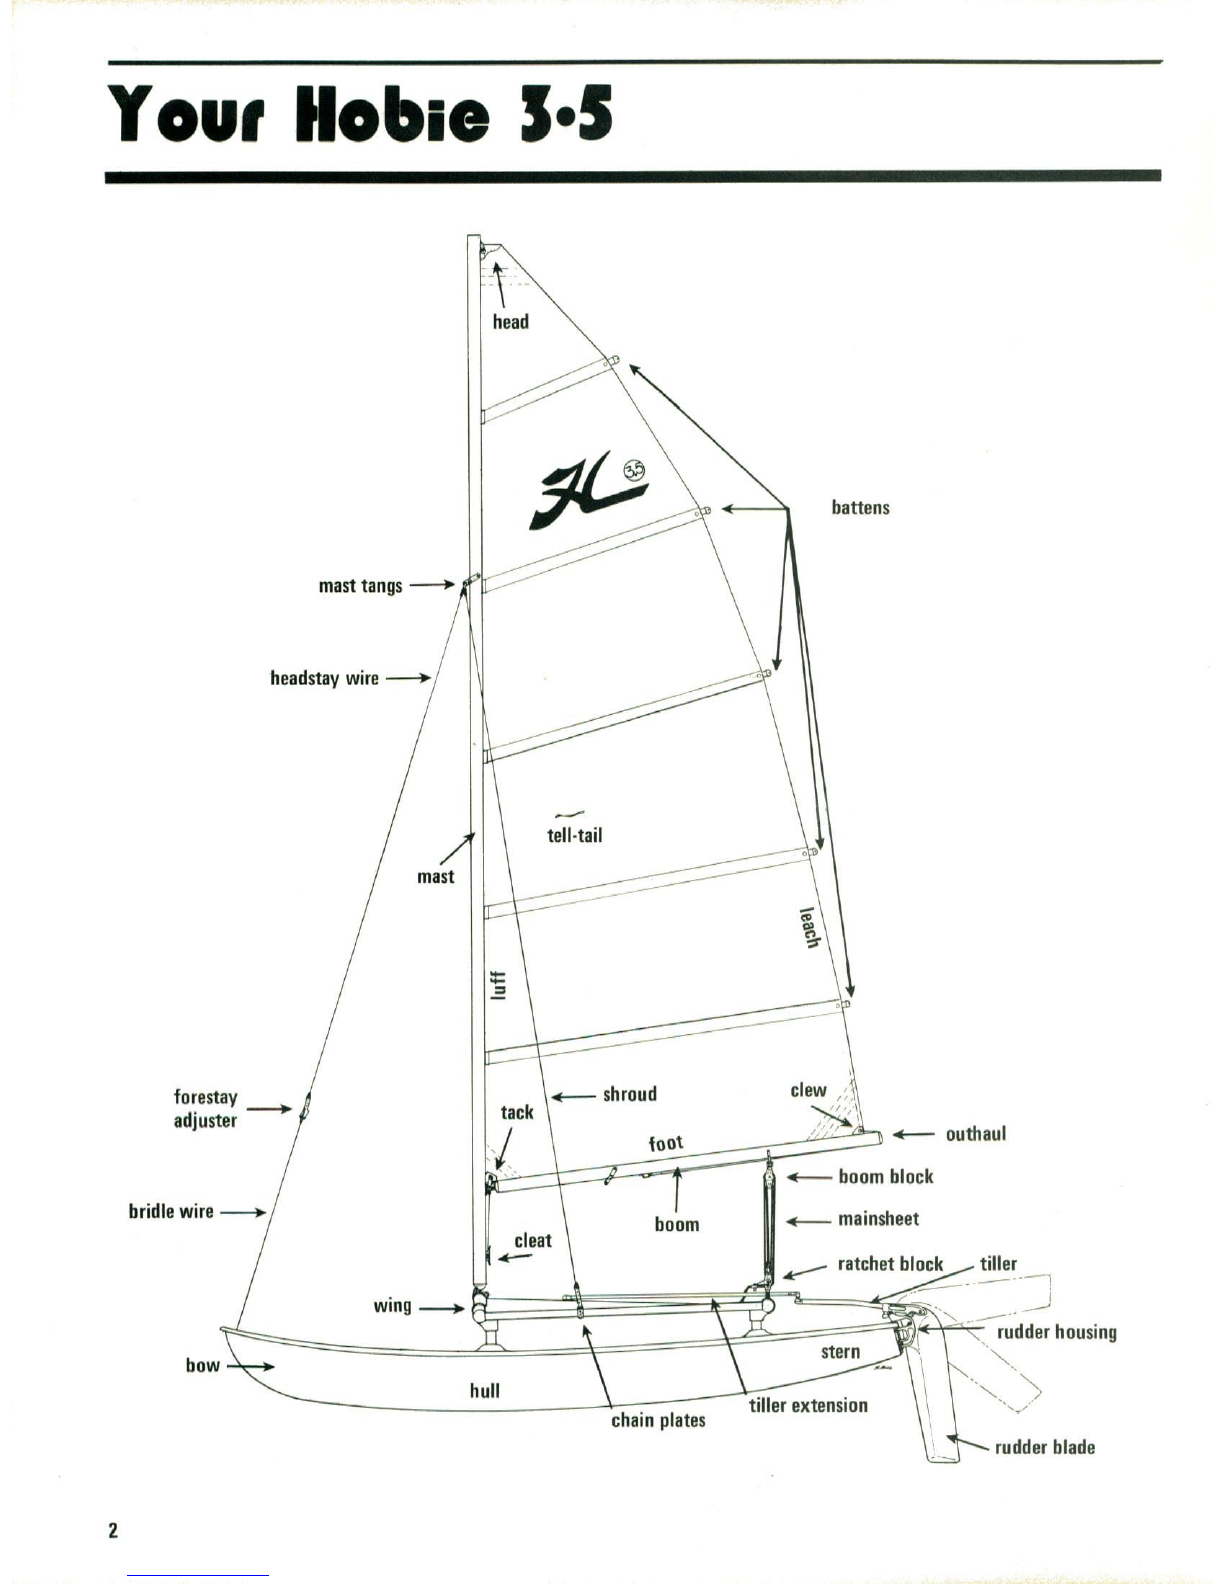
ilobie
3·5
#1036embly
=,MI.-/-•...-.-ZI--
.-,7.·.--I.«'.
·-
·
.-'-.'-
'
-
--
1.
1-*-<
1
.
I
I
-
t:=eis-*I.*.
.
.
4
:4*23/ik•(-4-bli
I
-..,·fli#-:..S·.1
1
£,6,-s:,44/4/
1
.·
I
--%
-
..,
-*Frac-i:Obki
=*46.
.--
gist'-•.i··'--i·:'i
laif;th7.·,&
.
;
I
--
....
1.--
I
.M.J.'Lifi:St:•#fj..
f.
7'ez...
.--=<:t--
-
b.-
-':•t'254··».':71.C..r"
•
.
..
...
:\<••••30-:•A
"-»9·ki:Zti"
59<
I.-·,·:.·i·,1'-·':·1.<·,-
":-
.1042't97/42fb-,•
1
'
•S%•::Bre.i
E-:•E.•.•4•-'.69::•fC
:
2.•=,A
c...·.j·.'-5,3:'.,·442C.-f·3/.:'64.fh-7.·'•,'·:9,•I.-1
f.•p<i••••••il..'••'',•ikZ•4*1•-:.I••:)
'-••••
A:mi•
r.:.:k.142.':,7»*c-f.".•...•ifN.J
.
//wzid.·M'
·'·,-t.
'
·:b=3
':..1,4
3·r,'.Zi
:>R....:,
1.-,-r.1....
t..39,-'.,s.'.,dr••3*.-.arfeam,&44•6..:E*6--
£·
•7..&4•u•*:.&FAit's,2·.,·ig•bi••v,-,•:•t
:4144<•49*:bis:1*,32:7':7111.f..1
52*2>3,•f;X.S
3.*#0"-4••2·-P,99·S:'',14"I"dir,··,:i<.9»24132<:13.6-2.'a..ki•i8-'..:efe
:261,+
..:
i.ie.
I.I
4
0....AL,
L.i..,
*.4:•8*.573',•.1-i.i.45'.•Fl.'.;,s
);•:1*,.s·¥,ittft'.4
:I:•,-,*,
S
'.,036
.6......."MY.254•3:,
:'te.;61
-1.·-
i
.4,··
-'·•6,·•·7·.'··•7·
·r·.'1.•;
il:'·•.ilpA•r•.••e/·.1,A.....A
ill.jifw•#,3-JiTTifi'.6516&b•Aff,Ikk••Eag#,il.ilia,ilialaj':2
23•42:·9.2.2#9*2.2*SPRZJKrfiV
):,g'•rafiwetjitif:Pifi
)2fic42(1ui,lihic.2'/LIC.£5
.
:
I
.:/:
--
,
S
.'.
.18•
I..,Ci-'E,
•..
. .
.·2:-iID.·-
:AS·:..0.
.....
·
;11
'.f:
f-:LiB.1
1'JJ/.':
--=::2.--*<;92<*
..
....
...
'.
..
....#-le.
. .
•
,
-•,1»
in:
vis<tri.
ICK,BETAL.
Str::52
.
:,
-
I
.
I.
,
:•A
t...'.9.\
•yi.L:-•:)1.-•1••&-•••&f-•:•6-•-
;:•I:*:
•..
1/
,/
.1
.
1
-.....,0,"le/8,1,;"I....7/4#ZZI.
·
ippir..r.-Der....
.....
1
-
4
,
.,·:.:,5.:,u
-2\,
1
'4-U..<2.:25.:•
:L:··:4•%z,•.:..f;..:i..:.Si
\I.
>,i·,·
4.j
...1
.Hug.r.
-\73,
.
..........
-:,r.:
\
'
-
.
•....
'-*te.
·.'...4:1.52:32.9.-t.•.,S-;·.:...
...
I .. .
I
.....
.036e•
I....I'.
•
5.t•
I....J.%.,A
E
13'7'
•
.,i.,Fl-:.-i
./4..
1.70'HEr
).<3'33<2:AB#*f,•4':.:.
e,4
-:.6.:.·LS
..
·4£•tti
'4
-
4..
.
liwi•i•.i;l
.1/
\3•1..:...5.•.
le.
·:
·•.....:.·.·-I.......'
·.
:i
':.:,..,.:.'·\-6,.'
\1
lillilllilllllllalllilillllillillmllfil.Pers##i.:A#is•:5-4.El,PE
E.s:6,•31
•9,2
L.
1,3.,4.:L..4
-c,47:'i-:6...8.•:t:,t.--5.VEN..fit.•:.•.#.4
-,-
.:.
6·.,·fi•rt.,'...:3..
:1
C.zi.036:,
t'·'
-'·<",
4
-
-:•..,0.....<
.:.•
'4=j'..Nf•.0.(6,3,-fif:.;:.i,
;.WI..
;
1
.'
'il•:3:':M,).';1,2457&:·(If'&•'.W·'Bi,;•:•521.
:'..·-t·
·":.
-.
•..vAl
In
the
hull
container,
you
will
find
the
trampoline,
sail
and
a
box
containing
the
rig
kit
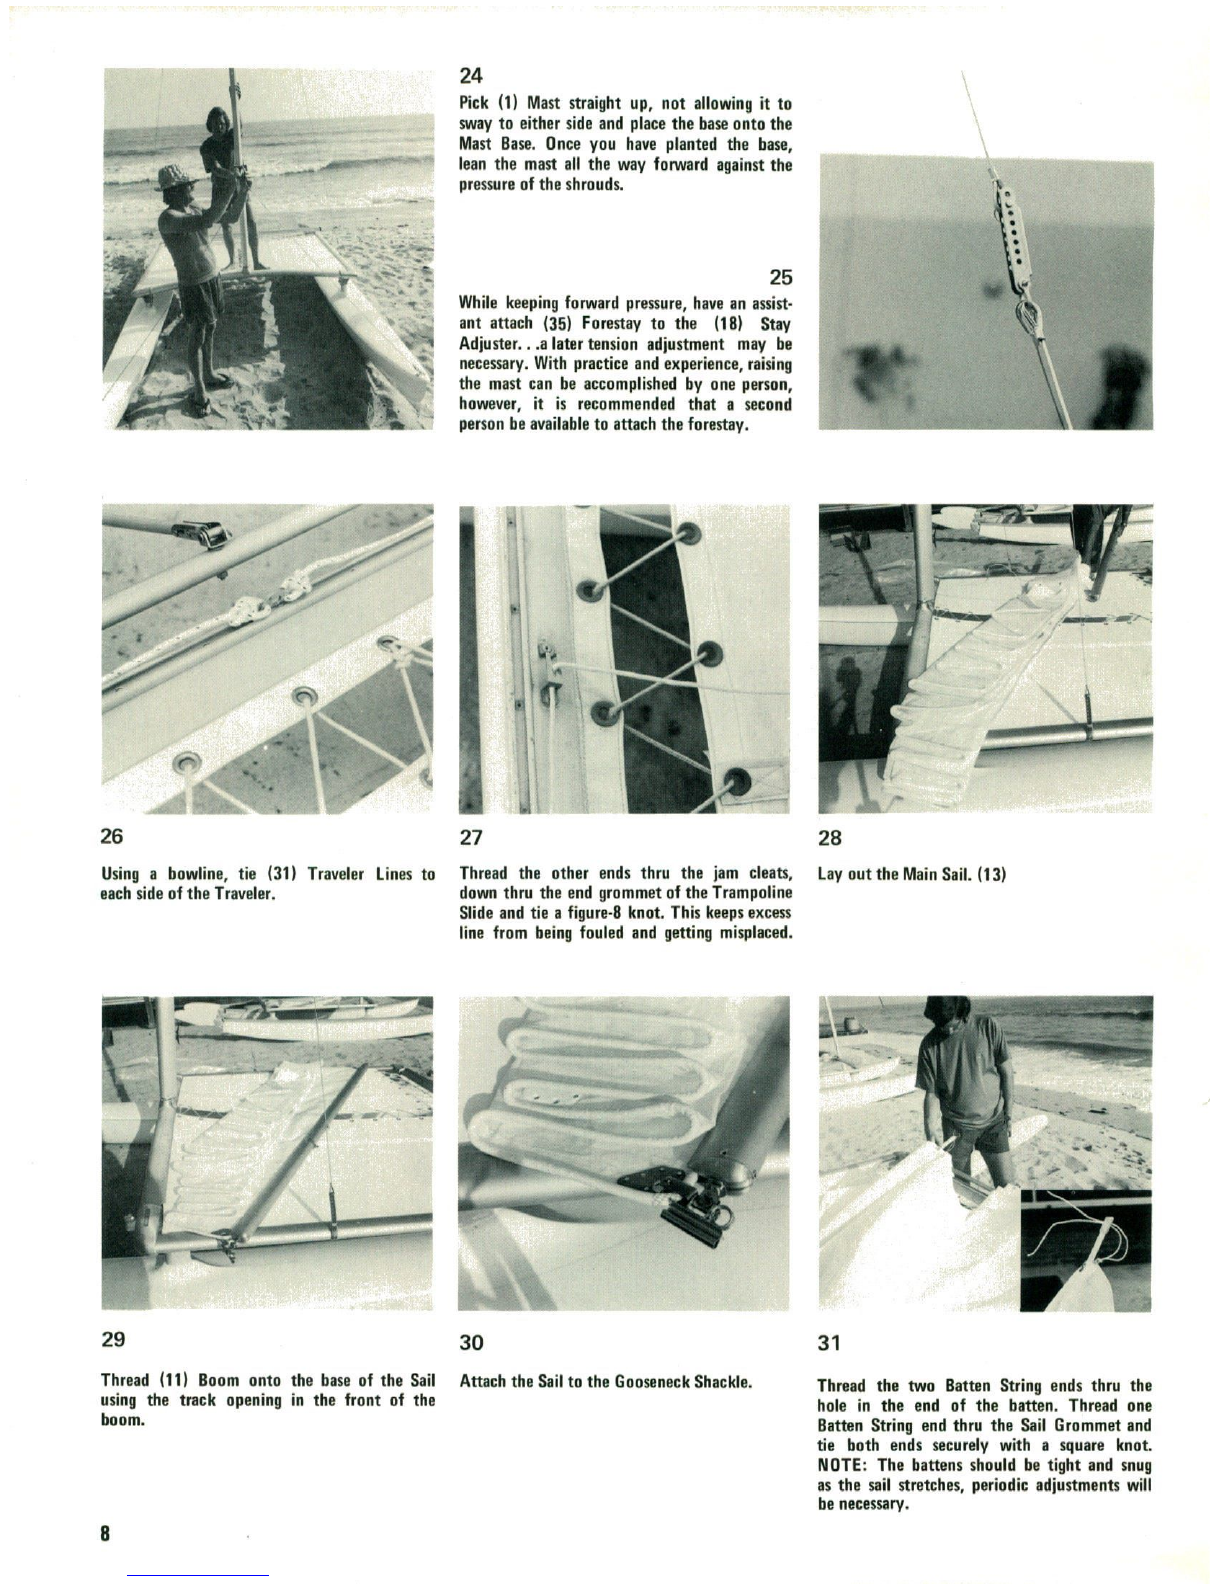
Lay
out
all
the
components
as
shown.
NOTE:
The
flat
side
of
the
hulls
should
be
facing
outward.
r.
P.I....:-:'
-d
8--...f....t./.
t
i
:....:..1
'1•.;
i
,
".
I.
3
ASSEMBLY
#s
DESCRIPTION
ASSEMBLY
#s
DESCRIPTION
1.
MAST
8.
STARBOARD
SIDE
BAR
2.
STARBOARD
HULL
(Right)
9.
PORTSIDE
BAR
3.
PORT
HULL
(Left)
10.
FRONT
CROSSBAR
ASSEMBLY
4.
STARBOARD
RUDDER
ASSEMBLY
11.
BOOM
5.
PORT
RUDDER
ASSEMBLY
12.
TRAMPOLINE
6.
TILLER
CROSSBAR
ASSEMBLY
13.
SAIL
'
7.
REAR
CROSSBAR
ASSEMBLY
14.
BATTEN
SET