Hobie PEARL User manual

Ref:MMPEARLAuthor:SDDate:03/04/2009Up‐date:0Page1/29
HOBIECAT«PEARL»ASSEMBLYMANUAL

Ref:MMPEARLAuthor:SDDate:03/04/2009Up‐date:0Page2/29
HOBIECAT«PEARL»ASSEMBLYMANUAL
TABLEOFCONTENT
Partslist ...........................................................................................3
Cables.......................................................................................4
Linebag&rigbag ....................................................................5
Gennakerriggingparts ............................................................6
Hullconstruction..............................................................................7
Trampolineassembly.......................................................................8
Rudderassembly............................................................................11
Tillercrossbarandextension.........................................................11
Mastpreparation...........................................................................12
SpeaderBars ..................................................................................13
MastSetUp ...................................................................................14
Steppingthemast..........................................................................15
Trapezes.........................................................................................16
Mainsail.........................................................................................17
Cunningham...................................................................................18
Boom..............................................................................................19
Mainsheetsystem..........................................................................20
Furlingjibassembly .......................................................................22
Gennaker .......................................................................................24
Towingdevice ................................................................................27
Wingassembly(option).................................................................28
Caution&safetytips......................................................................29

Ref:MMPEARLAuthor:SDDate:03/04/2009Up‐date:0Page3/29
HOBIECAT«PEARL»ASSEMBLYMANUAL
Itisadvisabletohaveatleast
2peopletoassemble
theHobieCatPearl
Toolsnecessary:
2wrenches‐No.17‐2wrenches‐No.10
1pairofuniversalpliers
PARTSLIST
Hulls(2)
Frontcrossbar
Rearcrossbar
Mast
Boom
Trampoline
Wirebag
Partbag
Ropebag
Gennakerriggingparts
Rudderassembly(2)
Tillercrossbar
Tillerextension
Mainsail+battens(7)
Furlingjib
Trampoline+rod
Gennaker+pole
CAUTION!DANGER
ALUMINIUMMAST
STAYAWAYOFELECTRICALWIRES

Ref:MMPEARLAuthor:SDDate:03/04/2009Up‐date:0Page4/29
HOBIECAT«PEARL»ASSEMBLYMANUAL
PARTSLIST
WIRES
1. 2Shrouds
2. Ø8schackle
3. Pigtail
4. Furlingjibswivel
5. jibhalyardblock
6. Forestaywire
7. Jibhalyardwire
8. 2trapezewires
9. Diamondwire
10. 2Bridles
11. Jibfurler
12. Polesupportbridle
13. 2trapezesets(4elements)
1
2
3
4
5
6
7
8
9
10
11
12
13

Ref:MMPEARLAuthor:SDDate:03/04/2009Up‐date:0Page5/29
HOBIECAT«PEARL»ASSEMBLYMANUAL
1
2
34
5
PARTSLIST
ROPES
1. Reartrampolinelacingline
2. Jiblufftensioningline
3. Jibsheet
4. Jibhalyardrope
5. Rightingline
RIGGING
1. Spreaderbarassembly(2spreaderbars)
2. 2drainplugs+watertightgaskets
3. 2Tillerconnectorkits‐TCM
4. Maincunninghamblock
5. 2maincuninghamblocks+shackle
6. Maincunninghamrope
7. 2Stayadjustercovers
8. 2stayadjusters
9. Assemblyfortwoadjusters
10. 2stopballs
11. Boomattachmentsplint
12. Gooseneck
13. 2jibclewblocks+hook
14. Mainsheetsystem(topblockwithhookandratchetblock)
15. Hawaiianrightingkit

Ref:MMPEARLAuthor:SDDate:03/04/2009Up‐date:0Page6/29
HOBIECAT«PEARL»ASSEMBLYMANUAL
2 3
4
5
1
6
7
PARTSLIST
Gennakerrigbag
1. Gennakersheetline
2. Gennakerhoistingline
3. Gennakertensionningline
4. Gennakerfurler
5. 2gennakerblocks
6. Gennakerhalyardwithswivel
7. Swivel

Ref:MMPEARLAuthor:SDDate:03/04/2009Up‐date:0Page7/29
HOBIECAT«PEARL»ASSEMBLYMANUAL
HULLCONSTRUCTION
1. Positionthehullsparalleltoeachotherasinthephoto.
NB:Itisadvisabletoputsomepaddingunderthehullsto
preventscratchinganddamage.
Lifttherighthull.Onepersonstraddlesthehulltoholditin
anuprightposition.TheotherpersonappliestheSilicone
sealant(forwaterproofing)aroundtheboltholesinthedeck
saddles.
2. Takethefrontcrossbarandremovethe2nuts(onestainless
washerandonenylonwasherfromeachbolt).NB:itis
advisabletoplaceasmallamountofgreaseoneachbolt.
3. Ensuringthatthetrampolinetrackfacestherearofthe
catamaran,Positionthefrontcrossbarinthedecksaddle
andpushtheboltsintothe
holes.Reachinthroughthe
inspectionportandpositionthe
washersandthennutonthe
threadofeachbolt.Tightenthe
nutsbyhandorlooselywiththe
#17wrench‐Donotover
tightenatthisstage.
NB:Respectthesameorderof
thewashersastheywereputon
theboat.
4. Lifttheporthull,andrepeatthe
mountingprocess.
5. Installtherearcrossbarnowinthesame
mannerasthefrontcrossbar.Verifythatthe
trampolinelacingpostsfacetherearofthe
boat.Nowusingthe#17wrenchtightenall8
nutsandboltssecurely,theninstallthelock
nuts.
NB:Checkallnutsafteryourfirsttimeonthewater
andafterwardsonaregularbasis

Ref:MMPEARLAuthor:SDDate:03/04/2009Up‐date:0Page8/29
HOBIECAT«PEARL»ASSEMBLYMANUAL
TRAMPOLINE
Thetrampolineispre‐equippedwithgennakerandjibtensionadjustersthatwillbeeasilyconnectedto
bothfurlers.
Putthetrampoline
withthereverseside
up,andyouwillsee
thegennakertension
adjusterinblack
(photoontheleft)and
thejibtensionadjuster
inwhite(photoonthe
right).
Taketheendofeach
lineandthreadit
throughthe
trampolineeyelet
facingtherespective
furler.
Youcannowmount
thetrampolineontotheframe.

Ref:MMPEARLAuthor:SDDate:03/04/2009Up‐date:0Page9/29
HOBIECAT«PEARL»ASSEMBLYMANUAL
TRAMPOLINE
1.
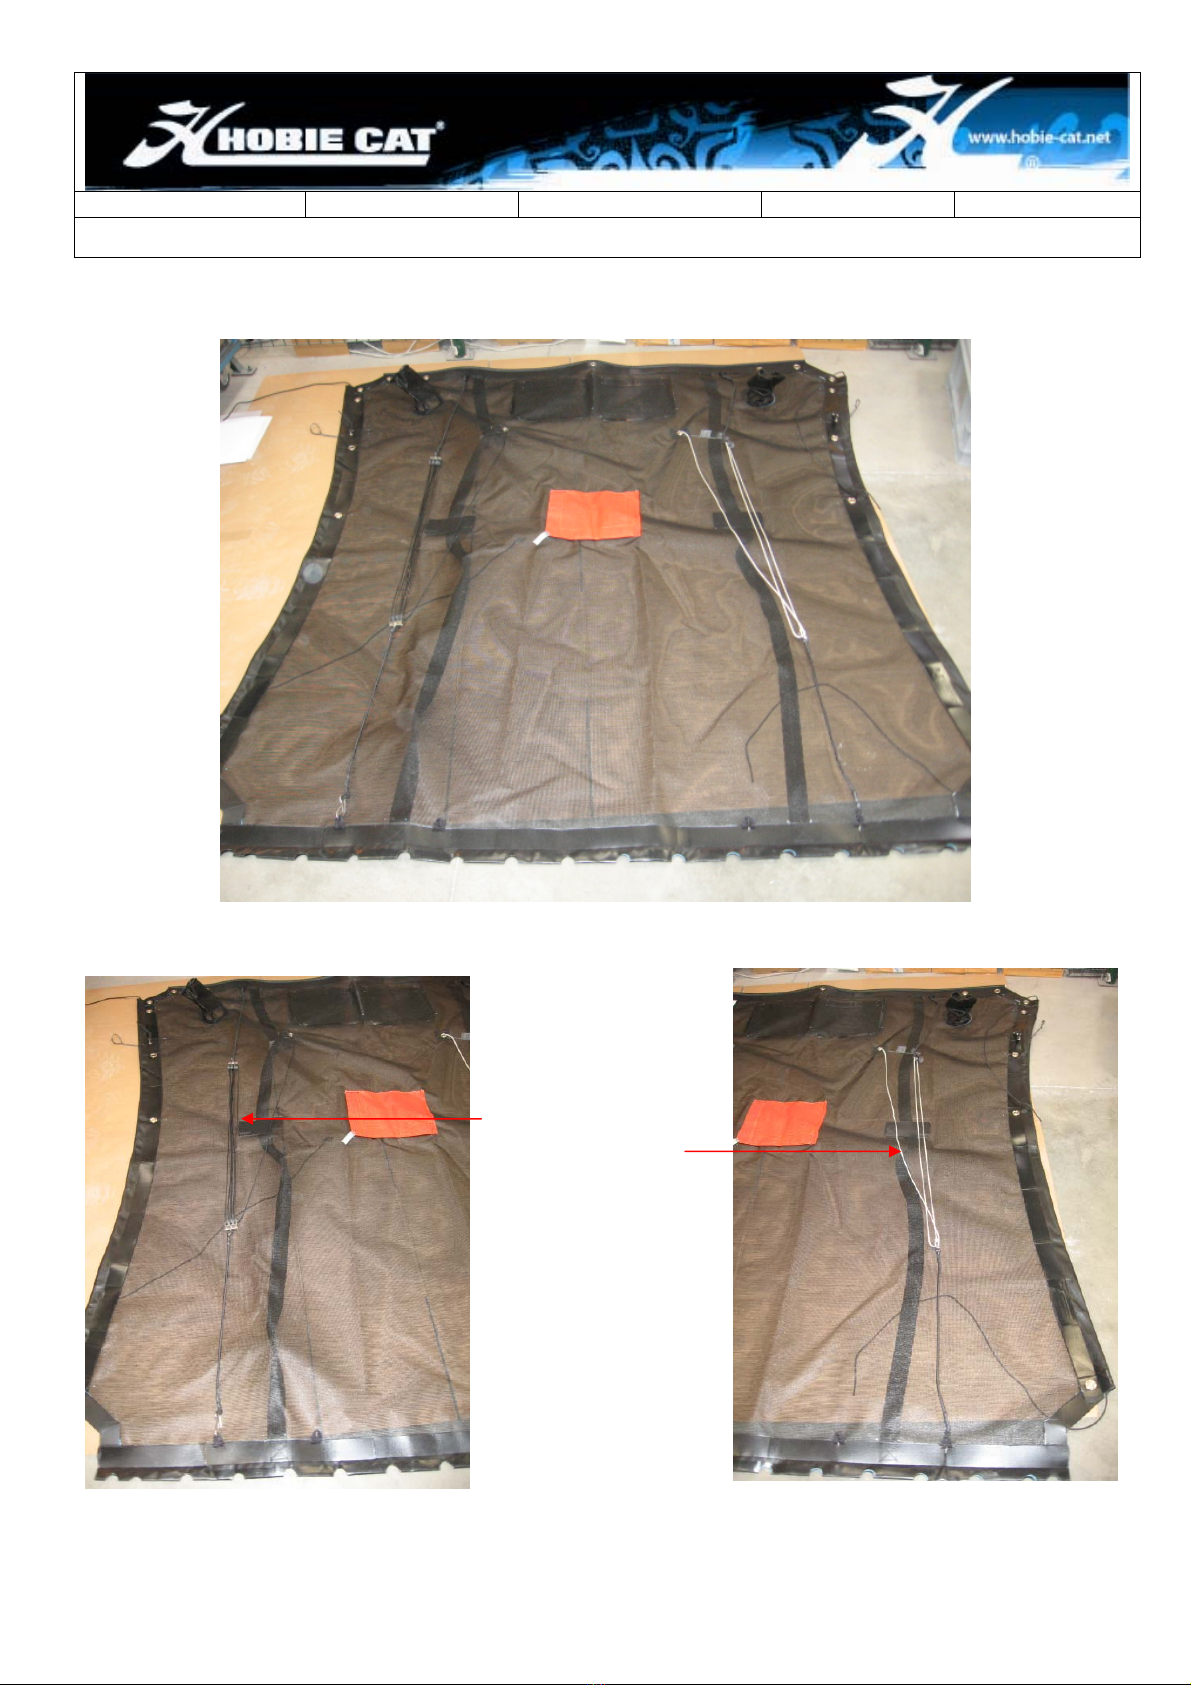
Unfoldthetrampoline.Notethatthetrampolinehas
sidetensionlinesthatarealreadypre‐threaded.Insert
thefrontedgeofthetrampoline(thesidewiththe
pocket)intothetrackattheleft,rearsideofthefront
crossbar.Continuefeedingthetrampolineintothe
trackandpositionitinthecentre.Lineupthegrommet
inthecentreofthetrampolinewiththedolphinstrikerpost
toensureitiscentred.
2.
Takeoneofthesidetensioninglinesandpasstheline
throughthepad‐eyethatisfixedtothefrontcrossbar.Then
tiethelineontothegrommetofthetrampolinewitha
bowlineknotneartowheretheropecomesoutofthe
trampoline.Repeatthisstepontheoppositefrontside
corner.
3.
Movetotherearofthetrampoline.Tiealoopveryclosetowheretheside
tensioninglinecomesoutoftherearofthetrampoline.Ensurethatyoupullthe
sidetensioninglinefirmly,inordertotietheloopascloselytowheretherope
comesoutofthetrampolineaspossible.Tieabowlineorasimilarloopintheline
whichwillbeusedasa4:1forcereductiononthesidetensioninglines.Repeatthis
stepfortheoppositesiderearcorner.
4.
Nowtakethetaleofthesidetensioninglineandpasstheropethroughthepad‐eye
mountedontherearcrossbeamclosesttowherethelinecomesoutofthetrampoline.
Thenpassthelinebackthroughtheloopmadeinstep3.Gothroughthepad‐eyeonthe
beamagainandbackthroughtheloop.
Thiswillprovidea4:1forcereduction.Pull
thelineslightlytogivesometensionon
thesidesbutdonotcompletethetension
atthisstage.
Repeatthisstepfortheoppositesiderear
corner.Ensurethatthetrampolineisstill
centred.

Ref:MMPEARLAuthor:SDDate:03/04/2009Up‐date:0Page10/29
HOBIECAT«PEARL»ASSEMBLYMANUAL
TRAMPOLINE
5.
Insertthetrampolinerodintotherearofthe
trampoline.
6.
Startbylacingtherearofthetrampoline.
Thelacinglinestartsattheleft,rearlacing
buttonontherearcrossbar.Lacetherearof
thetrampolineastightlyaspossibleasin
thephotographsanddiagramssupplied.
Continueacrosstherearcrossbarandtieoff
securelywhenfinished.
7.
Onceagain,takethesidetensioninglineandpullthelineveryfirmly.Oncethatit
isastightaspossible,tieoffthelinewithanadequateknot.Repeatthisforthe
oppositesiderearcorner.
8.
Oncethesidetensionlinehasbeentiedoff,usingthelongtail,passitbackthrough
thegrommetattherearcornerofthetrampolineneartowherethesidetensioning
linecomesoutofthetrampoline.Thenpassthelinethroughthepad‐eyeontherear
crossbar.Passthetailthroughthegrommetonthetrampolineagainandpullthe
linefirmly.Oncethesidesofthetrampolinehavebeenfurthertightened,tieoffthe
lineandtuckthetailunderthetrampoline.Repeatthisstepfortheoppositeside
rearcorner.
Itisimportantthatthetrampolinebestronglytightened.
Checkthetensiononaregularbasis.
beginning

Ref:MMPEARLAuthor:SDDate:03/04/2009Up‐date:0Page11/29
HOBIECAT«PEARL»ASSEMBLYMANUAL
RUDDERASSEMBLY
1.
Identifytherudder
assemblies:
‐greensticker=starboard;
‐redsticker=port.
2.
Taketheportrudderassembly
(red)andalignthelower
castingonthegudgeononthe
lefthull.Taketherudderpin,
removethesplitring,and
inserttherudderpinthrough
thecastingandthegudgeon.
Putthesplitringbackatthe
bottomoftherudderpin.
Repeattheprocedureforthe
starboardrudderandhull.
3.
Identifytherighthandendofthetillercrossbar.
(sticker«right»).Fastenittothetillerconnector
atthefrontoftheleftrudderarmusingthetiller
connectorkit(photobelow).Placethepartsas
shownontheleftphoto.Theresultshouldbeas
ontherightphoto.
Repeattheprocedureforthelefthandside.
4.
Fixthetillerextensioninthecentreofthetillerbarusingthepinattachedtothetiller
extensionandinserttheplasticloopoverthepintosecureit.

Ref:MMPEARLAuthor:SDDate:03/04/2009Up‐date:0Page12/29
HOBIECAT«PEARL»ASSEMBLYMANUAL
MASTPREPARATION
1.
Placethemastontotwo
supports(eg:twopiecesof
polystyrene).
Unrollthetrapezewiresand
fixthemusingashackletothe
upperholeonthemasttang
(twooneachside).The
trapezethimblesshouldbe
inserted2directlyaroundthe
shacklepinand2aroundthe
shackle(seephoto).
2.
Unrolltheshroudsandthe
forestaywire(withthejib
halyardblock)andfixthemto
thelowerholeofthemast
tangusingashackle.The
shroudsgoontoeachsideof
theforestay.
IMPORTANT:Attachthejibhalyardropetothesmallsingleblockattheend
ofthejibhalyardwire(seeredcirclebelow).
3.
Attachthegennakerswivelonthetangatthetopofthemast
4.
Fastenthegennakerhoisting
line(n°2page6)ontothegennakerhalyard(n°6page6)usingabowlineknot
(asshownonthephoto).
Fixthelooseendstothecleatatthebottomofthemast.

Ref:MMPEARLAuthor:SDDate:03/04/2009Up‐date:0Page13/29
HOBIECAT«PEARL»ASSEMBLYMANUAL
SPREADERBARS
1.
Unrollthediamondwires.Attachthe
jointendofthediamondwiresonto
theturnbuckleadjusternearthebase
ofthemast(levelwiththesecurity
sticker)usingthepinandsplitring.
Takethelooseendsofthediamond
wiresandholdtighttoadjusttothe
samelength,usingtheturnbuckle
adjusterwhichislocatedonthelower
sectionofoneofthewires.Oncethey
arethesamelength,attachthetwo
wirestotheshieldplatessituatedon
eachsideofthemastunderthemast
tang.
2.
Assemblethespreadersonthecentreofthe
mast.Thespreaderrootattachestothe
frontofthemastsectionontotheone‐piece
stainlesssteelstrap.Thespreaderrake
adjusterbarrelattachesoneachsidetothe
individualfittingsonbothsidesofthemast
nearerthesailtrack.Toadjustthespreader
rake,adjustthelengthofthebarrel(by
windinginorout)andmeasurefromthe
wirepositionsatthetipsofeachspreader.
Caution:donottrytoadjustspreaderrake
whilediamondwiresaretensioned.Only
adjustwithnodiamondwiretensionandby
screwingthebarrelbyhand.
3.
SlidethediamondWiresintothecorrespondingslotsattheendofthe
spreaders.Ensuretheblackplasticrollerisabovethespreaderarm.It
maybenecessarytoreleasetensionfromthediamondwireturnbuckle
adjusternearthebaseofthemast.Securethediamondwirewiththe
thinwiresupplied.Passthewirethroughthesmallholenearthe
spreadertip,bendthewireandononesideofthespreaderturnthe
wirearoundthethickerdiamondwirestwoorthreetimes.Dothesame
fortheothersideofthespreader.Cutofftheexcessthinwireensuringit
isbentneatlyontothediamondwiresastopreventthewirefrom
tearingthesails.Oncesecured,tapeoverthespreadertipstofurther
ensuretherearenosharpedges.

Ref:MMPEARLAuthor:SDDate:03/04/2009Up‐date:0Page14/29
HOBIECAT«PEARL»ASSEMBLYMANUAL
MASTSETUP
1.
LocatethebridlewiresandJibfurler.Fasten
thebridlewirestothebowtangsoneachhull
and,afterensuringthattheyarenottwisted,
fastentheinnerendsofthebridlewirestothe
Jibfurler.
Ensurethattheholeinthefurlerdrumcoverispointingtowardsthefront
crossbar.Now,windthefurlerdruminaclockwisedirectiontoprimethe
furler.
Leaveenoughlinetoreachthefurler'V''jamcleatmountedontherearof
thefrontcrossbar.
2.
Placethemastassemblyontopoftheplatform(onsomepaddingorfoam
topreventdamage)withthesailtrackunderneathandthemastbase
towardsthefront.Separateoruntwistallofthewiresandlaythe
correspondingshroudandtrapezesdowneachsideoftheboat.
3.
Pinthestayadjusterstothetwisttogglesandthenpinthetwisttogglesto
theshroudanchorpins.Ensurethattheadjustersarefacinginaforeand
aftdirection.
NB:Forinitialrigging,pintheshroudsintoanyofthe3topholesineach
adjusterandthetrapezewirescanbelefthangingloose.
Thetrapezescanbeconnectedoncethemastisupandtheshroudposition
inthestayadjusterscanbechangedtoaltermastrakeandtension.

Ref:MMPEARLAuthor:SDDate:03/04/2009Up‐date:0Page15/29
HOBIECAT«PEARL»ASSEMBLYMANUAL
Manque photo
Manque photo Manque photo
STEPPINGTHEMAST
CAUTION:ALUMINIUMMAST–DANGER
Lookaroundandmakesurethattherearenopowerlinesorotherobstructionsthatthemastmaycomeincontactwith.
Forthefirstfewtimes,threepeoplewillmakeiteasierandsafertoraisethemast
1.
Removethenut&boltfromthefrontofthemastbasecastingbutkeepthemhandy.Now,
pickupthemast‐onepersonatthehead,one
atthebase.
2.
Walkthemastbackandrotateit90degrees.
Placethemastbasecastingoverthemaststep
ballandreinstalltheboltandnut.Thiswill
preventthemastbasefromjumpingoffthe
maststepball,checkagainthatallwiresare
nottwisted,tangledorcaughtunderthe
ruddersandthattheforestayisfree.
3.
Onepersonnowgetsonthetrampoline
justinfrontoftherearcrossbarandthe
personatthemastheadwalkstowardthe
rearoftheboatraisingthemasthandover
hand.
Thepersononthetrampolinecanassist
hereuntiltheycansupportthefullweight
ofthemast.Now,theotherpersoncanhelpbyeither
gettingontothetrampolineandliftingorbywalking
forwardwiththeforestayoratrapezewire.
Whenthemastisfullyraised,onepersononthe
trampolinecanholdthemastuprightwhilsttheother
connectstheforestaytothetopofthechainplateofthefurler.
4.
NB:Theriggingwillbelooseatthisstage.Itcanbetightenednoworlatertoachieve
desiredtensionrake.Itisbesttodothisbeforethejibisattached.Whenadjusting
forestaychain‐plateposition,haveyourassistantwalkforwardandpulldownwitha
trapezewireforaddedsecurity.
Similarlywhenadjustingtheshroudposition,haveyourassistantpulldownonatrapeze
wireonatthesideofbesidetheboat.

Ref:MMPEARLAuthor:SDDate:03/04/2009Up‐date:0Page16/29
HOBIECAT«PEARL»ASSEMBLYMANUAL
TRAPEZE
1.
Locatethetrapezehandles(4),rope‐locks(4),andadjusterlines(4).
Assemblethetrapezesasinthephoto.
Takecaretoruntheadjusterlinesthroughtheropelockscorrectly‐
ifnotdoneproperly,theymayslip.
2.
Locatethe2trapeze
shockcordsfromthewires
bagandleadthem
underneaththetrampoline
andupthroughthe
grommetsatthesideedges
ofthetrampoline.
3.
Afterensuringthetrapeze
wiresarenottwistedor
wrappedaroundtheshrouds,
tieoffthetailendofthe
adjusterlinestotheloopsin
theendsofthetrapezeshock
cords.
Trapezeheightcansimplybeadjustedbychangingthepositionofthe
ropelockontheadjusterline.Itisagoodideatocheckyourtrapezing
heightbeforeyoulaunchyourboat.

Ref:MMPEARLAuthor:SDDate:03/04/2009Up‐date:0Page17/29
HOBIECAT«PEARL»ASSEMBLYMANUAL
MAINSAIL&BATTENS
1.
Unfoldthemainsailonto
thetrampolineandinsert
eachbattenintoits
respectivepocketinthe
sail.Thesmallestgoesat
thetopofthesailandthe
longestatthebottomof
thesail.Insertthebattens
intotheirpocketsand
securethemusingthe
webbingstrapsand
plasticclips.Applyenoughtensiontoremovethewrinklesfromthepocket.
2.
Attachthemainhalyardshackletothesailheadboard.Feedtheboltropeofthesailinto
theslitinthesailtrack.Proceedtopulldownonthemainhalyardwhilstyourassistant
feedstheboltropeintotheslit.
Raisethemainsailfully.
NB:AlwayspointyourHobiedirectlyintothewindbeforeyouraisethemainsail
3.
Feedthebottompartoftheboltrope(thepartthat
remainsatthebottomoncethesailisfullyraised)into
thesailtrackbelowtheslit.
4.
Securethehalyardinthecleatatthebottomofthemast.Stowtheexcesslineinthe
trampolinepocket.

Ref:MMPEARLAuthor:SDDate:03/04/2009Up‐date:0Page18/29
HOBIECAT«PEARL»ASSEMBLYMANUAL
CUNNINGHAM/RIGHTINGLINE
1.Cunningham
Attachthesnapclaspwiththetwodoublepulleys
inthegrommetatthetackpointofthemainsail.
Locatethecunninghamlineandthreaditthrough
thecleats,cunninghamblocksandmastbase
sheavesasinphoto.
Attachthelooseendstotheshrouds.
2.Rightingline
Taketherightingline.Passoneendthroughthegrommetinthecentre
ofthetrampolineandsecureittothedolphinstrikerpost.
Pullanyslackbackupthroughthetrampolinegrommetandstowthe
rightinglineinthetrampolinepocket.
Aknotintherightinglinejustabovethegrommetwillpreventthe
rightinglinefromslippingdownanddragginginthewater.

Ref:MMPEARLAuthor:SDDate:03/04/2009Up‐date:0Page19/29
HOBIECAT«PEARL»ASSEMBLYMANUAL
BOOM
1.
Slidetheoutboardendoftheboomthroughthe
webbingloopattachedtotheclewofthemainsail.
2.
Connecttheboom
tothemastusing
thehingevertex,
clevispinandsplit
ring.
3.
Connecttheshackleon
theboomouthaulline
tothegrommetinthe
clewofthemainsail.
4.
Taketheendoftherotationlinethatisattachedtotheclamcleatontopoftheboomandpassitthroughtherotationarmon
themast.Takethelinebackthroughtheclamcleatandsecurethesandowelasticcordontheplasticcleatattherearofthe
boom.

Ref:MMPEARLAuthor:SDDate:03/04/2009Up‐date:0Page20/29
HOBIECAT«PEARL»ASSEMBLYMANUAL
MAINSHEETSYSTEM
Themainsheetsystemofyourboatismountedwhenitisdeliveredwiththeboat.However,ifyouwishtochangetherope
seethefollowingpageforstepbystepexplanations.
1.
Fixthetackblocktothetraveller
carontherearcrossbarusingthe
snapclasp.
2.
Hangthetopblockdirectlyonthestrapusingthehook(as
showninthephoto).
This manual suits for next models
1
Table of contents
Other Hobie Boat manuals

Hobie
Hobie TriFoiler User manual

Hobie
Hobie 15 Club User manual

Hobie
Hobie LANAI User manual

Hobie
Hobie Gateway User manual

Hobie
Hobie Mirage i12s User manual

Hobie
Hobie FOX User manual

Hobie
Hobie HOBIE Miracle 20 User manual

Hobie
Hobie T1 User manual

Hobie
Hobie Mirage Compass User manual

Hobie
Hobie catsy User manual

Hobie
Hobie Mirage Kayak User manual

Hobie
Hobie Hobie T2 User manual

Hobie
Hobie 15 User manual

Hobie
Hobie Mirage Vantage CT User manual

Hobie
Hobie Mirage Tandem Island User manual

Hobie
Hobie Island User manual

Hobie
Hobie iCat User manual

Hobie
Hobie Twixxy User manual

Hobie
Hobie 16 User manual

Hobie
Hobie 17 User manual