Hoefer SE 600 Chroma User manual

user manual
SE 600 Chroma
um SE600X-IM/Rev. A0/05-04
Hoefer SE 600 Chroma
standard dual cooled gel electrophoresis unit


• pi
Page finder
Gel electrophoresis unit function and description
Specifications .................................................................2
Important information ....................................................3
Unpacking and inventory ....................................................5
Operating instructions
Prepare the gel sandwich .................................................9
Construct the gel sandwich & insert into caster .....................9
Acrylamide gels ......................................................................12
Gradient gels ..........................................................................14
Sample preparation and loading ...........................................16
Final assembly ................................................................18
Separating the sample ...................................................22
After electrophoresis .......................................................24
Care and maintenance .....................................................25
Troubleshooting .................................................................26
Bibliography .......................................................................31
Ordering information ........................................................34
Companion products .........................................................38


• p1
Gel electrophoresis unit
function and description
The Hoefer™ SE 600 Chroma™ vertical slab gel
electrophoresis unit is intended for protein and
nucleic acid electrophoresis under commonly
used denaturing and non-denaturing conditions.
Up to 28 samples can be compared on a single
slab gel.
Applications include protein separations, nucleic
acid fractionation, and the second-dimension
separation of 2-D electrophoresis. First-dimen-
sion separation of 2-D protein electrophoresis
should be performed on Immobilized pH Gra-
dient Gels. The focused strips are easily trans-
ferred to the second-dimension slab gel for size
separation.
The gel plates are 18 cm wide by 16 cm long.
Up to four gels can be run at one time if sand-
wiches are paired into “club sandwiches.” The
heat exchanger allows buffer temperature con-
trol in the lower chamber.

• p2
Specifications
Gel plate size 18 × 16 cm (w × h)
Gel size 14 or 16 cm × 16 cm
(w × h)
Maximum watt 50 W
Maximum volt 1 000 V
Maximum ampere 500 mA
Maximum temperature 45 °C
Environmental
operating conditions Indoor use: 4–40 °C
Humidity up to 80%
Altitude up to 2 000 m
Installation category: II
Pollution degree: 2
Dimensions width × height × depth
32 × 29 × 14 cm
(12.5 × 11.5 × 5.5 in)
Product certifications EN 61010-1, UL 61010A-1,
CSA C22.2 1010.1, CE Cer-
tified
This declaration of conformity is valid only when the
instrument is:
• used in laboratory locations,
• used as delivered from Hoefer, Inc. except for alterations
described in the user manual, and
• connected to other CE-labeled instruments or products recom-
mended or approved by Hoefer, Inc.

• p3
Important information
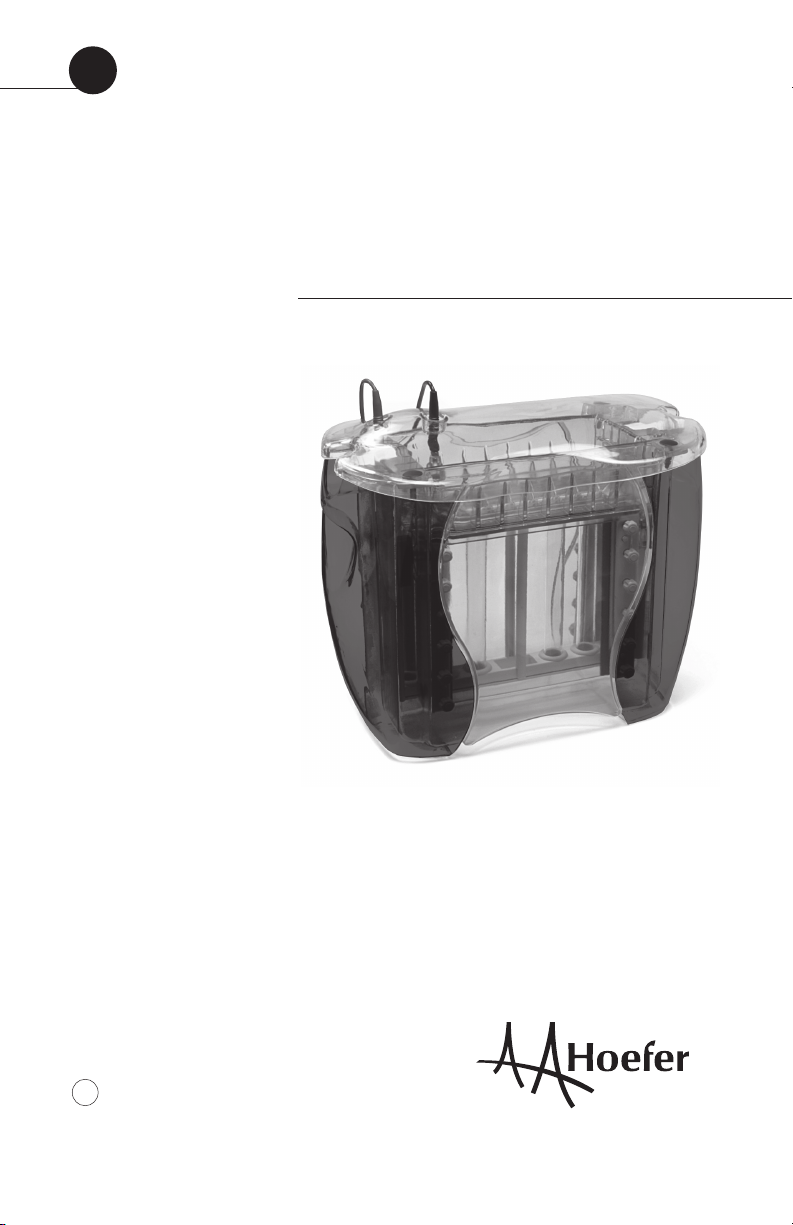
• The safety lid must be in place before connecting the power
leads to a power supply.
• Turn all power supply controls off and disconnect the power
leads before removing the safety lid.
• Circulate only water or 50/50 water/ethylene glycol through the
heat exchanger. Never introduce antifreeze or any organic solvent
into any part of the instrument. Organic solvents will cause
irreparable damage to the unit!
• Do not connect the heat exchanger to a water tap or any coolant
source where the water pressure is unregulated.
• Do not operate with buffer temperature above 45 °C. All plastic
parts are rated for 45 °C continuous duty. Circulate coolant
through the heat exchanger during electrophoresis to minimize
heating. Overheating will cause irreparable damage to the unit!
• Only accessories and parts approved or supplied by Hoefer, Inc.
may be used for operating, maintaining, and servicing this
product.
Informations importantes
• Le couvercle de sécurité doit être en place avant de brancher les
prises au générateur.
• Eteindre le générateur et débrancher les prises avant d’enlever le
couvercle de sécurité.
• Faire circuler seulement de l’eau ou 50/50 d’eau et d’éthylène
glycol dans l’échangeur vertical à cirulation d’eau. Ne jamais
utiliser d’anti-gel ou tout autre solvant organique avec cet
instrument. Les solvants organiques causeraient des dommages
irréparables à l’appareil.
• Ne pas connecter l’échangeur vertical à circulation d’eau à un
robinet ou quelque source de refroidissement dont la pression
n’est pas régulière.
• Ne pas utiliser avec un tampon à une température au dessus de
45 °C. Toutes les piéces en plastique sont prévues pour résister
à une température constante de 45 °C. Faire circuler l’eau dans
l’échangeur vertical durant l’électrophorèse pour minimiser
l’échauffement afin d’éviter des dommages irréparables à
l’instrument.
• Seulement les accessoires et piéces detachées approuvés ou
fournis par Hoefer, Inc. sont recommandés pour l’utilisation,
l’entretien et réparation de cet appareil.
�
�
�
�

• p4
Fig 1. Main components of the
Hoefer SE 600 Chroma
(see Fig 4 for caster compo-
nents).
Included but not shown:
• Gel Seal compound, 1/4 oz.
• Spacer-Mate alignment
template
• Well-locating decal
• Glass plates (6)
• Wonder Wedge plate separa-
tion tool
• Buffer dam
Complete unit also includes
spacers (4) and combs (2).
Required but not included:
• Magnetic stirrer
• Power supply with a
minimum rating of 500 V,
100 mA (constant A or V)
Optional: Circulator bath
Note: The ordering section
lists all accessories and
replacement parts.
color-coded
leads (2)
safety lid
interlock pins
upper
buffer
chamber
with upper
electrode
lower buffer
chamber
heat
exchanger
with lower
electrode

• p5
Unpacking and inventory
Unwrap all packages carefully and compare
contents with the packing list, making sure all
items arrived. If any part is missing, contact
your local sales office. Inspect all components
for damage that may have occurred while the
unit was in transit. If any part appears dam-
aged, contact the carrier immediately. Be sure
to keep all packing material for damage claims
or to use should it become necessary to return
the unit.
Lower buffer chamber
The lower buffer chamber is transparent,
which allows visual tracking of electrophoresis
process. The chamber is chemically resistant
to common electrophoretic buffers but not to
organic solvents or strong acids or alkali. Tem-
peratures above 45 °C may cause the chamber
to warp.
Upper buffer chamber
The upper buffer chamber is chemically resistant
to common electrophoresis buffers, but not to
organic solvents or strong acids or alkali. The
upper electrode (cathode) runs along the center
ridge and terminates at the banana plug. The
upper chamber requires 0.5–0.8 l of buffer (fill
no higher than the top of the plastic ribs).
Heat exchanger
The heat exchanger must be installed for every
use because it houses the bottom electrode
(anode), which runs along the bottom of the

• p6
frame. When connected to a circulator bath, the
heat exchanger regulates the buffer temperature
in the lower chamber. Coolant passes through
the glass tubes, which are secured with silicone
rubber grommets. The heat exchanger connec-
tor ports are 13 mm o.d. The heat exchanger is
rated to a maximum of 0.8 atmospheres above
ambient (12 psig). Connect only to coolant
sources with regulated pressure. (Do not con-
nect to the water tap.)
Safety lid
The banana plug on the heat exchanger connects
to the red lead, and the plug on the upper buffer
chamber connects into the black lead. The 4 mm
shrouded color-coded leads plug into color-coded
jacks in the power supply. Engage interlock pins
before lowering electrode connections on to
banana plugs. Always install the safety lid before
use!
Glass plates
The SE 600 Chroma accommodates 18-cm-wide
plates 16 or 8 cm long. Notched divider plates,
ordered separately, divide gel sandwiches to
form “club sandwiches” of two gels each, so up
to four gels can be run at one time.
Clamps
Two 16 cm clamps are used to secure the gel
sandwich. The clamp pressure bar, adjusted with
screws, distributes pressure evenly.

• p7
Casting stand
The casting stand holds assembled gel sand-
wiches upright for casting gels. Adjustable
feet level the caster. A laminated gasket in the
bottom of each casting cradle seals the bottom
of the sandwich when it is clamped into the
stand.
Cams
Cams are used twice: first to secure the assem-
bled sandwich in the casting stand and, second,
to attach the sandwich to the upper buffer
chamber.
Rubber gaskets
There are two sets of two gaskets: The solid
laminated gaskets fit into the bottom of the
casting stand and form the seal for casting the
gel. The slotted gaskets fit under the upper
buffer chamber and form the seal between the
upper and lower chambers. The ridges on the
upper gasket align the gasket slot to maintain
an open channel between the top of the gel and
the buffer in the upper chamber.
Spacers
Spacers determine the thickness of the gel and
are available in three thicknesses (0.75, 1, and
1.5 mm) and two widths (1 and 2 cm).
(May be ordered separately.)
Spacer-Mate alignment template
This template aligns spacers during sandwich
assembly.

• p8
Combs
Teflon combs are available in sizes that form
10, 15, 20, or 28 wells. Most combs are avail-
able in all three thicknesses: 0.75, 1, and 1.5
mm. Blank combs form a single large well, and
preparative combs include one or two reference
wells in addition to the preparative well.
(May be ordered separately.)
All blanks, preparative combs, and 10-, 15-, and
20-well combs form wells that are 25 mm deep.
The 28-well comb forms wells that are only 15
mm deep so that wells do not collapse when
the comb is removed. The sample volume held
by each well depends on the gel thickness, well
depth, and the number of wells per comb. Table
1 lists sample volumes of wells for all combs
(see page 10).
Wonder Wedge Gel Plate Separation tool
This tool is used to disassemble gel sandwiches
and to check spacer and comb thicknesses.

• p9
Operating instructions
Gel casting and electrophoresis procedures
follow. Included are instructions for polyacryl-
amide gels (used with continuous or discon-
tinuous buffer systems) and gradient gels. See
page 31 for bibliography.
Prepare the gel sandwich
Glass plates, spacers, and clamp sets are sized
so that the assembled sandwich can be easily
aligned to create the seal required first to cast the
gel and then to run it. For best results take extra
care to align all components when assembling
sandwiches. One to four gels (18 × 16 cm) can
be assembled and run in the SE 600 Chroma.
Both precast gels and self-cast gels can be used.
To self-cast multiple gels, kits can be ordered
separately: The SE 615 Multiple Gel Caster Kit
holds up to 10 single gel sandwiches, and the SE
675 Gel Caster Kit holds up to four sandwiches.
(See the accompanying gel caster User Manual
for complete instructions.) To run four gels con-
currently, two accessory notched divider plates
and two additional pairs of spacers are required.
Construct the gel sandwich and insert into
caster
Prepare the caster and clamps
Place the spirit level into the caster center and adjust the leveling
feet. Loosen all clamp screws and make space for the sandwich by
sliding the pressure plates toward the screws.

• p10
Construct gel sandwiches
For each sandwich choose two perfectly clean, unchipped glass
plates and two spacers. Lay one plate on a flat surface, lay the
Spacer-Mate alignment template onto the plate (wide side at the
top of the plate), place a spacer along each edge, and lay the sec-
ond glass plate on top.
Secure the sandwich with clamps
Slide one clamp at a time along the sandwich sides. Finger-tighten
one screw on each clamp, set the sandwich upright on a flat
surface, and loosen the screw to align the stack. Taking great care
in alignment will ensure a good seal. Finger-tighten all screws.
Remove the Spacer-Mate.
Tip: Use the casting cradle to hold the sandwich during align-
ment. Remove the laminated gasket from the cradle and, instead
of setting the sandwich upright on a flat surface, set it into the
casting cradle.
Club sandwich
A 16-cm-long, notched center-divider plate (ordered separately)
pairs two sandwiches to double the number of gels that can be
cast and run.
Assemble a club sandwich in the same manner as a regular sand-
wich, except before placing the top glass plate, lay the divider plate
and a second set of spacers on the stack. Place the notch so that
it will be at the top of the gels. It is essential that the spacers and
plates align perfectly in order to seal.
Remove the sandwich and inspect the bottom to make sure that
edges are aligned flush to ensure a complete seal. Adjust if
necessary.
Optional: Apply a light film of Gel Seal compound only on the
bottom corner surfaces created by the spacers and plates if the
sandwiches tend to leak.
Fig 3. Club sandwich assembly.
Side clamps will accommodate two
spacers up to 1.5 mm thick.
spacers
glass plates
(at the outer sides
of the sandwich)
notched
center plate
Fig 2. Sandwich assembly.
Inspect glass plates for nicks. Use
only unchipped plates to prevent
leaking.
glass plates
spacer
clamp ridges
The glass plates and spacers must be flush with
the clamp ridges at both top and bottom for a good seal.
pressure
plate
The glass plates and
spacers must be flush
with the clamp ridges
at both top and bottom
for a good seal.

• p11
Place the laminated gasket into the casting cradle (See Fig 4) with
the foam side down. Place the clamp assembly in the casting
cradle, screw side facing out.
Insert a cam into the hole on each side of the casting tray with
the ridge (short end) pointing up. Seal the gel sandwich against
the casting gasket by turning both cams as far as needed, usually
90°–150°, up to 180°. The cam action presses the plates down into
the gasket to seal the bottom of the sandwich. The seal is complete
once the glass edge appears darker and nearly transparent against
the gasket. Do not turn past this point.
Fig 4. Caster components and setup.
Note: When turning the cams, it is easier
to keep the caster balanced if you turn both
toward the center of the caster.
glass plate
clamp
spacer
cam hole
casting cradles (2)
leveling feet (4)
cam
(install ridge end up)
gasket
(foam side down)
cam hole
cam hole
cam hole
spirit level

• p12
Acrylamide gels
Prepare the monomer solution and pour the gel
Prepare the required amount of monomer solution. Deaerate and
add the initiator and catalyst just prior to pouring the gel. Pipette the
solution into one corner of the sandwich, taking care not to intro-
duce any air bubbles. See below for the appropriate solution level
according to the application.
No stacking gel (Continuous system) Fill solution to just below
the top of the upper plate edge. If bubbles are trapped, remove with
a pipette or syringe. Introduce a comb (at a slight angle) into each
sandwich, taking care not to trap air bubbles under the teeth.
Club sandwich Pipette the solution into both sandwiches, filling
each to the same level below the notched edge.
Stacking gel Fill solution to 3–4 cm below the top of the glass
plate. This height allows 1 cm of stacking gel below the wells.
Pour the gel and apply an overlay (see step 2). After the gel is set,
prepare the stacking gel as described below.
2-D electrophoresis (Discontinuous protein system) Fill monomer
solution to about 1 cm below the top of the glass plate to allow 4–5
mm for the IPG strip or tube gel and an agarose seal. (A stacking gel
will require extra space). Seal the IPG strip or tube gel in place with
agarose dissolved in running buffer. Take care to avoid trapping any
air bubbles between the first- and second-dimension gels.
Overlay each gel with a thin layer of water-saturated butanol, water,
or diluted gel buffer to prevent gel exposure to oxygen. Slowly
deliver the overlay solution from a glass syringe fitted with a 22-
gauge needle. Apply the solution near the spacer at one side of the
sandwich and allow it to flow across the surface unaided.
Allow the gel to polymerize for a minimum of 1 h.

• p13
Stacking gel preparation
Pour the stacking gel while the sandwich is still in the gel caster.
Stacking-gel resolution is optimal when poured just before elec-
trophoresis.
Remove the overlay by rinsing the top of the gel several times with
distilled water. Invert the caster to drain. To ensure a seamless
contact between the resolving and stacking gels, remove residual
liquid by blotting one corner with a lab wipe.
Calculate the stacking gel monomer solution volume.
Prepare the stacking-gel monomer solution, deaerate it, and add
catalyst and initiator. Pour the stacking gel onto the resolving gel
with a disposable or Pasteur pipette to a level about 2 mm from
the top of the plate.
Introduce a comb (at a slight angle) into the sandwich, taking care
not to trap air under the teeth. Allow a minimum of 1 h for the gel
to polymerize.

• p14
Gradient gels
Both linear and exponential gradient gels can be poured in the
dual-gel caster. We recommend using a Hoefer SG Series Gradient
Maker. Gradient gels are poured from the top of the caster with a
cannula if using the provided dual-gel caster or from the bottom if
using a Hoefer Multiple Gel Caster (see instructions accompanying
the caster). A stacking gel is then poured over the gradient gel.
Pouring a linear gradient gel
Assemble sandwich(es) into the dual-gel casters as described in
section 3.11.
Set up the monomer solution flow path
Run a length of clear vinyl tubing through a peristaltic pump. Attach
one end of the tubing to the gradient maker outlet port and the other
end to a 20 cm cannula. (The o.d. of the cannula must be less than
the spacer thickness.) Place the cannula so that it rests at the bottom
of the sandwich, midway between the spacers.
Prepare the monomer solution
Calculate the volume of monomer solution needed. Divide the total
volume in half and prepare this volume of both the higher- and
lower-percentage acrylamide solutions.
Optional: Adjust the higher-percentage acrylamide solution to
15% (w/v) sucrose or 25% (v/v) glycerol to improve layering.
Pour the “light” solution into the reservoir chamber (the chamber
farthest from the outlet). Open the stopcock between the chambers
long enough to displace the air and then close. Pour the “heavy”
Fig 5. Pouring a gradient gel.
A pipette tip may be used instead
of a cannula if the gel solution is
delivered at a rate that maintains
a continuous stream on the glass
surface.
Note: Gradient gels poured in the SE
615 or SE 675 Multiple Gel Caster are
introduced through the bottom.
Note: When pouring an exponential
gradient gel, position a plunger or
sealing plug above the liquid in the
mixing chamber to hold the volume
constant.

• p15
solution into the mixing chamber and place a stirring bar into
this chamber. Place the gradient maker onto a magnetic stirrer
and begin stirring at a rate that mixes well but does not introduce
bubbles into the solution.
Mix the gradient and pump the solution into the sandwich
While the solution is stirring, begin pumping from the mixing
chamber and open the stopcock to the reservoir chamber. Raise the
cannula as liquid enters the sandwich, keeping the tip at the gel
surface. Prepare more gels as required.
Overlay each gel with a thin layer of water-saturated butanol, water,
or diluted gel buffer to prevent gel exposure to oxygen. Slowly
deliver the overlay solution from a glass syringe fitted with a 22-
gauge needle. Apply the solution near the spacer at one side of the
sandwich and allow it to flow across the surface unaided.
Allow the gels to polymerize for a minimum of 1 h. After polymer-
ization, pour off the overlay and rinse the gel surface several times
with distilled water.
Prepare the stacking-gel monomer solution, pour the stacking gel,
and introduce a comb (at a slight angle) into the sandwich, taking
care not to trap air under the teeth. Allow a minimum of 1 h for the
gel to polymerize.

• p16
Sample preparation and loading
The sample can be loaded either while the sandwich is in the
caster or after the upper buffer chamber is attached. When loading
samples while using divider plates, the samples must be loaded
without the upper buffer chamber in place.
The amount of sample loaded depends on the thickness of the gel,
the sensitivity of the detection method used, and the amount of
sample expected in each band. In a continuous buffer system, the
protein sample should be relatively concentrated, because no stack-
ing gel is used. In a discontinuous buffer system, the zone into
which each molecular species migrates is sharpened by the stack-
ing gel, so the sample need not be as concentrated.
Prepare the wells
Remove the comb by gently rocking it side to side and then lifting
it straight up to avoid damaging the well walls. Carefully rinse
each well with distilled water to remove unpolymerized acrylamide
and then drain by inverting the gel sandwich (or caster). Fill each
well with electrophoresis buffer.
Prepare the sample
Increase liquid sample density with 10% glycerol or sucrose. Add a
tracking dye such as phenol red, bromophenol blue, or pyronin Y.
For SDS protein gels, use 2X treatment buffer to denature both
liquid and dry samples in a test tube.
To liquid protein solutions, add an equal volume of 2X buffer.
To dry protein samples, add equal volumes of 2X sample buf-
fer and high-purity water to achieve the desired concentration.
Heat the tube in boiling water for 90 s, then allow to cool to room
temperature. Treated samples can be stored at -40 to -80 °C for
future runs.
Heat membrane proteins to 60 °C for 20 min. Store unused sample
at 4 °C.
Underlay the sample into the wells using a fine-tipped microsy-
ringe or gel-loading pipette tip.
Note: With Coomassie Blue™ it is
possible to detect 1 µg of protein in a
single band. With the more sensitive
silver stains, it is possible to detect
as little as 10 ng of protein.
Note: Once the samples are in the
wells, take care to not jar the sand-
wiches so that the samples are not
spilled or mixed.
Table of contents
Other Hoefer Medical Equipment manuals
Popular Medical Equipment manuals by other brands

ZOLL
ZOLL CPR-D-padz quick start guide

BÜHLMANN
BÜHLMANN Quantum Blue user manual

natus
natus Quantum User and service manual

Weinmann
Weinmann COMBIBAG WM 11000 Description and operating instructions

QRS
QRS QRS-101 operating instructions

Shenzhen Roundwhale Technology Co., LTD.
Shenzhen Roundwhale Technology Co., LTD. R-C4D instruction manual