Home Fires Skytech 4000 Series User manual

America’s Exclusive Distributor of Real Flame English Firebaskets
Troubleshooting Guide
Making the Fire Work
A Comprehensive Checklist
Skytech – 4000 Series Spark to Ignition Remote System
The purpose of this checklist is to ensure proper function of the remote controlled burner for customer’s having
troubleshooting issues.
The checklist will be an explanation of the basic operation and functions of the burner and then a list of the
most common problems and their solutions, the most common explained first.
To elaborate, we will first explain the burner system and how normal operation works:
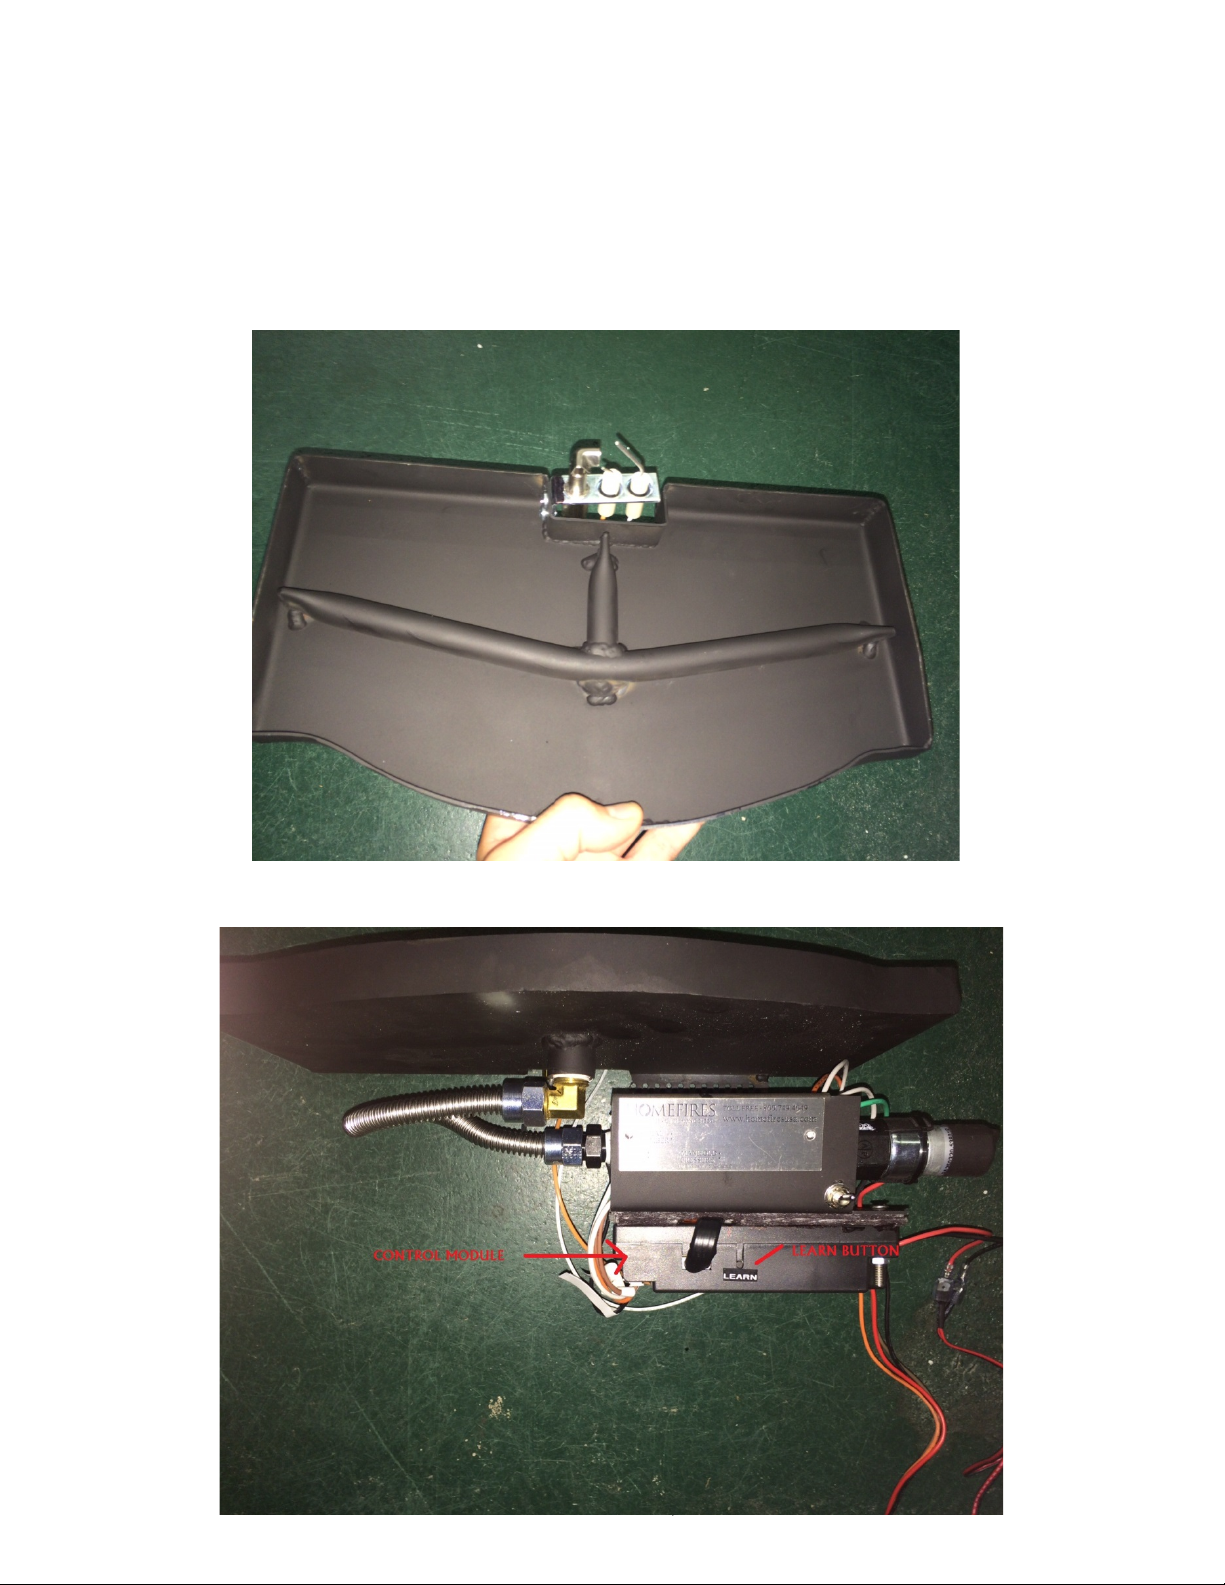
The burner itself is comprised of 4 main components: The gas valve (controls the gas flow), the pilot assembly
(lights the gas), the control module (controls the gas valve and pilot assembly, and communicates to the user)
and the battery pack (powers everything on the burner).
You also have a handheld remote with 4 buttons: ON, OFF, HIGH, LOW. The remote sends a radio signal to
the control module, which in turn controls the other components and does what you tell it to do.
The control module is essentially the brain of the burner, there is a learn button on the front and two sliding
switches on the back which can change the modes of ignition and operation.
The burner has two modes of operation: Standing Pilot and Spark to Ignition. By default, the burner is shipped
in Spark to Ignition mode, which means when you turn the main flames off the pilot flame will also extinguish.
In standing pilot mode, the pilot flame runs all the time. We recommend using the unit in spark to ignition
mode, as this saves money on gas in between uses.
The burner also has two modes of ignition: Remote and Switch. By default, the burner is sent out in Remote
mode, which means that the remote is what will control the burner. In Switch mode, the burner is turned
ON/OFF using the toggle switch; this should only ever be used if the handheld remote is physically lost as you
cannot control the flame height in switch mode.
With the control module set to its default settings, which are Remote and Spark to Ignition, this is how normal
operation occurs:
To light the fire you push the ON button on the remote. This sends a radio signal to the control module; once
this signal is received the control module should beep 1 time. Gas will begin to flow to the pilot assembly, and
the ignitor will spark. The sparking from the ignitor will light the pilot flame, the control module will recognize
that the pilot is lit through the pilot assembly, and the main gas will begin to flow. The main flame will ignite
in less than 30 seconds. To adjust the main flame, hold down the HIGH or LOW buttons until the desired flame
height is achieved, when you push down the HIGH or LOW button on the remote the control module should
beep 1 time. When you are ready to turn the fire off, push OFF on the remote, the control module should beep
one time, the gas flow is shut off and the main flames and the pilot flame will extinguish. This is how normal
operation should work.
The control module communicates to the user through various beeping. If the burner appears to not function
properly and the control module starts beeping, see Audible Alerts and Error Codes which is at the end of this
document, to understand what this beeping actually means. If the burner does not communicate any fault code,
then it is technically working as designed, and the problem lies somewhere in the setup.

2644 Shenandoah Avenue – Charlotte, North Carolina 28205
Toll Free: 1.800.749.4049 – Local: 704.376.9749 – www.homefiresusa.com
Top View of Gas Burner Inside the Firebasket
~the burner should be situated with the pilot in the rear of the fire grate and look like this if you are in the room
and looking into the firebasket. Of course, this view shows just the burner itself, without any sand/vermiculite,
embers or coals on top of it~
Front View of the Underside of the Burner

2644 Shenandoah Avenue – Charlotte, North Carolina 28205
Toll Free: 1.800.749.4049 – Local: 704.376.9749 – www.homefiresusa.com
Back View of the Underside of Burner
Battery Pack – This sits on the floor of the Fireplace

2644 Shenandoah Avenue – Charlotte, North Carolina 28205
Toll Free: 1.800.749.4049 – Local: 704.376.9749 – www.homefiresusa.com
Most Common Problems and Solutions
If you experience any problems whatsoever, the first thing you should do is replace the batteries. It is
imperative that the remote and battery pack have good batteries or else you may encounter a variety of different
issues.
•The handheld remote uses a size A23 - 12volt battery
oThis is an uncommon battery size, so make sure to purchase new, un-expired batteries
from a local hardware store. If there is dust on the packaging, the batteries have probably
been sitting on the shelf too long, so buy them somewhere else. The remote battery
should last about 2 years from our experience; lifespan of course varies depending on
how often the system is used.
•The burner inside the firegrate has a battery pack which sits on the floor of the fireplace; the best
location of placement for the battery pack is behind the iron back of the firegrate. This uses 4 x
AA batteries, these need to be changed out about once per season.
oThe battery pack has a red/black dual wire coming out of the top; this should not be in the
way. But there is a 4-pin wire harness coming out of the back which may need to be
removed before you can change the batteries. Grab all 4 wires and pull to remove the 4-
pin harness. Then, flip the battery pack over, you should see an arrow on the bottom
side, this is the door which covers the batteries, it slides out along the same plane it
resides, so push in a shearing motion in the same direction of the arrow on the plastic.
Replace the batteries and make sure they are in the correct direction.
Once the batteries in the remote and battery pack are replaced, there is a high probability that your fire will
function as normal. However, just for good measure we recommend re-linking the remote and control module,
continue reading to learn how to do this.
The remote communicates to the control module via radio wave. At the time of installation, the control module
is learned (tuned) to the specific frequency of the remote during the learn procedure; this is very important for
installations with more than 1 units so that each individual remote only controls its specific firegrate.
In some cases, we have seen the control module lose its tuning if the batteries get low/die. So, whenever
replacing batteries we always recommend re-learning the control module to the remote just for good measure.
See the photo above for the location of the Learn Button which is uses to link the remote/control module.
The learn button is 1/8” in diameter and inset into the Control Module.
For safety reasons, it is best to turn off the flow of gas to the burner by using the backup gas shutoff valve. If
you have a gas cock, turn it perpendicular (parallel is on/perpendicular is off). Or, if you have a key valve, use
the gas key to turn it all the way clockwise, to shut off the flow of gas. We turn off the gas supply to ensure that
once you have re-learned the remote control, it will not light the fire while you are still close to the firebox.

2644 Shenandoah Avenue – Charlotte, North Carolina 28205
Toll Free: 1.800.749.4049 – Local: 704.376.9749 – www.homefiresusa.com
First we will start with a clean slate by erasing the RAM of the system. Use something pointy like a paperclip
to gently push the learn button in for 10 seconds. At first you will hear 3 quick beeps. Then, you will hear 3
long beeps – this means the memory of the system has been erased. Release the learn button.
Next, push the learn button for just 1 second, you will hear 3 quick beeps. Immediately after, push ON on the
remote control, you should hear 4 quick beeps which confirm that the control module has been linked to the
system. The burner will begin the ignition cycle since you pushed ON on the remote. Push OFF on the remote
to cancel this ignition cycle.
At this point, your burner should be fully functioning! Go back to the gas shutoff valve and turn the gas supply
on. Push ON on the remote. You should hear the ignitor and spark generator, then the fire should light as
normal.
NOTE: If the pilot flame does not light within the first 60 seconds. The burner will go into a fault mode;
it will beep 1 time every 1 second. This is to warn the user that the pilot flame did not ignite. This is very
common if the fire has not been lit for longer than a few days. All you have to do is press OFF and then
ON again on the remote control. This will re-start the ignition cycle, and give the burner enough time to
bleed out the stagnant gas and allow for fresh gas to get to the ignitor.
The following are other, more complicated issues:
When you push the ON button on the remote, does the light on the remote come on?
If yes, proceed to the next question. If no, replace the battery in the remote, if it still does not light up, you need
a new remote control.
When you push the ON button on the remote, does the control module respond with a single beep sound?
If yes, proceed to next question. If no, check the electrical components below:
-The settings on the control module do not normally need to be adjusted, but over the years we have
discovered that it can help to turn the switches once to ensure they are set to the right settings. The
photo below is the rear of the control module. Imagine you are in the back of the fireplace, looking
out into the room, this is the view shown below. These switches are not visible from the room. To
turn the switches, you will need to reach behind the control module and feel for them. From your
perspective (in the room looking towards the rear of the fireplace) the switches will need to be slid to
the left. So, what you need to do is slide both switches to the right, and then slide them back to the
left. This will ensure they are both set to the correct settings and are making proper electrical
contact internally.

2644 Shenandoah Avenue – Charlotte, North Carolina 28205
Toll Free: 1.800.749.4049 – Local: 704.376.9749 – www.homefiresusa.com
-Open the battery compartment, where the AA batteries go, and check for corrosion and/or rust. In
some cases, the chimney flue can leak rainwater during bad storms. If water gets onto the battery
pack it will cause water damage and break the part. If you have noticeable corrosion, you need a
new battery pack.
-4-Pin Wire Harness to Battery Pack – unplug and plug back in
When you push the ON button on the remote, the control module responds with a single beep, but does the
ignitor begin sparking? If yes, proceed to the next question. If no, check the components below:
-The electrical connections on the side of the gas valve are very important for proper function of the
burner. Unplug each connection and plug back in to ensure proper
contact. The direction of each plus does not matter, only that they are
plugged back into the same location as they reside. Once you unplug
and reconnect these connections, test the burner again, if the control
module still responds with a beep but does not begin sparking, than
you probably need a new control module as most likely the spark
generator has broken.
-Another culprit can be the pilot assembly. Make sure that nothing metal is touching anything on the
pilot assembly; this can include a metal ember material
called Embaglow which was sent with orders prior to 2015.
If metal touches these parts, it will short circuit the system
and prevent the burner from functioning properly. In this
case, if the pilot is short circuited, when you push ON on the
remote the system will respond with a constant/rapid
beeping sound. This is an extremely rare issue.

2644 Shenandoah Avenue – Charlotte, North Carolina 28205
Toll Free: 1.800.749.4049 – Local: 704.376.9749 – www.homefiresusa.com
When you push ON on the remote, the control module responds with a beep and sparking begins, but does gas
flow to the pilot assembly? If yes, your burner should be working properly. If no, check the gas supply to
ensure you have gas flow. If you have gas flow to the pilot burner, but the pilot will not light, you may need to
adjust your pilot assembly. This is done at the location notated below. If the gas does not flow to the pilot, yet
you have checked the electrical connection on the gas valve shown above, you may need a new gas valve. Call
for assistance.
Low Pilot Flame –
In rare cases, we have had clients
complain that their main flames appear to
suddenly drop down in size, only to come
back up again momentarily. This is due
to a low pilot flame. Draft causes a small
pilot flame to pull away from the flame
sensor. The system recognizes this, shuts
down the main burner, and begins
relighting the pilot flame. Once the pilot
is re-established, the main flames come
back on. All of this happens quickly,
giving the appearance of a malfunction.
When in reality the system is working
normally, the pilot flame just needs to be
adjusted up. To do this, turn the pilot
flame adjustment screw.
This covers all of the most common issues related to the remote controlled Spark to Ignition burner system.
If you have addressed everything in this document but still are having problems, please contact us at:
800-749-4049 Choose the Technical Support Option
We are committed to your satisfaction and will do everything in our power to ensure you have a beautiful
firegrate for years to come!

2644 Shenandoah Avenue – Charlotte, North Carolina 28205
Toll Free: 1.800.749.4049 – Local: 704.376.9749 – www.homefiresusa.com
Audible Alerts and Error Codes
ALERTS
Ready to Learn:
Audible Alert: Single beep (~1 second in length) after pushing the LEARN button.
Description of Alert: Inform the user that the module is ready to learn the security code of a transmitter
Code Accepted:
Audible Alert: Four beeps in rapid succession.
Description of Alert: Inform the user that the module has successfully learned a transmitter’s security code.
Memory Cleared:
Audible Alert: Three long beeps in succession.
Description of Alert: Inform the user that the transmitter security code memory has been successfully cleared
(push and hole the LEARN button for 6 – 10 seconds).
ERROR CODES
Ignition Safety (Protection for Ignition system):
Error Code: One beep every one second
Description of Fault: Warn users if the pilot is not successfully ignited in 60 seconds. This can occur when the
time between uses of the fire runs into a day or two, and varies from fireplace to fireplace.
How to Clear: Press OFF then ON buttons to re-attempt ignition.
What to Check:
•Ensure gas supply is on
•Ensure orange/white leads from module are plugged into the “PILOT” connection on the valve body
•Verify lead from igniter on pilot assembly is connected to the “I” terminal on the module
•Verify lead from flame sensor on pilot assembly is connected to the “S” terminal on the module.
•Verify that the black ground lead from the module is connected to a proper ground on the fireplace.
•Ensure there is no blockage in the pilot line
Sensor Safety (Protection for Flame sensor):
Error Code: 4 Beeps every one second (constant beeping)
Description of Fault: Warn users that the pilot flame sensor detects a pilot flame already present when ignition
sequence is initiated. This fault will also occur if pilot flame sensor is shorted to ground.
How to Clear: Press OFF then ON buttons to re-attempt normal ignition.
What to Check:
•Check if pilot flame is actually present when valve is turned OFF (valve replacement necessary if yes).
•Replace pilot assembly
•Replace module
Thermal Safety (Overheat Protection):
Error Code: 4 Beeps every 2 seconds.
Description of Fault: Warn users that the modules internal temperature has exceeded 170 degree F
How to Clear: Module’s internal temperature must cool to below 160 deg. F AND then press ON button.
What to Check:
•Is module located in unapproved location, too close to burner?
•Move to cooler location
•Does the plastic casing of module have visible signs of warping?
Table of contents
Popular Industrial Equipment manuals by other brands

ABB
ABB HT598663 Operation manual

Zimmer
Zimmer GEP2000 Series Installation and operating instructions

Hubbell
Hubbell Walltrak PW2FEBC installation instructions

SUHNER ABRASIVE
SUHNER ABRASIVE SP 1030 Flat Technical document

Huawei
Huawei SUN2000-4.95KTL-JPL0 user manual

ABB
ABB UniVer G12 Installation, service and maintenance instructions