HOME NETWERKS 75-101-BT User manual

www.homewerksww.com
Questions, problems, missing parts? Before returning to your retailer, call our customer
service department at 1-877-319-3757, 8 a.m. - 5 p.m., CST, Monday - Friday.
LED DIMMABLE MIRROR
WITH BLUETOOTH®
SPEAKERS AND
ANTI-FOG GLASS
MODEL #75-101-BT, 75-101A-BT
Dec. 12, 2018
Home NetWerks
SIMPLE SOLUTIONS FOR A SMARTER HOME
The BLUETOOTH®word mark and logos are registered trademarks owned by BLUETOOTH SIG, Inc. and any use of the said
mark by Homewerks Worldwide is under license. Other trademark and trade names are those of their respective owners.
READ AND SAVE THESE INSTRUCTIONS

2www.homewerksww.com
TABLE OF CONTENTS
Preparation.........................................................................................................................................................................2
Safety Information ..............................................................................................................................................................2
FCC Compliance ................................................................................................................................................................2
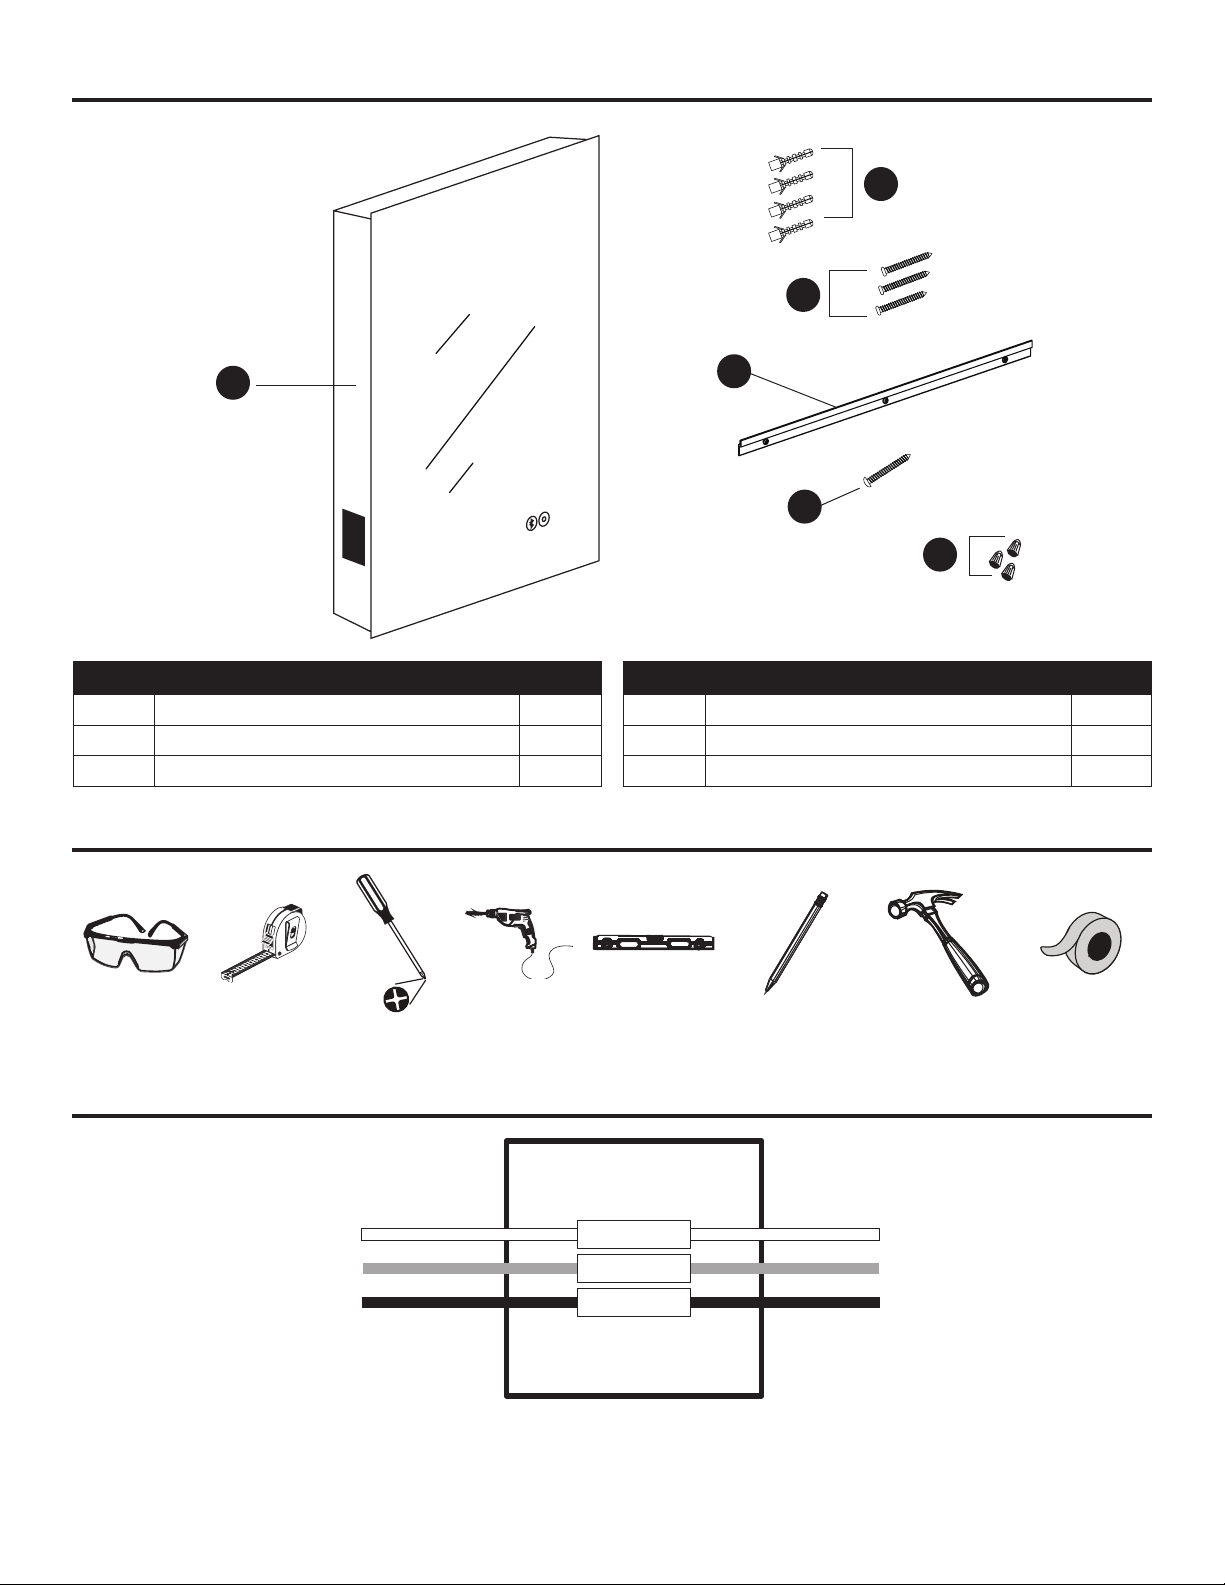
Package and Hardware Contents.......................................................................................................................................3
Recommended Tools..........................................................................................................................................................3
Wiring Diagram...................................................................................................................................................................3
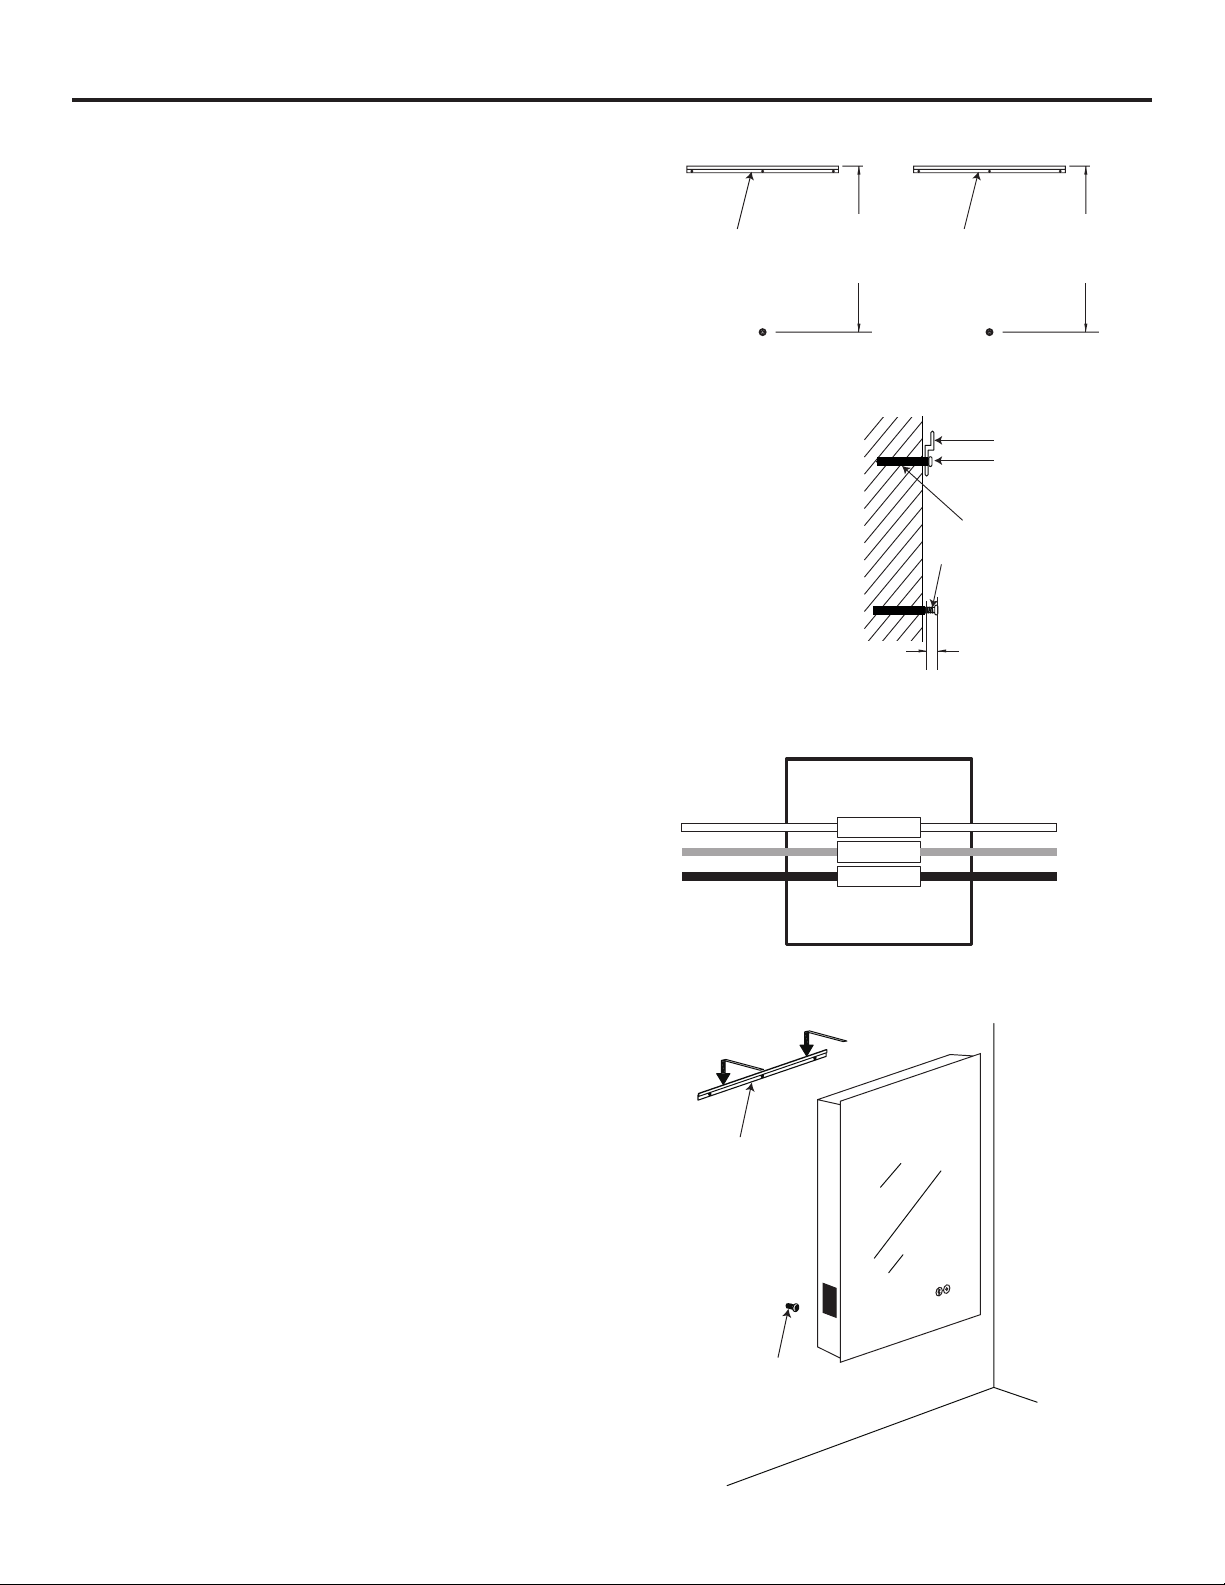
Installation Instructions.......................................................................................................................................................4
Operating Instructions ........................................................................................................................................................5
Care and Maintenance .......................................................................................................................................................5
Troubleshooting..................................................................................................................................................................5
Warranty .............................................................................................................................................................................5
This equipment complies with FCC RF radiation exposure limits set forth
for an uncontrolled environment.
This device complies with part 15 of the FCC rules. Operation is subject
to the following two conditions: (1) this device may not cause harmful
interference, and (2) this device must accept any interference received,
including interference that may cause undesired operation.
NOTE: The manufacturer is not responsible for any radio or TV interference
caused by unauthorized modications or changes to this equipment. Such
modications or changes could void the user’s authority to operate the
equipment.
NOTE: This equipment has been tested and found to comply with the limits
for a Class B digital device, pursuant to part 15 of the FCC Rules. These
limits are designed to provide reasonable protection against harmful
interference in a residential installation. This equipment generates uses
and can radiate radio frequency energy and, if not installed and used in
accordance with the instructions, may cause harmful interference to radio
communications. However, there is no guarantee that interference will not
occur in a particular installation. If this equipment does cause harmful
interference to radio or television reception, which can be determined by
turning the equipment off and on, the user is encouraged to try to correct
the interference by one or more of the following measures:
– Reorient or relocate the receiving antenna.
– Increase the separation between the equipment and receiver.
– Connect the equipment into an outlet on a circuit different from that
to which the receiver is connected.
– Consult the dealer or an experienced radio/TV technician for help.
PREPARATION
Before beginning assembly of product, make sure all parts are present. Compare parts with package contents list and
hardware contents. If any part is missing or damaged, do not attempt to assemble the product. Contact customer service
for replacement parts.
SAFETY INFORMATION
Please read and understand this entire manual before attempting to assemble, operate or install the product.
1. Always disconnect the power supply prior to installing, servicing or removing the LED mirror.
2. Installation work must be carried out by a qualied person(s) in accordance to all local and safety codes including the
rules for re-rated construction.
3. Follow all local building, safety and electrical codes as well as NEC (National Electrical Code) and OSHA (Occupational
Safety and Health Act).
4. Electric service supply must be 120 volts, 60 hertz.
5. This unit must be properly grounded.
6. Do not bend or kink the power wires.
7. Exercise care to not damage existing wiring when cutting or drilling into walls or ceilings.
8. Avoid putting sharp or hard objects against mirror surface. Damage and/or electrical injury may occur if punctured.
9. Turn product off during storms or power surge scenarios as power surges may damage internal components.
10. If installed with a power plug, never forcibly pull the plug from the wall. Remove gently to avoid unnecessary stress to the
wires.
11. If not being used for extended periods of time, ensure power is disconnected.
FCC Compliance

3
www.homewerksww.com
PACKAGE AND HARDWARE CONTENTS
PART DESCRIPTION QTY
A LED mirror 1
B Wall anchors 4
C Z-bar screws 3
PART DESCRIPTION QTY
D Z-bar 1
E Lower locking screw 1
F Wire connectors 3
A
B
C
D
E
F
RECOMMENDED TOOLS (NOT INCLUDED)
Safety
goggles
Tape
measure
Phillips
Screwdriver
Electric drill
and drill bits
Level Pencil Hammer Electrical
tape
WIRING DIAGRAM
Mirror House
black black
white neutral
ground
live
white
green green
Installations may vary depending on how the previous mirror was installed and the presence of a power source. Supplies necessary for installation of
your new mirror are not all included; however, most are available at your local home improvement or hardware store.

4www.homewerksww.com
MIRROR WIRING
3. Locate the White (neutral), Black (live) and Green
(ground) wires are extended from the cord in the back of
the mirror. With the power turned off, connect the wires
on the mirror with the neutral, live and ground house
wires with wire connectors (included).
FIGURE 2
D
E
HANG AND SECURE THE MIRROR
4. Hang mirror on the Z-bar (D), centering it and ensuring
that it is securely hanging (see FIGURE 2). The lower
locking screw (E) will align with the key-hole bracket on
the lower back of mirror. Once the lower locking screw
(E) is aligned through the key-hole slot, move the
mirror slightly to either side to lock it in place
(see FIGURE 2.)
IMPORTANT NOTE: Follow all local electrical and building
codes when wiring your device and consult an electrician.
INSTALLATION INSTRUCTIONS
INSTALLING THE Z-BAR FOR HANGING MIRROR
1. Place the Z-bar (D) at the desired location on the wall,
using a level for nal positioning. Mark the location of
the three holes in the Z-bar (D) on the wall. Drill 1/4 in.
holes at the marked locations and insert included
wall anchors (B). Secure Z-bar (D) to the wall with
three included screws (C).
Vertical mount
D
FIGURE 1
1/2"
22-3/4"
Vertical mount
D28-7/8
"
D
C
B
E
INSTALL LOWER LOCKING SCREW
2. Using a level, mark down from the center of the Z-bar
(D) 22-3/4 in. for vertical mirror orientation (see FIGURE
1). Drill a 1/4 in. hole at this location and insert an
included wall anchor (B). Drive the lower locking screw
(E) into the anchor (B), leaving 1/2 in. exposed (see
FIGURE 1).
Mirror House
black black
white neutral
ground
live
white
green green

5
www.homewerksww.com
OPERATING INSTRUCTIONS
OPERATING THE DIMMABLE LED LIGHT
Press the power touch sensor button and light will turn on at its brightest setting. Continue touching the sensor button again and
the light will dim to the next level. There are three light brightness levels and on the fourth touch the light will turn off.
OPERATING THE BLUETOOTH®SPEAKERS
Press and hold the Bluetooth®touch button for 4 seconds, a chime will indicate that the Bluetooth®is activated and the touch
button will change color to white.
To pair your device for the rst time, turn on the device's Bluetooth connection and look for the mirror, which will be labeled
HW MIRROR and connect to it.
Once paired, play music or make calls from your device and the audio will play through the mirror's dual speakers. To answer
an incoming call when Bluetooth®speakers are on and paired, touch the button with the Bluetooth®icon sensor on the the
mirror and start talking, the call will come through the mirror. If you want to talk from your phone only, answer the incoming call
on your phone instead.
Speakers can be muted during play by tapping the Bluetooth touch button and can be unmuted by tapping the button again.
CARE AND MAINTENANCE
When cleaning your LED mirror, a mild non-abrasive glass cleaner is recommended. Apply to a soft cloth or paper towel.
CAUTION: Do not spray cleanser directly onto the mirror or frame.
TROUBLESHOOTING
PROBLEM POSSIBLE CAUSE CORRECTIVE ACTION
Device will not pair Another device is already paired Make sure BLUETOOTH®signal is turned off
on other devices.
BLUETOOTH® SPEAKER – LIMITED 1-YEAR WARRANTY
If the BLUETOOTH® speaker fails due to a defect in materials or workmanship at any time during the rst year of ownership,
the manufacturer will replace it free of charge, postage-paid at their option. This warranty does not cover products that have
been abused, altered, damaged, misused, cut or worn. This warranty does not cover use in commercial applications. Use
only manufacturer-supplied genuine warranty repair replacement parts to repair the BLUETOOTH®speakers. Use of non-
genuine repair parts will void your warranty. The manufacturer DISCLAIMS all other implied or express warranties including
all warranties of merchantability and/or tness for a particular purpose. As some states do not allow exclusions or limitations
on an implied warranty, the above exclusions and limitations may not apply. This warranty gives you specic legal rights,
and you may have other rights that vary from state to state.
This warranty is limited to the replacement of defective parts only. Labor charges and/or damage incurred during installation,
repair, replacement as well as incidental and consequential damages connected with the above are excluded. Any damage
to this product as a result of neglect, misuse, accident, improper installation or use other than the purpose SHALL VOID
THIS WARRANTY.
Shipping costs for return product as part of a claim on the warranty must be paid for by the customer. Inquiries regarding
warranty claims can be directed to 1-877-319-3757, 8 a.m. - 5 p.m., CST, Monday - Friday.
Other manuals for 75-101-BT
1
This manual suits for next models
1
Table of contents
Other HOME NETWERKS Personal Care Product manuals