manuals.online logo
Brands
  1. Home
  2. •
  3. Brands
  4. •
  5. Homefibre
  6. •
  7. Switch
  8. •
  9. Homefibre OMS 126 RR-DL User manual

Homefibre OMS 126 RR-DL User manual

© Homefibre Digital Network GmbH Änderungen und Druckfehler vorbehalten. Seite 1
OMS126-DL_Manual_de_en_2020-07-13 Errors and omissions excepted. page 1
POF Fast Ethernet Media Switch
OMS 126 RR-DL (Version DATALIGHT)
Bedienungsanleitung / user manual
Beschreibung
Der OMS 126 RR-DL ist ein Ethernet Smart Switch mit sechs
OptoLock® POF (Kunststoff Lichtwellenleiter) Anschlüssen und zwei RJ45
Kupfer Anschlüssen. Die Übertragung wird über zwei unterschiedliche
Netzwerkverbindungsmedien (10/100/1000 Base-TX und 100 Base-FX)
durchgeführt.
Die Datenübertragungslänge über POF Kabel nach IEC 60793‐2
Klasse A4a.2 (z.B. Mitsubishi Chemical GHV 4002) beträgt 80 m.
Die Verbindungslänge für das Kupferkabel (Cat5e, Cat6; RJ45) beträgt
max. 100 m. Die „Auto-negotiation“ Funktion ermöglicht eine
Datenübertragung mit 10 Mbit/s, 100 Mbit/s oder 1 Gbit/s über UTP/STP
Kabel.
Die Standards IEEE 802.3, IEEE 802.3u und IEEE 802.3ab werden erfüllt.
Die Datenübertragung erfolgt über „switching“ und „store-and-forward“
Technologie, basierend auf einem „IK MAC address table“.
Der OMS 126 RR-DL ist CE zertifiziert und RoHS konform.
Die vollständige Benutzerdokumentation können Sie auf unserer Webseite
finden oder unter welcome@homefibre.at anfordern.
Description
The OMS 126 RR-DL is an Ethernet Smart Switch with six
OptoLock® Plastic Optical Fibre (POF) ports and two RJ45 Gigabit ports.
The transmission is carried out via two different network connection
media /10/100/1000 Base-TX and 100 Base-FX).
The transmission distance is 80 m over POF cable according to
IEC 60793-2 class A4a.2 (e.g. Mitsubishi Chemical GHV 4002).
The link distance for copper cables (Cat5e, Cat6; RJ45) is 100m. The
auto-negotiation function enables data transmission to operate at
10 Mbps, 100 Mbps or 1 Gbps connection over UTP/STP cable.
The device complies to IEEE 802.3, IEEE 802.3u and IEEE 802.3ab
standards.
The data transmission is realized by switching and store-and-forward
technology, based on IK MAC address table.
The OMS 126 RR-DL is CE certified and RoHS compliant.
The comprehensive user manual can be found on our webpage or
requested at: welco[email protected] .
Außenansicht / product exterior
Vorderansicht
/
f
ront
p
anel
Rückansicht
/
r
ear
p
anel
LED Anzeigen / LED indicators
Beschriftung /
label Farbe / color
Anzahl /
quantity
Anzeigen Funktion / indication function
EIN / ON AUS / OFF Blinken / blink
Power (PWR) rot / red 1 EIN / ON AUS / OFF NA
Utilization
(U1 - U8) grün / green 8 NA getrennt / disconnected aktiv /
active
Link POF
(L1 - L6) gelb / amber 6 Signal vorhanden /
signal detected
nicht vorhanden /
not detected NA
Link RJ45
(L7 - L8) gelb / amber 2 1000 Mbit/s Verbindung /
1000 Mbps connection
10 Mbit/s bzw. keine Verbindung /
10 Mbps or no connection
100 Mbit/s Verbindung /
100 Mbps connection
Spezifikationen /
Specifications
Kupfer / copper
Standard /standard
Anschluss / Connector
Impedanz / Impedance
max. Distanz / max. distance
IEEE 802.3, 802.3u
IEEE 802.3ab
2 x RJ45
100 Ohm
100 m
Zubehör / accessories
Netzgerät / power adaptor
100 – 240 V AC, 50-60 Hz
auf / to 5 V DC 2 A
Optisch / fibre optic
Quelle / source
Wellenlänge / wavelength
Anschluss / connector
Empfindlichkeit / sensitivitiy
max. Distanz / max. distance
RCLED
650 nm
6 x OptoLock®
-22 dBm typ.
80 m mit / with POF 2,2 mm
Abmessungen / dimensions
Gewicht / weight
Betriebstemperatur /
operating temperature
Lagertemperatur / storage temperature
(W) 196 x (H) 30 x (D) 124 mm
671 g (23,7 oz)
0 °C ~ 50 °C (media switch)
0 °C ~ 42 °C (AC/DC Adaptor)
-10 °C ~ +70 °C (14° ~ 158°F)
Energieversorgung / power supply
Ausgangsspannung / output voltage
Ausgangsstrom / output current
Polarität / polarity
Anschlussgröße / connector size
5 V DC
1.6 A max
inner pin pos.
ID=1.35 mm OD=3.5 mm
Pin min. = 10 mm
Zulassung / agency approvals
Abstrahlung /
electromagnetic emission
FCC Part 15, Class A
EN 55022, Class B
8
5V DC IN
+-
+-
+-
3
2
154
U
L
6 87 12 3 4 5 6 7
PWR
3
2
154
U
L
6 87 12 3 4 5 6 7
PWR
LED Anzeigen/
LED indicators
RJ45 Anschluss/
RJ45 interface RJ45 Anschluss/
RJ45 interface
AC / DC Adapter Anschluss/
AC / DC adaptor connector
OptoLock® Anschlüsse/
OptoLock® interfaces
© Homefibre Digital Network GmbH Änderungen und Druckfehler vorbehalten. Seite 2
OMS126-DL_Manual_de_en_2020-07-13 Errors and omissions excepted. page 2
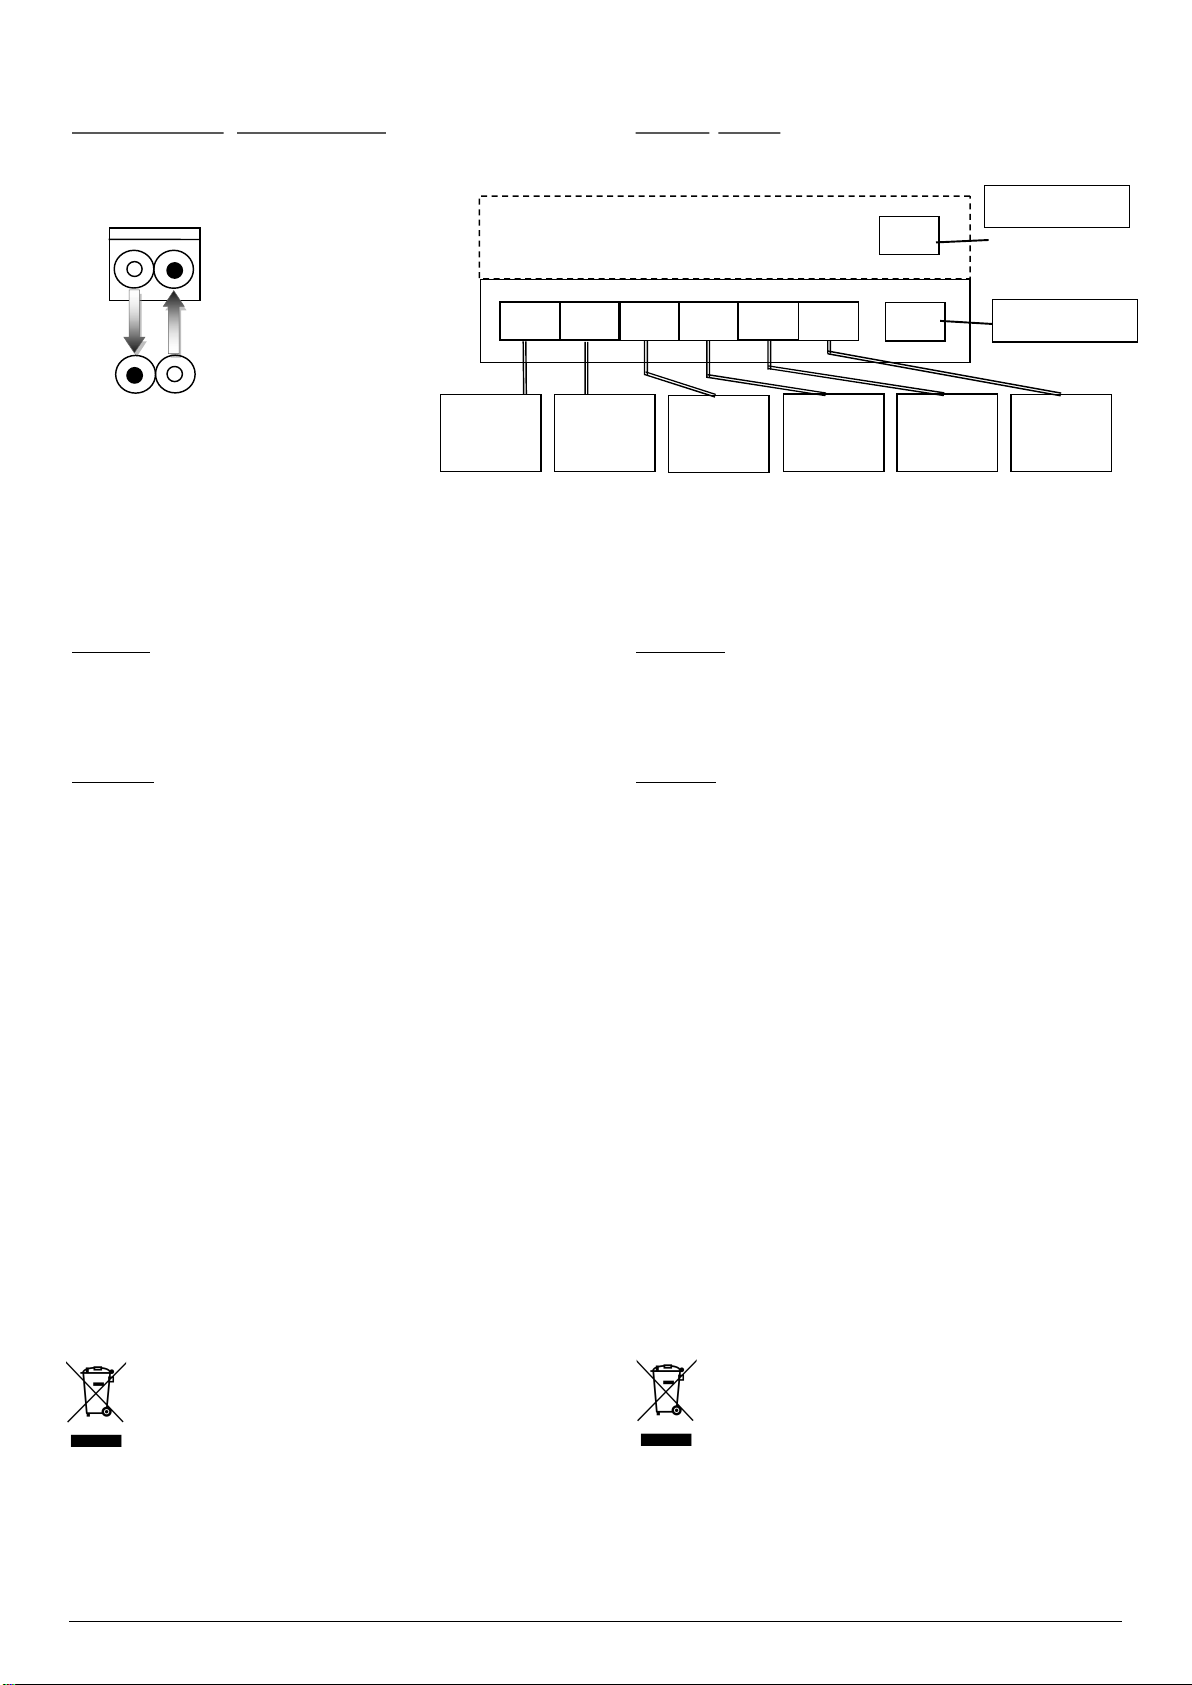
Verbindungsdiagramm / connection diagram
OptoLock® Anschluss / OptoLock® connector Diagramm / diagram
Stromversorgung
Der Media Switch ist automatisch eingeschaltet, sobald der AC/DC Adapter
mit einer AC Steckdose verbunden ist. Ist der Media Switch korrekt an die
Stromversorgung angeschlossen, leuchtet die PWR LED rot.
Power supply
The power of the media switch is automatically ON when the AC/DC
adaptor is connected to the AC power. The PWR LED (red) indicates the
status of the power.
Installation
Umgebung
 Betreiben Sie den Media Switch in kühler, trockener Umgebung
um eine optimale Funktion zu gewährleisten.
 Betreiben Sie den Media Switch in einem gut belüfteten Raum.
Lassen Sie allseitig genug Platz zur Belüftung.
Verbindung
1. Schließen Sie den Media Switch über den AC/DC Adapter an.
2. Verbinden Sie das Netzwerkgerät mit den jeweiligen Ports (UTP
oder POF) des Switches. Sobald die Verbindung aufgebaut
wurde, leuchtet die obere LED grün.
3. Das Gerät, welches am UTP-Port angeschlossen wird, kann auf
Auto-negotiation mode eingestellt werden. Wenn möglich
verwendet der Smart Switch die max. Übertragungs-
geschwindigkeit und full duplex. Der Smart Switch kann auf
10/100 oder 1000Mbit/s entweder full duplex oder half duplex
eingestellt werden. Die beteiligten Netzwerkgeräte müssen dabei
im selben Modus betrieben werden. Die LED L7/L8 leuchtet bei
1000 Mbit/s, blinkt bei 100 Mbit/s. Bei 10 Mbit/s oder bei fehlender
Verbindung ist die LED nicht eingeschaltet.
4. Das Gerät, welches am POF-Port angeschlossen wird, kann auch
in den Auto-negotiation mode oder mit fixen 100 Mbit/s im full
oder half duplex betrieben werden. Bei erfolgreicher optischer
Verbindung an den Ports 1 bis 6 leuchtet die untere LED gelb.
5. Die obere LED blinkt grün, wenn der dazugehörige Port in Betrieb
ist.
Installation
Environment
 Place the media switch in a cool, dry place to ensure a good
working condition.
 Place the media switch in an airy chamber. Leave enough
space for air circulation on each side of the media switch.
Connection
1. Power the media switch by using the AC/DC adaptor.
2. Connect network device/s to either UTP or POF Port/s on the
smart switch. When one port is connected properly, the
upper-level green LED related to that port will turn on.
3. The device connected to the UTP port can be set to
Auto-negotiation mode. The smart switch will run at the highest
speed and full duplex when available. The smart switch can be
fixed to a specific 10/100 or 1000 Mbps modes, either full
duplex or half duplex. At that time, the counterpart must be at
the same or Auto-negotiation mode. Use auto-negotiation
mode for optimum performance. The lower-level yellow LED at
port 7/port 8 will indicate the speed of transmission at the
UTP ports, 1000 Mbps by LED ON, 100 Mbps by LED blinking,
and 10 Mbit/s by LED OFF.
4. The device connected to the POF port can be set to
Auto-negotiation mode or fixed 100 Mbps either full duplex or
half duplex. The lower-level yellow LED at port 1 to 6 will turn
ON when the related POF port receives a light signal with
sufficient optical power.
5. The upper-level green LED will blink when the related port is
activated.
Lieferumfang
 1 OMS126RR-DL Media Switch
 1 LTE Netzgerät, 1 Netzkabel
 1 Bedienungsanleitung
Scope of delivery
 1 OMS126RR-DL Media Switch
 1 LTE power supply, 1 power extension cord
 1 user manual
Das durchkreuzte Symbol eines Müllcontainers auf dem Produkt
bzw. den begleitenden Dokumenten weist darauf hin, dass dieses
Produkt nach den „waste electrical and electronic equipment“
Richtlinien (WEEE) nicht im Hausmüll entsorgt werden darf.
Um für einen ordentlichen Umgang mit Elektrogeräten und deren
Bestandteile zu sorgen, ist das Gerät in dafür ausgerüsteten
Sammelzentren abzugeben. In einigen Ländern ist dies gratis möglich, in
anderen Ländern kann das Gerät zurück gegeben werden beim Kauf eines
äquivalenten neuen Gerätes.
The crossed out wheeled bin symbol on the product and / or
accompanying documents means that used electrical and
electronic equipment (WEEE) should not be mixed with
general household waste.
For proper treatment, recovery and recycling, please take this product/s
to designated collection points where it will be accepted free of charge.
Alternatively, in some countries, you may be able to return your products
to your local retailer upon purchase of an equivalent new product.
Media Switch
POF:
MK / Gerät
MC / Device
Rückseite /
rear
Vorderseite /
front
POF:
MK / Gerät
MC / Device
POF:
MK / Gerät
MC / Device
RJ45: PC / Router
POF:
MK / Gerät
MC / Device
POF:
MK / Gerät
MC / Device
POF:
MK / Gerät
MC / Device
Anschluss /
Connector
Übertragung /
transmission
Kabel /
cable
RJ45: PC / Router
© Homefibre Digital Network GmbH Änderungen und Druckfehler vorbehalten. Seite 3
OMS126-DL_Manual_de_en_2020-07-13 Errors and omissions excepted. page 3
Sicherheitshinweise & Einsatzzweck
Das Produkt muss immer in Übereinstimmung mit Vorgängen, welche in
dieser Betriebsanleitung angeführt sind, betrieben werden, und sollte nie für
unvorhergesehene Zwecke eingesetzt werden.
Der OMS 126 RR Smart Switch kann als Stand-Alone-Gerät in einem Büro /
Data Center / Heimnetzwerk verwendet werden. Das Gerät muss mit dem
mitgelieferten Netzteil betrieben werden. Das Gerät sollte in keinem Fall von
Laien beziehungsweise unautorisierten Personen in Betrieb genommen
oder administriert werden.
Safety Instructions & intended use
The product must always be used in compliance with the procedures set
out in this user guide and never for purposes that are different from the
foreseen ones.
The OMS 126 RR Smart Switch can be used as a stand-alone device in
an office / data center / home environment. The device must be used
only with the provided power supply. The device may not be used or
handled by unauthorized personnel.
Warnung
DER BENUTZER IST VERANTWORTLICH FÜR ALLE LEGALEN
VERPFLICHTUNGEN, WELCHE FÜR DIE VERWENDUNG UND
INSTALLATION DES PRODUKTES ANGEFÜHRT WERDEN. SOLLTE
DAS PRODUKT NICHT RICHTIG INSTALLIERT BZW. BENUTZT ODER
NICHT RICHTIG GEWARTET WERDEN, IST ES NICHT MÖGLICH DEN
HERSTELLER FÜR EVENTUELLE GEBRECHEN, MANGELNDE
FUNKTIONALITÄT, SCHÄDEN & VERLETZUNGEN VON PERSONEN
VERANTWORTLICH ZU MACHEN.
Warning
THE USER IS RESPONSIBLE FOR ALL LEGAL OBLIGATIONS
LINKED TO THE PRODUCT’S INSTALLATION AND USE. IF THE
PRODUCT IS NOT INSTALLED OR USED PROPERLY, OR CORRECT
MAINTENANCE / SERVICING IS NOT CARRIED OUT, IT SHALL NOT
BE POSSIBBLE TO DEEM THE MANUFACTURER RESPONISBLE
FOR ANY POSSIBLE BREAKAGE, MALFUNCTIONING, DAMAGES TO
THINGS, OR INJURIES TO PERSONS.
Installationsvorsichtsmaßnahmen
Vermeiden Sie direkte Einstrahlung des Sonnenlichts auf das Gerät.
Installieren Sie es nicht in feuchten oder staubigen Plätzen. Das Gerät darf
nicht Feuchtigkeit oder Wasser ausgesetzt werden. Stellen Sie sicher, dass
Ihnen der Installationsort ermöglicht, die Übertragungskabel und das
Netzteil leicht zu erreichen. Verwenden Sie dezidierte Steckerleisten oder
Ähnliches, um dem Gerät genug Leistung zur Verfügung zu stellen. Bitte
denken Sie daran, dass das Gerät für eine max. Betriebstemperatur von
40°C ausgelegt ist. Sollte das Gerät eventuell in Einbauschränken installiert
werden, könnte die Betriebstemperatur des Einbauschrankes höher als die
Raumtemperatur sein.
Installation precautions
Do not expose this device to direct sunlight, or a damp or dusty place.
Do not expose the device to moisture or water. Be sure that the
installation site will allow you to easily access the fibre optic and copper
LAN cables and the power cord. Use dedicated power circuits or power
conditioners to supply reliable power to the unit. Please notice that this
device is designed for a maximum operating temperature of 40°C
(104°F). If this device is installed in a wiring closet, the operating ambient
temperature of the closet environment may be higher than the room
ambient temperature.
Sicherheit und EMC Behördliche Abschlüsse
Das Gerät entspricht allen geeigneten „European Community Product
Specifications and Regulations“.
Das Produktzertifikat ist auf Anfrage verfügbar.
Safety and EMC Regulatory Statements
This device conforms to all appropriate European Community Product
Specifications and Regulations,
The product certification is available upon request.
Homefibre digital network GmbH
Fratresstrasse 20
9800 Spittal a.d. Drau / Austria
Homepage: www.homefibre.at
E-Mail: welcome@homefibre.at
Vertriebspartner /
Distribution Partner:

Other Homefibre Switch manuals

Homefibre OMS 126S-150 User manual

Homefibre

Homefibre OMS 126S-150 User manual

Homefibre OMS 1412 RS-GIG User manual

Homefibre

Homefibre OMS 1412 RS-GIG User manual

Homefibre OMS 113- 220 User manual

Homefibre

Homefibre OMS 113- 220 User manual

Homefibre OMS 113-150 User manual

Homefibre

Homefibre OMS 113-150 User manual

Homefibre OMS 113- 150 User manual

Homefibre

Homefibre OMS 113- 150 User manual

Homefibre OMS 105 User manual

Homefibre

Homefibre OMS 105 User manual

Homefibre OMS 1034 FUS-GIG User manual

Homefibre

Homefibre OMS 1034 FUS-GIG User manual

Homefibre OMS 105 User manual

Homefibre

Homefibre OMS 105 User manual

Homefibre OMS 1412 RS-GIG+ User manual

Homefibre

Homefibre OMS 1412 RS-GIG+ User manual

Popular Switch manuals by other brands

elsner elektronik Cala KNX Multitouch T Light/Sunblind quick start guide

elsner elektronik

elsner elektronik Cala KNX Multitouch T Light/Sunblind quick start guide

Centrepoint Technologies TalkSwith user guide

Centrepoint Technologies

Centrepoint Technologies TalkSwith user guide

LEGRAND Wattstopper LMDM-101-B quick start guide

LEGRAND

LEGRAND Wattstopper LMDM-101-B quick start guide

LEGRAND Wattstopper InteliSwitch AS-100 quick start guide

LEGRAND

LEGRAND Wattstopper InteliSwitch AS-100 quick start guide

Artistic Licence Rail-PSU-D4 user guide

Artistic Licence

Artistic Licence Rail-PSU-D4 user guide

D-Link DWS-1008 product manual

D-Link

D-Link DWS-1008 product manual

Intellinet 503723 Quick install guide

Intellinet

Intellinet 503723 Quick install guide

Motorola DIMETRA MTS 4 Installation, configuration, and service guide

Motorola

Motorola DIMETRA MTS 4 Installation, configuration, and service guide

CIS CIS-CRS112-8P product manual

CIS

CIS CIS-CRS112-8P product manual

DeLOCK 18683 user manual

DeLOCK

DeLOCK 18683 user manual

Theben SEL 173 DCF operating instructions

Theben

Theben SEL 173 DCF operating instructions

Motion CM-34-120 manual

Motion

Motion CM-34-120 manual

ATEN VS-0404 user manual

ATEN

ATEN VS-0404 user manual

TRENDnet TPE-80WS - Web Smart PoE Switch Quick installation guide

TRENDnet

TRENDnet TPE-80WS - Web Smart PoE Switch Quick installation guide

Moxa Technologies EDS-208 series installation guide

Moxa Technologies

Moxa Technologies EDS-208 series installation guide

Extreme Networks ISW Series installation guide

Extreme Networks

Extreme Networks ISW Series installation guide

Monroe Electronics R177M installation guide

Monroe Electronics

Monroe Electronics R177M installation guide

Sony BRS-200 Quick reference guide

Sony

Sony BRS-200 Quick reference guide

manuals.online logo
manuals.online logoBrands
  • About & Mission
  • Contact us
  • Privacy Policy
  • Terms and Conditions

Copyright 2025 Manuals.Online. All Rights Reserved.