Honeywell RCWL2205 User manual

Installation
Instructions
RCWL2205
Wireless MyChimeTM Door Chime &
Pre-recorded Sound Card
69-2110EFS-01
69-2110EFS_A.indd 1 11/29/2007 12:32:40 PM

Installation Instructions
69-2110EFS—01 ii
BATTERY
COMPARTMENT C
BATTERY
COMPARTMENT A BATTERY
COMPARTMENT B
HANGING
SLOT
VOLUME CONTROL
CODE DIAL
FIXING HOLES
USB SOUND
CARD SLOT
Safety
Before proceeding with the installation, please note the following safety warnings:
• Always follow the manufacturer’s advice when using power tools and wear
suitable protective equipment (e.g. safety goggles) when drilling holes, etc.
• Before drilling holes in walls, check for hidden electricity cables and water pipes.
The use of a cable/pipe locator is advisable if in doubt.
69-2110EFS_A.indd 2 11/29/2007 12:32:40 PM

RCWL2205
1 69-2110EFS—01
1. Fit batteries. Push batteries (2 x AAA) not included. Chime batteries 3x C cell,
not included.
2. Choose a code between 1 & 16. Apply the same code for push and chime.
69-2110EFS_A.indd 1 11/29/2007 12:32:41 PM

Installation Instructions
69-2110EFS—01 2
150 FT MAX
50 M MAX
3. Test your Chime and push.
4. Volume Control - Push button.
69-2110EFS_A.indd 2 11/29/2007 12:32:41 PM

RCWL2205
3 69-2110EFS—01
5. Selecting your standard tune.
Switch A Switch B Switch A
Position
Switch B at
Position 2
Switch B at
Position 1
3 Plays list of pre-
recorded songs one
after the other.
Plays the same
selected tune.
2 Westminster 8 note Westminster 8 note
1 Ding Dong Dong Ding Dong Dong
To change
your tune Switch B to
position 2
Play through your
list of tunes by
pressing the push
until desired tune is
reached, then…
Switch B to
position 1
this selects the
desired tune.
69-2110EFS_A.indd 3 11/29/2007 12:32:42 PM

Installation Instructions
69-2110EFS—01 4
6. Playing tunes from pre-recorded sound card:
Fit the pre-recorded sound card into your Chime.
69-2110EFS_A.indd 4 11/29/2007 12:32:42 PM

RCWL2205
5 69-2110EFS—01
Switch A
Position
Switch B at Position 2 Switch B at Position 1
3 Plays list of pre-recorded
songs one after the other.
Plays the same selected tune.
2 Westminster 8 note Westminster 8 note
1 Ding Dong Dong Ding Dong Dong
7. See the table below for tune selection.
69-2110EFS_A.indd 5 11/29/2007 12:32:42 PM

Installation Instructions
69-2110EFS—01 6
8. Mounting your Chime and Push
150 FT MAX
50 M MAX
Drill two 1/4-in. (5 mm) fixing holes for mounting the push back plate.
Do not mount on or next to a metal surface.
69-2110EFS_A.indd 6 11/29/2007 12:32:42 PM

RCWL2205
7 69-2110EFS—01
Dense walls and metal can reduce range, before final installation adjust distance and
position between push and chime while operating the push to optimize the chime
within your environment.
Wall Type Range Reduction
Dry-lined partition wall 10–30%
Single-layer brick wall 20–40%
Double-layer brick wall 30–70%
Metal panel/radiator 90–100%
69-2110EFS_A.indd 7 11/29/2007 12:32:42 PM

Installation Instructions
69-2110EFS—01 8
Troubleshooting
“My Chime does not work…”
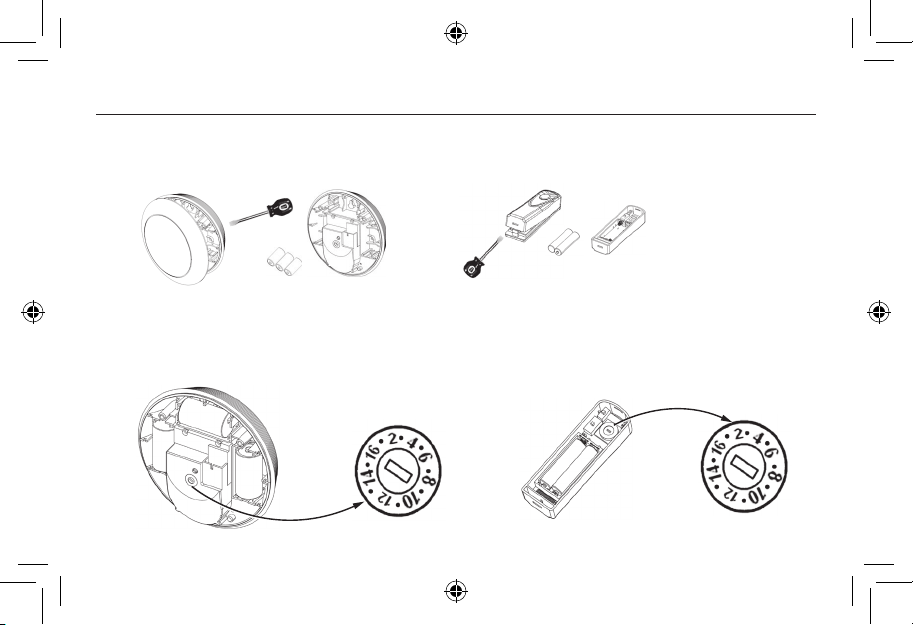
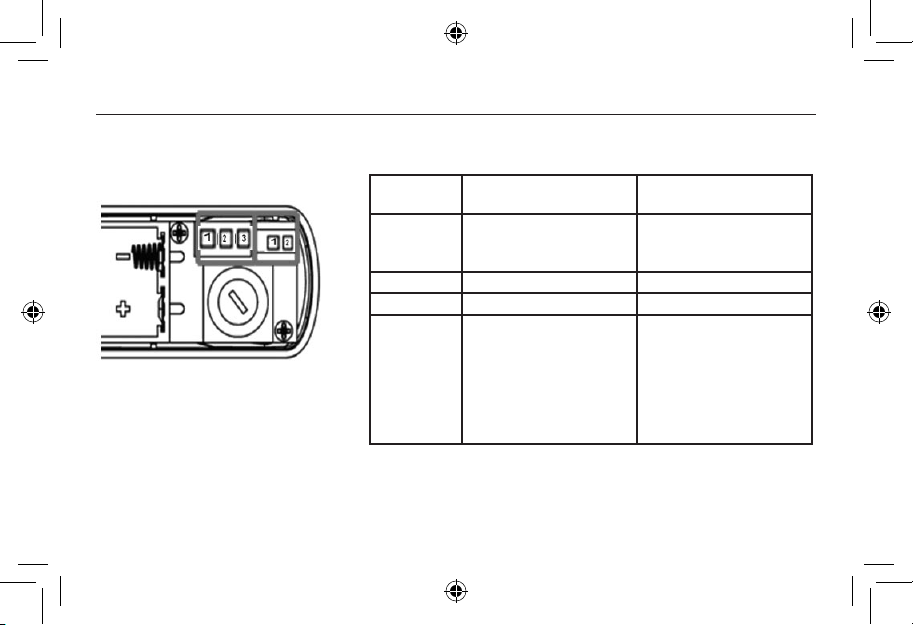
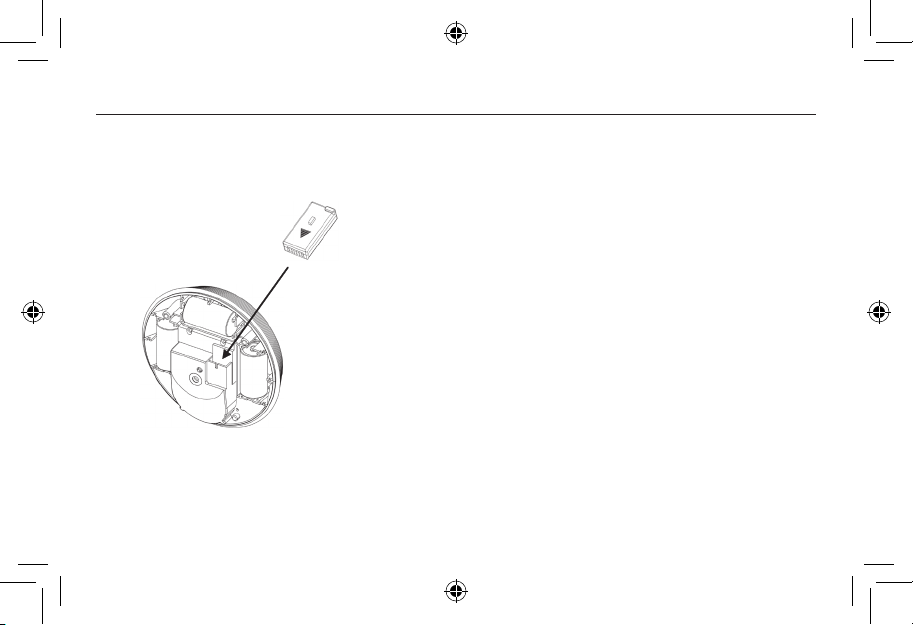
Make sure the batteries are fitted correctly + / - polarity.
Replace batteries every 12-18 months. Only use alkaline batteries.
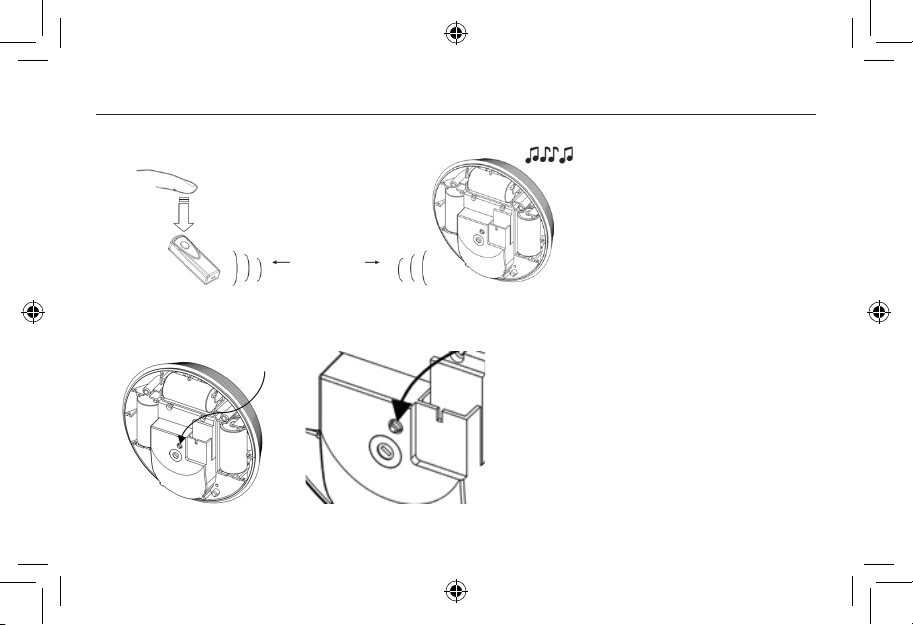
Make sure push and Chime are within range, see section 8
Check that the dial code on the bell push and chime are set at the same position. See
section 2.
Chime does not play tune selected:
Ensure you have selected the right options – see section 5-6.
Support website link: http://yourhome.honeywell.com - with automatic updates.
Disposal and Recycling
At the end of their useful life the packaging and product should be disposed
of via a suitable Recycling Center. Do not dispose of as normal household
waste. DO NOT BURN.
Check with your local authority or retailer for recycling advice.
69-2110EFS_A.indd 8 11/29/2007 12:32:42 PM

RCWL2205
9 69-2110EFS—01
Declaration
Honeywell hereby declares that this product complies with Part 15 of the FCC rules
and Industrial Canada standards. This device operation is subject to the following two
conditions:
(1) This device may not cause harmful interference, and
(2) This device must accept any interference received, including inter-
ference that may cause undesired operation.
Caution:
Changes or modification not expressly approved by the party responsible for regula-
tory compliance could void the user’s authority to operate the equipment.
Guarantee
Honeywell guarantees this product for 1 year from the date of purchase. Proof of pur-
chase is required: this does not affect your statutory rights. If you require further infor-
mation about your product call the Honeywell help line at 1-800-468-1502.
69-2110EFS_A.indd 9 11/29/2007 12:32:42 PM

® U.S. Registered Trademark.
© 2007 Honeywell International Inc.
69-2110EFS—01 M.S. 11-07
Printed in U.S.A. on recycled
paper containing at least 10%
post-consumer paper fibers.
Honeywell International Inc.
ACS, Environmental and Combustion Controls
1985 Douglas Drive, Golden Valley, MN 55422
www.honeywell.com
69-2110EFS_A.indd 10 11/29/2007 12:32:42 PM

RCWL2205
Logiciel MyChimeMC et carte de son pré-enregistrée pour carillon de porte sans fil
Directives
d’installation
69-2110EFS_A.indd 11 11/29/2007 12:31:18 PM

69-2110EFS—01 12
Directives d’installation
COMPARTIMENT
À PILES C
COMPARTIMENT
À PILES A COMPARTIMENT
À PILES B
FENTE EN
FORME DE POIRE
RÉGLAGE DU VOLUME
CADRAN POUR CODE
OUVERTURES DE FIXATION
FENTE POUR
CARTE DE SON USB
Sécurité
Avant de commencer l’installation, veuillez respecter les consignes de sécurité
suivantes :
• Toujours suivre les recommandations du fabricant lorsqu’on utilise des appareils
électriques et toujours se servir d’un équipement protecteur (par ex. des lunettes
de protection) lorsqu’on perce des trous, etc.
• Avant de percer un trou dans un mur, vérifier qu’il n’y a pas de canalisations ou
de câbles électriques encastrés. En cas de doute, il est conseillé d’utiliser un
appareil permettant de détecter les câbles/tuyaux.
69-2110EFS_A.indd 12 11/29/2007 12:32:43 PM

RCWL2205
13 69-2110EFS—01
1. Insérer les piles - Piles (2 x AAA) pour sonnette non comprises. Piles pour
carillons non comprises (3 piles de taille C).
2. Choisir un code entre 1 et 16. Appliquer le même code à la sonnette et au
carillon.
69-2110EFS_A.indd 13 11/29/2007 12:32:43 PM

69-2110EFS—01 14
Directives d’installation
50 M MAX
150 PI MAX
3. Vérifier la sonnette et le carillon.
4. Réglage du volume - Bouton-poussoir.
69-2110EFS_A.indd 14 11/29/2007 12:32:44 PM

RCWL2205
15 69-2110EFS—01
5. Sélection d’une mélodie standard.
Interrupteur A Interrupteur B
Position de
l’interrupteur
A
Interrupteur B à la
position 2
Interrupteur B à
la position 1
3 Fait entendre une liste
de mélodies pré-enregis-
trées l’une après l’autre.
Fait entendre la
même mélodie
choisie.
2 Westminster, 8 notes Westminster, 8
notes
1 Ding Dong Dong Ding Dong Dong
Pour modifier
la mélodie Interrupteur B à la posi-
tion 2
Faire jouer la liste des
mélodies en appuyant
sur la sonnette jusqu’à ce
que la mélodie souhaitée
soit atteinte, puis…
Interrupteur B à la
position 1
pour sélectionner
la mélodie sou-
haitée.
69-2110EFS_A.indd 15 11/29/2007 12:32:44 PM

69-2110EFS—01 16
Directives d’installation
6. Fait entendre les mélodies de la carte de son pré-enregistrées :
Insérer la carte de son pré-enregistrée dans le carillon.
69-2110EFS_A.indd 16 11/29/2007 12:32:44 PM

RCWL2205
17 69-2110EFS—01
Position de
l’interrupteur A
Interrupteur B à la
position 2
Interrupteur B à la
position 1
3 Fait entendre une liste de
mélodies pré-enregistrées
l’une après l’autre.
Fait entendre la même
mélodie choisie.
2 Westminster, 8 notes Westminster, 8 notes
1 Ding Dong Dong Ding Dong Dong
7. Suivre les directives du tableau ci-dessous pour choisir une mélodie.
69-2110EFS_A.indd 17 11/29/2007 12:32:44 PM

69-2110EFS—01 18
Directives d’installation
8. Installation du carillon et de la sonnette.
50 M MAX
150 PI MAX
Percer deux trous de fixation de 5 mm (1/4 po) pour installer la plaque de la
sonnette.
Ne pas installer la sonnette sur une surface métallique.
69-2110EFS_A.indd 18 11/29/2007 12:32:44 PM
This manual suits for next models
2
Table of contents
Languages:
Other Honeywell Household Appliance manuals
Popular Household Appliance manuals by other brands

Engelbert Strauss
Engelbert Strauss 63.64.2 Instructions and information

KRAIBURG
KRAIBURG SPORTEC motionflex Cleaning and Care Instructions

Pella
Pella 80WW0101 Replacement instructions

Southern Enterprises
Southern Enterprises CK622500TX-Espresso Finish Assembly

LG
LG LT1213CNR Energy guide

OYPLA Home
OYPLA Home 4104 user manual