manuals.online logo
Brands
  1. Home
  2. •
  3. Brands
  4. •
  5. Honeywell
  6. •
  7. IP Camera
  8. •
  9. Honeywell 2450Cm Series User manual

Honeywell 2450Cm Series User manual

PERFORMANCE SERIES IP
HEW2PER3*/HEW4PER3*/HEW8PER1*
WDR IR Ball Camera
Quick Installation Guide
(The last “*” represents V or L, and other numbers or letters)
Thank you for purchasing a Honeywell Performance Series IP
camera. Follow the instructions in this guide to install and log in
to your camera. For instructions on configuring the camera, refer
to the user guide on the DVD that came with your camera. If you
require additional assistance, call the number listed for your region
on the back cover.
Cautions and Warnings
WARNING
To ensure compliance with electrical safety standards, this product is
intended for use with a Listed Power Adapter marked “Limited Power
Source” or “LPS” on the unit, output rated to 12 VDC, minimum 0.33 A,
TMA=60 deg C, or from Power over Ethernet (PoE) provided by Listed
Information Technology Equipment meeting IEEE 802.3af PoE standard.
CAUTION
The Ethernet connection is not intended to be connected to exposed
(outside plant) networks. Do not connect two power sources to the camera
at the same time.
CAUTION
Invisible LED radiation (850 nm). Avoid exposure to beam.
Important Safeguards
•Read and keep these instructions.
•Confirm the installation surface can support at least three times the weight of the
camera.
•Do not aim the camera toward a bright light source for extended periods to prevent
damage to the imager.
•Avoid operating the unit under or close to unstable light sources (may cause flickering),
or close to fluorescent lamps or objects reflecting light.
•Do not touch the camera lens.
•Do not drop the camera or subject it to physical shock.
•Do not use a strong or abrasive detergent when cleaning the camera.
•Avoid operating or storing the unit in extremely humid, dusty, hot/cold environments,
where the operating temperature is outside the recommended range of -22°F to 140°F
(–30°C to 60°C).
•Do not apply power to the camera before completing installation.
Before You Begin
Before you begin, check that you have received all of the parts listed below. If any parts are
missing or damaged, contact your dealer immediately.
•Camera
•Installation DVD
•Quick Installation Guide
•Mounting Plate
•Self-tapping Screws (×4)
•Plastic Wall Anchors (×4)
•Mounting Template
CAUTION Installation and servicing should be performed only by qualified and experienced
technicians to conform to all local codes and to maintain your warranty.
Preparing the Mounting Surface
1. Apply the mounting template tothe
mounting surface.
Note Observe theorientation of the
cable exit notch onthebracket base.
Inoutdoor installations, the notch
should point downward to prevent
water from entering the camera
housing.
2. Using the mounting template as a
guide, drill three pilot holes in the
mountingsurface, then hammer the
supplied anchors into theholes.
3. Drill a cable entry hole inthe
mounting surface, then pull the
required cables through the hole.
CAUTION
THIS SYMBOL INDIC ATES THAT
DANGEROUS VOLTAGE
CONSTITUTING A RISK OF
ELECTRIC SHOCK IS PRESENT
WITHIN THE UNIT.
CAUTION: TO REDUCE THE RISK OF ELECTRIC
SHOCK, DO NOT REMOVE THE COVER.
NO USER-SERVICEABLE PARTS INSIDE.
REFER SERVICING TO QUALIFIED SERVICE
PERSONNEL.
THIS SYMBOL INDIC ATES THAT
IMPORTANT OPERATING AND
MAINTENANCE INSTRUCTIONS
ACCOMPANY THIS UNIT.
RISK OF ELECTRIC
SHOCK
DO NOT OPEN
© 2021 Honeywell International Inc. All rights reserved. No part of this publication may be reproduced by any means without written permission from Honeywell. The information in this publication is believed to be accurate in all respects. However, Honeywell
cannot assume responsibility for any consequences resulting from the use thereof. The information contained herein is subject to change without notice. Revisions or new additions to this publication may be issued to incorporate such changes.
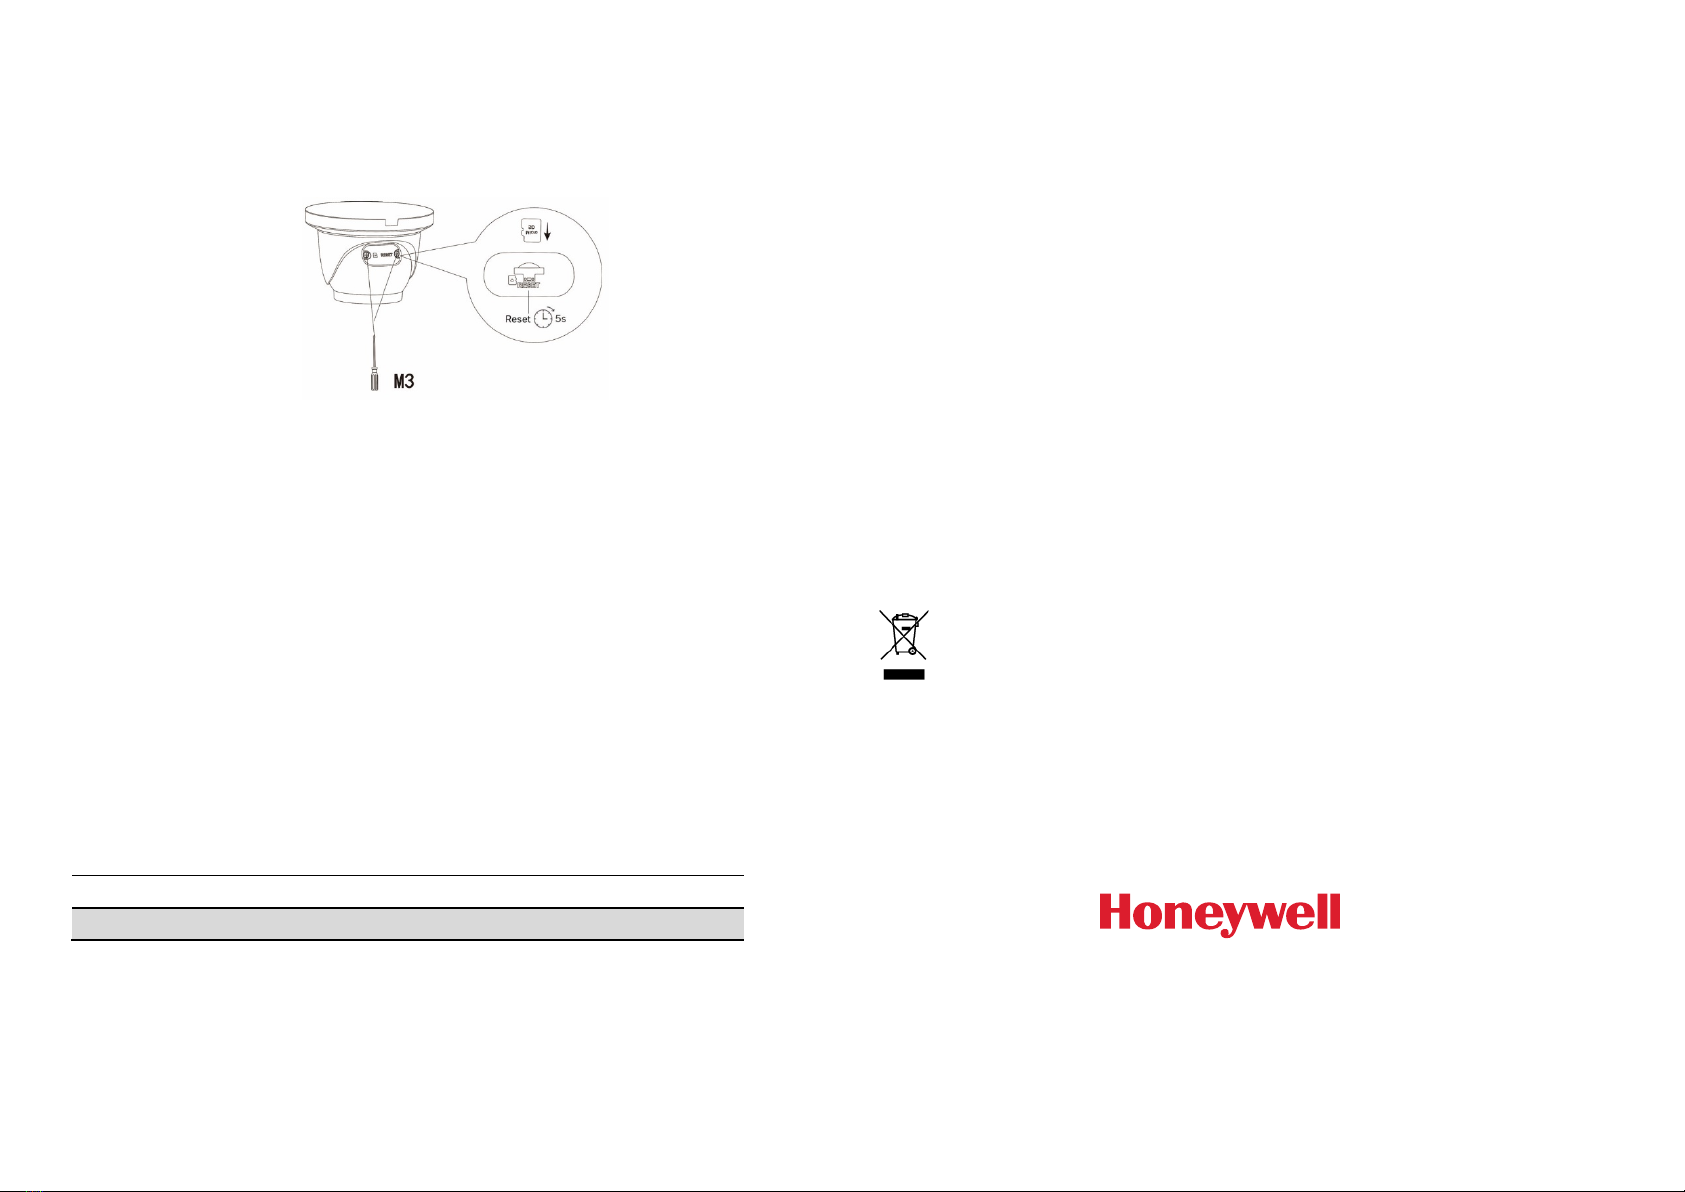
Mounting and Aiming the Camera
1.
Remove the dome cover from the camera assembly using the supplied Allenkey.
2.
If you are using a microSD card with the camera, install it before continuing. See below for
details.
3.
Connect the Ethernet cable to the RJ-45 port on thecamera.
4.
If the other end of the Ethernet cable is not connected to a PoE (Power-over-Ethernet)
switchor NVR, connect the power connector of the camera to a 12 VDC power source.
5.
Fix the camera assembly to the mounting surface using the supplied screws.
6.
Aim the camera lens in the desired direction, then tighten the screws on the camera
assembly.
7.
Reattach the dome cover.
Logging On to the Camera
If the camera is connected to the PoE port of a Honeywell Embedded NVR, it can be
configured using the NVR.
To log on remotely from a PC, install the Unified Tool from the software and documentation
DVD, find the camera on the network, and then open the web browser. The default user name
is admin (case-sensitive) and the default password is 1234.
Note

Only Internet Explorer 11 (or later) is supported.

IP address of the device is assigned automatically by DHCP server. If the DHCP server is not
available, the device will acquire 192.168.1.108 as the default IP address.
Recommended Recorders
HEN*4 8/16/32/64-channel Focus 4K NVRs (H.264 and H.265)
HEN*3 4/8/16/32-channel Performance Series NVRs (H.264 and H.265)
Regulatory Statements
FCC Compliance
This equipment has been tested and found to comply with the limits for a Class B digital device,
pursuant to part 15 of the FCC Rules. These limits are designed to provide reasonable protection
against harmful interference in a residential installation. This equipment generates, uses, and can
radiate radio frequency energy and, if not installed and used in accordance with the instructions,
may cause harmful interference to radio communications. However, there is no guarantee that
interference will not occur in a particular installation.
If this equipment does cause harmful interference to radio or television reception, which can be
determined by turning the equipment off and on, the user is encouraged to try to correct the
interference by one or more of the following measures:
•Reorient or relocate the receiving antenna.
•Increase the separation between the equipment and receiver.
•Connect the equipment into an outlet on a circuit different from that to which the receiver is
connected.
•Consult the dealer or an experienced radio/TV technician for help.
Note Changes or modifications not expressly approved by the party responsible for compliance
could void the user’s authority to operate the equipment.
This Class B digital apparatus complies with Canadian ICES-003.
Manufacturer’s Declaration of Conformance
North America The equipment supplied with this guide conforms to UL 60950-1 and CSA C22.2
No. 60950-1.
Europe The manufacturer declares that the equipment supplied is compliant with the European
Parliament and Council Directive on the restriction of the use of certain hazardous substances in
electrical and electronic equipment (2015/863/EU), the Low Voltage Directive (2014/35/EU) and
the essential requirements of the EMC directive (2014/30/EU), conforming to the requirements of
standards EN 55032 for emissions, EN 50130-4 for immunity, and EN 62368-1 for electrical
equipment safety.
WEEE (Waste Electrical and Electronic Equipment)
Correct disposal of this product (applicable in the European Union and other European
countries with separate collection systems). This product should be disposed of, at the
end of its useful life, as per applicable local laws, regulations, and procedures.
North America
Europe
Middle East
715 Peachtree St. NE Atlanta,
GA 30308
Newhouse Industrial Estate
Motherwell Lanarkshire ML1 5SB
United Kingdom
Emaar Business Park, Building No. 2,
Sheikh Zayed Road
P.O. Box 232362
Dubai, United Arab Emirates
www.security.honeywell.com
Tel: 1 800 323 4576
www.security.honeywell.com/uk
Tel: +44 (0) 1928 378005
www.security.honeywell.com/me
Tel: +971 4 450 5800
Document 800-26635-A, 03/2021

Other manuals for 2450Cm Series

39

This manual suits for next models

5

Other Honeywell IP Camera manuals

Honeywell VENTI Series D1 User manual

Honeywell

Honeywell VENTI Series D1 User manual

Honeywell H2W2PRV3 User manual

Honeywell

Honeywell H2W2PRV3 User manual

Honeywell 2450Cm Series User manual

Honeywell

Honeywell 2450Cm Series User manual

Honeywell HCX Series User manual

Honeywell

Honeywell HCX Series User manual

Honeywell EQUIP HCD554IP User manual

Honeywell

Honeywell EQUIP HCD554IP User manual

Honeywell 2450Cm Series User manual

Honeywell

Honeywell 2450Cm Series User manual

Honeywell iPCAM-WI Camera User manual

Honeywell

Honeywell iPCAM-WI Camera User manual

Honeywell EQUIP Series User manual

Honeywell

Honeywell EQUIP Series User manual

Honeywell iPCAM-PT2 User manual

Honeywell

Honeywell iPCAM-PT2 User manual

Honeywell H3D Series S User manual

Honeywell

Honeywell H3D Series S User manual

Honeywell EQUIP Series User manual

Honeywell

Honeywell EQUIP Series User manual

Honeywell HD4D3SX User manual

Honeywell

Honeywell HD4D3SX User manual

Honeywell 2450Cm Series User manual

Honeywell

Honeywell 2450Cm Series User manual

Honeywell Performance HE42XD2G User manual

Honeywell

Honeywell Performance HE42XD2G User manual

Honeywell HBD2PR1(X) User manual

Honeywell

Honeywell HBD2PR1(X) User manual

Honeywell H4 series User manual

Honeywell

Honeywell H4 series User manual

Honeywell HD30HD4 User manual

Honeywell

Honeywell HD30HD4 User manual

Honeywell HBD2PR1 User manual

Honeywell

Honeywell HBD2PR1 User manual

Honeywell iPCAM-WI Camera Reference guide

Honeywell

Honeywell iPCAM-WI Camera Reference guide

Honeywell 2450Cm Series User manual

Honeywell

Honeywell 2450Cm Series User manual

Honeywell HED2PER3 User manual

Honeywell

Honeywell HED2PER3 User manual

Honeywell 2450Cm Series User manual

Honeywell

Honeywell 2450Cm Series User manual

Honeywell EQUIP HD4HDIH User manual

Honeywell

Honeywell EQUIP HD4HDIH User manual

Honeywell EQUIP Series User manual

Honeywell

Honeywell EQUIP Series User manual

Popular IP Camera manuals by other brands

ADJ 700-00028 user guide

ADJ

ADJ 700-00028 user guide

Shenzhen POINT Electronic Tech. V1-MI-1080P user manual

Shenzhen POINT Electronic Tech.

Shenzhen POINT Electronic Tech. V1-MI-1080P user manual

ATV VLB7IR instruction manual

ATV

ATV VLB7IR instruction manual

Foscam FI8918W Quick installation guide

Foscam

Foscam FI8918W Quick installation guide

dallmeier DDF51 HDV-DN-SM Series Commissioning

dallmeier

dallmeier DDF51 HDV-DN-SM Series Commissioning

NAPCO iSeeVideo ISEE-VCAM1 installation guide

NAPCO

NAPCO iSeeVideo ISEE-VCAM1 installation guide

Foscam C2 Quick installation guide

Foscam

Foscam C2 Quick installation guide

Silent Sentinel Oculus Installer's guide

Silent Sentinel

Silent Sentinel Oculus Installer's guide

Grundig GD-CI-BP2647P quick start guide

Grundig

Grundig GD-CI-BP2647P quick start guide

Atlantis NetCamera 801NV manual

Atlantis

Atlantis NetCamera 801NV manual

Foscam FI9853EP user manual

Foscam

Foscam FI9853EP user manual

Iqinvision IQeye Alliance-mini IQD30SV-F1 Specifications

Iqinvision

Iqinvision IQeye Alliance-mini IQD30SV-F1 Specifications

Foscam FI9805W user manual

Foscam

Foscam FI9805W user manual

Eneo HDD-2080Z03IR D user manual

Eneo

Eneo HDD-2080Z03IR D user manual

Avidsen IPC480-i instructions

Avidsen

Avidsen IPC480-i instructions

EverFocus ED230 Operation instructions

EverFocus

EverFocus ED230 Operation instructions

Nuvico Zoom Matic CI-Z10P-LA-CX installation manual

Nuvico

Nuvico Zoom Matic CI-Z10P-LA-CX installation manual

AEMC 1950 quick start guide

AEMC

AEMC 1950 quick start guide

manuals.online logo
manuals.online logoBrands
  • About & Mission
  • Contact us
  • Privacy Policy
  • Terms and Conditions

Copyright 2025 Manuals.Online. All Rights Reserved.