manuals.online logo
Brands
  1. Home
  2. •
  3. Brands
  4. •
  5. horiso
  6. •
  7. Window Blind
  8. •
  9. horiso SPECIALTY VENETIAN BLINDS Instruction Manual

horiso SPECIALTY VENETIAN BLINDS Instruction Manual

150
mm
max.
2 - PELMET SET OUT
Face x pelmet
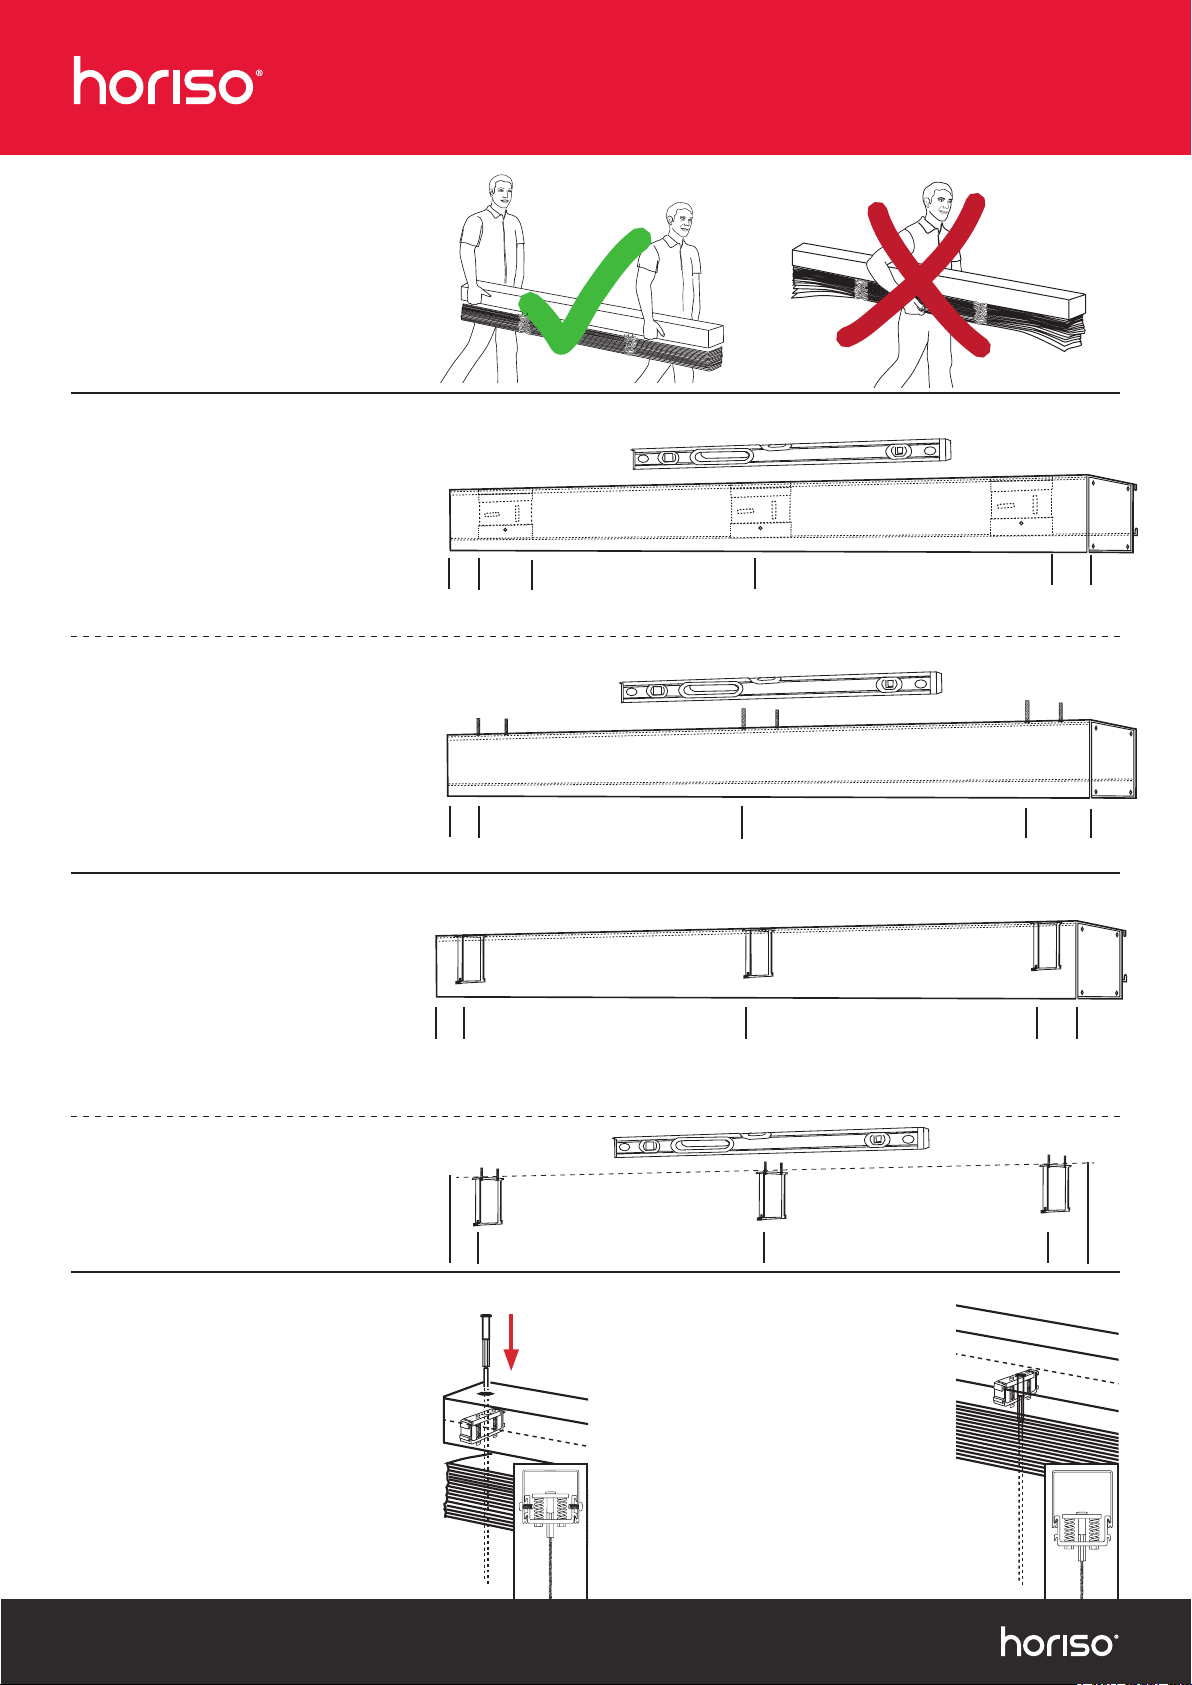
Pelmet wall brackets should be installed
maximum 250 mm in from each end and
spaced maximum 800 mm apart. Use a
spirit level to ensure pelmet is level.
NOTE: For AK-G, remove pelmet end plate
and slide in gate bracket, before installing
pelmet.
Top x pelmet
Fix pelmet according to width ensuring
pelmet does not bow or distort. 2 centre
lines are visible inside pelmet for drill
positioning. (Depending upon particular
situations, staggered xing may be
required). NOTE: For AK-G, remove pelmet
end plate and slide in gate bracket, before
installing pelmet. Ensure level.
3 - GATE BRACKETS SET OUT
With pelmet
Gate brackets in Horiso pelmet or surface
xing. Insert gate bracket at either end
of the blind maximum 150 mm in from each
end and with a maximum width of
600 mm apart. NOTE: For AK-G, remove
pelmet end plate and slide in gate bracket,
before installing pelmet.
250
mm
max.
250
mm
max.
800 mm center maximum
space between brackets
800 mm center maximum space
between brackets
To determine the front/out-facing side of the
blind locate the Horiso sticker on the right
hand side, third slat from the bottom.
4A - INSERT SIDE CABLES
Insert supplied cable guide through access
hole in top of head rail at both ends and thread
cable through slat pack. Ensure mushroom
head is inserted correctly on top of spring
tension bracket. (Do not remove cable ties
on tension bracket at this point.)
Ensure cables are running
parallel with each other and check diagonal.
250
mm
max. 800 mm maximum space between 800 mm maximum space between 250 mm
max.
600 mm maximum space between 600 mm maximum space between 150
mm
max.
1 - CARRYING / HANDLING
Unpacking SVB
Carry blind by head rail ONLY. Two installers
should carry blind at ALL times.
Warning: Be careful using scissors or knife to
unwrap blind, as you may seriously damage
blind coating or components.
Surface xing without pelmet
Fix gate bracket at either end of
the opening maximum 150 mm in from each
end and with a maximum width
of 600 mm apart. Ensure level.
150
mm
max. 600 mm maximum space between 600 mm maximum space between
150
mm
max.
4B - INSERT INTERMEDIATE CABLES
Insert supplied cable guide through spring
tension bracket and thread through slat pack.
Insert spring tension bracket into head rail by
twisting, then turning until top lip of double
spring bracket ts into
bottom lip of the
head rail. NOTE: For AK-G, spring tension
bracket is supplied installed. Install cable
only. (Do not remove cable ties on tension
bracket at this point.) Ensure all cables are
running parallel.
INSTALLATION GUIDE - SPECIALTY VENETIAN BLINDS
+61 2 8755 4500
[email protected] horiso.com.au
5 - INSTALL BLIND INTO PELMET
With the gate brackets in the opening
position and by holding the right side
of the blind by the head rail only, lift
the head rail into position and secure
gate brackets.
6 - CLOSE GATE BRACKETS
Close all gate brackets and tighten screws.
9 - CUT CABLE TIES
A Tighten swage until the cable guide is rigid
and lock off wall NUT. Trim any
excess cable guide under swage.
BCut cable ties off spring tension brackets
in head rail, AFTER having terminated the
cables to release tension.
10 mm 10 mm
10 mm
10 mm
EC
B
Disclaimer: These leaet instructions are a guide for professional installers only.
Motors: Refer to manufacturers instructions supplied with blind. Always set blind limits using the test lead.
BA
Face x Timber
Alternate timber or concrete Concrete
D
Cut
cable
guide
to
length
10 mm
7 - TERMINATE
A Depending on type of termination install
EITHER bracket, insert rampa screw, top
hat OR concrete insert. (Cable guide MUST
be plumb, locate termination via laser.)
B Insert swage with 10 mm of thread
showing as illustrated.
C Cut to length to underside of swage plus 10
mm and insert cable into swage.
D Use pliers if required on bottom
stripped section of cable guide to ensure
cable is in a straight position for tightening.
E Tighten the 3 grub screws while
GENTLY pulling the cable down.
(DO NOT use pliers on cable).
Use a 2.5 mm high quality hexagon key
wrench* to rmly tighten screws until recessed
to a minimum of 1 mm.
*(Allen key) for example Gedore, Belzer or Stahlwille.
INSTALLATION GUIDE - SPECIALTY VENETIAN BLINDS
+61 2 8755 4500
[email protected] horiso.com.au

Popular Window Blind manuals by other brands

Levolor InMotion user guide

Levolor

Levolor InMotion user guide

Deco LUX installation manual

Deco

Deco LUX installation manual

SOMFY Movelite RTS instructions

SOMFY

SOMFY Movelite RTS instructions

Hella TOP FOAM RvA Operating guidelines

Hella

Hella TOP FOAM RvA Operating guidelines

Inspire 70008372 manual

Inspire

Inspire 70008372 manual

Erfal Noblesse Assembly and operating instructions

Erfal

Erfal Noblesse Assembly and operating instructions

Victoria M 20000852 Original instructions

Victoria M

Victoria M 20000852 Original instructions

Draper FlexStyle C MO Series Installation & operation instructions

Draper

Draper FlexStyle C MO Series Installation & operation instructions

walser 30291 User instructions

walser

walser 30291 User instructions

Dometic SKYSOL operating manual

Dometic

Dometic SKYSOL operating manual

YewdaleDefiant C40-90T Manufacturing Instructions

YewdaleDefiant

YewdaleDefiant C40-90T Manufacturing Instructions

Guthrie Douglas TESS 140 instruction manual

Guthrie Douglas

Guthrie Douglas TESS 140 instruction manual

Kirsch Alternative Wood Blinds installation instructions

Kirsch

Kirsch Alternative Wood Blinds installation instructions

Dooya DM25LEU/S-0.7/34 instructions

Dooya

Dooya DM25LEU/S-0.7/34 instructions

LuxaFlex Timber Venetians Instruction booklet

LuxaFlex

LuxaFlex Timber Venetians Instruction booklet

Benthin RM11-Duo-Design manual

Benthin

Benthin RM11-Duo-Design manual

HOMCOM 713-001 Assembly instructions

HOMCOM

HOMCOM 713-001 Assembly instructions

Gimenez Ganga Saxun Plisada Glass 111 Assembly and installation manual

Gimenez Ganga

Gimenez Ganga Saxun Plisada Glass 111 Assembly and installation manual

manuals.online logo
manuals.online logoBrands
  • About & Mission
  • Contact us
  • Privacy Policy
  • Terms and Conditions

Copyright 2025 Manuals.Online. All Rights Reserved.