Country of Purchase Horizon Hobby Contact Information Address
United States of America
Horizon Service Center
(Repairs and Repair Requests) servicecenter.horizonhobby.com/RequestForm/
4105 Fieldstone Rd
Champaign, Illinois, 61822 USA
Horizon Product Support
(Product Technical Assistance)
productsupport@horizonhobby.com
877-504-0233
Sales websales@horizonhobby.com
800-338-4639
13 -PROGRAM SELECT – USER SET
TROUBLESHOOTING
1. Press the Esc / Mode Button to scroll through the main menu screens until you reach Program
Select = User set.
2. Press the Start / Enter button to enter the User Set menu.
3. Press the < Dec or Inc > Button to scroll through the menu.
4. Press the Start / Enter Button to edit the parameter.
5. Press the < Dec or Inc > Button to increase or decrease the value.
6. Press the Start / Enter Button again to save the selection.
7. Press the Esc / Mode Button to return to the main menu.
A -PRE CHARGE TIME (NI-MH/NI-CD BATTERIES ONLY)
If a Ni-MH or Ni-Cd battery is fully discharged, the battery charger may not detect the
battery. The Pre-Charge Time enables you to apply a low charge rate, increasing the battery
voltage to the point where the charger detects the battery.
WARNING: Never use the Pre-Charge Time with Li-Po batteries. Doing so may cause
the battery to catch fire.
B -WAIT TIME CHG>DCHG DEFAULT IS 1 MINUTE
When you cycle a Ni-MH or Ni-Cd battery (charging, discharging and then charging again),
the battery will get very warm. The Wait Time interval between each step of the process
allows the battery to cool before starting the next step. Default time is 1 minute, but this
can be set between 0 and 60 minutes. Always allow the battery to cool to room temperature
before charging or discharging.
C -NIMH SENSITIVITY D. PEAK – DEFAULT
The D. Peak (Delta Peak) value is adjustable between 5mV/Cell and 20mV/Cell. 8mV/
Cell is a good starting point for Ni-MH batteries. If the Delta Peak value is too high, you
risk overcharging the battery; if the value is too low, charging will stop before the battery
reaches full capacity.
D -NICD SENSITIVITY D. PEAK – DEFAULT
The D.Peak (Delta Peak) value is adjustable between 5mV/Cell and 20mV/Cell. 10mV/
Cell is a good starting point for Ni-Cd batteries. If the Delta Peak value is too high, you
risk overcharging the battery; if the value is too low, charging will stop before the battery
reaches full capacity.
E -TEMP. CUT-OFF DEFAULT IS 80C/176F
The charger can be used in conjunction with a battery mounted temperature sensor (sold
separately, DYN5033) connected to the Temperature Sensor Port to monitor the temperature
of the battery during the charging process. If the battery temperature reaches the cut-off
limit, the charger will stop the charging process. Temperature values can be adjusted
between 20–80° C (68–176° F).
NiCd Sensitivity
D. Peak Default
During charger operation, circuits monitor battery and charger functions. If the following messages show on the charger’s LCD screen, make the recommended responses. If the message continues
after you respond as recommended, contact your nearest Horizon Hobby customer service center for assistance.
REVERSE POLARITY Make sure each connection polarity is correct between the power source and the charger, then between the charger and the battery.
PROCESS INTERRUPTED Make sure the power connections are correct for charging.
OUTPUT SHORT CIRCUIT Make sure there are no short circuits between the poles of the battery or the battery and the charger. Replace damaged wires.
INPUT VOLTAGE ERROR Input voltage to the charger fell below the default or adjusted input voltage setting. Make sure the power source for the charger provides correct input voltage.
CHARGER FAILURE Charger electronics require repair.
BATTERY LOW VOLTAGE Battery voltage is lower than the value setting in the charger. Adjust settings, then make sure the battery is not damaged or replace the battery.
BATTERY HIGH VOLTAGE Battery voltage is higher than the value setting in the charger. Adjust settings, then make sure the battery is not damaged or replace the battery.
CELL LOW VOLTAGE Cell voltage is lower than the value setting in the charger. Adjust settings, then make sure the battery is not damaged or replace the battery.
CELL HIGH VOLTAGE Cell voltage is higher than the value setting in the charger. Adjust settings, then make sure the battery is not damaged or replace the battery.
CELL CONNECT ERROR Make sure the balance connection is correct for charging.
CHARGER OVERHEATING Charger temperature is too high. Power OFF the charger and let it cool.
OVER POWER Input voltage to the charger exceeded the default or adjusted input voltage setting. Make sure the power source for the charger provides the correct input voltage.
MAX CURRENT Current is higher than the value setting in the charger. Adjust settings, then make sure the battery is not damaged or replace the battery.
SAFETY TIMER Maximum safe time limit has been reached.
MAX CAPACITY Maximum capacity limit has been reached.
MAX EXT. TEMP External temperature is too high. Let charger and battery cool.
CONNECTION BREAK Make sure the battery pack is connected to the charger.
9 - PB DISCHARGING
7 - NICKEL CYCLE CHARGING
8 - PB CHARGING
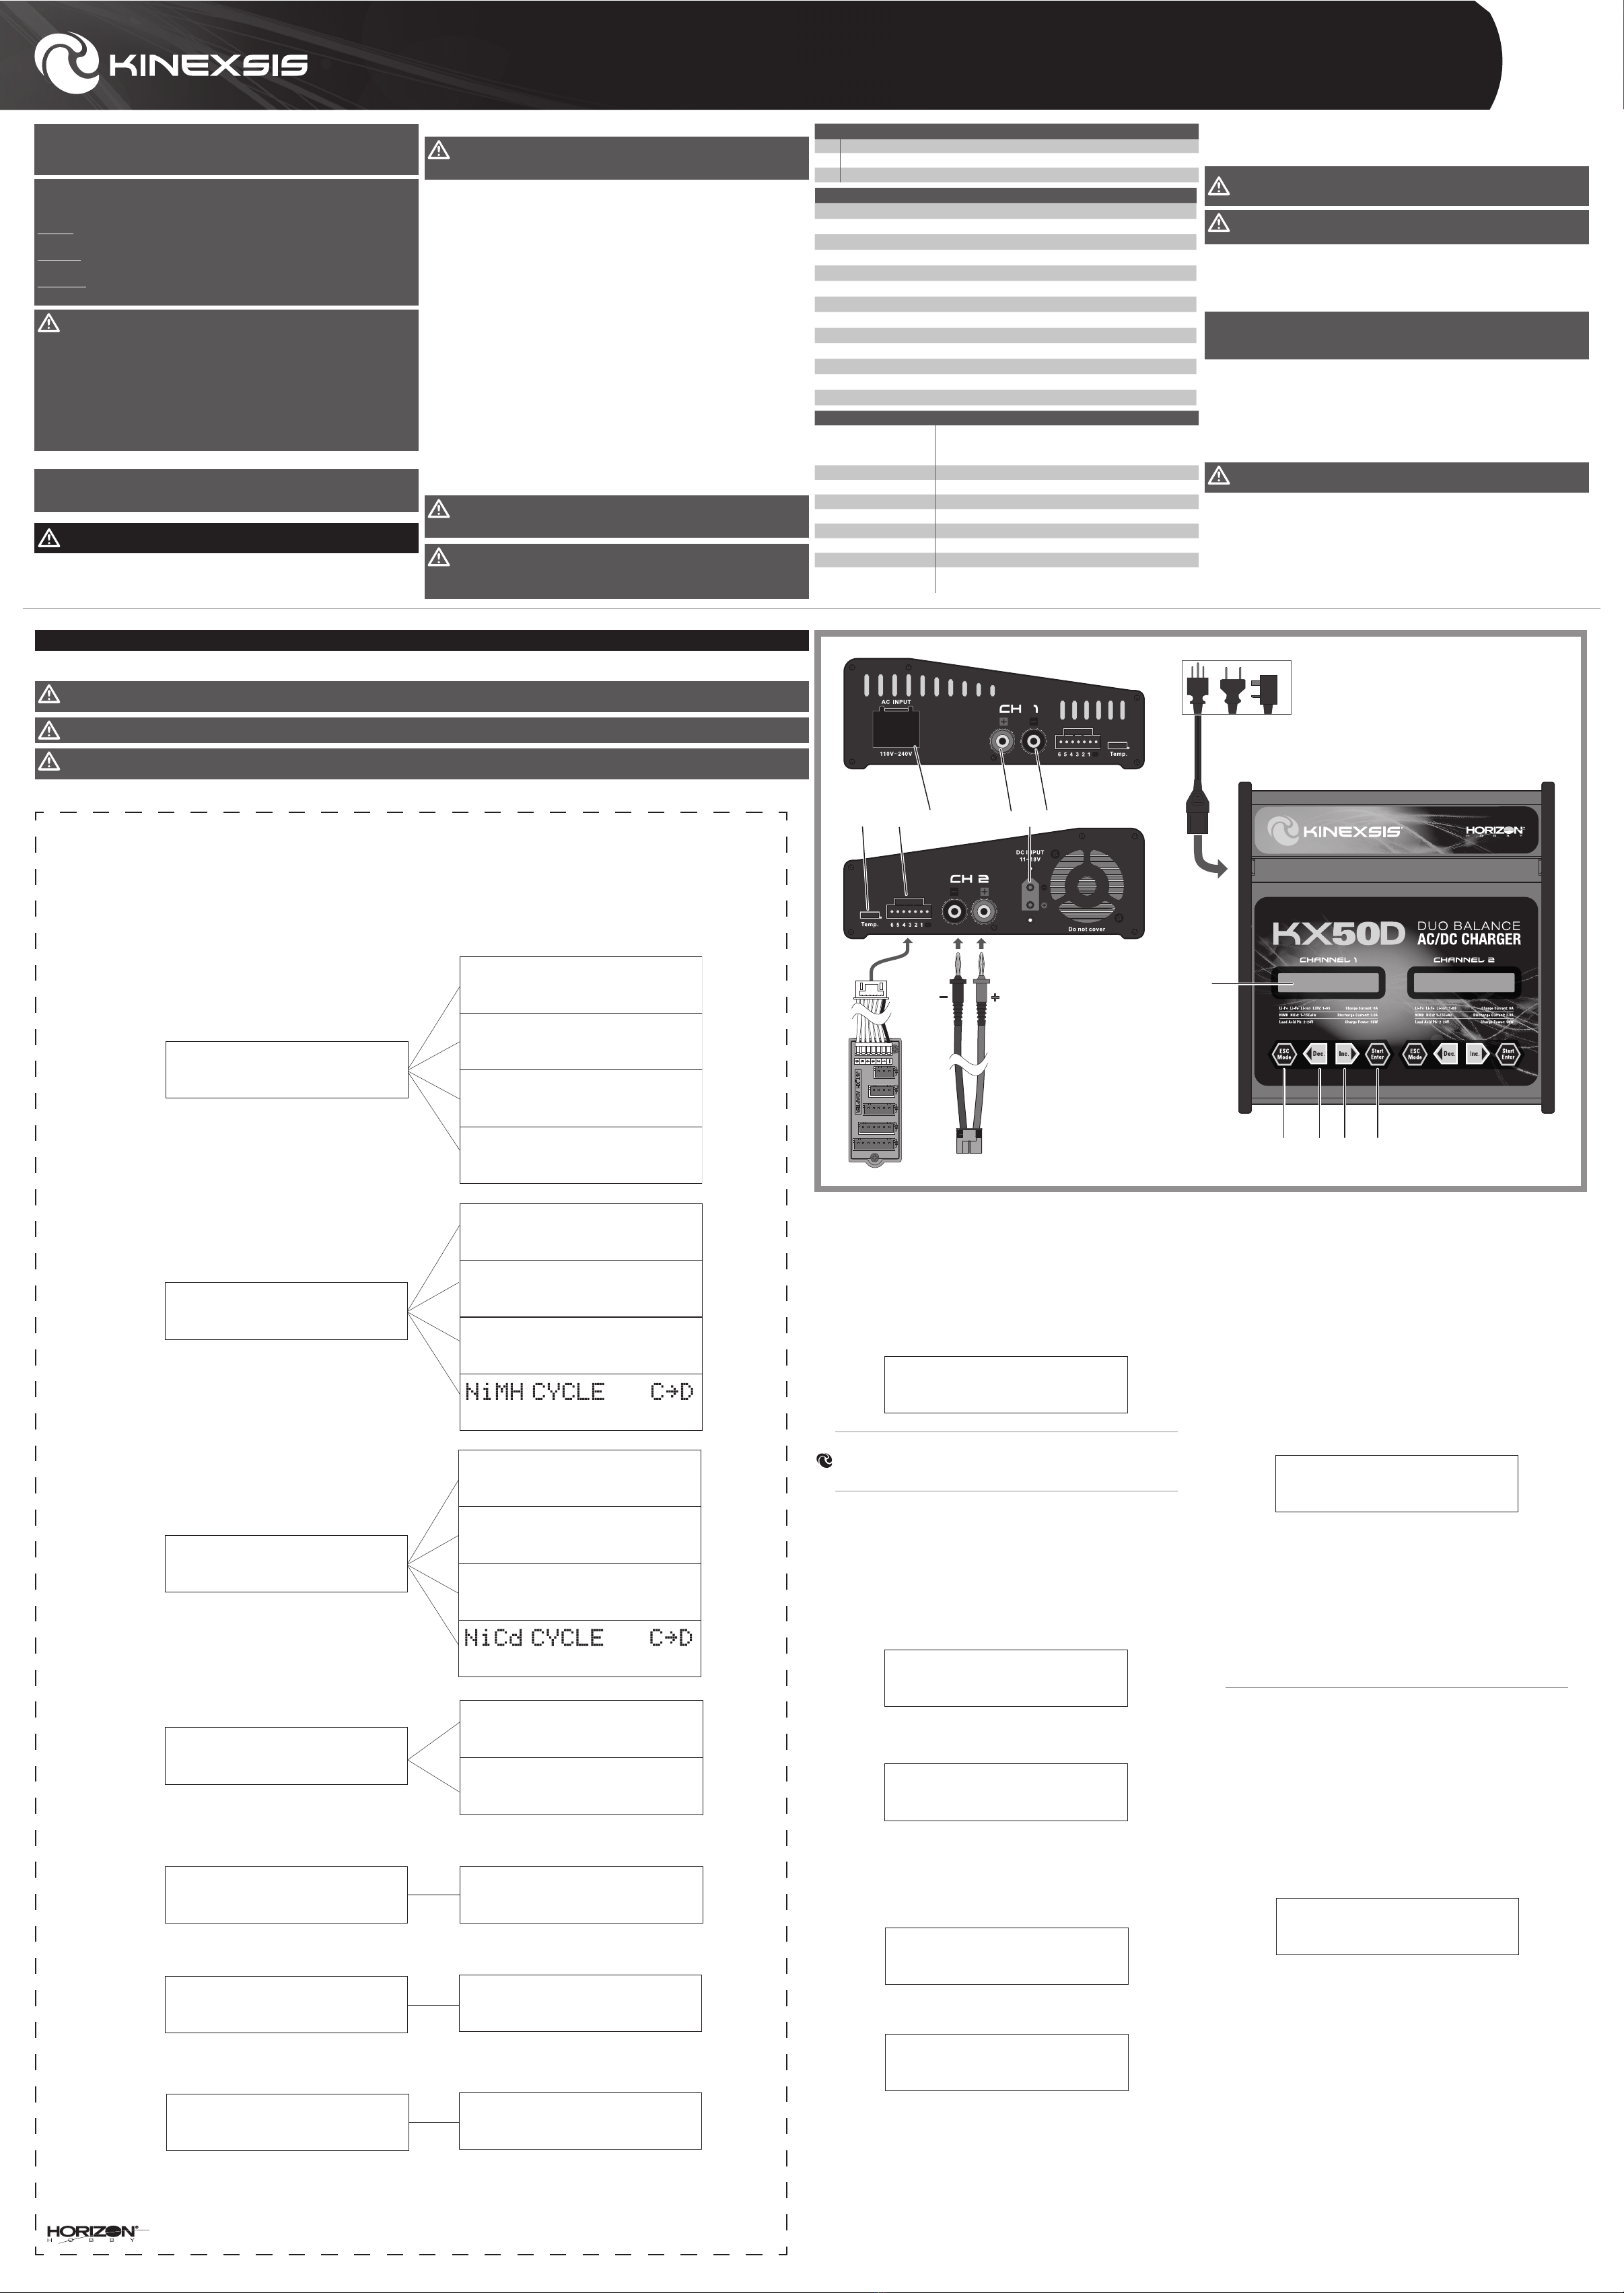
1. Connect the banana plugs of the battery adapter cable to the Power Output Black (–) and
Power Output Red (+), making sure that the positive and negative connectors are not reversed.
2. Connect the battery connector to the battery adapter cable.
3. Press the Esc/Mode Button to scroll through the main menu screens until you reach Program
Select=Pb BATT.
4. Press the Start/Enter button.
5. Press the < Dec or Inc > Button until Pb DISCHARGE appears.
6. Press the Start / Enter Button to edit the parameter.
7. Once the parameters are at the desired settings, press and hold the Start/Enter button for 3
seconds.
8. The charger will check the battery and charger settings and discharging will begin.
9. Press the < Dec or Inc > Button to see the rest of the Discharging information.
10.Press Esc / Mode at any time to stop discharging.
11.When discharging is complete, the charger will sound a series of beeps.
12.Disconnect the battery from the charger.
1. Connect the banana plugs of the battery adapter cable to the Power Output Black (–) and
Power Output Red (+), making sure that the positive and negative connectors are not reversed.
2. Connect the battery connector to the battery adapter cable.
3. Press the Esc/Mode Button to scroll through the main menu screens until you reach Program
Select=Ni-MH/Ni-Cd.
4. Press the Start/Enter button.
5. Press the < Dec or Inc > Button until Ni-MH/Ni-Cd DCHG>CHG appears.
6. Press the Start / Enter Button to edit the parameter.
7. Once the parameters are at the desired settings, press and hold the Start/Enter button for 3
seconds.
8. The charger will check the battery and charger settings and charging will begin.
9. Press the < Dec or Inc > Button to see the rest of the Cycle information.
10.Press Esc / Mode at any time to stop discharging.
11.When discharging is complete, the charger will sound a series of beeps.
12.Disconnect the battery from the charger.
1. Connect the banana plugs of the battery adapter cable to the Power Output Black (–) and
Power Output Red (+), making sure that the positive and negative connectors are not reversed.
2. Connect the battery connector to the battery adapter cable.
3. Press the Esc/Mode Button to scroll through the main menu screens until you reach Program
Select=Pb BATT.
4. Press the Start/Enter button.
5. Press the < Dec or Inc > Button until Pb CHARGE appears.
6. Press the Start / Enter Button to edit the parameter.
7. Once the parameters are at the desired settings, press and hold the Start/Enter button for 3
seconds.
8. The charger will check the battery and charger settings and charging will begin.
9. Press the < Dec or Inc > Button to see the rest of the charging information.
10.Press Esc / Mode at any time to stop discharging.
11.When charging is complete, the charger will sound a series of beeps.
12.Disconnect the battery from the charger.
CAUTION: The Pb charge program menus are to be used ONLY for the charging and
discharging of Pb battery packs. Charging other battery types using the Pb charge
programs will damage the battery or the charger.
10 - DIGITAL POWER
11 - MEMORY SAVE
12 - LOAD DATA
The Digital Power menu enables you to use the Kinexsis KX50D charger as a power supply for
external devices. The maximum Digital Power output is 6A / 24V.
1. Connect the banana plugs of the external device to the Power Output Black (–) and Power
Output Red (+), making sure that the positive and negative connectors are not reversed.
2. Press the Esc / Mode Button to scroll through the main menu screens until you reach Digital
Power.
3. Press the Start / Enter Button to edit the parameter.
4. Once the parameters are at the desired settings, press and hold the Start / Enter Button for 3
seconds.
5. Press the Esc / Mode Button at any time to stop supplying power to the external device.
6. Disconnect the external device from the charger.
The Memory Save menu option enables you to save 10 per channel battery charging profiles that
you use often.
1. Press the Esc / Mode Button to scroll through the main menu screens until you reach
Program Select - Memory Save.
2. Press the Start / Enter Button to enter the Memory Save menu. The first time you enter the
menu, the “0” model memory location flashes.
3. Press the < Dec or Inc > Button to select a memory location (0-9), then press and hold the
Start / Enter Button to save the selection. The BATT TYPE screen appears.
4. Press the < Dec or Inc > Button to select the desired battery type, then press the Start /
Enter Button.
5. Adjust the battery parameters as you normally would for charging the battery.
6. Press the Inc > Button to adjust the parameters for Balance Charge, Cycle, Storage, etc.
7. Press and hold the Start / Enter Button for 3 seconds to save your selections. The charger
screen displays “Saving..”, then returns to the Memory Save screen.
The Load Data menu option enables you to access the 10 per channel battery charging profiles
that you stored in the Save Data menu.
1. Press the Esc / Mode Button to scroll through the main menu screens until you reach
Program Select - Load Data.
2. Press the Start / Enter Button to enter the Load Data menu. The first time you enter the
menu, the “0” model memory location flashes.
3. Press the < Dec or Inc > Button to select a memory location (0-9).
4. Press the Start / Enter Button for 3 seconds until the Charge screen appears
5. Press the < Inc or Dec > Button to scroll through Charge, Balance Charge, Cycle, Discharge,
Storage, etc.
6. Press and hold the Start / Enter Button for 3 seconds to load the desired function.
5 - NICKEL (NI-MH/NI-CD) CHARGING
6 - NICKEL DISCHARGING
1. Connect the banana plugs of the battery adapter cable to the Power Output Black (–) and
Power Output Red (+), making sure that the positive and negative connectors are not reversed.
2. Connect the battery connector to the battery adapter cable.
3. Press the Esc/Mode Button to scroll through the main menu screens until you reach Program
Select=Ni-MH/Ni-Cd.
4. Press the Start/Enter button.
5. Press the < Dec or Inc > Button until Ni-MH/Ni-Cd CHARGE appears.
6. Press the Start / Enter Button to edit the parameter.
7. Once the parameters are at the desired settings, press and hold the Start/Enter button for 3
seconds.
8. The charger will check the battery and charger settings and charging will begin.
9. Press the < Dec or Inc > Button to see the rest of the Discharging information.
10.Press Esc / Mode at any time to stop discharging.
11.When discharging is complete, the charger will sound a series of beeps.
12.Disconnect the battery from the charger.
1. Connect the banana plugs of the battery adapter cable to the Power Output Black (–) and
Power Output Red (+), making sure that the positive and negative connectors are not reversed.
2. Connect the battery connector to the battery adapter cable.
3. Press the Esc/Mode Button to scroll through the main menu screens until you reach Program
Select=Ni-MH/Ni-Cd.
4. Press the Start/Enter button.
5. Press the < Dec or Inc > Button until Ni-MH/Ni-Cd DISCHARGE appears.
6. Press the Start / Enter Button to edit the parameter.
7. Once the parameters are at the desired settings, press and hold the Start/Enter button for 3
seconds.
8. The charger will check the battery and charger settings and charging will begin.
9. Press the < Dec or Inc > Button to see the rest of the Discharging information.
10.Press Esc / Mode at any time to stop discharging.
11.When discharging is complete, the charger will sound a series of beeps.
12.Disconnect the battery from the charger.
ONLY NI-MH IS SHOWN IN THE FOLLOWING THREE SECTIONS.
© 2016 Horizon Hobby, LLC. Kinexis, EC3, EC5, and the Horizon Hobby Logo are trademarks or registered trademarks of Horizon Hobby, LLC. Created 07/2016 | 51656
LIMITED WARRANTY
WARRANTY AND SERVICE CONTACT INFORMATION
PROGRAM SELECT
NiMH Battery
PROGRAM SELECT
Pb Battery
PROGRAM SELECT
Digital Power
PROGRAM SELECT
Memory Save
MEMORY NiMH [1]
AUTO 1.5A
MEMORY NiMH [1]
AUTO 1.5A
PROGRAM SELECT
Memory Load
PROGRAM SELECT
User Set =>
Temp. Cut-off
ON 80C(176F)
Screen saver
Alway OFF
Factory reset
Press Enter > 2S
NiMH CHARGE Man
CURRENT 1.0A
NiMH DISCHARGE
1.0A 12.0V
C=1.0A D=1.0A 1
Pb CHARGE
0.1A 4.9V (2P)
Pb DISCHARGE
1.0A 4.9V (2P)
Wait Time
CHG>DCHG 5min
NiMH Sensitivity
D. Peak Default
Saftey Timer
ON/OFF 120min
Capacity Cut-Off
ON/OFF 5000mAh
Input Power Low
Cut-Off 10.0V
Key Beep ON/OFF
Buzzer ON/OFF
PreCharge Time
ON/Off 1min
NOTICE: This equipment has been tested and found to comply with the limits for a Class B digital device, pursuant to Part 15 of the FCC rules. These limits are designed to provide reasonable
protection against harmful interference in a residential installation. This equipment generates, uses and can radiate radio frequency energy and, if not installed and used in accordance with the
instructions, may cause harmful interference to radio communications.
What this Warranty Covers
Horizon Hobby, LLC, (Horizon) warrants to the original purchaser that the product purchased (the
“Product”) will be free from defects in materials and workmanship at the date of purchase.
What is Not Covered
This warranty is not transferable and does not cover (i) cosmetic damage, (ii) damage due to acts
of God, accident, misuse, abuse, negligence, commercial use, or due to improper use, installation,
operation or maintenance, (iii) modification of or to any part of the Product, (iv) attempted service
by anyone other than a Horizon Hobby authorized service center, (v) Product not purchased from an
authorized Horizon dealer, or (vi) Product not compliant with applicable technical regulations or (vii)
use that violates any applicable laws, rules, or regulations.
OTHER THAN THE EXPRESS WARRANTY ABOVE, HORIZON MAKES NO OTHER WARRANTY OR
REPRESENTATION, AND HEREBY DISCLAIMS ANY AND ALL IMPLIED WARRANTIES, INCLUDING,
WITHOUT LIMITATION, THE IMPLIED WARRANTIES OF NON-INFRINGEMENT, MERCHANTABILITY
AND FITNESS FOR A PARTICULAR PURPOSE. THE PURCHASER ACKNOWLEDGES THAT THEY
ALONE HAVE DETERMINED THAT THE PRODUCT WILL SUITABLY MEET THE REQUIREMENTS OF
THE PURCHASER’S INTENDED USE.
Purchaser’s Remedy
Horizon’s sole obligation and purchaser’s sole and exclusive remedy shall be that Horizon will,
at its option, either (i) service, or (ii) replace, any Product determined by Horizon to be defective.
Horizon reserves the right to inspect any and all Product(s) involved in a warranty claim. Service
or replacement decisions are at the sole discretion of Horizon. Proof of purchase is required for
all warranty claims. SERVICE OR REPLACEMENT AS PROVIDED UNDER THIS WARRANTY IS THE
PURCHASER’S SOLE AND EXCLUSIVE REMEDY.
Limitation of Liability
HORIZON SHALL NOT BE LIABLE FOR SPECIAL, INDIRECT, INCIDENTAL OR CONSEQUENTIAL
DAMAGES, LOSS OF PROFITS OR PRODUCTION OR COMMERCIAL LOSS IN ANY WAY, REGARDLESS
OF WHETHER SUCH CLAIM IS BASED IN CONTRACT, WARRANTY, TORT, NEGLIGENCE, STRICT
LIABILITY OR ANY OTHER THEORY OF LIABILITY, EVEN IF HORIZON HAS BEEN ADVISED OF THE
POSSIBILITY OF SUCH DAMAGES. Further, in no event shall the liability of Horizon exceed the
individual price of the Product on which liability is asserted. As Horizon has no control over use,
setup, final assembly, modification or misuse, no liability shall be assumed nor accepted for any
resulting damage or injury. By the act of use, setup or assembly, the user accepts all resulting
liability. If you as the purchaser or user are not prepared to accept the liability associated with
the use of the Product, purchaser is advised to return the Product immediately in new and unused
condition to the place of purchase.
Law
These terms are governed by Illinois law (without regard to conflict of law principals). This warranty
gives you specific legal rights, and you may also have other rights which vary from state to state.
Horizon reserves the right to change or modify this warranty at any time without notice.
WARRANTY SERVICES
Questions, Assistance, and Services
Your local hobby store and/or place of purchase cannot provide warranty support or service. Once
assembly, setup or use of the Product has been started, you must contact your local distributor or
Horizon directly. This will enable Horizon to better answer your questions and service you in the
event that you may need any assistance. For questions or assistance, please visit our website at
www.horizonhobby.com, submit a Product Support Inquiry, or call the toll free telephone number
referenced in the Warranty and Service Contact Information section to speak with a Product
Support representative.
Inspection or Services
If this Product needs to be inspected or serviced and is compliant in the country you live and use
the Product in, please use the Horizon Online Service Request submission process found on our
website or call Horizon to obtain a Return Merchandise Authorization (RMA) number. Pack the
Product securely using a shipping carton. Please note that original boxes may be included, but are
not designed to withstand the rigors of shipping without additional protection. Ship via a carrier
that provides tracking and insurance for lost or damaged parcels, as Horizon is not responsible for
merchandise until it arrives and is accepted at our facility. An Online Service Request is available
at http://www.horizonhobby.com/content/service-center_render-service-center. If you do not
have internet access, please contact Horizon Product Support to obtain a RMA number along with
instructions for submitting your product for service. When calling Horizon, you will be asked to
provide your complete name, street address, email address and phone number where you can
be reached during business hours. When sending product into Horizon, please include your RMA
number, a list of the included items, and a brief summary of the problem. A copy of your original
sales receipt must be included for warranty consideration. Be sure your name, address, and RMA
number are clearly written on the outside of the shipping carton.
NOTICE: Do not ship Li-Po batteries to Horizon. If you have any issue with a Li-Po
battery, please contact the appropriate Horizon Product Support office.
Warranty Requirements
For Warranty consideration, you must include your original sales receipt verifying the
proof-of-purchase date. Provided warranty conditions have been met, your Product will be
serviced or replaced free of charge. Service or replacement decisions are at the sole discretion
of Horizon.
Non-Warranty Service
Should your service not be covered by warranty, service will be completed and payment
will be required without notification or estimate of the expense unless the expense
exceeds 50% of the retail purchase cost. By submitting the item for service you are agreeing
to payment of the service without notification. Service estimates are available upon request. You
must include this request with your item submitted for service. Non-warranty service estimates
will be billed a minimum of ½ hour of labor. In addition you will be billed for return freight. Horizon
accepts money orders and cashier’s checks, as well as Visa, MasterCard, American Express, and
Discover cards. By submitting any item to Horizon for service, you are agreeing to Horizon’s Terms
and Conditions found on our website http://www.horizonhobby.com/content/service-center_
render-service-center.
ATTENTION: Horizon service is limited to Product compliant in the country
of use and ownership. If received, a non-compliant Product will not be
serviced. Further, the sender will be responsible for arranging return shipment of
the un-serviced Product, through a carrier of the sender’s choice and at the sender’s
expense. Horizon will hold non-compliant Product for a period of 60 days from
notification, after which it will be discarded.
10/15
Battery end volt
LiPo 4.00V/V- 4.30V/C
LiIo 3.90V/C- 4.20V/C
LiFe 3.40V/C- 3.90V/C
Pb 2.20V/C- 2.50V/C
F -SAFETY TIMER DEFAULT IS ON, 240MIN
Use the Safety Timer menu to set a time limit for charging a battery. When a charge cycle is
started, a clock inside the charger will begin recording the elapsed charge time. If the safety
timer function has been turned ON, the charger will stop the charging process once this
time limit has been reached to avoid damage caused by overcharging the battery. This time
value can be set between 10 and 720 minutes, in 10 minute increments.
G -CAPACITY CUT-OFF DEFAULT IS ON, 5000MAH
Use the Capacity Cut-Off menu to set a capacity limit on when the charger stops charging
a battery. When a charge cycle starts, the charger records the battery capacity. When the
capacity cutoff function is set at ON, the charger will stop charging at the capacity limit to
prevent battery damage. Capacity can be adjusted between 10 and 25,000mAh in 100mAh
increments.
H -INPUT POWER LOW CUT-OFF DEFAULT IS 11.0V
Use the Input Power Low Cut-Off menu to set the input voltage limit. An alarm will sound if
the input voltage falls below the cut-off value. The voltage alarm value can be set between
10.0 and 15.0V.
I -KEY BEEP (DEFAULT ON) / BUZZER (DEFAULT ON)
Use the Key Beep/Buzzer menu to set the key beep and charger alarm buzzer at ON or OFF
as needed. We recommend that you leave the alarm ON to alert you when charging is
complete or if there is cause for alarm during charging.
J -SCREEN SAVER (DEFAULT ALWAYS OFF)
Use the Screen Saver menu to adjust the amount of time that the backlight stays on. The
default setting is “Always OFF,” meaning the backlight stays on as long as the charger is
powered on. If you change the value to 1 min, the backlight will turn off after 1 minute of
idle time.
K -BATTERY END VOLT
Use the Battery End Volt to adjust the peak voltage of each cell in the pack.
WARNING: Only High-Voltage Li-Po batteries can be charged at 4.3V. Do not charge
Standard Li-Po batteries above 4.2V or damage to the battery or a fire may occur.
L -FACTORY RESET PRESS ENTER > 2S
Press the Start/Enter button for more than 2 seconds to reset all charger values to the
default values.