Hoshizaki ROX-30SA-EW User manual

ROX-30SA-EW
ROX-60SA-EW
L1X007115 (032017)
WATER ELECTROLYZER
FOR END USER
INSTRUCTION MANUAL
3-16 Minamiyakata, Sakae, Toyoake, Aichi 470-1194 Japan

1
IMPORTANT SAFETY INFORMATION
Throughout this manual, notices appear to bring your attention to situations which could result in death, serious injury, or damage
to the unit.
WARNING Indicates a hazardous situation which, if not avoided, could result in death or serious injury.
CAUTION Indicates a hazardous situation which, if not avoided, could result in minor or moderate injury.
NOTICE Indicates a hazardous situation which, if not avoided, could result in damage to the unit.
HYGIENE Indicates important precautions for hygiene and food safety.
IMPORTANT Indicates important information about the use and care of the unit.
IMPORTANT
This booklet is an integral and essential part of the product and should be kept and preserved by the user.
Please read carefully the guidelines and warnings contained herein as they are intended to provide the user with essential
information for the continued safe use and maintenance of the product. In addition, it provides GUIDANCE ONLY to the user
on the correct services and site location of the electrolyzer.
Please preserve this booklet for any further consultation that may be necessary.
WARNING
This is a water electrolyzer, and should be destined only to be used for the purpose for which it has been expressly designed.
Any other use should be considered improper and therefore dangerous. The manufacturer will not be held liable or responsible
for any damage caused by improper, incorrect and unreasonable use.
The installation, and relocation if necessary, must be carried out by qualied personnel, in accordance with current
regulations, according to the manufacturer’s instructions.
This electrolyzer is not intended for outdoor use (including under canopy). Exposure to rain may cause electric leak or shock.
Direct sunlight can damage the plastic tank exterior, resulting in cracks and water leaks.
Ensure adequate ventilation. Hydrogen gas or chlorine gas may cause health problems.
Do not mix electrolyzed water with other chemicals. Mixture with acidic or chlorine-based chemicals can cause chlorine gas,
resulting in health problems.
Do not use a large volume of sanitizing water only. Generation of a large amount of chlorine gas may cause health problems
or corrosion of surrounding equipment.
The use of any electrical appliance involves the observance of some fundamental rules. In particular:
* Instances of high humidity and moisture increase the risk of electrical short circuits and potential electrical shocks. If in
doubt, disconnect the electrolyzer.
* Do not damage the power cord or pull it in order to disconnect the electrolyzer from the electrical supply network.
* Do not touch the electrical parts or operate the switches with damp hands.
* This appliance is not intended for use by persons (including children) with reduced physical, sensory or mental capabilities,
or lack of experience and knowledge, unless they have been given supervision or instruction concerning use of the appliance
by a person responsible for their safety.
* Children should be supervised to ensure that they do not play with the appliance.
*Donotattempttomodifytheelectrolyzer.Onlyqualiedpersonnelmaydisassembleorrepairtheappliance.
CAUTION
Donotuseaamenearacontainerortankholdingelectrolyzedwater.Hydrogengasfromcleaningwatermaycauseignition.

2
2. CONSTRUCTION
[a] EXTERIOR
[8] Sanitizing water vent (25A)
[9] Sanitizing water outlet (20A)
[10] Adjustable legs
Keep the unit level and stable.
[11] Power cord (with plug)
If the power cord is damaged, it must be replaced by a special cord or
assembly available from the manufacturer or its service agent.
[12] Grommet
Receives the cable from the operation box (option).
[1]
[2]
[3]
[4] [5]
[6]
[7]
(Front)
[8]
[9]
[10] (Rear)
[11]
[12]
[1] Cleaning water outlet (20A)
[2] Neutralizer vent (25A)
[3] Cleaning water vent (25A)
[4] Water tank (left)
Holds cleaning water in normal dispensing mode and sanitizing water
in reverse dispense mode.
[5] Water tank (right)
Holds sanitizing water in normal dispensing mode and cleaning water
in reverse dispense mode.
[6] Salt chute door
Open to add in salt.
[7] Operation panel
Indicates the state of operation. See “[c] OPERATION PANEL”.
In the context of this manual, the term "sanitizing water" refers to
acidic water and "cleaning water" refers to alkaline water.
1. PRINCIPLE OF ELECTROLYSIS
4
Reactions at Anode
Chloride ions (Cl-) and hydroxide ions
emit electrons (e-) to the anode, which
become hypochlorous acid (HOCl).
Reactions at Cathode
Sodium ions (Na+) receive electrons (e-)
from the cathode and become sodium
metal (Na) which reacts with water (H2O)
and becomes sodium hydroxide (NaOH)
and hydrogen gas (H2).
DC Power Supply
Hypochlorous Acid
(
HOCl
)
Sodium Hydroxide
(NaOH)
Cathode
(
RED
)
Anode
(OX)
Positive ions drawn
to cathode
Cl-
Negative ions
drawn to anode
Salt Water (NaCl)
Diaphragm
Electrolytic Cell
Flow of electrons
Cl-H2O
H2O
Na Na
Na+
Na+
Na+
OH-
OH-
2e-
2e-
H2
HOCl
Reactions at Anode
Chloride ions (Cl-) and hydroxide ions emit electrons (e-) to the
anode, which become hypochlorous acid (HOCl).
Reactions at Cathode
Sodium ions (Na+) receive electrons (e-) from the cathode and
become sodium metal (Na) which reacts with water (H2O) and
becomes sodium hydroxide (NaOH) and hydrogen gas (H2).
Salt water contains four kinds of ions; sodium ions (Na+), chlorine
ions (Cl-), hydrogen ions
(H+) and hydroxide ions (OH-).
NaCl + H2O → Na++ Cl-+ H++ OH-
(Mix water and salt) Salt water (4 kinds of ions)
When two electrodes are inserted into salt water and voltage is
applied:
Negative ions (Cl-) are drawn to the anode, and
Positive ions (Na+) are drawn to the cathode.
At the anode, hydrogen chloride (HCl) and hypochlorous acid (HOCl)
are generated.
2Cl-+ H2O → HCl+HOCl+2e-
Electrons (2e-) are emitted to the anode, which means the acidic
water (HCl + HOCl) causes
oxidization. [As electrons are emitted, the oxidization/reduction
potential becomes positive (+mV).]
Chlorine ions also emit electrons and become chlorine gas (Cl2).
2Cl- → Cl2+ 2e-
(Cl2= chlorine gas)
At the cathode, sodium hydroxide (NaOH) and hydrogen gas (H2) are
generated.
Na++ H2O + H++ 2e- → NaOH+H2
Electrons (2e-) are received from the cathode, which means the
alkali water (NaOH) causes reduction. [As electrons are received, the
oxidization/reduction potential becomes negative (-mV).]

3
[13] [14] [15]
(Bottom)
Front
[13] Drain outlet (G3/4 female)
[14] Tank drain outlet (G1/2 female)
[15] Water inlet (Rc1/2 female)
[b] INTERIOR
[1]
[2]
[3]
[4]
[5]
[6] [7]
[8]
[9]
[10]
[1] Power switch (earth leakage circuit breaker)
Turns on and off the power supply.
[2] Control panel (B)
ROX-60SA-EW only. Provided with buttons and display for setting cell
functions. See “[d] CONTROL PANEL (A) (B)”.
[3] Water softener
Softens tap water.
[4] Salt water tank
Dilutes salt to make salt water.
[5] Neutralizer
Neutralizes sanitizing water pH.
[6] Neutralizer inlet
Open to add in neutralizing agent.
[7] Door
Open/close to evacuate the salt water pump and add in neutralizing
agent.
[8] Water sampling tap
Sample water to check water hardness.
[9] Control panel (A)
Provided with buttons and display for setting cell functions. See “[d]
CONTROL PANEL (A) (B)”.
[10] Water softener timer
Sets the present time and regeneration time. See “[e] WATER
SOFTENER TIMER”.
[c] OPERATION PANEL
[1] Electrolyzed water lamp
(Blue = cleaning water, red = sanitizing water)
Indicates the type of water stored in the tank.
[2] Tank level lamp (green)
Indicates the water level for each tank in three steps. Electrolyzed
water is not available if this lamp is off.
[3] Flush (reverse dispense) lamp (blue)
The sanitizing and cleaning water outlets are switched while this lamp
is on. Check with the electrolyzed water lamp.
[4] Replace cell lamp (red)
Flashes when the electrolytic cell needs to be replaced.
[5] Error lamp (red)
Comesonorashesincaseoftrouble.
[6] ON/OFF switch
Starts and stops electrolyzing water.
[7] Operation lamp (green)
Stays on while the unit is in operation.
(ROX-60SA-EW: Flashes when one unit is off.)
[8] Add salt lamp (red)
Comes on when the salt water tank is running out of salt.
[9] Reset switch
Resets the add neutralizer lamp.
[10] Add neutralizer lamp (red)
Flashes when the neutralizer is getting empty.
Note: Whether the operation lamp is on or off, electrolyzed water is
available while the power switch is on, until the tank level lamp
goes off.
[d] CONTROL PANEL (A) (B) [ROX-30SA-EW: Control panel (A) only]
[1] [10] [9] [8] [7]
[2] [3] [4] [5] [6]
[1]
[2]
[3]
[4]
[5]
[7]
[6]
[1] Display
Indicates the cell run time, current, voltage, and error code in case
of trouble. Shows “STOP” when electrolysis stops for water softener
regeneration.

4
[2] Display lamp (red)
Indicates the displayed item.
[3] Display select button
For use by a trained operator and service personnel only.
[4] Flush button
Press to ush the electrolyzed water circuit.The ush lamp on the
operationpanelstaysonwhileushing.
[5] Flow rate lamp (red)
Indicatesthecurrentowrate.
[6] Flow rate button
Adjuststheowrateofbothsanitizingwaterandcleaningwater.
Reference: HI = for utensil, MID = for food, LO = for food
[7] Set/reset button
For use by a trained operator and service personnel only.
[e] WATER SOFTENER TIMER
[1]
[2]
[3]
[4]
15
14
13
12
11
10
9
8
7
6
5
4
3
2
1
24
23
22
21
20
19
18
17
16
12
11
10
9
8
765
4
3
2
1
[1] Contact select switch
Keep in the “AUTO” position.
[2] Time indicator
Indicates the present time.
[3] Set switch
Sets the water softener regeneration time. Regeneration begins at the
red time zone.
[4] Frequency select switch
Set to your local frequency.
[f] ACCESSORIES
Instruction manual 1 Installation manual 1
Operation sheet 1 pH test paper UNIV 1
Key 2 Chlorine test paper 1
Measuring cup 1 Water hardness indicator 1
Neutralizing agent 1 Reducing valve (0.25MPa) 1
Dual check valve 1
[g] OPTIONS
Automatic dispensing valve (VDW-2PB series)
Valve assembly
Operation box
Note: Ask an authorized Hoshizaki service company for installation of
the above options.
3. CHECKS BEFORE OPERATION (DAILY)
[a] SALT LEVEL
* Open the salt chute door to check the salt level in the salt water
tank. If it is low, follow steps 1) and 2) below.
* Check the add salt lamp on the operation panel. If it is on, follow
steps 1) to 4) below.
IMPORTANT
1. Use sodium chloride (NaCl) or potassium chloride (KCl)
with more than 99% purity. Any other kind of salt may cause
failure, clogged pipes, or health problems.
2. To prevent corrosion, do not spill salt.
3. Tightly close the salt chute door to avoid dust and dirt that
may cause failure.
Blue line
Salt chute
Salt net
* Check the add neutralizer lamp on
theoperationpanel.Ifitisashing,
follow steps 1) to 4) below.
1) Uncap the neutralizer. Add in
neutralizing agent up to the “MAX”
line.
2) Recap the neutralizer.
3) Press and hold the reset switch on the operation panel for more
than5seconds.Theaddneutralizerlampstopsashing,thengoes
off after 2 seconds.
4) Press the ON/OFF switch if it is off. The unit starts.
4. START UP
After water failure, purge the water circuit according to “6. WATER
FAILURE”.
1) Close the drain valve if it is open.
2) Open the water supply line shut-off valve.
3) Open the water supply valve.
Note: Each installation may have different water supply connections.
Locate the shut-off valve, water supply valve and drain valve in
your site.
4) Open the salt chute door to check the salt level in the salt water
tank. See “3. [a] SALT LEVEL”.
5) Plug in the unit.
6) Open the door.
7) Turn on the power switch (earth leakage circuit breaker). The unit
makes three sounds of initial operation. Then the operation lamp
comes on, and the unit starts automatically and runs until the water
tanksllup.
MAX
MIN
MAX
1) Open the salt chute door. Add
in salt.
IMPORTANT
To prevent clogging the
salt net, keep the salt level
below the blue line.
2) Close the salt chute door.
3) Press the ON/OFF switch on the operation panel. The add salt
lamp goes off.
4) Press the ON/OFF switch again. The unit starts.
[b] NEUTRALIZING AGENT LEVEL
* Open the door to check the neutralizing agent level in the neutralizer.
If it is close to the “MIN” line, follow steps 1) to 3) below.

5
8) Close the door. Electrolyzed water becomes available when the
tank level lamp comes on.
Note: The dispensing method depends on the dispensing valve
installed. Follow the instructions of the installer.
To use other than the optional dispensing valve, consult an
authorized Hoshizaki service company.
Refer to the instruction manual provided with the optional
dispensing valve.
5. SHUT DOWN
1) Press the ON/OFF switch on the operation panel. The operation
lamp goes off, and the unit stops.
2) Open the door.
3) Turn off the power switch (earth leakage circuit breaker).
4) Close the door.
5) Unplug the unit or turn off the main power supply.
6) Close the water supply line shut-off valve and water supply valve.
The water supply valve must be closed to prevent possible water
leaks in case of failure.
Note: Each installation may have different water supply connections.
Locate the shut-off valve, water supply valve and drain valve in
your site.
6. WATER FAILURE
In case of water failure, follow the instructions below:
1) Shut down the unit according to “5. SHUT DOWN”.
2) Wait until water supply is resumed.
3) Check that the water supply valve is closed.
4) Open the drain valve.
5) Open the water supply line shut-off valve. Drain water until no rusty
water comes out.
6) Close the drain valve.
7) Start up the unit according to “4. START UP”.
7. MAINTENANCE
IMPORTANT
1. Use a neutral cleaner for daily maintenance. As a sanitizer,
we recommend the use of invert soap (benzalkonium
chloride) available at a drugstore.
2. To prevent damage to the painted or plastic surfaces, do
not use thinner, benzine, alcohol, petroleum, soap powder,
polishing powder, alkaline detergent, acid, scrub brush, and
especially cleanser for use on fans and cooking ranges.
Also, to prevent corrosion, do not use a chlorine bleach.
3. Follow the manufacturer’s instructions when using a
disposable cloth.
4. Remove heavy soil as required.
[a] STAINLESS STEEL (AS REQUIRED)
The stainless steel parts are easily damaged. Clean them as follows:
1) Wipe with a soft cloth containing a calcium chloride based liquid
cleanser, tap water, and cleaning water.
2) Wipe clean with a damp cloth.
IMPORTANT
1. Do not damage the stainless steel surfaces. Use of a
steal brush or steel wool may break oxide film to develop
corrosion inside.
2. Use a calcium chloride based liquid cleanser to remove
corrosion, dirt, and chlorides.
3. Clean the stainless steel surfaces along with their grains if
any.
[b] CLEANING WATER CIRCUIT (MONTHLY)
The cleaning water circuit has calcium and magnesium deposits.
Continuous use may build up these deposits and obstruct the water
ow,resultinginshutdownorinadequatewaterproperties.
Topreventsuchtroubles,ushthewatercircuitonceamonth.
Note:Theushinglengthandfrequencydependonwaterquality,but
should be around two hours once a month.
It is best to use the unit for a month with the flush (reverse
dispense) lamp on.
Flushing is required if there is a big difference in dispensing
volume between sanitizing water and cleaning water.
1) Press the ON/OFF switch on the operation panel. The operation
lamp goes off, and the unit stops.
2) Open the dispensing valves to drain out the left and right water
tanks.
3) Close the dispensing valves.
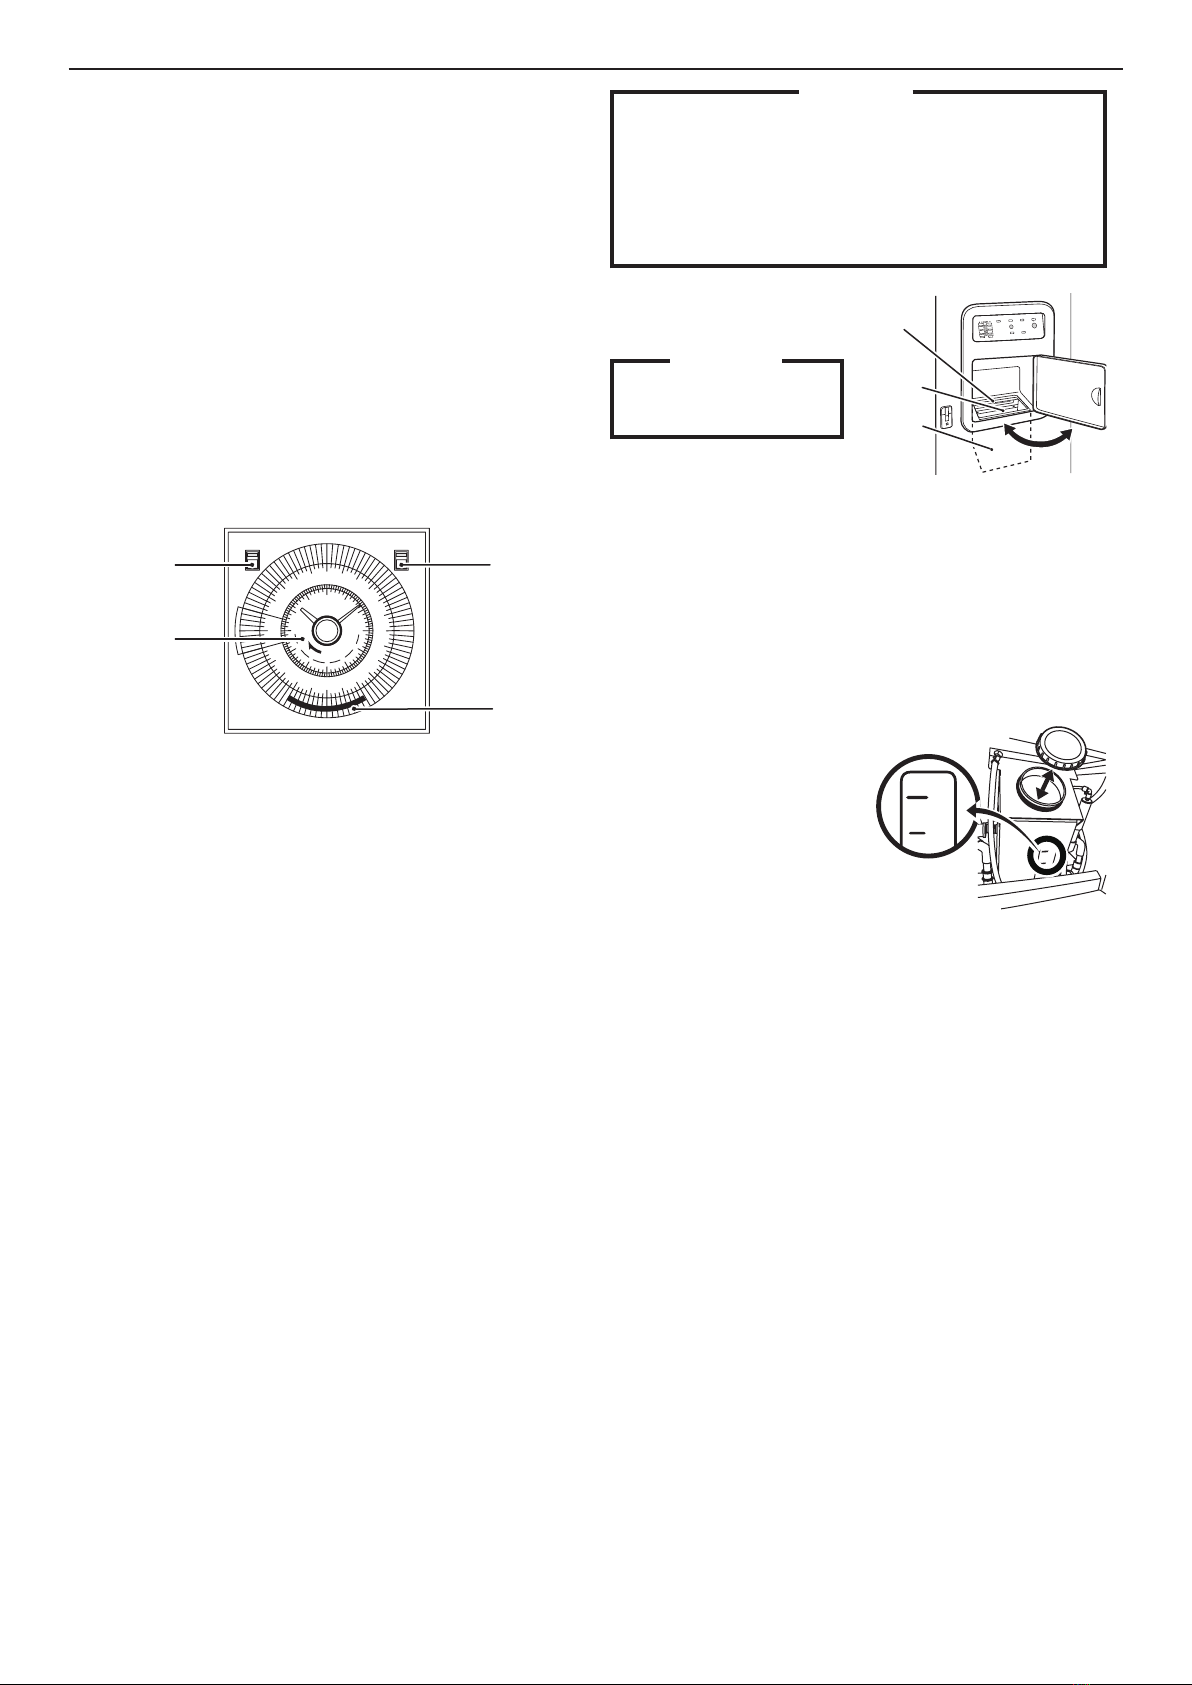
4)Press andhold the ushbutton on thecontrol panel (A)for more
than5seconds.Theush(reversedispense)lampcomeson,and
the water outlets are switched.
5) Press the ON/OFF switch on the operation panel. The operation
lamp comes on, and the unit starts.
Note:While the ush (reverse dispense) lamp is on, cleaning water
and sanitizing water are dispensed from the opposite outlets:
Water tank (left) = sanitizing water
Water tank (right) = cleaning water
6)Aftertheushingprocesscompletes,repeattheabovesteps1)to5).
Thistimetheush(reversedispense)lampgoesoff,andthewater
outlets are switched back to normal.
Note: Cleaning water and sanitizing water are dispensed from the
normal outlets:
Water tank (left) = cleaning water
Water tank (right) = sanitizing water
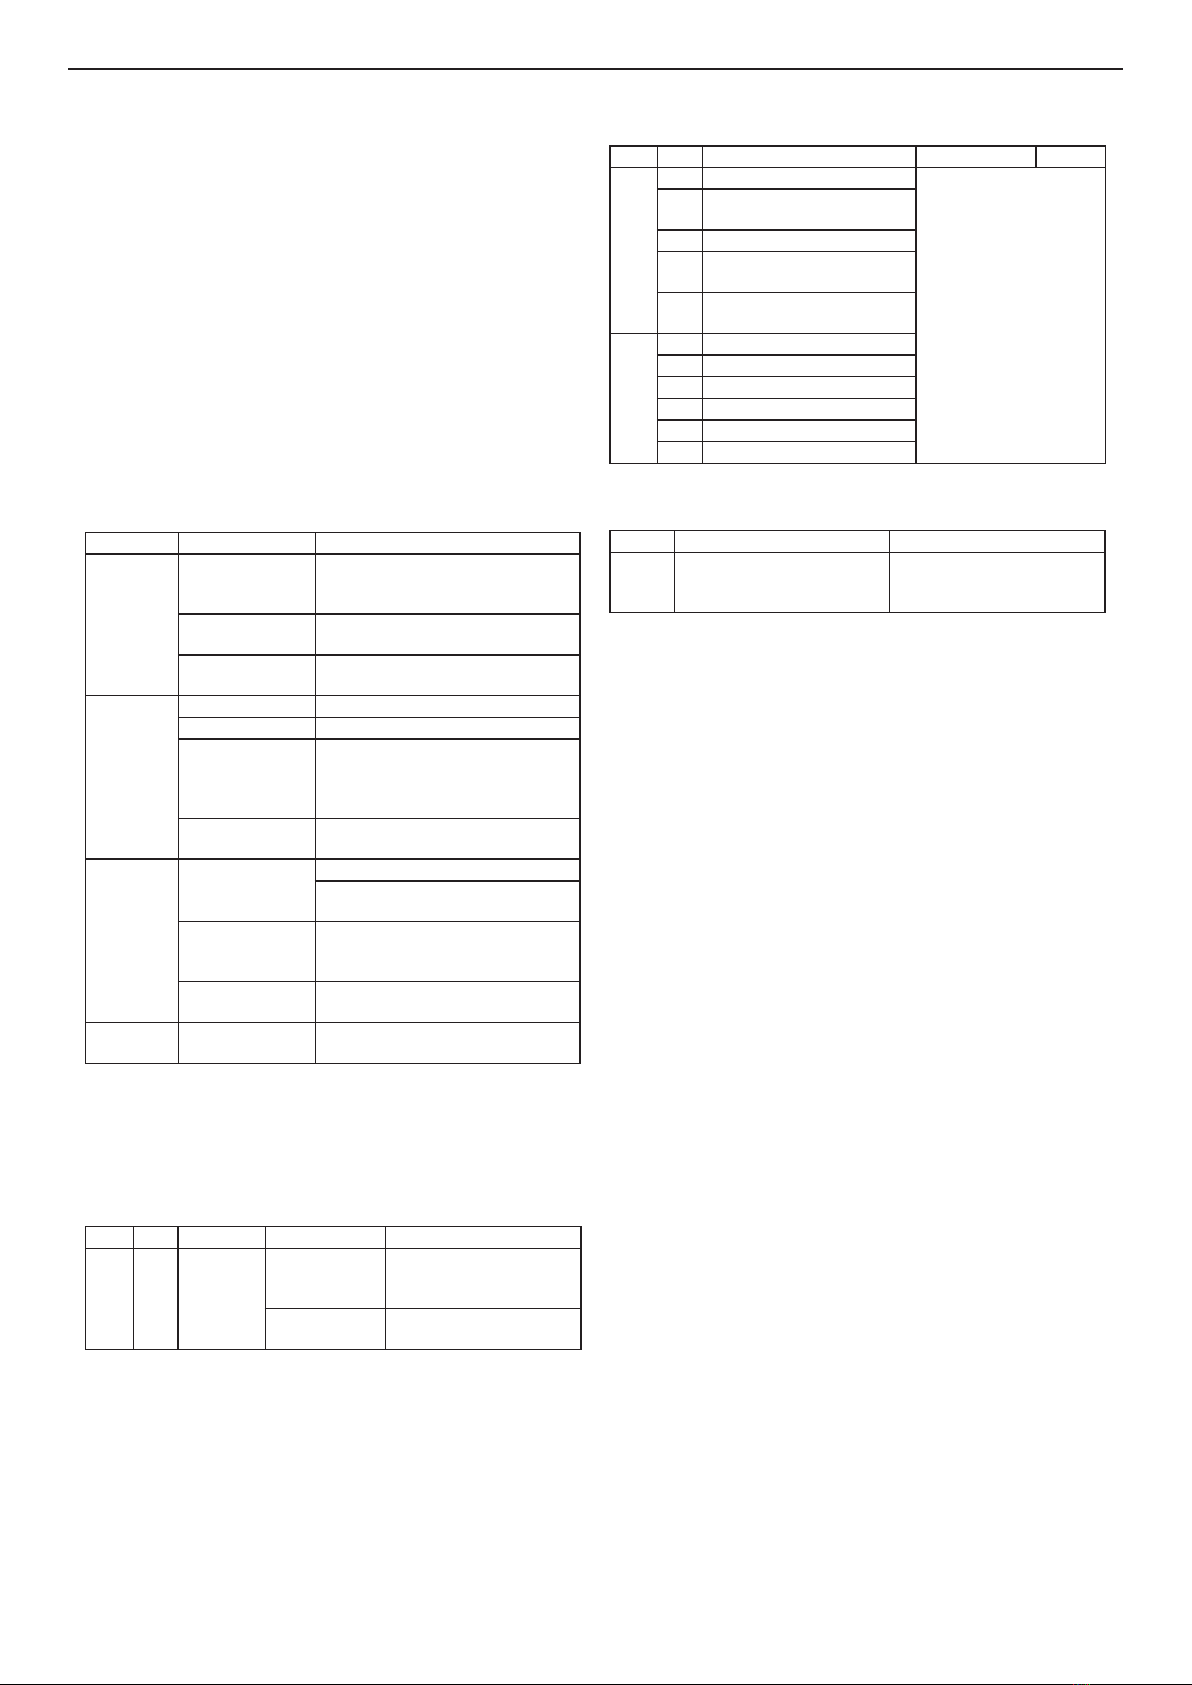
8. INSPECTION
Use a copy of “14. [a] DAILY INSPECTION SHEET” and “14. [b]
MONTHLY INSPECTION SHEET” to keep records.
[a] pH, AVAILABLE CHLORINE CONCENTRATION (DAILY)
1) Drain more than 1 liter each of sanitizing water and cleaning water.
Sample each water from its outlet into separate containers.
2) Use the pH and chlorine test papers to check that each value is
within the following range. Use the pH test paper to directly check
water in the neutralizer.

6
Water Test Paper pH Available Chlorine
Sanitizing
pH test paper UNIV Approx. 3 —
Chlorine test paper — 20 mg/kg (ppm)
or more
Cleaning pH test paper UNIV Approx. 11 —
Neutralizer pH test paper UNIV 5.8 or more —
* It is not necessary to check the available chlorine concentration of
cleaning water.
Note: See the instruction manual of each test paper for details of its
proper handling.
If any of the checked values exceeds the specified range,
contact an authorized Hoshizaki service company.
If water is not dispensed from its proper outlet, contact an
authorized Hoshizaki service company.
[b] SALT LEVEL (DAILY)
Check the salt level according to “3. [a] SALT LEVEL”.
[c] NEUTRALIZING AGENT LEVEL (DAILY)
The neutralizer prevents vaporization of chlorine generated from
water overflowing the sanitizing water tank. Water overflowing the
cleaningwatertankisnotneutralizedbutowsthroughtheneutralizer
without changing its pH.
Check the neutralizing agent level according to “3. [b] NEUTRALIZING
AGENT LEVEL”.
[d] WATER LEAKS (DAILY)
Checktheunitandsurroundingoorforwaterleaks.Ifanyisfound,
contact an authorized Hoshizaki service company.
[e] REPLACE CELL LAMP (DAILY)
Checkthatthereplacecelllampontheoperationpanelisnotashing.
The service life of the electrode in the electrolytic cell depends on
water quality. To maintain effective performance of electrolyzed
water, the electrolytic cell needs to be replaced every 3000 hours of
operation.
If the replace cell lamp is ashing, contact an authorized Hoshizaki
service company.
[f] CELL RUN TIME, CURRENT, VOLTAGE (AS REQUIRED)
To check the cell run time, current, and voltage:
1) Open the door.
2) Turn on the power switch (earth leakage circuit breaker).
3) Press the display select button on the control panels (A) and (B)
[ROX-30SA-EW: control panel (A) only].
4) Press the display select button until the desired item appears in the
display.
Note:Itisfactoryadjustedtodisplaythecellruntimerst.
5) Close the door.
[g] WATER HARDNESS (WEEKLY)
IMPORTANT
Continuous use with hard water may cause clogged pipes,
reduction in performance, or failure of the electrolytic cell. If
sampled water is hard, contact an authorized Hoshizaki service
company.
1) Open the water sampling tap. Let water
run for more than 5 seconds. Sample
water in the measuring cup.
2) Pour one or two drops of the water
hardness indicator into the measuring
cup, and stir a little. Check the water
hardness (red = hard water, blue = soft
water).
Water
sampling tap
Open
OFF
Test button
1) Press the test button of the power switch
(earth leakage circuit breaker).
2) Check that the switch turns off. If not,
immediately contact an authorized
Hoshizaki service company.
[i] ATTACHMENT PLUG (ANNUALLY/BIANNUALLY)
WARNING
Check periodically that the attachment plug blades and their
vicinity are free of dust and that the attachment plug is securely
plugged into the receptacle. Dusty blades or loose connection
maycauseelectricshockorre.
Check for the following problems:
Problem Remedy
The attachment plug or power cord
is too hot, damaged, weighed down,
or caught in.
Immediately ask an authorized
Hoshizaki service company for
repair.
The attachment plug blades, their
vicinity, and receptacle are dusty.
Clean.
The attachment plug is plugged
into a single receptacle with other
equipment.
Plug into a separate receptacle.
The unit shares a single power
supply with other equipment.
Use a separate power supply.
[j] CONSUMABLE/PERIODIC REPLACEMENT PARTS
Consumable parts:
pH test paper UNIV Chlorine test paper
Water hardness indicator Neutralizing agent
Periodic replacement parts:
Electrolytic cell (3000 hours)
9. PREPARING ELECTROLYZER FOR LONG STORAGE
WARNING
When shutting down the electrolyzer for more than a week, turn
off the power switch (earth leakage circuit breaker), and unplug
the unit to prevent electric leak, heat generation, or ignition.
CAUTION
When shutting down the electrolyzer for more than two days,
drain out the unit to prevent foul water from causing bacterial
growth and health problems.
Note: For details, follow the instructions of the water hardness
indicator.
[h] EARTH LEAKAGE CIRCUIT BREAKER (MONTHLY)
WARNING
Check the earth leakage circuit breaker for proper operation
once a month. If it is left inoperable, it could increase the risk of
electric shock in case of electric leak.

7
Purge the water circuit to prevent possible freeze-up.
1) Shut down the unit according to “5. SHUT DOWN”.
2) Clean the exterior. Follow the instructions in “7. [b] CLEANING
WATER CIRCUIT (MONTHLY)”.
3) Before restarting the unit, follow the instructions in “3. CHECKS
BEFORE OPERATION (DAILY)”.
10. BEFORE CALLING A SERVICE AGENT
If something seems wrong with the unit, check for possible causes
according to the following instructions.
If the problem still exists, turn off the power switch (earth leakage
circuit breaker), unplug the unit, and contact an authorized Hoshizaki
service company.
Onlyqualiedpersonnelmayrepairtheunit.Donotattempttorepair
it yourself.
[a] OPERATIONAL PROBLEMS
Problem Possible Cause Remedy
Abnormal
noise
Operating sounds
(water supply,
pump)
No problem.
Unstable
installation
Turn the adjusting bolts to level the
unit.
Contact with other
objects
Keep them away from the unit.
Electrolyzed
water is not
available
Power failure Wait until power is resumed.
Unplugged Plug in.
Power switch
(earth leakage
circuit breaker) is
off
Turn it on. If it turns off automatically,
there is a risk of electric leak.
Contact an authorized Hoshizaki
service company.
Operation lamp
(green) is off
Press the ON/OFF switch. See "4.
START UP".
Electrolyzed
water is not
available
Add salt lamp
(red) is on
Add salt. See "3. [a] SALT LEVEL".
Purge the salt water pump. See "11.
PURGING SALT WATER PUMP".
Add neutralizer
lamp (red) is
ashing
Add neutralizing agent. See "3. [b]
NEUTRALIZING AGENT LEVEL".
Tank level lamp
(green) is off
Wait until the water tank level
reaches the minimum level.
Wetoor Water leaks Contact an authorized Hoshizaki
service company.
[b] WHEN ERROR LAMP COMES ON OR FLASHES
When the error lamp (red) on the operation panel comes on or
ashes,openthedoorandchecktheerrorcodeinthedisplayonthe
control panels (A) and (B).
Lamp Code Problem Possible Cause Remedy
Flash E11 Inadequate
water
supply
Water failure Restart the unit after water
supply is resumed. See "6.
WATER FAILURE".
Water supply
valve is closed
Open.
* After the problem is resolved, press the ON/OFF switch on the
operation panel. The error lamp goes off. Press the ON/OFF switch
again to resume operation.
When one of the following error codes appears, immediately contact
an authorized Hoshizaki service company.
Lamp Code Problem Possible Cause Remedy
Flash E14 Water valve defective
Repair or replacement is
required.
Contact an authorized
Hoshizaki service
company.
E31 Water valve (salt water tank)
defective
E53 Reversing relay defective
E61 Flow switching valve
defective
E92 Water supply function
defective
On E12 Flow rate valve defective
E74 Thermistor defective
E81 Saltwatertankoatdefective
E82 Watertankoatdefective
E85 Waterpumpoatdefective
E91 Water softener defective
The following indication on the display is not an error.
Display On Off
STOP Electrolysis stops for water
softener regeneration.
Electrolysis automatically
resumes at the end of water
softener regeneration.
11. PURGING SALT WATER PUMP
This unit uses a pump to supply salt water. If the salt water pump
contains air, electrolyzed water cannot be dispensed properly. When
the add salt lamp on the operation panel comes on and electrolyzed
water is not available, purge air from the salt water pump as follows:
1) Open the door.
2) Press the ON/OFF switch on the operation panel. The operation
lamp goes off, and the unit stops.
3) Press and hold the display select button on the control panels (A)
and (B) [ROX-30SA-EW: control panel (A) only]. The salt water
pump starts running and pumping up salt water to purge the salt
water hose.
4) The sound of the pump becomes lower when the air is removed.
Release the display select button.
5) Close the door.
12. WARRANTY
Hoshizaki warrants to the original owner/user that all Hoshizaki
branded products shall be free of defects in material and/or
workmanship for the duration of the “warranty period”. The warranty
shall be effective for one year from the date of installation.
Hoshizaki’s liability under the terms of the warranty are limited and
shall exclude routine servicing, cleaning, essential maintenance and/
or repairs occasioned by misuse and installations not in accordance
with Hoshizaki guidelines.
Warranty repairs should be completed by an approved Hoshizaki
dealer or service agency using genuine Hoshizaki components.
To obtain full details of your warranty and approved service agency,
please contact:
e-Water Systems Pty Ltd
TEL : 1300 EWATER
FAX : +61(3) 9686 1377

8
13. SPECIFICATIONS
Model ROX-30SA-EW
Electrolysis System Membrane technology
Electrolyte Salt containing at least 99% sodium chloride
Power Supply 1 phase 220 - 240V 50/60Hz
Electric Consumption 250W
Pump operation: 550/670W
Performance
(Standard)
Sanitizing water: pH3 or less, available
chlorine 20 - 60mg/kg
Cleaning water: pH11 or more
Production Rate
(Standard)
Sanitizing water: Approx. 2.0L/min
Cleaning water: Approx. 2.0L/min
Safety Device Earth leakage circuit breaker (with
overcurrent protector)
Exterior Galvanized steel (polyester powder paint),
ABS plastic, polyethylene plastic (tank)
Dimensions 1400mm(W) x 660mm(D) x 1800(-1830)
mm(H)
Weight 230kg
Temperature Range Ambient: 5 - 35°C
Water supply: 5 - 30°C
Water Supply Comply with local water requirements
Pressure: 0.10 - 0.75MPa (with pressure
reducing valve)
Model ROX-60SA-EW
Electrolysis System Membrane technology
Electrolyte Salt containing at least 99% sodium chloride
Power Supply 1 phase 220 - 240V 50/60Hz
Electric Consumption 460W
Pump operation: 760/890W
Performance
(Standard)
Sanitizing water: pH3 or less, available
chlorine 20 - 60mg/kg
Cleaning water: pH11 or more
Production Rate
(Standard)
Sanitizing water: Approx. 4.0L/min
Cleaning water: Approx. 4.0L/min
Safety Device Earth leakage circuit breaker (with
overcurrent protector)
Exterior Galvanized steel (polyester powder paint),
ABS plastic, polyethylene plastic (tank)
Dimensions 1400mm(W) x 660mm(D) x 1800(-1830)
mm(H)
Weight 250kg
Temperature Range Ambient: 5 - 35°C
Water supply: 5 - 30°C
Water Supply Comply with local water requirements
Pressure: 0.10 - 0.75MPa (with pressure
reducing valve)

9
14. INSPECTION SHEET
Make copies of this page.
[a] DAILY INSPECTION SHEET
Date
Time
pH
Sanitizing water
Cleaning water
Neutralizer
Available chlorine concentration*
Salt level
Neutralizing agent level
Water hardness
Water leaks around unit
Water leaks from water circuit
Cell run time
Checked by
* Sanitizing water only
Date
Time
pH
Sanitizing water
Cleaning water
Neutralizer
Available chlorine concentration*
Salt level
Neutralizing agent level
Water hardness
Water leaks around unit
Water leaks from water circuit
Cell run time
Checked by
* Sanitizing water only
Date
Time
pH
Sanitizing water
Cleaning water
Neutralizer
Available chlorine concentration*
Salt level
Neutralizing agent level
Water hardness
Water leaks around unit
Water leaks from water circuit
Cell run time
Checked by
* Sanitizing water only
[b] MONTHLY INSPECTION SHEET
Date
Check power switch (earth
leakage circuit breaker)
Flush cleaning water circuit
Date
Check power switch (earth
leakage circuit breaker)
Flush cleaning water circuit
This manual suits for next models
1
Table of contents
Other Hoshizaki Water System manuals
Popular Water System manuals by other brands

EarthMinded
EarthMinded RainStation RS-0001 user guide

Honeywell
Honeywell HS10S-FA Installation instruction

Thermo Scientific
Thermo Scientific VersaCool user manual

Haws
Haws 1011HPSMS Installation, operation and maintanance

Red Sea
Red Sea WaveMaster Pro Installation & operation manual

Everpure
Everpure Carbon Filter Wrap CWS-10 Specification sheet

Bluevua
Bluevua RO500X6 user manual

Oase
Oase ProfiClear Premium operating instructions

SunEarth
SunEarth SolaRay PV Installation, operation and maintenance manual

Davco
Davco SHOP PRO FXP Technical manual

HydraMaster
HydraMaster BoxxerXL owner's manual

Dometic
Dometic SeaXChange XTC Series User manual & installation guide