
10
5. Der Drone ist nach zirka 90 Minuten aufgeladen. Die ROTE
LED am USB-Stecker erlischt und zeigt dadurch an, dass der
Akku des Drone vollständig aufgeladen ist. 6. Entfernen Sie den
USB-Pinstecker vom Akkuanschluss des Drone Racer, sobald der
Ladevorgang abgeschlossen ist. NICHT ÜBERLADEN. Flugzeit 6-7
Minuten.
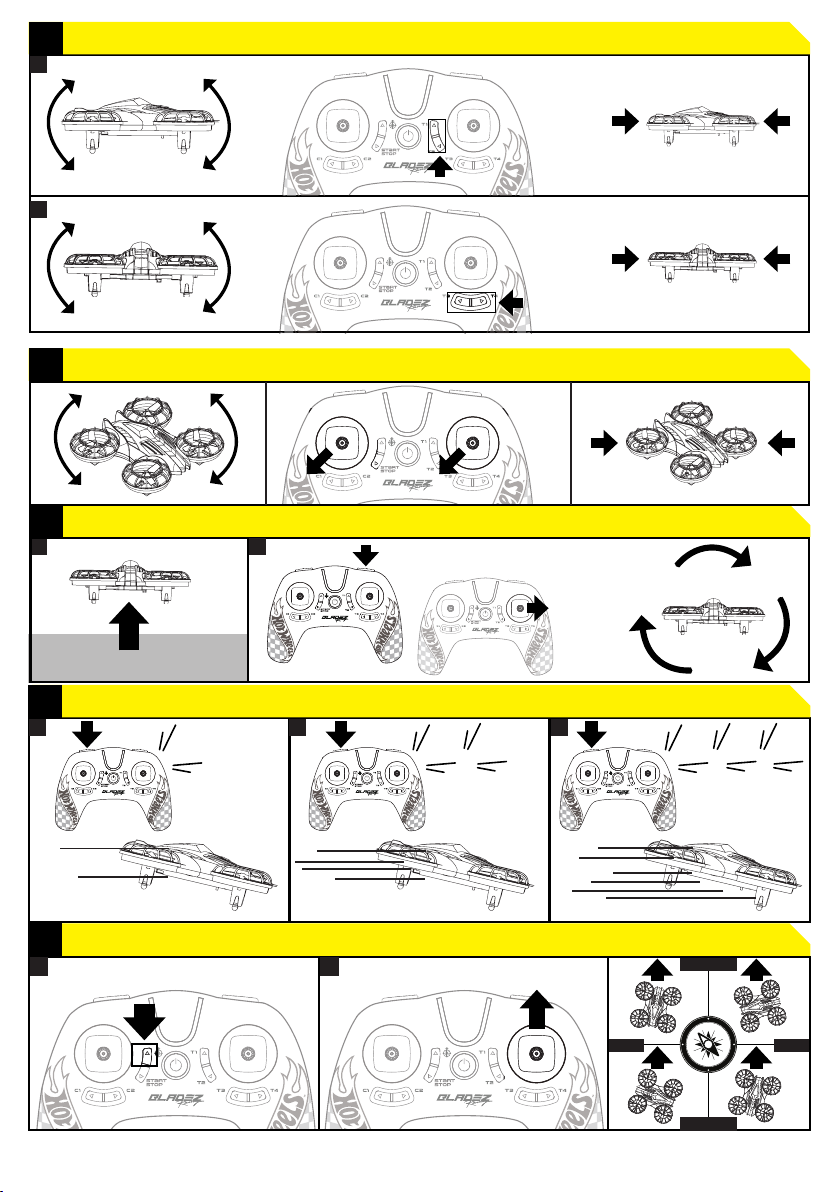
E. SYNCHRONISIEREN
1. Schalten Sie den Drone ein. Die Weiß und BLAUE LED-Leuchten
anderDrohneblinken.Die Drohne ist jetzt eingeschaltet. 2. Stellen
Sie die Drohne auf eine EBENE FLÄCHE, das Weiß LED-Licht zeigt
in Ihre Richtung. Wird der Drone nicht auf einer ebenen Fläche
positioniert, kann dies dazu führen, dass die Rotorblätter des
Drone sich nicht richtig drehen.3. Schalten Sie das Handgerät ein.
Das Handgerät gibt eine Piepton von sich. 4& 5. PDrücken Sie den
‘Steuerknüppel A’ langsam nach oben und wieder nach unten,
um das Handgerät mit dem Drone zu verbinden. 6. Handgerät
und Drone sind jetzt synchronisiert und aktiv. 7. Zum Aktivieren
der Rotorblätter die Start/Stopp-Taste auf dem Handgerät drücken.
8. Schieben Sie ‘Steuerknüppel A’ langsam nach oben, dann
beginnen die Rotorblätter sich zu drehen. 9. Ihr Drone beginnt
mit dem Abheben.
F. FLIEGEN
Abheben und landen: Den ‘Steuerknüppel A’ langsam nach
oben schieben, um das Abheben zu steuern und die Höhe zu
steigern. Langsam nach unten drücken, um die Höhe zu verringern
und zu landen. ‘Steuerknüppel A’ ist sehr empndlich, daher bitte
vorsichtig bewegen. Zum Landen der Drohne ‘Steuerknüppel A’
nach unten bewegen.
Links und rechts abbiegen: Während die Drohne in einem
kontrollierten Schwebeug gehalten wird, ‘Steuerknüppel A’ nach
rechts drücken, um sich im Uhrzeigersinn zu drehen und nach
links drücken, um sich gegen den Uhrzeigersinn zu drehen. Bitte
stellen Sie sicher, dass der Schwebeug mit ‘Steuerknüppel A’
beibehalten wird.
Vorwärts und rückwärts iegen. Während die Drohne in
einem kontrollierten Schwebeug gehalten wird, ‘Steuerknüppel
B’ langsam nach vorn drücken, um vorwärts zu iegen, und
nach hinten drücken, um rückwärts zu iegen. Steuern Sie beim
Vorwärts-/Rückwärtsiegen weiterhin ‘Steuerknüppel A’, um die
Rechts-/Linksdrehung anzupassen und die Höhe zu halten.
Nach links und rechts ziehen: Während die Drohne in einem
kontrollierten Schwebeug gehalten wird, ‘Steuerknüppel B’
langsam nach rechts drücken, um die Drohen seitlich nach rechts
zu steuern, oder nach links drücken, um die Drohne seitlich nach
links zu steuern. Achten Sie darauf, dass um die Drohne mindes-
tens 3 Meter Platz verfügbar ist.
G.TRIMMSTEUERUNG
1. Wenn Sie der Drohne unerwünscht nach vorn oder
hinten neigt (T1/T2). DieTrimmtaste in die entgegengesetzte
Richtung der unerwünschten Bewegung drücken. Neigt sich die
Drohne beispielsweise während des Schwebeugs nach vorne,
dann drücken Sie die Taste T2 (Trimmen rückwärts), um dies zu
korrigieren.
2. Wenn sich der Drohne unerwünscht nach links oder
rechts neigt (T3/T4). Die Trimmtaste in die entgegengesetzte
Richtung der unerwünschten Bewegung drücken. Neigt sich die
Drohne beispielsweise während des Schwebeugs nach links,
dann drücken Sie die Taste T4 (Trimmen rechte Neigung), um dies
zu korrigieren.
H. WIEDERHERSTELLEN DER STABILITÄT
Wird das Produkt instabil, drücken Sie linken und rechten Steuerhebel
in die untere linke Position und halten Sie diese für einige Sekunden.
Das Handgerät piept. LED-Leuchten an der Drohne blinken. Ihre
Drohne wurde nun zurückgesetzt und ist stabil.
I. STUNT 360º
1. Bringen Sie die Drohne in kontrolliertem Schwebeug auf eine
Höhe von mindestens 3 Metern über dem Boden. Stellen Sie
sicher, dass genügend freier Raum vorhanden ist und sich keine
Objekte in der Nähe benden. 2. Drücken Sie die Stunt 360º-Taste
(obere rechte Seite) und bewegen Sie den Steuerknüppel in die
Richtung der gewünschten 360˚-Umdrehung (vorwärts/rückwärts/
links/rechts), die Drohne dreht sich daraufhin in diese Richtung.
Für eine weitere Umdrehung wiederholen Sie die Schritte 1 - 2.
J. GESCHWINDIGKEITSEINSTELLUNG
Drücken Sie die Geschwindigkeitstaste, um die Geschwindigkeit
Ihrer Drohne einzustellen (Siehe Seite 2 & 6). 1. Drücken Sie
einmal für die Anfängergeschwindigkeit (1 ‘Piep’) 2. Drücken
Sie erneut für die Expertengeschwindigkeit (2 ‘Piep’). Stunts
und Tricks können mit beiden Geschwindigkeiten durchgeführt
werden. 3. Drücken Sie erneut für die Pro-Geschwindigkeit (3
‘Piep’).
K. FUNKTION HEADLESS
Im Modus Headless kann der Bediener die Drohne betreiben,
ohne Sich Gedanken über die Ausrichtung der Drohne zu
machen. Diese Funktion ist ideal für Anfänger, da sie die Steilheit
der Lernkurve reduziert.
1. Stellen Sie die Drohne auf eine EBENE FLÄCHE, das Weiß
LED-Licht zeigt in Ihre Richtung. 2. Die Taste Headless-Modus
drücken. Im Headless- Modus piept die Drohne in regelmäßigen
Abständen.
L. NOTBREMSUNG
1. Im Notfall kann es notwendig sein, mit der Drohne eine
Notbremsung durchzuführen. 2. Schieben Sie die Steuerknüppel in
die richtige Richtung, um eine Notbremsung durchzuführen. 3. Die
Motoren der Drohne werden vom Strom getrennt und die Drohne fällt
auf den Boden.
FEHLERBEHEBUNG
Rotorblätter der Drohne drehen sich NICHT - Drohne ein-
schalten / Sicherstellen, dass die Drohne vollständig geladen ist /
Batterien im Handgerät prüfen / Drohne und Handgerät aus- und
wieder einschalten und erneut synchronisieren. Drohne hält
während des Flugs an - Sicherstellen, dass der Flug innerhalb
der Reichweite von 25 m liegt / Batterien im Handgerät austaus-
chen / Drohne auaden. Drohne lädt NICHT - Sicherstellen,
dass das USB-Ladekabel richtig am Akku-Stecker angeschlossen
ist. Drohne bewegt sich in eine unerwünschte Richtung -
Verwenden Sie die Trimm-Tasten am Handgerät für eine genaue
Ausrichtung (siehe Seite 6). Die LED-Leuchten der Drohne
blinken während des Betriebs - Akku ist schwach. Stellen Sie
sicher, dass die Drohne vollständig geladen ist. Drohne ist un-
berechenbar und funktioniert nicht richtig - Möglicherweise
sind die Rotorblätter nicht richtig montiert. Stellen Sie sicher,
dass die Rotorblätter korrekt montiert sind. (siehe Seite 3 als
Referenz). Für weitere Fragen zur Problembehandlung besuchen
Sie bitte unsere Website.
ACHTUNG
Dieses Produkt ist nicht für Kinder unter 8 Jahren geeignet.
Entfernen Sie alle Verpackungselemente, bevor Sie das Spielzeug
in kinderhände geben. Aufsicht von Erwachsenen empfohlen.
Farb- und Inhaltsänderungen verhalten. Bitte bewahren Sie diese
Informationen für spätere Rückfragen auf. Die Garantie deckt nur
Herstellungsfehler ab und keine Beschädigungen aufgrund von
Benutzerfehlern. Zur Verwendung im Innen- und Außenbereich. Nur
das mitgelieferte Batterieladegerät verwenden. Nicht überladen.
Drehende Rotoren nicht berühren. Finger, Haare und lose Klei-
dung nicht in die Nähe des Motors oder der Räder bringen, wenn
das Gerät auf „ON“ geschaltet ist. Gefahr von Augenverletzun-
gen! Nicht in der Nähe von Gesichtern iegen, um Verletzungen
zu vermeiden. Nicht bei schlechten Witterungsverhältnissen
iegen. Lassen Sie das Produkt in einem für den bestimmungs-
gemäßen Gebrauch geeigneten Bereich iegen, der frei von
Hindernissen ist, und halten Sie einen Mindestabstand von 10
Metern zu Menschen und Tieren ein. Maximale Reichweite 25.
Nicht außerhalb der Reichweite iegen. Nicht in der Nähe von
Decken oder Wänden iegen. Die Motoren können während des
Flugs heiß werden - Nicht berühren. Beim Betrieb muss immer
direkter Sichtkontakt gehalten werden. Die für das Spielzeug
verwendeten Ladegeräte müssen regelmäßig auf Schäden an Ka-
bel, Stecker, Gehäuse und anderen Teilen untersucht werden. Im
Falle eines Schadens darf das Ladegerät erst wieder verwendet


 user manual")