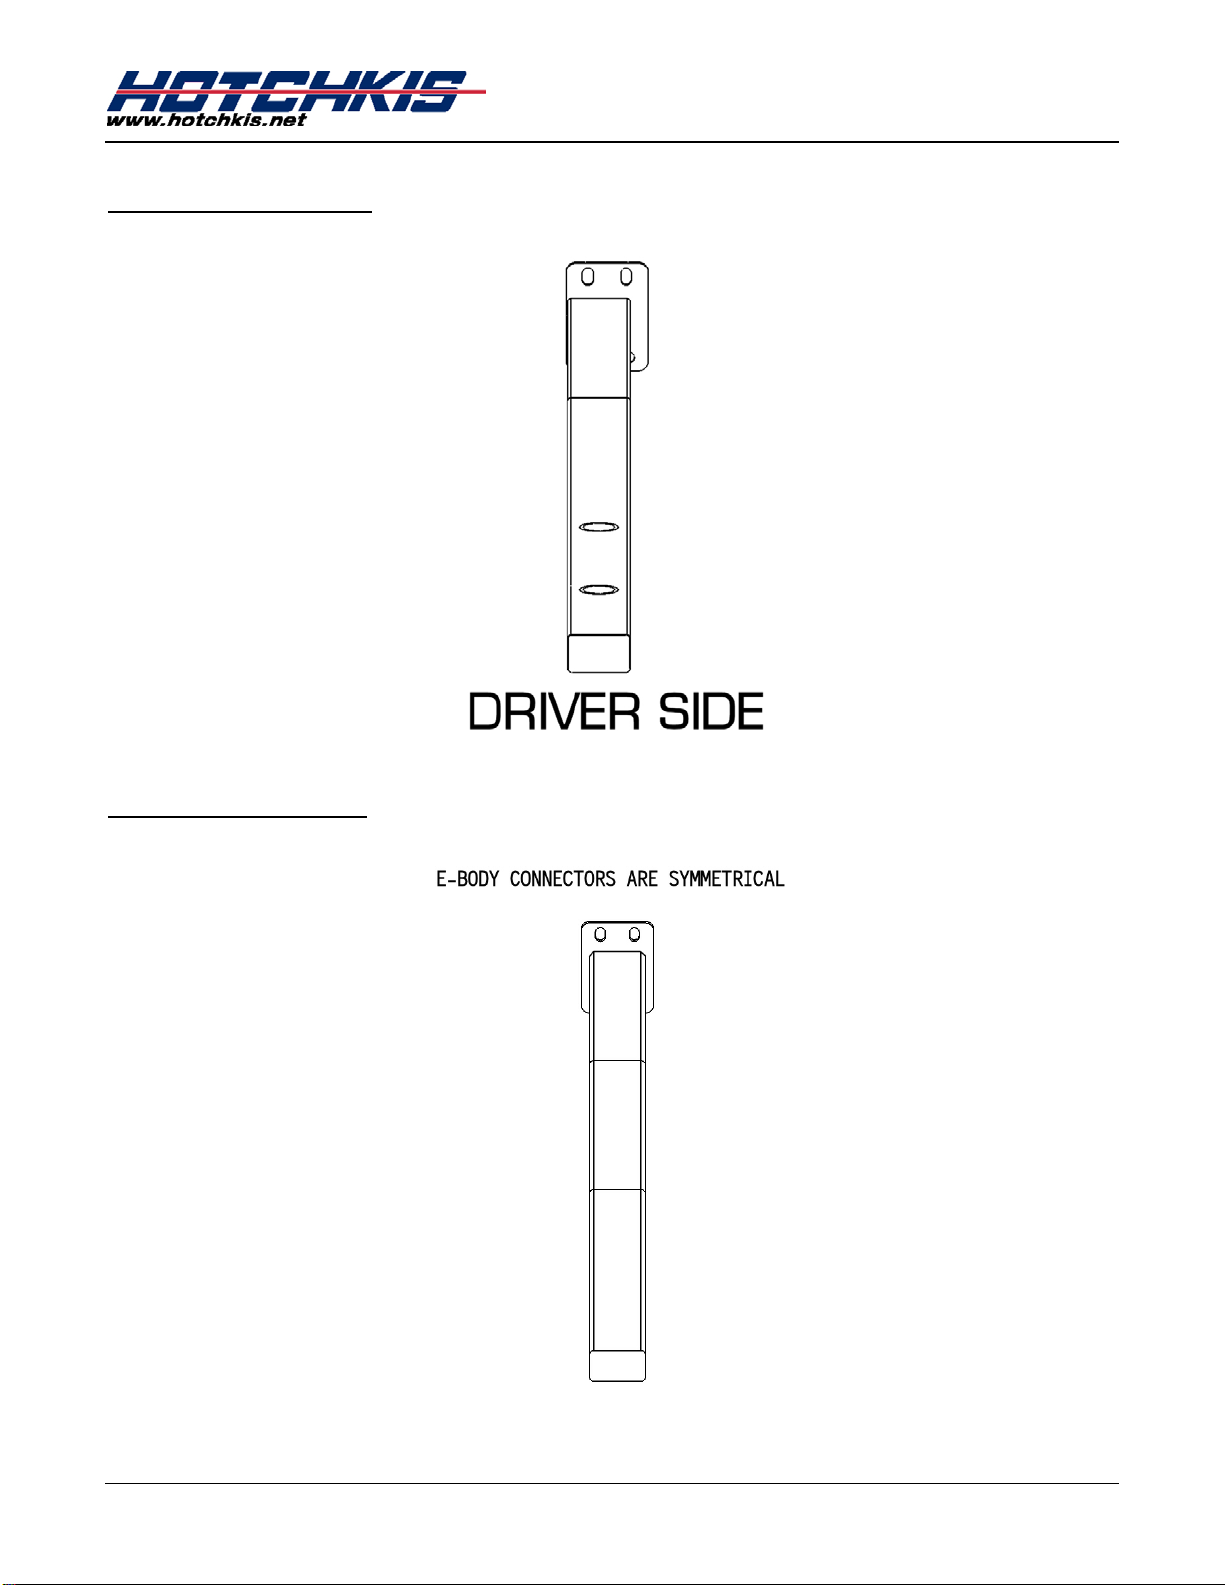
manuals.online logo
Brands
  1. Home
  2. •
  3. Brands
  4. •
  5. Hotchkis
  6. •
  7. Automobile Accessories
  8. •
  9. Hotchkis 4010 User manual

Hotchkis 4010 User manual

This manual suits for next models

2

Other Hotchkis Automobile Accessories manuals

Hotchkis 1304 User manual

Hotchkis

Hotchkis 1304 User manual

Hotchkis 2205 User manual

Hotchkis

Hotchkis 2205 User manual

Hotchkis 2207C User manual

Hotchkis

Hotchkis 2207C User manual

Hotchkis 4013 User manual

Hotchkis

Hotchkis 4013 User manual

Hotchkis 22101 User manual

Hotchkis

Hotchkis 22101 User manual

Popular Automobile Accessories manuals by other brands

Magneti Marelli AC161 Installation instruction

Magneti Marelli

Magneti Marelli AC161 Installation instruction

FDI uEZ GUI Start here

FDI

FDI uEZ GUI Start here

JCROffroad JT Install instructions

JCROffroad

JCROffroad JT Install instructions

Rostra VOXXElectronics 250-1930 owner's guide

Rostra

Rostra VOXXElectronics 250-1930 owner's guide

TOP VEHICLE TECH GR3FORD5 installation manual

TOP VEHICLE TECH

TOP VEHICLE TECH GR3FORD5 installation manual

Safe Fleet PRIME DESIGN AR-2000-BLK manual

Safe Fleet

Safe Fleet PRIME DESIGN AR-2000-BLK manual

Skoda Fabia Combi 5J Fitting instructions

Skoda

Skoda Fabia Combi 5J Fitting instructions

Camcar 40077 Al Mounting instructions

Camcar

Camcar 40077 Al Mounting instructions

Camcar 40089 AL Mounting instructions

Camcar

Camcar 40089 AL Mounting instructions

Impac Tradesman 2000 installation manual

Impac

Impac Tradesman 2000 installation manual

DVB OFFROAD BRSB-01 installation manual

DVB

DVB OFFROAD BRSB-01 installation manual

Safari Snorkel SS385HF installation guide

Safari Snorkel

Safari Snorkel SS385HF installation guide

ULTIMATE SPEED 279746 Assembly and Safety Advice

ULTIMATE SPEED

ULTIMATE SPEED 279746 Assembly and Safety Advice

SSV Works DF-F65 manual

SSV Works

SSV Works DF-F65 manual

ULTIMATE SPEED CARBON Assembly and Safety Advice

ULTIMATE SPEED

ULTIMATE SPEED CARBON Assembly and Safety Advice

Witter F174 Fitting instructions

Witter

Witter F174 Fitting instructions

WeatherTech No-Drill installation instructions

WeatherTech

WeatherTech No-Drill installation instructions

TAUBENREUTHER 1-336050 Installation instruction

TAUBENREUTHER

TAUBENREUTHER 1-336050 Installation instruction

manuals.online logo
manuals.online logoBrands
  • About & Mission
  • Contact us
  • Privacy Policy
  • Terms and Conditions

Copyright 2025 Manuals.Online. All Rights Reserved.

4010 & 4011S/L
Hotchkis Performance LLC. 1
Please read the following key points before installing this kit.
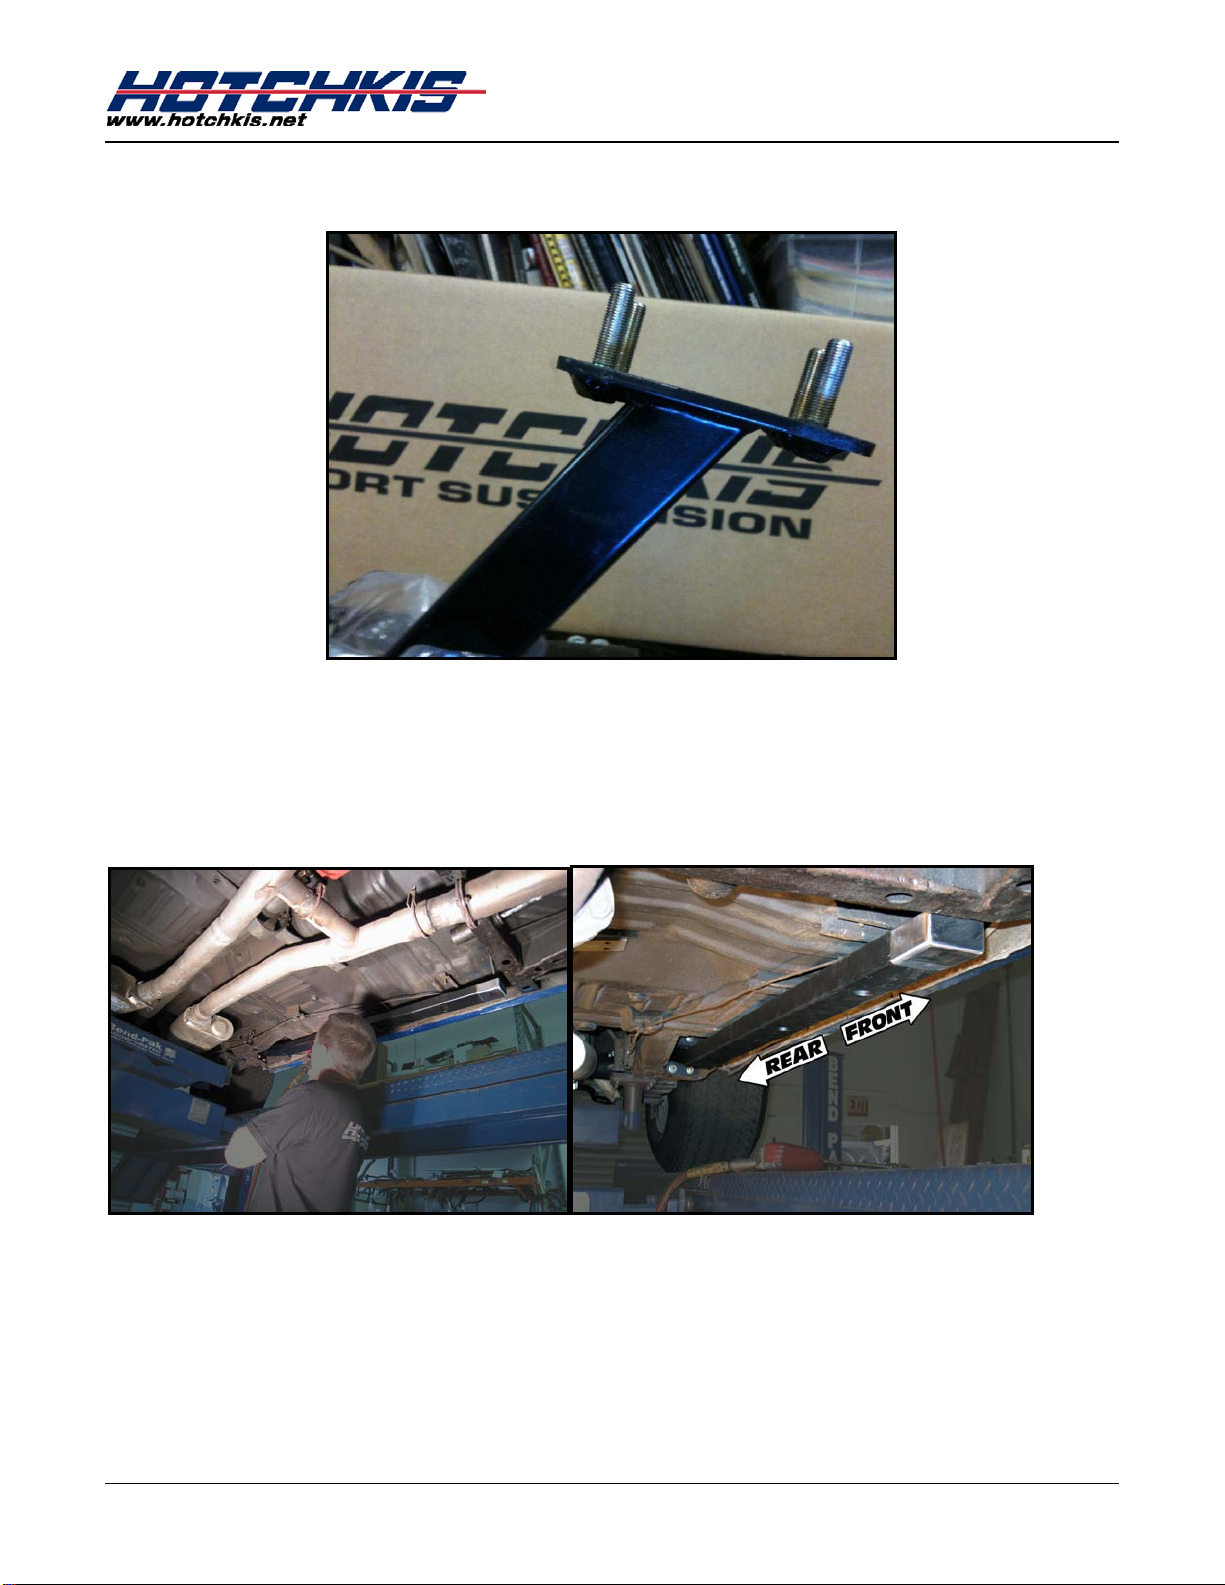
1 – Before performing the subframe connector installation, the vehicle must be completely assembled
with all body and component parts installed (e.g. fenders, hood, quarterpanels, trunk, full interior,
engine, glass, etc.). Basically, the subframe connectors should be one of the last components
installed on your vehicle. Reason being is you want the vehicle settled with all of it’s own final
weight. The car’s body is always in constant tension, with forces pushing or pulling within the
chassis & body. You want to make sure these forces don’t change after you install the subframe
connectors. For example, if you installed subframe connectors before installing the engine and
body panels this may result in having misaligned fenders, door panels and/or hood later on. The
car must be in it’s final state before the subframe connectors are installed.
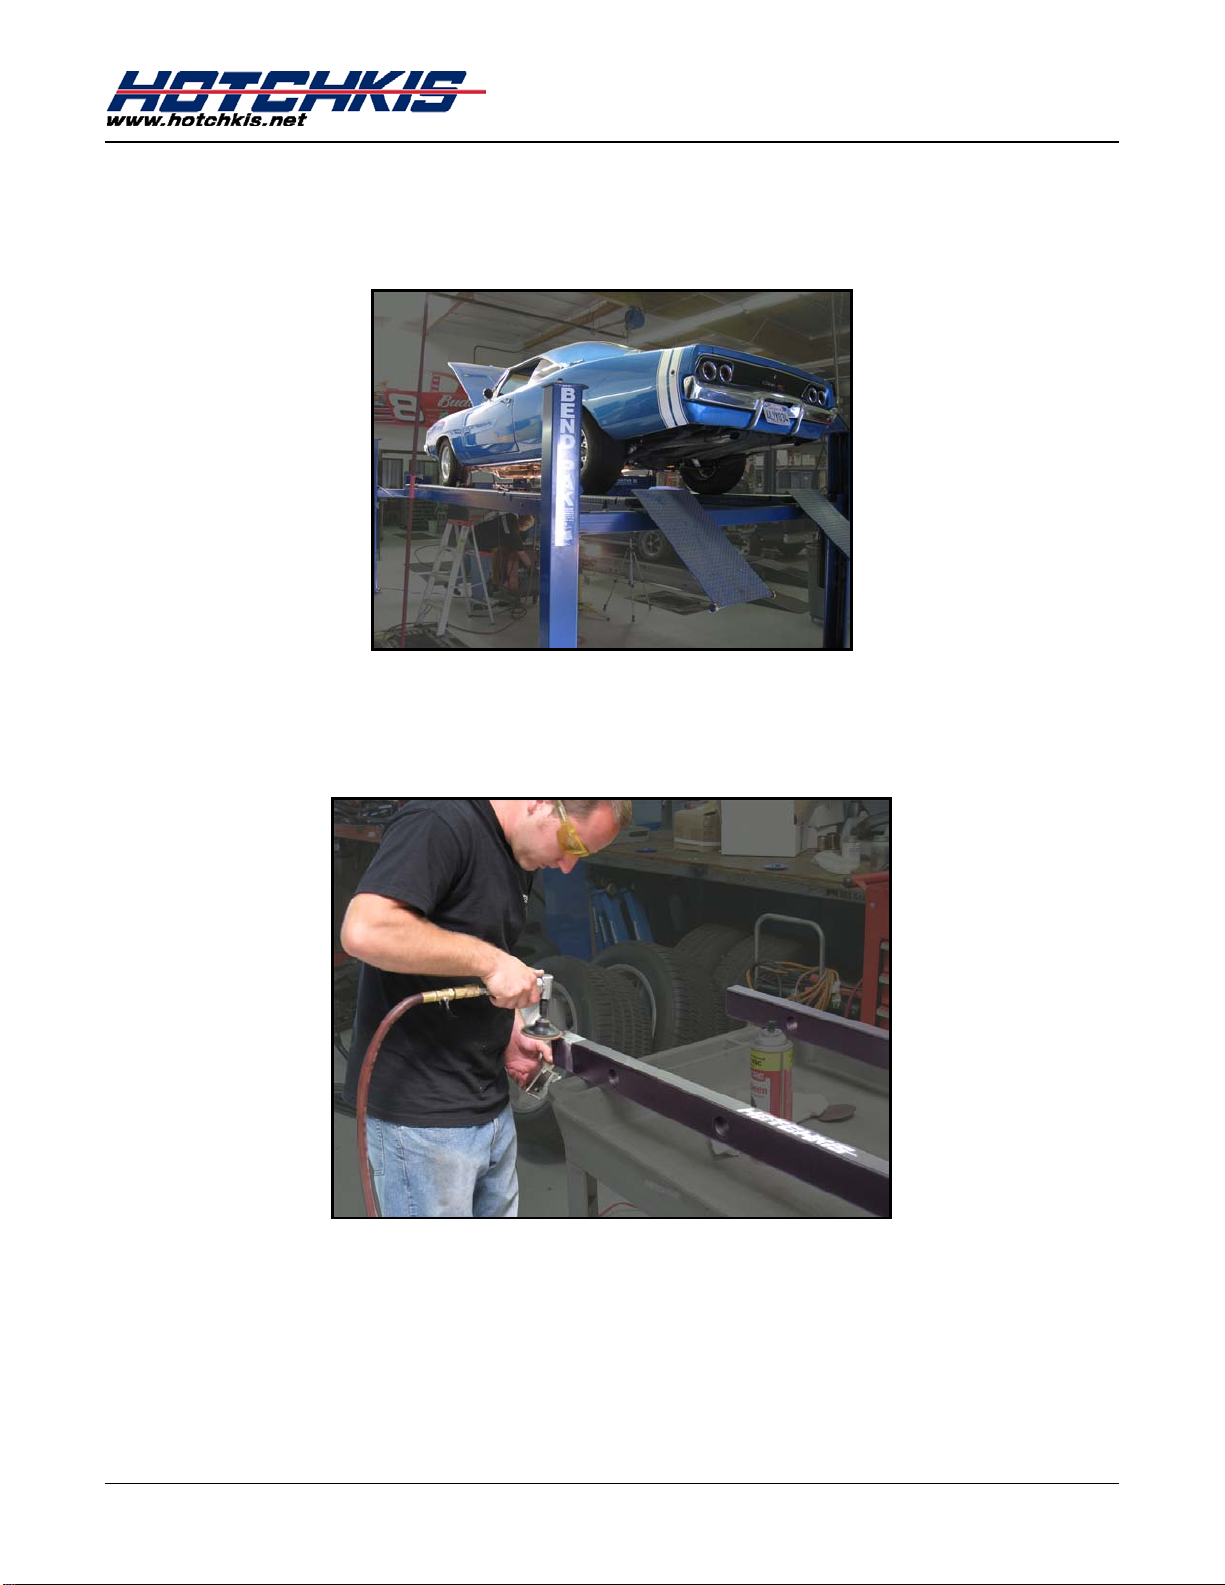
2 – The subframe connectors must be installed on an alignment rack or floor ramps (all 4 wheels). The
vehicle must be sitting on it’s wheels at ride height in order to install the subframe connectors. Do
not use a two-post lift, as this will load the chassis/body in the wrong points causing the chassis to
tweak.
3 – If you your vehicle is equipped with torque boxes, please pay attention to step 3b of this manual.
You may be required to purchase extra hardware in this case.
4010 & 4011S/L
Hotchkis Performance LLC. 2
4010
SubframeConnectors66-70ChryslerB-Body
4011S&4011L
SubframeConnectors70-74ChryslerE-Body
Thank you for your purchase from our new line of Chrysler parts.
Please call us at (877) 4NO - ROLL if you have any questions
regarding the service or installation of your Hotchkis products.
Subframe Connectors
Your new subframe connectors will increase the overall rigidity of your chassis and improve
handling and response. These engineered components connect the rear frame rails with the
front subframe to simulate a complete full frame chassis.
:
Notes
The subframe connector is essentially a Weld-In component, effectively connecting the front
subframe and rear frame rails.
:
Before You Start
The installation of these subframe connectors will require you to grind and weld. It is
recommended that a trained professional install this product. Always wear eye protection
when grinding or welding.
:
Please read the entire manual before starting.
All images will depict
the driver side installation.
4010 & 4011S/L
Hotchkis Performance LLC. 3
1. Raise Vehicle
It is best to install the subframe connectors at ride height. To do this properly, please use a 4-
Post lift or alignment rack. Disconnect the negative battery cable.
2. Prepare Subframe Pieces for Welding
Subframe pieces come fully powder coated so you will want to first prep them for the welding
process. Sand the ends that do not have the bolt connectors (front side).
4010 & 4011S/L
Hotchkis Performance LLC. 4
B-BodyConnector
E-BodyConnector
4010 & 4011S/L
Hotchkis Performance LLC. 5
3. Remove Nuts from Frame
Temporarily support the rear subframe with jacks to relieve the load on the leaf springs. Do not
jack up the car too much or else the weight of the rear end and wheels will hang in the air and
cause the front mount to pull downward. Remove the 4 nuts on the front leaf spring mounts.
3b. Torque Box Vehicles ONLY!
Some vehicles have torque boxes which may cover the path of the subframe connectors. If you
car does not have torque boxes, then you can proceed to step 4. You will need to cut the
forward section of the torque box so the subframe connector can mount flush to the floor pan.
4010 & 4011S/L
Hotchkis Performance LLC. 6
In addition, you will notice it will be extremely difficult to access the leaf spring mount nuts
once the subframe connector is in place. To alleviate this problem, you will need to weld bolts
onto the subframe connectors so you can fasten everything from the rearward side of the
mount. Procedure to follow…
Steps:
- Remove the front leaf spring mounts from each leaf spring
- Remove the 4 studs that are pressed in the mount (If you are installing Hotchkis leaf springs,
then you will be able to use the Hotchkis mount instead)
- Mock up the leaf spring bracket and the subframe connectors to get proper bolt locations.
This will require the following from your local hardware store:
- Grade 8 - 3/8” - 24 x 1.5 hex bolts (qty.8)
- Grade 8 - 3/8” SAE washers (qty. 16)
- Grade 8 - 3/8” - 24 nylock nuts (qty.8)
Mock-up shown with Hotchkis leaf spring mount
- FYI--The aforementioned hardware is included with the Hotchkis leaf spring kit.
4010 & 4011S/L
Hotchkis Performance LLC. 7
- Weld the bolt and washer to the subframe connectors. Disassemble the mock-up.
- Reinstall the leaf spring mount and continue with the subframe connector installation.
4. Connect Subframe
Slide the rear of the subframe connector onto the 4 bolts that you just removed the nuts from.
Once subframe is on, replace the nuts and snugly tighten, but not fully tighten.
4010 & 4011S/L
Hotchkis Performance LLC. 8
5. Position the Subframe
Using a screw jack to hold the subframe up and in place, mark the area where you will be
attaching the front mounting bracket and then remove both the mounting bracket and
subframe.
6. Seat Mounting Bolts
Be sure the seat mounting bolts line up with the seat mounting bolts access holes that are on
the subframe before moving on.
4010 & 4011S/L
Hotchkis Performance LLC. 9
7. Prepare Frame for Welding
After you remove the mounting bracket and subframe connector, sand down the area of the
frame where you will be welding.
8. Spot Weld Mounting Bracket
Install the subframe connector again with the mounting bracket resting in place on top. Be sure
to use the screw jack to hold the subframe in place. Spot weld the mounting bracket and then
once again, remove the subframe connector.
4010 & 4011S/L
Hotchkis Performance LLC. 10
9. Clean Surface / Weld Mounting Bracket / Install Subframe / Weld Subframe
Before welding, be sure that all of the surfaces that you will be welding is clean. Weld the front
mounting bracket to the frame.
When you’re done welding the front mounting bracket, reinstall the subframe connector. Fully
tighten the 4 rear mount nuts. You may now remove the jacks supporting the rear subframe.
The full weight of the car should be on all four tires from now on. Use the screw jack once
again to hold the subframe in place if need be. Now weld the subframe connector to the front
mounting bracket.