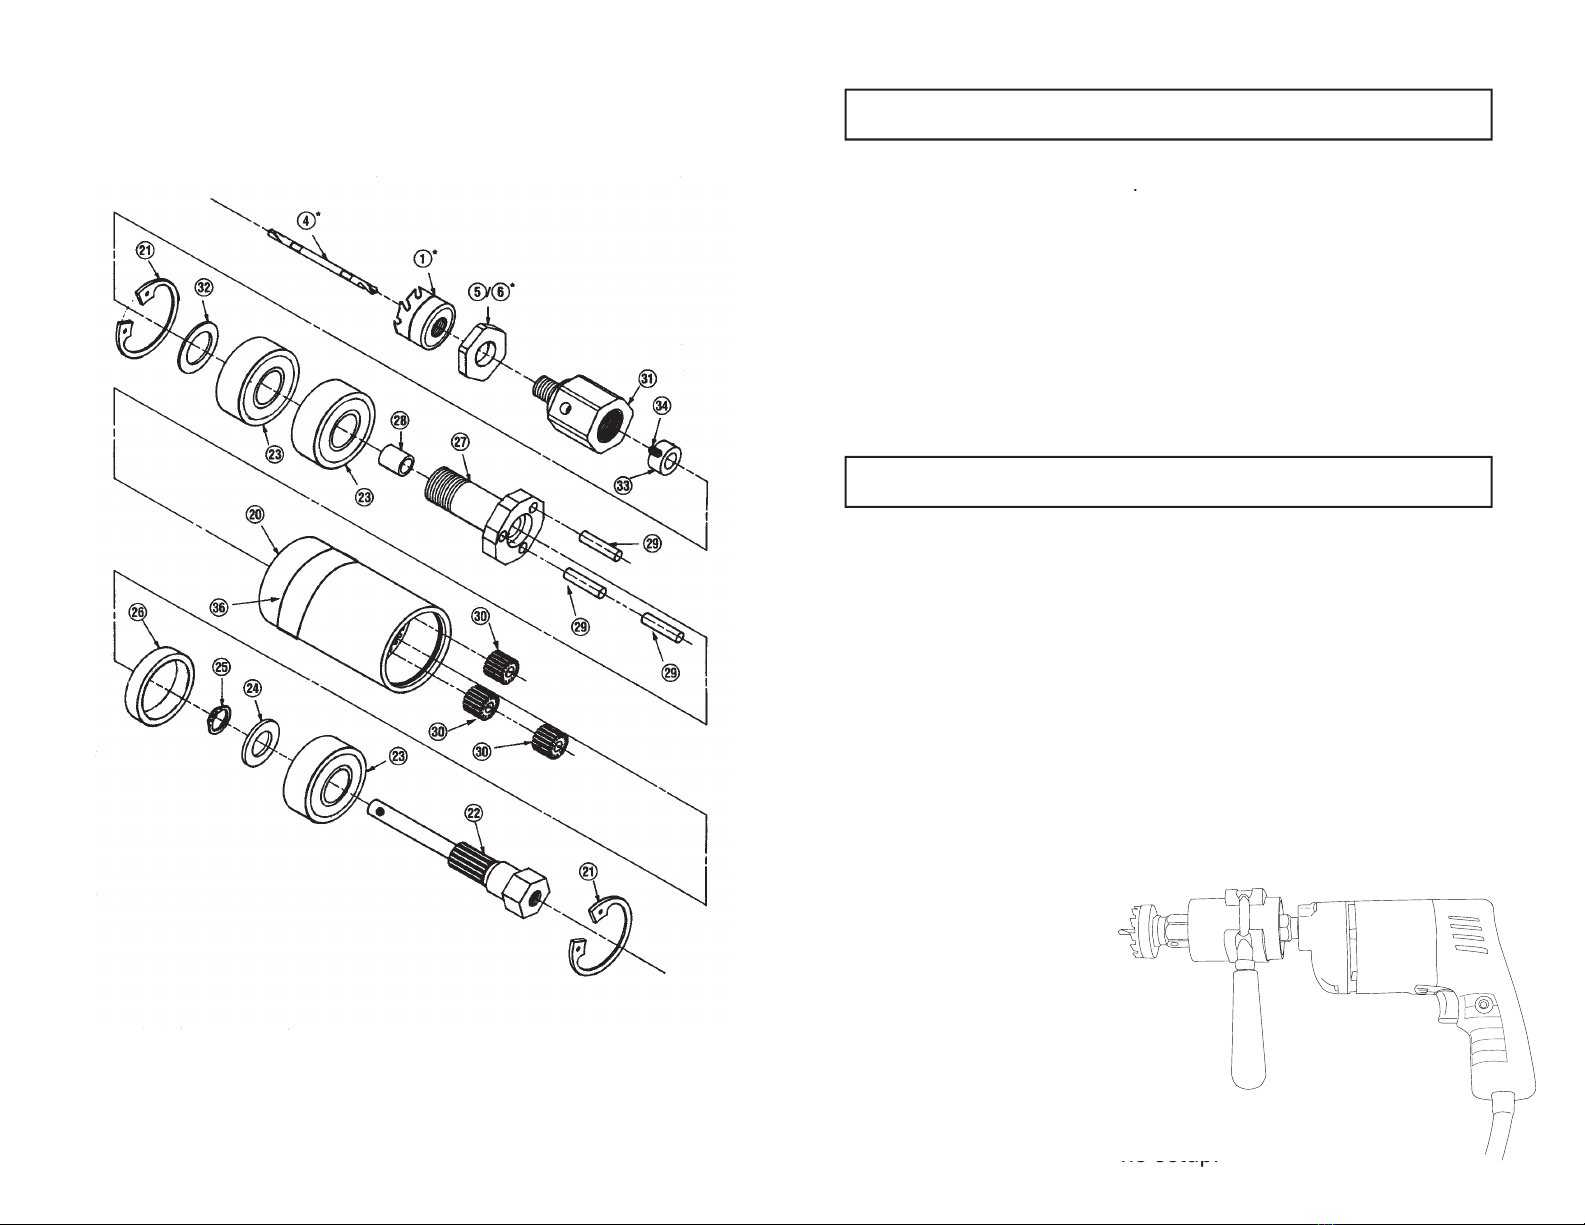
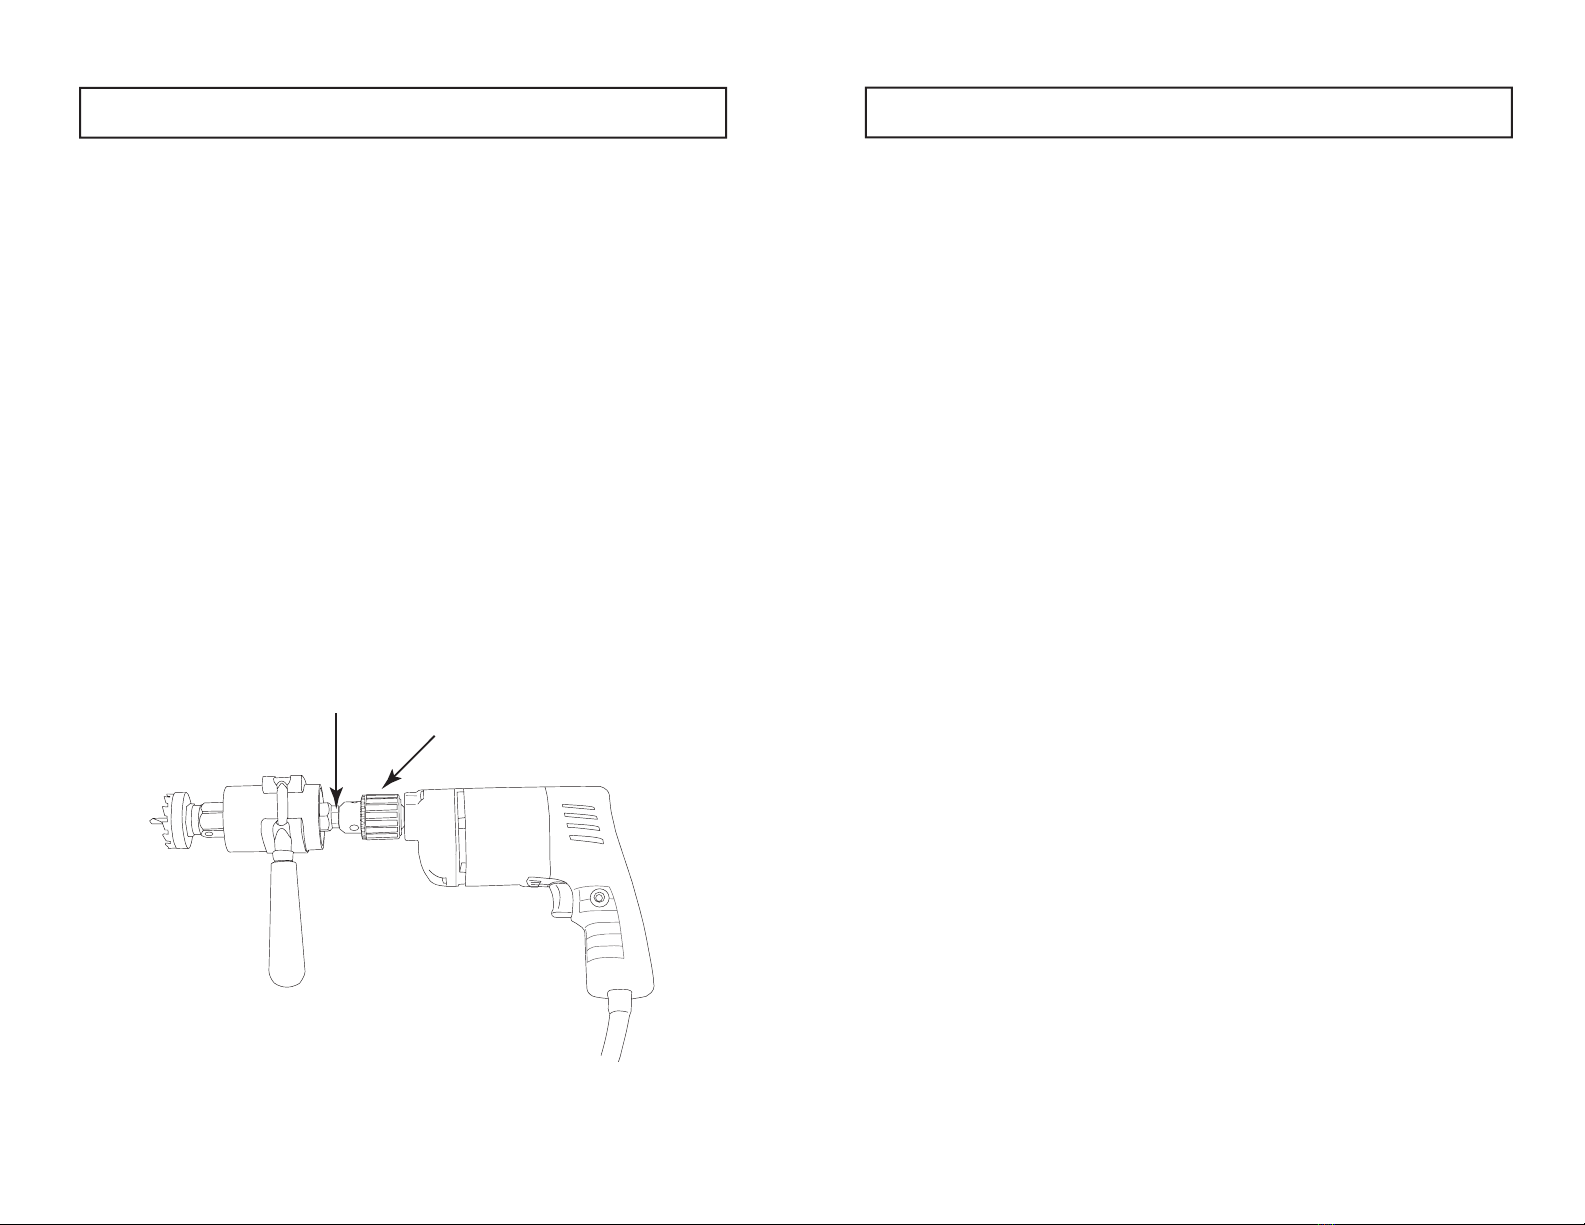
manuals.online logo
Brands
  1. Home
  2. •
  3. Brands
  4. •
  5. Hougen
  6. •
  7. Power Tools Accessories
  8. •
  9. Hougen Holcutter Speed Reducer User manual

Hougen Holcutter Speed Reducer User manual

SPEED REDUCER
For reducing RPMs while maintaining
torque when using Holcutters
Hougen Manufacturing, Incorporated warrants its Portable Magnetic Drills, Electro-
Hydraulic Hole Punchers, and Tornado II Paint Shaker for a period of one (1) year
and other products for ninety (90) days from date of purchase against defects due to
faulty material or workmanship and will repair or replace (at its option) without charge
any items returned. This warranty is void if the item has been damaged by accident
or unreasonable use, neglect, improper service, or other causes not arising out of de-
fects in material or workmanship. No other expressed warranty is given or authorized.
Hougen Manufacturing, Inc. disclaims any implied warranty of MERCHANTABILITY
or FITNESS for any period beyond the expressed warranty and shall not be liable for
incidental or consequential damages. Some states do not allow exclusions of inciden-
tal or consequential damages or limitation on how long an implied warranty lasts and,
if the law of such a state governs your purchase, the above exclusion and limitation
may not apply to you. This warranty gives you specifi c legal rights and you may also
have other rights which vary from state to state.
To obtain warranty service, return the item(s), transportation prepaid, to your nearest
Factory Authorized Warranty Repair Center or to Hougen Manufacturing, Inc., 3001
Hougen Drive, Swartz Creek, Michigan 48473.
Hougen Drills (Hougen Cutters) are warranted against manufacturing defects only.
Subject to Hougen Manufacturing inspection.
THIS WARRANTY IS IN LIEU OF ANY OTHER WARRANTY, EXPRESSED OR IM-
PLIED, INCLUDING ANY WARRANTY OF MERCHANTABILITY OR FITNESS FOR
A PARTICULAR PURPOSE.
© 2004 Hougen Manufacturing, Inc.
Commercial /
I
ndustrial
L
imited
This product is covered under the following U.S. patent: 5,607,266.
Photographs and Specifi cations shown are accurate in detail at time of printing.
Manufacturer reserves the right to make improvements and modifi cations without
prior notice. Hougen and the Hougen logo are proprietary trademarks of Hougen
Manufacturing Inc.
Hougen Manufacturing, Inc.
P.O. Box 2005 • Flint, MI 48501-2005
3001 Hougen Drive • Swartz Creek, MI 48473
Phone (810) 635-7111
•
FAX (810) 635-8277
Email: [email protected]
Online: www.hougen.com
OMSR0404 Printed and Made in U.S.A.
SAFETY FIRST
Speed Reducer
Welcome to Hougen
Congratulations on your purchase of the Holcutter™ Speed
Reducer. Your Speed Reducer is designed to reduce RPMs
while maintaining torque when using large diameter Holcut-
ters™. The Speed reducer can be connected directly to a
drill in place of the chuck or held in the drill’s chuck. The 4:1
gear ratio allows a drill turning at 1000RPM to reduce the
cutter output to 250 RPM. This allows for a more correct
cutting RPM for the large diameter Holcutters. Through con-
stant innovation and development, Hougen is committed to
provide you with hole-producing tools and products to help
you be more productive.
Before attempting to operate your new Speed Reducer,
please read all instructions fi rst. These include the Oper-
ator’s Manual and Warning Label on the unit itself. With
proper use, care, and maintenance, your model will provide
you with years of effective holemaking performance. Once
again, thank you for selecting our product and welcome to
Hougen.
The Speed Reducer is capable of producing high torque:
•
Always keep a fi rm grip on both handles when
drilling.
• Do not overreach or overextend while drilling; it
is best to keep the tool close to your body.
• Work from a stable stance.
• Pay attention to your work.
• Always wear safety glasses and gloves.
• Do not use the Speed Reducer without the
Clamp Handle.
• Always use Slick-Stik™ lubricant when cutting.
Parts List
Item
1
4
5
20
21
22
23
24
25
26
27
28
29
30
31
32
33
34
36
Part No.
Varies*
04942
04812
04987
04988
04989
04990
04991
04992
04993
04994
04995
04996
04997
04998
04999
05002
05048
04937
Description
Holcutter™
Pilot
Hex Washer
Ring Gear (54T)
Retaining Ring
Input Shaft (18T)
Bearing
Retaining Washer
Retaining Ring
Input Bearing Spacer
Planet Carrier
Bushing
Planet Pin 1/4”
Planet Gear (18T)
Output Adapter
Washer (M20)
Collar
Set Screw
Label
Qty
Req.
1
1
1
1
2
1
3
1
1
1
1
1
3
3
1
1
1
1
1
*Sold Separately
PARTS REQUIRED TO OPERATE
14008 Speed Reducer
04938 Clamp Handle
04939 3/16” Pilot
04812 Hex Washer
These parts are required to operate your Speed Reducer.
They are sold separately
.
Optional Parts:
INSTALLATION METHOD #1
04942 Thread Adapter (1/2-20-UNF to a 3/8-24-UNF
thread)
04943 Triple-fl atted Shank Adapter for 1/2” drill chucks
Recommended Method.
This method is used for drill
motors with a fi xed circular boss. With this method the
drill chuck is removed and the speed reducer is threaded
directly onto the drill chuck spindle.
You must maintain a
fi rm grip on both the drill and Speed Reducer Clamp
Handle.
1. Remove the chuck from the drill motor leaving washer
on drill motor shaft.
2. Thread the Speed Reducer onto the drill chuck spindle.
Tighten by hand. Speed Reducer has a 1/2-20-UNF
female thread.
3. Slide the clamp handle over the speed reducer and
down to the end
closest the drill
motor. Rotate
clamp handle
to the desired
position and
tighten clamp by
twisting handle.
4. Install pilot drill,
hex washer, and
cutter to complete the setup.
Exploded View
MAINTENANCE
The Speed Reducer is designed to be relatively mainte-
nance-free and is thoroughly lubricated at the factory: how-
ever, periodic lubrication will increase tool life. There are four
important points of lubrication:
1. Pilot Drill
2. Planetary Gearing
3. Planet Gear Shaft
4. Input Shaft Bushing
2, 3, 4 are internal parts and require partial disassembly.
Pilot Drill Lubrication
Each time the pilot drill is removed, a thin coating of
grease should be applied between the fl ats before
being reinserted. This grease provides lubrication for
the piloting hole in the output adapter which guides
the pilot drill. After installation, wipe away all the
excess grease from around the hole to prevent
machining chips from sticking to this area.
INSTALLATION METHOD #2
This method allows the Speed Reducer to be installed in a
1/2” chuck. This also allows the Speed Reducer to be quickly
removed and the drill be used with other holemaking tools.
The disadvantage is the Speed Reducer and drill is heavier
and longer.
You must maintain a fi rm grip on both the
drill and Speed Reducer Clamp Handle.
1. Screw the Triple-fl atted Shank Adapter (04943) into
the input shaft of the speed reducer.
2. Tighten the other end of the Shank Adapter into the
chuck of the drill motor.
3. Slide the clamp handle over the speed reducer and
down to the end closest the drill motor. Rotate
clamp handle to the desired position and tighten
clamp by twisting handle.
4. Install pilot drill, hex washer, and cutter to complete
the setup.
Chuck
Adapter
(04943)

This manual suits for next models

1

Other Hougen Power Tools Accessories manuals

Hougen 08177 User manual

Hougen

Hougen 08177 User manual

Hougen 08180 User manual

Hougen

Hougen 08180 User manual

Hougen 10937 User manual

Hougen

Hougen 10937 User manual

Popular Power Tools Accessories manuals by other brands

OEM Tools 24991 Operating instructions and parts manual

OEM Tools

OEM Tools 24991 Operating instructions and parts manual

Ryobi RT101 Repair sheet

Ryobi

Ryobi RT101 Repair sheet

Hilti TE DRS6-A Original operating instructions

Hilti

Hilti TE DRS6-A Original operating instructions

TREND H/JIG/8FT manual

TREND

TREND H/JIG/8FT manual

Extech Instruments CA3018 user guide

Extech Instruments

Extech Instruments CA3018 user guide

Worx WA0163 Original instructions

Worx

Worx WA0163 Original instructions

Sump Saver Mighty Mini Installation guide & owner's manual

Sump Saver

Sump Saver Mighty Mini Installation guide & owner's manual

DeWalt D514312 Assembly instructions

DeWalt

DeWalt D514312 Assembly instructions

Dynabrade 52061 manual

Dynabrade

Dynabrade 52061 manual

Craftex CX series manual

Craftex

Craftex CX series manual

Kobalt KEG 1040-03 manual

Kobalt

Kobalt KEG 1040-03 manual

TREND HR/JIG instruction manual

TREND

TREND HR/JIG instruction manual

Big Daishowa HYDRAULIC CHUCK Operation manual

Big Daishowa

Big Daishowa HYDRAULIC CHUCK Operation manual

Bosch GTA 3800 Professional Operating/safety instructions

Bosch

Bosch GTA 3800 Professional Operating/safety instructions

Tapco Side-Winder operating instructions

Tapco

Tapco Side-Winder operating instructions

Hilti X-PT 5 manual

Hilti

Hilti X-PT 5 manual

Metabo ISA 18 LTX 24 operating instructions

Metabo

Metabo ISA 18 LTX 24 operating instructions

Festool UG-CSC-SYS Original instructions

Festool

Festool UG-CSC-SYS Original instructions

manuals.online logo
manuals.online logoBrands
  • About & Mission
  • Contact us
  • Privacy Policy
  • Terms and Conditions

Copyright 2025 Manuals.Online. All Rights Reserved.