HP 4510s - ProBook - Celeron 1.8 GHz User manual

Multimedia
User Guide

© Copyright 2009 Hewlett-Packard
Development Company, L.P.
The information contained herein is subject
to change without notice. The only
warranties for HP products and services are
set forth in the express warranty statements
accompanying such products and services.
Nothing herein should be construed as
constituting an additional warranty. HP shall
not be liable for technical or editorial errors
or omissions contained herein.
First Edition: April 2009
Document Part Number: 536507-001
Product notice
This user guide describes features that are
common to most models. Some features
may not be available on your computer.

Table of contents
1 Multimedia features
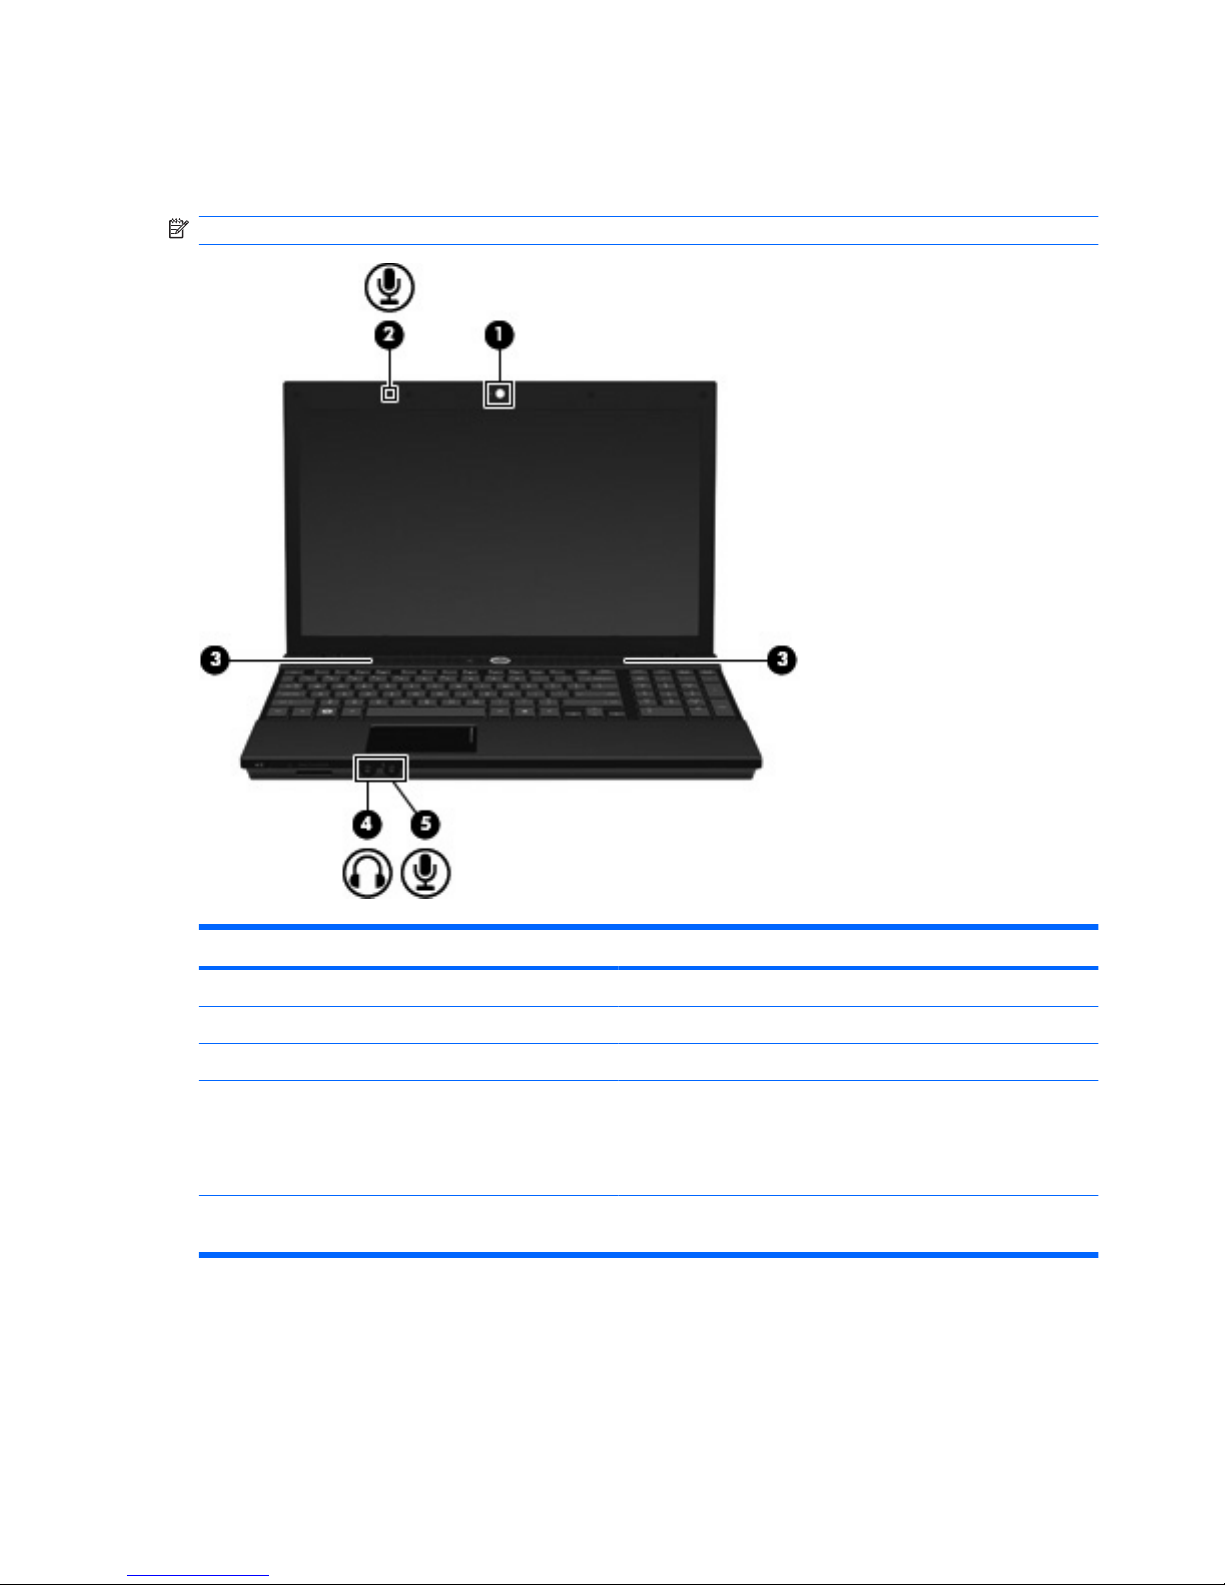
Identifying your multimedia components .............................................................................................. 2
Adjusting the volume ............................................................................................................................ 3
2 Multimedia software
Accessing your preinstalled multimedia software ................................................................................. 5
Installing multimedia software from a disc ............................................................................................ 6
3 Audio
Connecting external audio devices ...................................................................................................... 8
Checking your audio functions ............................................................................................................. 9
4 Video
Connecting an external monitor or projector ...................................................................................... 11
Using the HDMI port ........................................................................................................................... 12
5 Optical drive
Identifying the installed optical drive ................................................................................................... 13
Using optical discs .............................................................................................................................. 14
Playing music ..................................................................................................................................... 15
Watching a movie ............................................................................................................................... 16
Observing the copyright warning ........................................................................................................ 17
Copying or creating a CD or DVD ...................................................................................................... 18
Removing a CD, DVD, or BD ............................................................................................................. 19
The optical disc tray does not open for removal of a CD, DVD, or BD ............................................... 20
6 Webcam
Index ................................................................................................................................................................... 22
iii

iv

1 Multimedia features
Your computer includes multimedia features that allow you to listen to music, watch movies, and view
pictures. Your computer may include the following multimedia components:
●Optical drive for playing audio and video discs
●Integrated speakers for listening to music
●Integrated microphone for recording your own audio
●Integrated webcam that allows you to capture and share video
●Preinstalled multimedia software that allows you to play and manage your music, movies, and
pictures
●Hotkeys that provide fast access to multimedia tasks
NOTE: Your computer may not include all of the components listed.
The following sections explain how to identify and use the multimedia components included with your
computer.
1

Identifying your multimedia components
The following illustration and table describe the multimedia features of the computer.
NOTE: Your computer may look slightly different from the illustration in this section.
Component Description
(1) Webcam Records audio and video and captures still photographs.
(2) Internal microphone Records sound.
(3) Speakers (2) Produce sound.
(4) Audio-out (headphone) jack Produces sound when connected to optional powered stereo
speakers, headphones, ear buds, a headset, or television audio.
NOTE: When a device is connected to the headphone jack, the
computer speakers are disabled.
(5) Audio-in (microphone) jack Connects an optional computer headset microphone, stereo array
microphone, or monaural microphone.
2 Chapter 1 Multimedia features

Adjusting the volume
You can adjust the volume using the following controls:
●Computer volume hotkey—A combination of the fn key (1) and either the f9 (2), f11 (3), or f12 (4)
function key:
◦To mute or restore volume, press fn+f9.
◦To decrease volume, press fn+f11 repeatedly.
◦To increase volume, press fn+f12 repeatedly.
●Operating system volume control:
a. Click the Volume icon in the notification area, at the far right of the taskbar.
b. Increase or decrease the volume by moving the slider up or down. Select the Mute check box
to mute the volume.
– or –
a. Right-click the Volume icon in the notification area, and then click Open Volume Control.
b. In the Master column, you can increase or decrease the volume by moving the slider up or
down. You can also mute the volume by clicking the Mute icon. You can also adjust the
balance or mute the volume.
Adjusting the volume 3

2 Multimedia software
Your computer includes preinstalled multimedia software that allows you to play music, watch movies,
and view pictures. The following sections provide details about preinstalled multimedia software and
installing multimedia software from a disc.
4 Chapter 2 Multimedia software

Accessing your preinstalled multimedia software
To access your preinstalled multimedia software:
▲Select Computer >More Applications, and then open the multimedia program you want to use.
Accessing your preinstalled multimedia software 5

Installing multimedia software from a disc
To install any multimedia software from a CD or DVD, follow these steps:
1. Insert the disc into the optical drive.
2. When the installation wizard opens, follow the on-screen instructions.
3. Restart the computer if you are prompted to do so.
NOTE: For details about using software included with the computer, refer to the software
manufacturer’s instructions, which may be provided with the software, on disc, or on the manufacturer’s
Web site.
6 Chapter 2 Multimedia software

3 Audio
Your computer enables you to use a variety of audio features:
●Play music using your computer speakers and/or connected external speakers
●Record sound using the internal microphone or connect an external microphone
●Download music from the Internet
●Create multimedia presentations using audio and images
●Transmit sound and images with instant messaging programs
●Stream radio programs (select models only) or receive FM radio signals
●Create or “burn” audio CDs (select models only)
7

Connecting external audio devices
WARNING! To reduce the risk of personal injury, adjust the volume before putting on headphones,
earbuds, or a headset. For additional safety information, refer to the Regulatory, Safety and
Environmental Notices.
To connect external devices such as external speakers, headphones, or a microphone, refer to the
information provided with the device. For best results, remember the following tips:
●Be sure that the device cable is securely connected to the correct jack on your computer. (Cable
connectors are normally color-coded to match the corresponding jacks on the computer.)
●Be sure to install any drivers required by the external device.
NOTE: A driver is a required program that acts like a translator between the device and the
programs that use the device.
8 Chapter 3 Audio

Checking your audio functions
To check the system sound on your computer, follow these steps:
1. Select Computer >Control Center >System >Sound.
2. Click Sound.
3. When the Sound window opens, click the Sounds tab.
4. Under the Sounds tab, select the Device tab.
5. Under Sound Events, click a Test button for a corresponding sound event to test system sound.
To check the record functions of the computer, follow these steps:
1. Select Computer >More Applications >Sound Recorder.
2. Click Record and speak into the microphone. Save the file to your desktop.
3. To play the sound, select Computer >More Applications.
4. Open an audio player, such as Helix Banshee, and play back the sound.
NOTE: For best results when recording, speak directly into the microphone and record sound in a
setting free of background noise.
▲To confirm or change the audio settings on your computer, right-click the Sound icon on the
taskbar.
Checking your audio functions 9

4Video
Your computer enables you to use a variety of video features:
●Watch movies
●Play games over the Internet
●Edit pictures and video to create presentations
●Connect external video devices
10 Chapter 4 Video

Connecting an external monitor or projector
The external monitor port connects an external display device such as an external monitor or a projector
to the computer.
▲To connect a display device, connect the device cable to the external monitor port.
NOTE: If a properly connected external display device does not display an image, press fn+f4 to
transfer the image to the device. Repeatedly pressing fn+f4 alternates the screen image between the
computer display and the device.
Connecting an external monitor or projector 11

Using the HDMI port
Select computer models include an HDMI (High Definition Multimedia Interface) port. The HDMI port
connects the computer to an optional video or audio device, such as a high-definition television, or any
compatible digital or audio component.
The computer can support one HDMI device connected to the HDMI port, while simultaneously
supporting an image on the computer display or any other supported external display.
NOTE: To transmit video signals through the HDMI port, you need an HDMI cable (purchased
separately), available from most electronics retailers.
To connect a video or audio device to the HDMI port:
1. Plug one end of the HDMI cable into the HDMI port on the computer.
2. Connect the other end of the cable to the video device, according to the device manufacturer's
instructions.
3. Press fn+f4 to switch the image between the display devices connected to the computer.
12 Chapter 4 Video

5 Optical drive
Identifying the installed optical drive
▲Select Computer, and look under Status.
You will see a list of all the devices installed on your computer, including your optical drive. You may
have one of the following types of drives:
●DVD-ROM Drive
●DVD+/-RW SuperMulti Double-Layer LightScribe Drive
●Blu-ray ROM DVD+/-RW SuperMulti Double-Layer LightScribe Drive
NOTE: Some of the drives listed above may not be supported by your computer.
Identifying the installed optical drive 13

Using optical discs
An optical drive, such as a DVD-ROM drive, supports optical discs (CDs and DVDs). These discs store
information, such as music, photos, and movies. DVDs have a higher storage capacity than CDs.
Your optical drive can read standard CD and DVD discs. If your optical drive is a Blu-ray Disc ROM
Drive, it can also read Blu-ray Discs.
NOTE: Some of the optical drives listed may not be supported by your computer. The listed drives are
not necessarily all of the supported optical drives.
Some optical drives can also write to optical discs as described in the following table.
Optical drive type Write to CD-RW Write to DVD±RW/R Write to DVD±RW
DL
Write label to
LightScribe CD or
DVD ±RW/R
DVD+/-RW SuperMulti Double-
Layer LightScribe Drive*†
Yes Yes Yes Yes
Blu-ray ROM DVD+/-RW
SuperMulti Double-Layer
LightScribe Drive*†
Yes Yes Yes Yes
*Double-layer discs can store more data than single-layer discs. However, double-layer discs burned with this drive may not
be compatible with many single-layer DVD drivers and players.
†LightScribe discs must be purchased separately. LightScribe creates a grayscale image similar to black-and-white
photography.
CAUTION: To prevent possible audio and video degradation, loss of information, or loss of audio or
video playback functionality, do not initiate Suspend or Hibernation while reading a CD, DVD, or BD, or
writing to a CD or DVD.
14 Chapter 5 Optical drive

Playing music
1. Turn on the computer.
2. Press the release button (1) on the drive bezel to release the disc tray.
3. Pull out the tray (2).
4. Hold the disc by the edges to avoid touching the flat surfaces and position the disc label-side up
over the tray spindle.
NOTE: If the tray is not fully accessible, tilt the disc carefully to position it over the spindle.
5. Gently press the disc (3) down onto the tray spindle until the disc snaps into place.
6. Close the disc tray.
7. Select Computer >More Applications.
8. Open an audio player, such as Helix Banshee, to play the disc.
NOTE: After you insert a disc, a short pause is normal.
If Suspend or Hibernation is initiated during playback of a disc, you may experience the following
behaviors:
●Your playback may be interrupted.
●You may see a warning message asking if you want to continue. If this message is displayed, click
No.
●You may need to restart the CD or DVD to resume playback.
Playing music 15

Watching a movie
Your optical drive allows you to watch movies from a disc. You can also watch high-definition movies
from a disc if your computer includes an optional Blu-ray Disc ROM Drive.
1. Turn on the computer.
2. Press the release button (1) on the optical drive bezel to release the disc tray.
3. Pull out the tray (2).
4. Hold the disc by the edges and position the disc label-side up over the tray spindle.
NOTE: If the tray is not fully accessible, tilt the disc carefully to position it over the spindle.
5. Gently press the disc (3) down onto the tray spindle until the disc snaps into place.
6. Close the disc tray.
NOTE: After you insert a disc, a short pause is normal.
7. Select Computer >More Applications >LinDVD to watch the movie.
16 Chapter 5 Optical drive
Other manuals for 4510s - ProBook - Celeron 1.8 GHz
9
Table of contents
Other HP Laptop manuals