HP 10722A User manual

Errata
Title & Document Type: 10722A Plane Mirror Converter
Manual Part Number: 10722-90001
Serial Prefixes: 1948A
Revision Date: January 1980
HP References in this Manual
This manual may contain references to HP or Hewlett-Packard. Please note that
Hewlett-Packard's former test and measurement, semiconductor products and
chemical analysis businesses are now part of Agilent Technologies.
Changes to this Manual
No changes have been made to this manual. All pages are scanned at 300 DPI
or greater. About this Manual
This manual is reproduced from scans of an original document and images
OCR’d with Adobe Acrobat. OCR errors may exist and as such the user of this
document should take care and use common sense when referencing this
documentation. Copyright Notice
This documentation is © Copyright 1980 Hewlett Packard and © Copyright 2006,
Permission to use and redistribute this documentation for non-commercial and
internal corporate purposes is hereby granted, free of charge.
Any redistribution of this documentation or its derivates must include this
copyright notice.
You may not sell this documentation or its derivations without written consent.
You may modify this documentation as necessary, but you may not sell
derivative works based on it.
You may include this documentation with the equipment/hardware on which it is
used for the purposes of selling the equipment/hardware. If you advertise that a
copy of this documentation is included in the sale, you must state that is for
“Free”.
Meaning if you want to gratuitously toss in a copy of the manual on an eBay sale,
it’s ok with me as long as you state it’s for free. No you can’t sell a digital archive
of manuals and say it includes a free copy of this documentation. You must give
it away with equipment.
I think you get the spirit of the copyright; it takes a lot of hours to scan and
replicate a manual. I just want this used in the spirit in which is it given.
Agilent if you have questions or wish to include this in your archive, please email
me.

INSTRUCTION MANUAL
10722A
PLANE MIRROR CONVERTER
ACCESSORY FOR 5501A
LASER TRANSDUCER SYSTEM
REMOTE INTERFEROMETER
SERIAL PREFIX: 1948A
Thismanual appliesdirectly
to
Hewlett-PackardModel
10722A
Plane Mirror Converters with serial prefix
1948A.
For unitswithdifferentserialprefixesa manual
change sheet issupplied.
Printed: JAN 1980
Copyright HEWLETT-PACKARD COMPANY 1980
5305 STEVENS CREEK BLVD.. SANTA CLARA. CALIF. 95050
MANUAL PART NO. 10722-90001
Microfiche Part No. 10722-90002 PRINTED IN U.S.A.
I
HEWLETT
PACKARD

CERTIFICATION
Hewktt-Packard Company certifies that this product met its publishedspecifications at the time ofship-
ment from the factory. Hewlett-Packard further certifies that its calibration measurements are traceable
totheUnitedStates NationalBureauofStandards, tothe extentallowedbytheBureau'scalibrationfacility,
andto the calibration facilities ofother International Standards Organization members.
~
WARRANTY
This Hewlett-Packard system productiswarrantedagainstdefectsinmaterialsandworkmanship foraperiod
of
90
daysfromdateof installation. Duringthewarrantyperiod,HPwill,at itsoption,either repairorreplace
products which prove to be defective.
Warranty service of this productwill beperformedat Buyer's facility at nocharge within HP service travel
areas. Outside HP service travel areas, warranty service will be performed at Buyer's facility only upon
HP's prior agreement and Buyer shall pay HP's round trip travel expenses. Inall other cases, products
must
be
returned to a service facility designated by HP.
For products returned to HP for warranty service, Buyer shall prepay shippingcharges toHPand HPshall
pay shippingcharges to returntheproducttoBuyer. However, Buyershall pay allshippingcharges, duties,
and taxes for products returnedto HP from another country.
HP warrants that its software and firmware designated by HP for use with an instrument will execute its
programming instructions whenproperlyinstalledonthat instrument. HPdoes notwarrant that theopera-
tion of the instrument, or software, or firmware will be uninterrupted or error free.
LIMITATION
OF
WARRANTY
The foregoing warranty shall not apply to defects resulting from improper or inadequate maintenance
by Buyer, Buyer-supplied software or interfacing, unauthorized modificationormisuse, operation outside
of the environmental specifications for the product, or improper site preparationor maintenance.
NO
OTHER
WARRANTY
IS
EXPRESSED
OR
IMPLIED.
HP
SPECIFICALLY
DISCLAIMS
THE
IMPLIED
WARRANTIES OF MERCHANTABILITYAND FITNESS FOR A PARTICULAR PURPOSE.
EXCLUSIVE REMEDIES
THE REMEDIES PROVIDED HEREIN ARE BUYER'S SOLE AND EXCLUSIVE REMEDIES. HP SHALL NOT
BE LIABLE FOR ANY DIRECT, INDIRECT, SPECIAL, INCIDENTAL, OR CONSEQUENTIAL DAMAGES,
WHETHER BASED ONCONTRACT, TORT, OR ANY OTHER LEGAL THEORY.
ASSISTANCE
Product maintenance agreements andother customer assistance agreements are available for Hewlett-
Packardproducts.
For any assistance, contact your nearest Hewlett-PackardSales andServiceOffice.Addressesareprovided
at the back ofthis manual.

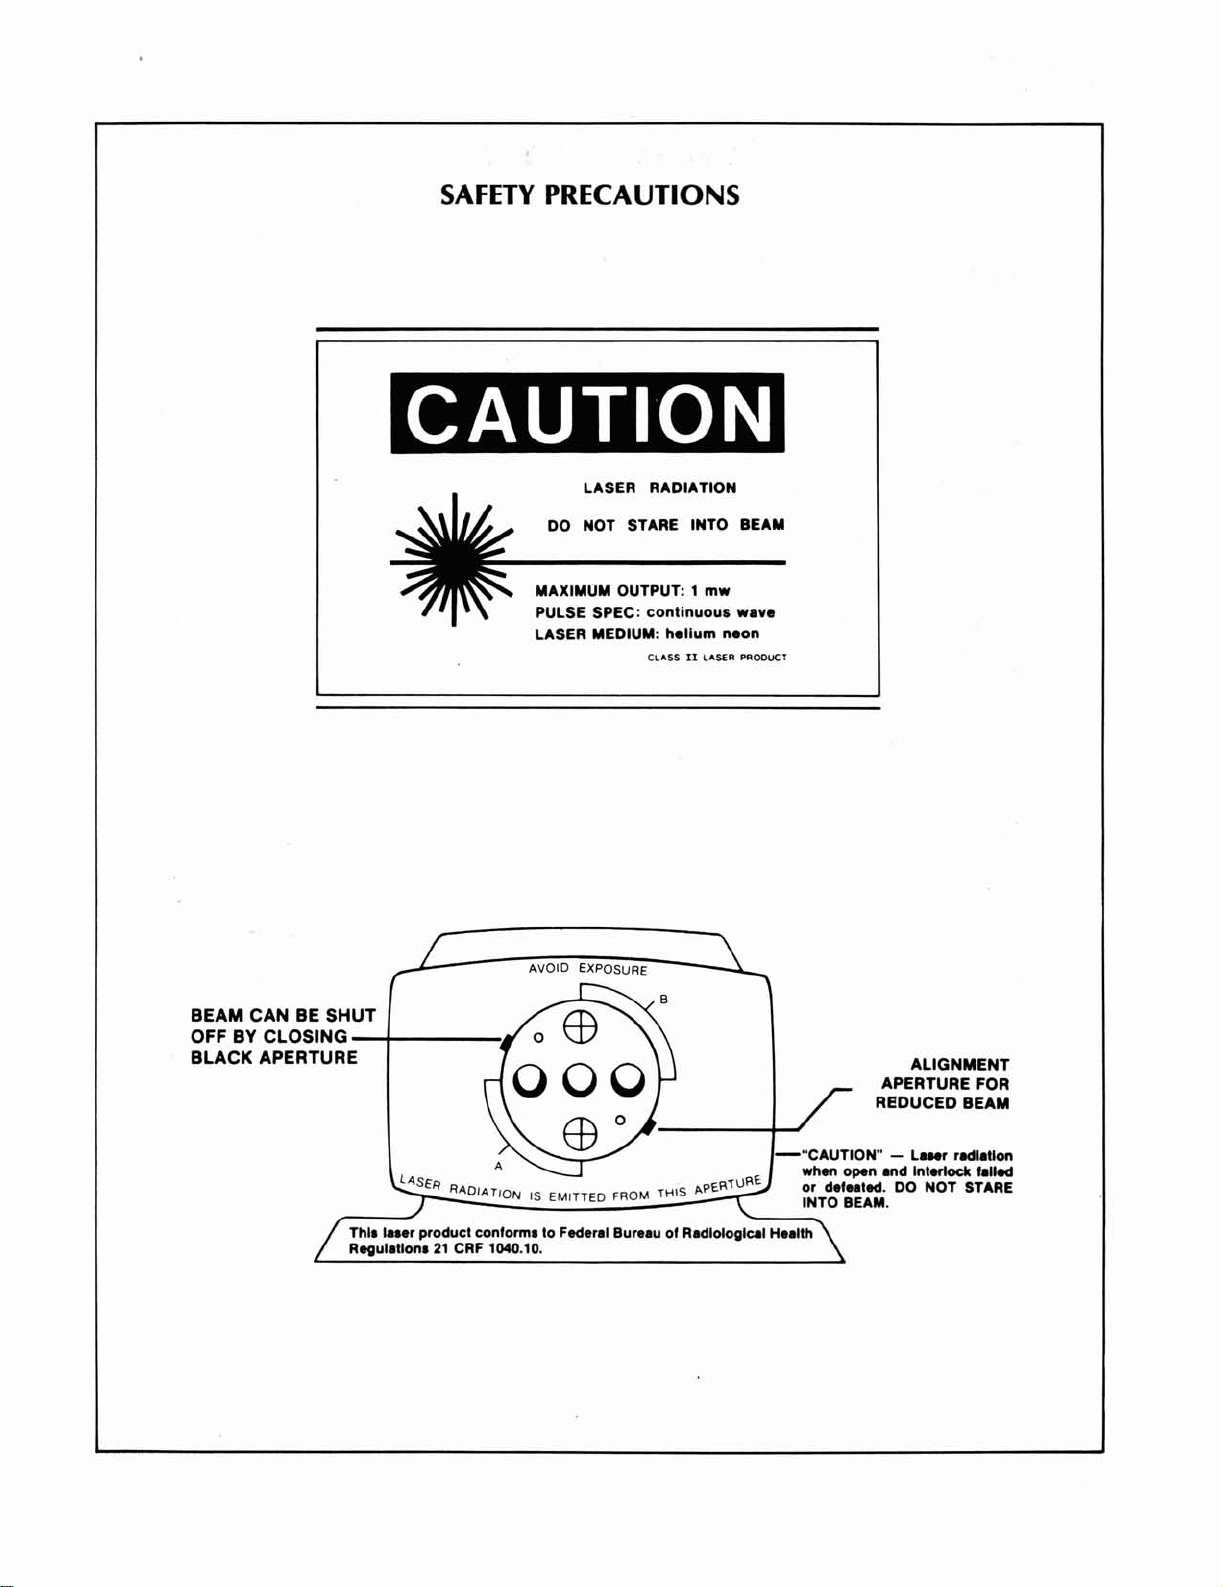
I
8
LASER RADIATION
I
DO NOT STARE INTO BEAM
MAXIMUM OUTPUT:
1
mw
PULSE SPEC: continuous wave
LASER MEDIUM: helium neon
CLASS
I1
LASER
WOOUCl
SAFETY PRECAUTIONS
BEAM CAN BE SHUT
OFF
BY
CLOSING
BLACK APERTURE
ALIGNMENT
APERTURE FOR
REDUCED BEAM
INTO
BEAM.
Regulations21 CRF 1040.10.

Model 10722A
Instruction Manual
TABLE OF CONTENTS
Page
GENERAL INFORMATION
...............................................................
1
10722APLANE MIRROR CONVERTER
...................................................
1
5501A LASER TRANSDUCER SYSTEM AND ITS PUBLICATIONS
.......................
1
5501A LASER TRANSDUCER SYSTEM
...................................................
1
SPECIFICATIONS
........................................................................
1
Plane Mirror Converter
.................................................................
1
Plane Mirror Reflector
..................................................................
2
INSTRUMENT IDENTIFICATION
........................................................
3
INSTRUMENT COMPONENTS SUPPLIED
........................................
3
INSTALLATION
AND
OPERA~ION
......................................................
4
INTRODUCTION
..........................................................................
4
UNPACKING AND INSPECTION
.........................................................
4
INSTALLATION
..........................................................................
4
..............................................................................
OPERATION
5
Measuring Setups
......................................................................
5
Operation Test
.........................................................................
7
MAINTENANCE
..........................................................................
9
..................................................................................
GENERAL
9
CLEANING
...............................................................................
9
STORAGE
.................................................................................
9
PRINCIPLESOFOPERATION
............................................................
10
PLANE MIRROR INTERFEROMETER PRINCIPLES
.....................................
10

Model
10722A
Instruction Manual
GENERAL INFORMATION
10722A PLANE MIRROR CONVERTER
The Hewlett-Packard
10722A
Plane Mirror Converter (Figure
1)
isanaccessory for the HP
10702A
LinearInterferometer. With the
10722A
PlaneMirrorConverter,andanadditionalHP
10703A
Retro-
reflector,theHP
1070%
LinearInterferometer canbeconvertedtoa
10706A
PlaneMirrorInterferom-
eter.Thisconfiguration allowsthe
5501A
LaserMeasurementSystemtomakemeasurementsof axial
displacement of a plane mirror. The stringent angular alignment requirements imposed by roof
prisms or single-beam arrangements is eliminated.
Figure
1.
Model
10722A
Plane Mirror Converter
SPECIFICATIONS
Specificationsforthe HP
10722A
Plane Mirror Converter andPlaneMirrorReflector areasfollows:
Plane Mirror Converter
Dimensions:
See Figure
2.
Weight:
.077
pounds
(35
grams)
Performance:
As
for the Model
5501A
LaserTransducer System and
10702A
LinearInterferometer
Plane Mirror Reflector (not supplied)
Flatnessf:
Must not deviate by more thanA/8
(3
microinches) over any 0.8 inch
(20
millimeter) dimension.
Surface Finish:
Metal
0.1
-
0.3
microinch arithmetic average.
Optical
80
-
40 (Mil-0-13830)
Maximum Angular Misalignment:
Depends on distance between interferometer and plane mirror.
Typical values are:
k25
arc-minutesfor
10
inches
(254
millimeters)
k15
arc-minutesfor
20
inches
(508
millimeters)
*5
arc-minutesfor
50
inches
(1270
millimeters)
*In
X-Y
stage applications, mirror flatness affects the overall accuracy of the system.
Page
1

Model 10722A
Instruction Manual
Figure 2. Plane Mirror Converter Dimensions
INSTRUMENT IDENTIFICATION
WEIGHT:
35
grams
(1.23
ounces)
DIMENSIONS:
See
dimensional drawing.
Each Hewlett-Packard instrument has a 10-character serial number (e.g., 0000A00000). The
four-digit serial prefix identifies a group of identical instruments, and the five-digit suffix is a
serial number unique
to
each instrument. If the serial prefix on your instrument is not on the
title page of this manual, your instrument is different from this manual.
A
Manual ChangeSheet
is included with this manual
to
describe the differences. If the manual change sheet is missing,
request one from the nearest Hewlett-Packard Sales and Service Office listed at the back of
this manual.
-C
f
1.120
DIA.
1.020
INSTRUMENT COMPONENTS SUPPLIED
The Plane Mirror Converter includes the following items:
Table
1.
Components Supplied
.550
T~~
;.
b-
-
-
DESCRIPTION
Plane Mirror Converter
Screw,Cap
Wrench, Hex
Page
2
HP
PARTNO.
10722A
3030-0253
8710-0896
QUANTITY
1
4
1

Model 10722A
Instruction Manual
INSTALLATIONAND OPERATION
INTRODUCTION
Thissection providesinstallation andoperatinginstructionsforthe10722APlaneMirrorConverter.
UNPACKINGAND INSPECTION
Prior
to
shipment, this instrument was inspected and met all specifications listed in Table
1.
Inspect the shipping container and, if damaged, remove and inspect the Plane Mirror Converter.
If the Plane Mirror Converter
is
damaged, file
a
claim with the camer and notify Hewlett-
Packard immediately.
INSTALLATION
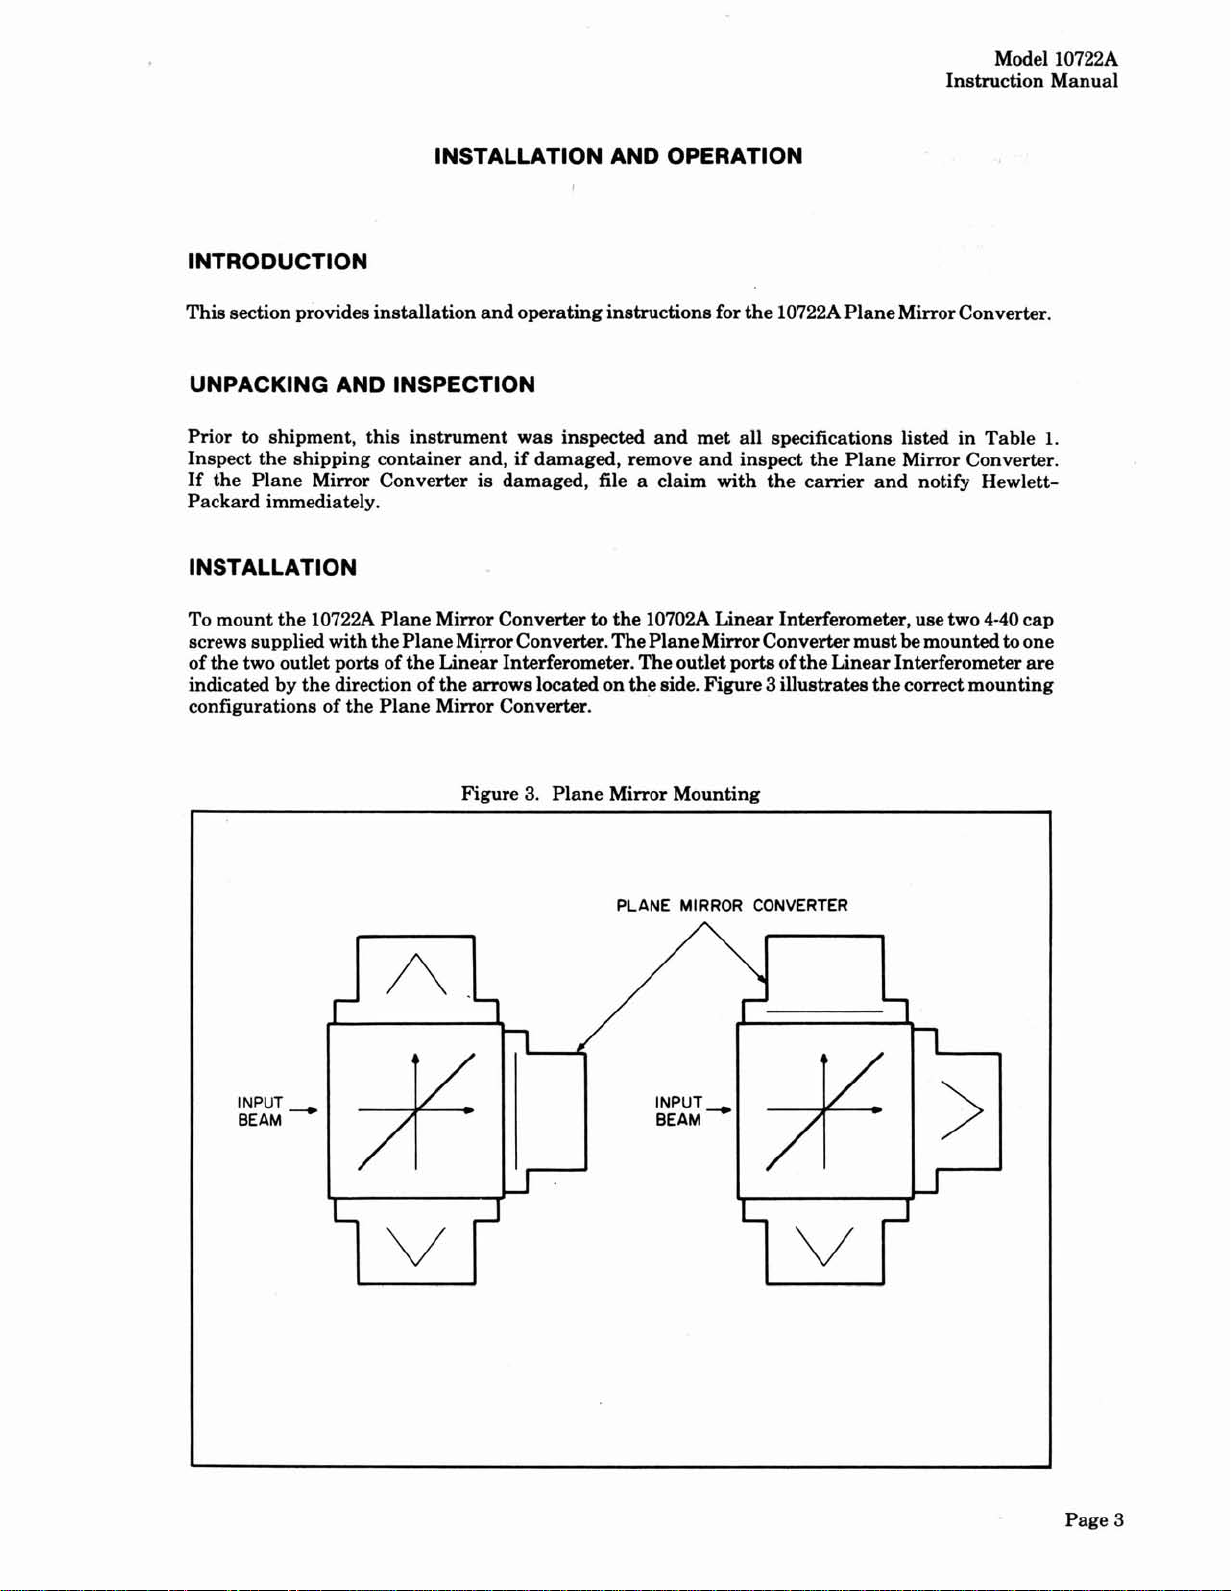
To mountthe 10722APlaneMirror Converter
to
the 10702ALinear Interferometer, usetwo 4-40cap
screwssuppliedwiththePlane
Mi~orConverter.ThePlaneMirrorConvertermust
be
mounted
to
one
of thetwo outlet ports of the Linear Interferometer. Theoutletportsof theLinear Interferometer are
indicated by thedirection of the arrowslocated on theside.Figure
3
illustratesthecorrectmounting
configurations of the Plane Mirror Converter.
Figure
3.
Plane Mirror Mounting
PLANE
MIRROR
CONVERTER
l
NPUT
BEAM
Page
3

Model
10722A
Instruction Manual
OPERATION
With the PlaneMirror Converter and anadditionalretroreflector, the Linear Interferometer can be
converted to
a
Plane Mirror Interferometer*. The Plane Mirror Interferometer extends the Laser
Measurement System's capability to make axial displacement measurements of a plane mirror
reflector.
A
Plane Mirror Interferometer is illustrated in Figure
4.
Figure
4.
Plane Mirror Interferometer
Because the two reflections inherent in the Plane Mirror Interferometer, there
is
optical resolution
doubling.
Measuring Setups
The
5501A
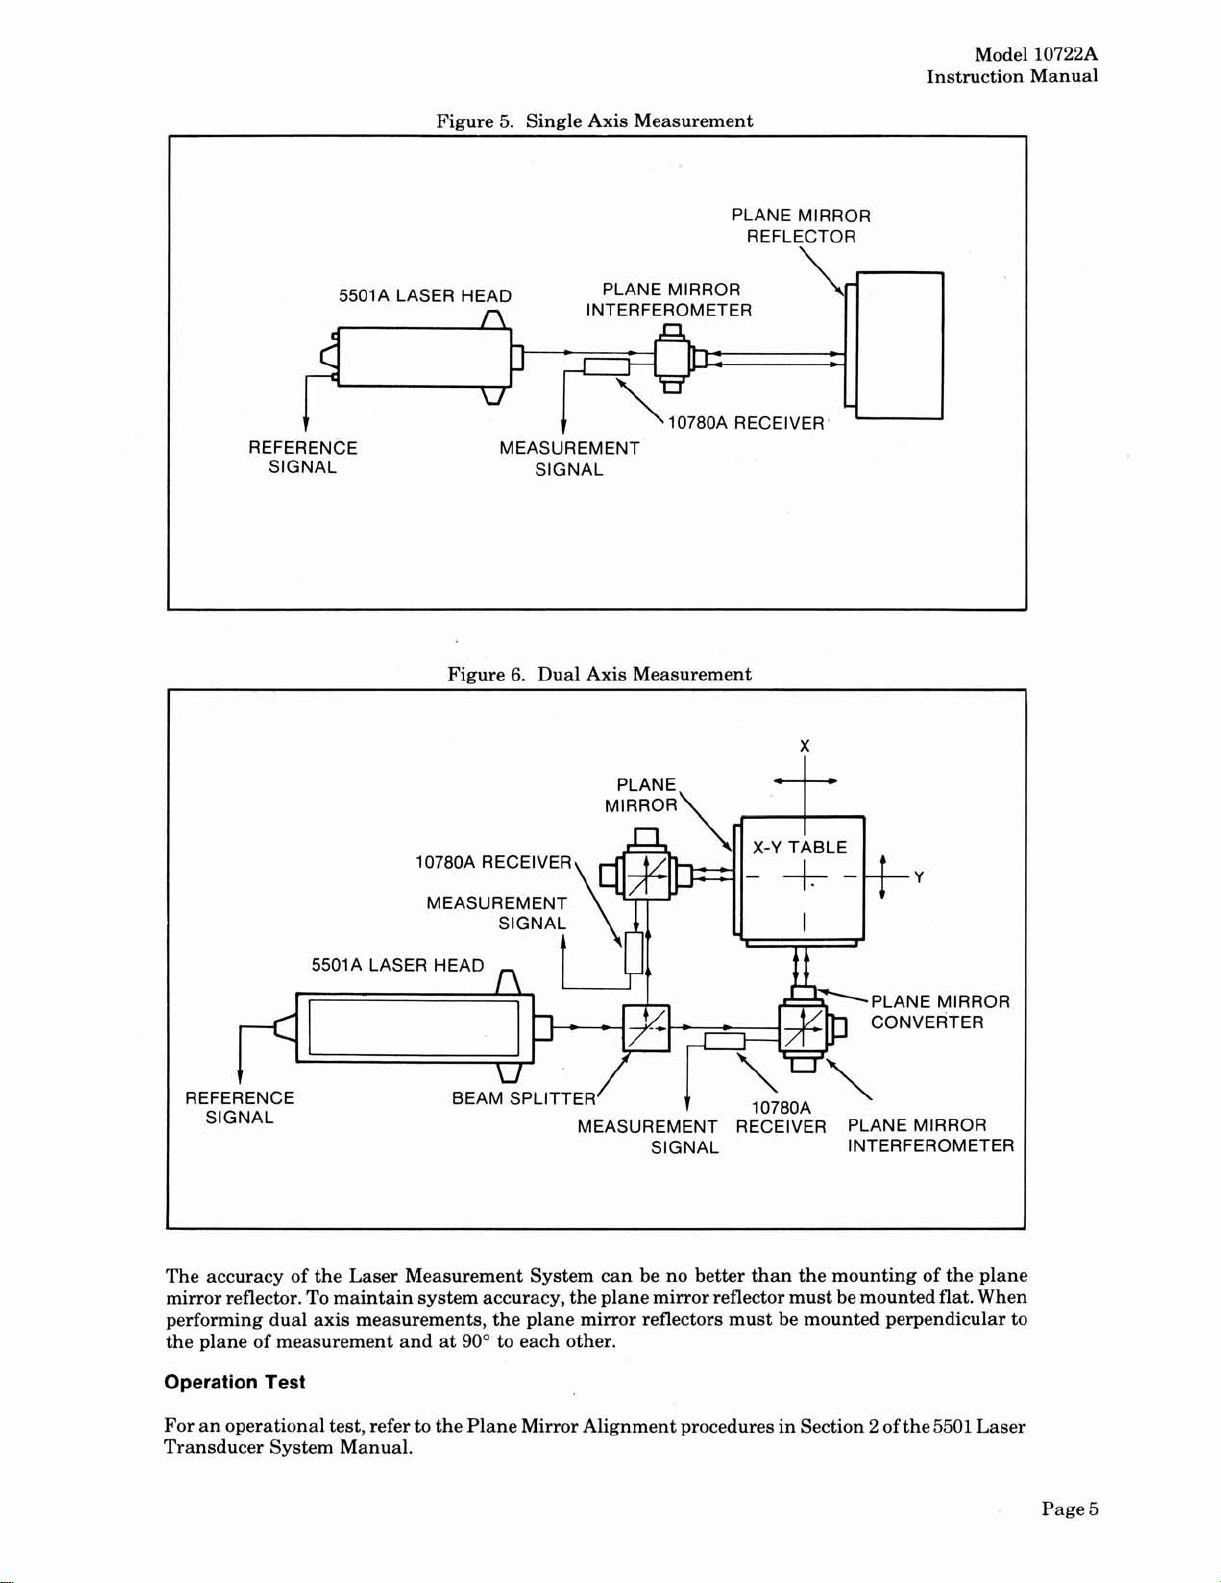
Laser Transducer System can perform either single axisor dual axisplane mirror mea-
surements. Thedual axis option isparticularly useful for
X-Y
stageapplications. Therequirements
forsingle
axis
measurements are:LaserHead,PlaneMirror Interferometer, anda planemirrorreflec-
tor. The dual axis requirements are: Laser Head, Beam Splitter, two Plane Mirror Interferometers,
and two plane mirror reflectors. Typical measuring setups for single
axis
and dual
axis
measurements
are shown in Figure
5
and
6.
*The Linear Interferometer includes one retroreflector.
Page
4

Model 10722A
Instruction Manual
Figure
5.
SingleAxis Measurement
PLANE MIRROR
REFLECTOR
5501A LASER HEAD PLANE MIRROR
n
INTERFEROMETER
I
t
1
\10780~RECEIVER,
-
REFERENCE MEASUREMENT
SIGNAL SIGNAL
Figure
6.
Dual Axis Measurement
X
10780A RECEIVER
Y
MEASUREMEN
5501A LASER HEAD
PLANE MIRROR
CONVERTER
REF
S
I
MEASUREMENT RECEIVER PLANE MIRROR
SIGNAL INTERFEROMETER
The accuracy of the Laser Measurement System can be no better than the mounting of the plane
mirror reflector.To maintain system accuracy,theplanemirror reflectormust bemountedflat.When
performing dual axis measurements, the plane mirror reflectors must be mounted perpendicular to
the plane of measurement and at
90'
to each other.
Operation
Test
For anoperationaltest,refer to thePlane MirrorAlignment proceduresin Section
2
of the5501Laser
Transducer System Manual.
Page5

Model
10722A
Instruction Manual
MAINTENANCE
GENERAL
Maintenance of the Plane Mirror Converter consists of cleaning the metal and glass surfaces.
CLEANING
Use a soft camel-hairlens brush to remove dust from the windows of the Plane Mirror Converter.
(A
good camera lens brush with a rubber bulb blower isrecommended.) Dampen a softcotton swab
with optical grade ethyl alcohol, shakeoff excess alcohol and wipe across window once. Use fresh
tissue dampened with alcohol for each wipe. Allow alcohol to dry naturally.
NOTE
DO use only camera or better grade lens tissue.
DO NOT use any of the various impregnated eye
glass tissues.
DO NOT use harsh solvents such as acetone or MEK
to clean the interferometer.
DO NOT use excessive amounts of alcohol.
DO NOT wipe window if there
is
any abrasive dust
or grit on
it.
STORAGE
Keep the Plane Mirror Converter in its wooden storage box when it is not in use.
Page
6

Model 10722A
Instruction Manual
PRINCIPLESOF OPERATION
PLANE MIRROR INTERFEROMETER PRINCIPLES
Figure 7 illustrates the operation of the Plane Mirror Interferometer. The laser light beam
containing frequencies fl and f2, of orthogonal linear polarization, leaves the center aperture of
the laser head and enters the inlet port of 10702A Plane Mirror Interferometer. The polarized
beam splitter in the interferometer splits the laser beam into
its
fl and f2 components. The fl
component
is
deflected to a cube-comer (retroreflector), which
reflects
the fi component back
to
the polarized beam splitter.
Figure 7. 5501A Laser Measurement System Plane Mirror Interferometer
The f2 component passes through the polarized beam splitter and the plane mirror converter
where it
is
changed from vertical polarization to circular polarization by the plane mirror con-
verter. The f2 component is reflected back on itself by the plane mirror reflector, resulting
in
f2
*
Af by 90° to change the polarization from circular to horizontal.
As
a result, the polarized
beam splitter reflects the f2
*
Af to the second cube-comer, as shown in Figure 7. The cube-
comer reflects the f2
*
Af back to the polarized beam splitter, where
it
is again reflected through
the plane mirror converter. The plane mirror converter changes the beam polarization from hori-
zontal
to
circular. The plane mirror reflects the f2
*
2Af back through theplane mirror converter,
which rotates the f2
*
2Af polarization by 90°, resulting in
a
vertically polarized beam. The f2
2Af beam
is
passed through the polarized beam splitter and
a
beam composed of fi
-
f2
*
2Af
is
appliedtotheinletport of the10780AReceiver. The
2
A
f
frequencychangeisa result of thedualpass
feature of the plane mirror interferometer (doubleDoppler shift).
LINEAR
INTERFEROMETER
HP 10702A
PLANE
MIRROR
CONVERTER
//
Anytilting of theplanereflectorrelativetothebeam axisresults onlyinanoffsetofthereturnbeam.
Tilting of the reflected wavefront iscompensated by the second reflection.
HP 10722A
FI F2f2AF F2fAE F2f2AF
C
C
4
C
5
/
9
9
-
+
-
C
I
FI F2 F2 F2fAF
3
PLANE MIRROR
-
REFLECTOR
RETROREFLECTOR
HP 10703A

HEWLETT
PACKARD
MANUAL PART NO. 10722-90001 PRINTED
IN
U.S.P

MANUAL DESCRIPTION
HEWLETT
PACKARD
MANUAL CHANGES
INSTRUMENT: 10722A Plane Mirror Converter
SERIAL PREFIX: 1948A
DATE PRINTED: JAN 1980
HP PART NO: 10722-90001
MICROFICHE NO: 10722-90002
-
CHANGE DATE:
March 24,1980
(Thischange supersedesall earlier dated
changes)
Make all changes listed as ERRATA.
Check the following table for your
instrument's serial prefix or serial number
and make listed change(s)to manual.
b
NEW OR REVISED ITEM
b
ERRATA
Page
2,
Table 1, ComponentsSupplied:
Change Quantity of cap screws supplied from 1 to
"3".
IF
YOUR
INSTRUMENT
HAS SERIAL PREFIX
OR SERIAL NUMBER
MAKE
THE
FOLLOWING CHANGES
TO YOUR MANUAL
IF
YOUR
INSTRUMENT
HAS SERIAL PREFIX
OR SERIAL NUMBER
MAKE
THE
FOLLOWING CHANGES
TO YOUR MANUAL
Table of contents
Other HP Media Converter manuals