HP MP102 Operation instructions

Tutorial
Includes lessons on transferring
music to iPod, playing music,
and storing files on iPod
019-0231.book Page 1 Tuesday, July 13, 2004 12:50 PM

The information in this document is subject to change without notice.
Hewlett-Packard®
Company makes no warranty of any kind with regard to this material, including, but not limited to,
the implied warranties of merchantability and fitness for a particular purpose.
HP shall not be liable for errors contained herein or for incidental or consequential damages in connection with the
furnishing, performance, or use of this material.
THE WARRANTY TERMS CONTAINED IN THIS STATEMENT, EXCEPT TO THE EXTENT LAWFULLY PERMITTED, DO
NOT EXCLUDE, RESTRICT OR MODIFY AND ARE IN ADDITION TO ANY MANDATORY STATUTORY RIGHTS
APPLICABLE TO THE SALE OF THIS PRODUCT OR SERVICE TO YOU.
HP assumes no responsibility for the use or reliability of its software on equipment that is not furnished by HP.
This document contains proprietary information that is protected by copyright. All rights are reserved. No part
of this document may be photocopied, reproduced, or translated to another language without the prior written consent
of HP.
Hewlett-Packard Company
P.O. Box 4010
Cupertino, CA 95015-4010
USA
© 2004 Hewlett-Packard Development Company, L.P. All rights reserved.
Apple, the Apple logo, FireWire, iPod, and iTunes are trademarks of Apple Computer, Inc., registered in the U.S. and
other countries. For legal or rightholder-authorized copying only. Don’t steal music.
HP supports lawful use of technology and does not endorse or encourage the use of our products for purposes other
than those permitted by copyright law.
07/04
019-0231.book Page 2 Tuesday, July 13, 2004 12:50 PM

3
1Contents
Preface 5 iPod and iTunes at a Glance
6How to Use the Tutorial
6Before You Begin
Chapter 111 Lesson 1:
Getting Music Into iTunes
12 Before You Begin
12 Importing Music From Your Audio CDs Into iTunes
13 Buying Songs Online Using the iTunes Music Store
15 Adding Songs Already on Your PC to the iTunes Library
15 Once You Have Imported Songs
Chapter 216 Lesson 2:
Transferring Music to iPod
16 Before You Begin
17 Charging the iPod Battery
17 Connecting iPod to Your PC
19 Transferring Music to iPod
20 Disconnecting iPod After Transferring Music
20 Once You Have Transferred Music
Chapter 321 Lesson 3:
Playing Music on iPod
21 Before You Begin
22 Using the iPod Menus
23 Playing Songs
24 Using the Other Controls
24 Disabling the iPod Controls Using the Hold Switch
24 Turning iPod On and Off
25 Using the Backlight
25 Once You Have Learned to Play Music on iPod
019-0231.book Page 3 Tuesday, July 13, 2004 12:50 PM

Contents 4
Chapter 426 Lesson 4:
Using iPod as a Hard Disk
26 Before You Begin
27 Using iPod as a Hard Disk
28 Disconnecting iPod
Chapter 529 Lesson 5:
Managing Music on iPod
29 Before You Begin
29 Transferring Music to iPod
30 Updating iPod Automatically
30 Updating iPod Automatically With Selected Playlists
31 Updating iPod Manually
31 Next Steps
Chapter 632 Learning More About Your iPod
32 iPod User’s Guide
32 iTunes Onscreen Help
32 Online Resources
019-0231.book Page 4 Tuesday, July 13, 2004 12:50 PM
5
iPod and iTunes at a
Glance
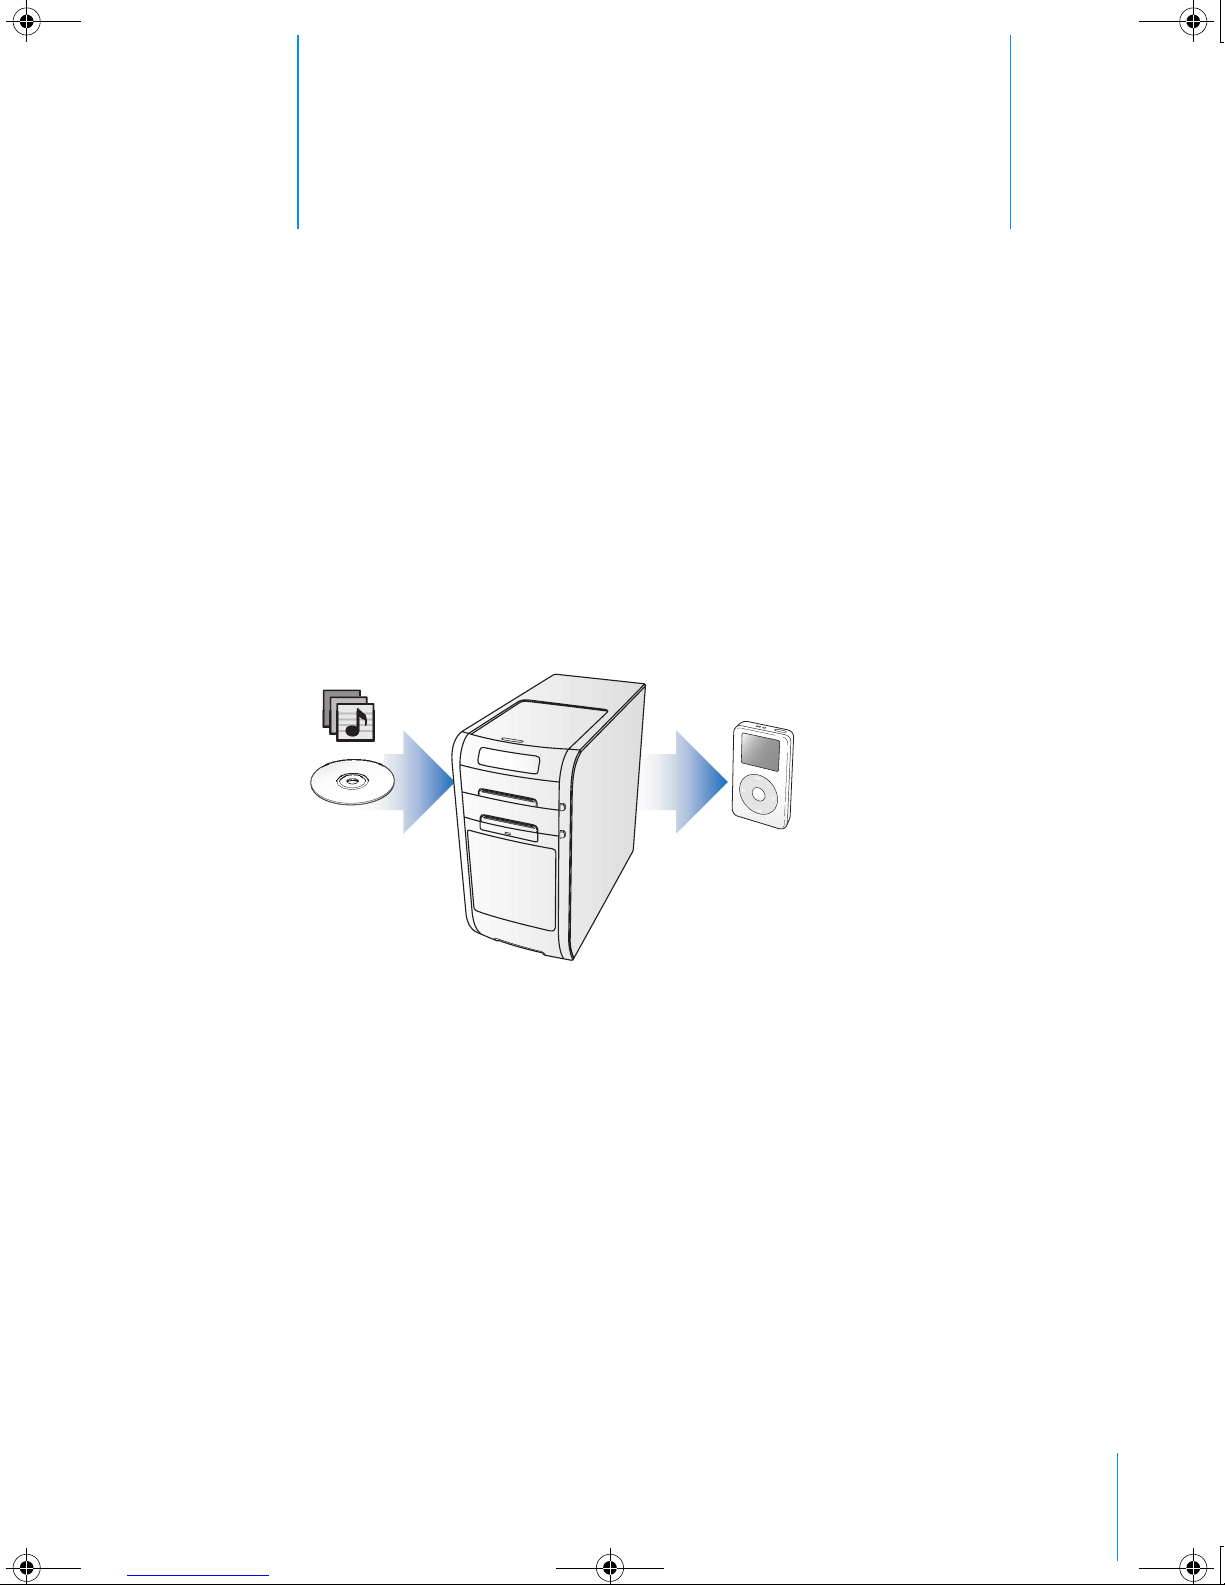
With your new iPod digital music player, you can take
your music collection with you wherever you go.
You use iPod by importing songs from your CD collection to the iTunes music
application on your PC, then transferring them to iPod for playing on the go. You
can also buy music and audiobooks online using the iTunes Music Store
(available in some countries/regions only).
If you are new to iPod or iTunes and want to learn how to get started playing
music on iPod quickly, this tutorial is for you.
019-0231.book Page 5 Tuesday, July 13, 2004 12:50 PM

iPod and iTunes at a Glance 6
How to Use the Tutorial
This tutorial has five lessons that teach you how to play music on your new iPod
and use some other iPod features. Before starting the lessons, look through this
chapter to get a feel for iPod and iTunes. You may want to refer back to this
chapter as you go through the tutorial lessons.
To get music on your iPod quickly, follow the directions in Lessons 1 to 3, starting
on page 11. In these lessons, you learn how to get music into iTunes, transfer
music from iTunes to iPod, and use the iPod controls to play music.
To learn how to use iPod as a hard disk, so you can store other files from your PC
on iPod, go through Lesson 4 (see page 26). To learn more advanced ways of
transferring and managing your music, go through Lesson 5 (see page 29).
Before You Begin
Before you start, make sure that you complete the following:
•Insert the iPod CD into your PC and install iTunes and the iPod software.
•To make it easier to complete the lessons, print this document.
•Be sure your PC and operating system meet the minimum iPod system
requirements. See the iPod User’s Guide for system requirements.
019-0231.book Page 6 Tuesday, July 13, 2004 12:50 PM
iPod and iTunes at a Glance 7
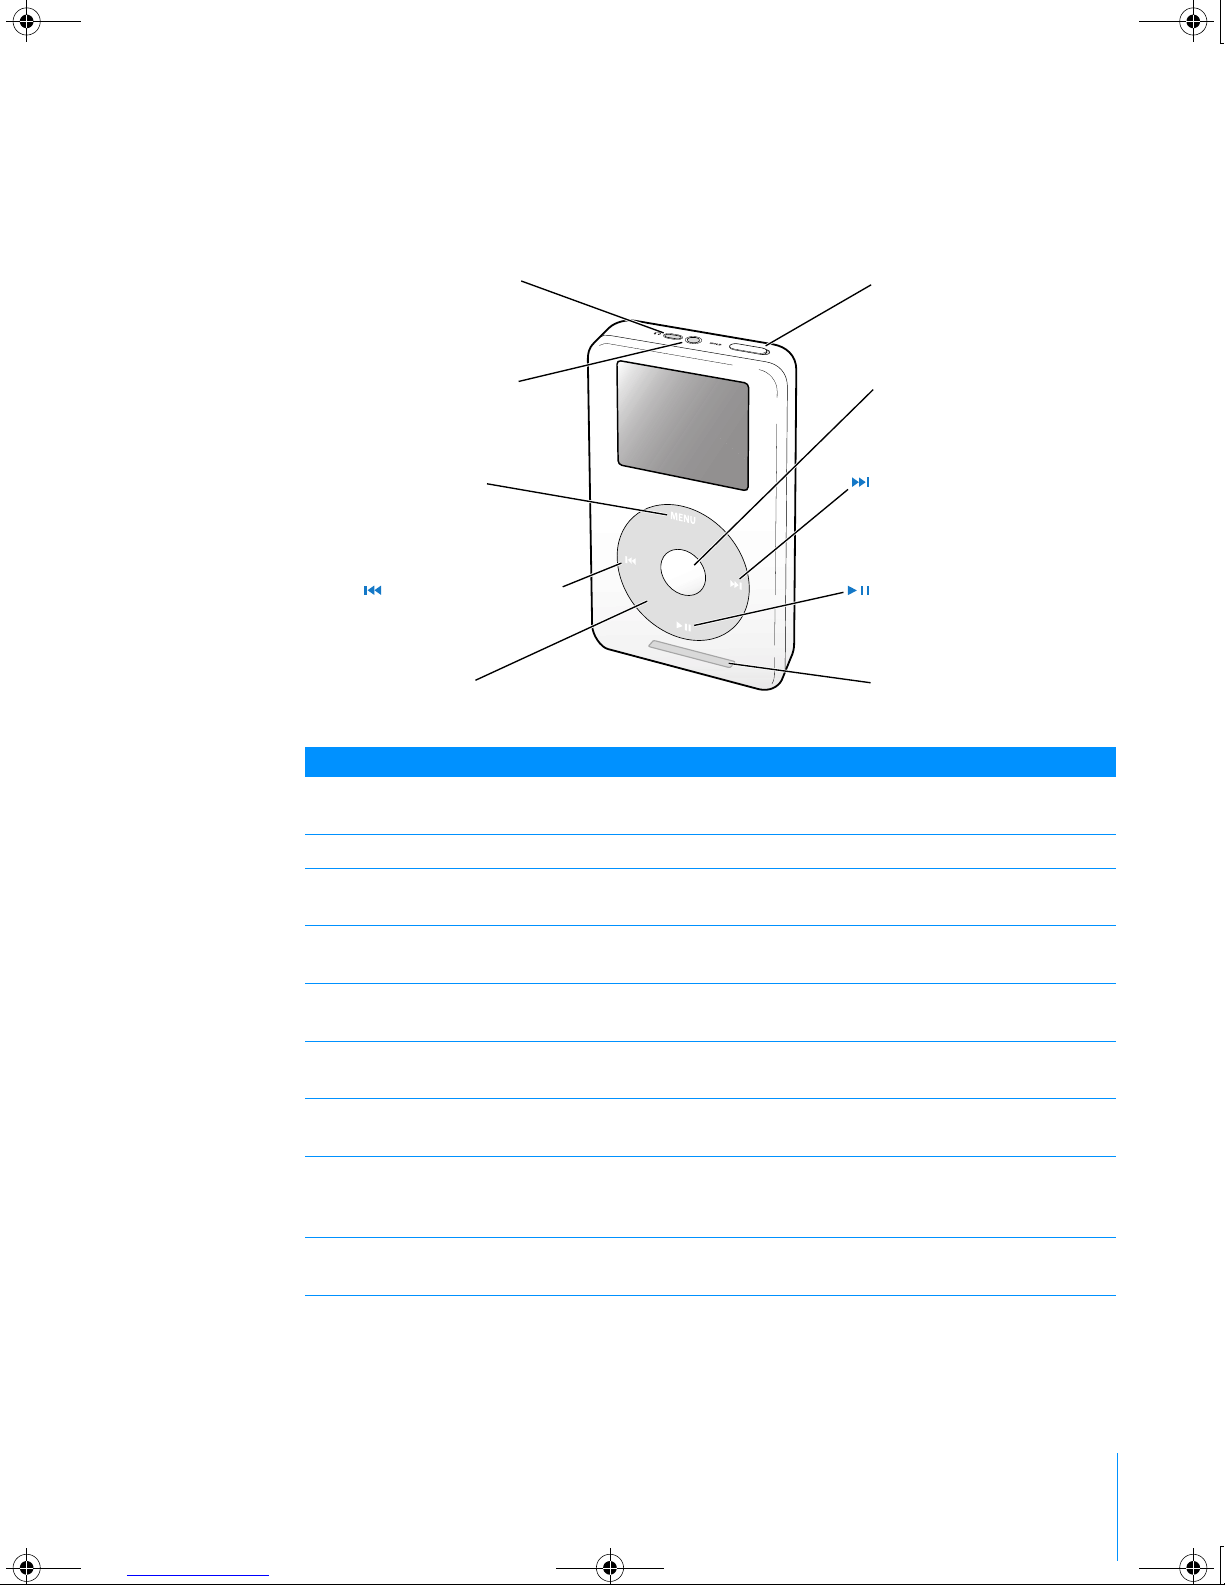
iPod
Use the iPod controls to navigate through onscreen menus, play songs, change
settings, and view information.
iPod Controls
Hold switch Use the Hold switch to disable the iPod controls, so you don’t
press buttons accidentally.
iPod Remote port Connect optional accessories, such as the iPod Remote.
Headphones port Connect headphones and speakers with a standard
3.5 millimeter stereo miniplug.
Menu button Press to go back to the previous menu. Press and hold to turn
on the backlight.
Select button Press to turn on iPod. If iPod is on, press to select a menu item
or play a song.
Previous/Rewind button Press to restart the current song. Press twice to play the
previous song. Press and hold to rewind.
Next/Fast-forward
button
Press to play the next song. Press and hold to fast-forward.
Click Wheel Run a thumb or finger around the Click Wheel to scroll through
menu items. From the Now Playing screen, use to change the
volume. Press the buttons on the Click Wheel to control iPod.
Play/Pause button Press to play the highlighted song. While a song is playing,
press to pause. Press and hold to turn off iPod.
iPod Remote port
Menu button
Previous/Rewind button
Click Wheel
Select button
Next/Fast-forward button
Dock connector port
Hold switch
Headphones port
Play/Pause button
019-0231.book Page 7 Tuesday, July 13, 2004 12:50 PM

iPod and iTunes at a Glance 8
iPod Menu
When you turn on iPod, you see the main menu. Select menu items to go to other
menus or perform functions on iPod. Status icons along the top of the screen show
iPod settings.
iPod Menu
Lock icon The Lock icon appears when the Hold switch (on top of iPod) is
set to Hold. When the switch is set to Hold, the iPod controls
are disabled.
Menu title Displays the title of the current menu.
Play status The Play icon ( ) appears if a song is playing. The Pause icon
( ) appears if a song is paused.
Battery status The Battery icon shows the remaining battery charge. If the
battery is charging, the icon is animated.
Menu items Use the Click Wheel to scroll through menu items. Press the
Select button (in the center of iPod) to select an item. An arrow
next to a menu item indicates that selecting it leads to another
menu.
Play status
Menu items
Battery status
Menu tit
l
eLoc
k
icon
019-0231.book Page 8 Tuesday, July 13, 2004 12:50 PM
iPod and iTunes at a Glance 9
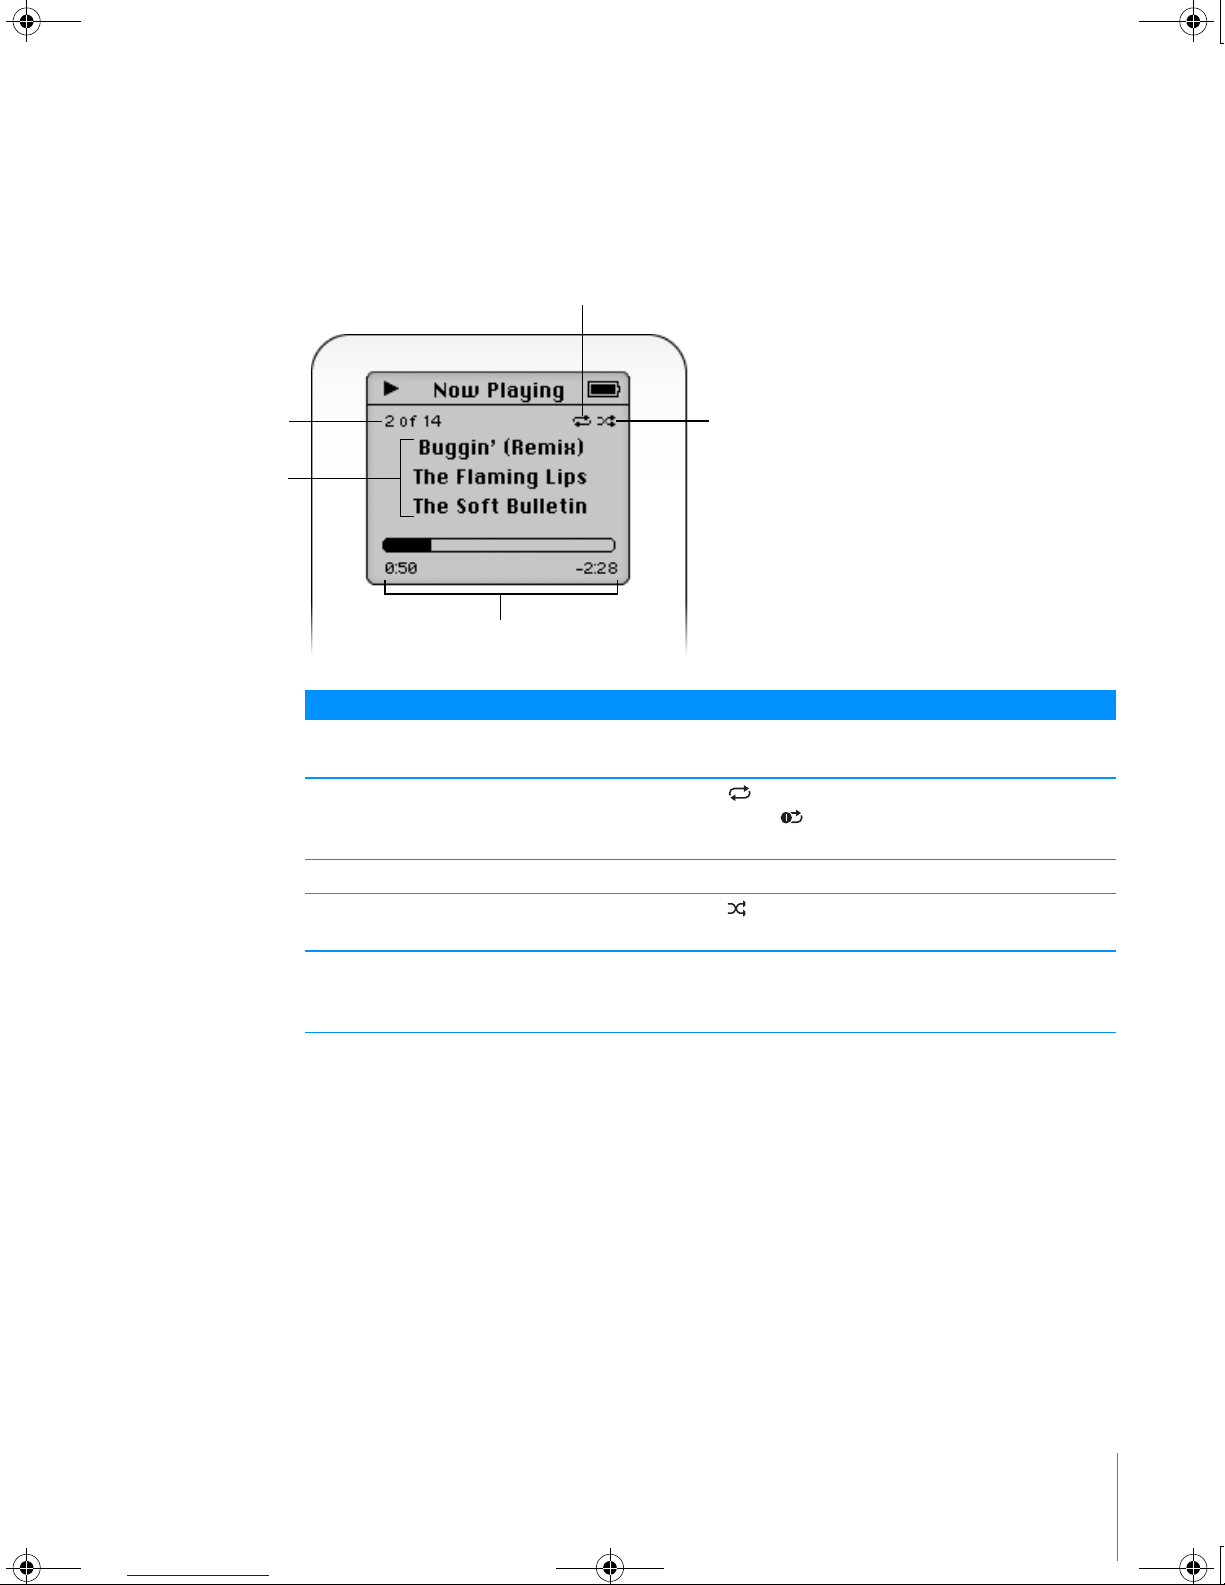
iPod Now Playing Screen
When a song is playing, the Now Playing screen appears. When you see the
Now Playing screen, you can run your thumb or finger around the Click Wheel
to change the volume. Click the Menu button to go back to the previous menu.
Now Playing Screen
Song number Shows the number of the song playing within the current
sequence of songs.
Repeat icon The Repeat icon ( ) appears if iPod is set to repeat all songs.
The Repeat Once icon ( ) appears if iPod is set to repeat
one song.
Song information Displays the song title and the artist.
Shuffle icon The Shuffle icon ( ) appears if iPod is set to shuffle songs
or albums.
Song time Displays time elapsed and time remaining for the current song.
Press the Select button to show the scrubber bar, then use the
Click Wheel to scroll to another point in the song.
Repeat icon
Shuffle icon
Song time
Song number
Song information
019-0231.book Page 9 Tuesday, July 13, 2004 12:50 PM
iPod and iTunes at a Glance 10
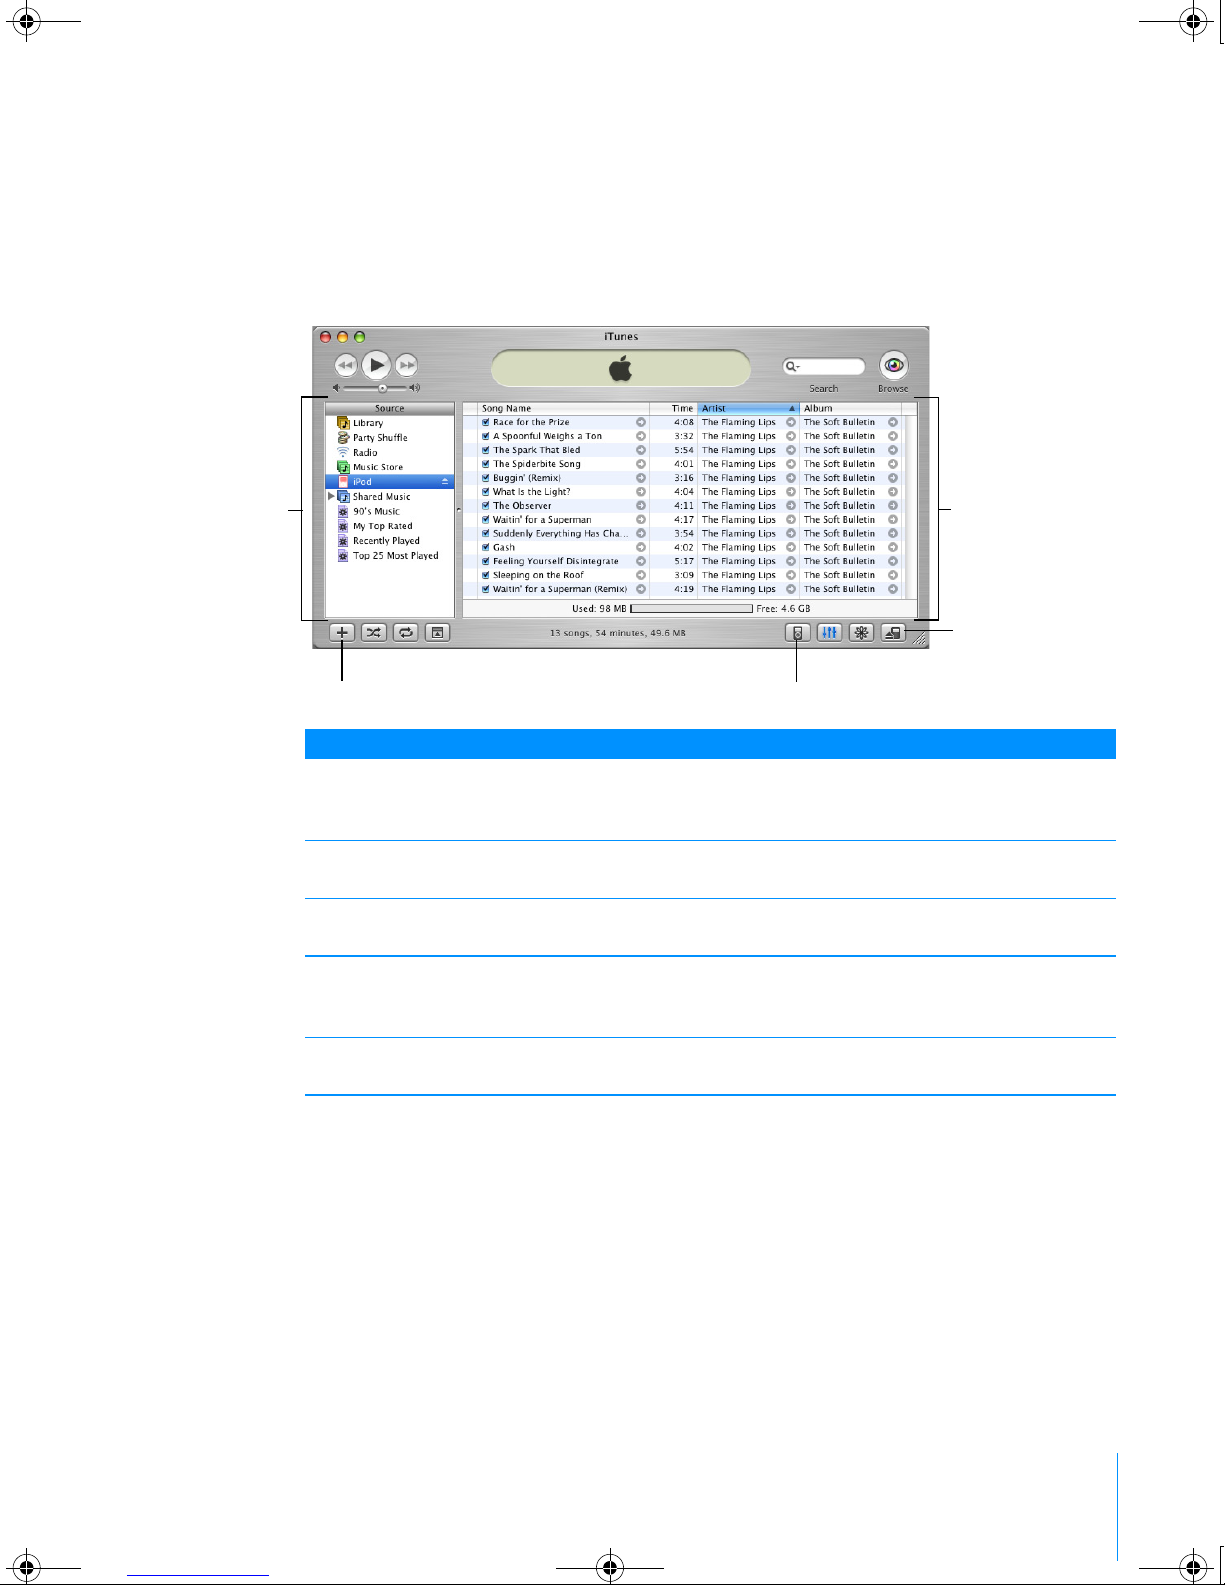
iTunes
Use iTunes to import music to your PC and transfer it to iPod, organize music on
iPod, and change settings on iPod. You can also use the iTunes Music Store
(inside iTunes) to purchase music online. The iTunes Music Store is available in
some countries/regions only.
iTunes
Source list Click items in the Source list to see your music. The Source list
shows your library, playlists, CDs, iPod, the iTunes Music Store,
and other sources of music.
Main window The main window shows songs from the item selected in the
Source list.
Add button Click to add a playlist to the Source list. Click Library, then
drag songs to the playlist to add them.
Options button Select iPod in the Source list, then click this button to change
settings on iPod. This button only appears when iPod is
selected in the Source list.
Eject button Select iPod in the Source list, then click the Eject button to eject
iPod before disconnecting it from your PC.
Source list Main window
Eject button
Options buttonAdd button
019-0231.book Page 10 Tuesday, July 13, 2004 12:50 PM
Other manuals for MP102
4
This manual suits for next models
4
Table of contents
Other HP MP3 Player manuals


