manuals.online logo
Brands
  1. Home
  2. •
  3. Brands
  4. •
  5. Hunkin Garden
  6. •
  7. Greenhouse Kit
  8. •
  9. Hunkin Garden Titan 79 EB User manual

Hunkin Garden Titan 79 EB User manual

Other Hunkin Garden Greenhouse Kit manuals

Hunkin Garden Titan 912 User manual

Hunkin Garden

Hunkin Garden Titan 912 User manual

Hunkin Garden Titan7x9 User manual

Hunkin Garden

Hunkin Garden Titan7x9 User manual

Hunkin Garden Titan 912 EB User manual

Hunkin Garden

Hunkin Garden Titan 912 EB User manual

Popular Greenhouse Kit manuals by other brands

Dancover TITAN Arch 196 manual

Dancover

Dancover TITAN Arch 196 manual

ACD PRESTIGE MR3 H manual

ACD PRESTIGE

ACD PRESTIGE MR3 H manual

Vitavia VA0040-TRP Assembly instructions

Vitavia

Vitavia VA0040-TRP Assembly instructions

VegTrug Nursery manual

VegTrug

VegTrug Nursery manual

Riverstone Networks Monticello 041315V Assembly instructions

Riverstone Networks

Riverstone Networks Monticello 041315V Assembly instructions

CLIMA POD Spirit V7 Series Assembly instructions

CLIMA POD

CLIMA POD Spirit V7 Series Assembly instructions

Vitavia GAIA JUMBO Assembly instructions

Vitavia

Vitavia GAIA JUMBO Assembly instructions

Palram Harmony 6'x4' Assembly instructions

Palram

Palram Harmony 6'x4' Assembly instructions

ClearSpan Storage Master 104598 instruction manual

ClearSpan

ClearSpan Storage Master 104598 instruction manual

Sproutwell GRANGE - 5 Assembly instructions

Sproutwell

Sproutwell GRANGE - 5 Assembly instructions

STC Easy Grow 6x12 Greenhouse Assembly instructions

STC

STC Easy Grow 6x12 Greenhouse Assembly instructions

Growhouse Lean To 6 x 8 Erection and Glazing Instructions

Growhouse

Growhouse Lean To 6 x 8 Erection and Glazing Instructions

Riverstone Networks Grower's 181010V Assembly instructions

Riverstone Networks

Riverstone Networks Grower's 181010V Assembly instructions

GrowSpan 500 Series manual

GrowSpan

GrowSpan 500 Series manual

Stocker 9641/2 manual

Stocker

Stocker 9641/2 manual

Outsunny 845-421V02 manual

Outsunny

Outsunny 845-421V02 manual

ACD Piccolo 03 manual

ACD

ACD Piccolo 03 manual

Riverstone Networks MONT-8 Assembly instructions

Riverstone Networks

Riverstone Networks MONT-8 Assembly instructions

manuals.online logo
manuals.online logoBrands
  • About & Mission
  • Contact us
  • Privacy Policy
  • Terms and Conditions

Copyright 2025 Manuals.Online. All Rights Reserved.

Titan 79 EB Greenhouse
Assembly Instructions
Model Titan 79 EB Hunkin Garden Products Ltd
[email protected]z www.hunkin.co.nz
Ph 0800 14 48 65
Dear Customer!
Thank you for purchasing one of our greenhouses. We feel sure that by following the detailed as-
sembly instructions, you will find as much pleasure in constructing the greenhouse as you will en-
joy growing plants in it. The assembly instructions are a combination of text and illustrations and
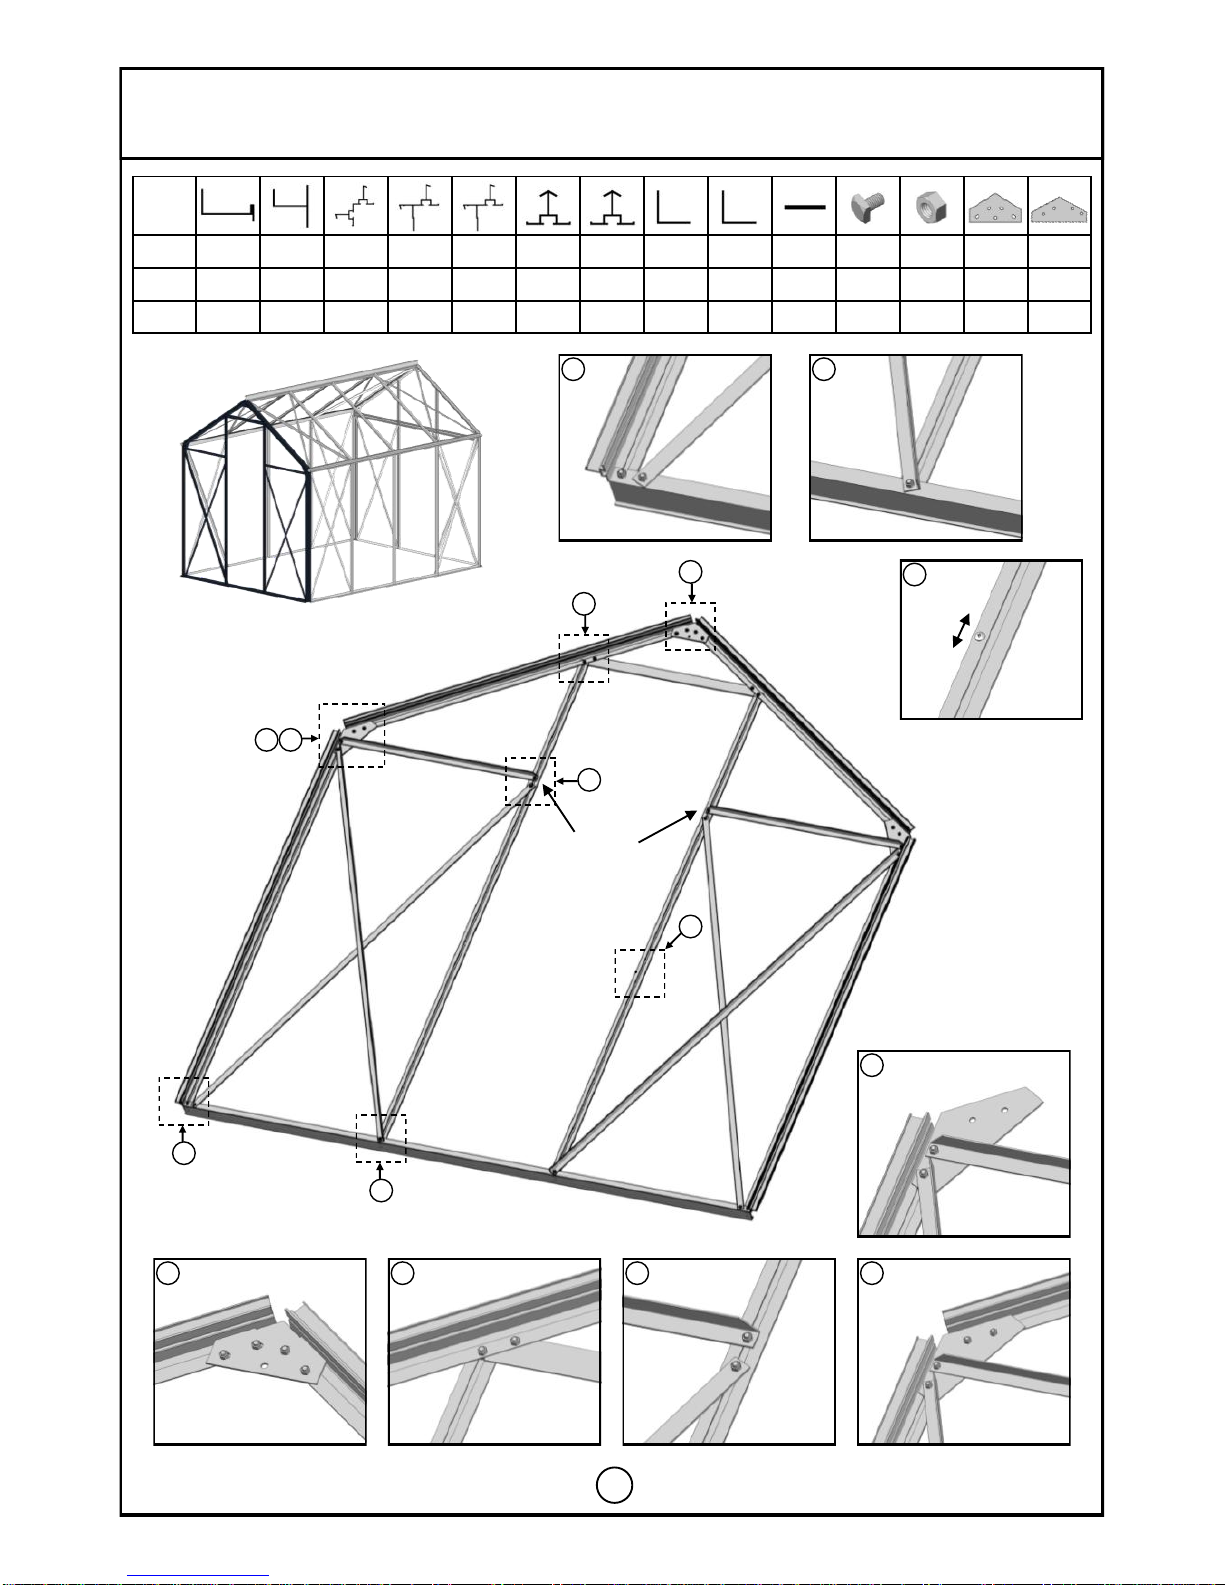
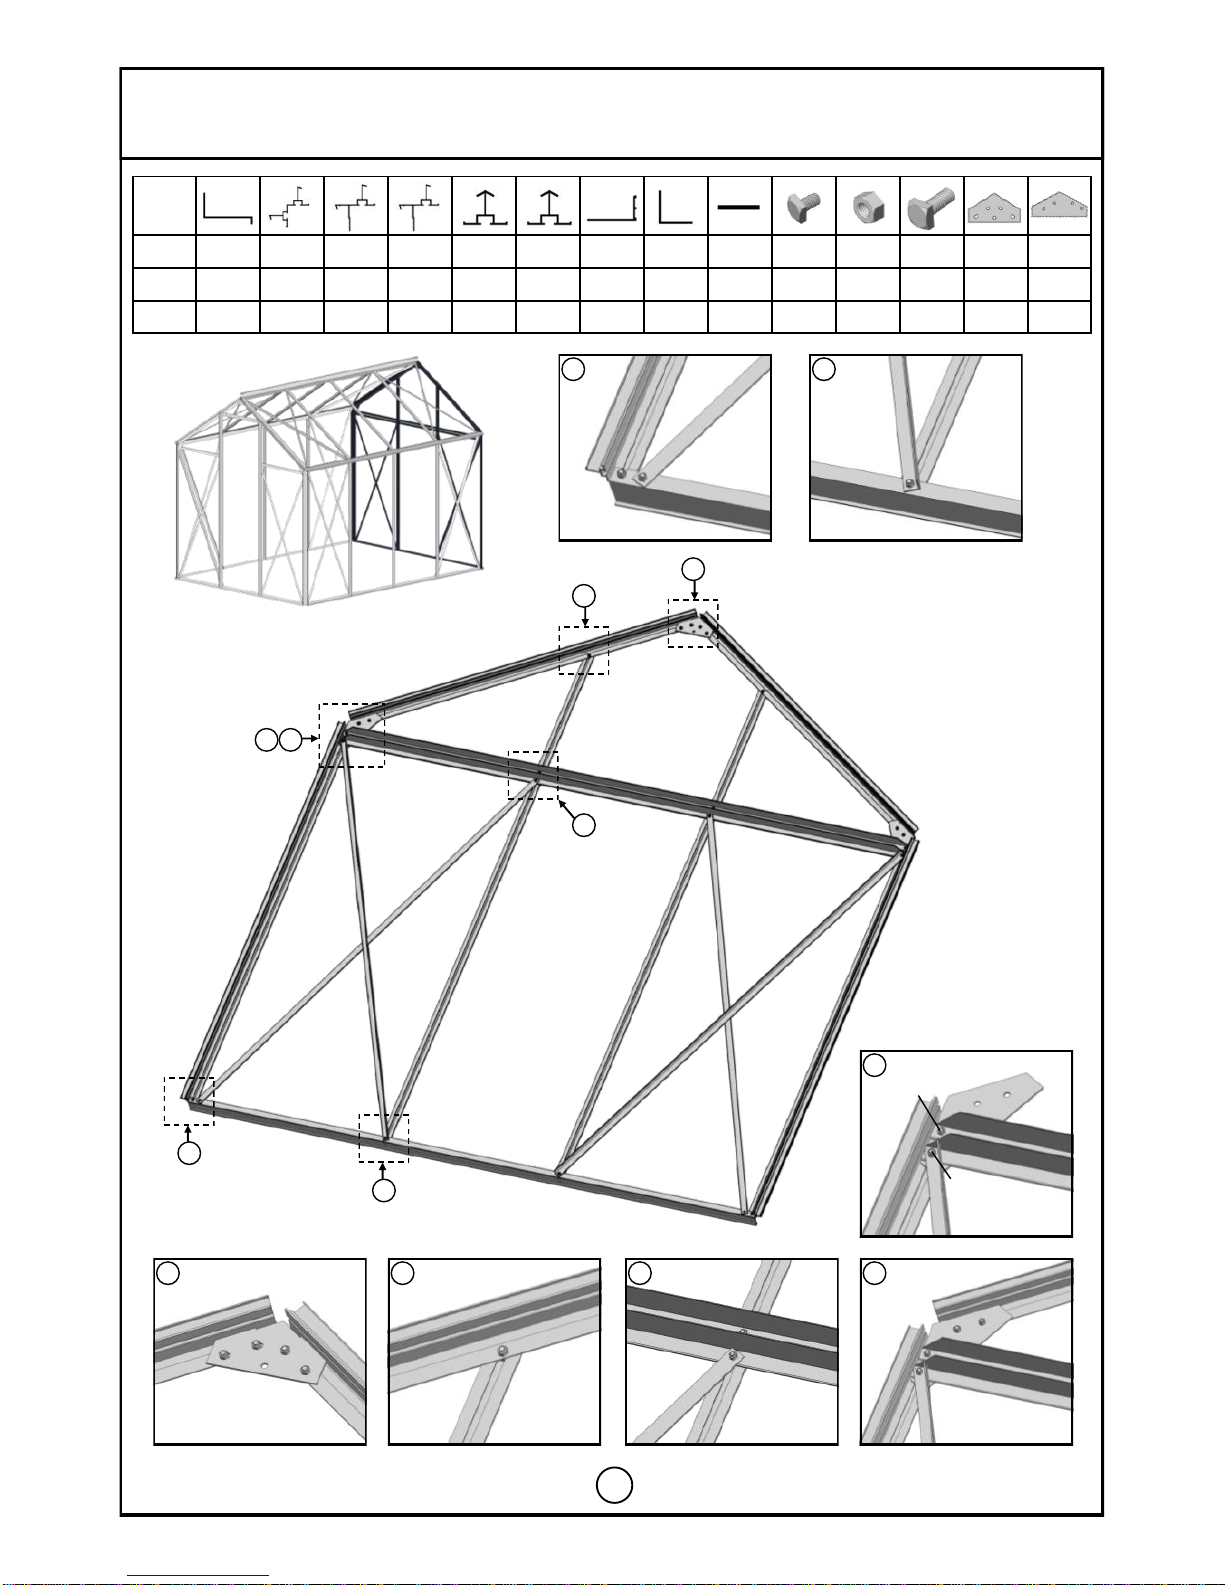
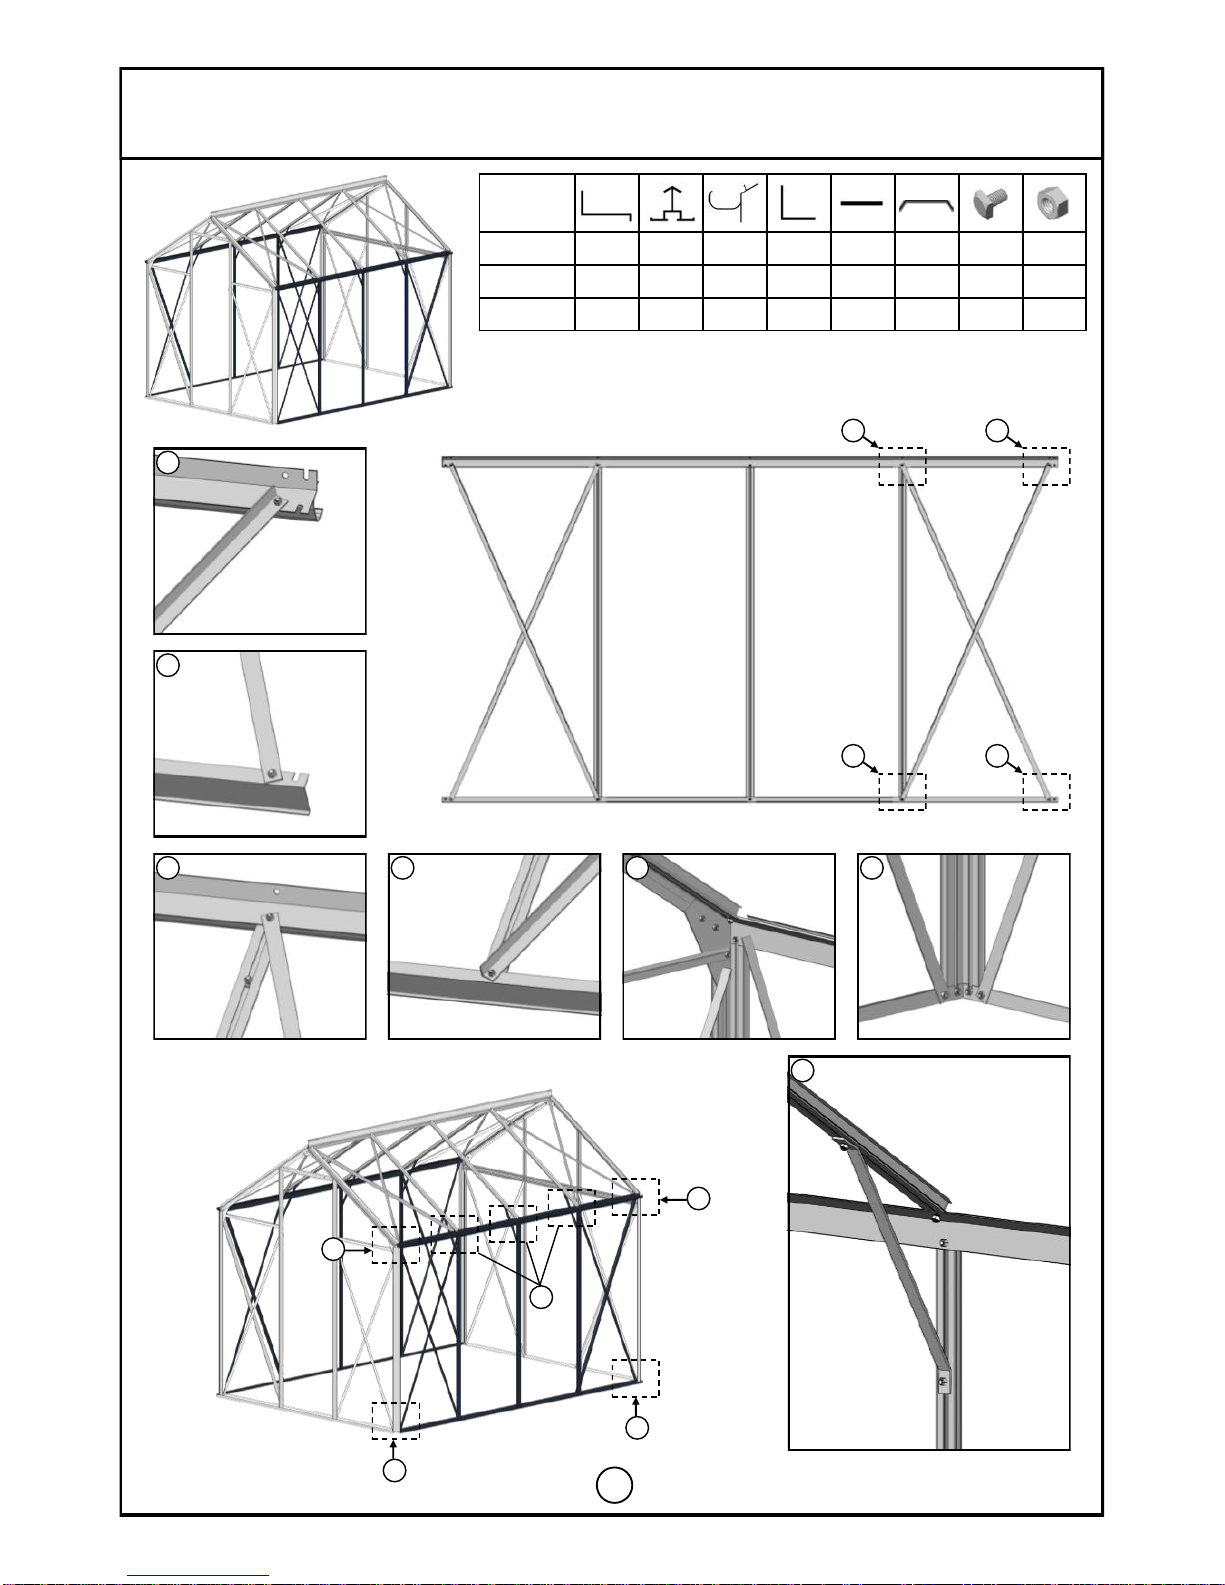
no technical knowledge is required for the erection of the greenhouse. The frames are numbered
and packed separately corresponding to the pages in the assembly instructions.
Assemble one section at a time. Bolts and various fittings for each section are included with each
pack. Each pack has a specified list of components.
We have attempted to make the greenhouse as strong as practicable but it still requires
protection from strong winds. The best shelter is a semi permeable one where the wind is
filtered but not completely stopped. Beware of situating your greenhouse between solid
objects as they tend to funnel the wind. A sheltered greenhouse will be much more efficient at
retaining heat.
Guarantee
There is a 10 year guarantee that covers replacement or repairs of defective frame parts due to
material or a manufacturing fault. The guarantee is limited to replacement of the faulty parts and
does not cover assembly costs, post and packaging or freight etc. The polycarbonate has a 7 year
guarantee. Should a fault with the polycarbonate arise it is replaced on a pro-rata basis. This means
for example if the polycarbonate was to fail in 3.5 years we would replace half of it free of charge,
the customer is charged for the other half. The guarantee is invalid if the greenhouse is not assem-
bled according to these instructions. The guarantee does not cover wind, snow and storm damage or
other natural disasters.
Winter Protection
Our greenhouses are constructed with frame dimensions up to 50% stronger than competing prod-
ucts. We still recommend you protect your greenhouse during the winter if you are expecting heavy
snow or high winds.
●Support the roof ridge at the centre of the greenhouse if expecting heavy snow.
●Don’t let snow build up on the roof.
●Site your greenhouse so snow can’t fall from trees or nearby roofs onto your greenhouse.
●Lock the door and windows to prevent wind damaging the greenhouse.
Foundation
The base is included with the greenhouse. All bases are powder coated to protect them from ground
salt corrosion even if your greenhouse is mill finish. The base is maintenance free and, of course,
all fittings are included. Remember to order concrete as this is not included in the kitset. Premixed
bags of standard concrete or rapid set (just add water) are available at your local hardware store.
Maintenance
●Grease doors, hinges and door track.
●Clean the gutter for leaves etc.
●Check adjustment of windows.
●Replace any damaged polycarbonate.
●Wash the polycarbonate with a warm soapy solution. Do not use solvents.
●Clean the greenhouse with disinfectant before and after the growing season.
We endeavour to supply a quality product, however should you encounter a problem please contact
Hunkin Garden Products Ltd either by email [email protected] or by free phone 0800 14
48 65. To help identify the problem please refer to the assembly instructions and the list of compo-
nents.
2
3
Caution
Important
●The base must be fastened to the ground using concrete around the pegs.
●The greenhouse must be securely fastened to the base.
●The base must be 100% level and square. The easiest way to ensure that the base is
square is to measure across the diagonals. The diagonals should measure the same.
●We recommend greasing self tapping screws for easier assembly.
●Glazing should only be carried out in fairly calm weather.
●Make sure that the greenhouse is square before starting to glaze.
●We recommend using gloves while glazing.
●An assistant will make the job much easier.
Tools
The greenhouse is assembled by means of the following tools:
●Spirit level
●Spanner/socket spanner 8 and 10 mm
●Screw driver (a battery drill with a clutch is very handy for quicker assembly)
●Caulking gun
Peel back approximately 2 inches (50mm) of film from
both sides before installing. Remove all film immediately
after the construction is completed. Mark the sheets with
a
permanent felt tip pen to indicate the correct side to the
The UV-protected side of the sheet is printed and must
face towards the sun. The side with the clear film goes to
the inside. Remove all film.
Please put on gloves to avoid cutting your hands.
Treat the polycarbonate carefully so it is not bent or
damaged.
Keep the polycarbonate away from material that could
scratch it. Don’t put the edges on the ground.
4
Dig a hole a minimum depth of
300mm or until you reach hard
clay with a spade and give it
some undercut before
concreting the base pegs in.
The pegs must be concreted
into hard ground, not loose fill.
The base is powder coated green. This protects the base from ground salts and makes it far more
durable when in ground contact.
XY
Titan 79 6’11” 9’5”
XY
Titan 79 2097mm 2859mm
Base
5
Package No.1
Front gable (view from inside looking out)
1
# 612 622 641 655 656 661 711 712 a1 a2 m1 m2723670
mm 2038 656 1535 1198 1198 1995 1634 710 M6x10 M6 --16231995
QTY 1121112226 26 1221
1
2
34
5
7
6
612
641
641661
670
711
712
712
655
656
622
723
711
723
1
612
641
723
612
661
711
2
3
4567
641
711
712
m2
641
655
712
711
661
712
723
655
661 622
655 656
m1
8
8
Preload two
bolts into
each 661
before assem-
bly. Used to
fasten 712
and 723.
670
6
Package No.2
Rear gable (view from inside looking out)
2
# 633 641 657 658 663 782 711 723 a1 a2 m1 m2664 a3
mm 2038 1535 1198 1198 2009 2036 1634 1623 M6x10 M6 --2009 M6x15
QTY 1211122222 24 1212
1
2
34
5
7
6
633
641
641663
664
711
782
657
658
723
711
723
782
1
633
641
723
633
663
711
2
7657 658
m1
3
456
641
711
782
782
m2
a1/a2
a3/a2
782
782
657
641
711
782
782
723
657
663 663
Preload 663 and 664
with two bolts .
These are used to fasten
2 x 782 horizontal
braces.
7
Package No.3
Side wall
666
Preload an extra bolt into 666 before assembly.
Used for eave braces later.
7
671
666
753
682
1
3
# 632 666 671 714 724 753 a1 a2
mm 2802 1535 2802 1674 1674 400 M6x10 M6
Titan 709 26244644 44
666 666
632
671
714
724
714
724
3
42
1
2
3456
671
714
632
724
671
666
724
666
632
714 671
714
724
632
5
5
6
6
7
8
Package No.4
Roof
All 682 profiles should be preloaded with 2 bolts
ie: all 682 profiles should have 2 free bolts once
the eave and ridge have been attached. These
bolts will be used to connect the eave brace. Vent
parts 521 also need these bolts.
4
# 701 715 725 a1 a2682
mm 2802 1374 1374 M6x10 M61198
Titan 709 14424 246
12345
678
1234
5678
701
682 682
682
715
725
715
725
701
715 715
725 725
682 682
682 682
725
715 682
9
(Build the vent around polycarbonate sheet B7. B7 is inserted into the
rebated vent frame. No glue required) Package No.6
Vent
6
# 201 521 531 541 551 a1 a2 a7 a9 a4 p3 p10
mm 300 724 601 707 678
M6x10
M6 M4x8 M4
Φ4.2x9.5
-40
QTY 112118822221
Vent No. 2
1
541
531
a1/a2
2
531
551
a1/a2
3
551
201
a7/a9
4
682
521
5
1
2
3
541 531
531
551
b7
521
682
a1/a2
5
6
p3/a4
701
541
p3/a4
Notes on vent assembly
No silicone is used on the vent poly-
carbonate.
1. Fit either 201 or an autovent, if you
purchased one (see picture below), to
551 using the bracket & screws sup-
plied. Fig 3/8
2. Fit the vent sides 531 to the vent
hinge 541.
3. Slide in b7 (correct side to sun) and
attach 551 to the sides 531
4. Repeat the procedure for the other
vents.
5. Slide in the vents before you glaze
the greenhouse. Fig 4
6. Before you slide in a vent, slide in
one p3/a4. One of these needs to be
positioned on both sides of a vent to
stop it sliding sideways. Fig 6, 7
7. When the vent is in position and
opens and shuts nip up a4 so p3 re-
mains in position. Do this before you
glaze the roof otherwise you will not
be able to tighten a4 later.
7
The autovent fitted with 6mm bolts before the
greenhouse is glazed to the sill 521. This picture
is looking from the outside so this will be hid-
den by polycarbonate.
8
10
Package No.5
Door (Tip: Grease the self-tapping screws before you screw them in)
591
592
582
583
581
591 583
a5 591
594
591
582
a5
a11
a9
n1
581
591
p4
a6
384
a1/a2
b4
b4
b4
# a2 a5 a6 a9 a11a1
Size M6
Φ3.5x19
Φ3.5x25
M4 M4x25M6x10
QTY 712 4227
5
# 571 581 582 583 591 592 791 594 384 p4 p5 m10 n1
Size 1235 623 633 633 1967 1967 406 903 -----
QTY 1111111412224
1
3
4
5
12
34
5
P4 has slots. When attaching p4 leave it
flush with 591 & 592 until you have put the
door on the top runner 592. P4 is used to
hold the bottom of the door in position (next
page).