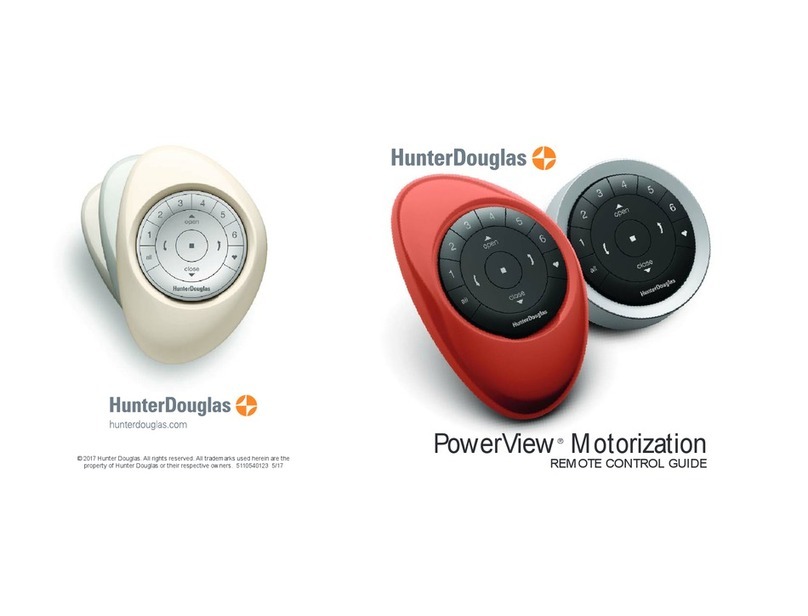
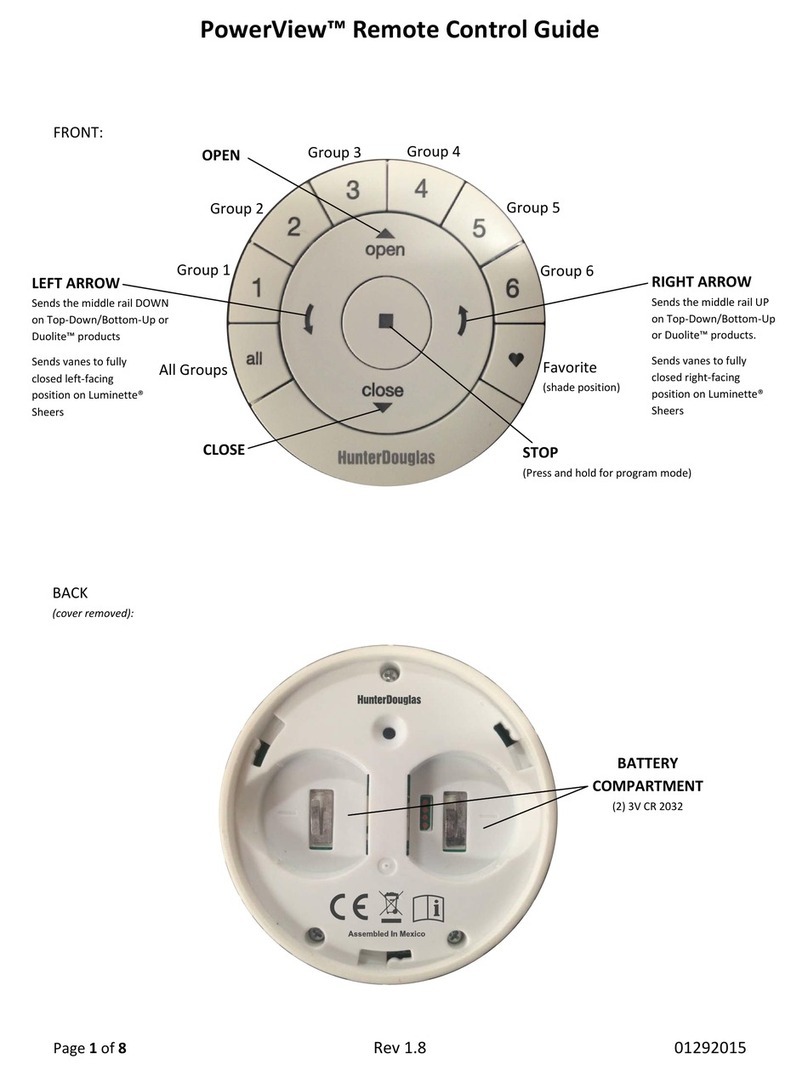
HunterDouglas PowerView Pebble Dimensional drawing

PRODUCT INFORMATION MANUAL
SECTION: 7E POWERVIEW GUIDE
POWERVIEW GUIDE
PEBBLE REMOTE
AND
APP SETUP &
OPERATION

TABLE OF CONTENTS
PowerView App Setup and OperationPowerView Pebble®Remote
Getting Started .............................. 3
Pairing Multiple Remotes to a Single Network ID ..... 4
Programming Mode Overview ................... 6
Selecting & De-Selecting Groups ................. 7
Joining a Shade to a Group ..................... 8
Removing a Shade From a Group................. 9
Setting a Favourite........................... 10
Product Operation:
Groups 1-6 ................................ 11
Product Operation:
ALL Button................................. 12
Product Operation:
Favourite Button ............................ 13
Product Operation:
Silhouette®and Pirouette®Shadings ............. 14
Product Operation:
Luminette® Privacy Shades .................... 15
Performing a Programming Reset ............... 16
Setting Limits .............................. 17
Duplicating a Remote......................... 18
Pairing a Repeater to a Network: Using a Remote.... 21
Battery Replacement ......................... 22
Mounting the PowerView Surface................ 23
Inserting the Remote Module into the Pebble®..... 24
Getting Started with the Hub ................... 26
Pairing a Hub to a Remote Network .............. 27
Creating a Network Using the PowerView App ...... 28
Pairing a Remote to a Hub Network .............. 29
Pairing a Repeater to a Network: Using the Hub ..... 30
Discover Shades ............................ 31
Edit Shade Information........................ 32
Assign Shade to a New Room .................. 33
Assign Shade to an Existing Room ............... 34
Create a Room ............................. 35
Shade Operation in a Room .................... 36
Delete a Room .............................. 37
Create a Room Scene ........................ 38
Create a Multiple Room Scene .................. 40
Shade Operation in a Scene.................... 41
Setting Up and Using Schedules ................ 42
Scheduling Scenes – Sunrise/Sunset............. 43
Enabling RemoteConnect...................... 44
Using RemoteConnect ........................ 46
Using Repeaters with the App .................. 47
Battery Life Indicator ......................... 48
Backing Up the Hub .......................... 49
Emailing a Hub Backup ....................... 50
Restoring a Hub Backup....................... 51
Adding a New Scene Controller ................. 53
Configuring Scenes in a Scene Controller.......... 54
Operating Scenes with the Scene Controller........ 56
PowerView Scene Controller
PowerView Help
Frequently Asked Questions .................... 57
Troubleshooting ............................. 62
© Copyright 2016 Hunter Douglas Limited [ABN 98 009 675 709]
® Luxaex, PowerView and Pebble are registered Trade Marks of Hunter Douglas • 03/2016

– 3 –
Remote Module
Manual Control Configurations
GETTING STARTED with the PowerView™ Pebble® Remote
Groups (1-6)
Select or de-select Group
numbers for programming
or operation.
Stop
Stops shade in any position.
Also used to enter and exit
programming mode.
Vane Open/
Close Arrows
Operate vanes.
All
Operate all groups
simultaneously.
Open
Move shade to fully
open position.
Favourite
Default setting is 50%
open. Customise to
move shade to a custom
favourite position.
Close
Move shade to fully
closed position.
Key to Operation
Pirouette®Shadings Sihouette® Shadings Duette®Shades Luminette®Privacy Sheers
The manual control button, located on the headrail, is different depending on the product. See images for product examples.
4VIDEO INSTRUCTION

– 4 –
PAIRING MULTIPLE REMOTES to a Single Network ID
Each PowerView Remote comes with its own
unique Radio Frequency (Network) ID. If
multiple remotes (ie. PowerView Pebble®and/
or PowerView Surface remotes) will be used in
the home, it is necessary to establish a single
PowerView Shade Network ID for all remotes
before any window covering programming is
done. This is to ensure that if a PowerView
Hub, PowerView Scene Controller or PowerView
Repeater(s) will be used in the future, it can
be used to operate previously programmed
window coverings in the home and be used in
conjunction with all the remotes on a single,
unified network.
qSELECT the initial Network remote. This
will be the source remote from which a
unified PowerView Shade Network will be
established for the home.
NOTE: Because a unified network has not
yet been established, it does not matter
which available remote you choose to use to
create a PowerView Shade Network.
wSELECT the target remote.
eREMOVE the back cover on the target
remote.
rUsing a ball point pen, PRESS and HOLD
the recessed Reset button on the back of
the target remote for six seconds.
NOTE: The Group numbers (1-6) buttons
will flash twice on the press of the Reset
button, then again at six seconds.
tREINSTALL the back cover onto the
target remote.
y
PRESS and HOLD (Stop) on the source
remote, until indicator lights begin to blink.
NOTE: This puts the source remote in
Programming Mode. Indicator lights on the
source remote will continue to blink for 20
seconds following each set of commands,
allowing additional target remotes to
be networked.
q
e
w
r
ty
Source Target Target
Target
Target
Source
Target

– 5 –
4VIDEO INSTRUCTION
uWith the source remote in Programming
mode, PRESS and continue to HOLD
(Stop) on the target remote.
Complete steps 8 and 9 at the same time.
iPRESS and RELEASE (Stop) on the
source remote.
oRELEASE (Stop) on the target remote.
NOTE: The Group numbers (1-6) on the
target remote will flash twice to indicate that
it has been networked to the source remote.
1) PRESS and HOLD (Stop) on the source
remote until the indicator lights stop
blinking.
u io
1)
Target
Target
Source
Source

– 6 –
PROGRAMMING MODE OVERVIEW
In programming mode, you can set a variety
of functions, from joining a shade to a Group
to removing a shade from a Group, to setting
Favourite shade positions. You must activate
programming mode on the PowerView™ Pebble®
Remote to establish communication between the
remote and shade.
ENTER PROGRAMMING MODE
qPRESS and HOLD (Stop) for 6 seconds
until indicator lights blink on the PowerView
Pebble Remote.
wRELEASE (Stop).
NOTE: Indicator lights on the remote will
continue blinking for 20 seconds following
each set of commands allowing additional
shades to be programmed, if desired.
EXIT PROGRAMMING MODE
qTo EXIT programming mode, PRESS and
HOLD (Stop) until the indicator light
stops blinking.
wRELEASE (Stop).
NOTE: If no buttons are pressed on the
remote for 20 seconds, the remote will exit
programming mode. All settings performed
while in programming mode will be retained.
4VIDEO INSTRUCTION
q w

– 7 –
SELECTING & DE-SELECTING GROUPS
4VIDEO INSTRUCTION
Before operating a single window covering
you must first select its corresponding Group
number (1-6) or the ALL button. Multiple Groups
numbers can be selected for simultaneous
operation in any combination. Group numbers
can be selected or deselected. Like any Group
number, the All button can also be selected or
deselected; however, its selection will override
any active Group(s).
SELECTING A GROUP
qPRESS and RELEASE the Group number(s)
(1-6) of your choice.
NOTE: Selected Group numbers are
illuminated to indicate that they are active.
DE-SELECTING A GROUP
qPRESS and RELEASE the Group
number(s) (1-6) of your choice.
NOTE: Deselected Group numbers will
darken to indicate that they are no longer
active.
q

– 8 –
JOINING A SHADE TO A GROUP
Shades must be joined to a Group to operate. A
single shade can be joined to multiple Groups,
if desired.
qPRESS and HOLD (Stop) until
indicator lights blink on the PowerView™
Pebble®Remote.
wRELEASE (Stop).
ePRESS and RELEASE the desired Group
number (1-6) on the remote.
The selected group number will blink.
NOTE: Steps 4-6 must be completed within
5 seconds.
rPRESS and HOLD the manual control
button on the headrail.
tThen PRESS and RELEASE 5(Open) on
the remote.
The shade will jog to indicate it’s been
joined to the selected Group.
yRELEASE the manual control button.
NOTE: To join additional shades to the
same Group, repeat steps 4-6 for each
shade.
uPRESS and HOLD (Stop) on the remote
until the indicator lights stop blinking.
4VIDEO INSTRUCTION
q
e
w
r
yt

– 9 –
REMOVING A SHADE FROM A GROUP
Shades can be removed from a group, if desired.
qPRESS and HOLD (Stop) until indicator
lights blink on the PowerView™ Pebble®
Remote.
wRELEASE (Stop).
ePRESS and RELEASE the desired Group
number (1-6) on the remote.
The selected group number will blink.
NOTE: Steps 4-6 must be completed within
5 seconds.
rPRESS and HOLD the manual control
button on the headrail.
tThen PRESS and RELEASE6(Close) on
the remote.
The shade will jog to indicate it has been
removed from the selected Group.
yRELEASE the manual control button.
NOTE: To remove additional shades from
the same Group, repeat steps 4-6 for each
shade.
uPRESS and HOLD (Stop) on the remote
until the indicator lights stop blinking.
q
e
w
r
yt
4VIDEO INSTRUCTION

– 10 –
SETTING A FAVOURITE
All shades come from the factory with a default
Favourite position set at 50% open. If you prefer
a different shade position, you can create a
custom Favourite.
qUse the PowerView™ Pebble®Remote
to move all shades to a desired Favourite
position.
wPRESS and HOLD (Stop) until indicator
lights blink.
eRELEASE (Stop).
NOTE: Steps 4-6 must be completed within
5 seconds.
rPRESS and HOLD the manual control
button on the headrail.
tThen PRESS and RELEASE (Favourite)
on the remote.
The shade will jog to indicate the position
has been set as a Favourite.
yRELEASE the manual control button.
NOTE: To position additional shades, repeat
steps 4-6 for each shade.
uPRESS and HOLD (Stop) until the
indicator lights stop blinking.
q
e
w
r
yt
4VIDEO INSTRUCTION

– 11 –
PRODUCT OPERATION: Groups 1-6
Shades must be joined to a Group to operate.
Multiple Groups can be simultaneously operated,
if desired.
qPRESS and RELEASE desired Group
number(s) (1-6) on the PowerView™
Pebble®Remote.
wWith desired Group number(s) selected,
PRESS and RELEASE either:
a. 5(Open) on the remote to open
the shade.
b. 6(Close) on the remote to close
the shade.
c. (Right Arrow) for vane operation.
d. (Left Arrow) for vane operation.
ePRESS and RELEASE (Stop) when the
desired shade position is reached.
Note: Group numbers (1-6) are selected
or deselected by pressing the desired
Group number(s). Selected Group numbers
are illuminated to indicate they are active.
Multiple Groups can be selected for
simultaneous operation.
q
ò
ò
ò
eò
2a
2b 2c
2d
4VIDEO INSTRUCTION

– 12 –
PRODUCT OPERATION: ALL Button
The ALL button allows all Grouped shades to be
operated simultaneously.
qPRESS and RELEASE the ALL button.
wPRESS and RELEASE either:
a. 5(Open) on the remote to open
the shade.
b. 6(Close) on the remote to close
the shade.
c. (Right Arrow) for vane operation.
d. (Left Arrow) for vane operation.
ePRESS and RELEASE (Stop) when the
desired shade position is reached.
NOTE: To de-select ALL, press any Group
number.
q
ò
ò
ò
eò
2a
2b 2c
2d
4VIDEO INSTRUCTION

– 13 –
PRODUCT OPERATION: Favourite Button
The (Favourite) button moves selected
Grouped shades to their individually set
Favourite position.
qPRESS and RELEASE desired Group
number(s) (1-6) or ALL on the
PowerView™ Pebble®Remote.
wPRESS and RELEASE (Favourite) on
the remote.
q w
4VIDEO INSTRUCTION

– 14 –
PRODUCT OPERATION: Silhouette®and Pirouette®Shadings
4VIDEO INSTRUCTION
qPRESS and RELEASE desired Group
number(s) (1-6) or ALL on the PowerView
Pebble® Remote.
wPRESS either:
a. (Left Arrow) on the remote to close
the vanes to the desired position.
NOTE: If the shade is in the fully raised,
open position, the shade will lower to the
down, closed position.
b. (Right Arrow) on the remote to
open the vanes to the desired
position.
NOTE: If the shade is in the fully raised,
open position, the shade will lower to the
down, closed position and the vanes will
fully open.
c. 5
(Open) on the remote to raise the
shade to the fully open position.
d. 6
(Close) on the remote to lower the
shade to the fully closed position.
NOTE: If the shade is fully lowered and the
vanes are open, the vanes will close.
ePRESS and RELEASE (Stop) when the
desired position is reached.
qò
ò
2b
2a
òe
2d
ò
2c

– 15 –
PRODUCT OPERATION: Silhouette®and Pirouette®Shadings PRODUCT OPERATION: Luminette® Privacy Sheers
4VIDEO INSTRUCTION
qPRESS and RELEASE desired Group
number(s) (1-6) or ALL on the PowerView
Pebble®Remote.
wPRESS either:
a. (Left Arrow) on the remote to rotate
the vanes to the left.
NOTE: If the shade is in the fully open
position, the shade will traverse to the fully
closed position. The vanes will then rotate to
the left into a vanes fully closed position.
b. (Right Arrow) on the remote to
rotate the vanes to the right.
NOTE: If the shade is in the fully open
position, the shade will traverse to the
fully closed position. The vanes will then
rotate to the right into a vanes fully closed
position.
c. 5
(Open) on the remote to traverse
the shade to the fully open position.
d. 6(Close) on the remote to traverse
the shade to the fully closed, vanes
open position.
ePRESS and RELEASE (Stop) when the
desired position is reached.
q ò
ò
2b
2a
4VIDEO INSTRUCTION
òe
2d
ò
2c

– 16 –
PERFORMING A PROGRAMMING RESET
This reset is used to erase all current
programming stored in a window covering’s
headrail, including a Network ID and any Group
assignments. It will not clear the window
covering’s limits. Completing a programming
reset will prevent a PowerView Pebble®Remote
or a mobile device from operating a window
covering until it is reprogrammed.
qPRESS and HOLD the manual control
button on the headrail for 12 seconds.
NOTE: The shade will jog at six seconds.
Then, at 12 seconds, the shade will jog a
second time.
wWhen the shade jogs a second time at
12 seconds, RELEASE the manual
control button.
NOTE: All previous programming
information stored in the window covering’s
headrail has now been cleared.
q w
4VIDEO INSTRUCTION

– 17 –
SETTING LIMITS
Limits identify the position that shades stop
when
fully open or fully closed. Limits are set at the
factory for the correct stop positions according
to the ordered height.
To reset the limits:
qPRESS and HOLD the manual control
button on the headrail for approximately 6
seconds. The shade will jog, indicating that
the limits and Favourite setting have been
cleared.
NOTE: Group programming is retained.
Limits must be reset to restore the default
Favourite position of 50% open.
wPRESS and RELEASE the manual button
on the headrail. The shade will then
automatically open and then close, setting
new limits.
NOTE: Do not press the manual button or
stop the shade during this operation.
q w
4VIDEO INSTRUCTION

– 18 –
DUPLICATING A REMOTE
Duplicating a remote copies a remotes unique
group programming information and transfers
it to another remote so that they are essentially
identical. Window coverings programmed to
operate with one remote will also respond
to commands from a duplicated remote.
Duplicating a remote is not the same as
pairing multiple remotes to a PowerView™
Shade Network.
qIDENTIFY the source remote.
NOTE: The source remote is the remote
initially used to first establish communication
between itself and a PowerView motorised
window covering, after installation. This will
be the remote that will be duplicated.
wIDENTIFY the target remote.
NOTE: This remote cannot yet be used
to operate PowerView motorised window
coverings already joined to Groups on the
source remote. This will be the remote that
you transfer the source remotes duplicated
programming information to.
eREMOVE the back cover of the
target remote.
rUsing a ballpoint pen, PRESS and HOLD
the recessed Reset button on the target
remote for six seconds then RELEASE.
NOTE: The Group number (1-6) buttons will
flash twice on the press of the Reset button,
then again at six seconds.
tREINSTALL the back cover onto the target
remote.
q
e
w
r
t
Target
Target
Target
Target
Source

– 19 –
4VIDEO INSTRUCTION
yPRESS and HOLD (Stop) on the source
remote, until the indicator lights begin
to blink.
NOTE: This puts the source remote in
Programming Mode. Indicator lights on
the source remote will continue to blink
for 20 seconds following each set of
commands. This allows the source remotes
programming information to be duplicated
and transferred to additional target remotes,
if desired.
Complete steps 8 and 9 at the same time.
uPRESS and HOLD ALL on the target
remote.
iThen PRESS and RELEASE (Stop) on
the source remote.
NOTE: The Group numbers (1-6) on the
target remote will flash twice. This indicates
that the source remotes Group programming
information has been duplicated and now
transferred to the target remote. Both
remotes are now identical.
oRELEASE ALL on the target remote.
1) PRESS and HOLD (Stop) on the source
remote until the indication lights blinking.
y
i
u
o1)
Source
Source Source
Target
Target

– 20 –
PAIRING A REPEATER TO A NETWORK: Using a Remote
Repeaters extend the range of the radio
frequency (RF) signal emitted by the
PowerView Pebble®Remote, the
PowerView Surface, or the PowerView Hub when
used with the PowerView App, for larger rooms
or multiple room applications. A Repeater comes
packed with a USB power source.
qASSEMBLE the Repeater Kit by INSERTING
the USB end of the PowerView Repeater into
the USB port of the USB Power Supply.
wPLUG the Repeater Kit into an electrical
outlet.
NOTE: A solid green light will illuminate on
the Repeater to indicate it is receiving power
and ready to join a network.
ePRESS and HOLD (Stop) on the
PowerView Pebble Remote until indicator
lights on the interior of the remote blink.
NOTE: This puts the remote in Programming
Mode.
Hold the remote in close proximity to the
Repeater to complete Step 4.
rPRESS (Stop) on the remote while the
remote is in Programming Mode.
Note: The solid green light on the Repeater
will turn off, indicating it has been paired to
the network.
tPRESS and HOLD (Stop) on the remote
until the indicator lights stop blinking.
q
e
w
r
t
4VIDEO INSTRUCTION
Table of contents
Other HunterDouglas Remote Control manuals

HunterDouglas
HunterDouglas PowerView User manual

HunterDouglas
HunterDouglas PowerView Pebble User manual

HunterDouglas
HunterDouglas PowerView Motorization User manual

HunterDouglas
HunterDouglas PowerView User manual

HunterDouglas
HunterDouglas PowerView User manual

HunterDouglas
HunterDouglas Platinum Use and maintenance manual