HUROM GI Series User manual

Cautions for Safe Use
Cautions for Use / Before Requesting for Repair
Part Names and Assembly of Parts
Using Juicer
Cleaning
Specifications / Warranty
02
04
06
12
16
20
HUROM User Manual, For Household Use (Warranty Included)
1. Read “Cauons for Safe Use” (p2) Carefully and use the appliance properly.
2. Keep the manual where it can be found aer use.
3. Design and product development may be upgraded without noce.
4. Any quality improvement are subject to change without noce.

02 |
1. Please read <Cauons for Safe Use> thoroughly.
2. Please observe <Cauons for Safe Use> thoroughly.
Warning When violang the labeling requirement, it may cause serious injury or death.
DO NOT PLUG OR PULL THE POWER CORD WITH WET HANDS.
It may lead to electric shock or injury.
DO NOT CONNECT TO ANY OTHER POWER SOURCES THAN AC 230-240 V AC.
It may cause electric shock, fire, or performance degradation. Using different voltage
may shorten the motor’s life or cause trouble.
PLUG THE POWER CORD ACCURATELY AND DEEPLY INTO THE OUTLET.
It may cause electric shock and fire.
DO NOT BEND THE POWER CORD TOO MUCH, TIE THE CORD, DAMAGE THE
CORD, PULL THE CORD, PLACE THE CORD NEAR HEAT OR FIRE SUCH AS GAS
RANGE, PLACE HEAVY OBJECTS ON THE CORD, PUSH THE CORD INTO THE NAR-
ROW SPACE, OR ALTER THE CORD.
It may damage the power cord and cause fire or electric shock.
NEVER ALTER THE PRODUCT. ALSO, DO NOT DISASSEMBLE OR TRY TO REPAIR
THE PRODUCT ARBITRARILY. DO NOT INSERT FINGER, METAL PIN, OR ANY OTH-
ER ALIEN OBJECTS INTO THE GAP OR HOLE OF THE MAIN BODY.
It may lead to fire, electric shock, injury, or damage. Contact HUROM’s Customer Center
for product repair and inspection.
IF THE POWER CORD IS DAMAGED, PLEASE CONTACT OUR CUSTOMER CENTER
FOR INSPECTION. DO NOT ATTEMPT TO REPAIR OR ALTER THE CORD. It may lead
to fire, electric shock, and injury.
DO NOT WET THE MAIN BODY OR SPRAY WATER ON THE MAIN BODY.
Take cautions to ensure that the switch of the product does not come in contact with
water or other alien substances.
DO NOT OPERATE THE SWITCH WITH WET HANDS.
It may lead to electric shock and fire.
THE PRODUCT MUST BE GROUNDED FOR SAFETY. (MAKE SURE TO USE THE
OUTLET WITH GROUND CONNECTION.) ALSO, DO NOT GROUND TO GAS PIPE,
PLASTIC WATER PIPE, TELEPHONE LINE, AND SO FORTH.
It may lead to electric shock, fire, trouble, or explosion.
WHILE IN USE, DO NOT ATTEMPT TO DISASSEMBLE CHAMBER SET PARTS OR
PLACE ALIEN OBJECTS SUCH AS FINGER AND SPOON INTO THE INLET OR JUICE
OUTLET. It may lead to injury, accident, and trouble.
DO NOT USE THE PRODUCT WITHIN THE REACH OF CHILDREN.
Children must be advised not to play with this product. When the product is operated
improperly by children or falls as a result, it may lead to injury or damage.
THE PERSON WHO IS NOT FAMILIAR WITH THE PRODUCT SHALL NOT USE THE
PRODUCT BY HIMSELF OR HERSELF.
The person with physical impairment or psy-
chological issues or the person without sufficient knowledge and experience of the prod-
uct shall not use the product without another person for supervision.
DO NOT RUN THE PRODUCT WHEN THE CHAMBER CAP IS NOT FIT.
It may lead to injury or trouble.
Cautions for Safe Use

| 03
Cauon When violang the labeling requirement, it may cause serious injury or damage to the appliance.
NEVER OPERATE THE MACHINE WITHOUT PROPERLY ASSEMBLING THE
CHAMBER SET TO THE MAIN BODY. It may lead to injury or trouble.
WHEN THERE IS A LEAK IN THE GAS SUPPLY, DO NOT TOUCH THE POWER CORD
BUT OPEN THE WINDOWS FULLY FOR VENTILATION. If not, it may cause injury,
damage, or fire.
DO NOT INSERT A FINGER OR AN ALIEN SUBSTANCE INTO THE AUGER INSER-
TION. NEVER INSERT CHOPSTICK, SPOON, AND SO ON INTO THE JUICE/DREGS
OUTLET.
It may lead to injury or trouble.
WHEN INSERTING INGREDIENTS INTO THE INLET, DO NOT USE OBJECTS (CHOP-
STICK, SPOON, HARD OBJECT, ETC.) OTHER THAN THE PUSHER.
It may lead to
injury or trouble.
IF THE AUGER STOPS IN THE MIDDLE OF USE, PRESS AND HOLD THE [REV] BUT-
TON FOR 2~3 SECONDS TO RUN IN REVERSE DIRECTION AND THEN PRESS THE
[ON] BUTTON AGAIN. If the product stops in the middle of use continuously, it may lead
to part damage and performance degradation due to motor overheat. If the problem
persists, stop the product and contact our Customer Center.
WHEN IN USE, DO NOT MOVE THE MAIN BODY OR REMOVE OR FIT THE CHAM-
BERSETORPARTS.
It may lead to injury or trouble. Always stop the product and unplug
the power cord first.
MAKE SURE THE TIE, LONG NECKLACE, SCARF, ETC. IS NOT TUGGED INTO THE
INLET WHEN USING THE PRODUCT. It may lead to injury, trouble, or breakage.
USE THE PRODUCT ON A FLAT AND STABLE PLACE.
It may lead to injury or trouble.
DO NOT USE THE PRODUCT CONTINUOUSLY FOR OVER 20 MINUTES IN EACH
USE. Overheated motor can cause trouble. Wait until the product comes to a complete
stop and cool the motor sufficiently before you resume.
DO NOT GIVE SEVERE SHOCK TO THE PRODUCT OR DROP THE PRODUCT.
It may lead to electric shock, breakage, or fire..
WHEN YOU HEAR STRANGE SOUND, SENSE EXCESSIVE HEAT, OR DETECT
SMOKE, STOP USING THE PRODUCT IMMEDIATELY AND CONTACT OUR CUS-
TOMER CENTER. However, the smell you sense when you use the product for the first
time will naturally subside with time.
UNPLUG THE POWER CORD FROM THE OUTLET WHEN THE PRODUCT IS NOT IN
USE. UNPLUG THE CORD BY THE HEAD OF THE PLUG INSTEAD OF THE CABLE.
If
you pull the cable to unplug the cord, it may lead to injury, electric shock, or fire.
DO NOT CLEAN THE PRODUCT AT A HIGH TEMPERATURE ENVIRONMENT ABOVE
80°C. DO NOT PLACE THE PRODUCT IN THE DISHWASHER, DISH DRYER, OR MI-
CROWAVE OVEN.
It may cause trouble or deformation.
THE PRODUCT IS APPROXIMATELY 5KG. WHEN MOVING THE PRODUCT, HOLD
THE PRODUCT FIRMLY WITH BOTH HANDS.
If you hold it by the Chamber set only or
hold it inappropriately, the main body will fall and cause injury or trouble.
DO NOT USE PRODUCT BUILT FOR HOUSEHOLD FOR COMMERCIAL USE.
Extracting a large amount juice at once may lead to part damage. When you wish to use
the product commercially, please consult our Customer Center for proper use.

04 |
Cautions in Use
Ingredients that Require Caution and Preparing Each Ingredient
- When extracting a large amount of juice, repeat ‘Disassemble after
Extraction and Wash’ process after extracting 1 kg or so.
- If ingredients have withered after prolonged storage in the refrigerator,
soak them in mineral water for 10 minutes before extraction.
- When mincing dried ingredients, only use completely dried ingredients.
Pear, kiwi,
Korean melon,
apple, grape,
etc.
Watermelon,
pomegranate,
orange, grapefruit,
melon, lemon, etc.
Mango, persimmon,
peach, plum,
apricot, cherry, etc.
Water parsley,
cactus, wheatgrass,
etc.
Ginger, carrot,
dandelion,
potato,
deodeok, pine
needles, kudzu,
etc.
Pear, kiwi, korean melon, and so on can be inserted with
the seeds and peels intact. Note that the stalk end of
oriental melon is bitter, and apple seeds are toxic, so it is
recommended to remove them before extracting. For
grapes, separate grapes from the vine.
Remove the outer peel of the vegetables and fruits, cut
flesh into the size that fits the inlet. For pomegranate,
remove outer peel and only use the flesh with the seed.
Ingredients with seeds that cannot be chewed with teeth
should have the seeds removed.
If not, it will stop the product in use or cause part damage.
For vegetables with long and tough fibers, cut them to
3~4cm in length. Insert them by handful so that they are not
scattered.
For root vegetables, wash them in running water to remove
alien substances such as soil before use. For materials
containing a lot of fibers such as ginger, remove the peel,
cut them into thin slices, and insert little by little. For pine
needles, soak them in water for an hour and insert them
while wet.
The following ingredients are prohibited.
They can cause breakage and trouble of Chamber, auger, juicing stem,
and mincing stem.
(To nd out about extractability, please contact HUROM Customer Center
for detailed informaon.)
- Ingredients that are not extractable like sesame seeds, coffee beans, barks, etc.
- Ingredients that cannot be extracted due to their characteristics like oleasters,
aloe, and cactus.
- Fruits (e.g. grapes, raspberry, mulberry) or enzymes (e.g. angelica, wasong) that
are preserved in alcohol, honey, sugar, etc.
- Spices like pepper seeds, Chinese pepper, and cinnamon.
- Unsoaked grains like rice, wheat, and beans.
- Dried medicinal herbs, safflower, unpeeld acorns, dried shiitake, semisulcospira
libertina, crab shells.
- Extremely hard ingredients like frozen meat or frozen fish (slightly thaw frozen
ingredients before usage).
- Stone fruits with seeds that cannot be chewed with teeth (e.g. mango, cherry,
peach, plum, permisson). Always remove seeds from such ingredients before
usage.
Do not store extracted juice for a long time. We recommend that you
have the juice right after extracting.
Do not crush dry grains. Soak them in water thoroughly before use.
For soaked rice, glutinous rice, and so on, insert it in small amounts.
- If you insert it in large amounts, the product might stop for safety reasons.
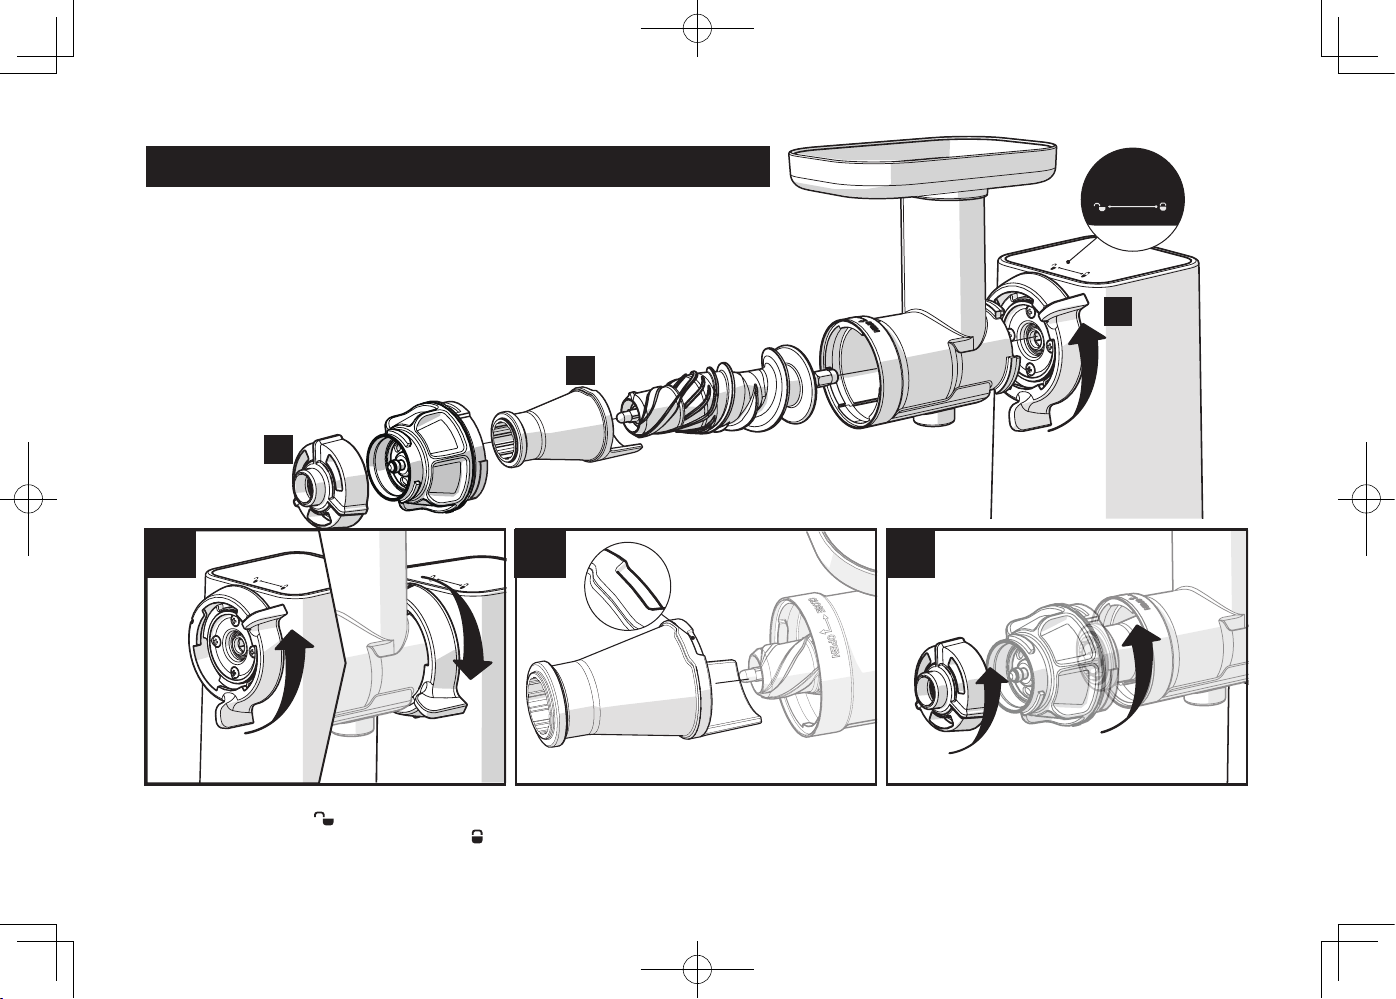
When using the mincing function, insert materials in small amounts.
- If not, the product might stop for safety reasons.
Do not re-extract the dregs from previous extraction.
When mincing meats, thaw the frozen meat slightly before use.
- You must remove pork rind, tendon, and bone. Slice the meat 1-2cm thick
and insert it piece by piece.
For raw meat, frozen the meat slightly before use.
(Freeze for about 1-2 hours, to the state where it is not too tough.)

| 05
I hear some sound from the Chamber set.
>>It can make louder than usual sound when crushing hard ingredients,
but this is normal. Use the product on a flat and stable place.
I am geng less juice than usual.
-Is the juicing stem blocked? Are the ingredients not fresh?
Did you put frozen vegetables or fruits?
>>The juicing stem can be blocked by ingredients. Wash and try again.
The extraction rate drops noticeably when you use vegetables and fruits
that are not fresh or frozen as it contains less moisture, and this may result
in thick juice.
The auger is not running.
-Did you put ingredients that you are not supposed to put in?
-Did you put too much ingredient or hard ingredient?
>>Press and hold the [REV] switch for 2~3 seconds, and then press the [ON]
switch. Repeat this process. If this does not make the auger run, stop the
product, disassemble the chamber set, wash, and resume.
-Did you put frozen meat or sh?
>>Slightly thaw frozen ingredients before usage.
Before Requesting for Repair
If dough is too thick, the machine may stop running.
In the event of kneading, insert extra when dough is invisible to the naked eye
because it is rolled in the mincing stem of the chamber set.
- Insert a small quantity of dough slowly. If a large quantity is inserted, the
machine may stop running.
Do not idle the product before inserting ingredients.
Do not use the product connuously for over 20 minutes in each use.
- Overheated motor can cause trouble.
Wait unl the product comes to a complete stop and the motor is
suciently cooled before use.
While in use, do not insert chopsck, spoon, and so on into the inlet,
juice outlet, and pulp outlet.
- Do not use objects other than the pusher to push in the ingredients.
(it can be stuck with the auger to cause breakage, injury, or trouble)
- Make sure the area around the switch does not come in contact with alien
substances. (it may lead to electric shock, electric leakage, and fire)
Do not push in a large amount of ingredients at once.
Check if the dregs are discharged smoothly during extracon and insert
small amounts each me.
- Inserting a large amount of materials at the same time can cause the
product to stop while it is in use or cause a failure.
Aer washing, dry the parts completely before storing.
- The exposure of the metal part of the chamber to salinity may lead to corrosion.
Please wash the parts in clean water instantly after use and dry thoroughly.
- High-hardness metal was used for enhanced performance. Negligence in properly
storing parts may cause corrosion. Store the parts carefully.
Before requesng for repair, check the following. About requesng
for repair services or any inquiry you may have while using the prod-
uct, please contact our Customer Center or homepage at hp://www.
globalhurom.com. Check the manufacturer’s number or barcode when
requesng for follow-up service or parts.

06 |
Nozzle
1 Parts and Assembly
Power Button
Locking Clip
Juice Outlet
Marking for
Locking on Main
Body
Inlet
Marking for
Locking Clip

| 07
01
03
05
09
02
04
06
10
11 -1
12
11
13
12
13
14
14
07
08
Pusher
Main body
Chamber
Auger
Mincing stem
Juicing stem
Chamber cap
Nozzle
Cylindrical nozzle
Flat noodle nozzle
Thick noodle nozzle
Thin noodle nozzle
Blade
Chamber packing
Blade stopper
Spare Blade stopper
Cleaning brush
Juice container
Pulp container
03
04
05
06
01
02
07
11
09
10
08
11 -1
08
Part Names

08 |
2
1
321
3
Assembling Parts to Use Extracting Function
Use thisfunctionto extract juice from fruitsand vegetables.
Juice is extracted through the juice outlet on the bottom
of the chamber and dregs, through the chamber cap.
Assemble chamber > auger > juicing stem >
chamber cap to the main body in respective order.
1. Turn the locking Clip of the main body
counterclockwise ( )to open, place
the chamber, and turn the locking Clip
( )clockwise to lock.
3. Turn the chamber cap counterclockwise
(CLOSE)to fit.
2. Assemble auger > juicing stem to the chamber
assembly in respective order. Place the auger
until its shaft completely fits into the main body.
Make sure the groove on the juicing stem faces up
when assembling the parts.

| 09
321
2
3
1
Assembling Parts to Use Mincing Function (mincing, kneading)
Use this function to mince food materials or make dough.
Minced ingredients or dough come out of the chamber
cap.
Assemble chamber > auger > mincing stem > chamber cap
to the main body in respective order.
*Aer using the mincing or kneading funcon,
disassemble and wash the parts periodically to
make sure the area between the blade and the
chamber cap is clear of any residue.
1. Turn the locking Clip of the main body
counterclockwise ( )to open, place
the chamber, and turn the locking Clip
( )clockwise to lock.
3. Turn the chamber cap counterclockwise
(CLOSE)to fit.
2. Assemble auger > mincing stem to the chamber
assembly in respective order. Place the auger until
its shaft completely fits into the main body.
Make sure the groove on the mincing stem faces
up when assembling the parts.

10 |
321
Assembling Parts to Use noodle making function (Assembly of nozzles)
Use when you make noodles after kneading.
As it is the same as the assembly of mincing function, attach a nozzle to the front of
the chamber cap. Noodles come out of the nozzle of the chamber cap.
Assemble chamber > auger > mincing stem > chamber cap > nozzle to the main body
in respective order.
* After using the noodle making function, disassemble and wash the parts periodically
to make sure the area between the blade and the chamber cap is clear of any residue.
1. Turn the locking Clip of the main body
counterclockwise ( )to open, place
the chamber, and turn the locking Clip ( )
clockwise to lock.
3. Turn the chamber cap counterclockwise
(CLOSE)to fit. Select a nozzle that is suitable
for the shape of a noodle you want to make
and connect it to the chamber cap.
2
1
2. Assemble auger > mincing stem to the chamber
assembly in respective order. Place the
auger until its shaft completely fits into
the main body. Make sure the groove on
the mincing stem faces up when
assembling the parts.
3

| 11
Instruction manual of each nozzle
Use when you make noodles after kneading.
(use of mincing function of dough)
The shape of a noodle differs depending on the shape
of the outlet of a nozzle.
Select a nozzle that is suitable for the shape of a noodle
you want to make.
Unless all parts are properly assembled, a nozzle may
be separated while the machine is running.
Turn a nozzle counterclockwise and assemble properly.
Cylindrical nozzle
The thickness of a noodle : less than 2 cm
stir-fried rice cake (Tteok-bokki), fish cake,
a meatballs, etc.
Flat noodle nozzle
The thickness of a noodle : less than 5 mm
noodle soup (Kalguksu), fettuccine,
tagliatelle, etc.
Thick noodle nozzle
The thickness of a noodle : less than 3 mm
udon, spaghetti, linguine, etc.
Thin noodle nozzle
The thickness of a noodle : less than 1.9 mm
plain noodles, buckwheat noodles,
capellini, etc.

12 | Nozzle
Juice Outlet
Marking for
Locking on
Chamber cap
Inlet
Locking Clip
2 Using Juicer

| 13
1 32
Use this function to extract juice from fruits and vegetables.
Extracting Juice
Place the dregs cup under the chamber cap and
juice cup, under the juice outlet.
Insert ingredients into the inlet and press [ON] button
on the back of the main body. Press the ingredients
down with the pusher to ease the insertion.
Dregs are discharged through the chamber cap
and the juice is extracted through the juice outlet on
the bottom of the chamber.

14 |
123
Use this function to mince food materials. (Insert ingredients in small amounts.)
Mincing
Place a dish under the chamber cap. Insert ingredients into the inlet and press [ON] button
on the back of the main body. Press the ingredients
down with the pusher to ease the insertion.
Minced materials will be discharged through the
chamber cap.

| 15
1 2 3 4
Use when you make noodles after kneading.
(After dough is rolled in a mincing stem, insert a little dough for good measure.)
Place a dish under the chamber cap.
Press [ON] button on the back of the
main body.
Insert dough by a spoonful.
After dough is rolled in a mincing stem,
insert a little dough for good measure.
Repeat the insert process 2 to 4 times.
Select a nozzle that is suitable for the
shape of a noodle you want to make
and connect it to the chamber cap.
Insert a loaf of the dough of
If noodles are re-inserted, this may
lead to the damage of the product
or its components. Re-insert 3 times
and less.
Making noodles
2

16 |
Nozzle
Chamber
Auger
Stem
3 Cleaning

| 17
1. Do not touch the product in operation or the power cord with wet hands. It involves the risk of product damage, electric shock, and injury.
2. Disassemble the chamber set after the product stops completely. The product will stop slowly for safety.
Any attempt to disassemble parts before the product comes to a complete stop may lead to injury or product damage.
3. Clean immediately after use.
Residues may dry and stuck on the parts and make it difficult to disassemble and clean or even deteriorate the performance.
4. Wipe the main body cleanly with the towel squeezed dry or soft cloth.
The product is not completely waterproof; please take cautions to prevent water from getting into the machine.
5. Do not attempt to clean the product with boiling water or by using hot temperature.
Do not use steel wool, abrasive, sink solvent, or sharp cleaning tools. Do not place the product in the dishwasher or dish dryer.
6. After washing, dry the parts completely before storing. The exposure of the metal part of the chamber to salinity may lead to corrosion.
Please wash the parts in clean water instantly after use and dry thoroughly.
7. Take cautions not to hurt your hands when washing the blade of the chamber cap.
Cautions in Cleaning

18 |
Cleaning
Wash the chamber set in water and wipe the main body
with the cloth squeezed dry.
1. If the locking clip of the main body is turned counterclockwise
( )
you can disassemble the chamber set from the main body.
2. Disassemble the chamber set in the reverse order of assembly.
3. Wash chamber cap, stem, auger, and chamber in running
water using cleaning brush.
(Each part of the chamber cap can be disassembly cleaned, so
please see the next page.)
4. Wipe the main body cleanly with the towel squeezed dry or
soft cloth.
After cleaning, dry the product off completely and keep it stored.
As it becomes corrosive if being exposed to moisture for a long
time, please be careful about cleaning and storage.

| 19
How to disassemble and clean each part
Press the blade shaft with hands to
disassemble stopper and blade.
If you lose the stopper, use the spare
attached to the bottom of the main body.
(when disassembling, be careful of not hurting
your hands. )
Augers are easily disassembled if you press a auger
spindle from the back of the chamber.
After cleaning disassembled parts, dry them off
completely and assemble.
1. Put blade inside blade and place the
stopper in front of the chamber cap.
2. When assembling the chamber cap
packing, make sure the wider side faces
outside. ( If they are assembled in the reverse
direction, juice may leak.)
1. The chamber cap is separable with a stopper, a chamber cap,
a chamber cap packing and a blade.
2. Clean it separately on a regular basis to prevent residues from
remaining between the blade and the chamber cap.
After cleaning, dry the product off completely and keep it
stored. As it becomes corrosive if being exposed to moisture
for a long time, please be careful about cleaning and storage.
3. Assemble the packing of the chamber cap in the right direction.
otherwise, juice may leak.
21
1 2

20 |
www.globalhurom.com | MADE IN KOREA
Copyright© All Rights Reserved by HUROM
Juice extractor
GI Series
230 - 240 V
50 Hz
150 W
64 rpm
1.4 m
Single-phase
induction motor
250 V 5 A
4.7 kg
Width 319mm
Length 161mm
Height 367mm
Less than
20 minutes
• Product name
• Model name
• Manufacture’s serial number
• Supplier
• Date of purchase
• Customer name
• Address
• Product Name
• Model Name
• Rated Voltage
• Rated Frequency
• Rated Power Consumption
• RP M
• Cord Length
• Motor
• Fuse
• Weight
• Outward Dimension
• Rated Operating Hour
Important: For beer protecon of your purchase, ll out
and mail this form to a local distributor where you pur-
chased the appliance and keep the original receipt.
This ceres that the Hurom Slow juicer is covered under
warranty by HUROM to be free from defects in
material construcon and workmanship.
Hurom provides warranty for one (1) year from the date of
purchase by the original purchaser. Coverage is valid only with
proof of purchase from an Authorized Local Distributor. (No
international warranty available)
This warranty does not apply to damages caused by accident,
misuse, abuse, commercial use, alteration, failure to follow
operating instructions, or damage caused by parts or service
unauthorized by HUROM . Damages caused by
transportation must be claimed with carrier. HUROM disclaims
all responsibilities for consequential damages from incidental
losses caused by use of this appliance.
Please check the boom of your Hurom product for a sck-
er with a barcode. This barcode scker helps verify a gen-
uine Hurom product and idenfy the product manufactur-
ing date. Hurom’s manufacturer’s warranty does not cover
products with missing or damaged barcode sckers.
Products are to be inspected upon receipt.
For service and assistance with technical diculty, please
contact our local Customer Service Center.
Warranty Customer informationProduct Specifications
Energy efficiency is low at high rated power consumption(W).
Other manuals for GI Series
1
Table of contents
Languages:
Other HUROM Kitchen Appliance manuals
Popular Kitchen Appliance manuals by other brands

Nemco
Nemco Easy Tomato Slicer 55600-2 Operating and maintenance instructions

AEG
AEG MWTK-60 quick start guide

Jumbuck
Jumbuck HS-CB007 Important safety instructions

Amica
Amica SMK 2015 user manual

Brentwood Appliances
Brentwood Appliances TS-120 Operating and safety instructions

Russell Hobbs
Russell Hobbs 21480-56 Instructions & recipes