Husky HOUC3101B12CA User manual

THANK YOU
USE AND CARE GUIDE
HUSKY 31 IN. 1-DRAWER MECHANICS TOOL CART
Questions, problems, missing parts?
Before returning to the store, call
Husky Customer Service
HUSKYTOOLS.COM
We appreciate the trust and confidence you have placed in Husky through the purchase of this cart. We strive to continually
create quality products designed to enhance your home. Visit us online to see our full line of products available for your home
improvement needs. Thank you for choosing Husky!
Model#HOUC3101B12CA
Sku#0000 000 000
1-888-HD-HUSKY
8 a.m. - 7 p.m., EST, Monday-Friday,
9 a.m. - 6 p.m., EST, Saturday

2
Table of Contents
Table of Contents.....................................................................2
Safety Information...................................................................2
Warranty.......................................................................................3
Pre-Assembly............................................................................4
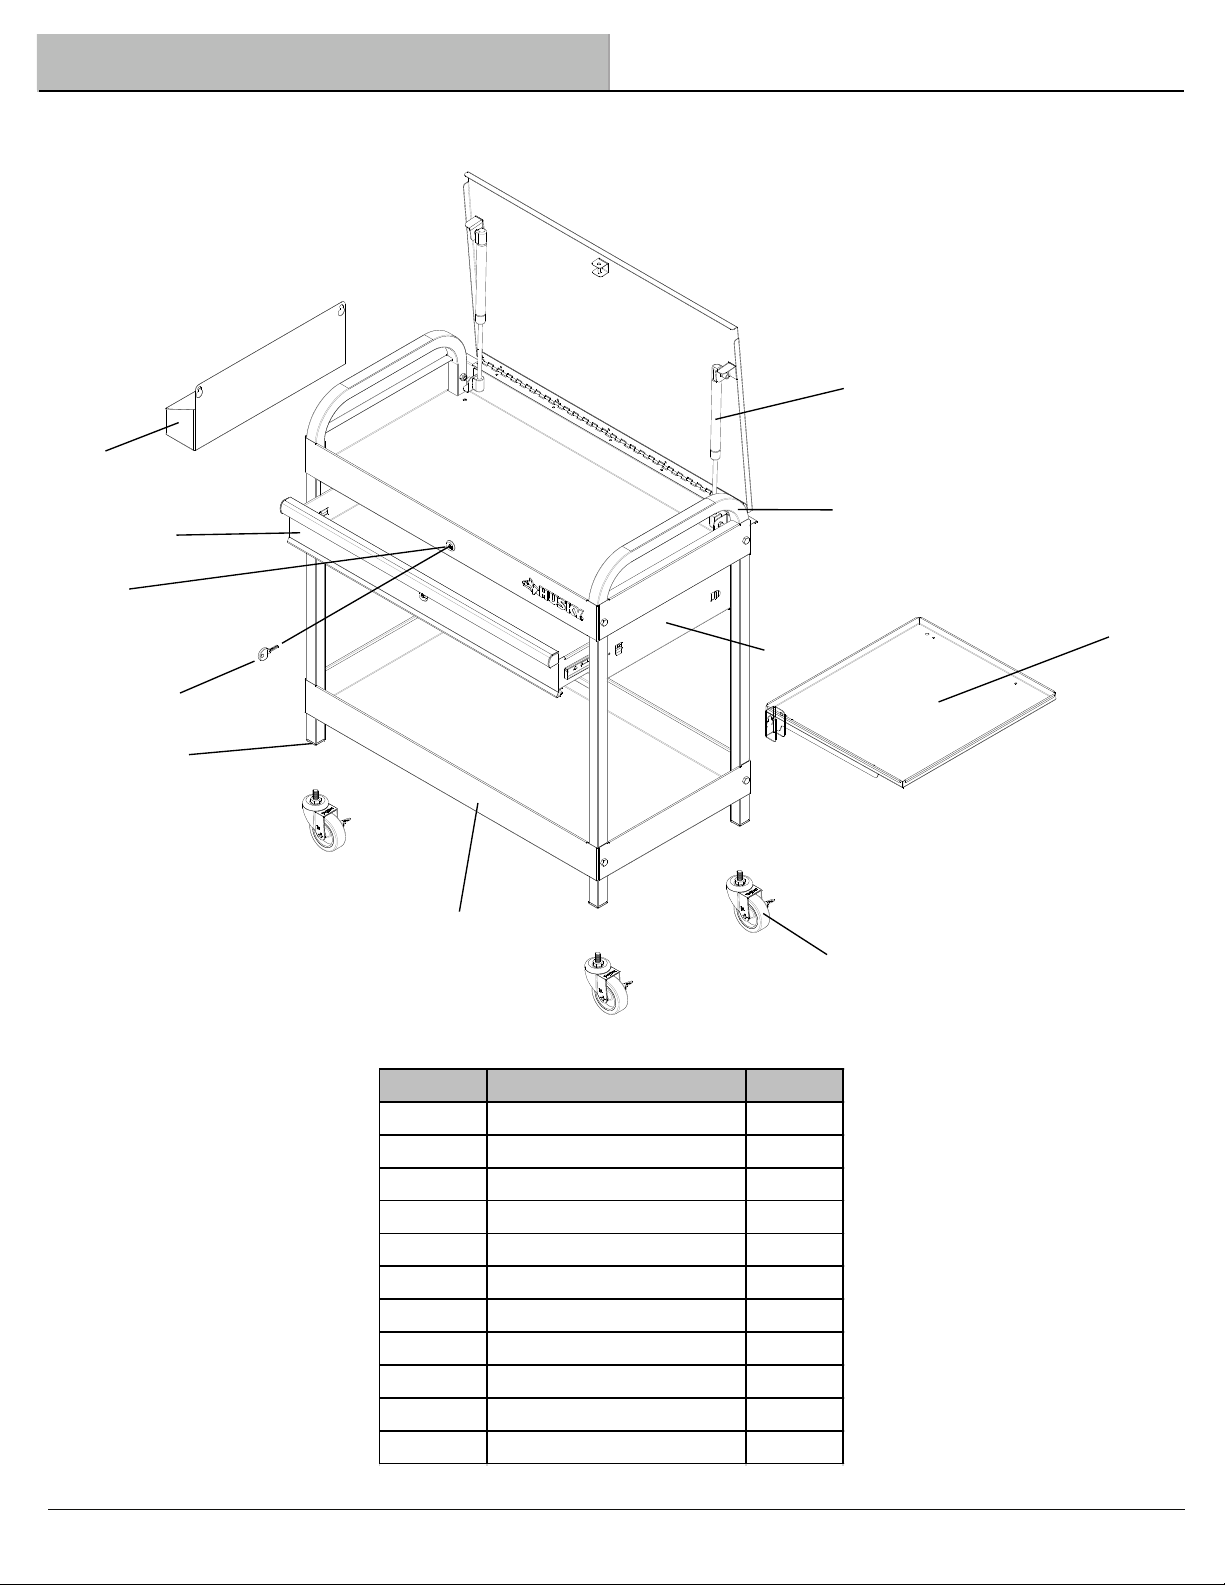
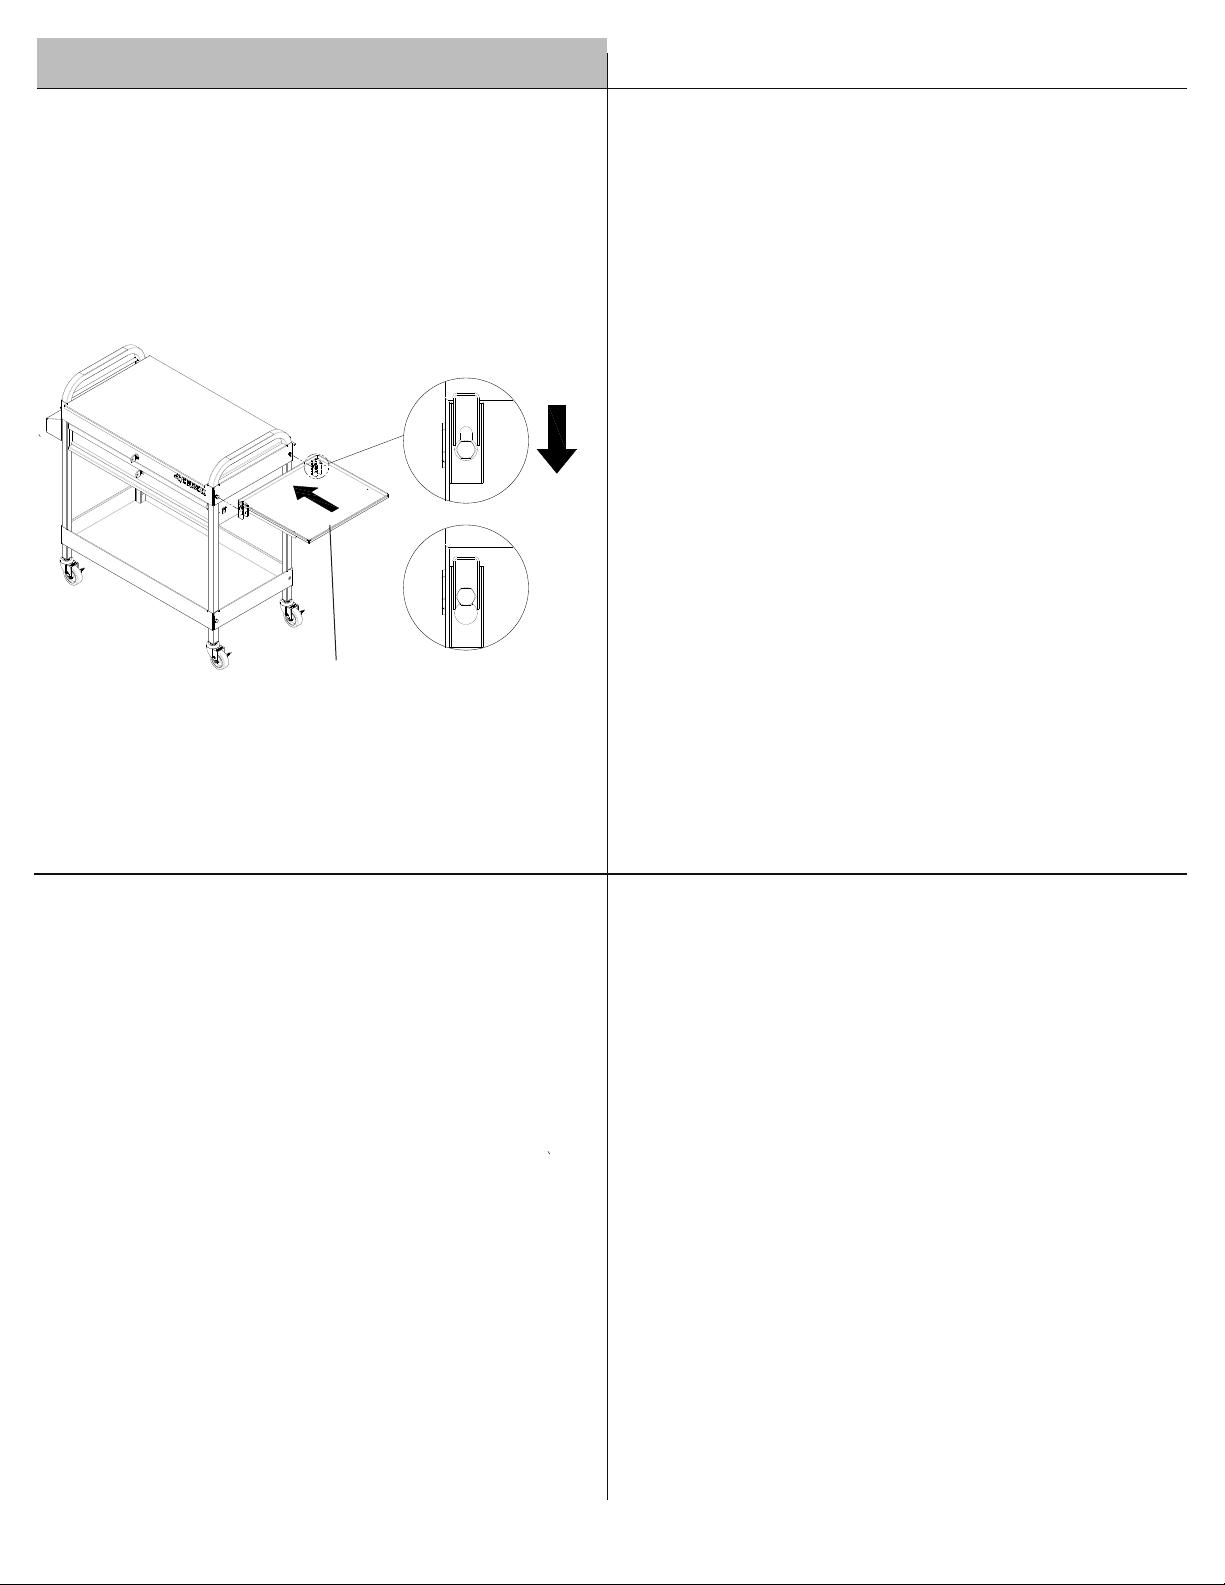
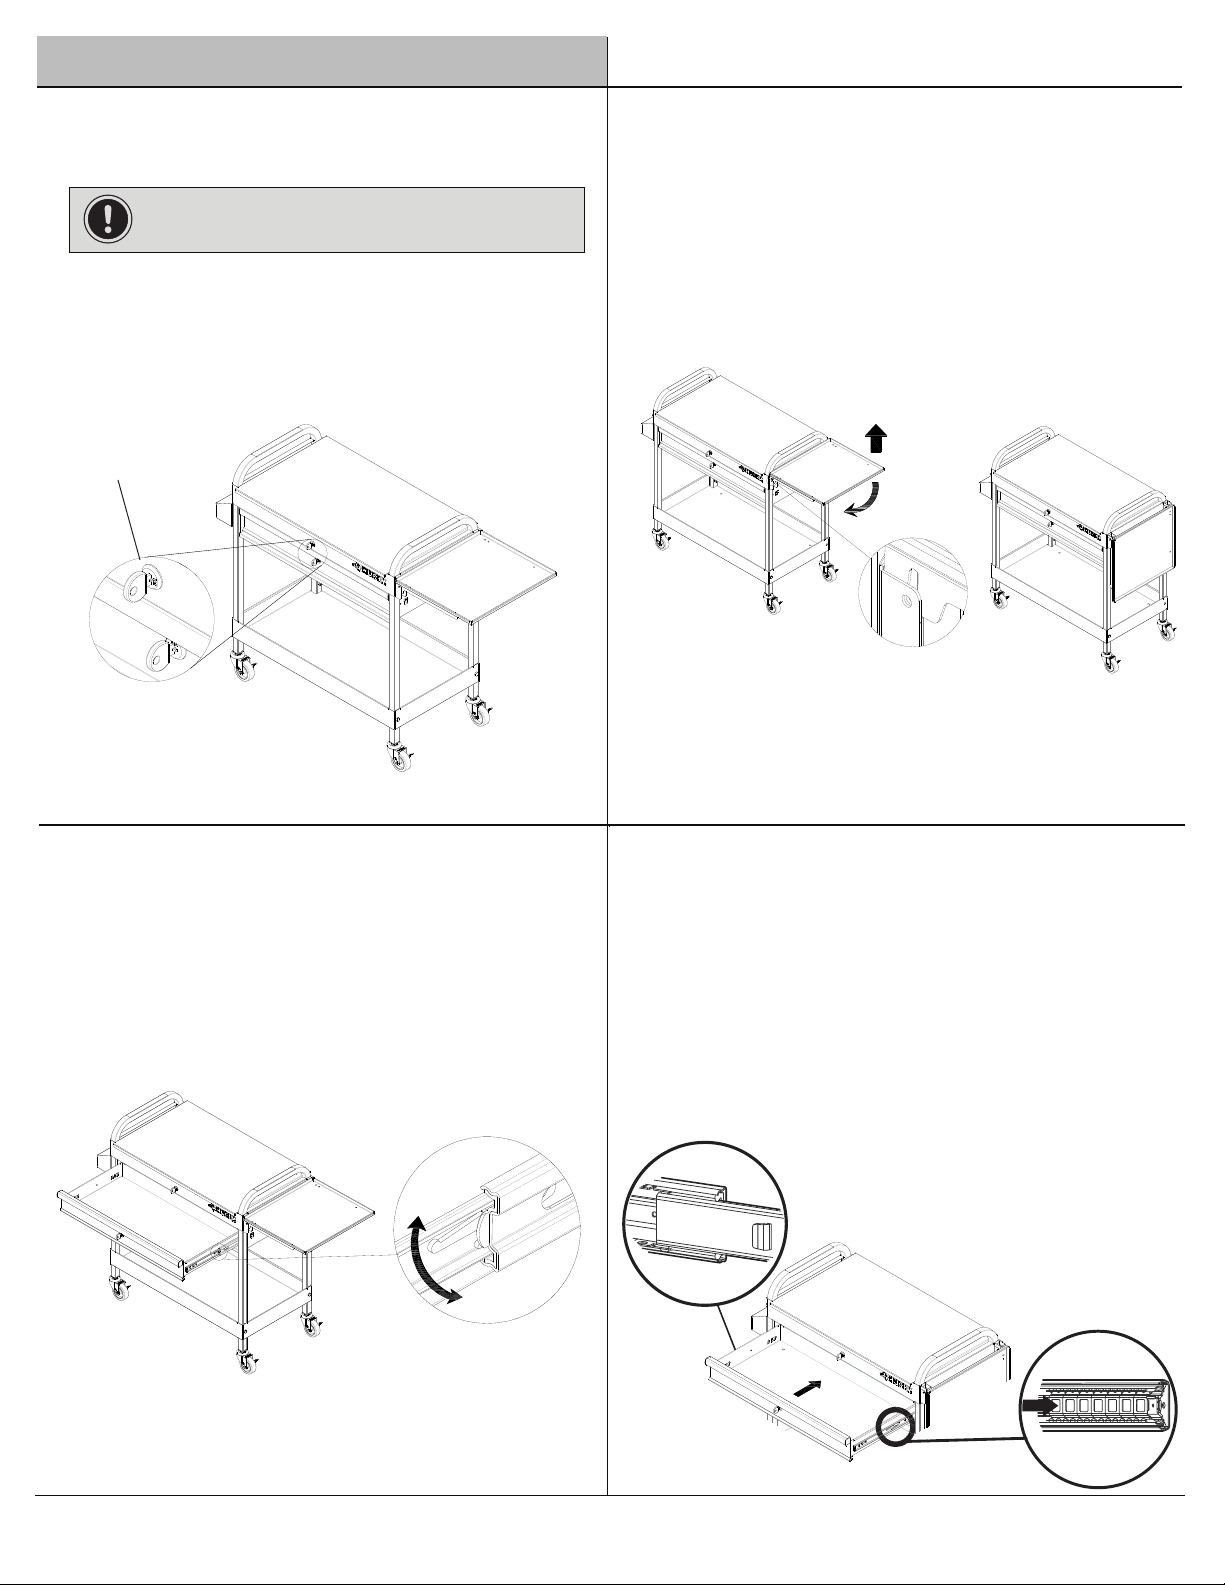
Assembly............................................................................6
Operation...........................................................................8
Maintenance.....................................................................9
Safety Information
DANGER: Do not stand on this product. You may
fall or cause the product to tip.
DANGER: Do not move the product prior to
closing and locking all the drawers. The drawers
could come open and make the product unstable
DANGER: Do not mount this product on a truck
bed or any other moving object.
WARNING:
CAUTION: Do not lift this product directly with a
forklift or tow with any mechanical devices.
CAUTION: Do not exceed the maximum product
weight, including contents. Do not exceed the
maximum weight for each drawer.
See Specifications on page 4.
CAUTION: Only transport this product when empty.
Properly secure when transporting.
Care and Cleaning..........................................................9
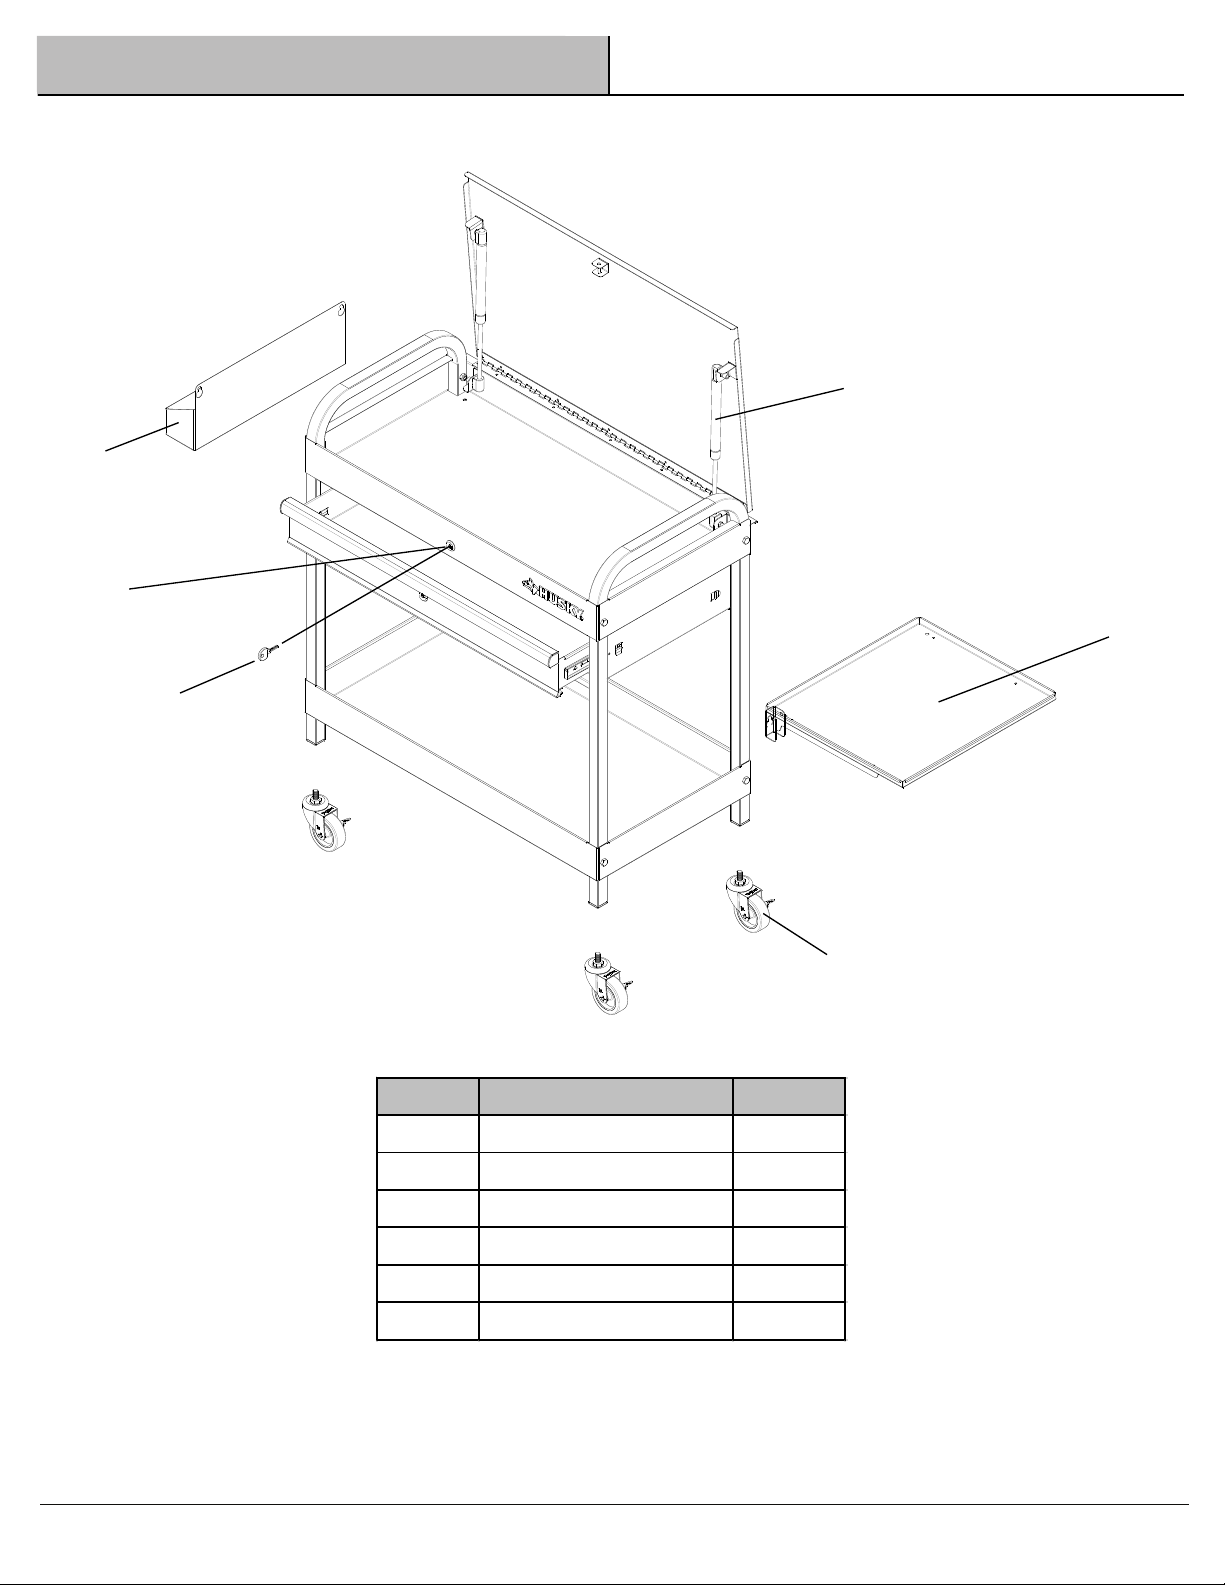
Service Parts....................................................................10
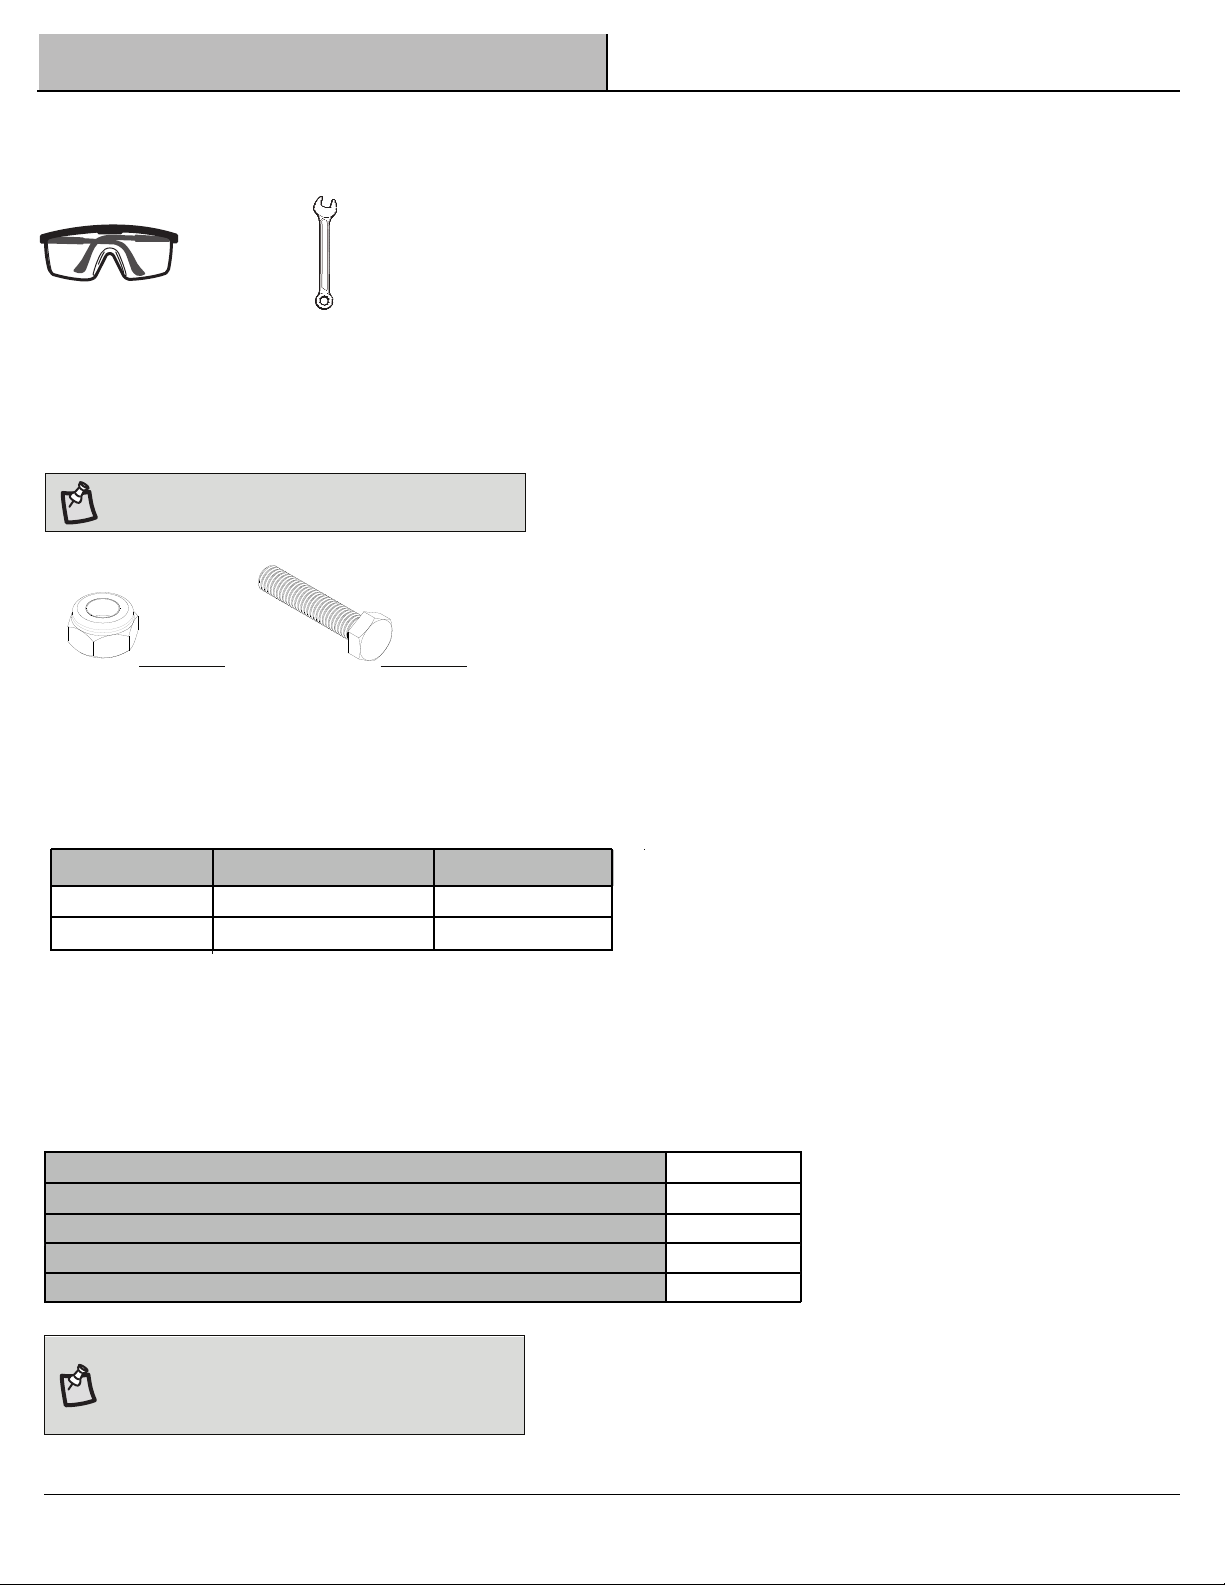
Tools Required...........................................................................4
Hardware Included....................................................................4
Specifications............................................................................4
Package Contents......................................................................5
DANGER:
Do not open more than one drawer at a time.
CAUTION:
Do not let children approach the tool cart.
Keep the locking caster brakes set unless
you are moving the cart. This will help to prevent the
product from rolling.
DANGER:
Do not pull the tool cart, push it when moving.
CAUTION:Do not alter this product in any manner as it
DANGER:Do not step in the tray.
will void the warranty.
WARNING:Keep the product on a level surface.
The product may become unstable and tip if
stored or moved on an uneven surface.
and tip.

Warranty
The manufacturer warrants the product to be free from defects in materials and workmanship for a period of three (3) years from date of
purchase. This warranty applies only to the original consumer and only to products used in normal use and service. If this product is
found to be defective, the manufacturer’s only obligation, and your exclusive remedy, is the repair or replacement of the product at the
manufacturer’s discretion, provided that the product has not been damaged through misuse, abuse, accident, modifications, alteration
neglect or mishandling. This warranty shall not apply to any product that is found to have been improperly installed, set-up, or used in
any way not in accordance with the instructions supplied with the product. This warranty shall not apply to a failure of the product
as a result of an accident, misuse, abuse, negligence, alteration, faulty installation, or any other failure not relating to faulty material or
workmanship. This warranty shall not apply to the finish on any portion of the products such as surface and/or weathering, as this is
considered normal wear and tear.
The manufacturer does not warrant and specifically disclaims any warranty, whether express or implied, of fitness for a particular purpose,
other than the warranty contained herein. The manufacturer specifically disclaims any liability and shall not be liable for any consequential
or incidental loss or damage, including but not limited to any labor/expense costs involved in the replacement or repair of said product.
Contact the Customer Service Team at 1-888-HD-HUSKY or visit www.huskytools.com.
3
HUSKYTOOLS.COM
Pleas e contact 1-888-HD-HUSK Y fo r furthe r assistanc.e

Pre-Assembly
4
TOOLS REQUIRED
Safety
goggles
13 mm
Wrench
HARDWARE INCLUDED
NOTE: Hardware not shown to actual size.
SPECIFICATIONS
Maximum capacity (per drawer) 100 lbs.
NOTE: Begin product assembly close to the final
intended location of your tool cart. This product is
heavy and may be difficult to move after assembly.
Bottom tray 100 lbs.
Extended side table 60 lbs.
Bottle/can tray 40 lbs.
AA
BB
Part Description Quantity
AA
BB
8
Bolt M8x40L
8
Nut M8
Maximum loading capacity 300 lbs.

Pre-Assembly (continued)
PACKAGE CONTENTS
5
HUSKYTOOLS.COM
Pleas e contact 1-888-HD-HUSK Y fo r furthe r assistanc.e
DC
A
B
H
J
E
F
G
I
K
Part Description Quantity
A Gas lift 2
B Legs 2
C Extendable side table 1
D Cabinet 1
E Swivel caster with brake 4
F Bottom tray 1
G Plug 4
H Bottle/Can tray 1
I Drawer 1
J Lock 2
K Keys (set) 2

Assembly
3
6
Installing the legs
1
Installing the bottom tray
2
□ Insert the legs (B) into the bottom tray (F) until the pre-drilled
Installing the casters
B
D
CAUTION: Do not over tighten the casters.
E
B
□
□
Screw the four swivel casters (E) all the way into the legs (B)
to the maximum depth.
WARNING:At least two people are needed for this step.
are aligned.
BB
nuts (AA). Finger tighten only.
□ Attach the legs (B) to the cabinet (D) by using four bolts (BB) and
and nuts (AA).
□ Attach the bottom tray (F) to the leg (B) by using four bolts (BB)
4
Installing the bottle/can tray
H
□ Clip the bottle/can tray (H) to the bolts on the left side of the
Tighten all bolts with a 13 mm wrench.
□ Insert the legs (B) into the cabinet (D) until the pre-drilled holes
□ Lay the cabinet (D) on its back. Use the the packaging material
to protect the finish.
□ Ensure the cabinet drawer is securely locked into place using
the key lock on the cabinet (D).
holes are aligned.
□ Tighten all bolts securely with a 13 mm wrench.
Return the cabinet (B) to its upright position.
□
AA
F
BB
B
AA
cabinet.

Assembly (continued)
7
HUSKYTOOLS.COM
Pleas e contact 1-888-HD-HUSK Y fo r furthe r assistanc.e
5
Attaching the side table
□ Tighten all bolts with a 13 mm wrench.
C
□ Clip the side table (C) to the bolts on the right side of the cabinet.

Operation
Lifting/Lowering extendable side table
1 Locking and unlocking the lid
IMPORTANT: The key will only lock the top lid and does
□ Insert the key (K) into the lock and turn one quarter turn
□ Remove the key (K).
□ Insert the key (K) into the lock and turn one quarter turn
□ Remove the key (K).
8
K
clockwise to unlock.
counterclockwise to lock.
2
not lock the drawers. See step 2 for securing the drawers.
□ Lift the extendable side table to raise into position and push it
□ Lower the extendable side table when not in use. Pull it up first
down. Make sure it is locked to the mechanism properly.
and let it down slowly.
Installing the drawers
□ Pull the slides and slide carrier out until fully extended.
□ Hold the slide on the cabinet while aligning it with
the slide on the drawer.
□
□ Slowly push the drawer until it is fully closed to
engage the slide.
□ Open the drawer and close it to verify proper
operation.
Slightly insert one side and repeat for the other side.
4
3Removing the drawers
□ Fully extend and empty the drawer.
□ Depending on the slide, either lift or lower the release
lever on both sides so the slides can ride over.
Pull out to remove.

Maintenance
1
Maintaining the casters 2 Maintaining the drawers
□ Grease the casters annually using high quality
bearing grease.
9
□ Periodically clean the drawer trim and inside
the drawers with a mild detergent and water.
□ Remove grease and oil with a standard,
nonflammable cleaning fluid.
□ The use of drawer liners is recommended to protect
the finish inside the drawers and make the drawers
easier to clean. Drawer liners can be purchased at
The Home Depot and can be cleaned with soap
□ Lubricate the slides semi-annually with grease or
equivalent.
□
This steel product has been coated with industrial powder coating
Care and Cleaning
□
To help protect the powder coated finish, do not allow harsh
□
®
Use a glass cleaner (Windex or equivalent product) to clean and
chemicals (oil, grease, or other chemical) to remain on the powder
and water.
for a durable finish.
coating surface.
maintain all surfaces of powder coating.
HUSKYTOOLS.COM
Pleas e contact 1-888-HD-HUSK Y fo r furthe r assistanc.e

Service Parts
10
C
A
H
J
E
K
Part Description Quantity
A Gas lift 2
C Extendable side table 1
E Swivel caster with brake 4
J Lock 2
K Keys (set) 2
H Bottle/can tray 1

Questions, problems, missing parts? Before returning to the store, call
Husky Customer Service
8 a.m.-7 p.m., EST, Monday-Friday, 9 a.m. - 6 p.m., EST, Saturday
1-888-HD-HUSKY
HUSKYTOOLS.COM
Retain this manual for future use.

Sku#0000 000 000
Modelo#HOUC3101B12
GUÍA DE USO Y MANTENIMIENTO
CARRO PARA HERRAMIENTAS DE 1 CAJÓN PARA MECÁNICO HUSKY, DE 78.7 CM
¿Preguntas, problemas o piezas faltantes?
Antes de regresar a la tienda, llama al Servicio al Cliente de Husky
de lunes a viernes entre 8:00a.m. y 7:00 p.m., (Hora Estándar del Este) y los
sábados entre 9:00 a.m. y 6:00p.m. (Hora Estándar del Este)
1-888-HD-HUSKY
HUSKYTOOLS.COM
GRACIAS POR TU COMPRA
Apreciamos la confianza que has depositado en Husky al comprar este carrito. Nos esforzamos
para continuamente crear productos de calidad diseñados para mejorar tu hogar. Visítanos por Internet para ver
nuestra línea completa de productos disponibles para las necesidades de mejoras para tu hogar ¡Gracias por elegir Husky!

2
Tabla de contenido
Información de seguridad
Tabla de contenido .............................. 2
Información de seguridad .............................. 2
Garantía .............................. 3
Pre-ensamblaje .............................. 4
Herramientas necesarias .............................. 4
Herrajes incluidos ............................. 4
Especificaciones .............................. 4
Contenido del paquete .............................. 5
Ensamblaje .............................. 6
Funcionamiento .............................. 8
Mantenimiento ............................. 9
Cuidado y limpieza ............................. 9
Piezas de repuesto ............................. 10
PRECAUCIÓN: Mantén a los niños lejos del carro de
herramientas.
ADVERTENCIA: Mantén bloqueados los frenos de las
ruedas, excepto si vas a mover el carro. Esto ayudará a
evitar que el producto ruede.
PELIGRO: No te pares sobre la bandeja.
PELIGRO: No hales el carro de herramientas;
empújalo para moverlo.
PELIGRO: No abras más de un cajón a la vez.
PRECAUCIÓN: No modifiques este producto de
ninguna manera, pues esto anulará la garantía.
PELIGRO: No te pares sobre este producto. Puedes
caerte o provocar que el producto se vuelque.
PELIGRO: No muevas el producto antes de cerrar y
asegurar todos los cajones. Los cajones pueden
abrirse y provocar que el producto quede inestable y
se vuelque.
ADVERTENCIA: Mantén el producto sobre una
superficie nivelada. El producto puede volverse
inestable y volcarse si se almacena o desplaza sobre
una superficie desnivelada.
ADVERTENCIA: Mantén el producto sobre una
superficie nivelada. El producto puede volverse
inestable y volcarse si se almacena o desplaza sobre
una superficie desnivelada.
PELIGRO: No montes este producto en la cama de un
camión o sobre cualquier otro objeto en movimiento.
PRECAUCIÓN: No sobrepases el peso máximo
permitido para el producto, incluyendo el contenido.
No sobrepases el peso máximo para cada
cajón.Consulta las especificaciones en la página 4.
PRECAUCIÓN: Transporta este producto sólo cuando
esté vacío. Asegúralo debidamente cuando vayas a
transportarlo.

Garantía
3
El fabricante garantiza que este producto no presentará defectos materiales ni de fabricación durante tres (3) años a partir de la fecha
original de compra. Esta garantía es válida solo para el consumidor original y cubre solo productos en uso y servicio normales. Si se
detecta algún defecto en este producto, la única obligación y solución exclusiva del fabricante, a su entera discreción, será reparar o
reponer el producto, siempre y cuando el producto no haya sido dañado por mal uso, abuso, accidente, modificaciones, alteraciones,
negligencia o manejo indebido. Esta garantía no se aplicará a ningún producto que se detecte mal instalado, mal-montado, o usado de
cualquier forma sin cumplir las instrucciones adjuntas. Esta garantía no cubre fallas del producto por causa de accidente, mal uso,
abuso, negligencia, modificaciones o instalaciones defectuosas, ni cualquier otra falla no relacionada con defectos materiales o de
fabricación. Esta garantía no se aplica al acabado de ninguna parte del producto, como la superficie, y/o deterioro, que se considera
normal por el uso.
El fabricante no garantiza y rechaza específicamente cualquier garantía, explícita o implícita, de la idoneidad del producto para un
propósito en particular, que no sea la garantía establecida por este medio. El fabricante rechaza específicamente cualquier obligación y
no será responsable por ningún daño o pérdida, directos o indirectos, incluyendo, pero sin limitarse a, cualquier costo de mano de
obra/gastos relacionados con la reposición o reparación de dicho producto.
Comuníquese con el Equipo de Servicio al Cliente por el 1-888-HD-HUSKY o visite www.huskytools.com
HUSKYTOOLS.COM
Para más asistencia, llama al 1-888-HD-HUSKY

Pre-ensamblaje
4
HERRAMIENTAS
HERRAJES INCLUIDOS
ESPECIFICACION
Capacidad máxima (por cajón) 45.4 kg
Bandeja inferior 45.4 kg
Mesa lateral extendida 27.2 kg
Bandeja para botellas/latas 18.1 kg
AA
BB
Pieza Descripción Cantida
AA
BB
8
Perno M8x40L
8
Tuerca M8
Capacidad máxima de carga 136.1 kg
Gafas de
seguridad
Llave de
13 mm
NOTA: No se muestra el tamaño real de los herrajes.
NOTA: Comienza a ensamblar el producto cerca de la ubicación final deseada
de tu carrito de herramientas. Este producto es pesado y puede ser difícil de
mover después de ensamblarlo.

Pre-ensamblaje (continuación)
CONTENIDO DEL PAQUETE
5
DC
A
B
H
J
E
F
G
I
K
Pieza Descripción Cantidad
A Alzador neumático 2
B Patas 2
C Mesa lateral extensible 1
D Gabinete 1
E Rueda giratoria con freno 4
F Bandeja inferior 1
G Conector 4
H Bandeja para botellas/latas 1
I Cajón 1
J Cerradura 2
K Llaves (juego) 2
HUSKYTOOLS.COM
Para más asistencia, llama al 1-888-HD-HUSKY

Ensamblaje
3
6
Cómo instalar las patas
1
Cómo instalar la bandeja inferior
2
Cómo instalar las ruedas
B
D
E
B
BB
4
Cómo instalar la bandeja para botellas/latas
H
AA
F
BB
B
AA
ADVERTENCIA: Se necesitan al menos dos personas
para este paso.
□ Asegúrate de que el cajón del gabinete esté bien cerrado en
su lugar usando la cerradura con llave del gabinete (D).
□ Acuesta el gabinete (D) sobre su parte trasera. Usa el
material del empaque para proteger el acabado.
□ Inserta las patas (B) en el gabinete (D) hasta que los
orificios pretaladrados estén alineados.
□ Fija las patas (B) al gabinete (D) usando cuatro pernos (BB)
y tuercas (AA). Aprieta sólo con los dedos.
PRECAUCIÓN: No aprietes demasiado los ruedas.
□ Enrosca las cuatro ruedas giratorias (E) en la patas (B)
hasta la profundidad máxima.
□ Coloca nuevamente el gabinete (B) en posición vertical.
□ Inserta las patas (B) en la bandeja inferior (F) hasta que los
orificios pretaladrados estén alineados.
□ Fija la bandeja inferior (F) a las patas (B) usando cuatro
pernos (BB) y tuercas (AA).
□ Aprieta bien todos los pernos con una llave de 13 mm.
□ Sujeta la bandeja para botellas/latas (H) a los pernos del
lado izquierdo del gabinete.
□ Aprieta todos los pernos con una llave de 13 mm.

Ensamblaje (continuación)
7
5
Cómo fijar la mesa lateral
C
□ Sujeta la mesa lateral (C) a los pernos del lado derecho del
gabinete.
□ Aprieta todos los pernos con una llave de 13 mm.
HUSKYTOOLS.COM
Para más asistencia, llama al 1-888-HD-HUSKY

Funcionamiento
Cómo levantar/bajar la mesa lateral extensible
1 Cómo cerrar y abrir la tapa
8
K
2
Cómo instalar los cajones
4
3Cómo quitar los cajones
IMPORTANTE: La llave sólo sirve para cerrar la tapa, no
los cajones. Consulta el Paso 2 para asegurar los
cajones.
□ Inserta la llave (K) en la cerradura y gírala un cuarto de
vuelta hacia la izquierda para cerrar.
□ Retira la llave (K).
□ Inserta la llave (K) en la cerradura y gírala un cuarto de
vuelta hacia la derecha para abrir.
□ Retira la llave (K).
□ Extiende completamente el cajón y vacíalo.
□ Dependiendo de la corredera, levanta o baja la palanca de
liberación en ambos lados para que las correderas pasen
por encima de los topes. Hala hacia afuera para retirar.
□ Levanta la mesa lateral extensible para elevarla a su
posición y empújala hacia abajo. Comprueba que está bien
asegurada al mecanismo.
□ Baja la mesa lateral extensible cuando no esté en uso.
Primero hálala hacia arriba y después bájala lentamente.
□ Hala las correderas y el sujetador de ellas hacia afuera
hasta que queden completamente extendidas.
□ Sostén la corredera en el gabinete mientras la alineas con
la corredera en el cajón.
□ Inserta un lado ligeramente y repite para el otro lado.
□ Empuja lentamente el cajón hasta que esté completamente
cerrado y enganche en la corredera.
□ Abre el cajón y ciérralo para verificar que funcione
correctamente.

Mantenimiento
1
Cómo dar mantenimiento a las ruedas 2
Cómo dar mantenimiento a los cajones
9
Cuidado y limpieza
□ Engrasa las ruedas anualmente con grasa de alta calidad
para cojinetes de bola.
□ Este producto de acero ha sido revestido con cubierta
granular industrial para un acabado duradero.
□ Para ayudar a proteger el acabado pulvirrevestido, no
permitas que haya productos químicos agresivos (aceite,
grasa u otros) en la superficie pulvirrevestida.
□ Usa un limpiador de vidrio (Windex® o producto
equivalente) para limpiar y dar mantenimiento a todas las
superficies pulvirrevestidas.
□ Limpia periódicamente la moldura del cajón y su interior
con un detergente suave y agua.
□ Quita la grasa y el aceite con un fluido de limpieza estándar
no inflamable.
□ Se recomienda usar revestimientos de cajones para
proteger el acabado dentro de ellos y facilitar su limpieza.
Los revestimientos de cajones pueden comprarse en The
Home Depot y limpiarse con agua y jabón.
□ Lubrica las correderas de los cajones dos veces al año con
grasa o un equivalente.
HUSKYTOOLS.COM
Para más asistencia, llama al 1-888-HD-HUSKY
Table of contents
Languages:
Other Husky Outdoor Cart manuals