Husky HOUC3304B10 User manual

THANK YOU
USE AND CARE GUIDE
HUSKY 33 IN. 4-DRAWER MECHANICS TOOL CART
Questions, problems, missing parts?
Before returning to the store, call
Husky Customer Service
HUSKYTOOLS.COM
We appreciate the trust and confidence you have placed in Husky through the purchase of this cart. We strive to continually
create quality products designed to enhance your home. Visit us online to see our full line of products available for your home
improvement needs. Thank you for choosing Husky!
Model#HOUC3304B10
SKU#1001 348 108
1-888-43-HUSKY
8 a.m. - 7 p.m., EST, Monday-Friday,
9 a.m. - 6 p.m., EST, Saturday
THD.com#1001 288 352

2
Table of Contents
Table of Contents.....................................................................2
Safety Information...................................................................2
Warranty.......................................................................................3
Pre-Assembly............................................................................4
Assembly............................................................................6
Operation...........................................................................8
Maintenance.....................................................................9
Safety Information
DANGER: Do not stand on this product. You may
fall or cause the product to tip.
DANGER: Do not move the product prior to closing
and locking all the drawers. The drawers could come
open and make the product unstable and tip.
DANGER: Do not mount this product on a truck
bed or any other moving object.
WARNING:
CAUTION: Do not lift this product directly with a
forklift or tow with any mechanical devices.
CAUTION: Do not exceed the maximum product
weight, including contents. Do not exceed the
maximum weight for each drawer.
See Specifications on page 4.
CAUTION: Only transport this product when empty.
Properly secure when transporting.
Care and Cleaning..........................................................9
Service Parts....................................................................10
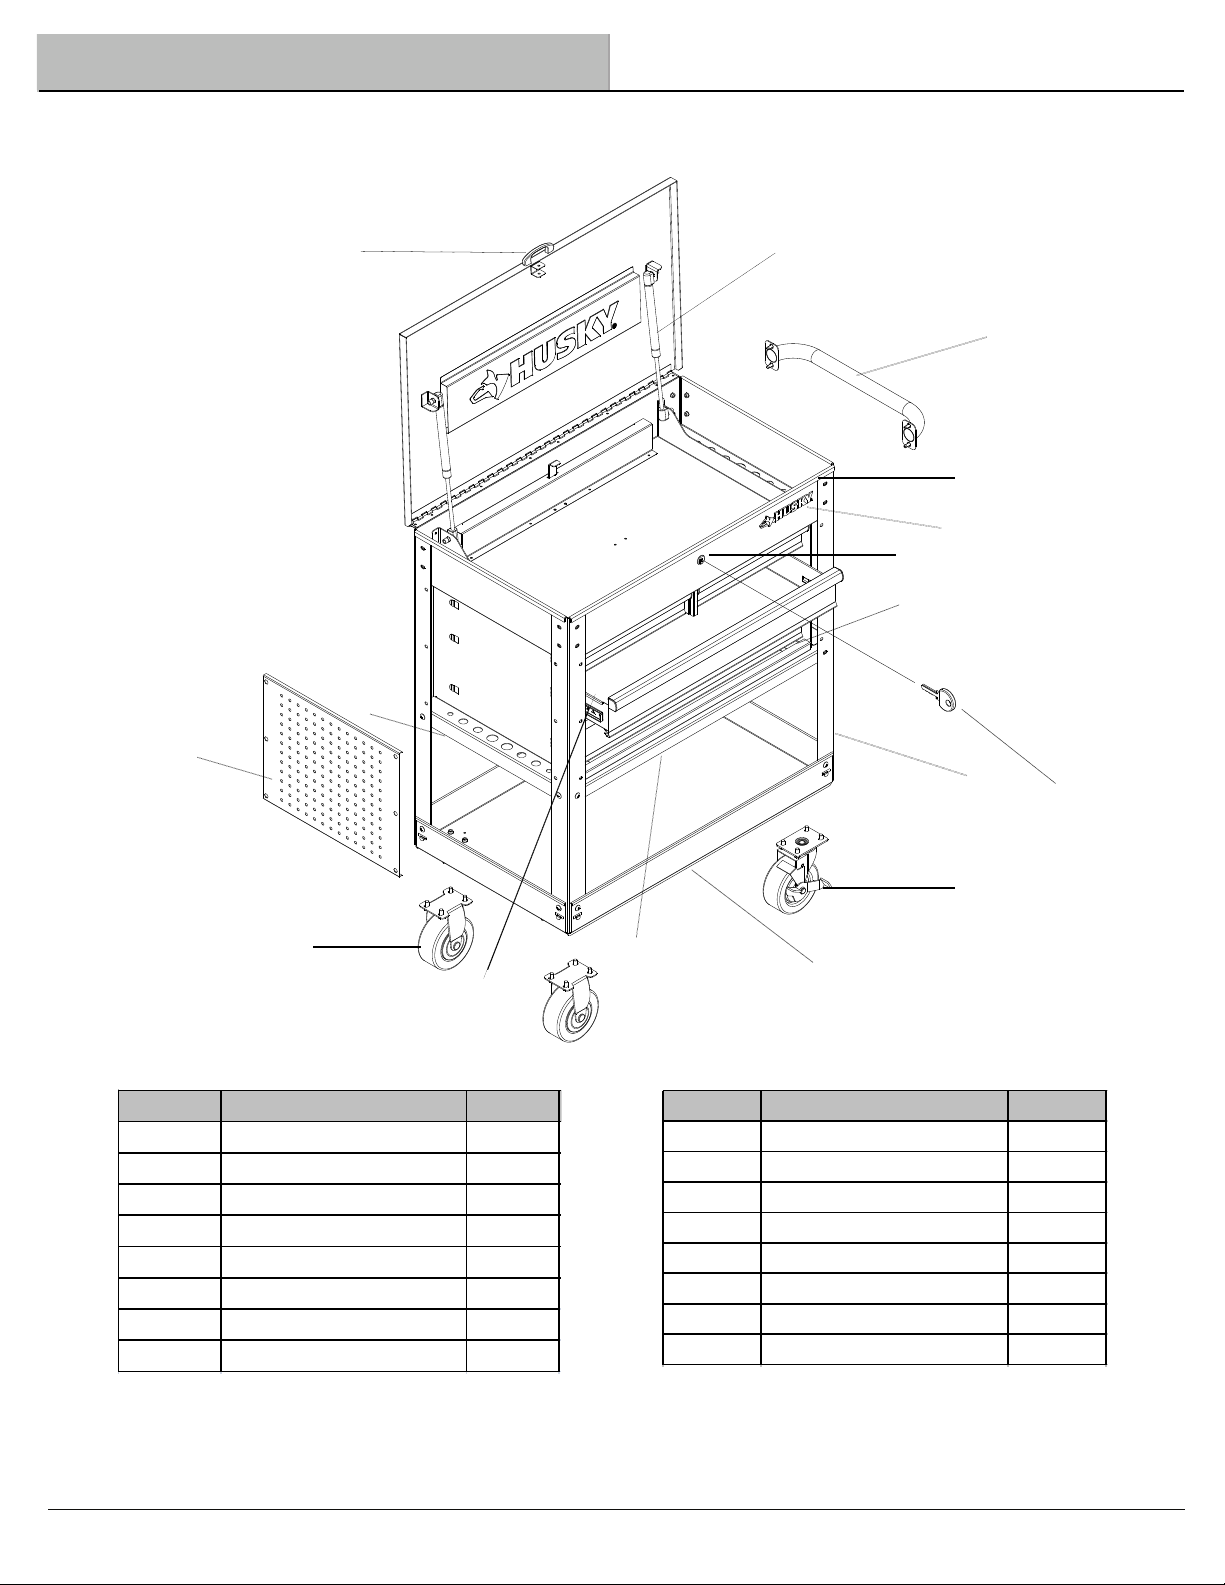
Tools Required...........................................................................4
Hardware Included....................................................................4
Specifications............................................................................4
Package Contents......................................................................5
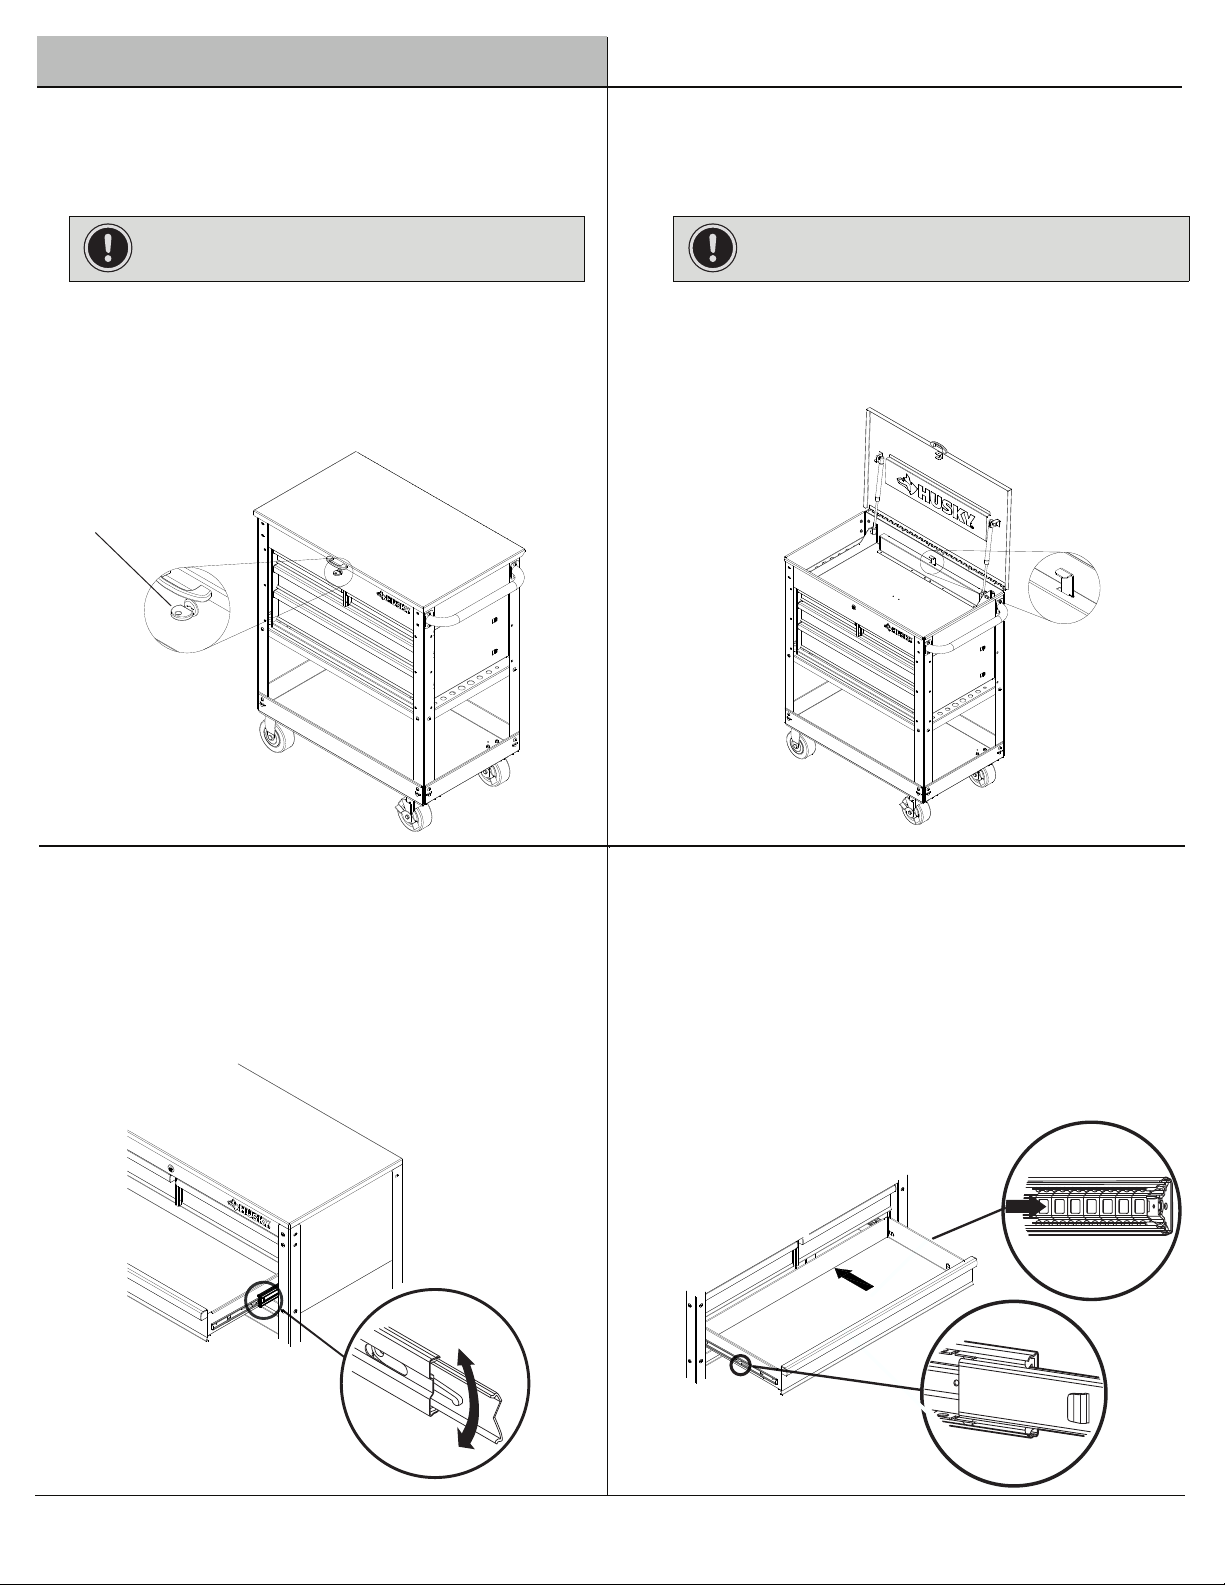
DANGER:
Do not open more than one drawer at a time.
CAUTION:
Do not let children approach the tool cart.
Keep the locking caster brakes set unless
you are moving the cart. This will help to prevent the
product from rolling.
DANGER:
Do not pull the tool cart, push it when moving.
CAUTION:Do not alter this product in any manner as it
DANGER:Do not step in the tray.
will void the warranty.
WARNING:Keep the product on a level surface
The product may become unstable and tip if
stored or moved on an uneven surface.
CAUTION: Do not use the side handle as a
point of leverage to lift the unit off of the ground.
Handle is not intended to withstand the force of
vertical lifting, and is only designed to aid in the
movement of unit around on casters. Failure to
adhere to this warning may cause handle to
break and cause personal injury and/or product
damage.

Warranty
The manufacturer warrants the product to be free from defects in materials and workmanship for a period of three (3) years from date of
purchase. This warranty applies only to the original consumer and only to products used in normal use and service. If this product is
found to be defective, the manufacturer’s only obligation, and your exclusive remedy, is the repair or replacement of the product at the
manufacturer’s discretion, provided that the product has not been damaged through misuse, abuse, accident, modifications, alteration
neglect or mishandling. This warranty shall not apply to any product that is found to have been improperly installed, set-up, or used in
any way not in accordance with the instructions supplied with the product. This warranty shall not apply to a failure of the product
as a result of an accident, misuse, abuse, negligence, alteration, faulty installation, or any other failure not relating to faulty material or
workmanship. This warranty shall not apply to the finish on any portion of the products such as surface and/or weathering, as this is
considered normal wear and tear.
The manufacturer does not warrant and specifically disclaims any warranty, whether express or implied, of fitness for a particular purpose,
other than the warranty contained herein. The manufacturer specifically disclaims any liability and shall not be liable for any consequential
or incidental loss or damage, including but not limited to any labor/expense costs involved in the replacement or repair of said product.
Contact the Customer Service Team at 1-888-43-HUSKY or visit www.huskytools.com.
3
HUSKYTOOLS.COM
Pleas e contact 1-888-43-HUSK Y fo r furthe r assistanc.e

Pre-Assembly
4
TOOLS REQUIRED
Phillips
screwdriver
Safety
goggles
HARDWARE INCLUDED
NOTE: Hardware not shown to actual size.
Part Description Quantity
AA Screw M6x15L 36
BB
16
CC
2
SPECIFICATIONS
Maximum capacity (per drawer) 75 lbs.
NOTE: Begin product assembly close to the final
intended location of your tool cart. This product is
heavy and may be difficult to move after assembly.
DD
Bottom tray 250 lbs.
Maximum loading capacity 672 lbs.
DD
Screw 3/16 x 3/8 in.
1
CC
BBAA
Bolt M8x15L
10MM/13MM Wrench
Part Code
L031134F
L031103M815
L0311280
L3011002

Pre-Assembly (continued)
PACKAGE CONTENTS
5
Part Description Quantity
A Gas lift 2
B Cabinet 1
C Lid handle 1
D Side handle 1
E Cross support - R 1
F Swivel caster with brake 2
G Legs 4
H Rigid caster 2
Part Description Quantity
I Tray 1
J Lock 1
K Keys (set) 1
L Front rail 1
M Drawer slide (pair) 4
N Pegboard 1
O Cross support - L 1
P Husky badge 1
HUSKYTOOLS.COM
Pleas e contact 1-888-43-HUSK Y fo r furthe r assistanc.e
D
A
K
I
M
G
H
N
J
L
B
C
E
F
O
P

Assembly
3
6
Installing the casters
□
□
□
□
Mount the two swivel casters with brake (F) to the bottom of
the tray (I) using four bolts (BB) per caster. The swivel casters with
brake (F) should be installed on the same side as the handle (D).
Mount the two rigid casters (H) to the tray (I) using four bolts (BB)
per caster.
Tighten all bolts (BB) with a 13 mm wrench.
Carefully return the tool cart to its upright position.
CAUTION: Do not over tighten the bolts.
1
Installing the legs
2
I
F
BB
H
□ Place tray (I) on its side on top of the packaging material while
mounting casters to protect the product`s finish.
□ Mount the four support legs (G) to the tray (I) using two
NOTE: Do not fully tighten bolts yet to allow for some
movement during cabinet installation.
Installing the cross supports
AA
AA
AA
G
E
L
N
screws (AA) per leg. Finger tighten only.
□ Attach the right cross support (E) as shown using two screws (AA).
□ Attach the front rail (L) to the legs as shown with two screws (AA).
Do not fully tighten screws at this time.
□ Attach the left cross support (O) as shown using two screws (AA).
Do not fully tighten screws at this time.
O
□ Attach the pegboard (N) to the legs of the cart using six screws (AA).
Do not fully tighten screws at this time.
4 Installing the pegboard
NOTE: The pegboard is designed to attach to either
the left or right side of the tool cart, according to your
preference.
I

Assembly (continued)
7
HUSKYTOOLS.COM
Pleas e contact 1-888-43-HUSK Y fo r furthe r assistanc.e
7 Attaching the handles
□ Attach the side handle (D) to the tool cart using four
6
5
Installing the cabinet
□ Carefully lower the cabinet (B) between the four support legs (G)
until each support leg is properly secured under the top lip of
Attaching the legs
□ Secure the cabinet (B) to the four legs (G) using twelve
□ Attach the lid handle (C) to the top lid using two screws (CC) .
AA
CC
D
the cabinet and the holes are in alignment.
AA
NOTE: The holes in the tool cart are tapped and do not
require nuts.
C
WARNING:At least two people are needed for this step. screws (AA).
□ Tighten all screws on the cart at this time. Be careful not
to over tighten.
screws (AA). Do not over tighten.
Do not over tighten.
B
G
B
G

Operation
Installing the drawers
□ Pull the slides and slide carrier out until fully extended.
□ Hold the slide on the cabinet while aligning it with
the slide on the drawer.
□
□ Slowly push the drawer until it is fully closed to
engage the slide.
□ Open the drawer and close it to verify proper
operation.
Slightly insert one side and repeat for the other side.
4
3Removing the drawers
□ Fully extend and empty the drawer.
□ Depending on the slide, either lift or lower the
release lever on both sides so the slides can ride over
the stops. Pull out to remove.
1 Locking and unlocking the lid
IMPORTANT: The drawers must be fully closed before
The key will only lock the top lid and does
□ Insert the key (K) into the lock and turn one quarter turn
□ Remove the key (K).
□ Insert the key (K) into the lock and turn one quarter turn
□ Remove the key (K).
8
K
clockwise to unlock.
counterclockwise to lock.
2 Securing the drawers
IMPORTANT:
□ To lock the drawers: Move the locking lever down and pull on
□ To unlock the drawers: Move the locking lever up and to the
the drawers to ensure all drawers are secured.
right to secure the lever in the open position.
locking / unlocking the unit. not lock the drawers. See step 2 for securing the drawers.

Maintenance
1
Maintaining the casters 2 Maintaining the drawers
□ Grease the casters annually using high quality
bearing grease.
9
□ Periodically clean the drawer trim and inside
the drawers with a mild detergent and water.
□ Remove grease and oil with a standard,
nonflammable cleaning fluid.
□ The use of drawer liners is recommended to protect
the finish inside the drawers and make the drawers
easier to clean. Drawer liners can be purchased at
The Home Depot and can be cleaned with soap
□ Lubricate the slides semi-annually with grease or
equivalent.
□
This steel product has been coated with industrial powder coating
Care and Cleaning
□
To help protect the powder coated finish, do not allow harsh
□
®
Use a glass cleaner (Windex or equivalent product) to clean and
chemicals (oil, grease, or other chemical) to remain on the powder
and water.
for a durable finish.
coating surface.
maintain all surfaces of powder coating.
HUSKYTOOLS.COM
Pleas e contact 1-888-43-HUSK Y fo r furthe r assistanc.e

Service Parts
10
Part Item No. Description Quantity
A K0509029 Gas lift 2
C K1811002 Lid handle 1
D D6TC040012 Side handle 1
F K03220265 Swivel caster with brake 2
H K03220263 Rigid caster 2
J K06120022 Lock 1
K K06120021 Keys (set) 1
M K0261001 Drawer slide (pair) 4
N B4B080UC33E1814A Pegboard 1
D
K
M
H
J
F
A
C
N

Questions, problems, missing parts? Before returning to the store, call
Husky Customer Service
8 a.m.-7 p.m., EST, Monday-Friday, 9 a.m. - 6 p.m., EST, Saturday
1-888-HD-HUSKY
HUSKYTOOLS.COM
Retain this manual for future use.

GRACIAS POR TU COMPRA
GUÍA DE USO Y MANTENIMIENTO
CARRITO DE HERRAMIENTAS PARA MECÁNICO HUSKY, DE 83.8 CM
¿Preguntas, problemas o piezas
faltantes? Antes de devolver
a la tienda, llama al servicio
HUSKYTOOLS.COM
Apreciamos la confianza que has depositado en Husky al comprar este tablero perforado. Nos esforzamos
continuamente en crear productos de calidad diseñados para mejorar tu hogar. Visítanos por Internet para ver
nuestra línea completa de productos disponibles con vistas a las necesidades de mejoras de tu hogar. ¡Gracias por elegir Husky!
Modelo núm.HOUC3304B10
SKU núm. 1001 348 108
por el teléfono 1-888-43-HUSKY
al cliente de Husky
de lunes a viernes, entre 8 a.m. y 7 p.m., (hora estándar del Este) y los
sábados entre 9:00 a.m. y 6:00 p.m. (hora estándar del Este)
THD.com núm. 1001 288 352

2
Tabla de contenido
Información de seguridad.....................................................2
Garantía........................................................................................3
Ensamblaje........................................................................6
Funcionamiento...............................................................8
Mantenimiento.................................................................9
Información de seguridad
PELIGRO: No te pares sobre este producto.
Puedes caerte o provocar que el producto se vuelque.
PELIGRO: No muevas el producto antes de cerrar
y asegurar todos los cajones. Los cajones pueden
abrirse y provocar que el producto quede inestable
PELIGRO: No montes este producto en la cama de
un camión ni sobre cualquier otro objeto en movimiento.
ADVERTENCIA:
PRECAUCIÓN: No levantes este producto
directamente con un montacargas ni lo remolques
PRECAUCIÓN: No sobrepases el peso máximo
permitido para el producto, incluyendo el contenido.
No sobrepases el peso máximo para cada cajón.
PRECAUCIÓN: Transporta este producto sólo
cuando esté vacío. Asegúralo debidamente
Cuidado y limpieza.........................................................9
Piezas de repuesto........................................................10
Herramientas necesarias......................................................4
PELIGRO:
No abras más de un cajón a la vez.
PRECAUCIÓN:
Mantén a los niños lejos del carrito
Mantén bloqueados los frenosn de
las ruedas excepto si vas a mover el carrito.
Esto ayudará a evitar que el producto ruede.
PELIGRO:
No hales el carrito de herramientas;
PRECAUCIÓN:No modifiques este producto de ninguna
PELIGRO: No te pares sobre la bandeja.
manera, pues esto anulará la garantía.
ADVERTENCIA:Mantén el producto sobre una
superficie nivelada. El producto puede volverse
inestable y volcarse si se almacena o mueve.
Preensamblaje...........................................................................4
Herrajes incluidos....................................................................4
Especificaciones......................................................................4
Contenido del paquete...........................................................5
Tabla de contenido..................................................................2
de herramientas.
empújalo para moverlo.
y se vuelque.
con ningún dispositivo mecánico.
Consulta las especificaciones en la página 4.
cuando vayas a transportarlo.
PRECAUCIÓN: No usar el asa lateral como
palanca para levantar la unidad. El asa no está
concebida para soportar la fuerza vertical
aplicada al levantarse. El asa sólo está diseñada
desplazar la unidad con ayuda de las ruedas.
Ignorar esta indicación puede causar que el asa
se rompa y cause daños personales y/o al
producto.

Garantía
El fabricante garantiza que este producto no presentará defectos materiales ni de fabricación durante tres (3) años a partir de la fecha original de
compra. Esta garantía es válida solo para el consumidor original y cubre solo productos en uso y servicio normal. Si se detecta algún defecto en
este producto, la única obligación y solución exclusiva del fabricante, a su entera discreción, será reparar o reponer el producto, siempre y cuando
el producto no haya sido dañado por mal uso, abuso, accidente, modificaciones, alteraciones, negligencia o manejo indebido. Esta garantía no cubre
ningún producto instalado, configurado o usado sin seguir las instrucciones adjuntas al producto. Esta garantía no cubre fallas del producto como
consecuencia de un accidente, mal uso, abuso, negligencia, modificaciones o instalaciones defectuosas, o cualquier otra falla no
relacionada con defectos materiales o de fabricación. Esta garantía no se aplica al acabado de ninguna parte del producto, como la
El fabricante no garantiza y rechaza específicamente cualquier garantía, explícita o implícita, de la idoneidad del producto para un
propósito en particular, , que no sea la garantía establecida por este medio. El fabricante rechaza específicamente de cualquier
obligación y no será responsable por ningún daño o pérdida, directos o indirectos, incluyendo, pero sin limitarse a, cualquier costo de
Comuníquese con el equipo de servicio al cliente por el 1-888-43- www com.HUSKY o visite .huskytools.
3
HUSKYTOOLS.COM
Para asistencia adicional, llama al 1-888-43-HUSKY.
superficie, ni al deterioro por condiciones ambientales, ya que se considera desgaste normal.
mano de obra/gastos relacionados con la reposición o reparación de dicho producto.

Preensamblaje
4
THERRAMIENTAS NECESARIAS
Destornilla
dor Phillips
Gafas
de
HERRAJES INCLUIDOS
NOTA:Los herrajes no se muestran en su
Pieza Descripción Cantidad
AA Tornillo M6x15L 36
BB
16
CC 2
Tornillo 3/16 x 3/8 in.
ESPECIFICACIONES
Capacidad máxima (por cajón) 34 kg (75 lb)
NOTA: Comienza a ensamblar el producto cerca de
la ubicación final deseada de tu carrito de
herramientas. Este producto es pesado y puede ser
Bandeja Inferior 113.4 kg (250 lb)
Capacidad máxima de carga 304.8 kg (672 lb)
DD Llave de 10MM/13MM 1
segurid
ad
tamaño real.
difícil de mover después de ensamblarlo.
DD
CC
BBAA
Perno M8x15L
Código de pieza
L031134F
L031103M815
L0311280
L3011002

Preensamblaje (continuación)
CONTENIDO DEL PAQUETE
5
Pieza Descripción Cantidad
A Alzador neumático 2
B Gabinete 1
C Asa de la tapa 1
D Asa lateral 1
E Soporte transversal - R 1
F Rueda giratoria con freno 2
G Patas 4
H Rueda rígida 2
Pieza Descripción Cantidad
I Bandeja 1
J Cerradura 1
K Llaves (juego) 1
L Riel frontal 1
M Corredera del cajón (un par) 4
N Tablero perforado 1
O Soporte transversal - L 1
P Placa de Husky 1
HUSKYTOOLS.COM
Para asistencia adicional, llama al 1-888-43-HUSKY.
D
A
K
I
M
G
H
N
J
L
B
C
E
F
O
P

Ensamblaje
3
6
Cómo instalar las ruedas
□
□
□
□
Instala las dos ruedas giratorias con freno (F) en la parte inferior
de la bandeja (I) usando cuatro pernos (BB) por rueda. Las
ruedas giratorias con freno (F) deben instalarse del mismo
Instala las dos ruedas fijas (H) en la bandeja (I) usando
cuatro pernos (BB) por rueda.
Aprieta todos los pernos (BB) con una llave de 13 mm.
Vuelve a colocar, con cuidado, el carrito de herramientas en
PRECAUCIÓN: No aprietes demasiado los pernos.
1
Cómo instalar las patas
2
□ Coloca la bandeja (I) de lado encima del material de empaque
mientras instalas las ruedas, para proteger el acabado del producto.
□ Instala las cuatro patas de soporte (G) en la bandeja (I) usando
NOTA: No ajustes completamente los pernos
todavía para que tengan algún movimiento
Cómo instalar los soportes transversales
AA
G
dos tornillos (AA) por pata. Aprieta sólo con la mano.
□ Fija el soporte transversal derecho (E) como se muestra con dos
□ Fija el riel frontal (L) a las patas con dos tornillos (AA), como se
muestra.No ajustes los tornillos por completo en este momento.
tornillos (AA). No ajustes los tornillos por completo en este momento.
□ Fija el soporte transversal izquierdo (O) con dos tornillos (AA),
como se muestra. No ajustes los tornillos por completo en este
□ Fija el tablero perforado (N) a las patas del carrito usando seis
tornillos (AA). No ajustes los tornillos por completo en este
4 Cómo instalar el tablero perforado
NOTA:El tablero perforado está diseñado para
instalarse al lado izquierdo o derecho del carrito,
según tu preferencia.
I
lado del asa lateral (D).
su posición normal.
momento.
mientras instalas el gabinete.
momento.
AA
E
L
O
AA
N
I
F
BB
H

Ensamblaje (continuación)
7
HUSKYTOOLS.COM
Para asistencia adicional, llama al 1-888-43-HUSKY.
7 Cómo instalar las asas
□ Fija el asa lateral (D) al carrito de herramientas usando cuatro
6
5
Cómo instalar el gabinete
□ Con cuidado, baja el gabinete (B) entre las cuatro patas de
soporte (G) hasta que cada una de ellas esté debidamente
Cómo fijar las patas
□ Asegura el gabinete (B) a las cuatro patas (G) usando doce
□ Instala el asa de la tapa (C) a la tapa superior usando dos
asegurada debajo de la tapa superior del gabinete y los
NOTA:Los orificios en el carrito de herramientas están
roscados y no necesitan tuercas.
ADVERTENCIA:Se necesitan al menos dos personas tornillos (AA).
□ Ajusta bien todos los tornillos del carrito en este momento.
Ten cuidado de no apretar demasiado.
tornillos(AA). No aprietes demasiado.
tornillos (CC). No aprietes demasiado.
para este paso.
orificios estén alineados.
B
G
AA
B
G
CC
D
AA
C

Funcionamiento
Cómo instalar los cajones
□ Hala las correderas y el sujetador de ellas hacia
□ Sostén la corredera sobre el gabinete al alinearla con
la corredera en el cajón.
□
□ Empuja lentamente el cajón hasta que
esté completamente cerrado y enganche en la corredera.
□ Abre el cajón y ciérralo para verificar que funciona bien.
Inserta levemente por un lado y repite la acción para
4
3Cómo quitar los cajones
□ Extiende completamente el cajón y vacíalo.
□ Dependiendo de la corredera, levanta o baja la palanca
de liberación en ambos lados para que aquellas pasen
por encima de los topes. Hala hacia afuera para retirar.
1 Cómo cerrar y abrir la tapa
IMPORTANTE: Los cajones deben estar completamente
La llave sólo sirve para cerrar la tapa,
□ Inserta la llave (K) en la cerradura y gírala un cuarto de
□ Retira la llave (K).
□ Inserta la llave (K) en la cerradura y gírala un cuarto de
□ Retira la llave (K).
8
vuelta hacia la derecha para abrir.
vuelta hacia la izquierda para cerrar.
2 Cómo asegurar los cajones
IMPORTANTE:
□ Para bloquear los cajones: Mueve hacia abajo la palanca de
□ Para liberar los cajones: Mueve la palanca de cierre hacia
cierre y hala los cajones para asegurar que estén cerrados.
arriba y hacia la derecha para trabarla en la posición de
cerrados antes de liberar o bloquear la unidad.
no los cajones. Consulta el Paso 2 para asegurar los
cajones.
“abierto”.
afuera hasta que queden completamente extendidos.
el otro lado.
K

Mantenimiento
1
Cómo dar mantenimiento a las ruedas 2 Cómo dar mantenimiento a los cajones
□ Engrasa las ruedas anualmente usando grasa de alta
calidad para cojinetes de bola.
9
□ Limpia periódicamente la moldura del cajón y el
interior de este con un detergente suave y agua.
□ Quita la grasa y el aceite con un fluido de limpieza
estándar no inflamable.
□ Se recomienda usar revestimientos de cajones
para proteger el acabado dentro de ellos y
facilitar su limpieza. Los revestimientos de
cajones pueden comprarse en The Home Depot y
□ Lubrica las correderas de los cajones dos veces
al año con grasa o equivalente.
□
Este producto de acero ha sido revestido con cubierta granular
Cuidado y limpieza
□
Para ayudar a proteger el acabado pulvirrevestido, no permitas
□
Usa un limpiador de vidrio (Windex® o producto equivalente)
que haya productos químicos agresivos (aceite, grasa u otros)
limpiarse con agua y jabón.
industrial para un acabado duradero.
en la superficie pulvirrevestida.
para limpiar y dar mantenimiento a todas las superficies
pulvirrevestidas.
HUSKYTOOLS.COM
Para asistencia adicional, llama al 1-888-43-HUSKY.
This manual suits for next models
1
Table of contents
Languages:
Other Husky Outdoor Cart manuals