Husky 024-0375H User manual

200-3128-E_11/21/18
THANK YOU
We appreciate the trust and confidence you have placed in Husky through the purchase of this air compressor
accessory. We strive to continually create quality products designed to enhance your home. Visit us online to see our
full line of products available for your home improvement needs. Thank you for choosing Husky!
USE AND CARE GUIDE
HEAVY DUTY DIGITAL TIRE INFLATION TOOL
Questions, problems, missing parts?
Before returning to the store, call
Husky Customer Service
8 a.m. - 7 p.m., EST, Monday - Friday
9 a.m. - 6 p.m., EST, Saturday
1-888-HD-HUSKY
HUSKYTOOLS.COM
Item #1003-145-153
Model #024-0375H

2
Safety Information
Table of Contents
Safety Information....................................2
Work Area Safety ...................................2
Personal Safety .....................................2
Warranty ...................................................3
Pre-Installation.........................................4
Specifications ........................................4
Package Contents..................................4
Planning Installation ..............................5
Installation................................................5
Connecting to the Air Compressor .........5
Setting up the Inflator............................6
Operation...................................................6
Operating the tire inflator ......................6
Maintenance .............................................7
Replacing the battery.............................7
Troubleshooting .....................................7
This manual contains information that is important for
you to know and understand. This information relates
to protecting your safety and preventing equipment
problems. To help you recognize this information, we use
the symbols at the right. Please read the manual and pay
attention to these symbols.
WORK AREA SAFETY
□Keep your work area clean and well lit. Ensure
floors are not slippery from wax or dust.
WARNING:Do not operate power tools in explosive
atmospheres, such as in the presence of flammable
liquids, gases, or dust. Power tools create sparks which
may ignite the dust or fumes. Keep bystanders, children,
pets, and visitors away while operating tools. Distractions
can cause you to lose control.
PERSONAL SAFETY
□Keep proper footing and balance at all times.
Proper footing and balance enables better control
of the tool in unexpected situations.
DANGER: Indicates an imminently hazardous situation
which, if not avoided, will result in death or serious injury.
WARNING:Indicates a potentially hazardous situation
which, if not avoided, could result in death or serious
injury.
CAUTION:Indicates a potentially hazardous situation
which, if not avoided, may result in minor or moderate
injury.
NOTICE:Indicates a practice not related to personal injury which, if
not avoided, may result in property damage.
CAUTION:Always disconnect the air supply and power
supply before making adjustments, servicing a tool, or
when a tool is not in use.
WARNING:Operating any power tool can result in foreign
objects being thrown into your eyes, which can result in
severe eye damage. Before beginning operation, always
wear safety goggles, safety glasses with side shields, or
a full face shield when needed. Always use eye protection
marked to comply with ANSI Z87.1.
WARNING: CONTAINS LEAD. May be harmful if
eaten or chewed. May generate dust containing lead. Wash
hands after use. Keep out of reach of children.
WARNING: This product can expose you to chemicals
including Lead, which is known to the State of California to
cause cancer and birth defects or other reproductive harm.
For more information go to www.P65Warnings.ca.gov
.
WARNING:Use safety equipment. Always wear eye
protection with side shields when operating power tools.
A dusk mask, non-skid safety shoes, hard hat, or hearing
protection must be used for appropriate conditions.
WARNING: Do not exceed the rated pressure of 150 PSI.
CAUTION:Keep the inflator dry. Exposure to moisture
can damage the precision electronics inside.
Keep the inflator away from electromagnetic interferences
and fields.

3 HUSKYTOOLS.com
Please contact 1-888-HD-HUSKY for further assistance.
LIMITED WARRANTY
WHAT IS COVERED
The manufacturer warrants to the original retail purchaser that this product is free from defect in material and
workmanship and agrees to repair or replace, at the manufacturer’s discretion, any defective product free of charge
within these time periods from the date of purchase.
This warranty is valid for three (3) years if the product is used for personal, family, or household use, and ninety (90)
days if used for any other purpose, such as commercial or rental use.
This warranty extends to the original retail purchaser only and commences on the date of the original retail purchase.
Any part of the product manufactured or supplied by the manufacturer and found in the reasonable judgment of
the manufacturer to be defective in material or workmanship will be repaired or replaced by an authorized service
dealer without charge for parts and labor.
The product, including any defective part, must be returned to an authorized service dealer within the warranty
period. The expense of delivering the manufacturer’s product to the dealer for warranty work and the expense
of returning it back to the owner after repair or replacement will be paid by the owner. The manufacturer’s
responsibility in respect to claims is limited to making the required repairs or replacements and no claim of breach
of warranty shall be cause for cancellation or rescission of the contract of sale of any of the manufacturer’s product.
Proof of purchase will be required by the dealer to substantiate any warranty claim. All warranty work must be
performed by an authorized service dealer.
WHAT IS NOT COVERED
This warranty does not cover any of the manufacturer’s product that has been subject to misuse, neglect,
negligence, accident, or that has been operated in any way contrary to the operating instructions as specified in this
manual. This warranty does not apply to any damage to the manufacturer’s product that is the result of improper
maintenance or to any manufacturer’s product that has been altered or modified. The warranty does not extend to
repairs made necessary by normal wear or by the use of parts or accessories which are either incompatible with
the manufacturer’s product or adversely affect its operation, performance, or durability.
The manufacturer reserves the right to change or improve the design of any product without assuming any
obligation to modify any product previously manufactured. All implied warranties are limited in duration to the
stated warranty period. Accordingly, any such implied warranties including merchantability, fitness for a particular
purpose, or otherwise, are disclaimed in their entirety after the expiration of the appropriate two-year or ninety day
warranty period. The manufacturer’s obligation under this warranty is strictly and exclusively limited to the repair
or replacement of defective parts and the manufacturer does not assume or authorize anyone to assume for it any
other obligation. Some states do not allow limitations on how long an implied warranty lasts, so the above limitation
may not apply to you. The manufacturer assumes no responsibility for incidental, consequential, or other damages
including, but not limited to, expense of returning the manufacturer’s product to an authorized service dealer and
expense of delivering it back to the owner, mechanic’s travel time, telephone or telegram charges, rental of a like
product during the time warranty service is being performed, travel, loss or damage to personal property, loss
of revenue, loss of use of the product, loss of time, or inconvenience. Some states do not allow the exclusion or
limitation of incidental or consequential damages, so the above limitation or exclusion may not apply to you.
This warranty gives you specific legal rights, and you may also have other rights which vary from state to state.
Contact the Customer Service Team at 1-888-HD-HUSKY or visit www.huskytools.com.
Warranty

4
Pre-Installation
SPECIFICATIONS
Display LCD (Backlit)
Units of Measure Toggle between PSI, BAR, KPA, KG/CM2
Accuracy
+/- 1.0 PSI to 100 PSI
+/-1.5 PSI from 100 PSI to 130 PSI
+/-2.0 PSI from 130 PSI to 150 PSI
Measuring Range 0-150 PSI
Max Pressure 150 PSI
Hybrid Hose 15” with 360 degree swivel end
NPT inlet ¼”
Relief Valve Built in relief valve to deflate overinflated tires
Batteries (2) 1.5 VDC Triple AAA
Battery Life Auto shut off after 60 seconds to extend battery life
Temperature Range -20F to 120F*
*Delay may occur in cold temperatures
Use Use with or without pressure hose to read tire pressures
Nitrogen Compatible with nitrogen
A
200-3128-A_1-31-18
THANK YOU
We appreciate the trust and confidence you have placed in Husky through the purchase of this air compressor
accesso
ry.We strive to continually create quality products designed to enhance your home.
Visit us online to see our
full line of products available for your home improvement needs. Thank you for choosing Husky!
USE AND CARE GUIDE
HEAVY DUTY DIGITAL TIRE INFLATION TOOL
Questions, problems, missing parts?
Before returning to the store, call
Husky Customer Service
8 a.m. - 7 p.m., EST, Monday - Friday
9 a.m. - 6 p.m., EST, Saturday
1-888-HD-HUSKY
HUSKYTOOLS.COM
Item #xxxx-xxx-xxx
Model #024-0375H
M
HLA1683066
B
C
D
E
F
G
HIJ
K
L
Part Description Qty. Part Description Qty.
AInator 1 G Hanging hook 1
BAir relief valve 1 H LCD Display 1
CHose 1 I On/Unit/Light Button 1
DSwivel end 1 J Ination lever 1
EAir chuck 1 K Tool retractor hook 1
FBattery compartment cover 1 L Male connector (In box) 1
F1 Battery protection strip 1 M Use and care guide 1
F1
NOTE: Before operating the inflation tool for the first time, pull out
the battery protection strip (F1) and discard.

5 HUSKYTOOLS.com
Please contact 1-888-HD-HUSKY for further assistance.
PLANNING INSTALLATION
NOTE: Tools not shown to actual size
TOOLS REQUIRED
Adjustable
Wrench
Thread
Seal Tape
Safety
Goggles
#0 Phillips
Head
Screwdriver
Installation
1 Connecting to the air
compressor
DANGER: This product is specifically designed for
compressed air or nitrogen service only. Never use this
tool to measure or dispense oxygen, carbon dioxide,
combustible gases, or any other bottled gas.
WARNING: Always turn compressor OFF, disconnect
from power source, and drain all pressure from system
before servicing.
NOTE: Use thread sealer or Teflon®on all male threads.
□To connect the air supply to the inflator (A),
connect an air hose (N) to a compressor that
has a quick connect coupler (O) on the end.
□Put thread sealant tape on the male threads
of the connector (L) that is supplied with the
inflator (A).
□Thread the male connector (L) into the end of
the inflator (A) and tighten using an adjustable
wrench.
NOTE: Insert the male connector (L into the quick
connect coupler (O) and push to lock in place.
N
To
Compressor
O L A
Figure 1
Typical Installation
Part Description Part Description
N Air Hose (not included) L Male Connector (included)
O Quick Connect Coupler (not included) A Inflator (included)

6
Installation
2 Setting up the Inflator
WARNING: Do not modify the digitial tire inflator.
Unauthorized modifications may impair the function and/or
safety of the equipment.
WARNING: Always check for damaged or worn out
parts before operating the digital tire inflator. Replace any
damaged or worn parts before using.
□Turn the inflator (A) on by pressing the On/
Unit/Light button (I). The LCD display (H)
should read < 0.00 Units >.
□To select the desired units of pressure (BAR,
KPA, KG/CM² or PSI - the units will appear to
the right of the 0.0), press the On/Unit/Light
button (I) for 2 seconds and release the button.
Continue this procedure until the desired units
are shown.
□To turn on the LCD display (H) backlight, press
the On/Unit/Light button (I) and release.
NOTE: The LCD display (H) on the inflator will
automatically turn off after 60 seconds of not being used.
3 Operating the tire inflator
WARNING: To avoid the risk of personal injury to eyes,
face or skin, DO NOT direct the air stream at any person.
WARNING: Operating any power tool can result in foreign
objects being thrown into your eyes, which can result in
severe eye damage. Before beginning operation, always wear
safety goggles, safety glasses with side shields, or a full face
shield when needed. Always use eye protection marked to
comply with ANSI Z87.1.
WARNING: Do not exceed the rated pressure of 150 PSI.
CAUTION:Keep the inflator dry. Exposure to moisture can
damage the precision electronics inside.
CAUTION:Keep the inflator away from electromagnetic
interferences and fields.
□Connect the tire inflator to an air supply (see
“connecting to the air compressor” section).
□Remove the tire valve cap.
□Press air chuck (E) onto the tire valve stem.
Make sure no air is leaking around the air
chuck.
□Turn on the inflator by pressing the On/Unit/
Light button.
□Press the inflation lever (J) to release air into
tire.
□Release the inflation lever and read the
pressure in the LCD display (H).
□If the pressure is higher than desired, press
the air relief valve (B) to bleed air from the tire.
□Release the air relief valve and read the
pressure on the LCD display (H).
NOTE: The gauge can be used with or without the air
hose attached.
Operation
I
J
B

7 HUSKYTOOLS.com
Please contact 1-888-HD-HUSKY for further assistance.
4 Replacing the battery
WARNING: Always turn compressor OFF, disconnect from
power source, and drain all pressure from system before
servicing.
□To change the batteries remove the 2 screws
(P) using a #0 Phillips Head Screwdriver and
then remove the battery cover (Q).
□Remove the batteries (R).
□Replace batteries with (2) 1.5 VDC AAA.
□Re-install the battery cover and tighten the
screws.
NOTE: Make sure the batteries are inserted the correct
way as shown in Figure 2.
NOTE: Do not overtighten the screws holding the battery
cover.
Battery Replacement
5 Troubleshooting
WARNING: Always turn compressor OFF, disconnect from
power source, and drain all pressure from system before
servicing.
Troubleshooting
Troubleshooting
-H- shown in display Inlet or measured pressure is too high. Reduce pressure to 150 Psi
or less
Unit will not turn Check batteries
LCD display is blank Change batteries, replace with (2) 1.5 VDC, AAA
Display hard to see in cold weather Wait approximately 15 to 20 seconds for LCD to warm up before
use
P
QR (+) R (-)
Figure 2

Questions, problems, missing parts? Before returning to the store, call
Husky Customer Service
8 a.m. - 7 p.m., EST, Monday - Friday
9 a.m. - 6 p.m., EST, Saturday
1-888-HD-HUSKY
HUSKYTOOLS.COM
Retain this manual for future use.
Document Number: 200-3128-E_11/21/18

200-3128-E_11/21/18
GRACIAS
Agradecemos la confianza que ha depositado en Husky a través de la compra de este accesorio para compresor de
aire. Siempre buscamos crear productos de calidad diseñados para mejorar su hogar. Visítenos en línea para ver
nuestra línea completa de productos disponibles para sus necesidades de mejoras del hogar. ¡Gracias por elegir
Husky!
GUÍA DE USO Y CUIDADO
HERRAMIENTA DIGITAL DE ALTO RENDIMIENTO
PARA INFLAR NEUMÁTICOS
¿Tiene preguntas o problemas, o le faltan piezas?
Antes de devolver a la tienda, llame a Atención al Cliente de Husky
Lunes a viernes de 8:00 a.m. a 7:00 p.m., EST,
y los sábados de 9:00 a.m. a 6:00 p.m., EST
1-888-HD-HUSKY
HUSKYTOOLS.COM
Artículo n.º 1003-145-153
Modelo n.º 024-0375H

2
Información de seguridad
Índice
Información de seguridad........................2
Seguridad en el área de trabajo.............2
Seguridad personal ...............................2
Garantía.....................................................3
Antes de la instalación.............................4
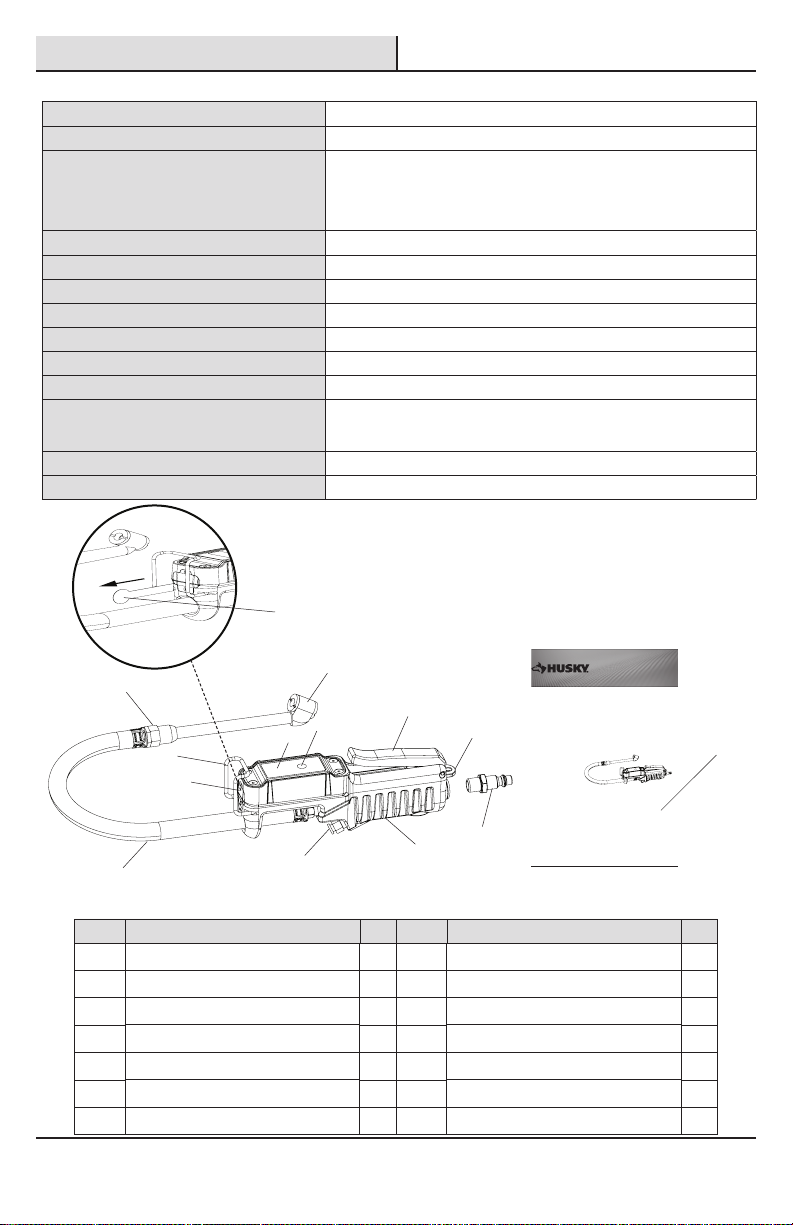
Especificaciones....................................4
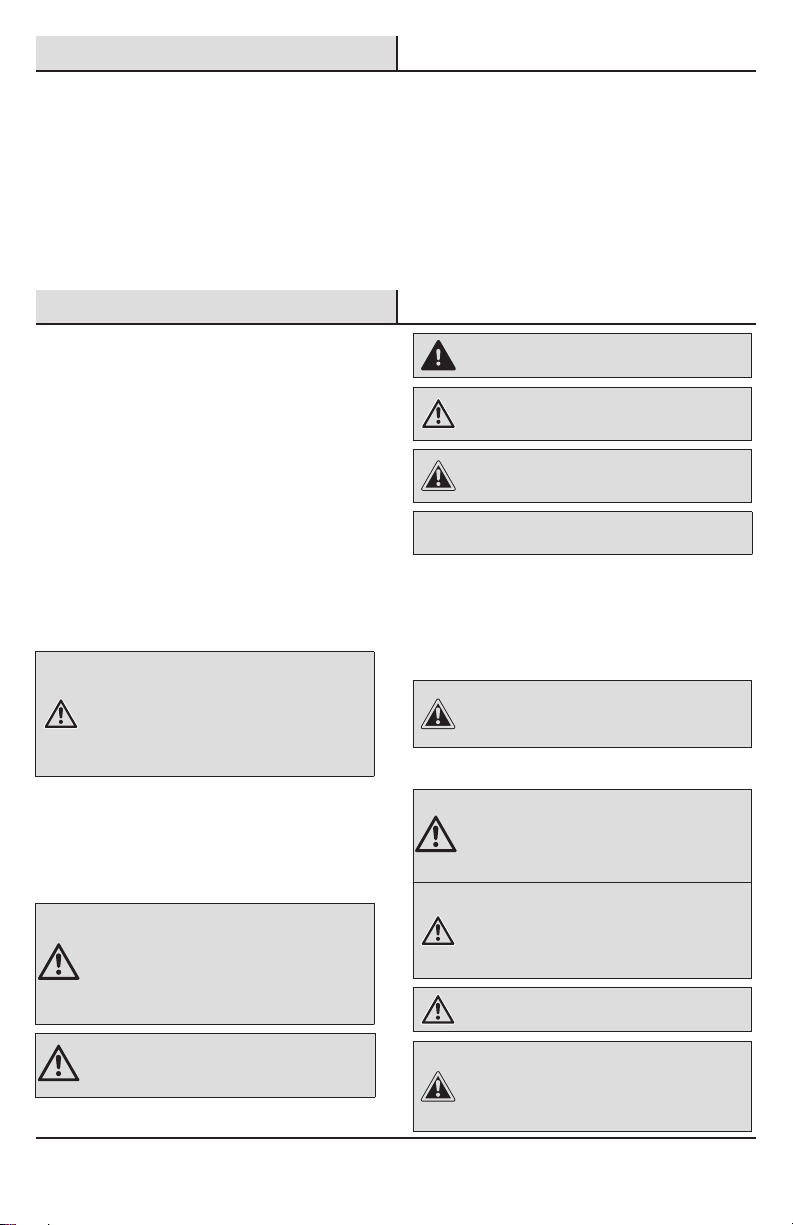
Contenido del paquete...........................4
Planificación de la instalación ...............5
Instalación ................................................5
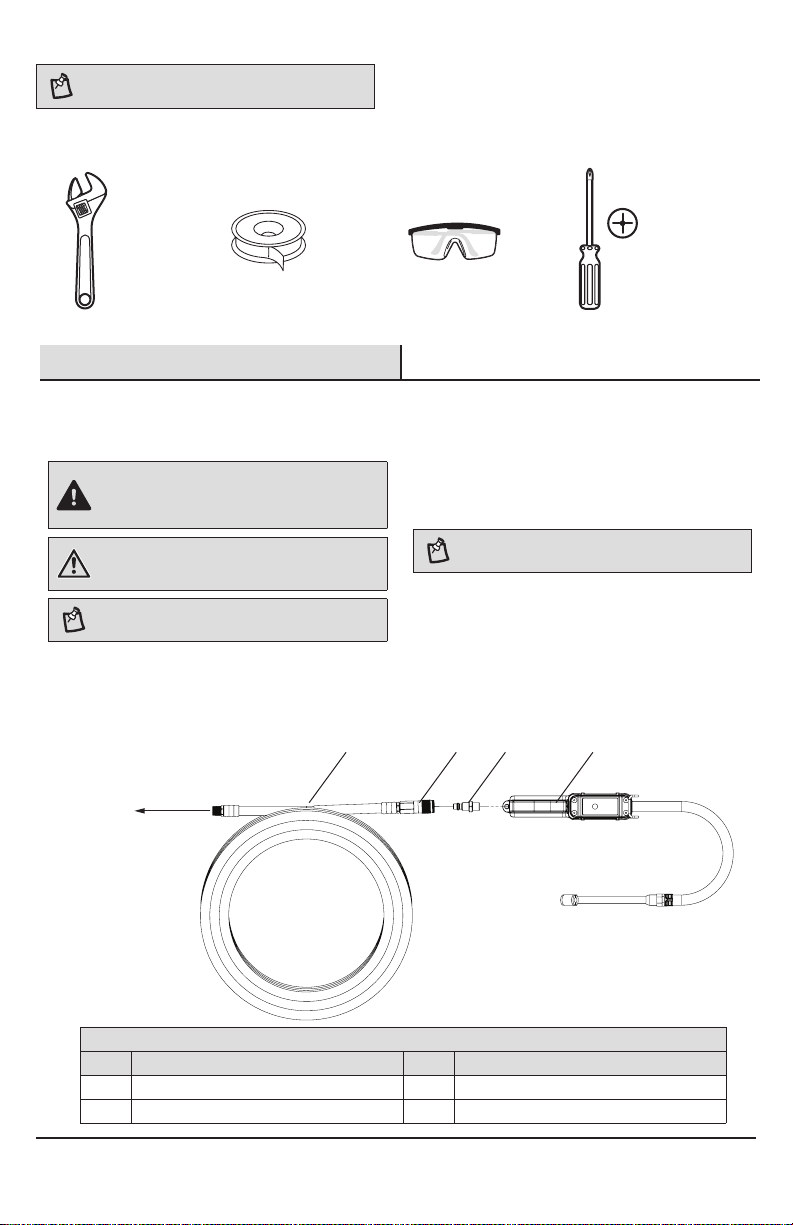
Conexión al compresor de aire ..............5
Configuración del inflador......................6
Funcionamiento........................................6
Uso del inflador de neumáticos .............6
Mantenimiento..........................................7
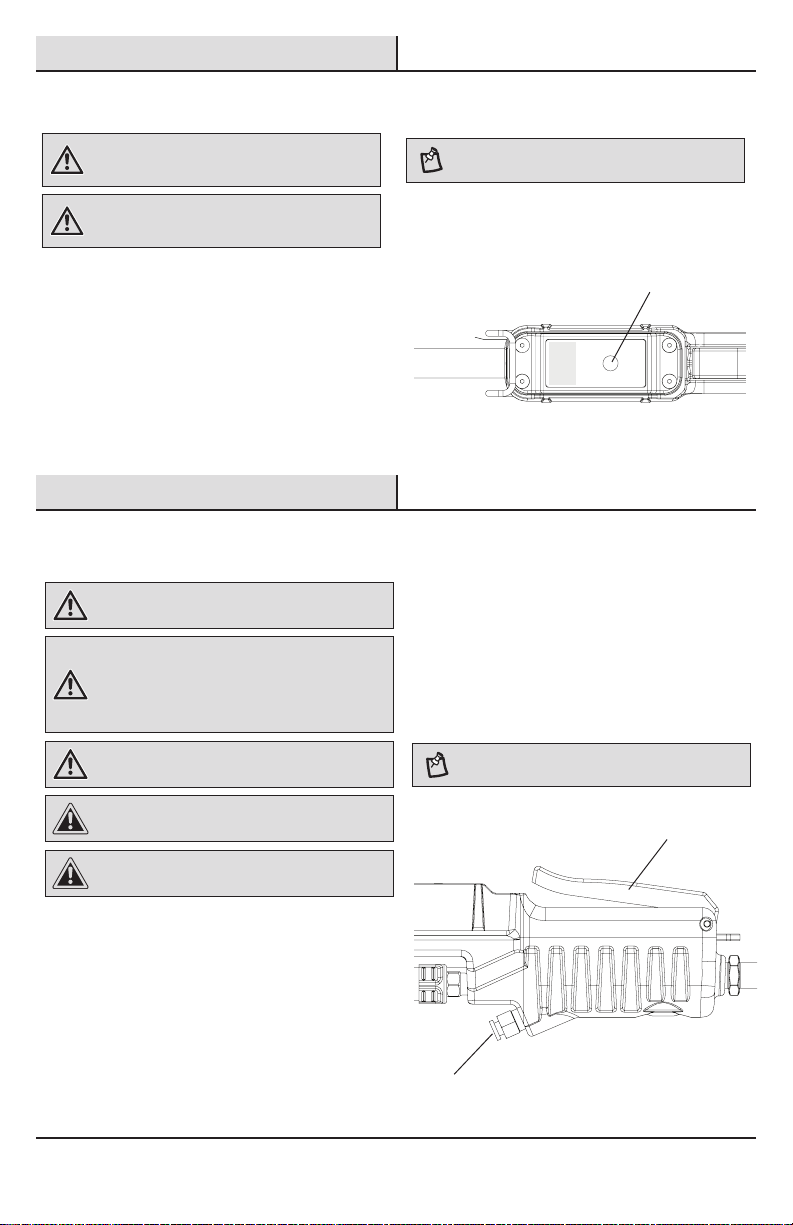
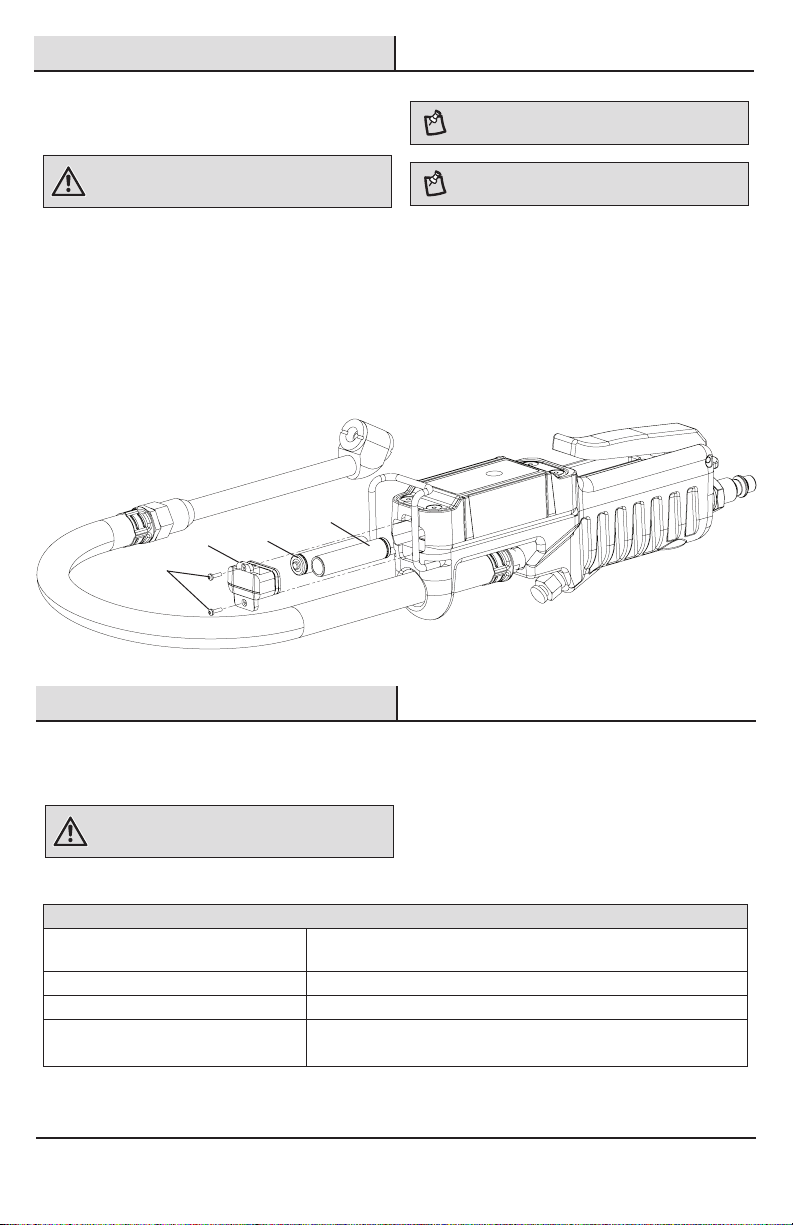
Cómo reemplazar la pila........................7
Resolución de problemas ......................7
Este manual contiene información que usted debe saber
y comprender. Esta información está relacionada con
la protección de su seguridad y para evitar problemas
del equipo. Para ayudarlo a reconocer esta información,
utilizamos los símbolos a la derecha. Lea el manual
y preste atención a estos símbolos.
SEGURIDAD EN EL ÁREA DE TRABAJO
□Mantenga su área de trabajo limpia y bien
iluminada. Asegúrese de que los pisos no estén
resbalosos debido a la cera o al polvo.
ADVERTENCIA:No opere herramientas eléctricas
en atmósferas explosivas, tal como ante la presencia de
líquidos, gases o polvo inflamables. Las herramientas
eléctricas crean chispas que pueden encender el polvo
o los vapores. Mantenga alejados a los transeúntes, niños,
mascotas y visitantes mientras opera las herramientas.
Las distracciones pueden causarle la pérdida de control
del equipo.
SEGURIDAD PERSONAL
□Manténgase de pie sólidamente apoyado y en
equilibrio en todo momento. Un apoyo sólido
y un buen equilibrio permite un mejor control
de la herramienta en situaciones inesperadas.
ADVERTENCIA:Operar cualquier herramienta eléctrica
puede provocar la expulsión de objetos extraños hacia sus
ojos, lo cual puede ocasionar daños graves en los ojos.
Antes de comenzar la operación, siempre utilice gafas de
seguridad, ya sea los modelos comunes o aquellos con
escudos laterales, o un escudo facial completo cuando esto
sea necesario. Siempre utilice protección ocular, marcada
para cumplir con ANSI Z87.1.
ADVERTENCIA: CONTIENE PLOMO. Pudiera ser
dañino si se ingiere o masca. Pudiera generar polvo que
contiene plomo. Lavarse bien las manos después de usar.
Mantener fuera del alcance de los niños.
PELIGRO: Indica una situación peligrosa inminente la
cual, si no se evita, provocará la muerte o lesiones graves.
ADVERTENCIA:Indica una posibilidad de situación
peligrosa la cual, si no se evita, puede provocar la muerte
o lesiones graves.
PRECAUCIÓN:Indica una posibilidad de situación
peligrosa la cual, si no se evita, podría provocar lesiones
leves o moderadas.
AVISO:Indica una práctica no relacionada a las lesiones personales
la cual, si no se evita, podría provocar daños a la propiedad.
PRECAUCIÓN:Siempre desconecte el suministro
de aire y el suministro eléctrico antes de hacer ajustes,
reparar una herramienta, cambiar un accesorio o cada
vez que una herramienta no esté en uso.
ADVERTENCIA: ESTE PRODUCTO PUEDE EXPONERLO
A SUSTANCIAS QUÍMICAS, ENTRE ELLAS PLOMO, Q UE EL
ESTADO DE CALIFORNIA RECONOCE COMO CAUSANTE DE
CÁNCER, MALFORMACIONES CONGÉNITAS U OTROS DAÑOS
AL SISTEMA REPRODUCTOR.
Para más información, visita
www.P65Warnings.ca.gov.
ADVERTENCIA:Utilice equipos de seguridad. Siempre
utilice protección ocular con escudos laterales al operar
herramientas eléctricas. Debe utilizarse una máscara
contra polvos, zapatos de seguridad antideslizantes,
un casco o protección auditiva para las condiciones
apropiadas.
ADVERTENCIA: No exceda la presión nominal
de 150 PSI.
PRECAUCIÓN:Mantenga el inflador seco.
La exposición a la humedad puede dañar los elementos
electrónicos de precisión en el interior.
Mantenga el inflador alejado de interferencias y campos
electromagnéticos.

3 HUSKYTOOLS.com
Comuníquese al 1-888-HD-HUSKY para obtener más información.
GARANTÍA LIMITADA
QUÉ ES LO QUE CUBRE
El fabricante garantiza al comprador minorista original que el producto no tiene defectos de material o de mano
de obra y acepta reparar o reemplazar, bajo su discreción, cualquier producto defectuoso sin cargo alguno dentro
de estos períodos desde la fecha de compra.
Esta garantía es válida por tres (3) año si el producto se utiliza para uso personal, familiar o doméstico y noventa
(90) días si se utiliza con cualquier otro fin, como uso comercial o alquiler.
Esta garantía se extiende solo al comprador minorista original y comienza en la fecha de compra minorista original.
Un proveedor de servicio técnico autorizado reparará o reemplazará sin cargo por piezas ni mano de obra cualquier
pieza del producto fabricado o suministrado por el fabricante y que el fabricante considere dentro de lo razonable
defectuosa en material o mano de obra.
El producto, incluida cualquier pieza defectuosa, se debe llevar a un proveedor de servicio técnico autorizado
dentro del período de la garantía. El propietario deberá asumir los gastos de envío del producto al proveedor para
los trabajos de garantía y los gastos de envío de regreso al propietario después de la reparación o la reposición.
La responsabilidad del fabricante respecto de reclamos se limita a hacer las reparaciones o reposiciones requeridas
y ningún reclamos de incumplimiento de garantía será causa de cancelación o rescisión del contrato de venta del
producto del fabricante. El proveedor requerirá una factura de compra para justificar cualquier reclamo de garantía.
Los trabajos por garantía los debe realizar un proveedor de servicio técnico autorizado.
QUÉ ES LO QUE NO CUBRE
Esta garantía no cubre productos del fabricante que se hayan empleado mal, descuidado, desatendido, dañado
o utilizado de forma no especificada en las instrucciones de uso especificadas en este manual. Esta garantía
no aplica a daños al producto del fabricante que sean resultado de un mantenimiento inadecuado o si se alteró
o modificó de alguna manera. Esta garantía no cubre reparaciones necesarias debido al desgaste natural o el
uso de piezas o accesorios incompatibles con el producto del fabricante o que afecten negativamente su uso,
desempeño o durabilidad.
El fabricante se reserva el derecho de cambiar o mejorar el diseño de cualquier producto sin asumir la obligación
de modificar los productos ya fabricados. Todas las garantías implícitas se limitan a la duración establecida
previamente. Por lo tanto, el fabricante se libera de la responsabilidad de cualquier garantía implícita incluidas
comerciabilidad, aptitud para un fin específico u otras, tras el vencimiento del período de garantía de dos años
o noventa días. La obligación del fabricante según esta garantía se limita pura y exclusivamente a la reparación
o reposición de piezas defectuosas y el fabricante no asume ni autoriza a nadie que asuma otra obligación en
su lugar. Algunos estados no permiten la limitación en la duración de una garantía implícita, de manera que la
limitación anterior podría no aplicarse a su caso. El fabricante no asume ninguna responsabilidad por daños
incidentes, consecuentes u otros daños incluidos, entre otros, los gastos de envío del producto a un proveedor
de servicio técnico y los gastos de envío de regreso al propietario, el tiempo de viaje del mecánico, los cargos
de teléfono o telegrama, el alquiler de un producto similar durante la reparación bajo garantía, viaje, pérdida o daño
de propiedad personal, pérdida de ingresos, pérdida de funciones del producto, pérdida de tiempo o inconvenientes.
Algunos estados no permiten la exclusión o la limitación de daños resultantes o incidentales, de manera que es
posible que la limitación o exclusión antedicha no se aplique en su caso.
Esta garantía le brinda derechos legales específicos y quizás usted tenga otros derechos que varían según el estado.
Póngase en contacto con el Equipo de Atención al Cliente al 1-888-HD-HUSKY o visite www.huskytools.com.
Garantía

4
Antes de la instalación
ESPECIFICACIONES
Pantalla LCD (Retroiluminada)
Unidades de medida Lecturas en PSI, BAR, KPA, KG/CM2
Precisión
+/- 1.0 PSI a 100 PSI
+/-1.5 PSI de 100 PSI a 130 PSI
+/-2.0 PSI de 130 PSI a 150 PSI
Rango de medición 0-150 PSI
Presión máxima 150 PSI
Manguera híbrida 15” con extremo pivotante de 360 grados
Entrada NPT ¼”
Válvula de liberación de
presión
válvula de liberación de presión integrada para desinflar neumáticos inflados
excesivamente
Pilas (2) AAA de 1.5 V CC
Duración de la pila Apagado automático tras 60 segundos para conservar la duración de la pila
Rango de temperatura -20 °F a 120 °F*
*Pueden haber demoras en temperaturas bajas
Uso Use con o sin la manguera de presión para medir la presión de los neumáticos
Nitrógeno Compatible con nitrógeno
A
200-3128-A_1-31-18
THANK YOU
We appreciate the trust and confidence you have placed in Husky through the purchase of this air compressor
accessory.We strive to continually create quality products designed to enhance your home. Visit us online to see our
full line of products available for your home improvement needs. Thank you for choosing Husky!
USE AND CARE GUIDE
HEAVY DUTY DIGITAL TIRE INFLATION TOOL
Questions, problems, missing parts?
Before returning to the store, call
Husky Customer Service
8 a.m. - 7 p.m., EST, Monday - Friday
9 a.m. - 6 p.m., EST, Saturday
1-888-HD-HUSKY
HUSKYTOOLS.COM
Item #xxxx-xxx-xxx
Model #024-0375H
M
HLA1683066
B
C
D
E
F
G
HIJ
K
L
AInador 1 G Gancho colgador 1
BVálvula de liberación de aire 1 H Pantalla LCD 1
CManguera 1 I Botón de Encendido/Unidad/Luz 1
DExtremo pivotante 1 J Palanca de inado 1
EMandril de aire 1 K Gancho retractor de la herramienta 1
FTapa del compartimiento de la pila 1 L Conector macho (en caja) 1
F1 Cinta de protección de la pila 1 M Guía de uso y cuidado 1
F1
NOTA: Antes de usar la herramienta de inflado por primera vez,
extraiga la cinta de protección de la pila (F1) y deséchela.

5 HUSKYTOOLS.com
Comuníquese al 1-888-HD-HUSKY para obtener más información.
PLANIFICACIÓN DE LA INSTALACIÓN
NOTA: Las herramientas no se muestran en su tamaño real
HERRAMIENTAS REQUERIDAS
Llave
ajustable
Cinta
de sello
roscado
Lentes
protectores
Destornillador
Phillips n.º 0
Instalación
6 Conexión al compresor
de aire
PELIGRO: Este producto está diseñado específicamente
para aire comprimido y nitrógeno. Nunca utilice esta
herramienta para medir o suministrar oxígeno, dióxido
de carbono, gases combustibles o cualquier otro gas
comprimido.
ADVERTENCIA: APAGUE siempre el compresor,
desconéctelo de la fuente de alimentación y drene toda
la presión del sistema antes de darle servicio.
NOTA: Use sellador de rosca o Teflon®en todas
las roscas macho.
□Para conectar el suministro de aire al
inflador (A), conecte una manguera de aire
(N) a un compresor que tenga un acoplador
de conexión rápida (O) en el extremo.
□Coloque una cinta de sello roscado en las
roscas macho del conector (L) que vienen
con el inflador (A).
□Enrosque el conector macho (L) al extremo del
inflador (A) y fíjelo con una llave ajustable.
NOTA: Inserte el conector macho (L) en el acoplador
de conexión rápida (O) y haga presión para trabarlo en
su lugar.
N
Al
compresor
O L A
Figura 1
Instalación típica
Pieza Descripción Pieza Descripción
N Manguera de aire (no incluida) L Conector macho (incluido)
O Acoplador de conexión rápida (no incluido) A Inflador (incluido)

6
Instalación
7 Configuración del inflador
ADVERTENCIA: No modifique el inflador de neumáticos
digital. Las modificaciones no autorizadas pueden afectar
el funcionamiento o la seguridad del equipo.
ADVERTENCIA: Verifique siempre si hay piezas
dañadas o desgastadas antes de usar el inflador de
neumáticos digital. Reemplace las piezas dañadas
o desgastadas antes de utilizarlo.
□Encienda el inflador (A) presionando el botón
de Encendido/Unidad/Luz (I). La pantalla LCD
(H) debe decir < 0.00 unidades >.
□Para seleccionar las unidades deseadas
de presión (BAR, KPA, KG/CM² o PSI - las
unidades aparecerán a la derecha de 0.0),
mantenga presionado por 2 segundos y suelte
el botón de Encendido/Unidad/Luz (I). Continúe
con este proceso hasta que aparezcan las
unidades deseadas.
□Para encender la retroiluminación de la
pantalla LCD (H), presione y suelte el botón
de Encendido/Unidad/Luz (I).
NOTA: La pantalla LCD (H) del inflador se apagará
automáticamente tras 60 segundos de inactividad.
8 Uso del inflador
de neumáticos
ADVERTENCIA: Para evitar el riesgo de lesiones en
los ojos, rostro o piel, NO dirija el chorro de aire hacia
las personas.
ADVERTENCIA: Operar cualquier herramienta eléctrica
puede provocar la expulsión de objetos extraños hacia sus
ojos, lo cual puede ocasionar daños graves en los ojos.
Antes de comenzar la operación, siempre utilice gafas de
seguridad, ya sea los modelos comunes o aquellos con
escudos laterales, o un escudo facial completo cuando esto
sea necesario. Siempre utilice protección ocular, marcada
para cumplir con ANSI Z87.1.
ADVERTENCIA: No exceda la presión nominal de 150 PSI.
PRECAUCIÓN:Mantenga el inflador seco. La exposición
a la humedad puede dañar los elementos electrónicos de
precisión en el interior.
PRECAUCIÓN:Mantenga el inflador alejado
de interferencias y campos electromagnéticos.
□Conecte el inflador de neumáticos a un
suministro de aire (consulte la sección
“conexión al compresor de aire”).
□Quite la tapa de la válvula del neumático.
□Empuje el mandril de aire (E) contra el vástago
de la válvula del neumático. Asegúrese de que
no haya pérdidas de aire alrededor del mandril
de aire.
□Encienda el inflador presionando el botón
de Encendido/Unidad/Luz.
□Presione la palanca de inflado (J) para liberar
el aire en el neumático.
□Suelte la palanca de inflado y lea la presión
en la pantalla LCD (H).
□Si la presión es superior a la deseada, presione
la válvula de liberación de aire (B) para drenar
aire del neumático.
□Libere la válvula de liberación de aire y lea
la presión en la pantalla LCD (H).
NOTA: La aguja se puede usar con o sin la manguera
conectada.
Funcionamiento
I
J
B

7 HUSKYTOOLS.com
Comuníquese al 1-888-HD-HUSKY para obtener más información.
9 Cómo reemplazar la pila
ADVERTENCIA: APAGUE siempre el compresor,
desconéctelo de la fuente de alimentación y drene toda
la presión del sistema antes de darle servicio.
□Para cambiar las pilas, quite los 2 tornillos (P)
con un destornillador Phillips n.º 0 y luego
quite la tapa de la pila (Q).
□Quite las pilas (R).
□Cambie las pilas por (2) AAA de 1.5 V CC.
□Vuelva a colocar la tapa de la pila y ajuste los
tornillos.
NOTA: Asegúrese de que las pilas estén insertadas
de la manera correcta como se muestra en la figura 2.
NOTA: No ajuste excesivamente los tornillos que
sostienen la tapa de la pila.
Reemplazo de la pila
10
Resolución de problemas
ADVERTENCIA: APAGUE siempre el compresor,
desconéctelo de la fuente de alimentación y drene toda
la presión del sistema antes de darle servicio.
Resolución de problemas
Aparece -H- en la pantalla La presión de entrada o medida es demasiado alta. Reduzca la
presión a 150 PSI o menos
La unidad no se enciende Verifique las pilas
La pantalla LCD está en blanco Reemplace las pilas con (2) AAA de 1.5 V CC
Se dificulta ver la pantalla en clima frío Espere aproximadamente 15 o 20 segundos para que se caliente
la pantalla LCD antes de usarlo
P
QR (+) R (-)
Figura 2

¿Preguntas, problemas, piezas que faltan? Antes de regresar a la tienda, llame al
Servicio de Atención al Cliente de Husky
Lunes a viernes, de 8:00 a 19:00 hs (hora del Este)
Sábados de 9:00 a 18:00 hs (hora del Este)
1-888-HD-HUSKY
HUSKYTOOLS.COM
Conserve este manual para su consulta futura.
Número de documento: 200-3128-E_11/21/18
This manual suits for next models
1
Table of contents
Languages:
Other Husky Tools manuals