Husky FC125LV User manual

Item # 100 695 8754
Model # FC125LV
THANK YOU
We appreciate the trust and con dence you have placed in Husky through the purchase of this inverter welder. We strive to continually
create quality products designed to enhance your home. Visit us online to see our full line of products available for your home improvement needs.
Thank you for choosing Husky!
USE AND CARE GUIDE
HUSKY FC125LV INVERTER WELDER
Questions, problems, missing parts?
Before returning to the store, call
Husky Customer Service
8 a.m. – 7 p.m., EST, Monday-Friday
9 a.m. – 6 p.m., EST, Saturday
1-888-43-HUSKY
HUSKYTOOLS.COM

2
Table of Contents
Table of Contents...............................................................2
Safety Information .............................................................2
Work Area Safety .....................................................................2
Personal Safety........................................................................2
Electrical Safety.......................................................................3
Fire Prevention.........................................................................2
Use and Care............................................................................2
Arc Welding..............................................................................3
Warranty ...........................................................................3
3 Year Limited Warranty ..........................................................3
Pre-Operation ................................................................... 4
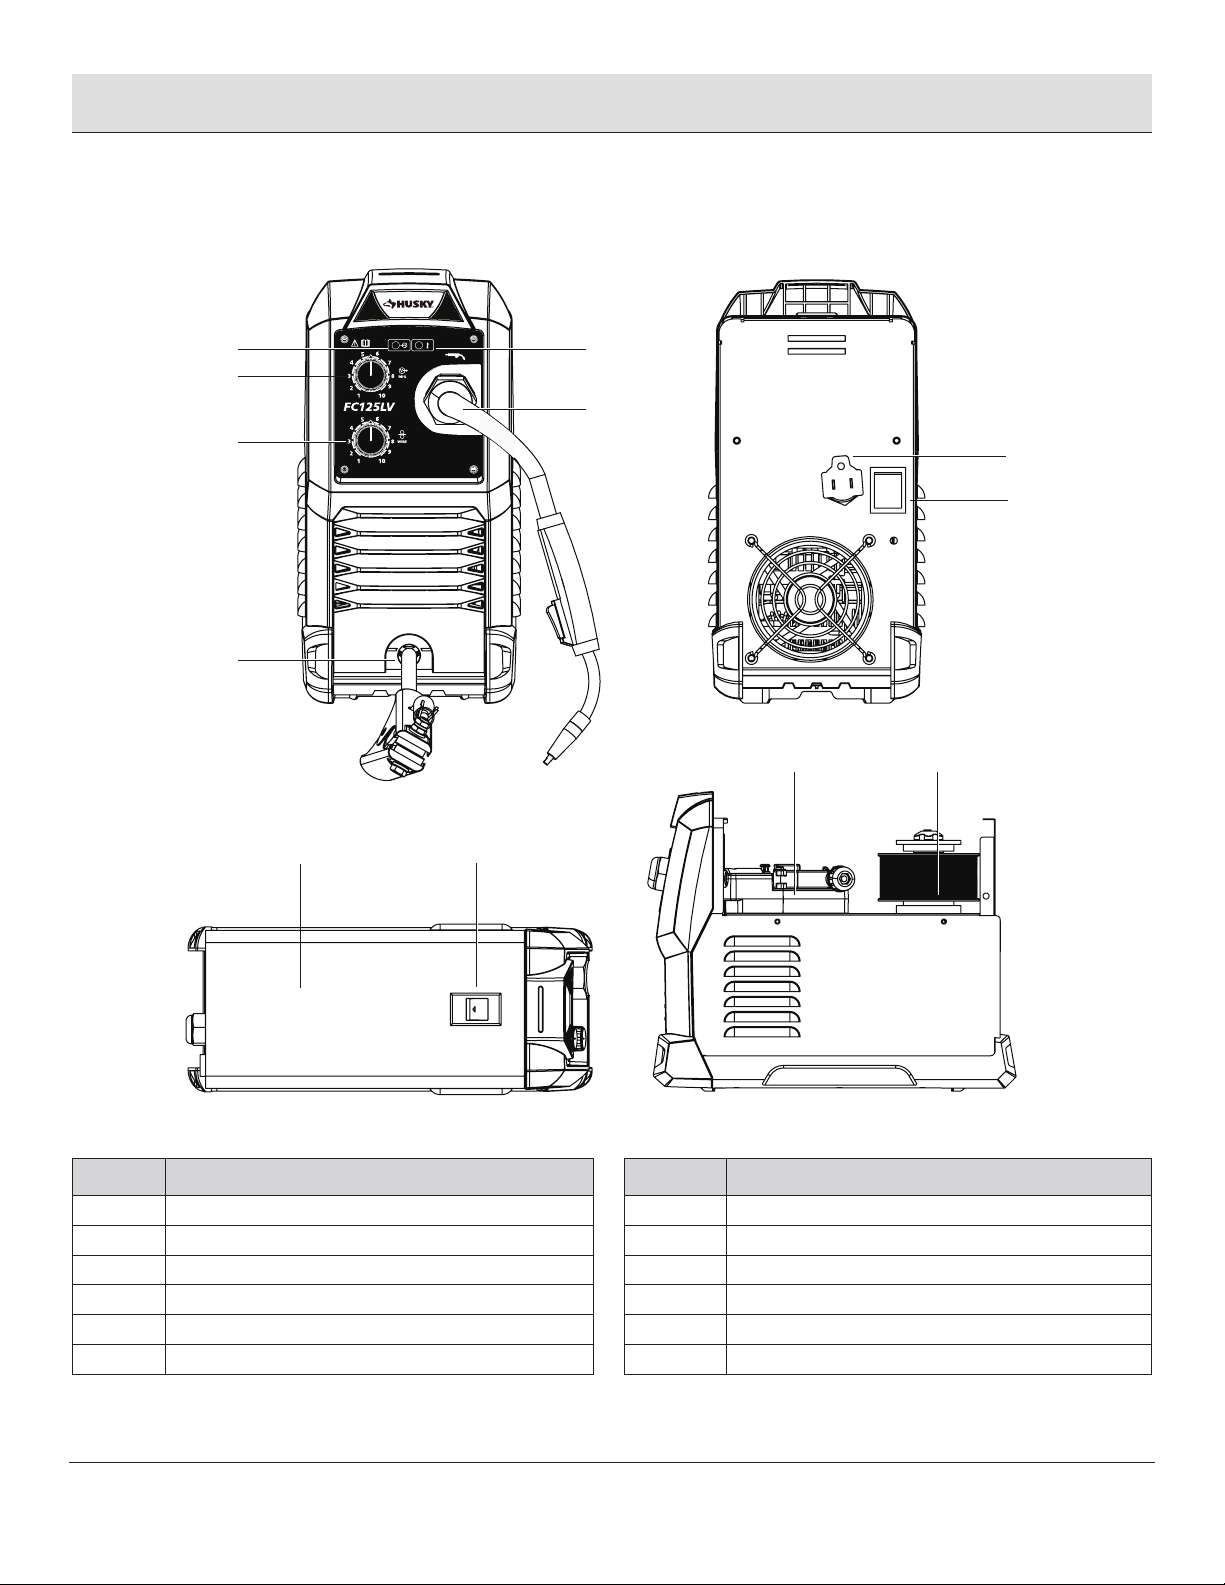
Speci ations ..........................................................................4
Package Contents ....................................................................5
Operation Instruction......................................................... 6
Maintenance ..................................................................... 8
Troubleshooting ................................................................ 9
Service Parts .................................................................. 11
Assembly Diagram.................................................................11
Safety Information
WORK AREA SAFETY
WARNING: Operating the welding machine without
preparation and caution can cause death, injury to yourself
or bystanders. To reduce the risks, the operator should
read, understand and follow the safety instructions.
Besides, bystanders in the area should also follow the
safety instructions under the guidance of operator.
□Ensure your work area is clean and well lit.
□Keep the welder on a stable and clean surface while
operating.
□Keep children, bystanders and visitors away while operating
welding machine. Distractions can cause you to lose control.
□Do not operate machines in explosive atmospheres, such as
in the presence of ammable liquids, gases or dust. Flying
sparks during welding may ignite the dust or fumes.
□Do not leave energized machine unattended. Always turn off
the machine before servicing parts, replacing components
or when the machine is not in use.
PERSONAL SAFETY
WARNING: Welding processes generate high-temperature
arc, welding sparks, hot slag and hot spatters. Welding arc
generates extremely intense ultraviolet and infrared light.
Failure to wear protective equipment during welding can
severely damage your eyes and burn your skin. To reduce
the risks, the operator should read, understand and follow
the safety instructions. Bystanders in the area should also
follow the safety instructions under the guidance of
operator.
WARNING: Welding processes generate fumes, gases and
vapors which can cause discomfort, illness and death. To
reduce the risks, the operator should read, understand and
follow the safety instructions. Bystanders in the area should
also follow the safety instructions under the guidance of
operator.
□Do not weld without proper protection. Flying sparks can
cause burn injury. Always wear protective clothing and face
shield. The intensive light of the electrical arc can also burn
skin. Ensure to wear closed-toe shoes, gloves and clothing
with heavy material, long sleeves and collar.
□Do not look at an electric arc without proper eye protection.
An electric arc is extremely bright and intense which can
burn the eye retina and cause permanent damage when
equipped with inadequate or no eye protection.
□Do not weld in con ned areas without adequate
ventilation. Otherwise, wear an air-supplied respirator.

3 HUSKYTOOLS.COM
Please contact 1-888-43-HUSKY for further assistance.
Safety Information (continued)
□Remind bystanders before striking a weld arc and make
sure they are at a safe distance and aware of coming
intensive welding arc.
□Make sure you are in a proper position while operating the
welder. Do not overreach. Keep proper footing and balance
at all times, which enables better control of the welder in
unexpected situation.
□Stay alert when operating a welding machine. Do not use a
machine while you are tired or under the inuence of drugs,
alcohol or medication. Avoid unintentional starting.
□Make sure you read the user manual and are well prepared
before welding.
□Read and understand manufacturer’s Safety Data Sheets
(SDS) and Material Safety Data Sheets (MSDS) if available.
ELECTRICAL SAFETY
WARNING: Improper use of welding machines will cause
electric shock. Electric shock can kill. To reduce the risks,
the operator should read, understand and follow the safety
instructions. Bystanders in the area should also follow the
safety instructions under the guidance of operator.
□Do not expose welding machine to rain or come in contact
with a wet surface. Water entering a machine will increase
the risk of electric shock.
□Do not make contact with any welding current circuits such
as ground clamps, electrodes, welding wires, MIG/TIG guns,
workpieces, any metal parts/conductive materials in contact
with electrode holder/workpieces.
□Do not make contact with any grounded metal surfaces such
as metal pipes, radiators and refrigerators. There will be an
increased risk of electric shock when your body is grounded.
□Ensure power is disconnected before setting up any TIG
torch/MIG gun/electrode holder, adjustment and services.
□Do not abuse any cords. Never carry, pull or unplug the
welder by its cord. Keep any cords away from heat, oil,
sharp edges or moving parts. Damaged or entangled cords
could increase the risk of electric shock.
□Inspect the welder before using it. Do not weld if you
observe any damaged and cracked parts, including but not
limited to damaged/cracked cables, electrode holders,
ground clamps and so on. Replace them before using the
welder.
□Use an extension cord (specic for outdoor use) when
operating a welder outdoors.
□Do not point torches/welding guns at people when
torches/welding guns are energized. Do not point MIG gun at
your eyes in any situation.
□Do not weld in damp area or when welding equipment is in
contact with water or wet surface.
□Do not weld when body or clothes are wet.

4
Safety Information (continued)
FIRE PREVENTION
WARNING: Failure to protect combustible materials against
welding sparks, hot slag and hot spatters can cause e and
even explosion. Fire and explosion can cause death, injury
and property damage. To reduce the risks, please read,
understand and follow the safety instructions.
□Check the area before welding. Ensure the work area is
checked and cleared of combustible and ammable
materials. A minimum distance of 35 feet (10 meters) is
required between work area and combustibles because 35
feet is an average distance welding sparks and slags can
f the minimum 35 feet distance requirement cannot be
met, protect consumable/ ammable materials with re
resistant covers or shields.
□Do not weld or cut on or near materials with combustible
coating or combustible internal substance, such as
materials in walls or ceilings, without any approved methods
to eliminate the hazard.
□Do not weld or cut in areas (such as gas station) where the
air may contain ammable substances such as combustible
dust, gas, or liquid vapors.
□Do not wear gloves, hair preparations, shoes and other
clothing that contains oil, grease, or other ammable
substances. Wear re-resistant protective clothing to protect
upper and lower body against re and heat. Protective
clothing includes but is not limited to leather gloves, heavy
long sleeve and cuf ess shirts, heavy and cuf ess pants,
high-topped shoes and helmet.
□Do not dispose of hot slag in containers holding combustible
materials. Keep a re extinguisher nearby and know how to
use it.
□Follow requirements in OSHA and NFPA for hot work and
have an extinguisher nearby.
□When nished welding, do not leave without a check for
evidence of potential re. Overlooked smoke or ame have
risks to cause re hazard. Check and make sure the welding
areas are free of sparks, slags, and ames before leaving
the welding area.
USE AND CARE
□Ensure you choose the right welder model and welding
mode recommended for your application. Use the welder
and accessories in compliance with these instructions.
Operating a welder under improper conditions could cause
unpredictable safety issues.
□Store idle welders out of reach of children. Do not allow
people who are unfamiliar with the welder and operational
instructions to operate the welder. Ignorance of any safety
instructions or operational guidance will result in potential
safety risk.
□Replace damaged parts immediately before use. Many
accidents are caused by poorly maintained welders.
□Have your welder serviced by a quali ed service person if
you encountered problems.

5 HUSKYTOOLS.COM
Please contact 1-888-43-HUSKY for further assistance.
Safety Information (continued)
ARC WELDING
CAUTION: High frequency and electromagnetic energy
generated from the welding process could cause damage to
your electronical devices. To reduce the risks, please read,
understand and follow the safety instructions.
□Follow manual to install and ground machine. Be sure
nearby equipment is compatible with electromagnetic
energy.
□Electronic products such as computer, computer-driven
equipment and communication equipment can be interfered
or even harmed by electromagnetic energy. Users with
pacemakers should consult with their physician before using
a welder because a pacemaker can be damaged by
electromagnetic energy if exposed to it.
□TIG welder and TIG welding process can generate high
frequency. High frequency can interfere with radio
navigation, safety services, computers and communication
equipment.
□It is the user’s responsibility to have a quali ed electrician
promptly correct any interference problem resulting from
installation or operation of the welder. The welder should be
regularly inspected and maintained. If necessary, shield the
work area or move the welding machine.
□The warnings, cautions, and instructions discussed in this
instruction manual cannot cover all possible conditions and
situations. It must be understood by the users that common
sense and caution are factors which cannot be built into this
product, but must be provided by the operator.
3 YEAR LIMITED WARRANTY
If this Husky product ever fails due to a defect in material or workmanship, return the product to any Home Depot retail store for
replacement with an item of equal or greater value. This warranty excludes incidental / inconsequential damages due to misuse, abuse, or
normal wear and tear. This warranty gives you speci rights, and you may also have other rights, which vary from state to state. Please
see store or call 1-888-HD-HUSKY for details.
Warranty

6
Pre-operation
SPECIFICATIONS
Process Flux Core (FCAW – ux core arc welding)
Power Plug 120V/15A
Open Circuit Voltage 44V
Duty Cycles 90A @ 30%
Welding Current Ranges 30A - 125A
Welds Up To 1/8 in. Steel
Weldable Metals Steel
Compatible Wire Capacity 0.030/ 0.035 in. flux core wire up to 4 lb spool
SYMBOLS
Symbol Description Symbol Description
Inverter power source DC
Warning! Please read user manual.
MIG/MAG welding
Electric shock hazard. Do not touch
energized parts.
Suitable for welding in an environment
with increased risk of electric shock
Fire hazard. Keep ammable materials
away during welding.
Power supply type of electric device
Arc ray hazard. Wear welding mask
with properly rated ter lens
Input voltage indicator
Inhalation hazard. Keep ventilation
Tripped protection/alert indicator
Wire feed speed
or WFS
MIG gun socket
Output voltage
1~50/60Hz.
.

HUSKYTOOLS.COM
7 Please contact 1-888-43-HUSKY for further assistance.
Pre-operation (continued)
PACKAGE CONTENTS
Part Description
Part Description
A Input voltage indicator
G Input power cord
B Voltage adjustment knob
H ON/OFF power switch
C Wire feed adjustment knob
I Top panel buckle
D Ground clamp
J Top panel
E Tripped protection/alert indicator
K Wire feeder
F Flux core gun
L Wire spool spindle
A E
G
H
F
B
C
D
J I
K L

8
Operation Instruction
1
Preparing for Welding
□Designate a work area that is clean and well lit. Keep
children and pets out of the work area.
□Read the user manual and safety guidelines before
operating the welder.
□Ensure you understand the basic speci ation of your
welder.
□Wear PPEs to protect your eyes and skins from hot welding
sparks and intensive arc rays. Ensure same protections are
provided to any bystanders nearby.
□Ensure all the combustible, ammable, hazardous
substances are removed from the work area. Make sure a
re extinguisher within reach is available.
□Inspect your welder before each use and do not operate a
welder with damaged cables and components. Replace all
the damaged parts before use. Have a quali ed technician
to help you if needed.
WARNING: Welding processes generate high-
temperature arc, welding sparks, hot slag and hot
spatters. Welding arc generates extremely intense
ultraviolet and infrared light. Failure to wear protective
equipment during welding can severely damage your
eyes and burn your skin.
WARNING: Failure to protect combustible materials
against welding sparks, hot slag and hot spatters can
cause e and even explosion. Fire and explosion can
cause death, injury and property damage.
2
Installing the Wire Spool
□Make sure ON/OFF power switch (H) is OFF and unplug the
welder before proceeding.
□Open the welder case by pushing the buckle (I) located on
the top panel (J).
□Unscrew the spool cap (1), and remove spring (2), and
spool plate (3).
□Place the wire spool (4) on the wire spool spindle in a
manner as shown on the right.
NOTE: The wire spool should rotate in a counterclockwise
direction when operating.
□Place the spool plate (3), spring (2) and the spool cap (1)
back to the wire spool spindle.
□To make sure wire spool can spin properly, avoid
Figure 1.Wire Spool Spindle Assembly
overtightening or insuf ent tightening of the spool cap.
Overtightening may cause inconsistent wire feeding while
insuf ent tightening will cause uncontrolled wire feeding.
□Next, please check the “Welding Wire Setup” to feed the
welding wire through MIG gun.
1
2
3
4

HUSKYTOOLS.COM
9 Please contact 1-888-43-HUSKY for further assistance.
Operation Instruction (continued)
3Setting Up the Welding Wire
□Release the drive roll pressure arm (7) by lifting up the
pressure arm adjustment knob (6).
□Rotate the drive roll knob (8) counterclockwise to remove it.
(See
Figure 2
. and
Figure 3.
)
□Check your drive roll (9). Ensure it matches with your
welding wire.
Note: Drive roll (9) has two grooves. The top groove is the
one that feeds welding wire.
□Place the drive roll knob (8) back and rotate clockwise to
tighten it.
□Before inserting your wire into the wire feeder, ensure your
wire end is straight. Cut the bent end with wire cutters if
necessary.
□Feed your wire into the wire inlet guide tube (5) of the wire
feeder and line the wire up with the TOP groove of the drive
roll. Push the wire across the drive roll and into the other
side of the wire feeder.
□Pull the pressure arm adjustment knob (6) back and lock it
by pushing the drive roll pressure arm (7) down.
□Remove the nozzle from the end of the flux core gun.
□Remove the contact tip at the tip of the gun by unscrewing
in counterclockwise direction.
□Plug the welder and switch the ON/OFF switch to ON.
Ensure you are not pointing the flux core gun at yourself
and any bystanders.
□Press the trigger on the flux core gun. Feed the wire
continuously until at least one inch of the wire extends out
of the gun.
□Check if the drive roll is feeding the wire properly. If the
drive roll is slipping on the wire, increase pressure on the
pressure arm adjustment.
□Check the contact tip and ensure it matches the welding
wire. Install the contact tip back to the flux core gun.
□Attach the flux core nozzle back to the gun.
□Cut off the over-extended wire that sticks out of the flux
core gun if needed.
.
i
ii
iii
76
5
8
8
9
Figure 3. (i) Locked Wire Feeder, (ii) Released Drive
Roll Pressure Arm, (iii) Removed Drive Roll Knob
Figure 2. Wire Feeder

10
Operation Instruction (continued)
4Setting Up for Flux Core Wire Welding
□Ensure your workpiece is clean and dry and the ground
clamp (D) has a good connection to the workpiece.
□Open the top panel (J). Load the wire spool and feed the
wire into the wire feeder. For detail instructions please see
"Installing the Wire Spool" and "Setting Up the Welding
Wire."
□Switch the ON/OFF power switch (H) to ON at the back of
the welder.
□Follow instructions in "Setting Up the Welding Wire," and
feed the welding wire into the wire feeder and flux core
gun (F). Press the flux core gun trigger to load welding wire
through the flux core gun.
□Adjust the wire feed adjustment knob (C) to set your wire
feed speed.
□Adjust the voltage adjustment knob (B) to set your welding
voltage.
□Hold the flux core gun (F) to the workpiece and press the
flux core gun trigger. The weld arc can be initiated by
touching the weld wire to the workpiece.
FC125LV Welding Recommendation Table
Material
Thickness
Knob Position
Wire Size
0.03 in. (0.8 mm)
Wire Size
0.035 in. (0.9 mm)
WFS Voltage WFS Voltage
20 ga
(1.0 mm) 1 1 1 1
18 ga
(1.2 mm) 4 2 3 2
16 ga
(1.6 mm) 5 4 4 3
14 ga
(2.0 mm) 8 5 5.5 4
3/32 in.
2.5
mm) 10 6 7 5
1/8 in.
(3.2 mm) - - 10 6
Cannot weld aluminum.
Maintenance
□Before each use, inspect the general condition of the welder. Check for loose screws, cracked or broken parts, damaged circuit
wiring or cables, and any other potential risks that may cause safety issues.
□After each use of the welder, clean external surfaces of the welder with clean cloth.
□Periodically clean the welder using compressed air to blow out all dust and debris from the interior.
□If the unit continuously shuts down due to thermal overload, please turn off the welder and have a quali ed electrician inspect the
welder and repair it.
□Store the welder and accessories in a clean and dry location out of reach of children.
□Wire feed drive rolls are consumable accessories. The grooves of the drive roll will wear deeper after long-time usage. The wear
out will cause a contact between the idler roll and the drive roll. In this situation, the wire feed drive roll should be replaced.
□Use a wire brush to scrub the outside of the contact tip. Use a tip cleaner (sold separately) to clean the inside.
□Contact tips are also consumable accessories. After long-time usage, the worn round hole of the contact tip will turn to an elliptical
shape or form some bulges. Thus, replace the contact tip when it wears out.
□Nozzle must be cleaned periodically because spatter and slag will build up inside the nozzle during welding process.
(
V V

HUSKYTOOLS.COM
11 Please contact 1-888-43-HUSKY for further assistance.
Troubleshooting
NOTE: When yellow Tripped protection/alert indicator turns on, the possible cause is tripped overheat protection. Please refer to a
quali ed electrician to check you welder.
Problem
Possible Cause
Solution
Wire feed motor works
but no wire feeds.
□Insuf ent pressure given to the
wire feed drive roll.
□Rotate the pressure arm adjustment knob clockwise to
increase the pressure on drive roll. See Operation
Instruction – Setting Up the Welding Wire"
"
(page 9) for
more details.
□Incorrect drive roll size.
□Replace the drive roll to the correct size.
□Damaged flux core gun or
damaged/blocked wire inlet
guide tube.
□Replace the flux core gun.
□Clean the wire inlet guide tube with compressed air or
replace the wire inlet guide tube.
Wire creates a bird’s
nest during operation.
□Clogged or damaged contact tip.
□Clean the contact tip or replace to a new one.
□Too much pressure on the drive
roll.
□Rotate the pressure arm adjustment knob counterclockwise
to decrease the pressure on drive roll. See Operation
Instruction - Setting Up the Welding Wire"
"
(page 9) for
more details.
No arc while wire feeds.
□Loose ground clamp connection.
□Check and make sure the ground clamp is well attached to
the workpiece.
Arc works but no wire
feeds.
□Insuf ent pressure on the wire
feed drive roll.
□Rotate the pressure arm adjustment knob clockwise to
increase the pressure on drive roll. See Operation
Instruction - Setting Up the Welding Wire"
"
(page 9 ) for
more details.
□No wire left on the wire spool.
□Check whether the wire spool is used up. Replace with a
new one if used up.
Wire burns back to
contact tip.
□Wire feed speed is too low.
□Increase wire feed speed by rotate wire feed adjustment
knob clockwise.
□Wrong size contact tip.
□Replace to a correct size contact tip.
□Clogged or damaged contact tip.
□Clean the clogged tip with a tip cleaner.
□Replace the damaged tip.
No welder output when
switched on and neither
indicator LED is
illuminated.
□Loose ground clamp connection.
□Check and make sure the ground clamp is well attached to
the workpiece.
□No input power supply.
□Check and make sure welder is plugged in.
□Verify outlet output power.
□Check the circuit breaker to see whether it is tripped or not.
Reset if necessary.

12
Troubleshooting (continued)
Problem
Possible Cause
Solution
No welder output when
switched on and Tripped
protection/alert
indicator is illuminated.
□Tripped thermal protector by
overheat (Tripped
protection/alert indicator turns
on).
□Cool the welder for at least 10 minutes. The Tripped
protection/alert indicator LED should turn off after welder
cools down.
□Reduce the duration of the welding period, or duty cycle, or
duration of use.
□Check whether the fan inside the welder is working
properly.
□Overheat caused by
environmental factor (high room
temperature or insuf ent air
ow).
□Relocate to a cool working environment.
□Check whether there is obstruction blocking air ow in the
room. Clear the obstruction if needed.
□Incorrect input voltage to
welder.
□Check the outlet voltage.
Weak arc strength/non-
penetrating weld.
□Long or improper extension
cord.
□Use a proper extension cord.
□Input power is too low.
□Verify your welder’s output voltage and current. Ask a
quali ed electrician for help if necessary.
□Poor ground clamp, torch or
electrode holder connection.
□Check connection of ground cable, torch or electrode holder
and make sure they are well connected.
□Wrong size or worn contact tip.
□Replace with the correct size contact tip or replace with a
new contact tip.
□Wrong welding wire size or type.
□Recommended welding wires are 0.030/0.035 in. flux core
welding wire.
Frequent circuit breaker
trips.
□Circuit breaker is insuf ent for
the working current of the
welder.
□Make sure the circuit breaker ts the working current of
the welder.
□Refer to a quali ed electrician if you are not able to gure
out.
□Too much amperage is drawing
due to the use of overlarge
welding wire.
□Recommended welding wires are 0.030/0.035 in. flux core
welding wire.
Poor welds.
□Improper current/voltage setting.
□Make sure the welding current/voltage matches the
recommended setting on chart.
□Workpiece is not clean (such as
rusty, painted or greasy).
□Ensure workpiece is clean and dry.
□Poor ground clamp or
torch/electrode holder
connection.
□Check and make sure ground clamp/workpiece have good
connection; torch/electrode holder and machine have good
connection.
□Rusty or dirty welding wire.
□Check your wire. Clean it or replace with a new wire spool.
Dif ult to start an arc.
□Welding amperage is low.
□Increase welding amperage.
□Clogged contact tip.
□Clean or replace contact tip.

HUSKYTOOLS.COM
13 Please contact 1-888-43-HUSKY for further assistance.
Service Parts
ASSEMBLY DIAGRAM
Part Description QTY
1 Lock catch
1
16 Right housing 1
2 Top housing
1
17 Recti er radiator 1
3 Spool
1
18 IGBT radiator 2
4 Wire feeder
1
19 High recovery recti er tube 3
5 Electrolytic capacitor
2
20 Audion 1
6 Left housing
1
21 Bridge recti ers radiator 1
7 Bracket
1
22 Bridge recti er 1
8 Main PCB
1
23 IGBT 2
9 Control PCB
1
24 Fan 1
10 OUT-Inductance
1
25 Transformer 1
11 Ig PCB
1
26 Switch 1
12 Bottom housing
1
27 Power cable 1
13 Front plastic panel
1
28 PG clip 1
14 Panel
1
29 Rear panel 1
15 PG clip
1
1
3
2
4
6
7
13
14
11
8
9
15
16
17
18
20
23
19
22
21
29
27
28
26
5
25
10
12
24

Questions, problems, missing parts? Before returning to the store,
call Husky Customer Service
8 a.m. – 7 p.m., EST, Monday-Friday, 9 a.m. – 6 p.m., EST, Saturday
1-888-43-HUSKY
HUSKYTOOLS.COM
Retain this manual for future use.

Artículo # 100 695 8754
Modelo # FC125LV
GRACIAS
Agradecemos la confianza que ha depositado en Husky con la compra de esta soldadora de plasma. Nos esforzamos por crear continuamente
productos de calidad diseñados para mejorar su hogar. Visíte nuestra página web donde podrá ver nuestra línea completa de productos disponibles
para sus necesidades de mejora del hogar. ¡Gracias por elegir Husky!
GUÍA DE USO Y MANTENIMIENTO
MÁQUINA DE SOLDAR INVERSORA HUSKY FC125LV
¿Tiene preguntas, problemas o ha perdido
alguna parte?
Antes de volver a la tienda, llame al servicio
de atención al cliente de Husky.
8 de la mañana a 7 de la tarde, EST, de lunes
a viernes
9 de la mañana a 6 de la tarde, EST, sábados
1-888-43-HUSKY
HUSKYTOOLS.COM

2
Índice
Índice ............................................................................ 2
Información de seguridad........................................... 2
Seguridad en el área de trabajo...............................................2
Seguridad personal..................................................................2
Seguridad eléctrica..................................................................4
Prevención de incendios..........................................................5
Uso y cuidado...........................................................................5
Soldadura por arco ..................................................................6
Garantía ........................................................................ 6
Garantía limitada de 3 años.....................................................6
Previo a la operación................................................... 7
Especificaciones ......................................................................7
Contenido del embalaje ...........................................................8
Instrucción de funcionamiento................................... 9
Mantenimiento ........................................................... 11
Solución de problemas.............................................. 12
Partes de servicio ...................................................... 15
Diagrama de montaje.............................................................15
Información de seguridad
SEGURIDAD EN EL ÁREA DE TRABAJO
ADVERTENCIA:
□Asegúrese de que el área de trabajo esté limpia y bien
iluminada.
□Mantenga la soldadora sobre una superficie estable y limpia
mientras hace uso de ella.
□Mantener alejados a visitantes, transeúntes y los niños
mientras se opera la soldadora. Las distracciones pueden
hacerle perder el control.
□No opere las máquinas en atmósferas explosivas, como en
presencia de líquidos, gases o polvos inflamables. Las
chispas que saltan durante la soldadura pueden encender el
polvo o los humos.
□No debe abandonar el lugar donde está la máquina
encendida y sin vigilancia. Apague siempre la máquina
antes de realizar el mantenimiento de las piezas, la
sustitución de los componentes o cuando la máquina no
esté en uso.
SEGURIDAD PERSONAL
ADVERTENCIA: Los procesos de soldadura generan
arcos de alta temperatura, chispas al soldar, escoria y
salpicaduras calientes. La soldadura por arco genera una
luz ultravioleta e infrarroja de gran intensidad. Si no se usa
el equipo de protección durante la soldadura, cabe el riesgo
de dañarse gravemente los ojos y quemarse la piel. Para
reducir los riesgos, el operador debe seguir, comprender y
leer las instrucciones de seguridad. Las personas que se
encuentren en la zona también deben seguir las
instrucciones de seguridad bajo la dirección del operador.
ADVERTENCIA:
□No se debe operar sin la protección adecuada. Las chispas
que saltan pueden causar quemaduras. Lleve siempre ropa
de protección y careta. La luz intensa del arco eléctrico
también puede quemar la piel. Asegúrese de llevar zapatos
cerrados, guantes y ropa con material grueso, mangas
largas y cuello.
□No mire un arco eléctrico sin una protección ocular
adecuada. Un arco eléctrico es extremadamente brillante e
intenso y puede quemar la retina del ojo y causar daños
permanentes cuando se lleva una protección ocular
inadecuada o no se lleva.
□No trabaje en lugares cerrados sin una ventilación adecuada.
De lo contrario, use un respirador con suministro de aire.
Los procesos de soldadura generan
vapores, gases y humos que pueden causar la muerte,
enfermedades y molestias. Para reducir los riesgos, el
operador debe seguir, comprender y leer las instrucciones
de seguridad. Las personas que se encuentren en la zona
también deben seguir las instrucciones de seguridad bajo la
dirección del operador.
La operación de la soldadora sin
preparación y precaución puede causar la muerte, lesiones
personales o a los transeúntes. Para reducir los riesgos, el
operador debe seguir, comprender y leer las instrucciones
de seguridad. Las personas que se encuentren en la zona
también deben seguir las instrucciones de seguridad bajo la
dirección del operador.

Información de seguridad (continuación)
□Antes de que se produzca un arco de plasma, debe hacerlo
saber a los transeúntes y debe asegurarse de que se
encuentran a una distancia segura y de que son conscientes
de que exponen su campo de visible a un arco de plasma
intenso.
□Asegurarse de estar en una posición adecuada mientras se
opera la soldadora. No se extienda demasiado. Mantenga el
equilibrio y la posición correcta en todo momento, lo que
permite un mejor control de la soldadora en situaciones
inesperadas.
□Manténgase alerta al operar una soldadora. No utilice la
máquina cuando esté cansado o bajo la influencia de drogas,
alcohol o medicamentos. Evite el arranque involuntario.
□Asegúrese de leer el manual del usuario y de estar bien
preparado antes de soldar.
□Lea y comprenda las hojas de datos de seguridad (SDS) del
fabricante y las hojas de datos de seguridad de los
materiales (MSDS) si están disponibles.
SEGURIDAD ELÉCTRICA
ADVERTENCIA: El uso inadecuado de las soldadoras
puede provocar una descarga eléctrica. La descarga
eléctrica puede matar. Para reducir los riesgos, el operador
debe seguir, comprender y leer las instrucciones de
seguridad. Las personas que se encuentren en la zona
también deben seguir las instrucciones de seguridad bajo la
dirección del operador.
□No exponga la soldadora a la lluvia ni entre en contacto con
una superficie húmeda. La entrada de agua en la máquina
aumenta el riesgo de descarga eléctrica.
□No toque ni entre en contacto con ninguna parte del circuito
de corriente de la máquina de soldar; como pinzas de tierra,
electrodos, alambres de soldadura, pistolas MIG/TIG, piezas
de trabajo, cualquier pieza metálica o de material conductor
que este en contacto con el portaelectrodos o las piezas de
trabajo.
□No haga contacto con ninguna superficie metálica
conectada a tierra, como tuberías metálicas refrigeradores y
radiadores. Hay un mayor riesgo de descarga eléctrica
cuando su cuerpo está conectado a tierra.
□Asegurarse de que la energía está desconectada antes de
configurar cualquier antorcha TIG/pistola
MIG/portaelectrodos, ajuste y servicios.
□No abuse de los cables. Nunca se debe transportar o
desenchufar la soldadora tirando del cable. Mantenga los
cables alejados del calor, el aceite, los bordes afilados o las
piezas móviles. Los cables dañados o enredados podrían
aumentar el riesgo de descarga eléctrica.
□Inspeccione el soldador antes de utilizarlo. No utilice la
soldadora si observa alguna pieza dañada o agrietada,
incluidos, entre otros, abrazaderas de tierra o cables
dañados o agrietados, etc. Sustituirlas antes de utilizar la
soldadora.
□Utilice un alargador (específico para uso en exteriores)
cuando opere una soldadora al aire libre.
□No apunte los sopletes/pistolas de soldar hacia las personas
cuando los sopletes/pistolas de soldar estén encendidos. No
apunte con la pistola MIG a los ojos en ninguna situación.
□No se debe soldar en zonas húmedas o cuando la soldadora
esté en contacto con agua o superficies mojadas.
□No se debe cortar cuando el cuerpo o la ropa estén mojados.
3 HUSKYTOOLS.COM
Póngase en contacto al 1-888-43-HUSKY para obtener ayuda.

Información de seguridad (continuación)
PREVENCIÓN DE INCENDIOS
ADVERTENCIA:
□Compruebe la zona antes de soldar. Asegúrese de que el
área de trabajo esté revisada y despejada de materiales
combustibles e inflamables. Se requiere una distancia
mínima de 10 metros entre el área de trabajo y los
combustibles ya que pueden volar las chispas al soldar
hasta un promedio de 10 metros de distancia. Si no se
puede cumplir el requisito de la distancia mínima de 10
metros, proteja los materiales consumibles o inflamables
con cubiertas o escudos resistentes al fuego.
□No corte sobre o cerca de materiales con revestimiento
combustible o sustancia interna combustible, como
materiales en paredes o techos, sin ningún método
aprobado para eliminar el peligro.
□No corte en áreas (como una gasolinera) donde el aire
pueda contener sustancias inflamables como polvo
combustible, gas o vapores líquidos.
□No use guantes, preparados para el cabello, zapatos y otras
prendas que contengan aceite, grasa u otras sustancias
inflamables. Utilizar ropa de protección resistente al fuego
para proteger la parte superior e inferior del cuerpo contra el
fuego y el calor. La ropa protectora incluye, entre otras
cosas, guantes de cuero, camisas pesadas de manga larga y
sin puños, pantalones pesados y sin puños, zapatos de
punta alta y casco.
□No tire escorial caliente en recipientes que contengan
materiales combustibles. Tenga cerca un extintor de
incendios y sepa cómo utilizarlo.
□Siga los requisitos de OSHA y NFPA para trabajos en caliente
y tenga un extintor cerca.
□Cuando termine de soldar, no debe abandonar el lugar sin
comprobar los indicios de un posible incendio. Los humos o
llamas que se pasan por alto tienen riesgos de causar
peligro de incendio. Compruebe y asegúrese de que las
zonas de soldadura están libres de chispas, escorial y
llamas antes de abandonar la zona a soldar.
USO Y CUIDADO
□Asegúrese de elegir el modelo de soldador correcto y el
modo de soldadura recomendado para su aplicación. Utilice
el soldador y los accesorios de acuerdo con estas
instrucciones. El funcionamiento de una soldadora en
condiciones inadecuadas podría causar problemas de
seguridad imprevisibles.
□Guardar los soldadores inactivos fuera del alcance de los
niños. No deje operar la soldadora a personas que no estén
familiarizadas con la soldadora y las instrucciones de
funcionamiento. El incumplimiento de las instrucciones de
seguridad o de las orientaciones de funcionamiento
supondrá un riesgo potencial para la seguridad.
□Sustituya inmediatamente las piezas dañadas antes de
utilizar la máquina. Muchos accidentes son causados por
soldadoras mal mantenidas.
□Lleve su soldadora a un servicio técnico calificado si
encuentra problemas.
4
Si no se protegen los materiales
combustibles contra las chispas al soldar, la escoria y
las salpicaduras calientes, se puede producir un
incendio e incluso una explosión. El fuego y la
explosión pueden causar lesiones, la muerte y daños
materiales. Para reducir los riesgos siga, comprenda y
lea las instrucciones de seguridad.

Información de seguridad (continuación)
PRECAUCIÓN: La energía electromagnética y de alta
frecuencia generada por el proceso de soldadura podría
dañar sus dispositivos electrónicos. Para reducir los riesgos
siga, comprenda y lea las instrucciones de seguridad.
□Siga el manual para instalar y conectar la máquina a tierra.
Asegúrese de que los equipos cercanos son compatibles con
la energía electromagnética.
□Los productos electrónicos como los ordenadores, los
equipos informáticos y los equipos de comunicación pueden
sufrir interferencias o incluso daños por la energía
electromagnética. Los usuarios con marcapasos deben
consultar con su médico antes de utilizar un soldador por
plasma porque un marcapasos puede resultar dañado por la
energía electromagnética si se expone a ella.
□La soldadora TIG y el proceso de soldadura TIG pueden
generar una alta frecuencia. La alta frecuencia puede
interferir con la navegación por radio, los servicios de
seguridad, los ordenadores y los equipos de comunicación.
□Es responsabilidad del usuario hacer que un electricista
cualificado corrija rápidamente cualquier problema de
interferencia resultante de la instalación o el funcionamiento
del soldador. El soldador debe ser inspeccionada y
mantenida regularmente. Si es necesario, proteja el área de
trabajo o traslade la soldadora.
□Las advertencias, precauciones e instrucciones comentadas
en este manual de instrucciones no pueden cubrir todas las
condiciones y situaciones posibles. Los usuarios deben
entender que el sentido común y la precaución son factores
que no pueden ser incorporados a este producto, sino que
deben ser proporcionados por el operador.
Si este producto Husky falla alguna vez debido a un defecto en los materiales o en la mano de obra, devuelva el producto a cualquier tienda
minorista Home Depot para que sea reemplazado por un artículo de igual o mayor valor. Esta garantía excluye los daños incidentales /
inconsecuentes debidos al mal uso, abuso o desgaste normal. Esta garantía le otorga derechos específicos y otros de sus derechos pueden
que varían de un país a otro. Visite nuestra tienda o llame al 1-888-43-HUSKY para más detalles.
Garantía
5 HUSKYTOOLS.COM
Póngase en contacto al 1-888-43-HUSKY para obtener ayuda.
SOLDADURA POR ARCO
GARANTÍA LIMITADA DE 3 AÑOS

Previo a la operación
ESPECIFICACIONES
Proceso Flux Core (FCAW - soldadura por arco con núcleo de flujo)
Enchufe de alimentación 120V / 15A
Tensión del circuito abierto 44V
Ciclo de trabajo 90A @ 30%
Rangos de corriente de soldadura 30A - 125A
Soldadura hasta 1/8 in. Acero
Metales soldables Acero
Capacidad de alambres compatibles 0.030/ 0.035 in. bobinas de alambre de núcleo de flujo de hasta 4 lb.
Tamaño 14.5 in. x 6 in. x 11.6 in.
SÍMBOLOS
Símbolo Descripción
Símbolo Descripción
Fuente de alimentación del inversor
AC/DC
¡Advertencia! Lea el manual del usuario.
Soldado MIG/MAG
Peligro de descarga eléctrica. No toque
las partes encendidas donde pasa
corriente.
Adecuado para soldar en un entorno
con mayor riesgo de descarga eléctrica.
Peligro de incendio. Mantener alejados
los materiales inflamables durante la
soldadura.
Tipo de alimentación del dispositivo
eléctrico.
Peligro de rayos de arco. Utilizar
máscara de soldar con lente de filtro de
clasificación adecuada.
Indicador de tensión de entrada
Peligro de inhalación. Mantener
ventilado.
Protección/indicador de alerta
disparado
o WFS
Velocidad de alimentación del alambre
Tensión de salida
Encaje de la pistola MIG
1~50/60Hz
6
This manual suits for next models
1
Table of contents
Languages:
Other Husky Welding System manuals
Popular Welding System manuals by other brands

Miller
Miller SRH 2000 STICK 400 owner's manual

widos
widos 20000 Working Instructions Translation

Parkside
Parkside PESG 120 A1 Assembly, operating and safety instructions

Crown
Crown CT33098 Original instructions

Lincoln Electric
Lincoln Electric PIPELINER 200 Service manual

Metabo
Metabo WIG 170 DC Set operating instructions

Miller Electric
Miller Electric Metro 300DX owner's manual

HTP
HTP MTS 160 owner's manual

Tweco
Tweco ULTRAFEED VAF-4 Service manual

Miller Electric
Miller Electric OM-1313 owner's manual

Campbell Hausfeld
Campbell Hausfeld WK250000AV Operating instructions and parts manual

CARBONE
CARBONE PowerMaster205 Operator's manual