HYDE WINGMAN 1.0 User manual

!
!
1!
HYDE WINGMAN 1.0
AND
HYDE WINGMAN 2.4
Owner’s Manual

!
!
2!
WARNING: THIS IS NOT A US COAST GUARD APPROVED LIFE VEST AND
DOES NOT COUNT TOWARDS CARRIAGE REQUIREMENTS
THIS PRODUCT DOES NOT HAVE ANY STATED OR IMPLIED WARRANTIES
CONCERNING ITS PERFORMANCE, DESIGNED FOR EXPERIENCED
SWIMMERS ONLY AND WILL NOT PROTECT ANY WEARERS FROM
DROWNING OR INJURY
THIS VEST IS DESIGNED FOR ADULTS 18 YEARS OF AGE AND WEIGHING 80
LBS OR MORE
+SPECIFICATIONS
USER WEIGHT: MORE THAN 80 LBS (36 KG)
CHEST SIZE: 30-52 INCHES (76-132 CM)
DESIGNED FOR ADULT USE
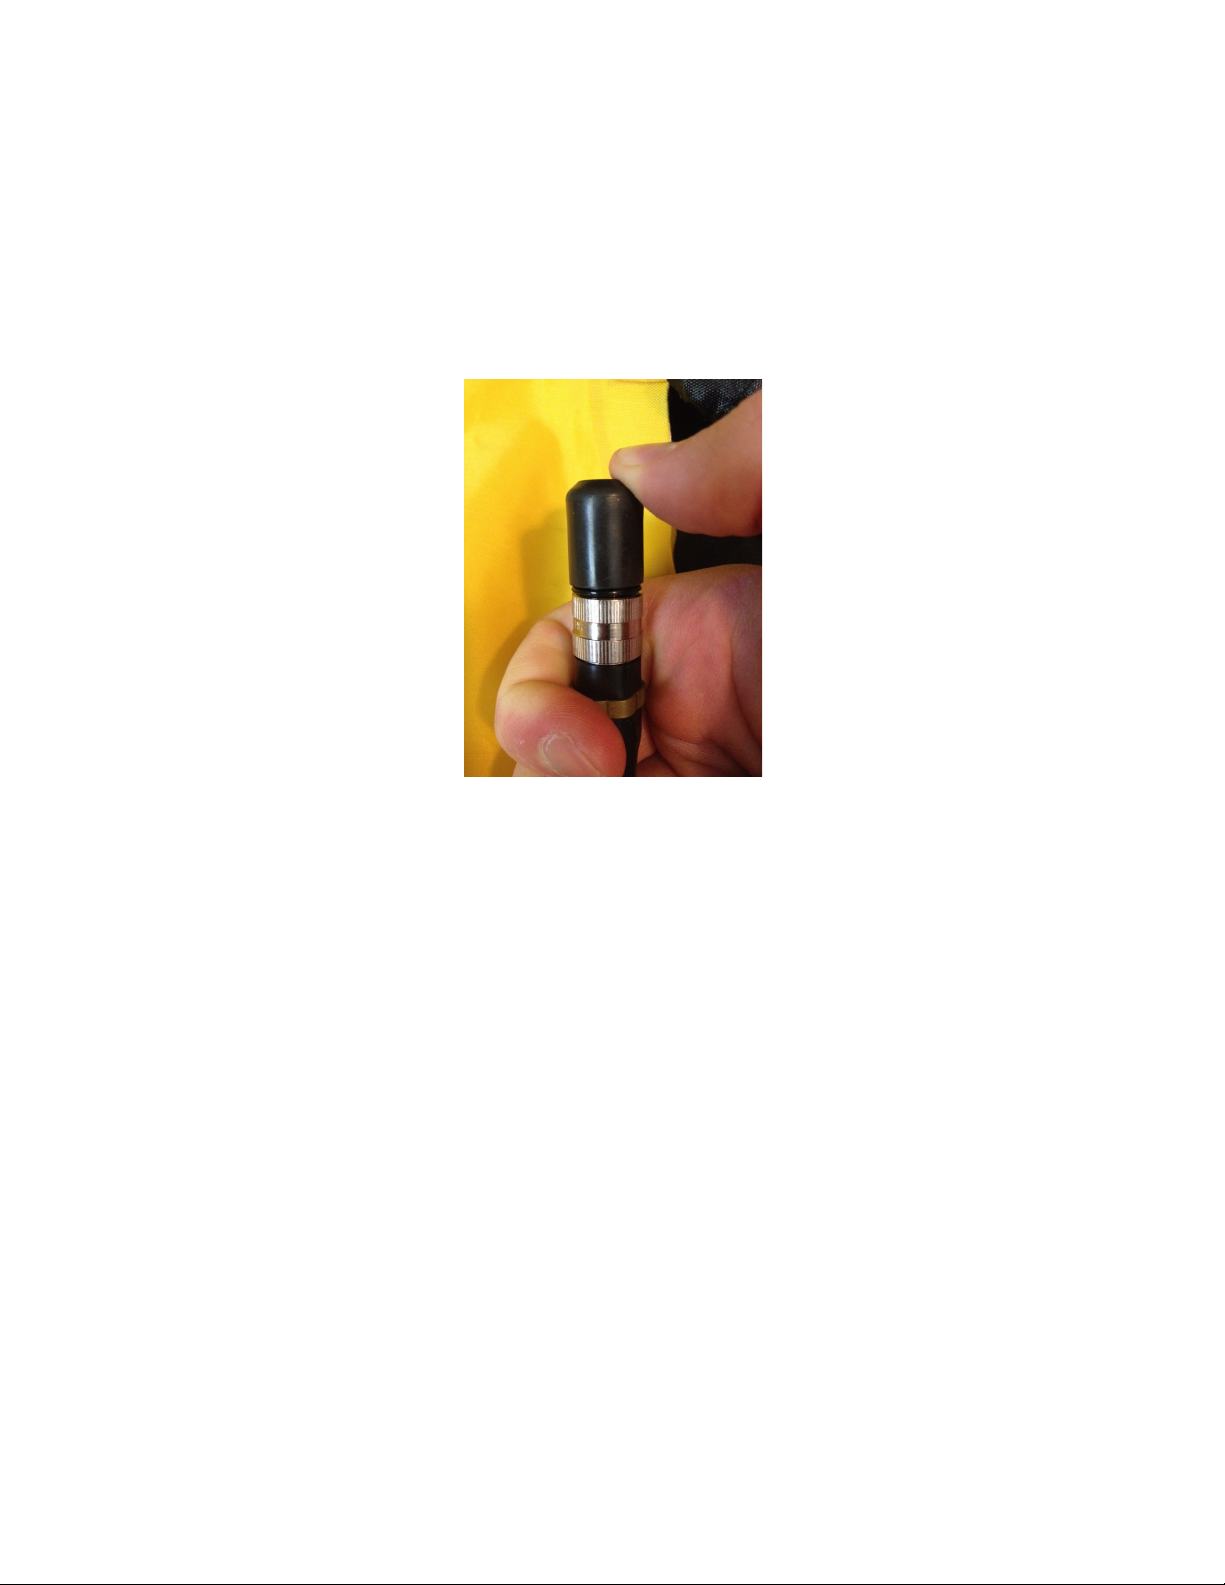
CO2 CYLINDER: 24 GRAM, đINCH THREAD
HALKEY ROBERTS 840 MANUAL INFLATOR
REARMING KIT: 840AMU-84204Z
USE ONLY THE REARMING KIT STIPULATED ABOVE FOR USE WITH YOUR
WINGMAN 1.0 OR WINGMAN 2.4. REARMING KITS AND PARTS ARE NOT
INTERCHANGEABLE. SUBSTITUTION MAY DAMAGE OR CAUSE YOU WINGMAN
TO MALFUNCTION
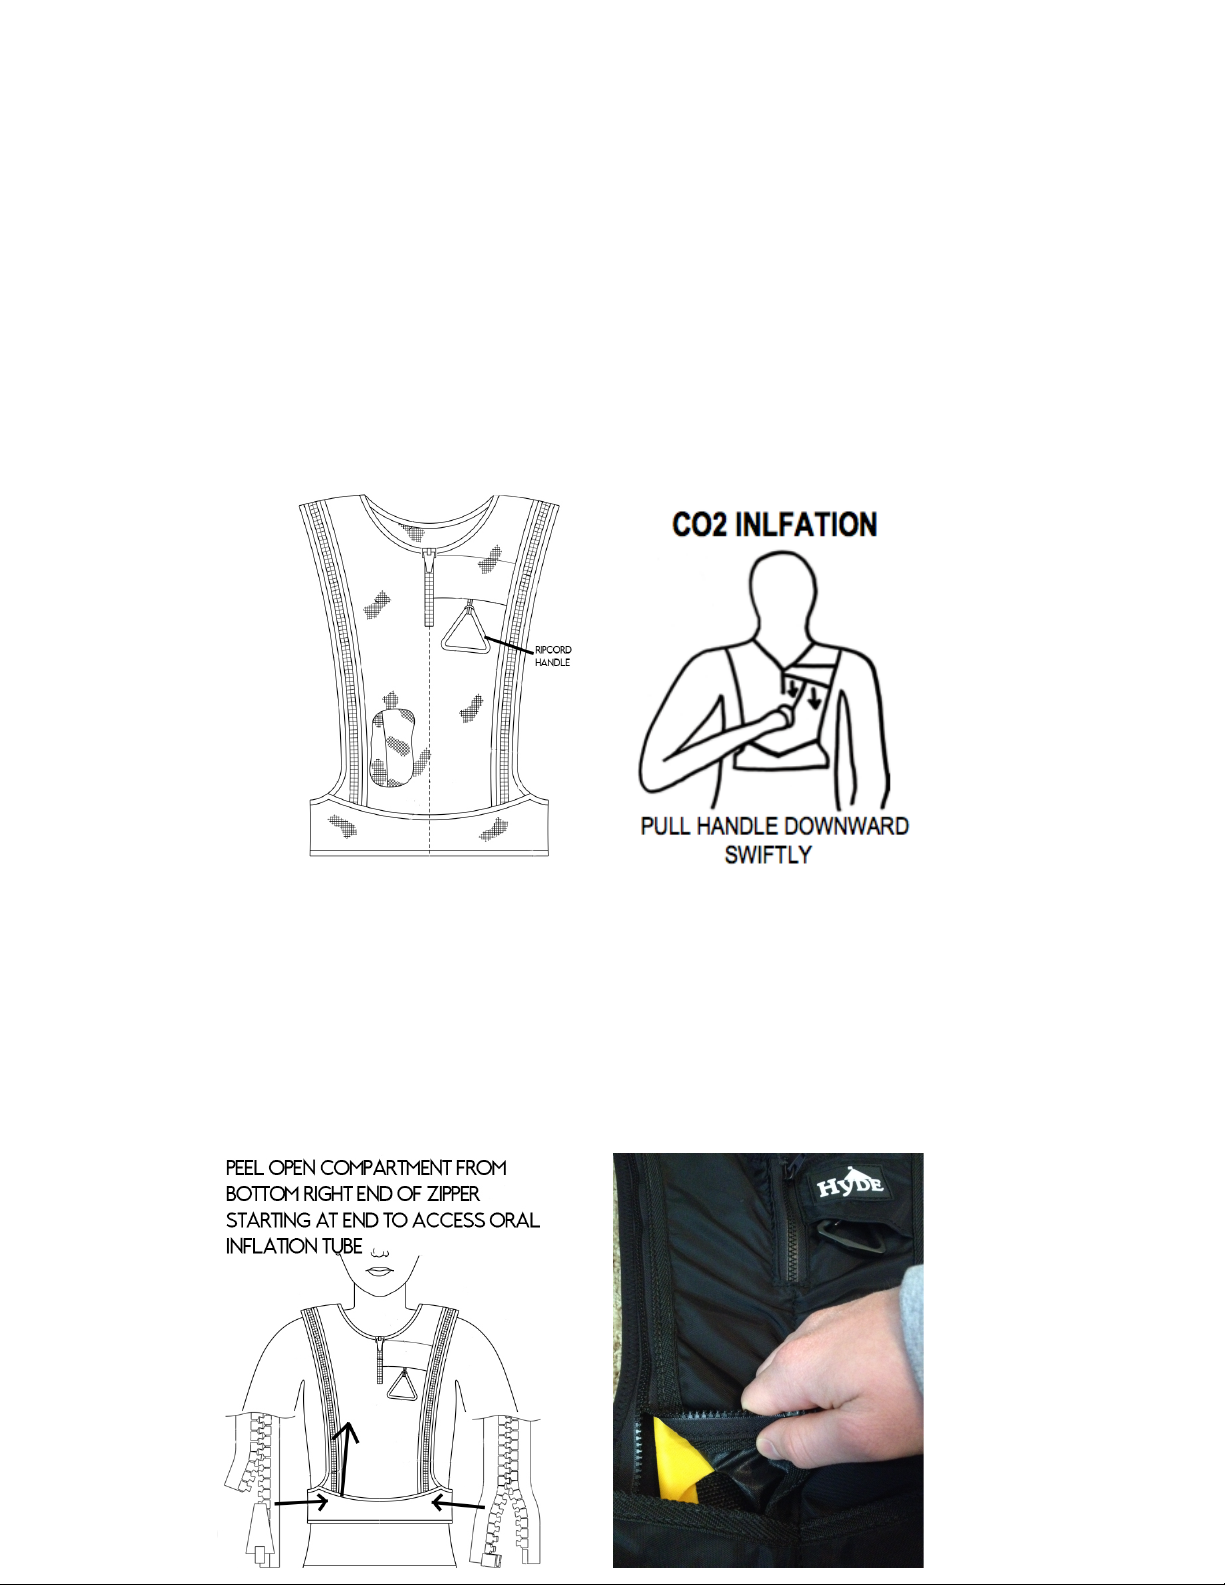
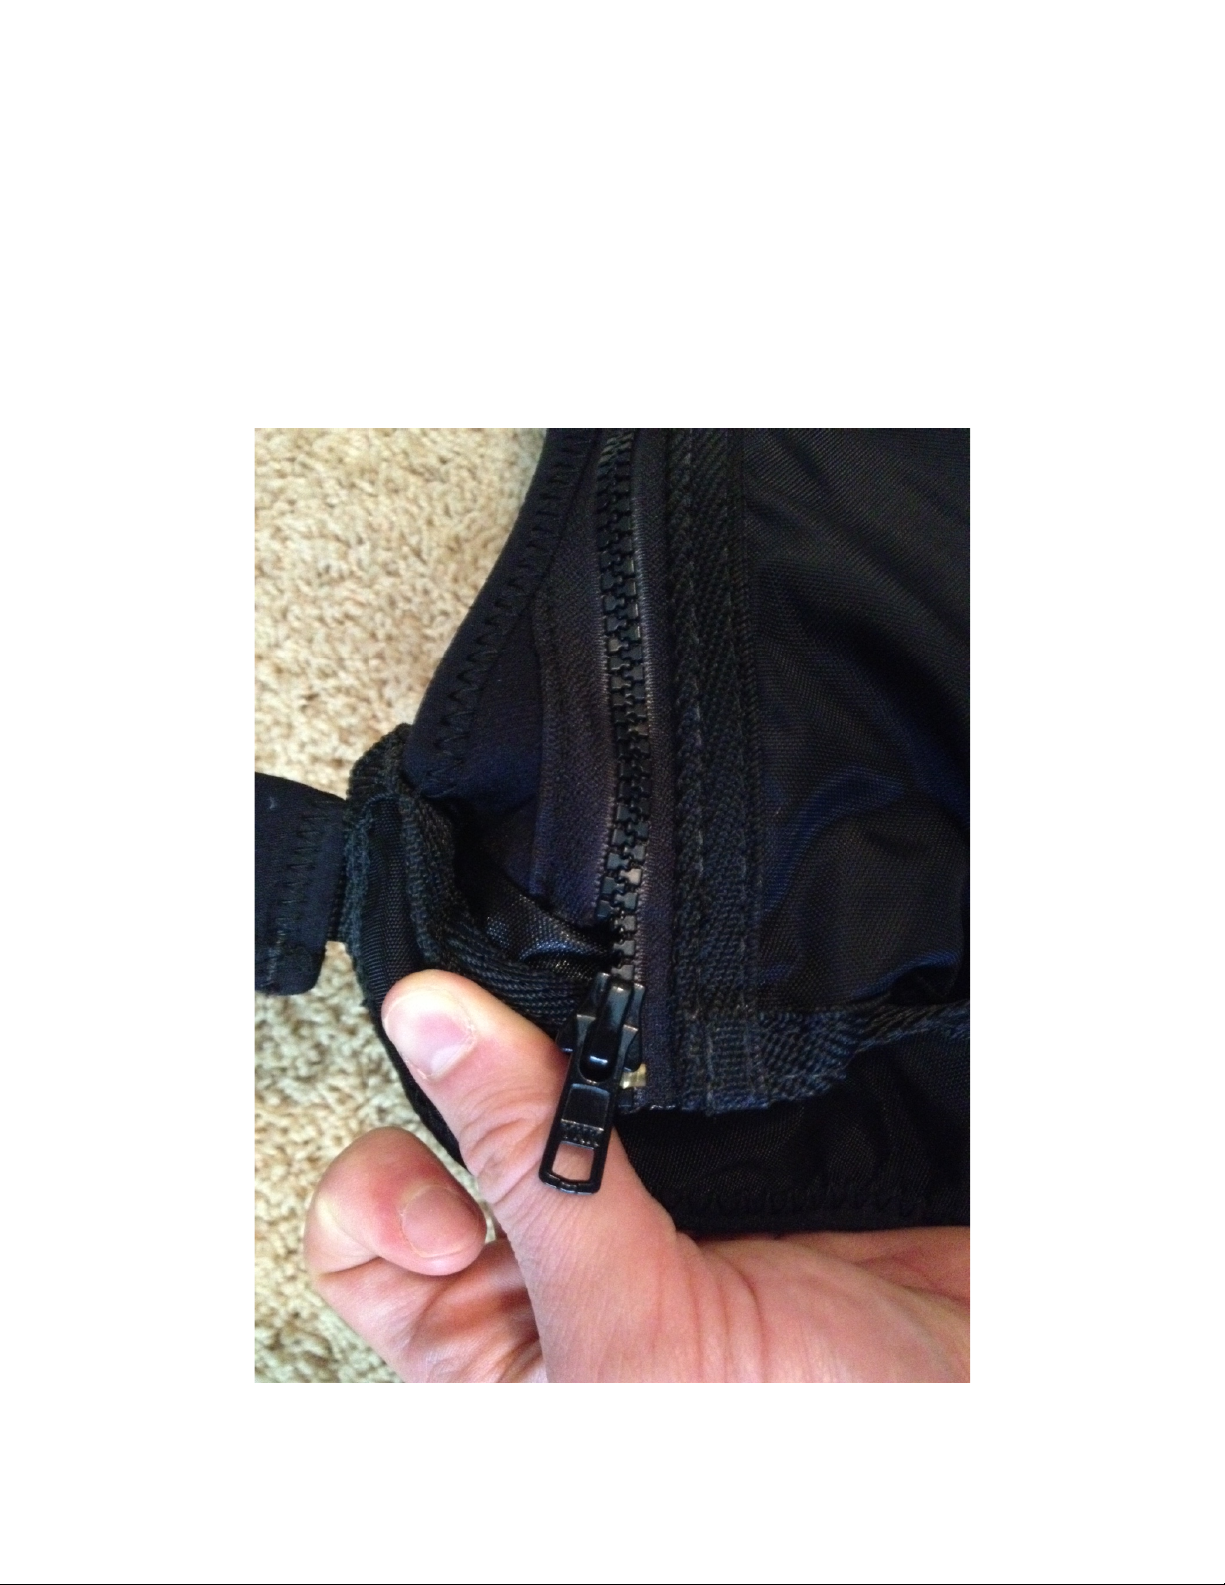
DO NOT INFLATE VEST WITH CO2 UNLESS WORN ON YOUR PERSON WITH
STRAPS FASTENED TIGHTLY. IF YOU NEED TO DEPLOY VEST WITHOUT
WEARING IT, OPEN ZIPPERED COMPARTMENT COMPLETELY PRIOR TO
INFLATING WITH CO2. WHEN ORALLY INFLATING, OPEN ZIPPERED
COMPARTMENT COMPLETELY PRIOR TO INFLATION.
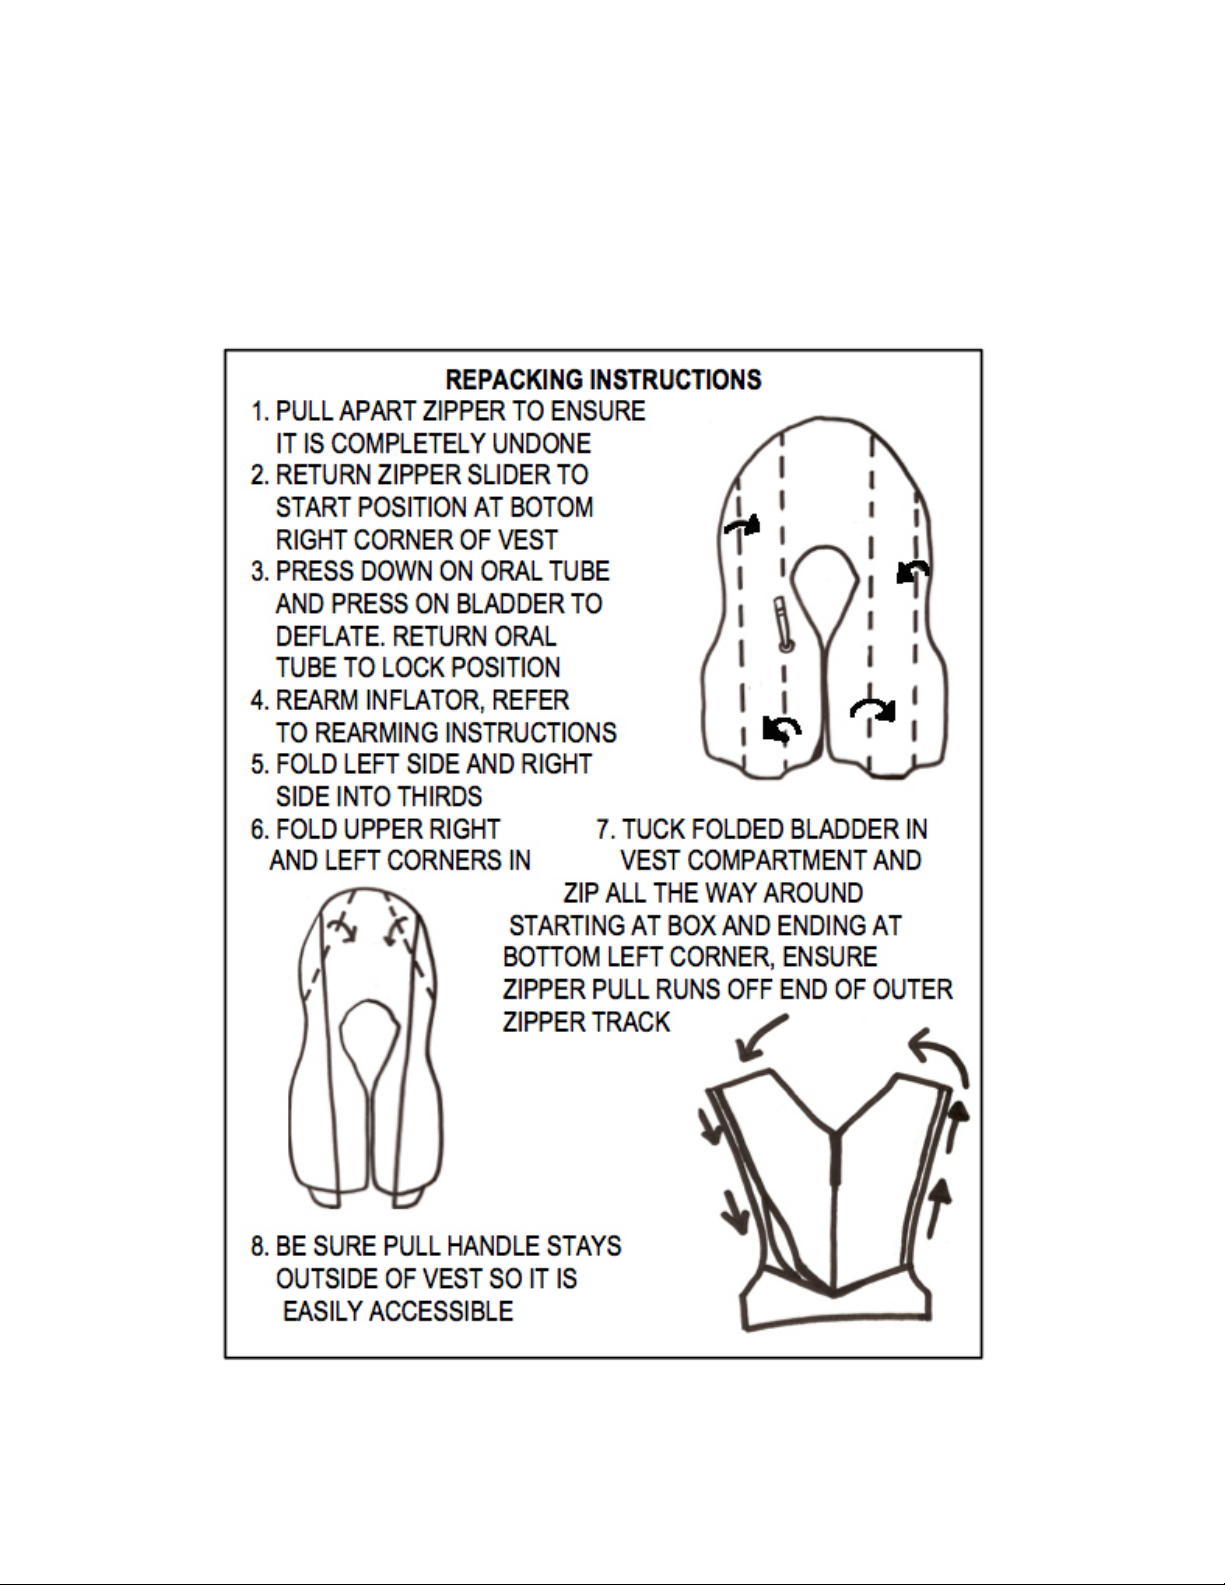
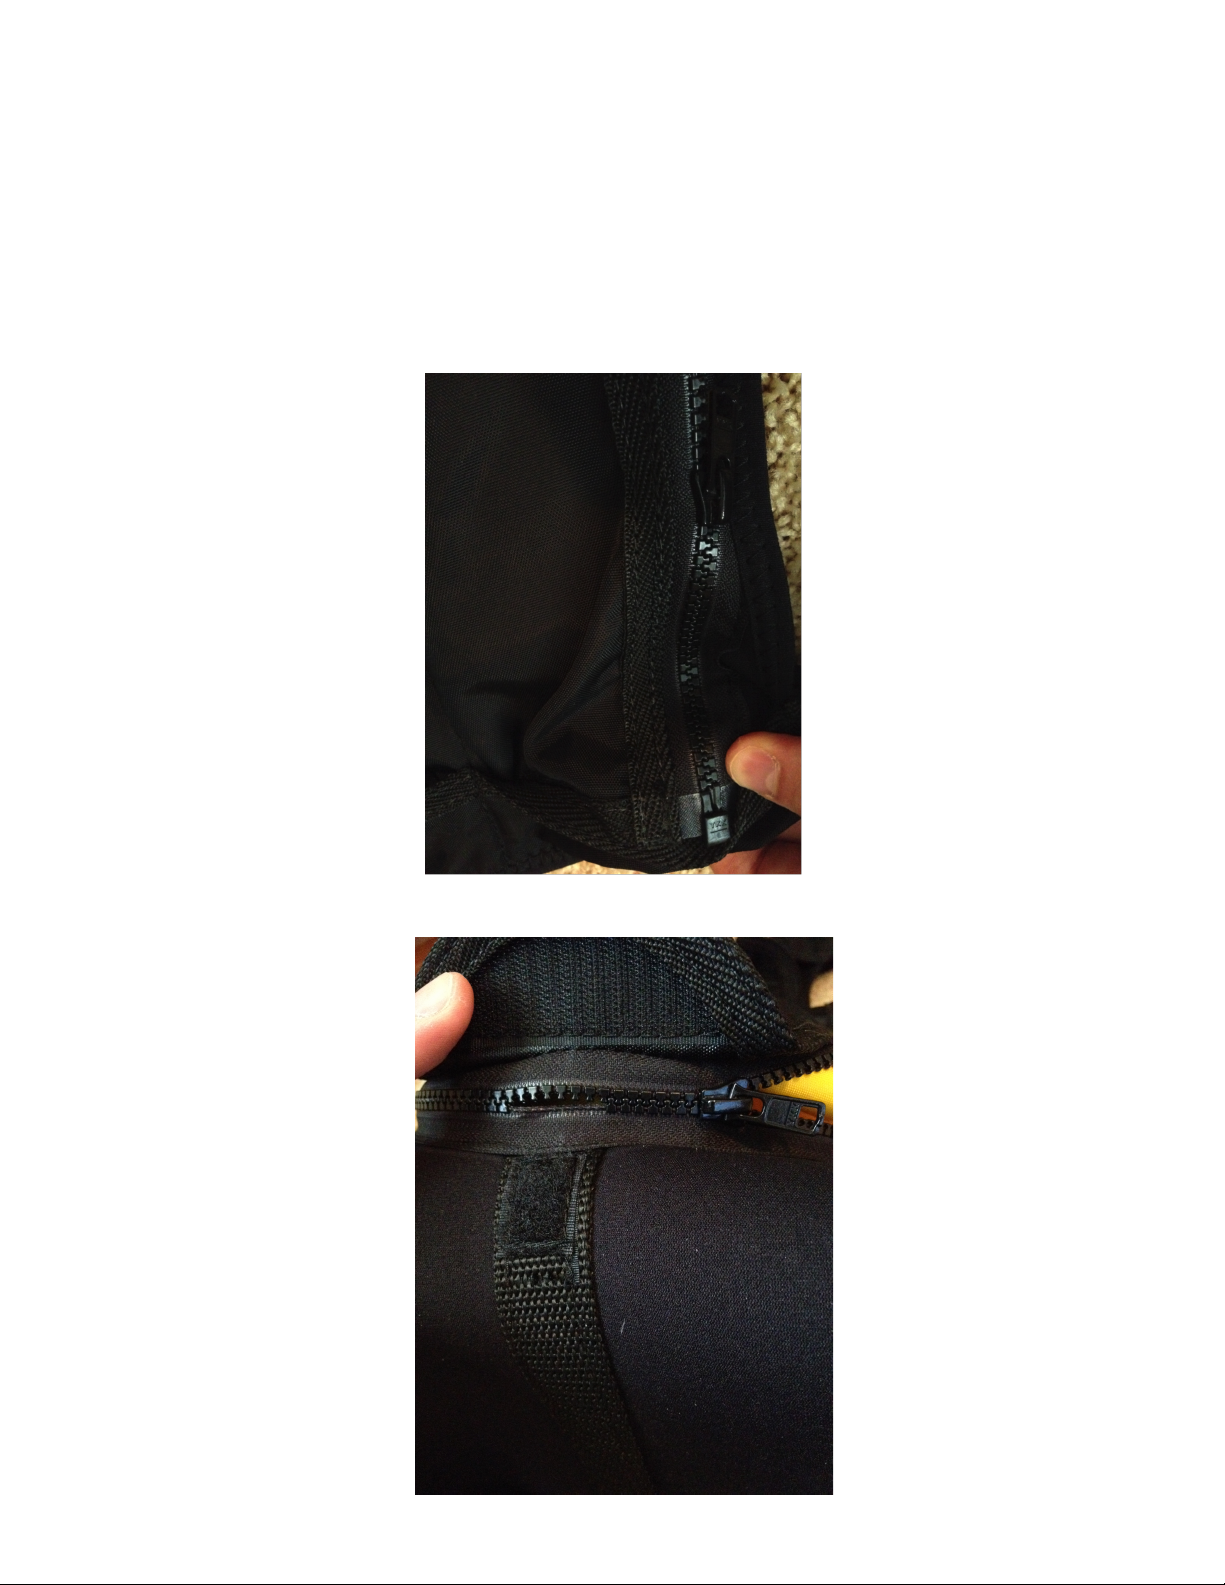
1. Where and How to Check Inflation System Status Indicators:
It is necessary to open the back compartment covering the inflator to determine
whether the device is armed according to the instructions on page 3, if inflator
indicator shows red re-arm according to instructions on page 3

!
!
3!
Rearming Instructions
English
Spanish

!
!
4!
French
2. Donning Instructions
5. ENSURE RIPCORD HANDLE IS ACCESSIBLE ON FRONT LEFT CHEST

!
!
5!
+IT IS IMPERATIVE THAT THE VEST IS PROPERLY ADJUSTED TO FIT
THE PERSON WEARING IT. AN INCORRECT FIT, OR IMPROPER DONNING
CAN INHIBIT THE EFFECTIVENESS OF THE DEVICE, OR RESULT IN
INJURY. DO NOT WEAR THE VEST UNDERNEATH ANY TYPE OF
CLOTHING, SERIOUS INJURY MAY RESULT.
3. HOW TO INFLATE YOUR WINGMAN
MANUAL INFLATION (CO2 INFLATION)
THE WINGMAN IS MANUALLY INFLATED BY GRASPING THE RIPCORD
HANDLE ON THE LEFT CHEST AND PULLING SHARPLY DOWNWARD.
ORAL INFLATION
1. Accessing Oral Inflation Tube
THE ORAL INFLATION TUBE IS LOCATED INSIDE THE ZIPPERED
COMPARTMENT ON THE WEARER’S RIGHT SIDE. TO ACCESS THE ORAL
INFLATION TUBE, PULL UP ON BOTTOM OF OUTER LAYER OF FRONT
RIGHT PORTION OF VEST TO PEEL OPEN ZIPPER, THE WEAK POINTS
ARE AT BOTH ENDS OF ZIPPER AND CENTER OF BACK, IN ORDER TO
OPEN THE VEST AND ACCESS ORAL INFLATION TUBE, PEEL APART
ZIPPER AT ONE OF THESE POINTS AND ACCESS BLADDER.

!
!
6!
2. Inflating with Oral Tube
Once the user has accessed the oral inflation tube the user must make sure
the tube is in the unlocked position prior to inflating. To unlock the tube
the user must screw down the locking ring so that the mouth nozzle can be
depressed. If the locking ring is in the up position and prevents the mouth
nozzle from being depressed the wearer will not be able to orally inflate the
bladder and must unlock the tube. Once the tube is unlocked the user
simply depresses the mouthpiece while bowing into the bladder until the
bladder is firm.
LOCKED UNLOCKED
NOTE: Oral inflation can be used to test for air leakage or as a back up in
the event that the CO2 cylinder fails to operate. CO2 gas permeates the
bladder more quickly than with air, and therefore oral inflation can be
used to refill the bladder in the event the wearer is in the water for an
extended period. DO NOT FULLY INFLATE THE BLADDER ORALLY
AND THEN INFLATE WITH CO2 CYLINDER, AS BLADDER COULD
INCURR DAMAGE

!
!
7!
4. HOW TO DEFLATE YOUR WINGMAN
TO DEFLATE YOUR WINGMAN UNLOCK THE ORAL INFLATION TUBE BY
SCREWING DOWN LOCKING RING, THEN DEPRESS MOUTH NOZZLE
WHILE PUSHING AIR OUT OF BLADDER, GENTLY SQUEEZE ALL THE AIR
OUT OF THE BLADDER. IF THE BLADDER HAS INLFATED WHILE BEING
WORN, IT MAY BE NECESSARY TO PARTIALLY DEFLATE THE BLADDER
TO REMOVE IT.
TO REMOVE ALL AIR, ROLL THE BLADDER INTO A BALL AND SQUEEZE
WHILE OPERATING THE DEFLATION MECHANISM. THE BLADDER WILL
BE DIFFICULT TO FOLD AND REPACK PROPERLY IF NOT COMPLETELY
DEFLATED.
PRACTICE WEARING AND ADJUSTING YOUR WINGMAN IN THE WATER
IN ORDER TO BE PREPARED FOR AN EMERGENCY.
PRACTICE UNTIL YOU HAVE COMPLETE CONFIDENCE IN THE
PERFORMANCE OF YOUR WINGMAN

!
!
8!
REPACKING YOUR WINGMAN
BEFORE REPACKING YOUR WINGMAN, MAKE SURE THAT THE DEVICE
HAS BEEN DEFLATED AND REARMED ACCORDING TO THE
INSTRUCTIONS IN THIS MANUAL.

!
!
9!
NOTES ON REPACKING YOUR WINGMAN AND PROPERLY USING
HYDE’S PATENT PENDING TRIPLE BURSTING ZIPPER
USER MUST COMPLETELY UNDO AND SEPARTE ZIPPER TO RE-ZIP
WINGMAN, IF YOUR WINGMAN BECOMES PARTIALLY UNZIPPED, OPEN
THE ENTIRE COMPARTMENT AND RESET THE ZIPPER PULL TO THE
BLOCK AND START ZIPPING FROM THE BEGINNING
GENTLY ZIP PULL OVER GAP IN ZIPPER AT CENTER OF BACK

!
!
10!
ENSURE ZIPPER PULL CLEARS OFF END OF OUTSIDE TRACK, THIS
ENSURES THAT UPON DEPLOYMENT THE ZIPPER CAN SEPARATE
AT THIS END, IF ZIPPER PULL IS NOT PULLED ALL THE WAY TO
END AND REMAINS CONNECTED TO OUTSIDE TRACK INFLATION
CAN BREAK THE ZIPPER AND IS NOT COVERED BY WARRANTY!
ALWAYS PULL ZIPPER PULL TO END OF TRACK AND MAKE SURE
IT PULLS OFF END OF OUTSIDE TRACK. 3 FUNCTIONAL BURST
POINTS ARE CRUCIAL TO THE FUNCTIONALITY AND LONGEVITY
OF YOUR WINGMAN!

!
!
11!
TO QUICKLY OPEN BLADDER COMPARTMENT, SIMPLY PULL UPWARDS
ON BACK TAB AND PEEL OPEN ZIPPER
USE, CARE, AND MAINTENANCE INSTRUCTIONS
USE
: There is a danger of bodily injury if this device is not donned
correctly. Be sure the logo faces outward. This PFD must be inflated to float
the wearer. Clothing can affect the performance of this device in the water.
To reduce risk of drowning before donning check that device is properly
armed and packed in accordance with this owner’s manual and that fully
charged 24 gram đinch threaded CO2 cartridge is in place.
+Choose the right type and size device and wear it
+Fasten all closures and adjust for snug fit
+Do not fasten device to boat
+This device requires rearming after each inflation. Always have rearming
kits to service your inflatable PFDs or use inflated
+Care must be taken to avoid damage from abrasion and sharp objects
Precautions for Use in Freezing Temperatures
The gas in a CO2 cartridge expands in hot weather and contracts in cold
weather

!
!
12!
At -30 degrees F (-33 degrees C) the bladder fill is 87% of the volume
created at 70 degrees F (22 degrees C).
Under freezing conditions the CO2 fills more slowly and achieves less
buoyancy.
This can be compensated by partly inflating the PFD with one or two
breaths of air through the oral tube.
CAUTION: DO NOT fully inflate by blowing in the oral tube and then
inflate with the CO2 cylinder. Repeated CO2 inflation after oral
inflation may damage the PFD.
Is your Wingman in Good and Serviceable Condition?
Check your Wingman between outings to be sure that it is properly armed;
that it is free of rips, tears or holes; that all seams are securely sewn; and
that the fabric, straps and hardware are still strong. Inspect the inflatable
portion of the PFD in accordance with care and maintenance instructions
below.
CARE AND MAINTENANCE INSTRUCTIONS
1. Before each outing unscrew the cylinder to be sure that it has not been
pierced. Replace cylinder if pierced. Rearm per instructions in this manual.
Make sure cylinder is tightly screwed in. Cylinders may unscrew over a
period of use.
2. Visually Inspect and Check for Leaks.
TO check for leaks, remove cylinder, orally inflate the device until firm,
and leave overnight. There should be no noticeable loss of firmness.
Perform this leakage test at the beginning of each season and at least every
two months thereafter if you are a light to moderate user, more often if you
use your Wingman frequently.
3. Rearming Instructions: Page 3.
4. Repacking Instructions: Page 8
5. The CO2 cartridge may be used ONLY ONE TIME to inflate the Wingman.
6. Use only the REARMING KIT indicated for your Wingman Model. See
Page 2.
7. Store in well-ventilated area away from direct sunlight.
-Hand wash in clear water and hang to dry
-Do not dry clean or used solvent-based cleaners

!
!
13!
-After each submersion in water, unzip device, unfold bladder
and rinse off by hand in fresh water, hang dry in well ventilated
area away from direct sunlight or chemical exposure to prevent
mold or deterioration
Each Wingman purchase comes with 2 rearming kits, use the first to
practice inflating the Wingman and growing comfortable with how it
works, it is critical to know how your device works before you find yourself
in an emergency.
How and Why to test your Wingman?
Inflate your Wingman and try it out in the water to:
Make sure it floats you:
+Comfortably (when worn properly)
+Adequately for expected wave conditions (body
shapes/densities affect performance)
Make sure it works:
+A flow of bubbles should not appear
+It should inflate quickly and easily
Learn how it works by:
+Activating the CO2 inflation system
+Rearming the CO2 inflation system
+Using the Oral Inflation Tube
Hyde recommends that you use the first rearming kit to test the inflation
system and the second to arm the device for use.
How do you test your Wingman using the Manual Inflator?
1. To test your Wingman you will need:
+Your fully armed Wingman
+Rearming Kit approved for your Wingman
2. Put on the Wingman
3. Actuate the inflation system by jerking firmly downward on the ripcord
handle. The Wingman should inflate within 5 seconds.
4. Get into shallow water, just deep enough that you can stand with your
head above the surface.
5. See if the Wingman will float you on your back or just slightly back of
vertical. In a relaxed floating position, verify that your mouth is well above
the water’s surface. Note the effect of where you hold your legs on how you
float.
6. Get out of the water and remove the Wingman. Remove the used CO2
cylinder from the Wingman inflator. Completely deflate the Wingman using
the oral inflator.

!
!
14!
7. Let the Wingman dry thoroughly. REARM and REPACK the Wingman in
accordance with the instructions in this manual.
How do you test your Wingman using the Oral inflator?
1. To test your Wingman, you will not need any spare parts or rearming
kits
2. Remove the CO2 cylinder, to prevent inadvertent activation of the
manual inflation system which could potentially damage the bladder.
Inspect the threaded end to confirm that it is un-used.
3. Put on the Wingman
4. Get into the shallow water, just deep enough that you can stand with
your head above the surface.
5. If you are a weak swimmer or non-swimmer, inflate the Wingman
partially so that you are supported well enough to be able to complete
inflation without touching bottom, either orally or manually. Note this
level of inflation because it is the minimum needed for you to safely use
this device.
6. Fully inflate Wingman using the Oral inflator.
7. See if the Wingman will float you on your back or just slightly back of
vertical. In a relaxed floating position, verify that your mouth is well above
the water’s surface. Note the effect of where you hold your legs on how you
float.
8. Get out of the water and remove the Wingman. Completely deflate the
Wingman using the oral inflator.
9. Let the Wingman dry thoroughly. REARM and REPACK the Wingman in
accordance with the instructions in this manual.
Wear your Wingman
In approximately 80 percent of all boating fatalities the victims were not
wearing a PFD. Most fatal accidents happen on calm sunny days. This
inflatable vest is much more comfortable to wear than other PFD’s. Get into
the habit of wearing this Wingman. Non-swimmers and children especially
should wear a hybrid or non-inflatable PFD at all times when on or near the
water. Ensure that you adhere to USCG PFD carriage requirements when
on the water; this device does NOT count towards carriage requirements.
Contact HYDE with any questions or if you need additional information at
(www.hydeexpedition.com) for more information.
This manual suits for next models
1
Table of contents
Popular Safety Equipment manuals by other brands

Lince
Lince Cerroko 7930RSA installation manual

FLAIM Systems
FLAIM Systems Extinguisher user manual

Sperian
Sperian Miller FALCON Series General Instructions for Use

Innova
Innova XTIRPA IN-8008 Instruction and safety manual

Singing rock
Singing rock TREE ANCHOR Instructions for use

Teknoware
Teknoware Zonespot II Installation and Maintenance