Hydrafeed Multifeed 65 User manual

1
Manufactured By Hydrafeed Limited
Talgarth House, Bond Avenue, Mount Farm Industrial Estate,
Milton Keynes, MK1 1JD
Telephone: +44(0) 1908 376331 www.hydrafeed.co.uk
Website: www.hydrafeed.co.uk Email: info@hydrafeed.co.uk
Note: all images may not represent exactly in manual as on your Barfeed

2
CONTENTS
Section 1 Safety Requirements………………………………………………....................
Section 2 Barfeed Installation…………………………………………………………….
3.0 Site Preparation…………………………………………………………………………
3.10 Delivery and Inspection of Barfeed…………………………………………………...
3.20 Positioning of Barfeed………………………………………………………………...
3.30 Alignment Procedure………………………………………………………………….
3.40 Operation of Barfeed………………………………………………………………….
Section 3 Barfeed Mechanism
4.1 The Barfeed Master Spindle Reduction Liner system…………………………………
4.2 Fitting Master Spindle Reduction Liner with BSU…………………………………….
4.3 Fitting Master Liner & Correct Sized Bored Bushings………………………………...
4.4 Height Adjustment of the Support Channel…………………………………………….
4.5 Bar Stops & Adjustments………………………………………………………………
4.6 Changing or Removing the Push Rod…………………………………………………..
Section 4 External Electrical Devices
5.1 Pusher forward movement sensor………………………………………………………
5.2 Location of Cross slide sensors…………………………………………………………
5.3 Location of Bushing sensor…………………………………………………………….
5.4 Location of Guard sensor……………………………………………………………….
5.5 Location of Material sensor…………………………………………………………….
5.6 Location of Cylinders sensors…………………………………………………………..
Section 5 Pneumatic Devices
6.1 Location of Loader cylinder……………………………………………………………
6.2 Location of Cross slide cylinder………………………………………………………..
Section 6 Pneumatic Control Devices
7.1 Location of Cross slide and Cam adjustment valves…………………………………..
7.2 Pusher adjustment valve……………………………………………………………….
7.3 Location of air pressure Regulator……………………………………………………..
7.4 Schematic of pneumatic system………………………………………………………..
Section 7 Electrical Signal
8.1 Input and Output signals and descriptions…………………………………………..…

3
Section 8 Electrical Control and Functionalities
9.1 Cabinet control functions……………………………………………………………….
9.2 Alarm signals and description…………………………………………………………..
9.3 List of alarm signal messages…………………………………………………………..
9.4 Retract control function………………………………………………………………...
9.5 Hand unit control function……………………………………………………………..
Section 9 Trouble Shooting
10.1 Common causes and solutions………………………………………………………...
Section 10 Barfeed’s Parts Listings
11.1 Cover and Guard parts list…………………………………………………………….
11.2 Feed Mechanism parts list…………………………………………………………….
11.3 Extrusion parts list…………………………………………………………………….
11.4 Magazine parts list……………………………………………………………………
Section 11 Barfeed Parts Location
12.1 Front View of Pre-built Barfeed………………………………………………………
12.2 Rear View of Pre-built Barfeed……………………………………………………….
12.3 Complete Overview of Magazine Assembly…………………………………………
12.4 Complete Internal View Assembly……………………………………………………
Section 12 Electrical Diagrams and Schematics
Main Circuit
1 Power Transformer ……...……………………………………………………………….
2 Emergency Stop……..…………………………………………………………………..
Output Control Circuit
3 Output-Relay-Interface……..……………………………………………………………
4 Output-LED-Valve……...………………………………………………………………..
Control Device Circuit
5 Hand Unit Control………………………………………………………………………..
Input Control Circuits
6 24pin Interface ……..…………………………………………………………………….
7 Input Interface……...……………………………………………………………………..
8 External Interface……...….………………………………………………………………
Safety Circuits
9 Safety Relay ……..……………………………………………………………………….
10 BSU Safety switch……...……………………………………………………………….

4
Wiring Looms and Specifications
15 Lathe to B/Feed Interface pin to pin specification………………………………………
16
17 Optional Mains Power lead……………………………………………………………..
18 Lathe to B/Feed Interface Lead…………………………………………………………
19 External Barfeed wiring loom…………………………………………………..………
External Electrical Schematic
20 Cabinet Door Isolator……………………………………………………………………
21 Stand Socket Outlets…………………………………………………………………….
22 Cabinet Control Panel…………………………………………………………………..
Internal Control Cabinet Layout
23 XT-Terminal Schematic…………………………………………………………..……
24 Cabinet Components…………………………………………………………………….
25 Cabinet Component List………………………………………………………………...
26 Valve Block Schematic………………………………………………………………….
Hand unit
27 Hand Unit Layout……………………………………………………………………….
Electrical Listings
28 Elementary Diagram List………………………………………………………………..
29 Electrical Cabinet Parts List…………………………………………………………….
30 Electrical External Parts List……………………………………………………………
BSU Electrical
31 Socket Outlet…………………………………………………………………………….
Options
Bar Support Unit (BSU)…………………………………………………………………….
Multi-Stacker………………………………………………………………………………..
Maintenance…………………………………………………………………………………
Setting & Operating Risks…………………………………………………………………..
EC Declaration of Conformity………………………………………………………………

5
1. READ COMPLETE INSTRUCTIONS BEFORE OPERATING BARFEED
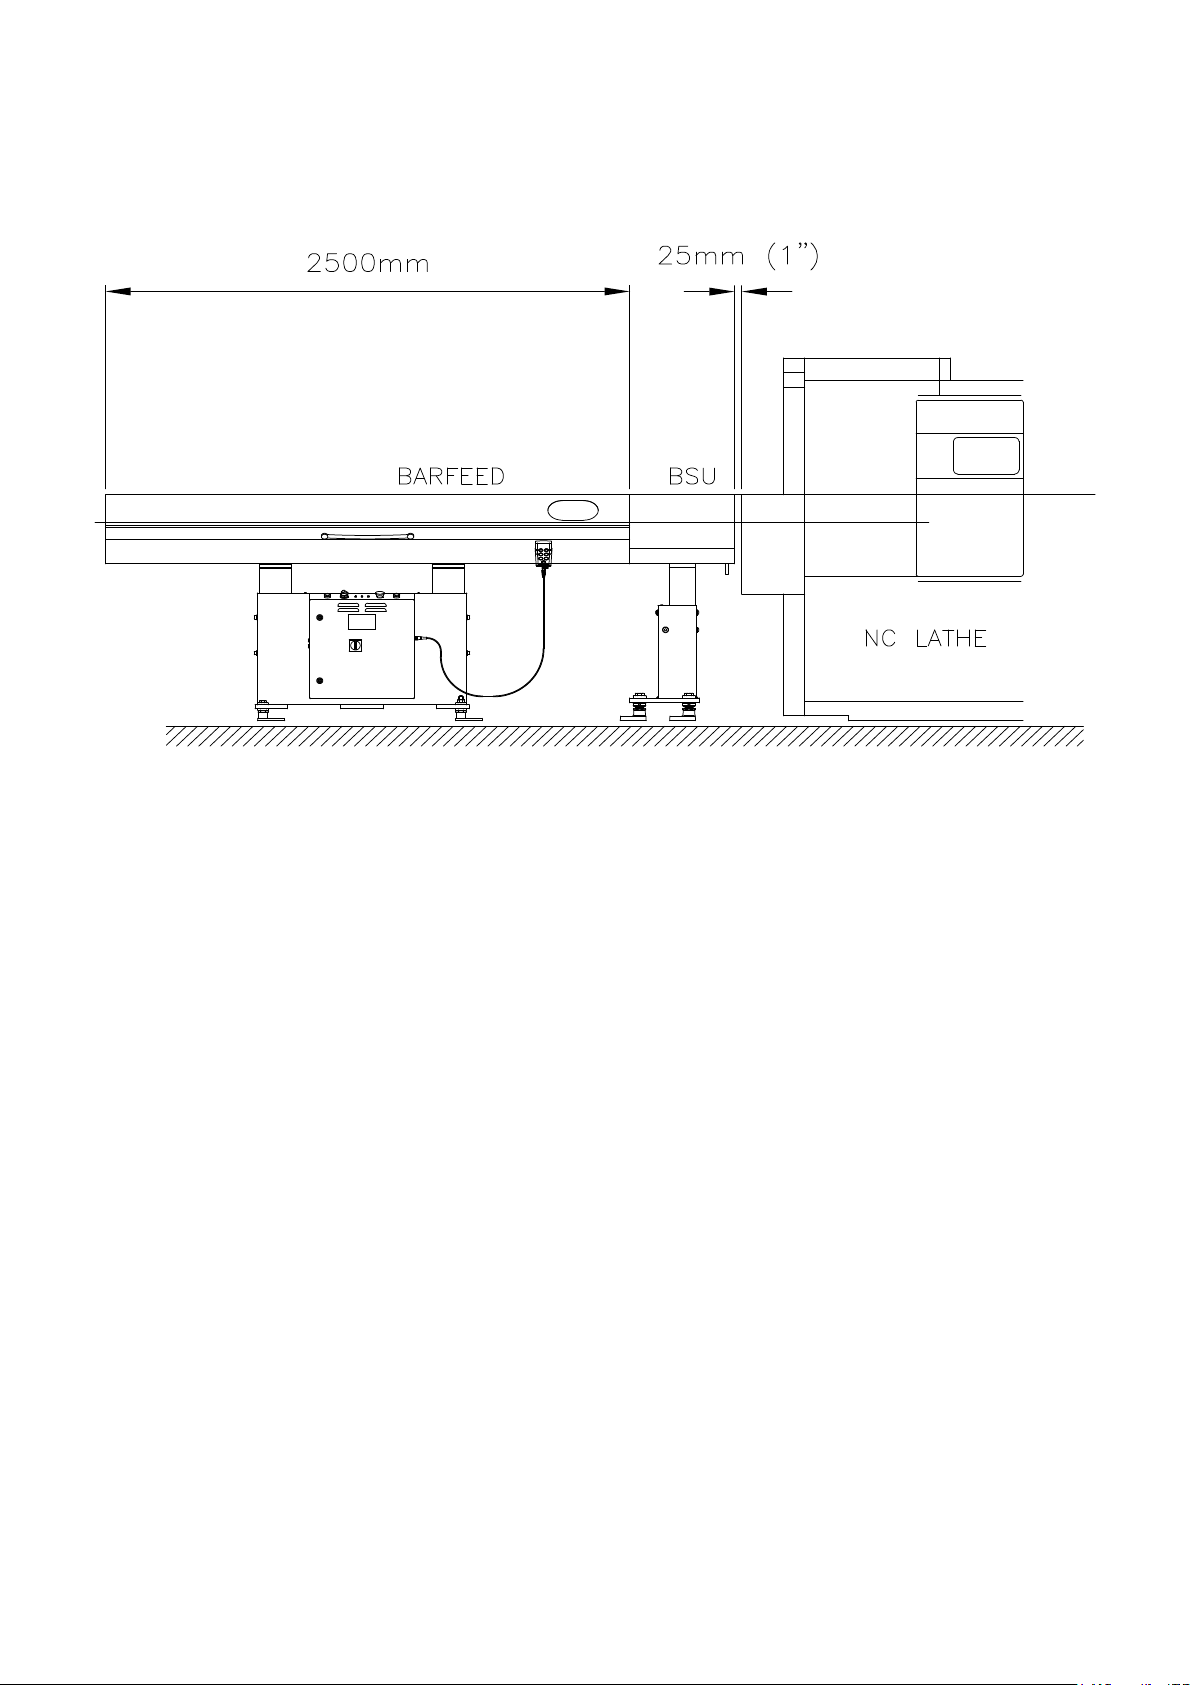
When this instruction manual was printed the information was correct. Since we are
constantly improving the design it is possible however that the illustrations and
descriptions may vary from the Barfeed supplied.
The Barfeed is designed and built for maximum ease of use and safety of operation.
However, some previously accepted shop floor practices might not reflect current
safety regulations and procedures and should be re-examined to ensure compliance
with same.
It is recommended that all works supervisors, maintenance personnel and machine
tool operators be advised of the importance of safe maintenance, set-up and
operation of Hydrafeed equipment. Our recommendations are listed below.
SAFETY POINTS AND AWARENESS
Before any operation of the Barfeed the following safety awareness must be
observed, failure to do so could result to injuries to the operator.
Read the appropriate manual or instructions before attempting operation or maintenance of
the Barfeed. Ensure you understand all instructions.
Consult your supervisor when in doubt as to the correct way to do the job.
Do not remove any warning or instruction tags from the machine.
Disconnect main electrical power before attempting any repair or maintenance.
Do not reach into any control or power case area unless electrical and pneumatic power is off.
Do not touch electrical equipment when hands are wet or when standing on wet surface.
Keep chemical and flammable material away from electrical or operating equipment.
Do not use a toxic flammable substance as a solvent cleaner or coolant.
Be sure to know where all stop buttons are located in case of emergency.
Any electrical connection that is to be carried out to the Barfeed should be a qualified and
competent electrical engineer.
When the Barfeed is in operation, under no circumstances should any personnel put his or
hers hands or other objects inside the Barfeed and that the electrical cabinet is not to be
opened or any of the wires, components or electrical devices are to be interfered with.
When the Barfeed is in operation, carrying out any adjustment, servicing, cleaning or any
physical interaction is strictly forbidden.
Be sure to disconnect main electrical supply to the Barfeed before any mechanical or electrical
repair or maintenance is performed.
Do not operate this Barfeed unless proper maintenance has been regularly carried out and
that the equipment is in good working order.
Do not operate the Barfeed if there is any unusual noise or if there is heat, smoke or vibration
taking place. Any of these occurrences and damaged components is to be reported.
Do not allow untrained personnel to operate or carry out any repairs to the Barfeed.
Do not operate the Barfeed with safety guard’s open and not to override safety devices and
not leave lose components, parts, tools, etc on or inside the Barfeed.
Make certain that all Barfeed guards are in good condition and are functioning properly before
operating the machine.
Do not operate any equipment while any part of the body is in the proximity of a potentially
hazardous area.
Before proceeding auto cycle, be sure that all data and functions have been entered.
Be sure to follow instructions and alarms, which are generated, via the screen.
If STRICT COMPLIANCE with the above safety procedures is not undertaken, Hydrafeed
Limited cannot accept responsibility for any accident thus incurred.
FOR YOUR OWN PROTECTION - WORK SAFELY

6
2. INSTALLATION
When this instruction manual was printed, the information given was correct.
However, since we are constantly improving the design of our Barfeed’s, it is possible
that the illustrations and descriptions may vary from the Barfeed supplied.
When supplied for installation within Europe, the Barfeed carries the CE mark of
incorporation, and should be declared in conformity with the EC Directives after safe
installation with the Lathe.
Site Preparation
3.0 Ensure that the Lathe is secured in position on solid flooring by means of either
floor bolts through Lathe feet, or by Restraining Brackets, illustrated in figure 30.1.
40x40x5 Angle Iron 2-off M20 Lock Nuts M20 Studding
Figure 30.1
6mm Bracket 16.5 Holes for Floor Fixing Reinforce Rib
Diagram 30.1 is a typical example of a restraining bracket; items of similar design
should be used to prevent Lathe movement where it has not been possible to secure
the Lathe through its feet.
3.1 Ensure that the Lathe is accurately levelled in all planes using a machine level.
3.2 Check that the Lathe has been correctly interfaced to the Barfeed control
specification.
3.3 Ensure sufficient space (foot print) is available for the Barfeed to be positioned
next to Lathe! Allowing for the space required for the swing aside facility in front of
the Barfeed and also taking into consideration space required for access when
loading the magazine. Complete requirements illustrated in figure 30.2

7
3.4 Check that a suitable air supply (70psi 5bar) is available for connection to
Barfeed. If the pressure is below 5bar the Barfeed will not respond, 5bar is to be a
recognised pressure for the Barfeed to operate safely.
Delivery and Inspection of Barfeed
3.10 The Barfeed should be removed from it’s packaging, exported Barfeed’s are
supplied in a wooden transit box, in this case remove screws from around base,
(usually about 16-off), and lift top section of box up and over the top of the Barfeed.
3.11 Before commencing installation, the Barfeed and fittings should all be examined
for transit damage. Any damage or discrepancies should be notified to the supplier
immediately.
3.12 Check all lose equipment supplied with the Barfeed, the following check list is
what’s supplied.
i. 1-off Master spindle reduction liner, including bush retaining cap
ii. 1-off Master spindle reduction liner retaining cap of flange
iii. 2-off Additional push rods, (+1-off fitted in Barfeed)
iv. 5-off sets of bushings to fit spindle reduction liner
v. 1-off set of steel spacers to fit spindle reduction liner
vi. 1-off line-up bush, bored to 16.3mm (approx.41/64”)
vii. 1-off line-up bug
viii. 1-off Interface lead
ix. 1-off set of allen keys, (socket wrenches)
x. 1-off Operators instruction manual
Positioning of Barfeed
3.20 Slide the master spindle reduction liner into the Lathe spindle, ensuring a good
location fit within Lathe bore.
3.21 Remove the bush retaining cap from the liner, and fit the liner-retaining cap of
flange. The fixing method supplied will vary depending on Lathe type, but in all cases
the liner should be held secure within the drawtube.
3.22 Re-fit the bush-retaining cap to the liner
3.23 Position the Barfeed to side of Lathe with approximate clearance of ½”
(12.5mm) between Lathe guard and the front end of the Barfeed, If coolant catcher
supplied then between the Lathe and the coolant catcher fitting. This illustrated in
figure 30.3.

8
Figure 30.3
3.24 Open the cover on the Barfeed and remove the black plastic transit spacers
from the cross slide bars, then close the cover.
3.25 Connect air supply via filter bottle located at side of stand
Note; Minimum air supply 70psi(5bar).
3.26 Check the transformer settings and the voltage output from the Lathe, if these
are specified for correct interface proceed to stage 3.27, otherwise contact the Lathe
agent for alterations.
3.27 Connect the interface lead between the Lathe and the Barfeed.
3.28 Power up the Barfeed by turning the isolator located to the top right hand side of
the control cabinet to ‘ON’ the Barfeed will now reference its home position and will
be indicated on the screen when referencing is complete.
3.29 Power down the Barfeed then raise the cover of the Barfeed and remove the
Push Rod, the Push Rod is latched in two places;
i. De-latch the brass bushing from the support block that is positioned Lathe
side of Barfeed.
ii. The Push Rod is now to be released from the support blocks opposite side
to the brass bush, there is two latches which are to be arranged-refer to
Removing Push Rod in section 4.4.
Multifeed

9
Alignment Procedure
3.30 Latch the smallest bore Push Rod bushing into the front support block that is
positioned Lathe side of Barfeed.
3.31 Clamp the line-up bung that’s supplied into the collet/chuck.
3.32 Feed a 2mm (5/64”) cord through the orifice of the Pusher block, and then be
sure that it’s tied behind the block using the aid of a knot or clamping device.
3.33 Pass the lose end of the cord through the brass bushing then through the
spindle-collet section and the line up bung that’s clamped in the collet/chuck of the
Lathe. Now securely attach the cord to the turret of the Lathe.
3.34 Using appropriate measuring equipment accurately align the Barfeed to the
Lathe’s centre point of the spindle.
Use the spherical adjusters that are located at the feet of the Barfeed to achieve
accurate alignment.
3.35 On initial alignment securely bolt the Barfeed to the floor. Re-check the position
after securely fixing the Barfeed, may need to finite the alignment.

10
OPERATION
3.40
You are able to manually operate the Barfeed’s basic functions through the screen.
ie Loading Cams
Cross Slide
Insert Pusher
Main Pusher
This just simply allows the operator to manoeuvre the positions of the working
functions for whatever reason.
After set-up, the pushrod pushes the material forward as requested by the Lathe
until the bar is fed to a Lathe stop. When the collet/chuck closes, the push rod will
retract to a variable distance (or will retract fully if full retract function is selected) so
that there is no contact with the pushrod and the material during turning, this intern
prevents vibration.
The pushrod will repeat this cycle to the point at witch the Barfeed will generate a
signal to the Lathe to state the last component has fed out.
After the last component has been depleted the bar end will be ejected from the
collet/chuck by the newly loaded material or by the push rod, the push rod will then
fully retract. When the push rod is back, the cams will rise to load material into the
supporting channel then the cross slide will traverse so that the channel is in line with
the spindle.
The insert pusher will push the new material along the channel and will pause for a
short period once the Barfeed has detected the front end of the bar, the bar will then
be fed into the spindle, when insert pusher is at full stroke, it will then retract and its
at this point the Barfeed will detect weather or not material has been loaded! if there
was no material loaded then the Barfeed will activate an alarm and generate a
magazine empty signal. If new material is loaded then the Cross Slide will traverse so
that the pushrod is in line with the spindle.
The pushrod will push the new bar against the Lathe stop and a new turning cycle
will start.
Full retract and Single bar is selected on the auto monitor screen that is only
displayed after auto set-up stage is completed.
If single bar is selected then only one cycle operation is carried out and will not
reload any more material and will generate an alarm after the final component has
been depleted.
The reload sequence is totally controlled by the Lathe.

11
4.1. THE BARFEED MASTER SPINDLE REDUCTION LINER SYSTEM
Because a short magazine Barfeed does not have a push rod with a support cone
and the material to be machined is not chamfered or coned, as with standard
Barfeed’s, the collet/chuck cannot support the bar by gripping the front end only.
To enable a CNC Lathe to run at maximum RPM using a short bar it is essential that
the material is enclosed in a spindle reduction liner, (filler tube) which has a bore of
approximately 0.5mm (0.020”) greater than the diameter of the material OD to
prevent whip and vibration.
The Barfeed is supplied with the necessary master liner, five sets of bushings and
one set of steel spacers to suit the CNC Lathe as standard. Extra sets of bushings
can be supplied blank or bored from Hydrafeed Limited, or made ‘in house’ to the
specifications in the drawings.
4.1.1
Figure 11 illustrates assembling the Reduction Liner and its components.
4.1.2
Figure 12 illustrates Master Liner Bushing dimension details.
4.1.3
Figure 13 illustrates Master Liner Bushing arrangement.
4.1.4
Figure 14 illustrates plugging tube material and plug specifications.
When feeding small diameter bars (12mm or less), it is sometimes necessary to use
extended bushings to support the bar up to the back of the chuck or collet.
4.2. FITTING MASTER LINER WITH BAR SUPPORT UNIT
If a Master Liner is being used when a Bar Support Unit is fitted, the rear liner
bushing (ie B/feed end) should be a close fit into the Master Liner bore, and the
bushing bore must be concentric to the bushing O.D. its important that the rear
bushing should have a bore approximately 0.2 mm (0.008”) greater than bar O.D.,
and the length of the bushing bore in contact with the bar should not exceed 20 mm
in length (see diagram). NOTE; The rear bushing is identified as a white
material.
It is absolutely essential that the Bar Support Unit is carefully lined up with the Lathe
and the Barfeed, and that the bar being used is supported at the rear end of the
Lathe spindle by a liner or liner bushings described as follows.

12
The clearance between the O.D. of the bar and the remainder of the liner or liner
bushings should be approximately 0.5 mm over the bar O.D. and the effective length
of the support bushings should not be greater than 25mm, except with very small
diameter bar, i.e. 5mm diameter or less. Chamfers on each end of the bushings
should be long enough to reduce the effective length of support as short as 20mm
long.
These conditions will ensure that the bar, which is outside of the lathe spindle, will be
rotating as accurately as possible so to avoid ‘whip’ and prevent vibration caused by
eccentric rotation.
It should be understood that if the length of bar is not true, i.e. bent, this will cause
problems dependant on the degrees of trueness.
The Bar Support Unit is not effective when machining hex or square bar and bar
lengths should be restricted to 1 metre.
If plastic material is being run in the Bar Support Unit, do not use standard oilon
bushings, but use steel bushings in the Bar Support Unit.
4.3. FITTING MASTER REDUCTION LINER INTO THE LATHE SPINDLE AND
SELECTING THE CORRECT SIZED BORED BUSHINGS
Fit the master spindle reduction liner with the correct size bushings into the
drawtube/spindle, lowering the support channel to obtain maximum clearance.
A handle that’s shown in diagram below will adjust the channel height.
The push rod that’s fitted to the Barfeed may be the same diameter as the bushing
bore, if this is the case it may be necessary to use a push rod that’s smaller in
diameter. This will prevent contact with the spindle wall and therefore vibration.
Where a small diameter push rod is used, it may also be necessary to use full retract
mode as the push rod may droop excessively when fully extended resulting in
vibration.
Figure 10

13
Figure 11

14
Figure 12

15
Figure 13
Figure 13

16
Figure 14

17
4.4. HEIGHT ADJUSTMENT OF THE SUPPORT CHANNEL
Ensure that Cross Slide and support channel are in the ‘out’ position.
Place the material to be used on the support channel, and slide material forward by
hand towards the lathe spindle. Unclamp the two locking handles indicated in figure
10.
Raise or lower the channel to the height at which the material can easily be inserted
into the spindle with out much interference.
Figure 12
Once the channel is set to the correct height, the stop screw shown in figure 12 is to
be set against the channel plate, this will also enable finite adjustment when lowering
and raising the channel, the nut is to be tighten once the height is established so that
the channel is unable to move when material is being loaded.
4.5. BAR STOPS AND ADJUSTMENTS
Note: There are two sets of magazine bar stops;
Small stops are for 25mm diameter and over.
Large stops are for diameters approximately 25mm and under.
In figure 01 shows where the material stops are located;
Loosen the cap head screws that lock the stops in place,
Make sure the correct stops are used
In figure 03 illustrates how the stops are to be adjusted so that only one bar can be
loaded.

18
Move the stops so that the material is against the stops in the position shown in
figure 13.
Then adjust the stops so that only one piece of material is lifted into the V-channel.
Once this has been established be sure to tighten the stop screws securely.
Figure 13
Cam Adjustment stops Cam lever
Figure 14
Material Channel Insert Pusher Material
The bar will remain stationary on the channel and the cross slide will be in the
position where the centre of channel is aligned with centre of spindle, either by
loading bar via hand control or through automatic reloading, figure 04 illustrates how
this is carried out.

19
4.6. CHANGING OR REMOVING THE PUSH ROD
The mechanical Pusher latch is designed so that when the push rod is in line with the
spindle the Push rod is latched to the main carriage therefore allowing insertion of
material to be fed through the collet section.
When the Insert Pusher is in line with the spindle the push rod will be detached from
the carriage therefore allowing insertion of material to be loaded into the spindle
section.
To change the push rod the slide must be in the specific position and the rear and
front latch are to be arranged as illustrated in figure 15, this can only be achieved
when the Barfeed is switched off via the isolator.
Rear Latch Front Latch Insert Pusher
Figure 15
Main Carriage Push Rod

20
5.1 PUSHER FORWARD MOVEMENT SENSOR
Figure 20
This sensor detects the forward movement of the Main Pusher.
This signal information is used to finish the M-Code signal (that is generated from the
Lathe), when the Main Pusher has stopped moving, ie fed to Lathe stop, the Barfeed
will then generate an M-Finish signal to the Lathe to cancel the M-Code so machining
can continue.
Table of contents
Other Hydrafeed Industrial Equipment manuals
Popular Industrial Equipment manuals by other brands

Schulte
Schulte SMR-800 Operator's manual

AAF
AAF AmericanAirFilter K Installation, operation and maintenance instructions

SMC Networks
SMC Networks CJP Series Operation manual

Siemens
Siemens 8MF1 Series operating instructions

Raven
Raven DCS 700 Installation and service manual

probst
probst TAK Series operating instructions