HydraMaster TREADMASTER 100-100-001 User manual

EN
OWNER’S
GUIDE
IMPORTANT SAFETY INSTRUCTIONS
When using an electrical appliance, basic precautions should always
be followed, including the following:
READ ALL INSTRUCTIONS BEFORE USING THE TREADMASTER
HydraMaster
11015 47th Avenue West, Mukilteo, Washington 98275
MAN-45980 Rev. C, March 31 2016
(P/N 000-182-100D)
No part of this manual may be reproduced or used in any form or by any means (i.e. graphic, electronic, photocopying
or electronic retrieval systems) without the express written permission of HydraMaster. Specications and information in this
document are subject to change without prior notice.
All rights reserved. © 2016
HydraMaster
SAVE THESE
INSTRUCTIONS
TREADMASTER™
ESCALATOR
CLEANER
Models 100-100-001
100-100-002
100-100-003
100-100-004
100-100-005
100-100-006
Models 100-100-221
100-100-222
100-100-223
100-100-224
100-100-225
100-100-226

EN
EN = ENGLISH (120 V/230V)
= CANADIAN FRENCH (120V)
FR

1 - TreadMaster Owner’s Guide
EN
INFORMATION
This Owner’s Guide provides you with important Contact Information, Warnings and
Cautions, Operating Instructions and Maintenance instructions. In the back inside cover
of this guide you will also nd a CD that contains the digital Owner’s Manual.
HOW TO USE THESE RESOURCES
This Owner’s Guide is to be used for quick reference only and is not intended to be a
comprehensive source of information. Refer to the Information and Operating Instructions
Manual when more detailed information is needed.
The digital Information and Operating Instructions Manual contains information on
everything from installation to operation and maintenance. It also contains detailed
machine assemblies and parts lists. You should become familiar with the material in the
Information and Operating Instructions Manual as it contains information that is essential
for safe operation and increased reliability.
This Owner’s Guide contains the following sections:
Approvals/Certications
Contact Information
Warnings, Cautions and Notices
Machine Specications
Grounding Instructions
Operating Instructions
Daily Maintenance

TreadMaster Owner’s Guide - 2
EN
APPROVALS/CERTIFICATIONS
CSA Approved
Your machine has been designed and tested to comply with the Canadian standard for
this class of equipment. It has been tested under the following standard:
CSA C22.2#243
Issue:2001/12/07 Ed. 3 Rev:2001/06/15 Vacuum Cleaners, Blower Cleaners, and
Household Floor Finishing Machines; General Instruction No 1; UL 1017 (R2006)
If it is necessary to provide verication, your machine is labeled with an ETL mark.
Do not remove or tamper with any part of the TreadMaster; this may result in a
non-compliance with the above standard.

3 - TreadMaster Owner’s Guide
EN
CONTACT INFORMATION
If you have any questions regarding the operation, maintenance or repair of this machine,
refer to the following information and contact the appropriate HydraMaster department.
Hours Telephone Numbers E-mail Addresses
Monday-Friday (800) 426-1301 Option 2
Support Tech Support:
techsupport@hydramaster.com
7:00 a.m. to
5:00 p.m. (800) 426-1301 Option 4
Parts Parts Support:
parts@hydramaster.com
Pacic Time FAX
(425) 771-7156
When calling or contacting us, be sure to reference the serial number and date of purchase.
FOR YOUR REFERENCE
Model: TreadMaster
Serial Number: __________________
Purchase Date:_____________
Name and phone number of your distributor:
_____________________________________
_____________________________________

TreadMaster Owner’s Guide - 4
EN
WARNINGS, CAUTIONS AND NOTICES
HydraMaster uses this WARNING symbol throughout this document to warn of
possible injury or death.
This CAUTION symbol is used to warn of possible equipment damage.
This NOTICE symbol indicates that federal or state regulatory laws may apply,
and also emphasizes supplemental information.

5 - TreadMaster Owner’s Guide
EN
Warnings and Cautions specic to the TreadMaster include the following. To reduce the
risk of re, electric shock, or injury:
Turn off all controls before unplugging the TreadMaster. Failure to do so can
cause bodily injury.
Unplug the TreadMaster from outlet when it is not in use and before servicing.
Failure to do so can cause bodily injury.
Do not unplug the TreadMaster by pulling on its cord. To unplug, grasp the plug,
not the cord. Failure to follow this warning can result in a damaged power cord,
leading to the possibility of electric shock and serious bodily injury or death.
Do not handle the plug or the TreadMaster with wet hands. Failure to follow this
warning can cause bodily injury.
Do not use the TreadMaster outdoors (except in arenas or stadiums) or on wet
surfaces. This machine is for dry use only and shall not be used or stored in
uncovered outdoor venues or in wet conditions. Failure to follow this warning can
cause bodily injury.
Do not allow anyone to sit or stand on the TreadMaster. Failure to follow this
warning can cause bodily injury.
Do not allow to be used as a toy. Close attention is necessary when used near
children.
Use the TreadMaster only as described in this manual. Use only manufacturer’s
recommended attachments. Failure to do so can cause bodily injury.

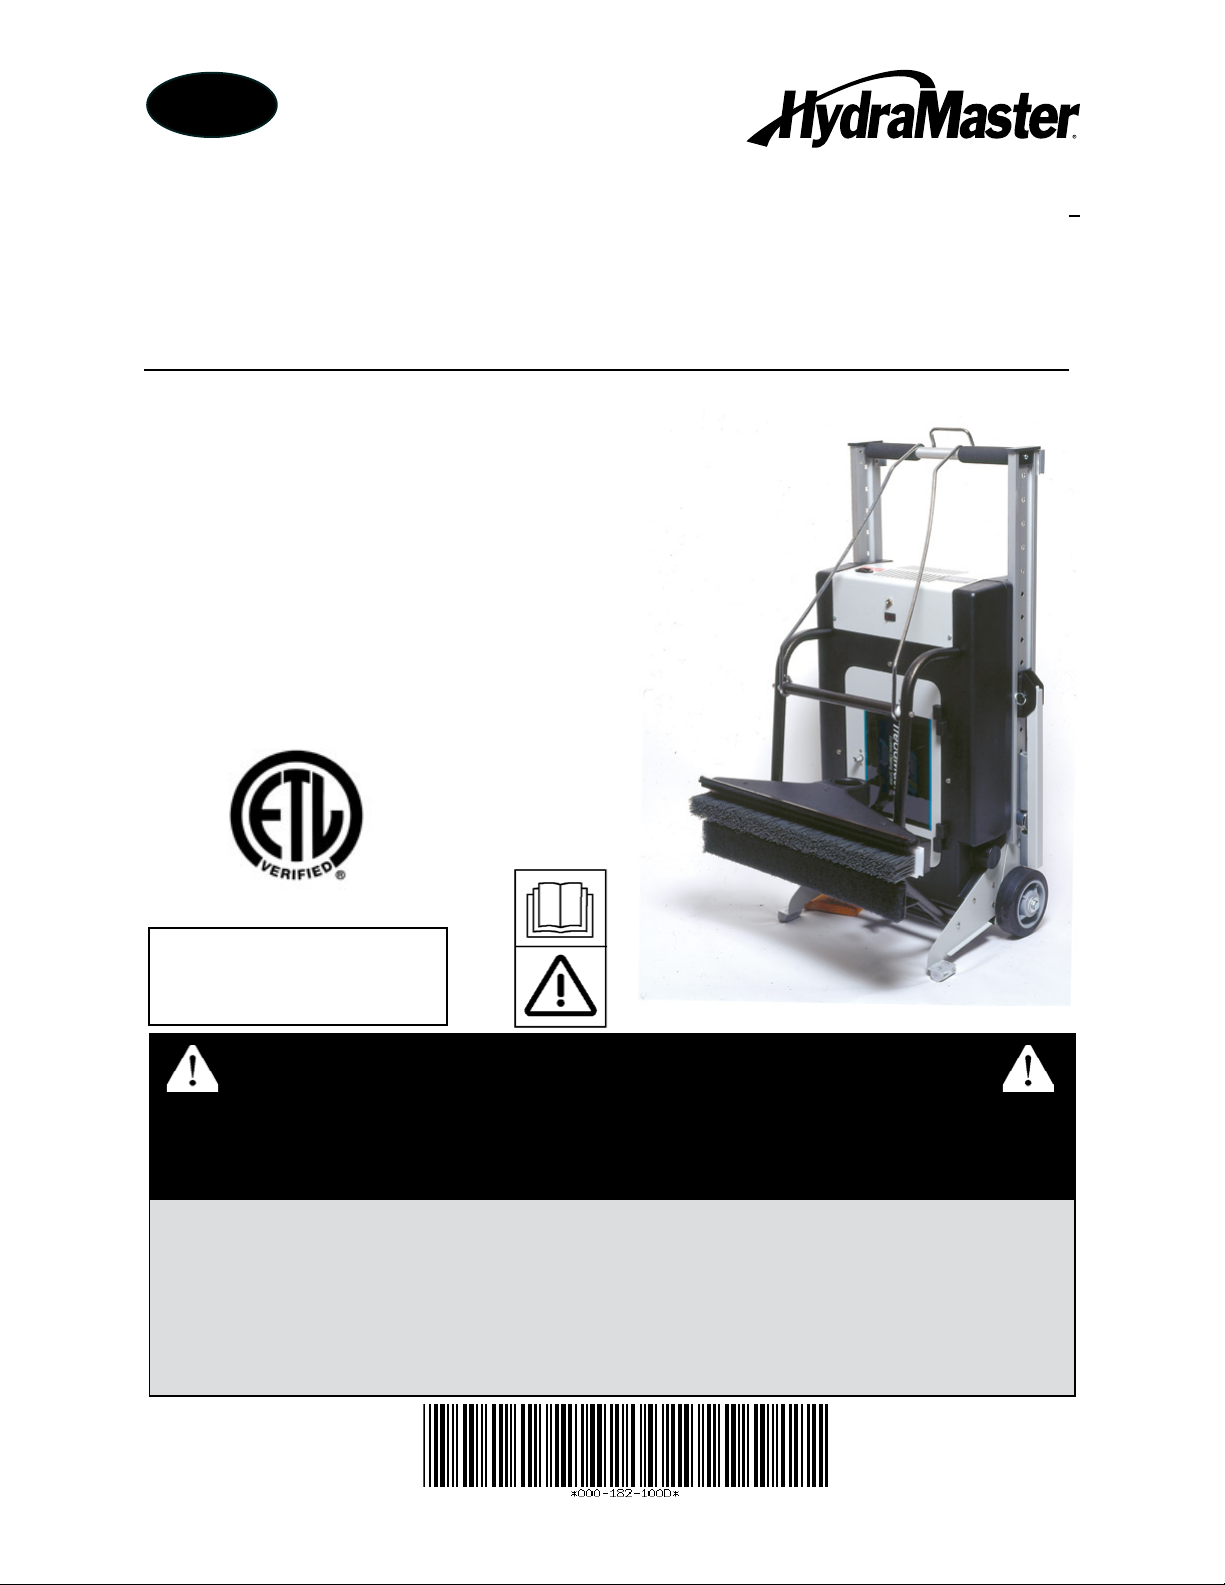
TreadMaster Owner’s Guide - 6
EN
Do not use with damaged cord or plug. If appliance is not working as it should,
has been dropped, damaged, left outdoors, or dropped into water, return it to a
service center. Failure to follow this warning can result in the possibility of electric
shock, serious bodily injury and/or death.
Do not pull or carry by cord, use cord as a handle, close a door on cord, or pull
cord around sharp edges or corners. Do not run appliance over cord. Keep cord
away from heated surfaces. Failure to follow this warning can result in a damaged
power cord, leading to the possibility of electric shock and serious bodily injury
or death.
Do not put any object into openings. Do not use with any opening blocked; keep
free of dust, lint, hair, and anything that may reduce air ow. This machine is not
suitable for accumulating, gathering or otherwise picking up health-endangering
dust. Failure to follow this warning can cause bodily injury.
Keep hair, loose clothing, ngers, and all parts of body away from openings and
moving parts. Failure to do so can cause bodily injury.
Do not use without vacuum bag and/or lters in place. Failure to follow this
warning can cause bodily injury.
Do not use to pick up ammable or combustible liquids, such as gasoline, or use
in areas where they may be present. Failure to follow this warning can lead to the
possibility re and/or explosion. This can result in serious bodily injury or death.
Do not pick up anything that is burning or smoking, such as cigarettes, matches,
or hot ashes. Failure to follow this warning can lead to the possibility re and/or
explosion. This can result in serious bodily injury or death.

7 - TreadMaster Owner’s Guide
EN
Before setting up the machine, turn off the escalator or moving sidewalk. Failure
to do so can cause bodily injury.
This appliance must be grounded. Connect to a properly grounded outlet only.
See Grounding Instructions on page 11 of this document. Failure to properly
ground the equipment can result in the possibility of electric shock and serious
bodily injury or death.
If the plug on the power cord is damaged, dispose of the cord. To prevent possible
electric shock, DO NOT insert the damaged plug into an electrical socket. Failure
to follow this warning can result in the possibility of electric shock and serious
bodily injury or death.
Use extra care when cleaning on stairs.
The TreadMaster must be set up and operated from the bottom of the escalator,
with the steps moving away from the unit. Setting up and operating the
TreadMaster at the top of the stairs could result in death or personal injury, and
equipment damage if the TreadMaster inadvertently falls down the stairs.
Match the size of the TreadMaster head assembly to the size of the step you are
cleaning. Do not use a 24” head to clean a 32” or 40” step.
The power cord for the following models is not supplied by the manufacturer; it
must be supplied by the operator:
100-100-221 100-100-224
100-100-222 100-100-225
100-100-223 100-100-226

TreadMaster Owner’s Guide - 8
EN

9 - TreadMaster Owner’s Guide
EN
MACHINE SPECIFICATIONS
Housing Assembly
Dimensions 21.5” W x 31.5” L x 47” H (55 cm W x 80 cm L x 119 cm H)
Housing Assembly
Weight 84 lbs (38 kg)
Brush and
Head Assembly
Dimensions and
Weight
22” Head 7” W x 22” L x 10” H
(18 cm W x 56 cm L x 25 cm H) 58 lbs
(26 kg)
24” Head 7” W x 24” L x 10” H
(18 cm W x 61 cm L x 25 cm H) 58 lbs
(26 kg)
32” Head 7” W x 32” L x 10” H
(18 cm W x 81 cm L x 25 cm H) 69 lbs
(31 kg)
37” Head 7” W x 37” L x 10” H
(18 cm W x 94 cm L x 25 cm H) 80 lbs
(36 kg)
40” Head 7” W x 40” L x 10” H
(18 cm W x 102 cm L x 25 cm H) 80 lbs
(36 kg)
Vacuum Motor Two 1 5/8 HP motors
Power Consumption 120V AC 230V AC
12 Amps 6.8 Amps
50/60 Hz 50/60 Hz
1,440 Watts 1,564 Watts
Construction Durable rotomolded housing - Polyethylene UL-94V2 Rated
Two nonmarking rubber wheels
Extruded aluminum frame

TreadMaster Owner’s Guide - 10
EN

11 - TreadMaster Owner’s Guide
EN
GROUNDING INSTRUCTIONS
During operation, the TreadMaster must be electrically grounded. If it should malfunction
or breakdown, grounding provides a path of least resistance for electric current to reduce
the risk of electric shock.
This appliance is equipped with a cord which has an equipment-grounding conductor
and grounding plug. The plug must be inserted into an appropriate outlet that is properly
installed and grounded in accordance with all local codes and ordinances.
Improper connection of the equipment-grounding conductor can result in a risk
of electric shock. Check with a qualied electrician or service person if you are
in doubt as to whether the outlet is properly grounded. Do NOT modify the plug
provided with the appliance.
The TreadMaster is intended to be connected to a 15 Amp circuit, is for use on a circuit
having a nominal rating of 120V or 230V, and is factory-equipped with a specic electric
cord and plug to permit connection to a proper electric circuit.
In Canada, the use of a temporary adapter is not permitted by the Canadian
Electrical Code.
Make sure that the TreadMaster is connected to an outlet having the same
conguration as the plug. No adapter should be used with this machine. Failure
to connect the TreadMaster to a proper outlet can result in bodily injury.

TreadMaster Owner’s Guide - 12
EN

13 - TreadMaster Owner’s Guide
EN
OPERATING INSTRUCTIONS
PREPARATION
1. Ensure that the escalator is not moving.
2. Wheel the TreadMaster to the escalator or moving sidewalk in the TreadMaster’s
upright position (see Figure 1).
The TreadMaster must be set up and operated from the bottom of the escalator,
with the steps moving away from the unit. Setting up and operating the
TreadMaster at the top of the stairs could result in death or personal injury, and
equipment damage if the TreadMaster inadvertently falls down the stairs.
3. Center the unit on the oor plate, between the handrails of the escalator or moving
sidewalk.
4. Unlock the lifting arm and slowly lower the cleaning head onto the threshold.
5. Lower the unit until it lays at on the oor (see Figure 2).
Figure 1. TreadMaster Shown
in Upright Position
Figure 2. TreadMaster Shown in Flat
Position
Figure 3. TreadMaster Shown in
Preferred Placement, at Bottom of
Escalator

TreadMaster Owner’s Guide - 14
EN
Figure 4. Components of TreadMaster
“Escalator Cleaning in
Progress” Sign
Handle
Restraining
Arm
Built-In
Vacuum System
Storage Compartment
Quiet Ride Wheels
Pad Holder Lift Arm
Adjustable Cleaning Head
Replaceable Polishing Pad
and Brushes
Vacuum Hose
Power Switch
Leveling Adjustment Knob
Cleaning
Head Level
Do not operate this machine without the restraining arms in place as it could
damage the TreadMaster and/or the escalator/moving sidewalk.
Make sure that the warning sign is clearly visible at all times during operation of
the TreadMaster as indicated in Figure 4. If anyone attempts to use the escalator/
moving sidewalk during cleaning operations, serious injury could result.

15 - TreadMaster Owner’s Guide
EN
Figure 5. Ensure Restraining Arms are
Firmly Seated Against Balustrades
Figure 6. Location of Cleaning
Head Level
Figure 7. Adjust Depth of Cleaning
Head with Fluted Knobs
6. Slide the restraining arms in their
channel to position the cleaning head
over the tread. Notice that the pin in
the end of the arm will t into one of
the holes in the channel, locking the
arm into place. Extend the restraining
arms to their full locked position (see
Figure 4 and Figure 5).
7. Slide the TreadMaster into the
treadwell, making sure the restraining
arms are rmly seated against the
balustrades (see Figure 5).
8. Use the leveling adjustment knob to
ensure proper contact with the tread
surface (see Figure 4). Check the
cleaning head level to ensure proper adjustment (see Figure 4 and Figure 6).
9. Adjust the depth of the cleaning head with the uted knobs on the cleaning head
(see Figure 7).
10. Remove the power cord, vacuum hose and warning sign from the storage
compartment.

TreadMaster Owner’s Guide - 16
EN
11. Attach the vacuum hose between the
housing assembly and the cleaning
nozzle. The hose connector with the
shorter end should be connected to
the cleaning nozzle assembly. The
hose connector with the longer end
is connected to the housing assembly
(see Figure 8) and should be secured
by tightening the clamp.
Figure 8. Attach Other End of Hose to
Housing Assembly

17 - TreadMaster Owner’s Guide
EN
OPERATION
1. To seat the cleaning brush in the grooves, set the polishing pad holder lift arm in the
"up" position (see Figure 9).
2. Attach the warning sign to the crossbar handle (see Figure 5).
3. Plug in the power cord at the machine receptacle rst; then, plug the cord into the
nearest rated outlet.
4. Prior to starting the escalator/moving sidewalk, review Steps 2– 11 on pages
13 – 16.
5. Turn on the TreadMaster’s power switch (see Figure 4).
6. Turn on the escalator and again make sure the direction of travel is away from the
TreadMaster.
For rst-time cleaning, HydraMaster recommends that the unit be allowed to run
for 1 hour for optimum results.
Polishing Pad
Holder Lift Arm
Figure 9. Set Lift Arm in Up Position

TreadMaster Owner’s Guide - 18
EN
POLISHING
Pull the pad holder lift arm back toward the machine and down (see Figure 9). This lowers
the polishing pad to the tread surface and simultaneously lifts the brush bristles from the
grooves.
TOUCH-UP CLEANING HINTS
Perform these simple steps to prolong the service life of your equipment and reduce
replacement costs:
1. Disconnect the hose from the vacuum head and attach the crevice tool.
2. Before moving the unit, vacuum the loose dirt (which was created by the scrubbing
action of the brush) from around the cleaning head.
3. Raise the head assembly and vacuum off the pad surface and the brush.
This manual suits for next models
11
Table of contents
Languages: