manuals.online logo
Brands
  1. Home
  2. •
  3. Brands
  4. •
  5. HYDROCOWL
  6. •
  7. Enclosure
  8. •
  9. HYDROCOWL Safe-T-Cover 300 Series User manual

HYDROCOWL Safe-T-Cover 300 Series User manual

Page 1www.safe-t-cover.com 1-800-245-6333
7/8/2020
ASSEMBLY INSTRUCTIONS - PLEASE READ CAREFULLY
Model No.
Inside
Dimensions
Outside
Dimensions
Recommended Concrete
Pad Dimensions
300 Series
22"W x 72"L x 38"H
25 3/4"W x 75 1/8"L x 41 1/4"H
36"W x 86"L x 6" Thick
300D Series
48"W x 78"L x 44"H
51 3/4"W x 81 1/8"L x 47 1/4"H
62"W x 92"L x 6" Thick
300DS Series
48"W x 91"L x 44"H
51 3/4"W x 94 1/8"L x 47 1/4"H
62"W x 105"L x 6" Thick
300T Series
22"W x 72"L x 50"H
25 3/4"W x 75 1/8"L x 53 1/4"H
36"W x 86"L x 6" Thick
300TD Series
48"W x 78"L x 50"H
51 3/4"W x 81 1/8"L x 53 1/4"H
62"W x 92"L x 6" Thick
300TDS Series
48"W x 91"L x 50"H
51 3/4"W x 94 1/8"L x 53 1/4"H
62"W x 105"L x 6" Thick
400 Series
26"W x 86"L x 44"H
29 3/4"W x 89 1/8"L x 47 1/4"H
40"W x 100"L x 6" Thick
400T Series
26"W x 86"L x 54"H
29 3/4"W x 89 1/8"L x 57 1/4"H
40"W x 100"L x 6" Thick
600 Series
36"W x 100"L x 56"H
39 3/4"W x 103 1/8"L x 59 1/4"H
50"W x 114"L x 6" Thick
600T Series
36"W x 100"L x 64"H
39 3/4"W x 103 1/8"L x 67 1/4"H
50"W x 114"L x 6" Thick
600TM Series
36"W x 100"L x 70"H
39 3/4"W x 103 1/8"L x 73 1/4"H
50"W x 114"L x 6" Thick
600TS Series
38"W x 120"L x 64"H
41 3/4"W x 123 1/8"L x 67 1/4"H
52"W x 134"L x 6" Thick
1. Do not remove the PVC masking film until the enclosure is fully assembled. The PVC masking film
will protect the finish of the metal panels during installation.
2. The concrete pad should be 6” thick x 14” longer than enclosure ID x 14” wider than enclosure ID.
Please note - the concrete pad should be level or the access panels may be difficult to install.
3. Mark the concrete pad for the outside of the enclosure using the dimensions in the table above.
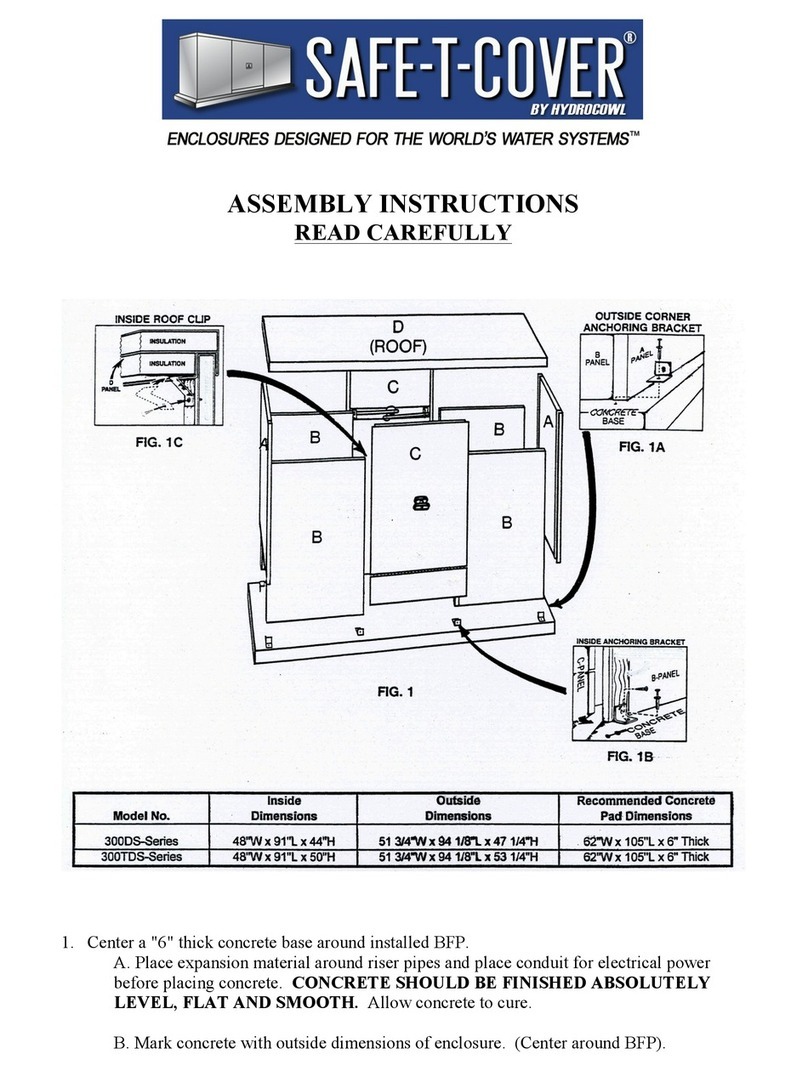
4. Assemble the “B-A-B” (side-end-side) assemblies using hex head screws.(For best results, insert a bead
of silicone caulk into the inside bend of the “A” panel corners.) Position both sets of assembled panels
on the marked concrete base (Fig. 1).
FIG. 1
Page 2www.safe-t-cover.com 1-800-245-6333
7/8/2020
5. Set the “C” access panels in place with about a 3/16” gap on each side of the panels.
6. Set the “D” (roof) panel on the “B-A-B” assemblies and fasten in place using hex head screws through
all holes provided at panel stud locations.
7. Inspect the alignment of the “C” (access) panels during the assembly process. Verify that their removal
and replacement allow adequate spaceand positioning within the openingsand with the adjacent panels
prior to attaching any bracket to the concrete.
8. Attach the Outside Corner Anchoring Brackets (smallest angle brackets in the hardware package) to
the corner of the B panel of the “B-A-B” sections. First, attach the bracket to the B panel using two (2)
hex head screws. (Fig. 2A). Then fasten the bracket to the concrete with one (1) concrete anchor.
Fasten one (1) Outside Corner Anchoring Bracket at both corners on one side.
FIG. 2
9. On the same side of the enclosure where the Outside Corner Anchoring Brackets were just installed,
attach the Inside Anchoring Brackets (largest angle brackets in the hardware package) to the bottom
of the “B” panels on the inside of the enclosure. (Fig. 2B). First, attach the bracket to the B panel using
two (2) hex head screws. Then fasten the bracket to the concrete with one (1) concrete anchor. Fasten
the Inside Side Anchoring Brackets to the “B” panels and concrete along one side of the enclosure.
10. Insert the Inside Roof Clips into the “D” (roof) panel at the “B” panel studs (Fig. 2C). Attach the clips
to the “B” panels as shown using one (1) hex head screw for each.
Page 3www.safe-t-cover.com 1-800-245-6333
7/8/2020
11. Repeat Steps 8, 9, & 10 on the other side of the enclosure. Note, all Inside Anchoring Brackets must be
installed for the enclosure to withstand strong winds.
12. For maximum protection, it is suggested that the area between the bottom of the enclosure and the
concrete base should be caulked except for the “C” panels. DO NOT CAULK THE BOTTOM OF
THE “C” PANELS.
13. Provide a ground-fault interrupter device in all electrical circuits per all applicable codes. Install the
heater(s) as per the manufacturer’s instructions and governing local and national codes.
14. REMOVE THE PVC MASKING FILM IMMEDIATELY AFTER INSTALLATION. If the panels get
wet with the masking film in place, water will irreversibly stain the panels. Summertime heat will bake
the masking film onto the panels.
CONTENTS
1. Assembly parts included:
A. 2- “A” (end) Panels
B. 4- “B” (side) Panels
C. 1- “C” (removable access) Panel
D. 1- “C” (removable access) Panel W/drain
E. 1- “D” (roof) Panel
F. 4- Outside Corner Anchoring Brackets (1 ½” x 1 ½”)
G. 4- Inside Anchoring Brackets (3” x 3”)
H. 4- Inside Roof Clips
I. 1- Package of Anchors
J. 1- Package of Hex Head Screws
K. 1- Masonry Bit
L. 1- Magnetic Chuck
2. Tools needed:
A. Hammer
B. Screw Gun
C. ¾” Wrench
D. Hammer Drill

This manual suits for next models

11

Other HYDROCOWL Enclosure manuals

HYDROCOWL SAFE-T-COVER 600TD Series User manual

HYDROCOWL

HYDROCOWL SAFE-T-COVER 600TD Series User manual

HYDROCOWL SAFE-T-COVER 1000DS Series User manual

HYDROCOWL

HYDROCOWL SAFE-T-COVER 1000DS Series User manual

HYDROCOWL Safe-T-Cover 800 Series User manual

HYDROCOWL

HYDROCOWL Safe-T-Cover 800 Series User manual

HYDROCOWL SAFE-T-COVER 1000TDS-AL User manual

HYDROCOWL

HYDROCOWL SAFE-T-COVER 1000TDS-AL User manual

HYDROCOWL SAFE-T-COVER 600DS Series User manual

HYDROCOWL

HYDROCOWL SAFE-T-COVER 600DS Series User manual

HYDROCOWL Safe-t-Cover 300DS Series User manual

HYDROCOWL

HYDROCOWL Safe-t-Cover 300DS Series User manual

HYDROCOWL Safe-T-Cover 800S Series User manual

HYDROCOWL

HYDROCOWL Safe-T-Cover 800S Series User manual

Popular Enclosure manuals by other brands

ADC HiGain HRE-450 List 4A user manual

ADC

ADC HiGain HRE-450 List 4A user manual

StarTech.com InfoSafe IDECASE35U2 instruction manual

StarTech.com

StarTech.com InfoSafe IDECASE35U2 instruction manual

Salsbury Industries 51000 Series installation instructions

Salsbury Industries

Salsbury Industries 51000 Series installation instructions

Icy Dock MB672SKGF user manual

Icy Dock

Icy Dock MB672SKGF user manual

Pulsar AWO-270 user manual

Pulsar

Pulsar AWO-270 user manual

Conrad Electronic 41 28 12 operating instructions

Conrad Electronic

Conrad Electronic 41 28 12 operating instructions

Eaton Crouse-Hinds IHB8L DC2 KIT Installation & maintenance information

Eaton

Eaton Crouse-Hinds IHB8L DC2 KIT Installation & maintenance information

MTX RTF10P quick start guide

MTX

MTX RTF10P quick start guide

Dot Hill Systems AssuredSAN 3004 Series Setup guide

Dot Hill Systems

Dot Hill Systems AssuredSAN 3004 Series Setup guide

ZALMAN HD160XT Plus user manual

ZALMAN

ZALMAN HD160XT Plus user manual

Digitus DA-70550-1 user manual

Digitus

Digitus DA-70550-1 user manual

Premio DSS316S-UN quick guide

Premio

Premio DSS316S-UN quick guide

Dynex DX-PHD25 user manual

Dynex

Dynex DX-PHD25 user manual

Netstor TurboBox Pro NA250A Quick installation guide

Netstor

Netstor TurboBox Pro NA250A Quick installation guide

ADC OmniReach FDH 3000 installation instructions

ADC

ADC OmniReach FDH 3000 installation instructions

Antec OVERTURE II user manual

Antec

Antec OVERTURE II user manual

SilverStone ML07 instruction manual

SilverStone

SilverStone ML07 instruction manual

ABB ACS150 series installation instructions

ABB

ABB ACS150 series installation instructions

manuals.online logo
manuals.online logoBrands
  • About & Mission
  • Contact us
  • Privacy Policy
  • Terms and Conditions

Copyright 2025 Manuals.Online. All Rights Reserved.