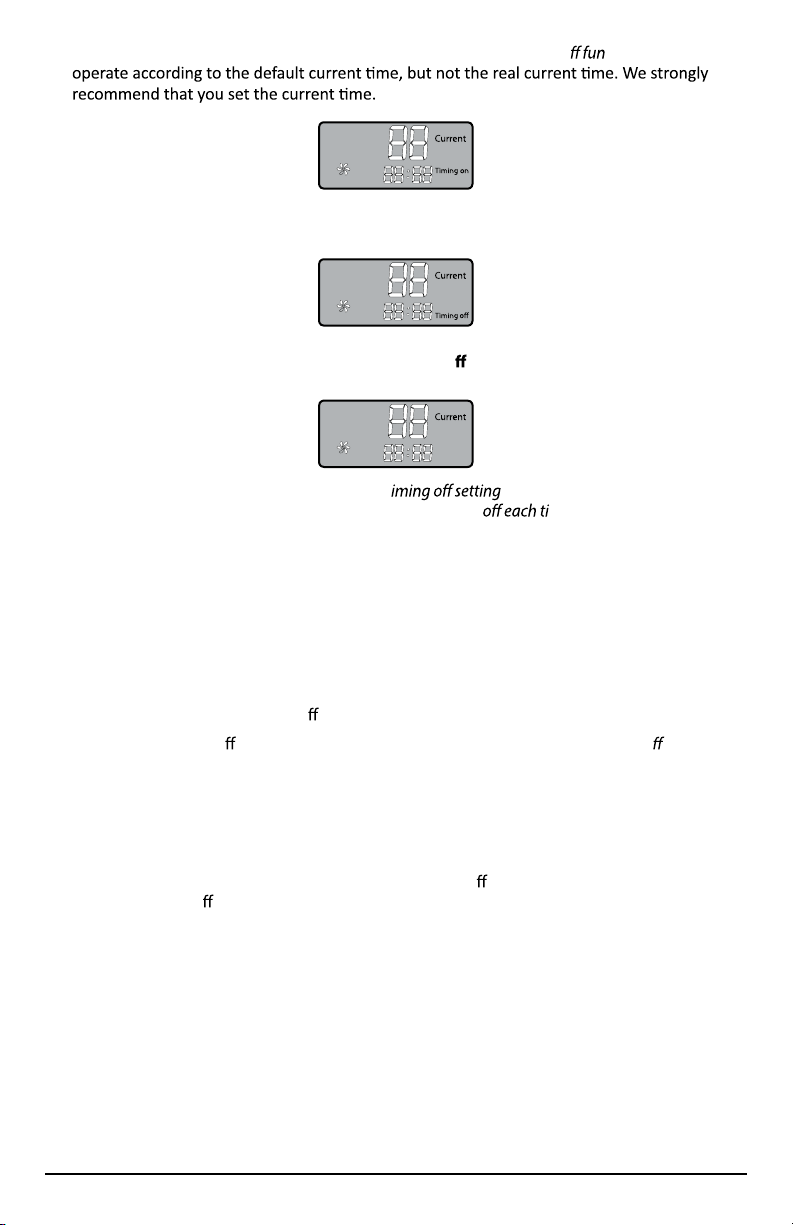
Hydrofarm Active Air AADHC1802P User manual

USER MANUAL
AADHC1802P
DEHUMIDIFIER 190 PINT

Hydrofarm.com
2

TABLE OF CONTENTS
OVERVIEW 4
FEATURES 4
WARNINGS 4
SPECIFICATIONS 4
PRODUCT LEGEND 5
DRAINAGE INSTALLATION 6
MACHINE SETUP AND OPERATION 7
KEY FUNCTIONS 7
HUMIDITY AND TIMER SETUP 7
OPERATIONS 8
MAINTENANCE 10
MACHINE STORAGE 11
TROUBLE SHOOTING 11
3

OVERVIEW
Thank you for selecting Active Air dehumidifiers. This manual details the proper use and
maintenance of these dehumidifiers. Please take a few minutes to read this manual, and please keep
it for further reference.
Active Air industrial-grade dehumidifiers provide powerful and reliable dehumidification solutions
for grow room environmental control. These units have been designed for improv ciency,
performance and increased water removal capabilities. The digital humidistat is programmable
for precise and automatic control of indoor humidity levels. The units can be operated 24/7 for
continuous use or programmed for timed operation.
These updated dehumidifiers are equipped with automatic restart, allowing them to be used with
external humidity controllers. The system has auto-memory that maintains programmed settings
The internal air filter collects
airborne particles helping keep your indoor environment and plants as healthy as possible. The filter
is washable for repeated use. All three models are ETL-listed. They have a one-year warranty and are
equipped with caster wheels for easy and secure placement.
For information on additional Active Air products please visit Hydrofarm.com.
FEATURES
• Removes up to 190 pints per day
•
Automatic Restart (humidity controller compatible)
•
Programmable humidity setting
•
Timed operation
•
Continuous draining option
•
Low decibel output
•
Digital humidistat control • Caster wheels for easy mobility and storage
WARNINGS
Please follow the below safety guidelines when using the dehumidifier:
• Unplug the power supply when cleaning or storing the unit.
• Do not put into water or operate near a water source.
• Do not place the unit near the heating equipment or ammable substances.
• Keep ngers and other objects away from air inlets and outlets.
• Do not stand on the unit.
• Do not cover the louvered panes on the machine or it will overheat.
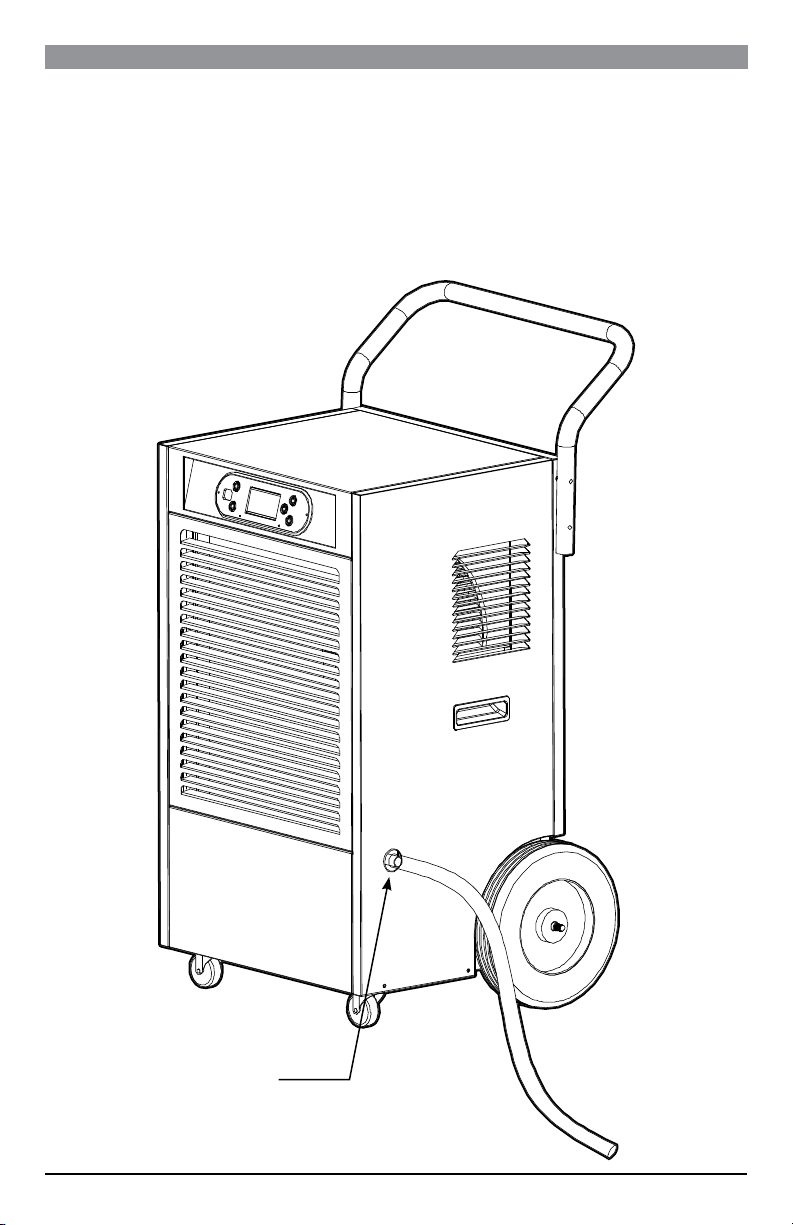
• Install the drainpipe facing downward so condensation will ow out of the pipe.
• If the power cable is damaged, please contact a licensed electrician for replacement or repair.
SPECIFICATIONS
Rated capacity Up to 120 Pints/Day @ 80°F, 60% RH
Up to 190 Pints/Day @ 86°F, 80% RH
Power supply 115VAC/60Hz
Power consumption and current 1165W/10.2A @ 80°F, 60% RH
1350W/12.0A @ 86°F, 80% RH
Refrigerant type & capacity R410A/27.5 oz (780 g)
Maximum design pressure High Side: 522 psig (3.6MPa)
Low Side: 240 psig (1.65MPa)
4
during unexpected power outages or after daily on/o cycles.
%HIRUHSOXJJLQJLQWKHXQLWWRDSRZHUVRXUFHDQGRSHUDWLQJOHWWKHXQLWVWDQGXSULJKWIRUD
PLQLPXPRIKRXUV7KLVZLOOUHGXFHWKHSRVVLELOLW\RIDPDOIXQFWLRQLQWKHFRROLQJV\VWHP
IURPKDQGOLQJGXULQJWUDQVSRUWDWLRQ
•

P R O D U C T LEGE N D
Control Panel
Air-In Louver
Front Panel
Drainage Pipe
Power
Cord
Side
Handle
Compressor
Heat Vent
Back Handle
Air-Out Louver
Side Handle
FRONT
BACK
5
Quick repair access

DRAINAGE INSTALLATION
Install the included drain pipe to the draining nozzle on the machine and direct the pipe to the
desired area before operate the machine. If in need to replace or extend the drainage pipe, use 5/8"
ID (Ø16 mm) piping.
WARNING: Do not block the drainage hose. The end of the drainage pipe should not be higher than
the outlet hole. If the drainage pipe end is higher than the outlet hole, water will not drain properly
and could damage components of the unit.
Drainage
Nozzle
Drainage Pipe
6

SETUP AND OPERATION
KEY FUNCTIONS
POWER– Turns the unit on and o.
CONTINUOUS OPERATION – When pressed, the unit will operate continuously.
TIMER/MODE – The unit has 5 modes: Humidity, Current Time, Timed Operation On, Timed
Operation O, and Exit. Every time you pressthe Timer/Mode key it cycles to the next mode.
“+”BUTTON – When in the “SET”mode, every time you press the“+”button, it will raise the humidity
by 1%. If you hold the button down, it will add humidity more quickly. When in any of the time
modes, the “+”button adds hours. These buttons are used to set “CURRENT”time, “TIMING ON”, and
“TIMING OFF.”
“–“ BUTTON – When in the“SET”mode, every time you press the“–”button, it will lower the
humidity by 1%. If you hold the button down, it will lower humidity more quickly. When in any of the
time modes, the “–”button adds minutes. These buttons are used to set“CURRENT” time,“TIMING
ON”, and“TIMING OFF.”
HUMIDITY AND TIMER SETUP
When the machine is powered on for the firsttime there will be an audible buzz sound. Press
the POWER button to start the machine. The screen will display “Run” and“Current,”the present
humidity.
1. To set the desired humidity, pressthe TIMER/MODE button. The screen shows“Set”and the
machine enters into the set mode. When in the set mode, you can increase or decrease the
humidity from the default setting to your desired level by using the “+”or “–”buttons.
ATTENTION:
2. To set the current time, press TIMER/MODE again to see the present time. You can change the
time by using the “+”button to change hours and “–”button to change minutes.
ATTENTION: The time format is in 24 hours and the default time is set at 12:00. You can choose to
skip the current time setting by pressing the TIMER/MODE button to cycle to exit. However, if the
Run
Run Set
Run Set
7
The machine may be lower or higher than the current ambient humidity when the
machine is powered onforthe first time. If the default humidity is higher than the currenat humidity,
after the machine is powered on, although the fan will operate, the dehumidify function will not
operate. You are required to reset the humidity to your desired level in order to ensure the machine
will operate properly.

machine operates by the default current time, the Timing On and Timing O ction,
if set, will
3. To set for timed operation, press TIMER/MODE a third time and “Timing on” will display. Use the
“+”button to change hour and the “–”button to change minutes. The timer is in 24-hour format.
4. After you press TIMER/MODE a fourth time,“Timing o ”will display. Use the“+”button to
change hour and the“–”button to change minutes.
TIP: You can choose to skip the Timing on and T by pressing theTIMER/MODE but-
ton to exit. If so, you must manually power the machine on or me by pressing thePOWER
button.
5. Press TIMER/MODE a fifth time to exit the setting mode.
OPERATIONS
Non-timed dehumidifying operation to the desired humidity level
When the timer is not set, the unit dehumidifies up to the humidity set point and automatically goes
to the standby mode when the set point is achieved. After the ambient humidity increases more
than 3%, the dehumidifying function operates again. The machine will continue working in this
pattern until it is manually powered o .
Due to the 3-minute on/o delay design to protect the working components (see On/O Delay, page
9), the humidity reading may go up more than 3% while the machine remains in the standby mode
since it is within the 3-minute delay protection period. This usually happens under conditions where
the ambient humidity is high. It is not a machine malfunction.
Timed dehumidifying operation to the desired humidity level
When the timer is set, the machine will operate according to the humidity set point (see page 7,
step 1), only after the Timing On time and before the Timing O time. Before the Timing On time
and after the Timing O time, the machine is in standby mode. Unless the power supply cord is
unplugged, the machine remembers all set points in the standby mode and will automatically
operate according to the timer setup every day.
You can manually override the timer function to start or stop the dehumidifying function by
pressing the POWER button. The machine resumes to the timer mode in the next 24-hour cycle.
AutomaticDefrost
The unit will automatically go into defrost mode when frost forms on the evaporator coil. The screen
shows“Defrost.”After 15 minutes of defrost time the unit will resume operation. When in the defrost
mode, the unit does not dehumidify.
Continuous dehumidifying operation
NOTE: Use this setting when operating this dehumidifier with a timed humidity controller.
Run Set
Run Set
Run
8

When the machine is in continuous operation, the desired humidity set point is still remembered
but is deactivated. The machine will continuously dehumidify, no matter what the humidity set
point is, until it is manually powered off or timed off.
1. Press the CONTINUOUS OPERATION button to enter the continuous operation mode. The
screen will show“Continuous.”
2. Press the CONTINUOUS OPERATION button again to deactivate continuous operation. The
machine goes back to the mode of operating according to the humidity set point.
When there is a frost buildup, the machine will be forced to stop dehumidifying and start defrosting
automatically. The screen shows the machine in“Defrost”process under“Continuous” mode. After
the defrost function ends,“Defrost”disappears from the screen while“Continuous”still shows.
Automatic Restart
In the event of a power failure, the machine will remember what the humidity set point was and
whether the unit was in operating mode before the power failure.
When power is restored, if the unit was operating before the power failure, it automatically restarts
to operate according to the humidity set point in the non-timed mode.
Note that the unit was powered off when a power failure occurs, the unit will remain powered off
until it is turned back on.
The Automatic Restart feature allows the unit to be used with controllers and timers.
On/Off Delay
If the system is turned off after running and you wish to turn it on again, there is a 3-minute delay
before restart as protection to the working components of the unit.
Run
9

1. Clean the machine with a soft wet cloth.
2. Pull out the louver on the front panel to gain access to the filter.
3. Remove the filter mesh from the unit.
4. Use a clean rag to absorb the surface dust on the filter mesh. If the filter is extremely dirty, use
tap water to flush the filter. Fully dry the filter before putting it back into the air inlet fence. A
clean filter will increase the machine’s capacity.
MAINTENANCE
10

If you will not be using the unit for an extended period of time, please store it perthe
following steps.
• Clean the lter mesh.
ATTENTION: The evaporator inside the machine has to be dried out before the unit is packed to
avoid component damage and molds. Unplug the unit and place it in a dry open area for a few days
to dry it out.
TIP: Another way to dry the unit is to set the humidity point higher than the ambient humidity to
force the fan to dry the evaporator for 30 minutes. The dehumidifying functionwill not work and the
fan can accelerate the drying process.
•
•
MACHINE STORAGE
TROUBLESHOOTING
SYMPTOM POSSIBLE CAUSE SOLUTION
Machine does not run
Unit is not plugged in. Plug in the unit.
Ambient temperature is under 5
degrees or above 35 degrees.
To protect the machine, use it only when ambient temperature
is between 5 and 35 degrees.
The humidity sensor is loose, wet or
defective; the screen will show “E5”.
Check the sensor connection. Use a blower to dry the humidity
sensor behind the front cover. If the machine still does not run,
contact your retailer to replace the sensor.
The temperature sensor is loose or
defective; the screen will show “E6”.
Check the sensor connection. Contact your retailer to replace
the sensor.
Machine runs but does
not dehumidify
The humidity set point is higher than
the ambient humidity.
Reset the humidity to a lower set point, or power o the machine
if the desired humidity level has been reached.
Reduced dehumidi¿er
capacity
Filter mesh is jammed. Clean the ¿lter mesh according to manual.
Air-in and/or Air-out louvers are
jammed.
Clear the blockage from Air-in and/or Air-out louvers.
No air inlet Filter mesh or Air-in louver is jammed. Clean ¿lter according to instructions or clean the louver
blockage.
Loud Operation
Machine is situated on an incline or
decline slope. Move to a level location.
Filter mesh is jammed. Clean ¿lter mesh according to instructions.
11
ERROR CODES
Error codes display Interpretations Solutions
E5 Humididity sensor failure
Check the sensor connection.
Use a blower to dry the humidity sensor behind the front cover.
If the machine still does not run, contact your retailer to replace
the sensor.
E6 Humididity sensor failureCheck the sensor connection. Contact your retailer to replace
the sensor.
Collect the power cord, bunch it, and hang it in the power cord pocket at the back of unit.
Store the unit in a clean, dry environment.
•
7KHXQLWPXVWEHNHSWLQXSULJKWSRVLWLRQZKHQ
LQVWRUDJH

Hydrofarm.com
WARRANTY
Like us on Facebook, follow us on Twitter,
and check out Hydrofarmtv on YouTube and Instagram!
Get Connected with the Hydrofarm Community:
AADHC1802P_Instructions revised - January 8, 2018 10:15 AM
LIMITED WARRANTY
Hydrofarm warrants the AADHC1802P to be free from defects in materials and workmanship. The warranty term is
for 1 year beginning on the date of purchase. Misuse, abuse, or failure to follow instructions is not covered under this
warranty. Hydrofarm’s warranty liability extends only to the replacement cost of the product. Hydrofarm will not be
liable for any consequential, indirect, or incidental damages of any kind, including lost revenues, lost profits, or other
losses in connection with the product. Some states do not allow limitation on how long an implied warranty lasts or
the exclusion of incidental or consequential damages, so the above limitations or exclusions may not apply to you.
Hydrofarm will, at our discretion, repair or replace the AADHC1802P covered under this warranty if it is returned to
the original place of purchase. To request warranty service, please return the AADHC1802P, with original sales receipt
and original packaging, to your place of purchase. The purchase date is based on your original sales receipt.
Thank you for choosing Active Air by Hydrofarm. For further information about Active Air
products, videos, and technical information,
please visit Hydrofarm.com
ADDITIONAL LANGUAGES OF THESE INSTRUCTIONS CAN BE FOUND AT Hydrofarm.com
Table of contents
Other Hydrofarm Dehumidifier manuals