Hygiena INCUBATOR User manual

Operation Manual
Small Format Digital Dry
Block Incubator
Catalog No. INCUBATOR
Rev. C. April 2016

Thank you for purchasing the Digital Dry Block incubator
(catalog no. INCUBATOR) from Hygiena.
Opening Check
Please check the instrument when you first open the
instrument packing case. If you find there is something wrong
or missing with the instrument, contact Hygiena at
www.Hygiena.com. A list of included parts can be referenced
in section 1.1

Contents
1. Introduction ............................................................... 1
1.1 What’s in the box?....................................................
1
1.2 Incubator diagram...................................................... 2
1.3 Set up the incubator …............................................. 3
2. Technical data............................................................. 4
3. Safetyprecautions....................................................... 5
4. Operationguide........................................................... 6
4.1 Control keys .............................................................. 6
4.2 Create a new program .............................................. 6
4.3 Select minute or second for timer............................. 7
4.4 Run and stop a program ........................................... 7
4.5 Temperaturecalibration ............................................ 8
5. Maintenance andcleaning........................................... 12
6. Troubleshooting instrument errors.............................. 12
Appendix
Wiring diagramfor incubator ........................................... 13

1. Introduction
This manual contains operational instructions, please read the
entire manual thoroughly before using the incubator.
1.1 What is in the box?
When you unpack the incubator, make sure you have the
following parts:
No
Item
Type
QTY
1
Incubator
INCUBATOR
1
2
Power adapter and cord
12V 4A
1
3
Wrench
1
4
Operation manual
1
5
Certificate of
certification
1
1

Power switch
Power connector
1.2 Incubator diagram
2
Block
Display
Panel

1.3 Set up the incubator
1.3.1
Place the incubator onto a level,horizontal surface.
1.3.2
Connect theincubator to thepower adapter, connect the
adapter to the power cord, and connect the power cord to a
main powersupply.
100-240V
~
1.3.3 To power ON the incubator, turn the power switch to “I”. The
incubator is ready to operate when the display becomes
visible.
3
DC 12V
ON
OFF

2.Technicaldata
4
Model
INCUBATOR
Power supply
DC12V
Power
35 W
Temperature range
RT+5 ℃ ~ 80 ℃
Timing range
1sec ~999 sec or
1min ~999 min
Accuracy of the
temperature
≤±0.5℃
Displayaccuracy
0.1℃
Heating time
(from 20 to 80
≤12min
Ambient temperature
5℃ ~ 35℃
Dimensions W×D×H)
110mm×150mm×80mm
Weight
0.5 kg

3.Safety precautions
Read the manual thoroughly before operation.
This product is for indoor useonly.
The operator should not open or attempt to repair the
instrument, which will result in loss of repair guarantee or
could cause an accident. If there is an issue with the
instrument, contact Hygiena.
The instrument should be operated in an environment with
low temperature, little dust, no water and away from the sun
or heat lamp. The area should have good airflow, no
corrosive gas or a strong disturbing magnetic field. It should
be far away from central heating, camp stoves and any
other heat resource.
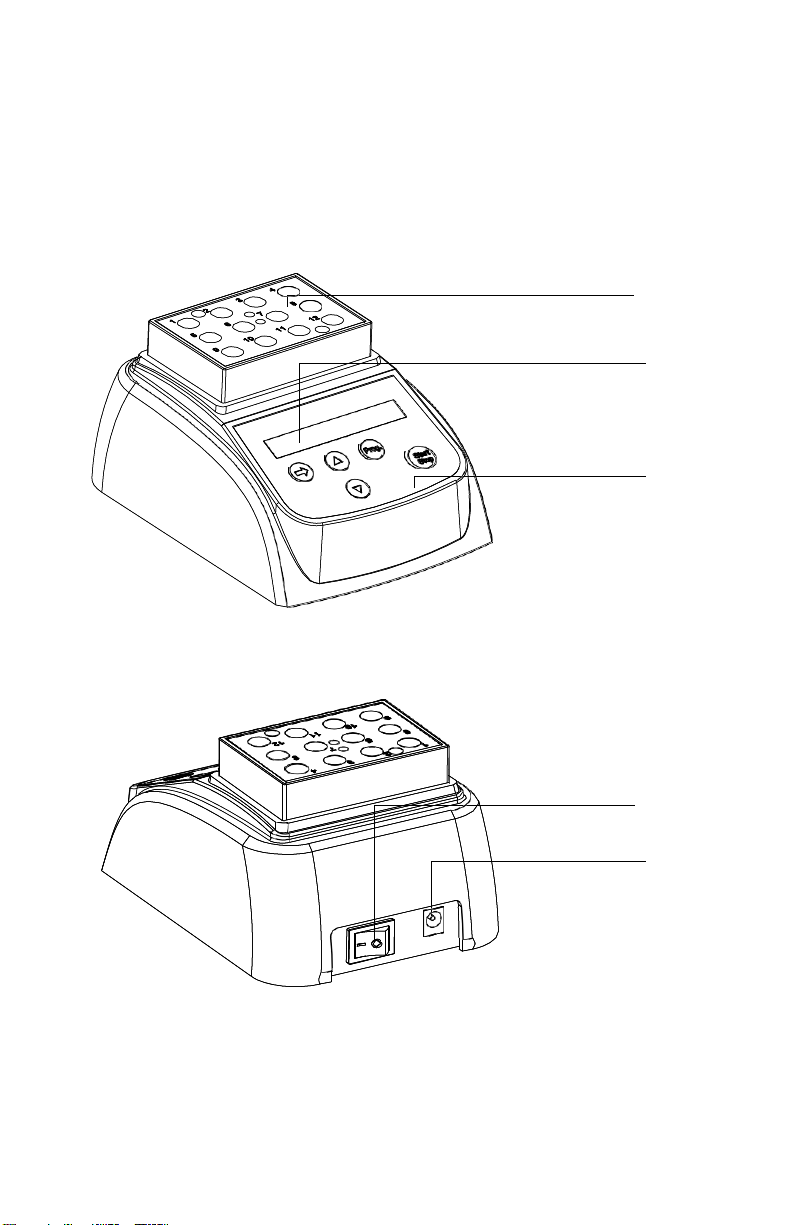
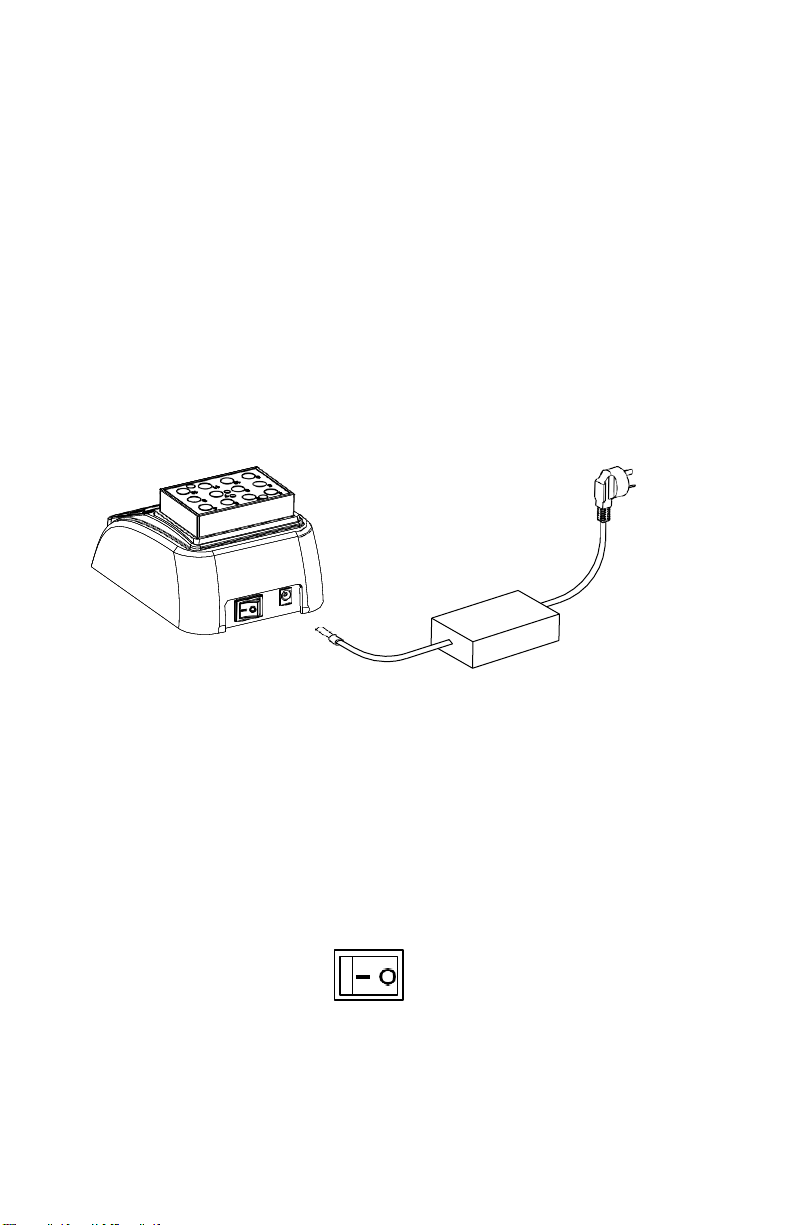
The power switch is on the rear of the device, push “I” to
power ON the device, and push “O”to power OFF the
device.
The power connector is on the rear of the device, DC12V
input, inside is “+”, outside is “-”.
Power OFF when not in use.
For extended non-use, remove the connector plug and
cover incubator to shield from dust.
5

4. Operation guide
4.1
Control keys:
START/STOP ............... start or stop the procedure
Prog. ......................... select various programs
.......................... for setting temperature and time
............................... move the cursor
4.2
Create a new program
Press the “Prog.” key to select various programs, from P1 to P9.
For example, select P8, then press the key to move the cursor,
press the keys to set a new value.
Users can set two temperatures and times for each program. The
single symbol, is the first temperature and time, the double
symbol is the second temperature and time.
Press the key to all the way to the right end of the display screen
to toggle between first and second temperature and times.
In 8 seconds, the cursor will disappear exiting the setting interface.
See the example diagram below:
First temperature and time
*In 8 seconds the cursor will exit the setting interface.
Shows Room temperature
6
P8 40.0 006min
P8 50.0 003min
P8 36.2 ℃NOTOK
Second temperature andtime

4.3
Select minute or second as unit of time for timer
The timer unit of time can be set to either minute or second. To set
the unit of time, press the key to enter setting interface, release,
then hold the key for 2seconds. Press the to select min. or
sec. then press the key toconfirm.
4.4
Run and stop a program
4.4.1 Press the “Prog.” key to select the program.
The instrument starts to heat automatically according to the
previously set temperature.
4.4.2
It shows “NOTOK” on the display as it is heating up. When the
target temperature is reached, the display screen shows “OK.”
Then press the START/STOP key torun the timer.
* NOTE: When the first timing at the first temperature is complete,
the second temperature automaticallybegins.
7
P8 35.5 ℃NOTOK
P8 45.0 ℃OK
P8 45.0 020min
P8 45.0 020min
Timer unit : min
Timer unit : sec

4.4.3
When the second time reaches 0, the buzzer alarms and the
display will read “PROGRAM END”. The second temperature will
be maintained. Press any key to return, or press the START key
to run again.
4.4.4
Press any key
Press START to runagain
4.4.5 Press the “START/STOP” key for 1 second to stop the program.
4.5 Temperature calibration
The temperature of the instrument has been calibrated at the
factory. If there is deviation between the actual temperature
and the displayed temperature, the calibration steps in
section 4.5.1 may be followed. The Instrument uses double
temperatures adjustment to ensure its accuracy. This means it is
linearly calibrated on 40 ℃and 80 ℃(two points). The
temperature veracity will be within ±0.5 ℃after the double
temperature adjustment. The ambient temperature should be
lower than 35 ℃when starting temperature calibration.
8
PROGRAM END
P8 45.0 ℃OK

4.5.1 Calibration
After the instrument is powered on, it will enter standby mode.
Make sure both the ambient temperature in the room and the
temperature displayed on the instrument are below 35 ℃. If the
temperature is higher than 35 ℃, wait until the temperature is below
35 ℃. In this example, an ambient and set program display
temperature of 20.5 ℃ is used.
4.5.2 Inject olefin oil (mineral oil) into one of the cone-shaped wells, and
then put a thermometer into the well. The precision of the
thermometer should be within 0.1 ℃and the temperature ball
should be completely immerged into the cone-shaped well,
incubate for 20 min. See Fig. a.
Let the instrument sit for 20 min at the set temperature.
9
Fig a
Thermometer
Mineral oil
Cone-shapedwell

40.0℃Adj
4.5.3 After 20 min., Press the and keys
simultaneously, the display temperature (in this
example) will show 20.5 ℃, and then begin to rise
to 40.0 ℃automatically. During this time, the *
sign will flicker. When the display temperature
reaches 40.0 ℃, the signs ADJ and *will flicker
together. Let the instrument incubate at 40.0 ℃
for 20 min.
4.5.4 After 20 min, the thermometer temperature can
be matched with the display temperature. Read
the actual temperature of the thermometer (in this
example) it is 38.8 ℃. Press the and keys to
amend the display temperature value to 38.8 ℃,
and then press the “start” key to confirm.
4.5.5 At this point the incubator temperature will begin
to rise automatically until it reaches 80.0℃,
the * sign on the display willflicker. When the
display temperaturereaches 80.0℃, the signs
ADJ and *will flicker together. Let instrument
Incubate at 80℃, for 20 min.
10
38.8℃Adj
80.0℃Adj
””
Press “Start”

4.5.6
After 20 min, the thermometer temperature
can be matched with the display
temperature. Read the actual temperature
of the thermometer (in this example) it is
79.0℃. Press the or key to amend the
display value to 79.0, then press the“start”
key to confirm.
4.5.7
The screen will return tothe display as
seen to theright.
After temperature calibration, the
temperature displayed is now the same as
the temperature of the block.
4.5.8. Canceling Calibration
During temperature calibration, press and key simultaneously
to cancel the calibration. If canceled, the system will keep the
former calibration.
11
79.0℃Adj
P1 74.5 ℃ NOTOK
Press “start”
””

5. Maintenance and cleaning
Block wells should be cleaned with a cloth dampened with
alcohol
Power OFF the incubator when cleaning.
Do not drop cleaning liquid directly into the well when
cleaning.
Do not use corrosive cleaning liquid.
6. Troubleshooting Instrument Errors
Error
Cause
Solution
No display
No main power
connection.
Power failure.
Plug in main cable on
both sides.
Check the fuse
“OPEN” in the
display with
alarm
Broken sensor
or loose contact
of the module
Contact Hygienafor
service.
“SHO” in the
display with
alarm
The sensor is
short
Contact Hygiena for
service.
No heating of
the block
Heater failure
Contact Hygiena for
service.
Press invalid
Keyboard failure
Contact Hygienafor
service.
12
Other manuals for INCUBATOR
1
This manual suits for next models
2
Table of contents
Other Hygiena Accessories manuals
Popular Accessories manuals by other brands

IGYM
IGYM FN 10215 user guide

Generac Power Systems
Generac Power Systems Air-Cooled Generator Sets 5621 specification

LI-COR
LI-COR 1400-101 Operation and installation instructions

Graco
Graco Carseat instructions

Network Technologies Incorporated
Network Technologies Incorporated SPLITMUX Series Installation and operation manual

netvox
netvox R718UBD Series user manual