manuals.online logo
Brands
  1. Home
  2. •
  3. Brands
  4. •
  5. Hytera
  6. •
  7. Portable Radio
  8. •
  9. Hytera HM78XVHF User manual

Hytera HM78XVHF User manual

1
1. Product Overview
1.1 Product Layout
Front Panel
No. Part Name No. Part Name
1 Volume Control &Channel/GroupSelecto
r
Knob 9 Right Key
2 LED Indicator 10 Down Key
3 LCD Display 11 Speaker
4 OK/Menu Key 12 P5/Answer Key
5 Back/Subgroup Key 13 Left Key
6 P6/End Key 14 P1/P2/P3/P4 (Programmable Keys)
7 Power On/Off Key 15 Top Key (TK)
8 Up Key 16 Aviation Connector
2
Rear Panel
No. Part Name No. Part Name
1 RF Antenna Connector 4 GPS Antenna Connector
2 Power Inlet 5
N
etwork Port
3 Accessory connector / /
Note
The GPS antenna connector is used only by radioswith the GPS feature.
Palm Microphone
Note
The palm microphone without keypad is available for the digital radio and the one with keypad is for the
trunking radio.
3
Handset
Note
The handset is available only for the duplex radio.
1.2 Programmable Keys
You can request your dealer to program the followingkeys as shortcuts to assignable radio features:
Mobile radio: TK, P1 key, P2 key, P3 key, P4 key, P5/Answer key, and P6/End key.
Palm microphone with keypad: TK, P1 key, and P2 key.
Handset: Same as the mobile radio.
4
2. Installation
2.1 Instructions
Before installing the radio in a vehicle, read the following instructions carefully:
The radio must work with a 13.6V ± 15% negative ground electrical system only. Ensure to check the ground
polarity and voltage of the vehicle power supply prior to installation.
Check how long the screws will extend from the bottom surface of the radio. Drill the mounting hole cautiously to
avoid damage to the vehicle wiring and other parts.
Connect the antenna and power cord to the radio before you install the radio in the bracket. Make sure the antenna
and power cord are dedicated for digital radios of the Company.
Install the radio with mounting bracket supplied by the Company, to avoid radio looseness in case of accidents.
The loose radio may cause bodily injury.
Install the radio in a location where you can reach the front panel conveniently.
Keep sufficient clearance at the back of the radio for wiring.
Be sure to use the fuse with the same specification for DC power cord upon replacement.
If any other devices are in the vicinity of this radio,the antenna of this radio shall be no less than 10meters away
from that of such RF device.
2.2 Tools
Electric drill
Phillips screwdriver
T6 torx screwdriver
5
2.3 Parts
No. Part Name No. Part Name
1 Mobile Radio 8 Handset
2 Locking Knobs 9 Screw (4 mm x 16 mm)
3 Mounting Bracket 10 Handset Hanger
4 Screw (4.8 mm x 20 mm) 11 GPS Antenna
5 Palm Microphone 12 Power Cord (with fuse)
6 Screw (4 mm x 16 mm) 13 RF Antenna
7 Microphone Hanger / /
6
Note
The RF antenna should be purchased separately.
The GPS antenna is available only for radioswith the GPS feature.
The palm microphone without keypad (with ⑥and ⑦) is available for the digital radio, and theone with
keypad (with ⑥and ⑦) is for thetrunking radio. The handset (with ⑨and ⑩) isfor the duplex radio.
2.4 Procedure
1. Select a location, drill holes based on the shape of themounting bracket, and then use the screws (4.8 mm x20 mm)
to secure the bracket.
2. Connect the RF antenna, GPS antenna,and powercord to the radio.
3. Slide the radio into the mounted bracket, and then secure itusing the locking knobs.
4. Install the microphone hanger in a location whereyou can reach it easily, and then use the screws (4 mm x 16 mm)
to secure it.
5. Align the triangle index on the palm microphone orthe handset with the installation index, plug theconnector into
the radio, and then rotate the connectorclockwise to secure it.
6. Place the palm microphone or the handset on thehanger when you do not use it.
3
3
T
o
T
o
3
T
o
1.
2.
3
Y
o



3
.Bas
.1 Tur
n
o
turn the ra
d
o
turn the ra
d
.2 Adj
u
o
increase or
Press the
V
Rotate th
e
.3 Usi
n
o
u can use t
h
To switc
h
To enter
s
To enter
a
Not
e
If n
o
key
p
ic O
p
n
ing th
d
io on, long p
r
d
io off, press
t
u
sting
t
decrease the
V
olume Co
n
e
Volume C
o
n
g the
K
h
e keypad on
t
h
the input m
e
s
pecial chara
c
a
space, press
e
o
t particularl
y
p
ad or the ha
n
p
erati
o
e Radi
r
ess the On-
O
t
he On-Off
k
t
he Vo
volume, rota
n
trol knob to
o
ntrol knob t
o
K
eypa
d
t
he palm mi
c
e
thod betwee
n
c
ters, press
in alp
h
y
specified, t
h
n
dset.
o
ns
o On
o
O
ff key.
k
ey.
lume
te the Smart
switch to vo
l
o
adjust the
v
d
c
rophone or t
h
n
alph
a
b
etic
m
in alpha
b
h
abetic mod
e
h
e keypad m
e
7
o
r Of
f
knob clock
w
l
ume control
v
olume.
h
ehandset to
m
odeand nu
m
b
eticmode.
e
.
e
ntioned in t
h
w
ise or count
e
mode.
edit user alia
m
eric mode,
p
h
is manual i
n
er
-clockwise.
ses or IDs a
n
p
ress .
n
dicates that
o
n
d text messa
g
o
f the palm
m
g
es.
m
icrophone
w
w
ith
8
3.4 Switching the Operation Mode
The radio can operate in conventional or trunking mode.In conventional mode, you can receive and transmit voiceand
data after selecting the required channel. In trunkingmode, you can receive and transmit voice and data afterthe radio
registers with the base station (BS)successfully.
To manually switch the operation mode, go toMode>Manual Switch, or press the preprogrammedOperation
Mode Switch key.
To allow the radio to automatically switch toconventional mode when the signal drops below thepreset level in
trunking mode, go to Mode>AutoSwitch, or press the preprogrammed ModeAutomatic Switch key.
3.4.1 Conventional Mode
In conventional mode, a channel is used to receive and transmit data and voice, and a zone is a group of channels within
the same operational area. The radio receives and transmits data and voice on the selected channel.
3.4.1.1 Selecting a Zone
On the Zone menu, press the Up or Down key toselect a zone, and then press the OK/Menu key.
Press the preprogrammed Zone Up or Zone Down key.
3.4.1.2 Selecting a Channel
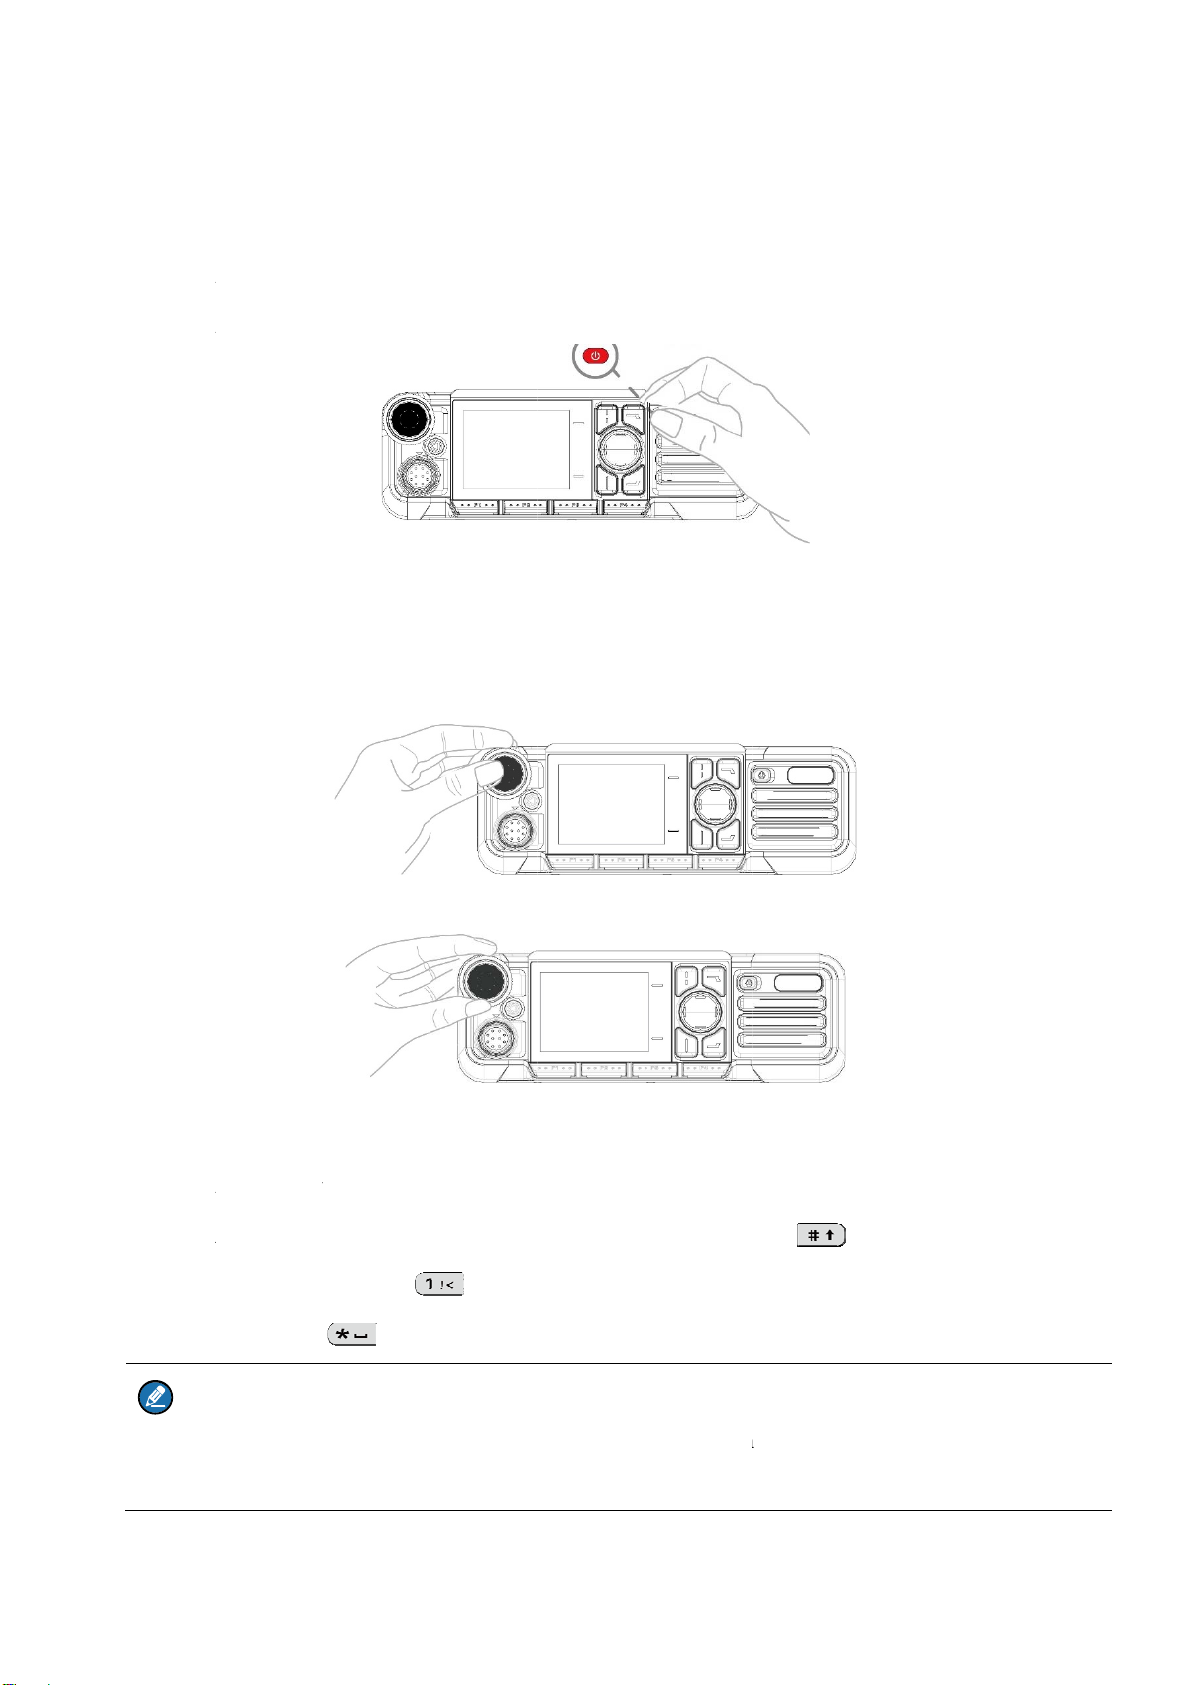
Press and rotate the Smart knob.
Rotate the Channel Selector knob.
Press the preprogrammed Channel Up or Channel Down key.
Press the preprogrammed Preset Channel key.
Note
If the Voice Notify feature is enabled by yourdealer, the radio announces the channel numberupon channel
switching.
3.4.2 Trunking Mode
In trunking mode, the radio communicates with eachother through base stations after successful registration.The radio
can communicate with a group of radios or asingle radio.
3.4.2.1 Selecting Group or Private Contacts
Rotate the Group Selector knob.
Press the Back/Subgroup key, and then press the Upor Down key to select from the member list.
Press the preprogrammed Group/Private Up or Group/Private Down key.
9
3.4.2.2 Selecting a Subgroup
A subgroup consists of multiple groups or private contacts. To select a subgroup, do one of the following:
Press the Back/Subgroup key, and then press the Upor Down key.
Press the preprogrammed Subgroup Up or Subgroup Down key.
4
4
F
o
4
4
.Sta
t
.1 Che
c
Icon
o
r more statu
s
.2 Che
c
S
Flashes gre
e
Flashes gre
e
Glows gree
n
t
us In
c
king
L
The radio d
e
More bars i
n
The radio o
p
The radio o
p
The keypad
i
An accessor
y
The Mode
A
The radio is
The Voice
O
The radio o
p
The radio o
p
The radio o
p
The radio is
There is/are
There is/are
The inbox is
s
icons, refer
c
king
L
S
tatus
e
n
e
n slowly
n
dicat
i
L
CD I
c
e
tects no sign
a
n
dicate stron
g
p
erates in lo
w
p
erates in hig
h
i
s locked.
y
is connecte
A
utomatic S
w
scanning.
O
perated Tra
n
p
erates in sile
p
erates in pro
f
p
erates in pro
f
in emergenc
y
missed call(
s
new/unread
m
full.
to the releva
n
L
ED In
The r
a
The r
a
The r
a
i
ons
c
ons
a
l.
g
er signal str
e
w
power mod
e
h
power mo
d
d.
w
itch feature i
n
smit (VOX)
f
nt mode.
f
ile 1.
f
ile 2.
y
mode.
s
).
m
essage(s).
n
t user man
u
dicati
o
a
dio is being
t
a
dio is stand
b
a
dio is receiv
i
10
Radio
e
ngth.
e
.
d
e.
s enabled.
f
eature is en
a
u
al.
o
ns
t
urned on.
b
y in trunkin
g
i
ng.
Status
a
bled.
Radio Stat
u
g
mode.
u
s
11
Glows red The radio is transmitting.
Flashes red The radio is establishing a call in trunking mode. This indication is applicable
only to the calling radio.
Flashes orange slowly
Conventional mode: The radio is scanning or roaming.
Trunking mode: The radio is hunting.
Flashes orange rapidly
Conventional mode: The radio is operating in Emergency mode.
Trunking Mode: The radio is establishing a Full Off Air Call Set-up
(FOACSU) private call. This indication is applicable only to the calle
d
radio.
Glows orange
Call hang time: No voice is being transmitted or received during a call. Within
such a period, you can press and hold the PTT key and speak.
Flashes blue every 3s The BT feature is enabled, but no BT device is connected.
Flashes blue every 1.5s A BT device is connected.
Flashes blue every 0.1s The BT feature is being disabled.
5
W
o
p
5
Y
o


5
5
.
1.
2.
5
.
C
1.
2.
3.
T
1.
2.
3.
5
.Call
W
hen you are
p
timal voice
q
Note
The rad
i
.1 Digi
t
o
u can initiat
Group ca
l
Private c
a
.1.1 Init
i
.
1.1.1 T
h
Press and
Do either
Pres
s
Pres
s
.
1.1.2 T
h
C
onventi
o
Go to Co
n
Select the
Do either
Pres
s
Pres
s
runking
Go to Su
b
Select the
Do either
Pres
s
Ser
v
speaking d
u
q
uality on th
e
i
o cannot ma
k
t
al Cal
e or receive
t
l
l: A call fro
m
a
ll: A call fro
m
i
ating
G
h
rough
P
rotate the S
m
of the follo
w
s
on the
m
s
or pres
s
h
rough
C
o
nal Mo
d
n
tact>Conta
requiredgro
u
of the follo
w
s
on the
m
s
or pres
s
Mode
b
group>Me
m
requiredgro
u
of the follo
w
s
on the
m
v
ices
u
ring a call,
e
receiving r
a
k
e any call i
f
ls
t
he followin
g
m
an individu
m
an individ
u
G
roup
C
P
reset
C
m
art knob to
w
ings:
m
obile radio.
s
and hold th
e
C
ontact
d
e
ctList/Favo
r
u
p contact.
w
ings:
m
obile radio.
s
and hold th
e
m
bers.
u
p contact.
w
ings:
m
obile radio.
keep themic
a
dio.
f
it fails to re
g
g
types of dig
i
al user in a g
r
u
al user to an
C
alls
C
ontact
select the di
g
e
PTT key o
n
List/Fa
v
r
iteContact.
e
PTT key o
n
12
rophone abo
g
ister with th
e
i
tal calls:
r
oup to all th
other indivi
d
g
ital channel
n
the palm m
i
v
oriteC
o
n
the palm m
i
ut 2.5 to 5
c
e
BS or you
s
e other mem
b
d
ual user.
or group con
t
crophone or
t
o
ntact
crophone o
r
t
c
m away fro
s
elect an em
p
b
ers.
t
act.
t
he handset.
t
he handset.
o
m your mo
u
p
ty group.
u
th.This ens
u
u
res
5
.
C
1.
2.
3.
4.
T
1.
2.
3.
5
Y
o
5
5
.
In
5
.
In




Pres
s
.
1.1.3 T
h
C
onventi
o
Go toCo
n
Press on t
h
Enter the
r
Do either
Pres
s
Pres
s
runking
Go to Set
t
From the
h
Do either
Pres
s
Pres
s
Note
For dial
.1.2 Re
c
o
u can recei
v
.1.3 En
d
.
1.3.1 C
o
convention
a
.
1.3.2 Tr
u
trunking m
o
The calli
n
The call
d
A preemp
The calli
n
s
or pres
s
h
rough
M
o
nal Mo
d
n
tact>Manu
a
h
e palmmicr
o
r
equiredgrou
p
of the follo
w
s
on the
m
s
or pres
s
Mode
t
ings>Radio
h
omescreen,
of the follo
w
s
on the
m
s
or pres
s
ing rules, co
n
c
eiving
v
e a group ca
l
d
ing a
G
o
nventi
o
a
l mode, a gr
o
u
nking
M
o
de, a group
c
n
g party ends
d
uration pres
e
tive or emer
g
n
g party swit
c
s
and hold th
e
M
anual
D
d
e
a
l Dial.
o
phone or th
e
p
ID.
w
ings:
m
obile radio.
s
and hold th
e
Set>Keypa
d
enter thegro
u
w
ings:
m
obile radio.
s
and hold th
e
n
tact your de
a
Group
C
l
l without an
y
G
roup
C
o
nal Mo
d
o
up call ends
M
ode
c
all ends in a
n
the c
a
ll.
e
t by your de
a
g
ency call in
t
c
hes to an e
m
e
PTT key o
n
D
ial
e
handset to s
w
e
PTT key o
n
d
Mode, and
t
u
p number.
e
PTT key o
n
a
ler.
C
alls
y
operation i
n
C
all
d
e
when the ca
l
n
y of the foll
o
a
ler expires.
t
errupts the c
a
m
pty group
13
n
the palm m
i
w
itch theinp
u
n
the palm m
i
t
henselect E
n
n
the palm m
i
n
convention
a
l
l hang time
e
o
wing cases:
a
ll.
crophone or
t
u
t mode to G
r
crophone or
t
n
able.
crophone or
t
a
l or trunkin
g
e
xpires.
t
he handset.
r
oupID.
t
he handset.
t
he handset.
g
mode.

5
Y
o
p
r


5
.
1.
2.
5
.
1.
2.
3.
5
.
C
1.
2.
3.
4.
The base
s
.1.4 Init
i
o
u can initiat
r
essing the pr
e
Duplex c
a
Simplex
c
Note
The du
p
.
1.4.1 T
h
Press and
Do either
Pres
s
Pres
s
.
1.4.2 T
h
Go to Co
n
Select the
Do either
Pres
s
Pres
s
.
1.4.3 T
h
C
onventi
o
Go toCo
n
Press on t
h
Enter the
r
Do either
Pres
s
Pres
s
s
tation signa
l
i
ating
P
e simplex or
e
programme
d
a
ll: Both part
i
c
all: Only on
e
p
lex call is o
n
h
rough
P
rotate the S
m
of the follo
w
s
on the
m
s
or pres
s
h
rough
C
n
tact>Conta
requiredpri
v
of the follo
w
s
on the
m
s
or pres
s
h
rough
M
o
nal Mo
d
n
tact>Manu
a
h
e palmmicr
o
r
equiredpriv
a
of the follo
w
s
on the
m
s
or pres
s
l
is lost.
P
rivate
C
duplex calls,
d
Call Setup
i
es can spea
k
e
party can s
p
n
ly available
f
P
reset
C
m
art knob to
w
ings:
m
obile radio.
s
and hold th
e
C
ontact
ctList/Favo
r
v
ate contact.
w
ings:
m
obile radio.
s
and hold th
e
M
anual
D
d
e
a
l Dial.
o
phone or th
e
a
te ID.
w
ings:
m
obile radio.
s
and hold th
e
C
alls
which can b
e
Mode key.
k
at the same
t
p
eak at one ti
m
f
or duplex ra
d
C
ontact
select the di
g
e
PTT key o
n
List/Fa
v
r
iteContact.
e
PTT key o
n
D
ialing
e
handset to s
w
e
PTT key o
n
14
e
set by goin
g
t
ime.
m
e.
d
ios.
g
ital channel
n
the palm m
i
v
orite C
o
n
the palm m
i
w
itch theinp
u
n
the palm m
i
g
to Settings
>
or private co
n
crophone or
t
o
ntact
crophone or
t
u
t mode to P
r
crophone or
t
>
Radio Set
>
n
tact.
t
he handset.
t
he handset.
r
ivateID.
t
he handset.
>
Call Setup
M
M
ode or
T
1.
2.
3.
5
5
.
Y
o
5
.
Y
o

W
th
e

W
5
5
.
In
5
.
In




runking
Go to Set
t
From the
h
Do either
Pres
s
Pres
s
Note
For dial
.1.5 Re
c
.
1.5.1 C
o
o
u can recei
v
.
1.5.2 Tr
u
o
u can listen
FOACSU
W
hen receivin
g
or press an
d
e
handset wi
t
Off Air C
a
W
hen receivin
g
.1.6 En
d
.
1.6.1 C
o
convention
a
.
1.6.2 Tr
u
trunking m
o
The calli
n
The call
d
A preemp
The calli
n
Mode
t
ings>Radio
h
omescreen,
of the follo
w
s
on the
m
s
or pres
s
ing rules, co
n
c
eiving
o
nventi
o
v
e a private c
a
u
nking
M
to a call in d
i
g
a FOACS
U
d
hold the P
T
t
hin the pres
e
a
ll Set-Up (
O
g
an OACS
U
d
ing Pri
o
nventi
o
a
l mode, a pri
v
u
nking
M
o
de, a private
n
g party ends
d
uration pres
e
tive or emer
g
n
g party swit
c
Set>Keypa
d
enter thepri
v
w
ings:
m
obile radio.
s
and hold th
e
n
tact your de
a
Private
o
nal Mo
d
a
ll without a
n
M
ode
i
fferent ways
U
private call
,
T
Tkey on the
e
t time perio
d
O
ACSU)
U
private call,
vate C
a
o
nal Mo
d
v
ate call end
s
M
ode
call ends in
a
the call.
e
t by your de
a
g
ency call in
t
c
hes to an e
m
d
Mode, and
t
v
ate call num
b
e
PTT key on
a
ler.
Calls
d
e
n
y operation.
varying wit
h
,
the radio ri
n
palm micro
p
d
.
you can list
e
a
lls
d
e
s
when the c
a
a
ny of the fo
l
a
ler expires.
t
errupts the c
a
m
pty group
15
t
henselect E
n
b
er.
the palm mi
c
h
thesetup m
o
n
gsand vibra
t
p
hone o
r
e
n toit witho
u
a
ll hang time
l
lowing case
s
a
ll.
n
able.
c
rophone or
h
o
de of the ca
l
t
es. To answ
e
u
t any operat
i
expires.
:
h
andset.
l
l:
e
r the call, pr
e
i
on.
e
ss on th
e
e
radio, or p
r
r
ess
16
The base station signal is lost.
5.2 Analog Calls
In conventional mode, you can initiate or receive a call on an analog channel with or without signaling.
5.2.1 Call Without Signaling
On an analog channel without signaling, you can initiate acall to all the other users on the channel. Do as follows:
1. Select the required channel.
2. Press and hold the PTT key, and speak into the microphone.
5.2.2 Call With Signaling
On an analog channel with signaling, you can initiate a call to a specific contact on the channel. Do as follows:
1. Rotate the Channel Selector knob to select therequired channel.
2. Press the OK/Menu key, and go to Contact >Contact List.
3. Select the required channel.
4. Press the PTT key or the preprogrammed One TouchCall/Menu key to send the code.
The call is established when the target radio receives anddecodes the matched signaling.
5.3 Emergency Call
The Emergency feature allows you to ask for help from your companion or the control center in case of emergency.
With the highest priority, you can make an emergency call even when your radio is transmitting or receiving.
This feature needs to be configured and enabled by your dealer. For details, refer to the Emergency feature described in
the relevant user manual.
4
T
h


4
1.
2.
3.
4.
4
1.
2.
F
o
d
o
4
. Me
s
h
e radio can
s
Quick tex
t
Status m
e
transfers
t
4
.1 Se
n
Go to Me
n
In the rec
i
Alternati
v
In the me
s
Alternati
v
trunking
m
Select Se
n
4
.2 Ed
i
Go to Me
n
Select the
Sele
c
Pres
s
»Se
»Se
»Se
»Se
o
r details on
o
wnload the
r
s
sag
e
s
end and rec
e
t
message: a
e
ssage: a pr
e
t
he message
c
n
ding
a
n
u>Messag
e
i
pient text bo
v
ely, press th
e
s
sage text bo
x
v
ely, select I
n
m
ode).
n
d, and then
p
i
ting a
n
u>Messag
e
message, pr
e
c
t Reply to r
e
s
the Up key,
lect Forwar
d
lect Resend
t
lect Delete t
o
lect Delete
A
more featur
e
r
elevant user
m
e
Ser
v
e
ive short me
s
frequently u
s
e
defined cod
e
c
ontent.
a
New
e
>Msg New
>
x, enter the c
e
OK/Menu
k
x
, enter the
m
n
sert, and t
h
p
ress the O
K
Mess
a
e
to enter the
m
e
ss the OK/
M
e
ply to the m
e
select a mes
s
d
to forward
t
t
o resend the
o
delete the
m
A
ll to delete a
e
s and operat
i
m
anual.
v
ices
s
sages, whic
h
s
ed text mess
a
e
that transf
e
Messa
>
New Msg to
ontact numb
e
k
ey to enter
t
m
essage cont
e
h
en press the
K
/Menu key.
a
ge
m
essage inte
M
enu key, an
e
ssage.
s
age, press t
h
t
he message.
message.
m
essage.
ll messages
w
i
ons, please
v
17
h
are classifi
e
a
ge that can
b
e
rs the mess
a
ge
enter the ne
w
e
r, and then
p
t
he contact li
s
e
nt.
OK/Menu
k
rface.
d then do on
e
h
e OK/Men
u
w
ith the cont
a
v
isit our we
b
e
d into the fo
l
b
e created, e
d
a
ge content.
w
message i
n
p
ress t
o
s
t, and then s
e
k
ey to add
q
e
of the follo
w
u
key, and th
e
a
ct.
b
site athttp://
w
l
lowing type
s
d
ited, or dele
t
Status mess
n
terface.
o
switch the
n
e
lect the con
t
q
uick text m
e
w
ing:
e
n do one of
t
w
ww.hytera.
c
s
:
t
ed through t
h
age: a pred
e
n
umber type.
t
act.
e
ssage or sta
t
t
he following
c
o
m
or scan
h
e menu.
e
fined code t
t
us message
:
the QR cod
e
hat
(in
e
to
FCC Statement
This equipment has been tested and found to comply with the limits for
a Class B digital device, pursuant to part 15 of FCC Rules. These limits
are designed to provide reasonable protection against harmful
interference in a residential installation. This equipment generates and
can radiate radio frequency energy. If not installed and used in
accordance with the instructions, it may cause harmful interference to
radio communications. However, there is no guarantee that interference
will not occur in a particular installation. Verification of harmful
interference by this equipment to radio or television reception can be
determined by turning it off and then on. The user is encouraged to try
to correct the interference by one or more of the following measures:
z Reorient or relocate the receiving antenna. Increase the separation
between the equipment and receiver.
z Connect the equipment into an outlet on a different circuit to
that of the receiver's outlet.
z Consult the dealer or an experienced radio/TV technician for help.
Operation is subject to thefollowing two conditions:
z This device may not cause harmful interference.
z This device must accept any interference received,
including interference that maycause undesired operation.
Note: Any changes or modifications to this unit not expressly
approved by the party responsible for compliance could void the
user's authority to operate the equipment.
FCC Radiation Exposure Statement
This equipment complies with FCC radiation exposure limits
set forth for an controlled environment .
This transmitter must not be co‐located or operating in
conjunction with any other anten na or transmitter. This
equipment should be installed and operated with m inimum
distance 40 cm between the radiator& your body.
Le présent appareil est conforme aux CNR d'Industrie Canada
applicables aux appareils radio exempts de licence.
L'exploitation est autorisée aux deux conditions suivantes: (1)
l'appareil ne doit pas produire de brouillage, et (2) l'utilisateur
de l'appareil doit accepter tout brouillage radioélectrique subi,
même si le brouillage est susceptible d'en compromettre le
fonctionnement
ISEDC Radiation Exposure Statement:
This device must be restricted to work related
operations in an Occupational/Controlled RF exposure
Environment.
This equipment should be installed and operated with
minimum distance 40 cm between the antenna & your
body.
ISEDC exposition aux radiations:
Ce dispositif doit être limité aux opérations liées au
travail dans un environnement d'exposition RF
professionnel/contrôlé. Cet équipement doit être
installé et utilisé avec un minimum de 40 cm de
distance entre le antenne et votre.corps.
RF Energy Exposure Awareness and Control
Information and Operational Instructions for
Occupational Use
NOTICE: This radio is intended for use in occupational/controlled
conditions where users have full knowledge of their exposure and
can exercise control over their exposure to meet the occupational
limits in FCC and International standards. This radio device is NOT
authorized for general population consumer use.
Compliance with RF Exposure Standards
Hytera's radio complies with the following RF energy exposure
standards and guidelines:
United States Federal Communications Commission, Code of
Federal Regulations; 47 CFR § 1.1307, 1.1310 and 2.1093
American National Standards Institute (ANSI) /Institute
of Electrical and Electronic Engineers (IEEE) C95.
1:2005; Canada RSS102 Issue 5 March 2015
Institute of Electrical and Electronic Engineers (IEEE)
C95.1:2005 Edition
RF Exposure Compliance and Control
Guidelines and Operating Instructions
To control your exposure and ensure compliance with the
occupational/controlled environmental exposure limits, always
adhere to the following procedures.
Guidelines:
Do not remove the RF Exposure Label from the device.
User awareness instructions should accompany device when
transferred to other users.
Do not use this device if the operational requirements
described herein are not met.
Operating Instructions:
Transmit no more than the rated duty factor of 50% of the
time. To transmit (talk), push the Push-To-Talk (PTT)
key. To receive calls, release the PTT key. Transmitting 50%
of the time, or less, is important because the radio generates
measurable RF energy only when transmitting (in terms of
measuring for standards compliance).
Use of non-approved antennas, batteries, and accessories
causes the radio to exceed the FCC RF exposure
guidelines.
Contact your local dealer for the optional accessories of
the product.
EU Regulatory Conformance
As certified by the qualified laboratory, the product is
in compliance with the essential requirements and
other relevant provisions of the followingdirectives:
2014/53/EU,
2006/66/EC, 2011/65/EU, and 2012/19/EU.
Please note that the above information is applicable to
EU countries only.
ISEDC Statement
This device complies with Innovation, Science and Economic
Development Canada Compliance
license-exempt RSS standard(s). Operation is subject to the
following two conditions:
This device may not cause harmful interference.
This device must accept any interference received,
including interference that may cause undesired
operation.

Other Hytera Portable Radio manuals

Hytera PD405 User manual

Hytera

Hytera PD405 User manual

Hytera BD55X User manual

Hytera

Hytera BD55X User manual

Hytera PD78X Series User manual

Hytera

Hytera PD78X Series User manual

Hytera PD98X User manual

Hytera

Hytera PD98X User manual

Hytera PD78X Series User manual

Hytera

Hytera PD78X Series User manual

Hytera PD702 User manual

Hytera

Hytera PD702 User manual

Hytera TC-508 User manual

Hytera

Hytera TC-508 User manual

Hytera PD602 User manual

Hytera

Hytera PD602 User manual

Hytera Sepura STP9100 User manual

Hytera

Hytera Sepura STP9100 User manual

Hytera TF-412 User manual

Hytera

Hytera TF-412 User manual

Hytera HP70X User manual

Hytera

Hytera HP70X User manual

Hytera BP51X User manual

Hytera

Hytera BP51X User manual

Hytera PD412i User manual

Hytera

Hytera PD412i User manual

Hytera H Series User manual

Hytera

Hytera H Series User manual

Hytera DIGITAL PORTABLE RADIO User manual

Hytera

Hytera DIGITAL PORTABLE RADIO User manual

Hytera PD602i User manual

Hytera

Hytera PD602i User manual

Hytera PD50X User manual

Hytera

Hytera PD50X User manual

Hytera X1e User manual

Hytera

Hytera X1e User manual

Hytera PD602 User manual

Hytera

Hytera PD602 User manual

Hytera PD60Xi Um User manual

Hytera

Hytera PD60Xi Um User manual

Hytera PD70X Series User manual

Hytera

Hytera PD70X Series User manual

Hytera PD412 User manual

Hytera

Hytera PD412 User manual

Hytera PD785 User manual

Hytera

Hytera PD785 User manual

Hytera PT580H Plus F4 User manual

Hytera

Hytera PT580H Plus F4 User manual

Popular Portable Radio manuals by other brands

Vitek VT-3584 Manual instruction

Vitek

Vitek VT-3584 Manual instruction

Uniden uh065sx owner's manual

Uniden

Uniden uh065sx owner's manual

Uniden UH-040XR operating guide

Uniden

Uniden UH-040XR operating guide

Philips AE5430/10 user manual

Philips

Philips AE5430/10 user manual

QFX R-31U user manual

QFX

QFX R-31U user manual

Studebaker SB2003BT user manual

Studebaker

Studebaker SB2003BT user manual

Motorola GP1280 Series user guide

Motorola

Motorola GP1280 Series user guide

Tivoli Audio iPAL owner's manual

Tivoli Audio

Tivoli Audio iPAL owner's manual

Roberts R757 operating instructions

Roberts

Roberts R757 operating instructions

Covalue CU450-2 instruction manual

Covalue

Covalue CU450-2 instruction manual

Teac SR-100i owner's manual

Teac

Teac SR-100i owner's manual

Kirisun PT6500 Service manual

Kirisun

Kirisun PT6500 Service manual

Harris XL-185P Pairing Guides

Harris

Harris XL-185P Pairing Guides

HQT PoC Radio user manual

HQT

HQT PoC Radio user manual

Vertex Standard VX-131 Series Specifications

Vertex Standard

Vertex Standard VX-131 Series Specifications

Vertex Standard VX-P820 Series Brochure & specs

Vertex Standard

Vertex Standard VX-P820 Series Brochure & specs

LLOYTRON Classique N8101SV operating instructions

LLOYTRON

LLOYTRON Classique N8101SV operating instructions

Grundig DRP5100 instruction manual

Grundig

Grundig DRP5100 instruction manual

manuals.online logo
manuals.online logoBrands
  • About & Mission
  • Contact us
  • Privacy Policy
  • Terms and Conditions

Copyright 2025 Manuals.Online. All Rights Reserved.