Hytera TC-508 User manual

Preface
Thank you for purchasing Hytera TC-508 portable radio. With
simple appearance, reliable mechanics, practical functions
and stable performance, it will refresh your communication
experience!
To derive optimum performance from your product, please
read this manual and the supplied Safety Information Booklet
carefully before use.

Instructional Icons
The following icons are available through this manual:
Caution: indicates situations that could cause damage to your radio.
Note: indicates tips that can help you make better use of your radio.
Term Explanation
Please pay your attention to the following key terms:
Key Operation
Short press: to press a key and release it quickly.
Long press: to press and hold down a key for above 1 second.
Hold down: to press a key and remain holding it down.
User Mode
Refers to the mode entered after you turn on the radio directly.
CTCSS/CDCSS
The signaling can help you prevent unwanted conversations at the same frequency.
Copyright Information
Hytera and HYT are trademarks or registered trademarks of Hytera Communications Co., Ltd.
(“Hytera”) in PRC and/or other countries or areas. Hytera retains the ownership of its trademarks
and product names. All other trademarks and/or product names that may be used in this manual
are properties of their respective owners.
The Hytera product described in this manual may include Hytera computer programs stored
in memory or other media. Laws in PRC and/or other countries or areas protect the exclusive
rights of Hytera with respect to its computer programs. The purchase of this product shall not be
deemed to grant, either directly or by implication, any rights to the purchaser regarding Hytera
computer programs. Any Hytera computer programs may not be copied, modied, distributed,
decompiled, or reverse-engineered in any manner without the prior written consent of Hytera.
Disclaimer
Hytera endeavors to achieve the accuracy and completeness of this manual, but no warranty of
accuracy or reliability is given. All the specications and designs are subject to change without
prior notice due to continuous technology development. No part of this manual may be copied,
modified, translated, or distributed in any manner without the express written permission of
Hytera.
If you have any suggestions or would like to learn more details, please visit our website at: http://
www.hytera.cn.

RF Radiation Information
RF Radiation Prole
Radio Frequency (RF) is a frequency of electromagnetic radiation in the range at which radio
signals are transmitted. RF technology is widely used in communication, medicine, food
processing and other elds. It may generate radiation during use.
RF Radiation Safety
In order to ensure user health, experts from relevant industries including science, engineering,
medicine and health work with international organizations to develop standards for safe exposure
to RF radiation. These standards consist of:
United States Federal Communications Commission, Code of Federal Regulations; 47CFR
●
part 2 sub-part J;
American National Standards Institute (ANSI)/Institute of Electrical and Electronic Engineers
●
(IEEE) C95. 1-1992;
Institute of Electrical and Electronic Engineers (IEEE) C95. 1 – 1999;
●
International Commission on Non-Ionizing Radiation Protection (ICNIRP) 1998;
●
FCC Regulations
Federal Communication Commission (FCC) requires that all radio communication products
should meet the requirements set forth in the above standards before they can be marketed in
the U.S, and the manufacturer shall post a RF label on the product to inform users of operational
instructions, so as to enhance their occupational health against exposure to RF energy.
As a conscientious company centering on users, Hytera strictly complies with the foregoing
requirements from design, production and test.
EU Regulatory Conformance
The product is in compliance with the essential requirements and other relevant provisions of the
Directive 1999/5/EC.
Note: The above information is applicable to EU countries only.

1
Contents
Checking Items in the Package ---------------------------------------------------------------------------- 2
Product Overview ----------------------------------------------------------------------------------------------- 3
Product Controls --------------------------------------------------------------------------------------------- 3
Programmable Keys ---------------------------------------------------------------------------------------- 4
Before Use--------------------------------------------------------------------------------------------------------- 5
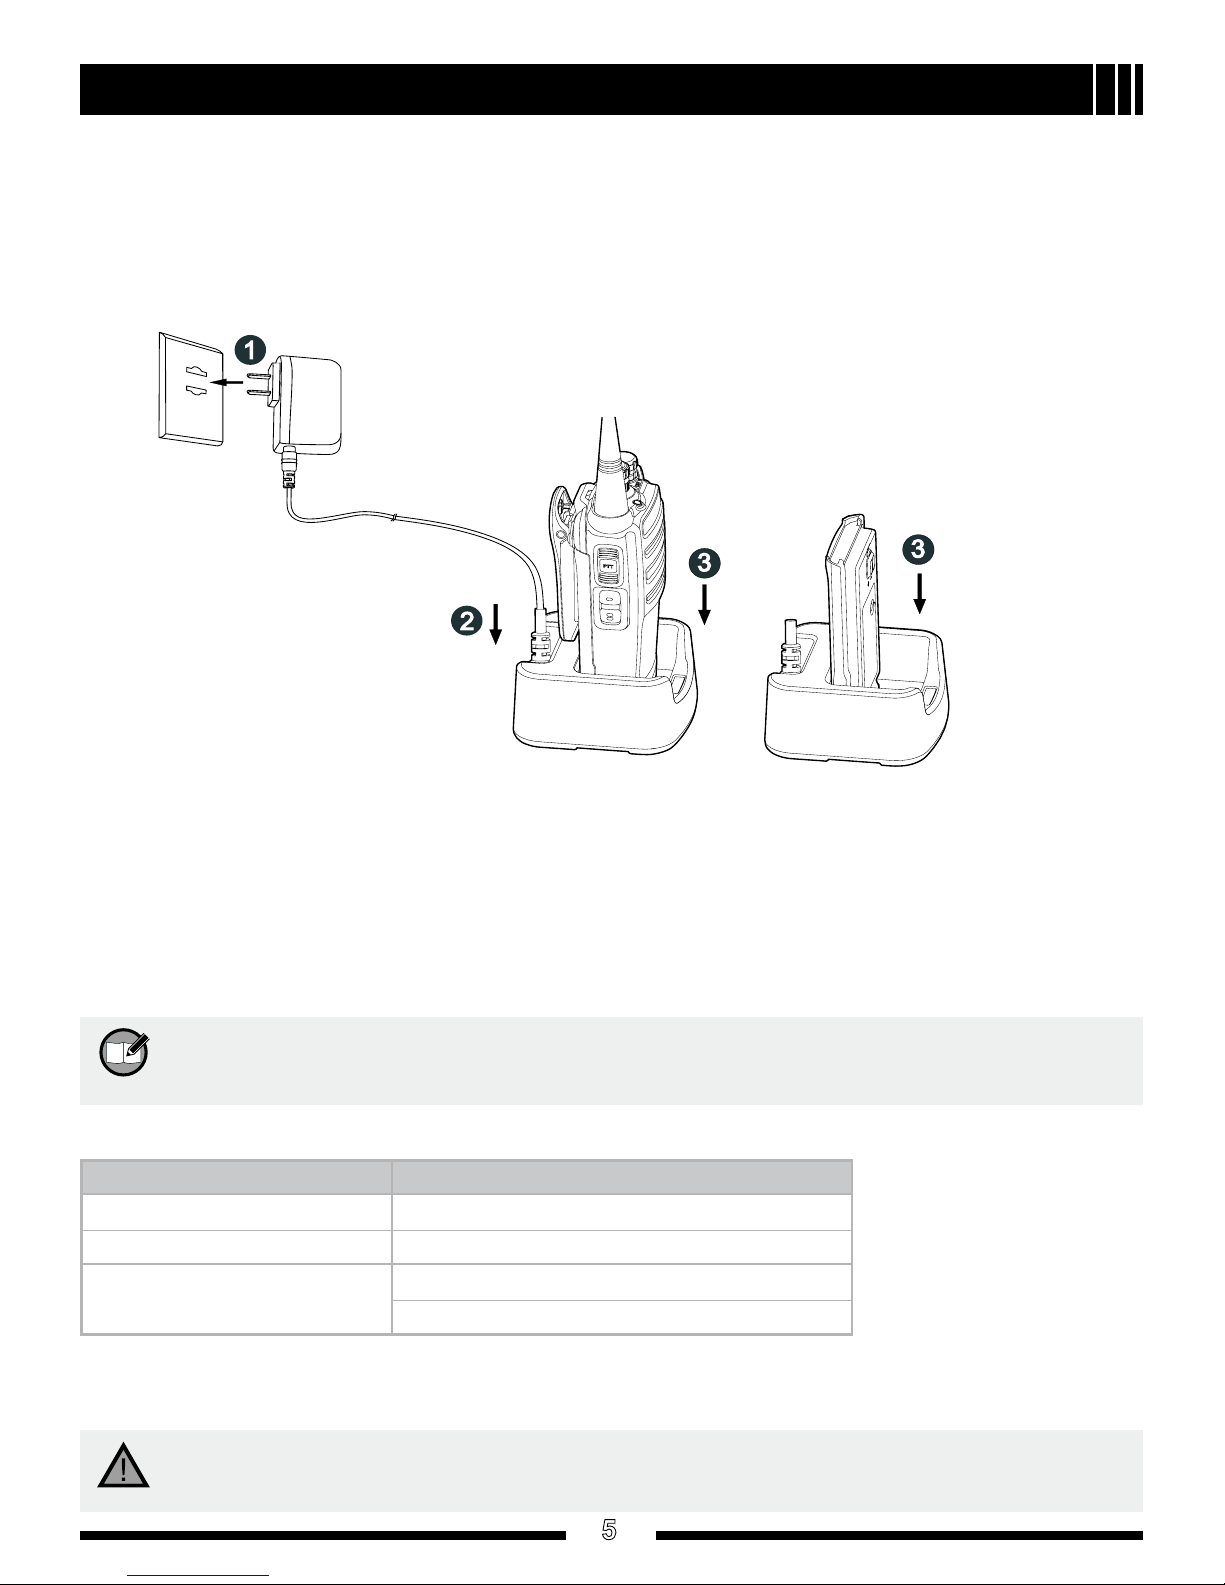
Charging the Battery ---------------------------------------------------------------------------------------- 5
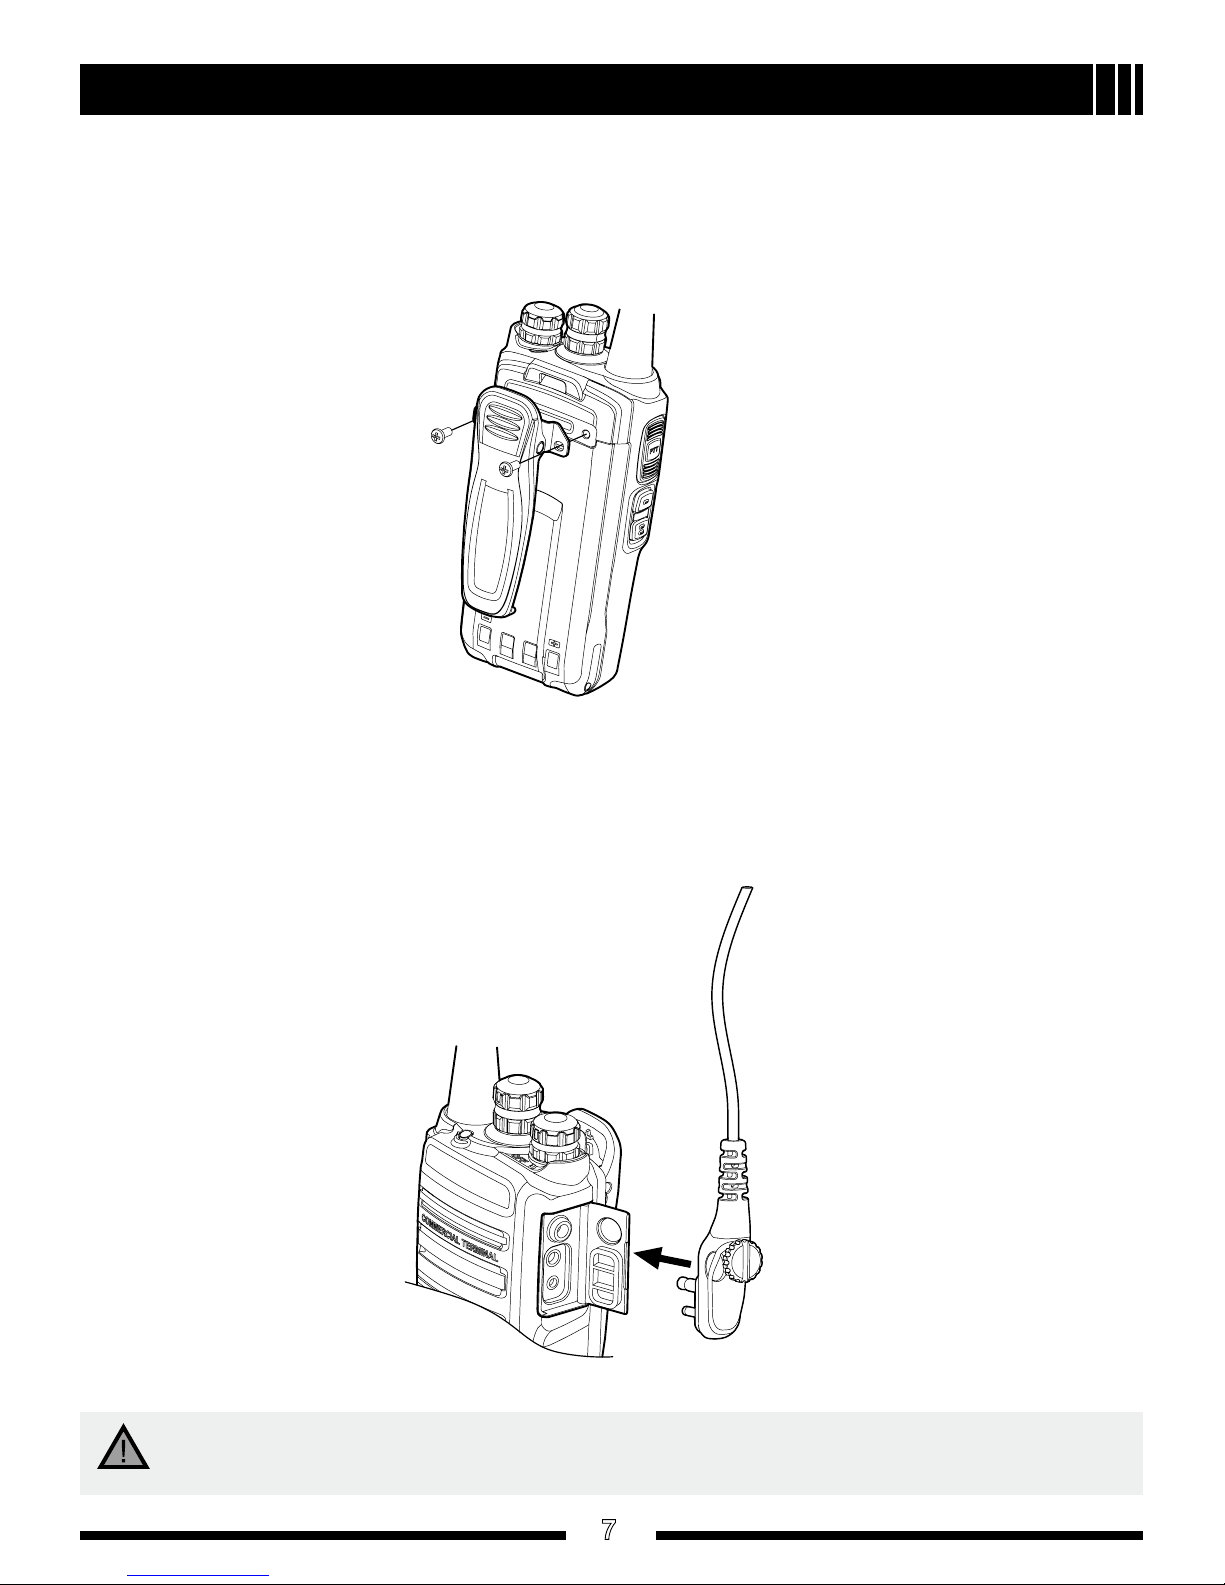
Assembling the Accessories ------------------------------------------------------------------------------ 6
Status Indication ------------------------------------------------------------------------------------------------ 8
Basic Operations------------------------------------------------------------------------------------------------ 8
Turning the Radio On/Off ---------------------------------------------------------------------------------- 8
Adjusting the Volume --------------------------------------------------------------------------------------- 8
Selecting a Channel----------------------------------------------------------------------------------------- 8
Transmitting / Receiving ----------------------------------------------------------------------------------- 8
Functions and Operations ----------------------------------------------------------------------------------- 8
CTCSS/CDCSS ---------------------------------------------------------------------------------------------- 8
Time-out Timer (TOT)--------------------------------------------------------------------------------------- 9
Adjust Power Level ------------------------------------------------------------------------------------------ 9
Monitor---------------------------------------------------------------------------------------------------------- 9
Squelch Off ---------------------------------------------------------------------------------------------------- 9
Scan------------------------------------------------------------------------------------------------------------- 10
VOX--------------------------------------------------------------------------------------------------------------10
Battery Strength Indicator --------------------------------------------------------------------------------- 11
Low Battery Alert--------------------------------------------------------------------------------------------- 11
Channel Lock ------------------------------------------------------------------------------------------------- 12
Battery Save -------------------------------------------------------------------------------------------------- 12
Busy Channel Lockout ------------------------------------------------------------------------------------- 12
Troubleshooting ------------------------------------------------------------------------------------------------- 13
Care and Cleaning ---------------------------------------------------------------------------------------------- 15
Optional Accessories ------------------------------------------------------------------------------------------ 16

2
Checking Items in the Package
Please unpack carefully and check that all items listed below are received. If any item is missing
or damaged, please contact your dealer.
Rapid-rate Charger (for
Li-Ion battery)
Battery
Radio
Belt Clip
Strap
Antenna
Manuals
Power Adapter
Note: The pictures above are for reference only.
Safety Information Booklet
Owner’s Manual

3
Product Overview
Product Controls
No. Part Name No. Part Name
1 PTT Key 2 SK1 (programmable)
3 SK2 (programmable) 4 Antenna
5 Channel Selector Knob 6 Radio On-Off/Volume Control Knob
7 Speaker 8 Microphone
9 LED Indicator 10 Battery Latch
11 Accessory Jack Cover 12 Accessory Jack
13 Strap Hole 14 Belt Clip
15 Battery 16 Screw (Belt Clip)
17 Charging Piece

4
Programmable Keys
For enhanced convenience, you may request your dealer to program the keys SK1 and SK2 as
shortcuts to the functions listed below:
No. Shortcut Key Function
1Adjust Power Level To adjust power level through one button press.
2 Monitor To adjust the condition for incoming signal match
3 Monitor Momentary
4 Squelch Off To always unmute speaker no matter whether
carrier is present or not
5 Squelch Off Momentary
6 Scan To listen to communication activities on other
channels.
7VOX To make the radio transmit automatically when
you speak.
8 Battery Strength Indicator To indicate the battery strength
9 Channel Lock
The current channel will remain unchanged in
case of rotating the Channel Selector knob
accidentally.
Product Overview
Note: Long and short press of a key can be assigned with different functions by your
dealer.

5
Before Use
Charging the Battery
Use only the charger and battery specied by Hytera. Charger LED can indicate the charging
process.
Charge Diagram
■
Procedures
■
1. Connect the power adapter to AC socket. See arrow 1.
2. Plug the power adapter into the rear jack of the charger. See arrow 2.
(At this time, the LED glows green to indicate the charger is ready for use.)
3. Place the radio with the battery attached, or the battery alone, into the charger. See arrow 3.
4. The charging process initiates when LED glows red, and is completed when LED glows
green.
Charge Indicator
■
LED Indicator Charge Status
Red LED glows. Charging
Orange LED glows. Approximately charged completely
Green LED glows. Fully charged
Ready for use
When battery power runs low, the LED will flash red, and the low-pitched tone will sound
periodically. In this case, please replace or charge the battery.
Note: To achieve optimal battery performance, please charge the battery for 5 hours
before initial use.
Caution: Be sure to read the Safety Information Booklet, to get necessary safety
information.

6
Before Use
Assembling the Accessories
Assembling the Antenna
■
Turn the antenna clockwise to fasten it.
To remove the antenna, rotate it counter-clockwise.
Assembling the Battery
■
1. Slide the battery into the radio’s slot.
2. Slightly press the bottom of the battery until a click is heard.
To remove the battery, turn off the radio rst. Slide the battery latch upward to release the battery.

7
Before Use
Assembling the Belt Clip
■
1. Remove the screws.
2. Align the screw holes on the belt clip with those on the radio’s body, and then tighten the
screws.
To remove the belt clip, loosen the screws.
Assembling the Audio Accessory/Programming Cable
■
1. Uncover the accessory jack.
2. Plug an audio accessory/programming cable into the accessory jack, and then tighten the
screw.
To remove the accessories, loosen the screw at rst and pull out the plug.
Caution: When you are using an external accessory, waterproof performance of the
radio may get affected.

8
Status Indication
The top LED indicator will help you easily identify the current status of your radio.
LED Indicator Radio Status
Red LED glows. Transmitting
Red LED ashes. Low battery alert
Green LED glows. Receiving
Green LED ashes. Scanning
Basic Operations
Turning the Radio On/Off
Rotate the Radio On-Off/Volume Control knob clockwise/counter-clockwise until a click is heard
to turn the radio on/off.
Adjusting the Volume
You may control the volume level using the Radio On-Off/Volume Control knob. After the
radio is powered on, rotate the knob clockwise to increase the volume, or counter-clockwise to
decrease the volume.
Selecting a Channel
The radio supports up to 16 channels. Rotate the Channel Selector knob to align your desired
channel number with the white channel mark.
Transmitting / Receiving
To transmit audio signals, press and hold down the PTT, and speak into the microphone. During
transmission, the LED glows red.
To receive, just release the PTT. When any audio signal is received, the LED glows green.
CTCSS/CDCSS
CDCSS/CTCSS can be used to prevent unwanted conversations at the same frequency. If
CTCSS/CDCSS is set on a certain channel, you can only receive voice calls from radios with
matching CTCSS/CDCSS. Otherwise you will receive voice calls from all users operating at the
Note: When the radio is currently on a blank channel, it will sound beep tones
continuously.
Note:
To ensure optimal volume of the receiving radio, hold the radio approximately 2.5
●
to 5 centimeters away from your mouth.
Communication range may get affected in rainy days or forest locations.
●

9
Functions and Operations
same frequency.
You may request your dealer to program corresponding parameters on certain channels. For
detailed operation method, please consult your dealer.
Time-out Timer (TOT)
The purpose of TOT is to prevent any user from occupying a channel for an extended period.
When the preset time expires, the radio will automatically terminate transmission and keep
beeping. To stop beeping, please release the PTT key. You must wait for a certain time period
(preset by your dealer) to initiate another transmission.
If the pre-alert function is set by your dealer, your radio will alert you to the TOT expiration in
advance.
Adjust Power Level
With this feature, you may switch power levels quickly. Generally, we recommend you to adopt
low power for battery saving. However, if you cannot communicate with other radios located at a
distant place with low power, please select high power.
Operation:
Press the programmed Adjust Power Level key to switch between high power and low power
(from high power to low power: a low-pitched tone sounds; from low power to high power: a high-
pitched tone sounds).
Monitor
This feature allows you to lower the conditions for incoming signal match.
Operation:
Press the programmed
●Monitor key to activate this function (an alert tone sounds); press it
again to deactivate the function (the alert tone sounds twice). Or
Press and hold down the programmed
●Monitor Momentary key to activate this function (an
alert tone sounds); release the key to exit (the alert tone sounds twice).
Squelch Off
This feature allows you to always unmute the speaker, no matter whether carrier is present or
not.
Operation:
Press the programmed
●Squelch Off key to activate this function; press the key again to
deactivate it. Or
Press and hold down the programmed
●Squelch Off Momentary key to activate this function;
release the key to deactivate it.

10
Functions and Operations
Scan
The feature allows you to listen to communication activities on other channels so that you can
keep a close track of your team members. The scan list can be set by your dealer.
Operation:
1. To activate this function, you may
press the programmed Scan key; or
●
switch to a channel enabled with the auto scan feature (programmed by your dealer).
●
2. After the feature is enabled, your radio will scan according to the scan list set for the
channel on which scanning starts. The scanning process is as follows:
The LED ashes green during scanning.
●
When communication activities are detected on a channel, the radio will stay on the channel
●
to receive current activities. Meanwhile, the LED glows green.
If the Talk Back feature is enabled by your dealer, press and hold down the PTT to reply
●
when the radio stays on a certain channel.
You can scan the frequently used channel if the priority scan feature is enabled. When scan
●
stays on a non-priority channel, the radio will keep detecting activities on the priority channel.
Once any activity is detected, it will jump to the priority channel. For more information, please
consult your dealer.
3. To exit the scanning process, you may
press the Scan key again, or
●
switch to a channel where the auto scan feature is disabled; or
●
turn the radio off.
●
VOX
This feature allows you to transmit your voice with no need to press the PTT. However, you must
employ a dedicated earpiece to realize this function.
Note: When this function is enabled on current channel, you will hear audio signals (if
any); otherwise, background noise will be heard.
Note: The radio will not start scan if there are less than two channels in the scan
list.
Note:
The Scan Start Alert tone and the Scan End Alert tone can be enabled /
●
disabled by the dealer.
During scanning, the following function keys (if programmed) are available:
●PTT,
Squelch Off , Squelch Off Momentary , Monitor and Monitor Momentary.

11
Operation:
1. Set the PTT/VOX Switch on the earpiece to VOX;
2. Plug the earpiece into the accessory jack;
3. Press the programmed VOX key to activate this function.
4. Speak into the microphone (on the earpiece) to transmit your voice, and transmission will
stop automatically when you stop talking;
5. Power the radio off or press the VOX key again to deactivate this function.
Battery Strength Indicator
This feature allows you to know the current battery strength.
Operation:
Press and hold down the programmed Battery Strength Indicator key, and the LED glows to
indicate remaining battery strength by different colors .Release the key to exit. The following
table lists different colors representing different battery strength levels
LED Indicator Battery Strength
Green LED glows. High
Orange LED glows. Medium
Red LED glows. Low
Low Battery Alert
This feature allows you to know the low battery status. When battery power runs low, the LED will
ash red, and the low-pitched tone will sound periodically. In this case, please replace or charge
the battery.
Functions and Operations
Note:
If the
●PTT/VOX Switch on the earpiece is set to PTT, you can only transmit by
pressing the external PTT, no matter whether VOX is activated.
When the
●PTT/VOX Switch is set to PTT, you are not allowed to switch it
from PTT to VOX directly; otherwise, continuous transmission may occur. If
continuous transmission occurs unexpectedly, you can restore the radio to
normal operation by toggling the switch from VOX to PTT, or turning the radio
off and back on.
You can select an appropriate VOX sensitivity according to the environment. If
●
VOX is activated under heavy noise, continuously transmission may occur.

12
Functions and Operations
Channel Lock
This feature can avoid unexpected channel change due to rotation of Channel Selector knob
accidentally.
Operation:
Press the programmed Channel Lock key to enable the feature (an alert tone sounds); press the
key again to deactivate it (the alert tone sounds twice). When this function is activated, the radio
will stay on the current operating channel even if you rotate the Channel Selector knob.
Battery Save
In Standby mode, when no signal is received / transmitted or no operation (key press) is
performed for 10 seconds (programmable), the radio will automatically enter Battery Save mode
to reduce power consumption. The radio may exit the Battery Save mode and get activated as
soon as any key is pressed or any signal is received.
Busy Channel Lockout
If enabled via the programming software, this feature can prevent your radio interfering with other
transmitting radios on the same channel. When the channel is already in use, the radio will keep
beeping and return to RX mode upon pressing the PTT key. To stop beeping, please release the
PTT key.
Note: This function will be deactivated if the radio is powered off and back on, or it
is programmed.
Note: When the battery strength is insufcient, the programmed Battery Strength
Indicator key will become unavailable; when the battery strength is drained,
transmission will be prohibited; if you press PTT in such situations, the radio will
sound an alert to warn you.

13
Troubleshooting
Phenomena Analysis Solution
The radio can not
be powered on.
The battery may be improperly
installed. Remove the battery and attach it again.
The battery may run out. Recharge or replace the battery.
The battery may suffer from
poor contact caused by dirtied
or damaged battery contacts.
Clean the battery contacts. If the problem
can not be solved, contact your dealer
or our authorized service center for
inspection and repair.
During receiving
signals, the voice is
weak, discontinuous
or totally inactive.
The battery strength may be
too low. Recharge or replace the battery.
The volume may be set to a
low level.
Increase the volume by rotating the
Volume Control knob clockwise.
The antenna may get loose or
may be improperly installed.
Power off the radio, re-install the antenna
and power on the radio again.
The speaker may be blocked
or damaged.
Clean surface of the speaker. If the
problem can not be solved, contact your
dealer or our authorized service center for
inspection and repair.
You can not
communicate with
other members.
The frequency or signaling may
be inconsistent with that of
other members.
Set your TX/RX frequency and signaling to
the same as that of other members.
The Channel Lock feature
is enabled unexpectedly and
you operate on an undesired
channel.
Exit the Channel Lock mode and switch
to the desired channel.
You may be too far away from
the group members.
Move towards other members. And make
sure that you are within the communication
range.
Irrelevant
communication
activities or noises
are heard on the
channel.
You may be interrupted
by radios using the same
frequency.
Change the frequency, or adjust the
squelch level.
The radio may be set with no
signaling.
Set signaling for all member radios to
avoid interference at the same frequency.

14
The noise is too
loud.
You may be too far away from
other members.
Move towards other members, power off
your radio and then restart it.
You may be at an unfavorable
position. For example, your
communication may be blocked
by high buildings or frustrated
in the underground areas.
Move to an open and at area, and restart
the radio.
You may suffer from external
disturbance (such as
electromagnetic interference).
Stay away from equipment that may cause
interference.
If the above solutions can not x your problems, or you may have some other queries, please
contact us or your local dealer for more technical support.
Troubleshooting

15
Care and Cleaning
To guarantee optimal performance as well as a long service life of the product, please follow the
tips below.
Product Care
Do not pierce or scrape the product with any edged instruments or hard objects.
●
Keep the product far away from substances that can corrode the circuit.
●
Do not hold the product by its antenna or earpiece cable directly.
●
Attach the accessory jack cover when the product is not in use.
●
Product Cleaning
Clean up the dust and ne particles on the product surface and charging piece with a clean
●
and dry lint-free cloth or a brush regularly.
Use neutral cleanser and a non-woven fabric toclean the keys, control knobs and front case
●
after long-time use. Do not use chemical preparations such as stain removers, alcohol,
sprays or oil preparations, so as to avoid surface case damage. Make sure the product is
completely dry before use.
Caution: Power off and remove the battery before cleaning.

16
Optional Accessories
The following items are the main optional accessories for the product, and please consult your
local dealer for more other accessories.
Li-Ion Battery
(1650mAh) BL1719
Li-Ion Battery
(1300mAh) BL1301
Vehicle Power Adapter
CHV09
Six-unit Switching
Power PS7002
D-earset with Boom
MIC & VOX EHM16
Earbud with on-MIC
PTT & VOX ESM12
D-earset with in-Line
MIC & VOX EHM15
Earbud with in-Line
PTT & VOX ESM11
Nylon Carrying
Case (non-swivel)
(black)NCN001
Antenna
Caution: Use the accessories specified by
Hytera only. If not, Hytera shall not be liable for
any losses or damages arising out of use of
unauthorized accessories.
Other manuals for TC-508
2
Table of contents
Other Hytera Portable Radio manuals

Hytera
Hytera PD70X Series User manual

Hytera
Hytera PD702 User manual

Hytera
Hytera MD62X User manual

Hytera
Hytera PD75X User manual

Hytera
Hytera HM78XVHF User manual

Hytera
Hytera PD60X UL913 User manual

Hytera
Hytera HP78X User manual

Hytera
Hytera PD40Xi User manual

Hytera
Hytera X1e User manual

Hytera
Hytera PD662i User manual

Hytera
Hytera TC610 User manual

Hytera
Hytera TC610 User manual

Hytera
Hytera PD792IS User manual

Hytera
Hytera TC-508U1 User manual

Hytera
Hytera TC-508V User manual

Hytera
Hytera PD355LF User manual

Hytera
Hytera PD46 Series User manual

Hytera
Hytera PD50X User manual

Hytera
Hytera HP31X User manual

Hytera
Hytera PD782iG User manual