Hyundai H-CCR8104F User manual

USB/SD-МЕДИАПЛЕЕРUSB/SD MEDIA PLAYERРуководство по эксплуатации Instruction manualH-CCR8104F

Contents2Dear customer!Thank you for purchasing our product. For safety, it is strongly recommended to read this manual carefully before connecting, operating and/or adjusting the product and keep the manual for reference in the future.111111111111121212Table of contents Before you start Utilization of the product Important safeguardsInstallation/ConnectionInstallationGeneral notes1. DIN front-mount (Method A)Trim frame installation2. DIN rear-mount (Method B)Dismantling the unitConnectionConnection diagramUsing the ISO ConnectorOperationControl elementsLCD layoutGeneral operationsTurning on/offMode selectionVolume controlMute functionPreset equalizer modesClockAUX inputRadio operationsBand selectManual/Automatic tuningStoring and recalling stationsUSB/SD/MMC operationsConnecting a USB/memory cardPlaybackTrack selectFast forward/rewind233344444456668899999991010101010101111111111PauseIntro playbackRepeatRandomGeneral informationTroubleshooting guideCleaning the unit body AccessoriesSpecification

Before you start3If you want to dispose this product, do not mix it with general household waste. There is a separate collection system for used electronic products in accordance with legislation that requires proper treatment, recovery and recycling.Please contact your local authorities for the correct method of disposal. By doing so, you will ensure that your disposed product undergoes the necessary treatment, recovery and recycling and thus prevent potential negative effects on the environment and human health.Utilization of the productImportant safeguards• Read carefully through the manual to familiarize yourself with this unit.• Keep this manual handy as a reference for operating procedures and precautions. Do not allow persons who have not read through this manual to use this unit.• Do not allow this unit to come into contact with liquids. Electrical shock could result. Also, damage to this unit, smoke, and overheating could result from contact with liquids or dust. Protect this unit from moisture.• Make sure that foreign objects do not get inside the unit; they may cause malfunctions, or create safety hazards such as electrical shock or laser beam exposure.• The beginning of operation is the moment of the unit installation. Before use the device in winter it is recommended to heat up the passenger compartment during 20 seconds or to the operation temperature.• Using the unit with the temperature that goes beyond the operation temperature greatly decreases the operation resource of the screen and other components of the unit and can result in an outage.• Disconnect the vehicle’s negative battery terminal while mounting and connecting the unit.• The unit is designed for negative terminal of the battery, which is connected to the vehicle metal. Please ensure it before installation.• When replacing the fuse, be sure to use one with an identical amperage rating. Using a fuse with a higher amperage rating may cause serious damage to the unit.• Do not allow the speaker wires to be shorted together when the unit is switched on. Otherwise it may overload or burn out the power amplifier.• Make sure you disconnect the power supply and aerial if you will not be using the system for a long period or during a thunderstorm.• Make sure you disconnect the power supply if the system appears to be working incorrectly, is making an unusual sound, has a strange smell, has smoke emitting from it or liquids have got inside it. Let a qualified

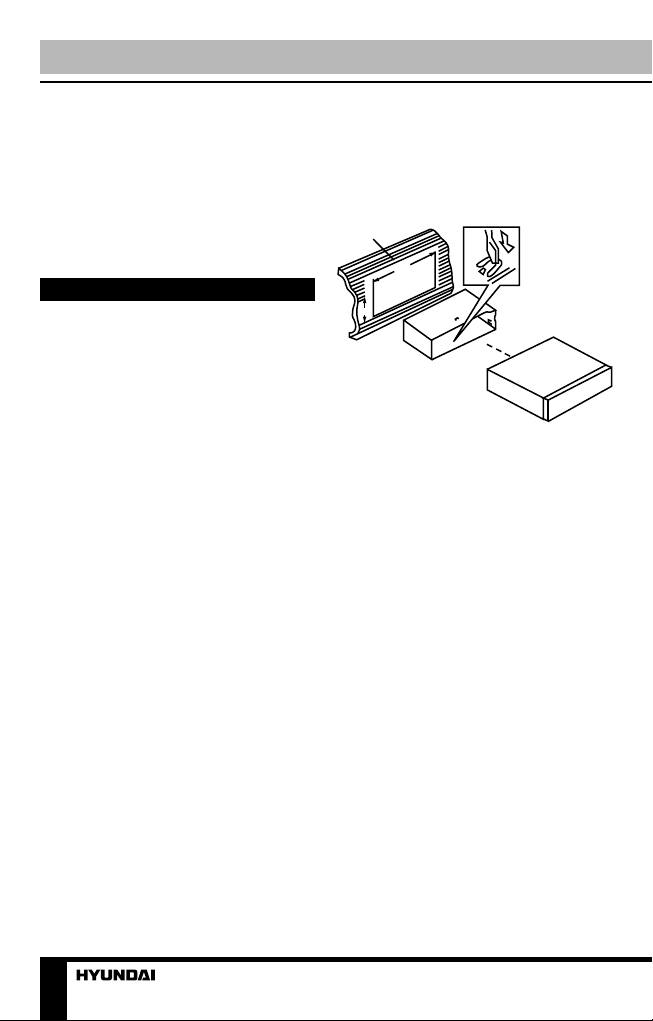
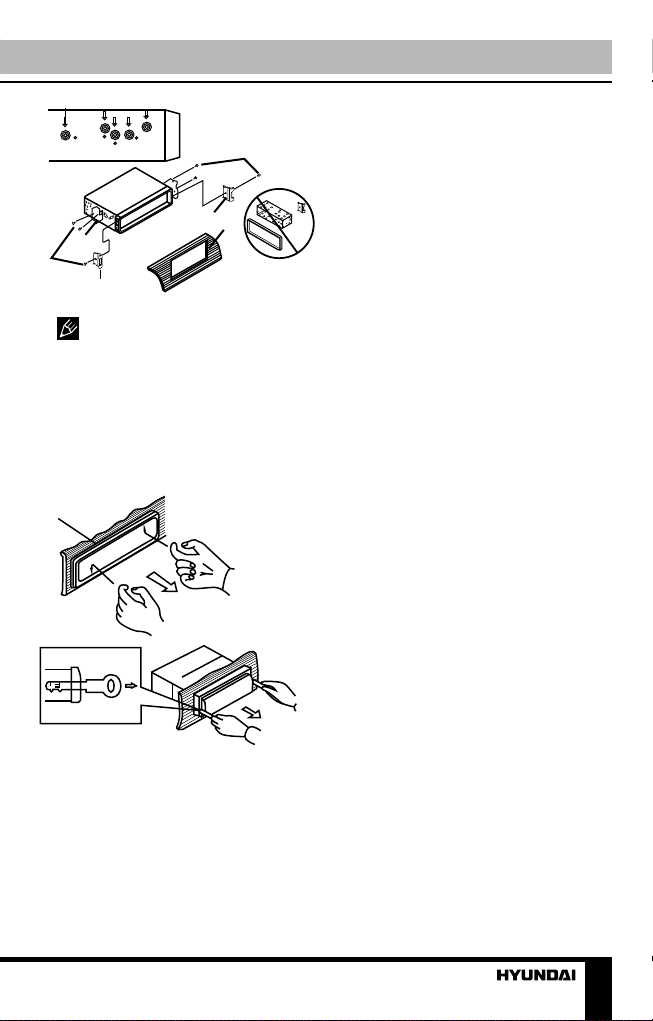
Installation/Connection4technician check the system.• Always keep the volume low enough so that you can hear sounds from outside the vehicle.• Should this product fail to operate properly, contact your dealer or nearest service center.InstallationGeneral notes• Choose the mounting location where the unit will not interfere with the normal driving function of the driver.• Before finally installing the unit, connect the wiring and make sure that the unit works properly.• Consult with your nearest dealer if installation requires the drilling of holes or other modifications of the vehicle.• Install the unit where it does not get in the driver’s way and cannot injure the passenger if there is a sudden stop, like an emergency stop.• Avoid installing the unit where it would be subject to high temperature, such as from direct sunlight, or from hot air, from the heater, or where it would be subject to dust, dirt or excessive vibration.DIN front-mount (Method A)1. Install the sleeve into the dashboard; ensure it is installed with the correct side and there are no obstacles (wires, dashboard elements, etc) for the unit installation.2. After installing the sleeve into the dashboard, bend tabs fitting to the size of the dashboard to fix the sleeve in place.3. Make the necessary wire connections. Ensure the connections are correct.4. Install the unit into the sleeve until the side locks are fixed.21182531. Dashboard2. Sleeve tab to bendTrim frame installationTo install the trim frame, press it to the unit body and push it to fix it in place. This should be done before installing the front panel; otherwise you are not able to install the trim frame.DIN rear-mount (Method B)For this method, use the screw holes in the lateral sides of the unit. Fix the unit with the help of the factory radio mounting brackets.1. Select a position in which the screw holes of the brackets (3) are aligned with the screw holes in the unit body, and screw in two screws (2) in each side.2. Screw.3. Factory radio mounting brackets.4. Vehicle dashboard.5. Lock (remove this part).

Installation/Connection5225543 The outer trim frame and mounting sleeve are not used for method of installation.Dismantling the unita – Trim frameb – Frame uninstall directionc – Release key insertioncba1. Switch off the unit and detach the front panel.2. Insert your fingers into the groove in the front side of the trim frame (apply some effort to detach the frame). Pull the frame to detach it.3. Insert the supplied release keys into the both sides of the unit body to click, as shown in the picture. To extract the unit from the dashboard, pull the release keys or the unit body to pull it out.

Installation/Connection6ConnectionConnection diagramRCA output left (white)AntennajackRCA output right (red)ISO connectorFuse (5 A)Using the ISO Connector1. If your car is equipped with the ISO connector, then connect the ISO connectors as illustrated. 2. For connections without the ISO connectors, check the wiring in the vehicle carefully before connecting, incorrect connection may cause serious damage to this unit. Cut the connector, connect the colored leads of the power cord to the car battery as shown in the color code table below for speaker and power cable connections.

Installation/Connection7LocationFunctionConnector AConnector B1Rear right (+) - Purple-2Rear right (-) - Purple-Black-3Front right (+) - Grey-4Front right (-) - Grey-BlackBattery +12V/Yellow5Front left (+) - WhitePower antenna/Blue-White6Front left (-) - White-Black-7Rear left (+) - GreenIgnition/Red8Rear left (-) - Green-BlackGround/Black Power antenna wire is intended for power supply of the antenna and for remote control of an additional amplifier.

Operation8Control elements1. PWR/MOD button2. / buttons3. VOLUME knob/SELECT button4. APS button5. MUT/LUD button. 6. Display7. USB port8. SD card slot9. BND/CLK button10. RESET button (hole)11. 1/ button12. 2/INT button13. 3/RPT button14. 4/RDM button15. 5/ button16. 6/ button17. AUX in1234567891011121314151617

Operation9LCD layout1. Radio band indicator2. Digit display (frequency, track time, etc.)3. FM frequency4. Signal indicator5. Not active6. SD playback indicator7. USB playback indicator8. Stereo signal reception indicator9. Mute indicator10. Intro mode on11. Repeat mode on12. Random playback on13. Not active14. Signal indicatorGeneral operationsTurning the unit on/offPress PWR/MOD button to turn the unit on. Press and hold the button again to turn the unit off.Mode selectionPress PWR/MOD button repeatedly to select between Radio, auxiliary input, USB or Memory Card modes. Modes of operation are indicated on the display. Memory card and USB modes are not available unless a memory card or USB device is connected.Volume controlAdjust volume by rotating VOLUME knob.Mute functionPress MUT/LUD button to switch off the sound; press it again or rotate VOLUME knob to resume the sound.LoudnessPress and hold MUT/LUD button to select loudness ON or OFF (when on, loudness indicator will be displayed). Activating this feature will enhance bass and treble frequencies when listening to music at low volumes.
1234567891011121314

Operation10Audio parameter settingPress SELECT button repeatedly to select a parameter: BAS (bass) => TRE (treble) => BAL (balance) => FAD (fader) => LOUD ON/OFF => EQ (equalizer) => ST/MONO (stereo or mono). Rotate VOLUME knob to adjust each mode:• Bass/Treble: from -7 to 7;• Balance: L07 (left) to R07 (right);• Fader: from R07 (rear) to F07 (front).• Loudness: see “Loudness” paragraph above.• EQ: select ROCK/POP/CLASS/JAZZ equalizer mode. When equalizer is in any mode except OFF, bass and treble are not adjustable.Preset equalizer modesIN USB/SD playback mode press SELECT button repeatedly until ROCK/POP/CLASS or JAZZ equalizer mode is displayed. Rotate VOLUME regulator to select equalizer mode.ClockPress and hold BND/CLK button to display the time on the screen. Then press and hold this button again; the hour indication will blink. Rotate VOLUME regulator to adjust hours; press BND/CLK button to go to minutes; rotate VOLUME regulator to adjust minutes. To confirm the adjustment, press BND/CLK button or leave the unit idle for several seconds.AUX inputAUX-in jack is intended for connecting an external audio equipment to amplify the sound. If connection is made correctly, the audio signal from the external source will be translated through the acoustics of the head unit. This enables to adjust the volume and quality of the sounding. For example, you can connect an MP3-player to listen to tracks using the car acoustic system.Radio operationsBand selectIn Radio mode press BND/CLK button to select a radio band: F1 (FM1), F2 (FM2), F3 (FM3). 6 stations can be saved in each band.Manual/automatical tuning• Press / buttons repeatedly to adjust the needed frequency manually.• Press and hold or button. The radio will seek to the next down or up strong and clear frequency station.Storing and recalling stations• Press and hold APS button for more than 2 seconds to automatically find and store 6 strongest stations in the current band.• After 6 strongest stations are saved, press APS button; scanning of all stored stations will begin.• Press buttons 1-6 to select saved channels. If you want to save a new station in a preset position, select corresponding station number with 1-6 buttons. Then tune to the needed frequency as described in “Manual/automatical tuning“ above and press

Operation11and hold 1-6 buttons. The new frequency will be saved in the selected position.Mono/Stereo control (in FM radio mode)Press SELECT on the panel until the display shows STEREO (MONO).Rotate VOLUME knob to select between mono reception or stereo reception. Mono mode is recommended in cases of poor signal reception. USB/SD/MMC operationsConnecting a USB/Memory cardInsert a USB device into the USB port of this unit (remove the rubber cover first). Insert an SD/MMC memory card until a click into the memory card slot. To remove the card, press it until a click, then pull to remove. USB/SD/MMC supported capacity: up to 32 GB. FAT16/FAT32 file systems are supported.For correct and satisfactory operation, licensed SD/MMC memory cards of famous brands should be used with this unit. Avoid using memory cards of unknown brands. Some models of USB devices cannot be supported by this unit due to incompatibility.According to the USB 1.1/2.0 Standard, usage of a USB device with power current consumption exceeding 500 mA is not recommended without supplementary power supply. Failure to use supplementary power for connected USB drives with power consumption exceeding this value as well as defective USB drives may cause mechanical or thermal changes of elements of this unit as well as failure of internal elements of the USB port. Such damages are not warrantee cases.Warning: usage of external USB drives containing BIN files in the root directory may cause malfunction of the unit or damage to the software.PlaybackWhen a USB or a memory card is first connected, playback will begin automatically. Depending on the number of files and folders, the device may take several seconds to begin playback.Track select• Press button to skip to the beginning of the next track. Press button to skips to the previous track.• Press 5/ button to go back to the previous folder. Press 6/ button to go to the next folder.Fast forward/rewindPress and hold or button to rewind or fast forward the current track. Release the button to return to normal playback.PausePress 1/ button to temporarily stop file playback. Press it again to resume playback.Intro playbackPress 2/INT button to play first several seconds of each track

General information12consequently. Press again to cancel.RepeatPress 3/RPT button to continuously repeat the current track. Press again to cancel.RandomPress 4/RDM button to play all the tracks in the current folder in random order. Press again to cancel.TroubleshootingBelow is a table describing simple measures that can help you eliminate most problems likely to emerge when this unit is in use. If below measures do not help, turn to a service center or to the nearest dealer.SymptomCauseSolutionNo powerWiring is connected incorrectly.Make correct wiring connection.The car ignition is not on.If the power supply is properly connected to the car accessory switch the ignition on.The fuse is blown.Replace the fuse.No soundVolume is in minimum.Adjust volume to a desired level.Wiring is not properly connected.Check wiring connection.The radio does not workThe antenna cable is not connected.Insert the antenna cable properly.The radio station automatic tuning does not workThe signals are too weak.Select stations manually.

General information13Cleaning the unit bodyWipe with a soft cloth. If the cabinet is very dampen (not dropping wet) the cloth with a weak solution of soapy water, and then wipe clean.Accessories1. Receiver2. ISO connector 3. Mounting parts: Release key Mounting collar Trim frame4. Instruction manual5. Warranty card6. Consumer informationSpecificationsGeneralMaximum power output: 4 x 45 WSuitable speaker impedance: 4-8 OhmFuse: 5 AStorage support: USB/SD/MMC up to 32 GBDimensions/Weight: 178 х 51 х 78 mm/0.5 kgTemperature range: -200C - +600CFM Stereo RadioFrequency range: 87.5 - 108.0 MHzPresettable stations: 18Stereo separation: 35 dB (1 kHz)TerminalsLine out: Stereo RCA line-out (2 V)Specifications are subject to change without notice. Dimensions are approximate.1 pc1 pc2 pcs1 pc1 pc1 pc1 pc1 pc

Содержание14Уважаемый покупатель!Благодарим Вас за покупку нашего изделия. Чтобы понять, как правильно и безопасно пользоваться Вашей моделью изделия, рекомендуется тщательно изучить настоящее руководство перед подключением, регулировкой и эксплуатацией изделия. Сохраняйте руководство для использования в будущем.СодержаниеПеред началом эксплуатацииУтилизация изделияМеры предосторожностиУстановка/ПодключениеУстановкаОбщая информацияУстановка в приборную панель (Метод А)Установка декоративной рамкиУстановка в приборную панель (Метод Б)Снятие устройстваПодключениеСхема электрических соединенийИспользование разъема ISOУправление устройствомЭлементы управленияСимволы ЖК-дисплеяОсновные операцииВключение/выключениеВыбор режима работыРегулирование громкостиПриглушение звукаРежимы эквалайзераЧасыВход AUXОперации с радиоВыбор диапазонаПоиск радиостанций1415151516161617171717191919212122222222222223232323232323232424242424242425252525262626Сохранение и вызов станцийОперации с USB/SD/MMCПосле USB-накопителя/карты памятиВоспроизведениеВыбор трекаПеремотка вперед/назадПаузаОбзорное воспроизведениеПовторСлучайное воспроизведениеОбщая информацияРуководство по устранению неисправностейЧистка корпуса устройстваКомплект поставкиТехнические характеристики

Перед началом эксплуатации15Если вы желаете утилизировать данное изделие, не выбрасывайте его вместе с обычным бытовым мусором. Существует отдельная си-стема сбора использованных электронных изделий в соответствии с законодательством, которая предполагает соответствующее обраще-ние, возврат и переработку.Обращайтесь в органы местного управления за инструкциями по правильной утилизации продукта. Тем самым Вы обеспечите утили-зацию Вашего изделия с соблюдением обязательных процедур по обработке, утилизации и вторичной переработке и, таким образом, предотвратите потенциальное негативное воздействие на окружаю-щую среду и здоровье людей.Утилизация изделияМеры предосторожности• Внимательно изучите данное руководство, чтобы ознакомиться с устройством.• Держите данное руководство под рукой в качестве справочника по правилам эксплуатации и мерам предосторожности. Не допускайте к использованию устройства по-сторонних лиц, не ознакомившихся и не усвоивших данные инструкции по эксплуатации.• Не допускайте попадания жидкости на устройство. Это может повлечь поражение электрическим током. Кроме того, попадание жидкости или пыли в устройство может стать причиной его выхода из строя, перегрева и появления дыма. Оберегайте устройство от воздействия влаги.• Убедитесь, что внутрь устройства не попали посторонние предметы. Они могут вызвать сбои в работе или стать причиной воз-горания или поражения лазерным лучом.• Началом эксплуатации устрой-ства считается момент его установ-ки в автомобиль. Перед началом использования устройства в зим-ний период рекомендуется прогреть салон автомобиля в течение 20 минут или до достижения эксплуа-тационного диапазона температуры устройства.• Использование устройства при температуре, выходящей за рамки эксплуатационного диапазона температур, значительно снижает ресурс работы экрана и других компонентов устройства и может привести к выходу устройства из строя.• При установке и подключении устройства отключите отрицатель-ную клемму аккумулятора автомо-биля.• Устройство разработано таким образом, чтобы отрицательный вы-вод аккумулятора был подключен к корпусу транспортного средства.

Установка/Подключение16Пожалуйста, убедитесь в этом перед установкой.• При замене предохранителя, убедитесь, что вы устанавливаете предохранитель с тем же номина-лом. Используя предохранитель с повышенным значением тока, можно причинить значительные повреждения устройству.• Не позволяйте проводам дина-миков соприкасаться друг с другом или с корпусом автомобиля после включения устройства. В против-ном случае усилитель может быть перегружен или выйти из строя.• Убедитесь, что источник питания и антенна отключены, если Вы не будете пользоваться устройством в течение длительного времени или во время грозы.• Убедитесь, что источник пи-тания отключен, если обнаружена неправильная работа устройства, устройство издает нехарактерные звуки, запах, выделяет дым или внутрь его попала жидкость. В этих случаях необходим квалифи-цированный технический осмотр устройства.• Не устанавливайте уровень громкости, заглушающий внеш-ние звуки дорожной обстановки и сигналы специального автотран-спорта.• При неполадках в работе устройства свяжитесь с торговым представителем или с ближайшим сервисным пунктом.УстановкаОбщая информация• Перед окончательной установ-кой устройства временно подклю-чите все провода и убедитесь, что все соединения выполнены верно, а устройство и система работают правильно.• Для обеспечения правильной установки устройства используйте только те детали, которые входят в комплект. Использование других приспособлений может привести к появлению сбоев в его работе.• Если для установки устройства необходимо сверлить отверстия в кузове автомобиля или вносить какие-либо другие изменения в его конструкцию, проконсультируйтесь с продавцом.• Устанавливайте устройство там, где оно не будет закрывать водителю обзор и отвлекать от до-рожной обстановки и не сможет на-нести травм пассажирам в случае внезапной остановки автомобиля, например, при экстренном тормо-жении.• Никогда не устанавливайте устройство в таких местах, где оно будет подвергаться воздействию высокой температуры, напри-мер, в местах попадания прямых солнечных лучей, в местах выхода горячего воздуха от отопителя автомобиля, в местах, где очень грязно или пыльно, или там, где устройство будет подвергаться сильной вибрации.• Перед установкой устройства обязательно снимите переднюю панель.

Установка/Подключение17Установка в приборную панель (Метод А)1. Установите монтажный кожух в приборную панель автомоби-ля, убедитесь, что он установ-лен правильной стороной и нет препятствий (провода, элементы приборной панели) для установки магнитолы.2. После установки монтаж-ного кожуха в приборную панель отогните на нем металлические язычки, соответствующие толщине приборной панели. Это позволит закрепить кожух на месте.3. Подключите необходимые провода и разъемы. Убедитесь в правильности подключения.4. Установите магнитолу в монтажный кожух до фиксации боковых защелок.21182531. Приборная панель2. Металлический язычок мон-тажного кожухаУстановка декоративной рамкиДля установки декоративной рам-ки прижмите ее к корпусу устрой-ства и нажмите, чтобы вставить на место. Это необходимо сделать до установки передней панели, иначе вы не сможете установить декора-тивную рамку на место.Установка в приборную панель (Метод Б)В данном случае установки ис-пользуются отверстия для винтов на боковых сторонах устройства. Закрепите устройство с помощью штатных кронштейнов крепления радиоприемника.1. Выберите такое положение, в котором отверстия для винтов на кронштейне (3) будут совмещены с отверстиями для винтов на корпусе устройства и вкрутите по два винта (2) с каждой стороны.2. Винт.3. Монтажный кронштейн штат-ного радиоприемника.4. Приборная панель или консоль автомобиля.5. Защелка (снимите эту деталь).225543 При установке по методу Б монтажный кожух и внешняя деко-ративная рамка не используются.Снятие устройстваа – Декоративная рамкаб – Направление снятия рамки

Установка/Подключение18в – Установка ключей съемниковвба1. Выключите магнитолу.2. Вставьте пальцы в канавку на передней стороне декоративной рамки (рамка снимается с неболь-шим усилием). Потяните рамку на себя, чтобы снять ее.3. Вставьте входящие в ком-плект ключи-съемники с обеих сторон корпуса устройства, как показано на рисунке, до щелчка. Для того чтобы извлечь устройство из приборной панели, потяните за съемники или магнитолу и вытяни-те её на себя.

Установка/Подключение19ПодключениеСхема электрических соединений• Независимо от размера динамиков следует использовать динамики с сопротивлением 4 Ом.• Не допускайте короткого за-мыкания проводов динамиков на корпус головного устройства или автомобиля.Использование разъема ISO1. Если в Вашем автомобиле есть разъем ISO, произведите под-ключение, как показано на рисунке.2. Для подключений без разъ-емов ISO внимательно проверьте все провода перед подключением, неправильное подключение может привести к повреждениям изделия. Обрежьте разъем, подключите цветные головки разъема к шнуру питания батареи в соответствии с приведенной таблицей.

Установка/Подключение20НомерФункцияРазъем AРазъем B1Тыловой правый(+) - Фиолетовый-2Тыловой правый(-) - Фиолетовый-Черный-3Фронтальный правый(+) - Серый-4Фронтальн. правый(-) - Серый-ЧерныйПитание 12В (+)/желтый5Фронтальный левый(+) - БелыйПитание антен./Синий-Белый6Фронт. левый((-) - Белый-Черный-7Тыловой левый(+) - ЗеленыйЗажигание/красный8Тыловой левый(-) - Зеленый-ЧерныйЗемля/черный Провод питания антенны предназначен для подачи питания на антен-ну и для удаленного управления дополнительным усилителем.
Other manuals for H-CCR8104F
1
Table of contents
Languages:
Other Hyundai Media Player manuals

Hyundai
Hyundai H-DVB01T2 User manual

Hyundai
Hyundai H-F2010 User manual

Hyundai
Hyundai MPC 501 FM User manual

Hyundai
Hyundai H-CCR8091 User manual

Hyundai
Hyundai MPC 883 FM User manual

Hyundai
Hyundai TRC 191 DRSU3 User manual

Hyundai
Hyundai H-CCR8098 User manual

Hyundai
Hyundai TRC 333 AU3BT User manual

Hyundai
Hyundai H-F1010 User manual

Hyundai
Hyundai H-DVB03T2 User manual