i-box Attune User manual

Attune
EN Portable DAB/DAB+/FM Radio
DE Tragbares DAB/DAB+/UKW-Radio
ES Radio DAB/DAB+/FM Portátil
FR Radio portable DAB/DAB+/FM
IT Radio portatile DAB/DAB+/FM
NL Draagbare DAB/DAB+/FM-radio

EN Introduction
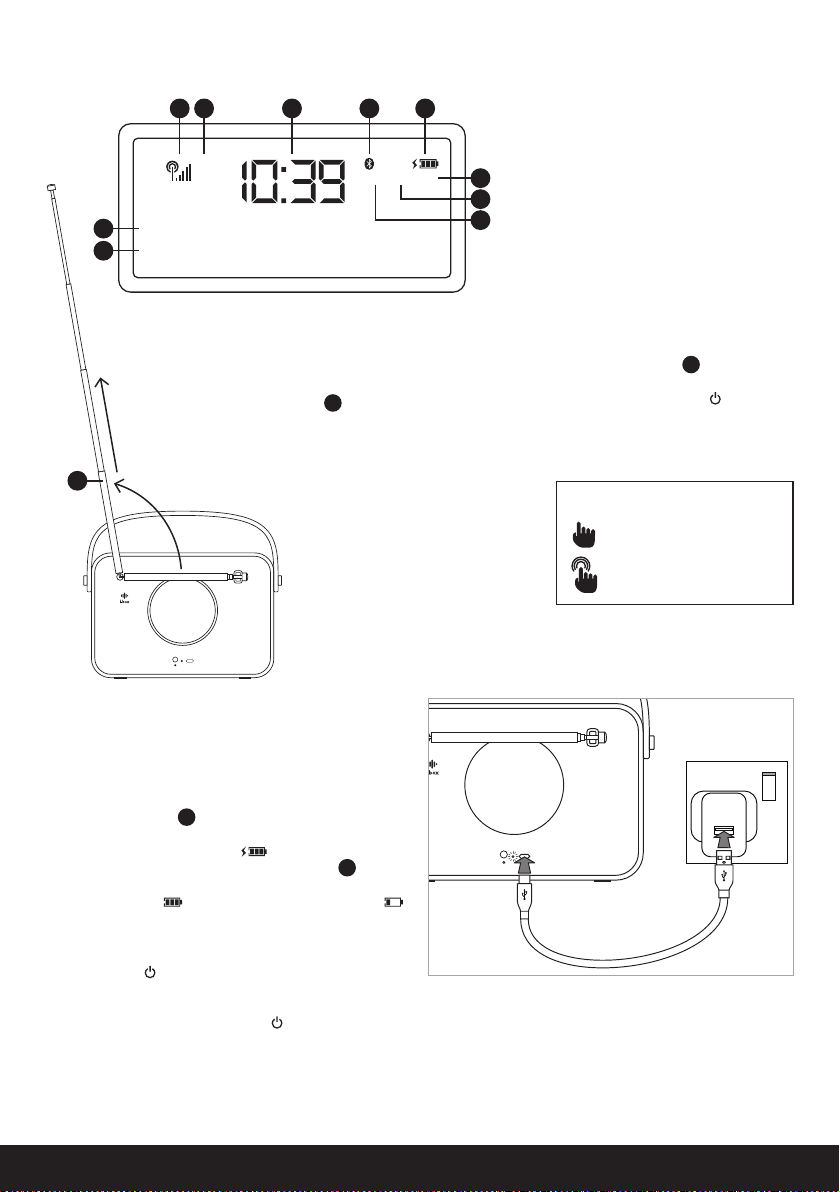
The i-box Attune is a stylish and easy-to-use upright portable DAB/DAB+ and FM radio. The DAB+ radio function offers
you crisp and clear audio quality at the touch of a button and automatically searches for all available radio stations,
displaying them on the large LCD display - so you know exactly which one you’re listening to. If you prefer to play
your own selection of music the Attune also offers playback via Bluetooth and AUX IN. While the built-in 2,200mAh
rechargeable lithium battery and handy carrying strap, make it easy to listen to your favourite tracks and stations from
anywhere around the home.
DE Einleitung
Die i-box Attune ist ein stylisches und nutzerfreundliches tragbares DAB/DAB+ und FM-Radio. Die DAB+- Funktion
bietet Ihnen mit nur einem Tastendruck eine kristallklare Audioqualität, sucht automatisch nach allen verfügbaren
Radiosendern und zeigt sie auf dem großen LCD-Display an - so wissen Sie immer ganz genau, welchen Sender Sie
hören. Wenn Sie lieber Ihre eigene Musik abspielen möchten, haben Sie mit dem Attune auch die Möglichkeit, diese
über Bluetooth und Aux IN abzuspielen. Mit dem eingebauten wiederauadbaren 2200mAh Lithium-Akku und dem
praktischen Trageriemen können Sie zuhause von jedem Punkt aus Ihren Lieblingsliedern und -sender hören.
ES Introducción
La i-box Attune es una radio DAB/DAB+ y FM portátil, elegante y fácil de usar. La función de radio DAB+ ofrece una
calidad de audio limpia y clara con solo pulsar un botón y busca automáticamente todas las emisoras de radio
disponibles, mostrándolas en su gran pantalla LCD, para que sepa exactamente qué está escuchando. Si preere
reproducir su propia selección de música, la Attune también ofrece reproducción a través de Bluetooth y una entrada
auxiliar. La batería de litio recargable integrada de 2200 mAh y la práctica correa de transporte le facilitan la escucha de
sus canciones y emisoras favoritas desde cualquier parte de su hogar.
FR Présentation
La Attune d’i-box est une radio portable DAB/DAB+ et FM, élégante et simple d’utilisation. La fonction radio DAB+
permet une qualité audio nette et claire sur simple pression d’un bouton. Elle recherche automatiquement toutes les
stations radio disponibles et les afche sur le grand écran LCD, vous indiquant clairement laquelle vous écoutez. Si vous
préférez écouter votre propre sélection de musique, l’Attune propose également la lecture en Bluetooth et via le mode
AUX IN. La batterie au lithium rechargeable de 2,200 mAh intégrée et la sangle de transport très pratique permettent
d’écouter facilement vos morceaux et stations préférés partout dans la maison.
IT Introduzione
i-box Attune è una radio portatile DAB/DAB+ e FM elegante e semplice da usare. La funzione DAB+ offre una qualità
audio chiara e nitida al tocco di un pulsante e ricerca automaticamente tutte le stazioni radio disponibili, mostrandole
su un ampio display LCD, così saprai esattamente che cosa stai ascoltando. Se preferisci riprodurre la tua selezione
di musica personale, la radio Attune offre anche la riproduzione attraverso il Bluetooth e AUX IN. La batteria al litio
ricaricabile integrata da 2,200mAh e il comodo cinghia di trasporto, inne, ti permettono di ascoltare le tue tracce e le
tue stazioni preferite con la massima comodità, in qualsiasi punto della casa.
NL Inleiding
De i-box Attune is een, draagbare DAB/DAB+ en FM-radio met een stijlvol en gebruiksvriendelijk ontwerp. De
functie voor DAB+ radio biedt met één druk op de knop een helder en scherp geluid. Verder worden alle beschikbare
radiostations automatisch opgezocht en weergegeven op het grote lcd-scherm. Zo weet u precies naar welk station u
luistert. Voor wie liever zelf kiest, heeft de Attune een Bluetooth- en AUX-in-functie om een eigen muziekselectie af te
spelen. En dankzij de geïntegreerde lithiumbatterij van 2,200mAh en de handige draagriem beluistert u uw favoriete
nummers en stations waar u maar wilt in huis.
02 | i-box

EN User Guide
Caring for your Radio
Important safety information. Please read these instructions fully before operating your radio.
Do not place naked ame sources, such as lit candles on or near the unit.
Do not expose to dripping or splashed liquids. Objects lled with liquids, such as vases, must not be placed
close or on the unit.
The unit should not be exposed to direct sunlight, very high or low temperatures, moisture, strong magnetic elds,
microwaves or dusty environments.
Always leave sufcient space around the unit for ventilation, do not cover.
Do not use abrasives or solvents to clean this product. Use only a clean, damp, soft, cloth.
Never attempt to insert wires, pins or other such objects into the vents or openings of the unit, except for the
reset hole (16) – see reset instructions on page 5 or 10.
Do not disassemble or modify the unit, there are no user-serviceable parts.
If the unit is damaged in any way or malfunctions do not use. Consult a qualied service engineer.
This product contains a built-in lithium-ion battery. Improper use can cause the battery to catch
re or explode causing serious or fatal injury. Always charge in a cool place out of direct sunlight,
allowing good air circulation around the product. Once the battery is fully charged, remove from
charge. Never charge your battery for more than 6 hours. Over-charging will reduce battery life and
may cause overheating and catastrophic failure.
Contents Page
Controls & Features......................................................................................................................................................................................04
Charging Your Attune...................................................................................................................................................................................05
Turning Your Attune On/Off........................................................................................................................................................................05
Navigating Menus.........................................................................................................................................................................................06
Changing the Operating Language...........................................................................................................................................................06
Audio Mode Selection..................................................................................................................................................................................06
DAB Radio Mode...........................................................................................................................................................................................06
FM Radio Mode.............................................................................................................................................................................................07
Bluetooth Mode.............................................................................................................................................................................................08
AUX IN Mode..................................................................................................................................................................................................08
System Menu.................................................................................................................................................................................................08
Sleep Function...............................................................................................................................................................................................08
Time and Date Settings...............................................................................................................................................................................09
Troubleshooting............................................................................................................................................................................................10
Product Specications................................................................................................................................................................................10
Box Contents
1x i-box Attune
1x USB Charging Cable
1x User Manual
1x Quick Start Guide
i-box | 03

MODE
BACKPRESET
INFO
MENU
VOLUME
Welcome to
Digital radio
ENTER
SCAN
1
2
3
4
5
6
7
8
9
10
11
12
AUX IN
USB 5V
RESET
13
14
15
16
17
18
Front View
Back View Front View
01. Carrying Strap
02. LCD Display
03. On/Off key
04. Preset key
05. Mode key
06. Back key (previous menu)
07. Volume dial
08. Info/Menu key
09. Enter/Scan / Play/Pause key
10. Next key
11. Previous key
12. Speaker
Back View
13. Antenna
14. Bass Reex port
15. AUX IN port
16. Power Reset Switch*
17. Charging LED indicator
18. USB-C Charging port
04 | i-box

Absolute 80s
Discover more at absolute
AM
PM DAB FM AUX
19 20 21 22 23
27
28
24
25
26
AUX IN
USB 5V
RESET
13
AUX IN
USB 5V
RESET
Display Display
19. Signal Strength indicator
20. AM/PM indicator
21. Time
22. Bluetooth indicator
23. Charge indicator
24. AUX Mode indicator
25. FM Radio indicator
26. DAB Radio indicator
27. Radio Station
28. Programme Information
*If in the rare event that your Attune
“hangs” or “freezes”. Insert a thin
object such as a pin or paper clip
into the RESET hole 16 and press
until you hear a click and your Attune
will switch off. Press the ON/OFF
key (3) to switch your Attune back
on again.
Help
Short Press
Long Press (2-3s)
1. Charging Your Attune
Before charging the Attune, please read the warnings
concerning charging lithium batteries on page 3. Your
Attune has a 2,200mAh built-in, non-user replaceable,
lithium battery. To charge your Attune, plug the USB cable
(supplied) into a powered USB port and the USB-C into the
USB-C charging port 18 . For best results, the rst time
you charge the Attune, let it charge for 3-5 hours until
fully charged. This battery icon is displayed when the
Attune is charging. The charging LED indicator 17 lights red
during charging. The LED will turn off when the unit is fully
charged. This icon indicates a full charge, this icon
indicates low charge.
2. Turning Your Attune On/Off
Short press the ON/OFF key (3) to switch on your Attune
into the last used mode, if you are powering your Attune for
the rst time it will automatically go to DAB radio mode. To
turn off your Attune, short press the ON/OFF key (3).
Please make sure the antenna 13 is fully
extended for optimum reception when
listening to radio stations.
i-box | 05

3. Navigating Menus
Long press the INFO/MENU key (8), then use the next (10) and previous (11) keys to scroll through the
menu options. Short press ENTER (0) to select an option or enter a submenu. Short press BACK (6) to return to
the previous menu.
Language
< English >
*BACK
Previous Menu
System
< Language > BACK
Previous Menu
DAB
< System > BACK
DAB Radio
Absolute 80s
Discover more at
4. Change Operating Language
The default is English. Five other operating languages are also available: Deutsch, Español, Français, Italiano
and Nederlands.
INFO
MENU
DAB
< System >
ENTER
SCAN
System
< Language >
ENTER
SCAN
Language
< English >
* Language
< Deutsch >
Language
< Español >
Language
< Français >
Language
< Italiano >
Language
< Nederlands >
ENTER
SCAN
5. Setting the Time and Date
The time and date are congured to set automatically when the Attune rst enters either DAB or FM mode and receives
a signal (depending on your location). If you want to set the time or date manually see page 9.
6. Audio Mode Selection
Short press the MODE key (5) repeatedly to switch between audio modes.
DAB Radio
Absolute 80s
Discover more at MODE
FM Radio
87.50MHz
[No RadioText] MODE
Bluetooth
Bluetooth
Not Connected MODE
AUX IN
Enter AUX
7. DAB Radio Mode
7.1 Full Scan
The rst time the Attune is switched to DAB mode it will perform a full scan to compile a list of all currently available
DAB stations. To ensure as complete a list as possible make sure the antenna 13 is fully extended.
Welcome to
Digital radio
Scanning... 21 Absolute 80s
Playing
To start a new full scan at any time long press the ENTER/SCAN (9) key.
Absolute 80s
Discover more at
ENTER
SCAN
Scanning... 28 Absolute 80s
Playing
Or long press the INFO/MENU key (8) then short press ENTER/SCAN (9) to start a new full scan.
Absolute 80s
Discover more at
INFO
MENU
DAB
< Full scan >
ENTER
SCAN
Scanning... 14 Absolute 80s
Playing
7.2 Station List
The LCD display shows the name of the station playing and program information. Short press the next (10) and
previous (11) keys to scroll through the list of stations found during scanning, the short name will be shown. Press
ENTER/SCAN (9) to listen to the station shown.
Absolute 80s
Discover more at
Station list
< Abs 80s >
Station list
< BBC R1 >
ENTER
SCAN
BBC Radio 1
Playing
7.3 Saving a Station to the Preset List
To save the station playing to one of the 30 available DAB preset slots, long press the PRESET (4) key, scroll to an empty
preset slot or overwrite an old one, press the ENTER/SCAN (9) key to store.
Absolute 80s
Discover more at PRESET Preset Store
< 1: BBC Radio 1 >
Preset Store
< 2: (Empty) >
ENTER
SCAN
Preset 2
Stored
7.4 Playing a Saved Preset
Short press the PRESET (4) key, scroll to the preset you want to play, press the ENTER/SCAN (9) key to play.
Captial UK
You’re listening to PRESET Preset Recall
< 1: BBC Radio 1 >
Preset Recall
< 2: Absolute 80s >
ENTER
SCAN
Absolute 80s
Playing
06 | i-box

7.5 DAB Radio Menu
The options are full scan, station list, manual tune, DRC, prune, or system.
INFO
MENU
DAB
< Full scan >
DAB
< Manual tune >
DAB
< DCR >
DAB
< Prune >
DAB
< System >
ENTER
SCAN
7.6 Manual Tune
If you know the frequency of a station you can search for it using this option, press ENTER/SCAN (9) to play.
DAB
< Manual tune >
ENTER
SCAN
Manual tune
< 5A 174.928MHz >
Manual tune
< 13F 239.200MHz >
ENTER
SCAN
7.7 Dynamic Range Control (DRC)
DRC can make quieter sounds easier to hear when your radio is used in a noisy environment. This function is only
available for some DAB stations.
DAB
< DCR >
ENTER
SCAN
DCR
< DCR high >
* DCR
< DCR low >
DCR
< DCR off >
ENTER
SCAN
7.8 Prune
Set prune to “Yes” to clear stations with no signal reception from the DAB station list when you next perform a full scan.
DAB
< Prune >
ENTER
SCAN
Prune?
<No> Yes
Prune?
No <Yes>
ENTER
SCAN
8. FM Radio Mode
8.1 Auto Scan
Long press the ENTER/SCAN (9) key to auto scan for all receivable FM stations. Stations found will be saved to the
preset list. To ensure as complete a list as possible make sure the antenna 13 is fully extended.
87.50MHz
[No RadioText]
ENTER
SCAN
88.20MHz P01
Auto Scanning...
90.10MHz P02
Auto Scanning...
107.70MHz P14
Auto Scanning...
88.20MHz P1
[No RadioText]
8.2 Auto Scan for Next Available Station
Long press the / (10/11) keys to tune to the next available station.
87.50MHz
[No RadioText]
90.05MHz
Scanning...
90.10MHz
BBC R2
8.3 Manual Tuning
Short press the / (10/11) keys to ne tune the frequency.
87.50MHz
[No RadioText]
87.55MHz
[No RadioText]
87.60MHz
[No RadioText]
87.65MHz
[No RadioText]
8.4 Saving a Station to the Preset List
To save the station playing to one of the 30 available FM preset slots, long press the PRESET key (4) then short press
the next/previous / (10/11) keys to scroll to an empty preset slot or overwrite an old one. Press ENTER/SCAN (9)
to store.
87.50MHz
[No RadioText] PRESET Preset Recall
< 1: 88.20MHz >
Preset Recall
< 2: 90.10MHz >
ENTER
SCAN
90.10MHz P2
BBC R2
8.5 Playing a Saved Preset
Short press the PRESET (4) key to enter the preset menu, then short press / (10/11) to scroll to the preset slot you
want to play. Press ENTER/SCAN (9) to play.
102.20MHz
Smooth Radio PRESET Preset Store
< 1: 88.20MHz >
Preset Store
< 15: (Empty) >
ENTER
SCAN
Preset 15
Stored
8.7 FM Radio Menu
The options are scan settings or system.
INFO
MENU
FM
< Scan Setting >
FM
< System >
ENTER
SCAN
i-box | 07

8.8 Scan Settings
By default, the FM scan stores all available stations, even if the signal is weak and the audio quality is poor. It is best to
use the “Strong stations only” option to ensure the stations found have a clear signal, follow the steps below.
FM
< Scan Setting >
ENTER
SCAN
Scan Setting
< Strong stations >
* Scan Setting
< All Stations >
ENTER
SCAN
9. Bluetooth Mode
Use the MODE key (5) to select Bluetooth mode, the screen will ash “Not Connected” to indicate that the Attune is in
pairing mode. Your Attune will automatically search for the last connected device. Connect a compatible device as
shown below. When your device is connected you will hear a chime.
MODE Bluetooth
Not Connected Available Devices
i-box Attune
Bluetooth
Available Devices
Connectedi-box Attune
Bluetooth Bluetooth
Connected
You don’t need to re-pair. The Attune will automatically reconnect with your device when they are in range and both
are turned on.
To disconnect your device, long press the ENTER/SCAN key (9). You will hear a chime when your device has been
disconnected successfully. Your Attune is now ready to pair with a new device.
9.1 Playback Controls
Use your device to control playback or use the Attune’S controls for the following options:
• Previous track (11)
• ENTER/SCAN Play/Pause track (9)
• Next track (10)
• Use the volume dial (7) to control the volume. You can also use your device to change the volume. Adjust the volume
on both your device and the Attune for optimum sound.
10. AUX IN Mode
Use the MODE key (5) to select AUX IN mode. Connect any audio device to the 3.5mm AUX IN port 15 on the back of
your Attune. Use your device to control and select audio and use a combination of the volume on your device and the
Attune to adjust for optimum sound.
11. System Menu
The options are sleep, time, backlight, language, factory reset, software version.
INFO
MENU
System
< Sleep >
System
< Time >
System
< Backlight >
System
< Language >
System
< Factory Reset >
System
< SW version >
ENTER
SCAN
12. Sleep Function
In any audio mode you can use the sleep timer function to set a time period after which your Attune will switch off
automatically. The available options are: Sleep off, 15, 30, 45, 60 and 90 minutes. When the sleep function is in use, this
icon and the remaining time is displayed.
System
< Sleep >
ENTER
SCAN
Set sleep time
Sleep off
Set sleep time
15 minutes
ENTER
SCAN
Absolute 80s 14
Discover more at
To turn off the sleep function, re-enter the sleep menu, and set to “Sleep off”.
System
< Sleep >
ENTER
SCAN
Set sleep time
14 minutes
Set sleep time
Sleep off
ENTER
SCAN
Absolute 80s
Discover more at
13. Backlight
13.3 Timeout
Select how long until the display enters dim level. The available options are: 10, 20, 30, 45, 60, 90, 120, 180 seconds
or on (the display will not dim).
Backlight
< Timeout >
ENTER
SCAN
Timeout
< 60 sec >
* Timeout
< 90 sec >
Timeout
< 120 sec >
ENTER
SCAN
08 | i-box

13.1 On Level
Select the brightness of the display when on.
Backlight
< On level >
ENTER
SCAN
On level
< Medium >
* On level
< Low >
On level
< High >
ENTER
SCAN
13.2 Dim Level
Select the brightness of the display when dimmed.
Backlight
< Dim level >
ENTER
SCAN
Dim level
< Medium >
* Dim level
< Low >
Dim level
< High >
ENTER
SCAN
14. Time and Date Settings
By default the time and date will auto update, for other time settings or to set the time/date manually see below.
System
< Time >
ENTER
SCAN
Time
< Set Time/Date >
Time
< Auto update >
Time
< Set 12/24 hour >
Time
< Set date format >
ENTER
SCAN
14.1 Set Time/Date Manually
Follow the steps below to set the time and date manually.
Time
< Set Time/Date >
Set time
10:00
ENTER
SCAN
Set time
10:39
ENTER
SCAN
Set date
6-1-2020
ENTER
SCAN
Set date
6-12-2020
ENTER
SCAN
Set date
6-12-2022
ENTER
SCAN
Time
Saved
ENTER
SCAN
14.2 Auto Update
By default the Attune will auto update the time/date using a DAB or FM time signal. You are given the choice of using
“Update from Any”, “DAB” or “FM” for auto update, or of using “No Update”. We recommend you select “Update from Any”
if you want to auto update as the availability of DAB and FM time signals can vary from region to region.
Time
< Auto update >
ENTER
SCAN
Auto update
< Update from Any >
* Auto update
< Update from DAB >
Auto update
< Update from FM >
ENTER
SCAN
14.3 Set Display Format
Choose between 12-hour or 24-hour clock display format. The default is 24-hour.
Time
< Set 12/24 hour >
ENTER
SCAN
Set 12/24 hour
< Set 24 hour >
*Set 12/24 hour
< Set 12 hour >
ENTER
SCAN
14.4 Set Date Format
Choose between DD-MM-YYYY (the default) or MM-DD-YYYY.
Time
< Set date format >
ENTER
SCAN
Set date format
< DD-MM-YYYY >
*Set date format
< MM-DD-YYYY >
ENTER
SCAN
15. Factory Reset
Reset the Attune to factory default settings. This will delete all settings, the station list and presets.
System
< Factory Reset >
ENTER
SCAN
Factory Reset?
<No> Yes
Factory Reset?
No <Yes>
ENTER
SCAN
Restarting...
16. Software Version
View the current software version.
i-box | 09

Troubleshooting
Solutions
Radio reception
is poor
Check that the antenna
is extended for the
maximum signal strength
and improved reception.
Adjust the antenna
direction to improve the
signal. Move the unit
closer to a window.
Check that the unit is
not close to microwaves,
uorescent lights or other
equipment which may
cause interference.
No sound Check if the volume is
turned down. Increase the
volume.
Check that the unit is
switched on.
Try tuning to another
radio station.
The unit does not
turn on
The battery is at and
the unit is not securely
connected to a powered
USB socket.
Connect to a powered
USB socket.
Connect to a higher
output USB socket.
Radio hangs or freezes
Use the power reset switch (16) to turn off the Attune:
1. Insert a thin object for example a pin or paperclip into the RESET hole (16) on the
back of your Attune.
2. Short press the ON/OFF key (3) to turn the Attune back on.
Product Specifications
Specifications
Power Input 5V𝌂1.5A
Audio Output 3W RMS
FM Frequency Range 87.0 MHz to 108.0 MHz
DAB/DAB+ Frequency Range 174.928MHz (5A) - 239.200MHz (13F)
Playing Time Up to 12 hours at 50% volume
Built-in Rechargeable Battery Lithium-ion 2,200mAh
Disclaimer
Updates to rmware and/or hardware components are made regularly. Therefore some of the instructions,
specications and pictures in this documentation may differ slightly from your particular situation. All items
described in this guide are for illustration purposes only and may not apply to your particular situation.
No legal right or entitlements may be obtained from the description made in this manual.
Declaration of Conformity
Hereby, Philex Electronic Ltd. declares that the radio equipment model i-box Attune for wireless reception in domestic
premises is in compliance with the Radio Equipment Directive 2014/53/EU. The full text of the EU declaration of
conformity is available at the following internet address: www.philex.com/doc
Technical Support
For further help, advice, information visit www.iboxstyle.com/support
10 | i-box

DE Benutzerhandbuch
Pflege Ihres Radio
Wichtiger Sicherheitshinweis. Bitte lesen Sie sich diese Anweisungen vor der Betrieb Ihres Radio vollständig durch.
Stellen Sie keine offenen Flammen, wie z. B. brennende Kerzen, auf oder in die Nähe der Einheit.
Setzen Sie das Gerät keinen tropfenden oder verschütteten Flüssigkeiten aus. Mit Flüssigkeit gefüllte Gegenstände, wie
z. B. Vasen, sollten nicht in der Nähe oder auf dem Gerät abgestellt werden.
Das Gerät sollte keinem direktem Sonnenlicht, sehr hohen oder niedrigen Temperaturen, Feuchtigkeit, starken
Magnetfeldern, Mikrowellen oder sehr staubigen Umgebungen ausgesetzt werden.
Lassen Sie zur Belüftung stets genügend Platz um das Gerät herum. Decken Sie das Gerät nicht ab.
Verwenden Sie zur Reinigung des Geräts keine Schleifmittel oder Lösungsmittel. Reinigen sie das Gerät ausschließlich
mit einem sauberen, feuchten, weichen Tuch.
Versuchen Sie niemals, Drähte, Stifte oder ähnliche Gegenstände in die Lüftungsschlitze oder Öffnungen des Geräts zu
stecken – außer in das Loch zum RESET (16), siehe die Anleitung zum Zurücksetzen auf Seite 13 oder 19.
Bauen Sie das Gerät nicht auseinander oder modizieren es; es existieren keine vom Endbenutzer zu wartenden Teile.
Verwenden Sie die Soundbar nicht, falls sie beschädigt ist oder nicht ordnungsgemäß funktioniert. Wenden Sie sich in
einem solchen Fall an einen qualizierten Service-Techniker.
Dieses Produkt enthält eine eingebaute Lithium-Ionen-Batterie. Bei unsachgemäßem Gebrauch kann die
Batterie in Brand geraten oder explodieren, was zu schweren Verletzungen bis hin zum Tod führen kann.
Laden Sie das Gerät immer an einem kühlen Ort ohne direkte Sonneneinstrahlung auf und sorgen Sie
für eine gute Luftzirkulation um das Gerät herum. Sobald die Batterie vollständig geladen ist, trennen Sie
das Gerät vom Netzteil. Laden Sie die Batterie niemals länger als 6 Stunden. Eine Überladung verkürzt
die Lebensdauer der Batterie und kann zu Überhitzung oder Ausfall führen.
Inhalt Seite
Bedienelemente & Funktionen...................................................................................................................................................................12
Laden Ihres Attune .......................................................................................................................................................................................13
Ein-/Ausschalten Ihres Attune...................................................................................................................................................................13
Navigieren der Menüs..................................................................................................................................................................................14
Ändern der Bedienungssprache................................................................................................................................................................14
Audiomoduswahl..........................................................................................................................................................................................14
DAB-Radio-Modus........................................................................................................................................................................................14
UKW-Radio-Modus ......................................................................................................................................................................................15
Bluetooth-Modus..........................................................................................................................................................................................16
AUX-IN-Modus ..............................................................................................................................................................................................16
Systemmenü..................................................................................................................................................................................................16
Einschlaffunktion..........................................................................................................................................................................................17
Uhrzeit- und Datumseinstellungen...........................................................................................................................................................17
Fehlerbehebung............................................................................................................................................................................................19
Produktspezikationen ...............................................................................................................................................................................19
Schachtelinhalt
1x i-box Attune
1x USB-Ladekabel
1x Benutzerhandbuch
1x Schnellanleitung
i-box | 11

MODE
BACKPRESET
INFO
MENU
VOLUME
Welcome to
Digital radio
ENTER
SCAN
1
2
3
4
5
6
7
8
9
10
11
12
AUX IN
USB 5V
RESET
13
14
15
16
17
18
Vorderansicht
Rückansicht Vorderansicht
01. Trageriemen
02. LCD-Display
03. EIN/AUS-Taste
04. Voreinstellung-Taste
05. Modus-Taste
06. Zurück-Taste (vorherigen Menü)
07. Lautstärkeregler
08. Info/Menü-Taste
09. Enter/Frequenzsuche- /
Abspielen/Pausieren-Taste
10. Weiter-Taste
11. Zurück-Taste
12. Lautsprecher
Rückansicht
13. Antenne
14. Bass Reex-Anschluss
15. AUX-Eingangsanschluss
16. Power-Reset-Schalter*
17. Lade-LED-Anzeige
18. USB-C-Ladeanschluss
12 | i-box

Absolute 80s
Discover more at absolute
AM
PM DAB FM AUX
19 20 21 22 23
27
28
24
25
26
AUX IN
USB 5V
RESET
13
AUX IN
USB 5V
RESET
Display Display
19. Signalstärke
20. AM/PM-Anzeige
21. Zeit
22. Bluetooth-Anzeige
23. Ladeanzeige
24. AUX-Modus-Anzeige
25. FM-Modus-Anzeige
26. DAB-Modus-Anzeige
27. Radiosender
28. Programminformationen
*In dem seltenen Fall, dass Ihr Attune
„hängt“ oder „einfriert“. Führen Sie
einen dünnen Gegenstand wie eine
Nadel oder eine Büroklammer in das
RESET-Schalter 16 ein und drücken
Sie, bis Sie hier ein Klicken hören und
Ihr Attune sich ausschaltet. Drücken
Sie die EIN/AUS-Taste (3), um Ihr
Attune wieder einzuschalten.
Hilfe
Kurz Drücken
Lange Drücken (2-3s)
1. Laden Ihres Attune
Bevor Sie den Trip auaden, lesen Sie bitte die
Warnhinweise zum Laden von Lithium-Akkus auf Seite 11.
Ihr Attune kommt mit einer eingebauten, nicht
auswechselbaren 2200 mAh-Lithium Batterie. Um Ihr
Attune zu laden, stecken Sie das USB-Kabel (mitgeliefert) an
einem stromversorgten USB-Port und den USB-C-Stecker
am USB-C-Ladeanschluss 18 an. Für beste Ergebnisse
empfehlen wir, das Attune vor dem ersten Gebrauch 3-5
Stunden lang aufzuladen, bis es voll aufgeladen ist. Wenn
das Attune geladen wird, erscheint das Batteriesymbol .
Die Lade-LED-Anzeige 17 wird während des Ladevorgangs
rot leuchten. Das LED wird erlöschen, wenn das Attune voll
aufgeladen ist. Dieses Symbol zeigt eine volle Ladung
an, dieses Symbol zeigt eine geringe Ladung an.
2. Ein-/Ausschalten Ihres Attune
Drücken Sie kurz die EIN/AUS-Taste (3), um Ihr Attune im
zuletzt benutzten Modus einzuschalten. Falls Sie Ihr Attune
zum ersten Mal einschalten, wird es automatisch in den
DAB-Radio-Modus gehen. Um das Attune auszuschalten,
drücken Sie kurz auf die EIN/AUS-Taste (3).
Stellen Sie bitte sicher, dass die Antenne
13 vollständig herausgezogen ist, um beim
Radiohören einen optimalen Empfang zu
gewährleisten.
i-box | 13

3. Navigieren der Menüs
Drücken Sie lange auf die INFO/MENU-Taste (8) und verwenden Sie danach die Tasten Weiter (10) und Zurück (11),
um durch die Menüoptionen zu blättern. Drücken Sie kurz die ENTER/SCAN-Taste (9), um eine Option auszuwählen oder
ein Untermenü aufzurufen. Drücken Sie kurz auf BACK (6), um zum vorherigen Menü zurückzukehren.
Language
< English >
*BACK
Vorherigen Menü
System
< Language > BACK
Vorherigen Menü
DAB
< System > BACK
DAB-Radio
Absolute 80s
Discover more at
4. Ändern der Bedienungssprache
Die voreingestellte Sprache ist Englisch. Außerdem sind fünf weitere Bediensprachen verfügbar: Deutsch, Español,
Français, Italiano und Nederlands.
INFO
MENU
DAB
< System >
ENTER
SCAN
System
< Language >
ENTER
SCAN
Language
< English >
* Language
< Deutsch >
Language
< Español >
Language
< Français >
Language
< Italiano >
Language
< Nederlands >
ENTER
SCAN
5. Einstellen von Zeit und Datum
Zeit und Datum sind so konguriert, dass sie automatisch eingestellt werden, wenn das Attune zum ersten Mal im
DAB- oder FM-Modus ist und ein Signal empfängt (abhängig von Ihrem Standort). Falls Sie Zeit oder Datum manuell
einstellen möchten, sehen Sie Seite 17.
6. Audiomoduswahl
Drücken Sie kurz und wiederholt die MODE-Taste (5), um die Audiomodi zu wechseln.
DAB-Radio
Absolute 80s
Discover more at MODE
UKW-Radio
87.50MHz
[No RadioText] MODE
Bluetooth
Bluetooth
Not Connected MODE
AUX IN
Enter AUX
7. DAB-Radio-Modus
7.1 Vollständiger Suchlauf
Wenn das Attune zum ersten Mal auf den DAB-Modus geschaltet wird, führt es einen vollständigen Suchlauf durch, um
eine Liste aller derzeit verfügbaren DAB-Sender zu erstellen. Um eine möglichst vollständige Liste zu erhalten, muss die
Antenne 13 vollständig ausgezogen sein.
Welcome to
Digital radio
Scanning... 21 Absolute 80s
Playing
Um jederzeit einen neuen vollständigen Suchlauf zu starten, drücken Sie lange die ENTER/SCAN-Taste (9).
Absolute 80s
Discover more at
ENTER
SCAN
Scanning... 28 Absolute 80s
Playing
Oder drücken Sie lange die INFO/MENU-Taste (8) und danach die ENTER/SCAN-Taste (9), um einen neuen vollständigen
Suchlauf zu starten.
Absolute 80s
Discover more at
INFO
MENU
DAB
< Full scan >
ENTER
SCAN
Scanning... 14 Absolute 80s
Playing
7.2 Senderliste
Das LCD-Display zeigt den Namen des eingestellten Senders und Programminformationen an. Durch kurzes Drücken
der Tasten Weiter (10) und Zurück (11) können Sie die Liste der beim Suchlauf gefundenen Sender durchsehen.
Hier wird der Kurzname angezeigt. Drücken Sie die ENTER/SCAN-Taste (9), um sich den angezeigten Sender anzuhören.
Absolute 80s
Discover more at
Station list
< Abs 80s >
Station list
< BBC R1 >
ENTER
SCAN
BBC Radio 1
Playing
7.3 Abspeichern eines Senders in der Vorwahlliste
Um einen aktuell empfangenen Sender auf einem der 30 verfügbaren DAB-Speicherplätze zu speichern, drücken
Sie lange auf die PRESET-Taste (4), blättern Sie zu einem leeren Speicherplatz oder überschreiben Sie einen alten
Speicherplatz und drücken Sie zum Speichern die ENTER/SCAN-Taste (9).
Absolute 80s
Discover more at PRESET Preset Store
< 1: BBC Radio 1 >
Preset Store
< 2: (Empty) >
ENTER
SCAN
Preset 2
Stored
14 | i-box

7.4 Abspielen eines gespeicherten Presets
Drücken Sie kurz die PRESET-Taste (4), blättern Sie zu dem Preset, das Sie abrufen möchten, und drücken Sie die
ENTER/SCAN-Taste (9) zur Wiedergabe.
Captial UK
You’re listening to PRESET Preset Recall
< 1: BBC Radio 1 >
Preset Recall
< 2: Absolute 80s >
ENTER
SCAN
Absolute 80s
Playing
7.5 DAB-Radio-Menü
Die Optionen sind vollständiger Suchlauf (full scan), Senderliste (station list), manuelle Frequenzeinstellung (manual
tune), DRC, Leeren (prune) oder System.
INFO
MENU
DAB
< Full scan >
DAB
< Manual tune >
DAB
< DCR >
DAB
< Prune >
DAB
< System >
ENTER
SCAN
7.6 Manuelle Frequenzeinstellung
Wenn Sie die Frequenz eines Senders kennen, können Sie mit dieser Option danach suchen. Drücken Sie zur
Wiedergabe ENTER/SCAN (9).
DAB
< Manual tune >
ENTER
SCAN
Manual tune
< 5A 174.928MHz >
Manual tune
< 13F 239.200MHz >
ENTER
SCAN
7.7 DRC (Dynamic Range Control)
Dynamic Range Control kann das Hören leiserer Klänge vereinfachen, wenn Ihr Radio in einer lauten Umgebung
verwendet wird. Diese Funktion ist nur für einige DAB-Sender verfügbar.
DAB
< DCR >
ENTER
SCAN
DCR
< DCR high >
* DCR
< DCR low >
DCR
< DCR off >
ENTER
SCAN
7.8 Senderbereinigungsfunktion
Wird in der Funktion Löschen „Ja“ eingestellt, werden bei der nächsten automatischen Frequenzeinstellung alle Sender
ohne Signalempfang aus der DAB-Senderliste gelöscht.
DAB
< Prune >
ENTER
SCAN
Prune?
<No> Yes
Prune?
No <Yes>
ENTER
SCAN
8. UKW-Radio-Modus
8.1 Automatischer Suchlauf
Drücken Sie lange die ENTER/SCAN-Taste (9), um automatisch sämtliche empfangbaren FM-Sender zu suchen. Die
gefundenen Sender werden in der Vorwahlliste abgespeichert. Um eine möglichst vollständige Liste zu erhalten, muss
die Antenne 13 vollständig ausgezogen sein.
87.50MHz
[No RadioText]
ENTER
SCAN
88.20MHz P01
Auto Scanning...
90.10MHz P02
Auto Scanning...
107.70MHz P14
Auto Scanning...
88.20MHz P1
[No RadioText]
8.2 Automatischer Suchlauf für den nächsten verfügbaren Sender
Drücken Sie lange die Tasten / (10/11), um zum nächsten verfügbaren Sender zu gehen.
87.50MHz
[No RadioText]
90.05MHz
Scanning...
90.10MHz
BBC R2
8.3 Manuelle Frequenzeinstellung
Drücken Sie kurz die Tasten / (10/11), um die gewünschte Frequenz einzustellen.
87.50MHz
[No RadioText]
87.55MHz
[No RadioText]
87.60MHz
[No RadioText]
87.65MHz
[No RadioText]
8.4 Abspeichern eines Senders in der Vorwahlliste
Um einen aktuell empfangenen Sender auf einem der 30 verfügbaren FM-Speicherplätze zu speichern, drücken Sie
lange auf die PRESET-Taste (4), drücken Sie danach kurz die Tasten Weiter/Zurück / (10/11), um zu einem leeren
Speicherplatz zu blättern oder einen alten Speicherplatz zu überschreiben. Drücken Sie zum Speichern die ENTER/
SCAN-Taste (9).
87.50MHz
[No RadioText] PRESET Preset Recall
< 1: 88.20MHz >
Preset Recall
< 2: 90.10MHz >
ENTER
SCAN
90.10MHz P2
BBC R2
i-box | 15

8.5 Abspielen eines gespeicherten Presets
Drücken Sie kurz die PRESET-Taste (4), um das Preset-Menü anzuzeigen, drücken Sie danach kurz / (10/11), um zu
dem gewünschten Preset zu blättern, das Sie abrufen möchten. Drücken Sie zur Wiedergabe ENTER/SCAN (9).
102.20MHz
Smooth Radio PRESET Preset Store
< 1: 88.20MHz >
Preset Store
< 15: (Empty) >
ENTER
SCAN
Preset 15
Stored
8.6 UKW-Radio-Menü
Die Optionen sind Suchlauf-Einstellungen (scan settings) oder System.
INFO
MENU
FM
< Scan Setting >
FM
< System >
ENTER
SCAN
8.7 Suchlauf-Einstellungen
Standardmäßig speichert die FM-Sendersuche alle verfügbaren Sender, auch wenn der Empfang schwach und die
Tonqualität schlecht ist. Wir empfehlen, die Option „nur Sender mit starken Signalen“ (Strong stations only) zu benutzen,
um sicherzustellen, dass die gefundenen Sender ein klares Signal haben. Befolgen Sie dazu die nachstehenden Schritte.
FM
< Scan Setting >
ENTER
SCAN
Scan Setting
< Strong stations >
* Scan Setting
< All Stations >
ENTER
SCAN
9. Bluetooth-Modus
Benutzen Sie die MODE-Taste (5), um in Bluetooth-Modus auszuwählen, die Anzeige wird blinken „Not Connected“,
um anzuzeigen, dass das Attune sich im Kopplungsmodus bendet. Ihr Attune wird automatisch nach dem zuletzt
verbundenen Gerät suchen. Verbinden Sie, wie unten gezeigt, ein kompatibles Gerät mit Ihrem Attune. Sobald Ihr Gerät
verbunden ist, werden Sie einen Klingelton hören.
MODE Bluetooth
Not Connected Available Devices
i-box Attune
Bluetooth
Available Devices
Connectedi-box Attune
Bluetooth Bluetooth
Connected
Sie brauchen nicht neu zu koppeln. Das Attune wird sich automatisch mit Ihrem Gerät neu verbinden, wenn sie
gegenseitig in Reichweite und eingeschaltet sind.
Um Ihr Gerät zu trennen, drücken Sie lange auf die ENTER/SCAN-Taste (9). Sobald Ihr Gerät erfolgreich getrennt worden
ist, werden Sie einen Klingelton hören. Ihr Attune kann jetzt mit einem neuen Gerät gekoppelt werden.
9.1 Wiedergabesteuerung
Verwenden Sie Ihr Gerät, um die Wiedergabe zu steuern, oder verwenden Sie die Steuerungen des Attune für die
folgenden Optionen:
• Vorheriger Titel (11)
• ENTER/SCAN Titel abspielen/pausieren (9)
• Nächster Titel (10)
• Verwenden Sie den Lautstärkeregler (7), um die Lautstärke einzustellen. Sie können auch Ihr Gerät verwenden, um die
Lautstärke zu ändern. Um einen optimalen Klang zu erhalten, empfehlen wir, die Lautstärke sowohl an Ihrem Gerät als
auch am Attune einzustellen.
10. AUX-IN-Modus
Verwenden Sie die MODE-Taste (5), um den AUX-IN-Modus zu wählen. Schließen Sie sie ein beliebiges Audiogerät an
die 3,5-mm-AUX IN-Buchse 15 auf der Rückseite Ihres Attune an. Verwenden Sie Ihr Gerät und wählen Sie Audio und
verwenden Sie die Lautstärkeregelung an Ihrem Gerät und am Attune, um einen optimalen Klang zu erhalten.
11. Systemmenü
Die Optionen sind Schlafen (sleep), Uhrzeit (time), Beleuchtung (backlight), Sprache (language), Werkseinstellungen
(factory reset) oder Software-Version.
INFO
MENU
System
< Sleep >
System
< Time >
System
< Backlight >
System
< Language >
System
< Factory Reset >
System
< SW version >
ENTER
SCAN
16 | i-box

12. Einschlaffunktion
Sie können in jedem Audiomodus die Einschlaffunktion verwenden, um die Zeit einzustellen, nach der sich Ihr Attune
automatisch abschaltet. Es stehen folgende Optionen zur Verfügung: Einschlaffunktion aus (Sleep off), 15, 45, 60 oder
90 Minuten. Wenn die Einschlaffunktion aktiviert ist, werden dieses Symbol und die verbleibende Zeit angezeigt.
System
< Sleep >
ENTER
SCAN
Set sleep time
Sleep off
Set sleep time
15 minutes
ENTER
SCAN
Absolute 80s 14
Discover more at
Wenn Sie die Einschlaffunktion deaktivieren möchten, öffnen Sie noch einmal das Menü und wählen Sie
„Einschlaffunktion aus“ (Sleep off).
System
< Sleep >
ENTER
SCAN
Set sleep time
14 minutes
Set sleep time
Sleep off
ENTER
SCAN
Absolute 80s
Discover more at
13. Hintergrundbeleuchtung
13.1 Zeit bis zum Dimmen
Wählen Sie die Zeitdauer aus, nach der das Display gedimmt wird. Es stehen folgende Optionen zur Verfügung: 10, 20,
30, 45, 60, 90, 120, 180 Sekunden oder eingeschaltet (das Display wird nicht gedimmt).
Backlight
< Timeout >
ENTER
SCAN
Timeout
< 60 sec >
* Timeout
< 90 sec >
Timeout
< 120 sec >
ENTER
SCAN
13.2 Helligkeit
Legen Sie die Helligkeit des Displays fest, wenn es aktiviert ist.
Backlight
< On level >
ENTER
SCAN
On level
< Medium >
* On level
< Low >
On level
< High >
ENTER
SCAN
13.3 Dimm Level
Legen Sie die Helligkeit des Displays fest, wenn es gedimmt ist.
Backlight
< Dim level >
ENTER
SCAN
Dim level
< Medium >
* Dim level
< Low >
Dim level
< High >
ENTER
SCAN
14. Uhrzeit- und Datumseinstellungen
Standardmäßig werden Uhrzeit und Datum automatisch aktualisiert. Andere Zeiteinstellungen oder manuelle
Einstellung von Uhrzeit/Datum werden nachstehend beschrieben.
System
< Time >
ENTER
SCAN
Time
< Set Time/Date >
Time
< Auto update >
Time
< Set 12/24 hour >
Time
< Set date format >
ENTER
SCAN
14.1 Manuelle Einstellung von Uhrzeit/Datum
Befolgen Sie die nachstehenden Schritte, um Uhrzeit und Datum manuell einzustellen.
Time
< Set Time/Date >
Set time
10:00
ENTER
SCAN
Set time
10:39
ENTER
SCAN
Set date
6-1-2020
ENTER
SCAN
Set date
6-12-2020
ENTER
SCAN
Set date
6-12-2022
ENTER
SCAN
Time
Saved
ENTER
SCAN
14.2 Automatische Aktualisierung
Standardmäßig aktualisiert der Attune die Uhrzeit/Datum automatisch, wenn er ein DAB- oder UKW-Zeitsignal erhält.
Sie haben die Wahl zwischen den Update-Quellen „Update von Beliebigen“ (Update from Any), „DAB“ oder „UKW“ (FM)
oder der Option „Kein Update“ (No Update). Wir empfehlen Ihnen, für automatische Updates die Option „Update von
Beliebigen“ (Update from Any) zu wählen, denn je nach Region gibt es Unterschiede in der Verfügbarkeit von DAB- und
UKW-Zeitsignalen.
Time
< Auto update >
ENTER
SCAN
Auto update
< Update from Any >
*Auto update
< Update from DAB >
Auto update
< Update from FM >
ENTER
SCAN
14.3 Uhrzeitformat-Einstellung
Wählen Sie, ob die Uhrzeit im 12- oder im 24-Stunden-Format angezeigt werden soll. Die Voreinstellung ist 24 Stunden.
Time
< Set 12/24 hour >
ENTER
SCAN
Set 12/24 hour
< Set 24 hour >
* Set 12/24 hour
< Set 12 hour >
ENTER
SCAN
i-box | 17

14.4 Datumsformat-Einstellung
Wählen Sie zwischen TT-MM-JJJJ (Standard) oder MM-TT-JJJJ.
Time
< Set date format >
ENTER
SCAN
Set date format
< DD-MM-YYYY >
* Set date format
< MM-DD-YYYY >
ENTER
SCAN
15. Zurücksetzen auf Werkseinstellungen
Setzen Sie das Attune auf die Standard-Werkseinstellungen zurück. Sämtliche Einstellungen, die Senderliste und die
gespeicherten Voreinstellungen werden gelöscht
System
< Factory Reset >
ENTER
SCAN
Factory Reset?
<No> Yes
Factory Reset?
No <Yes>
ENTER
SCAN
Restarting...
16. Software-Version
Anzeige der aktuellen Softwareversion.
18 | i-box

Fehlerbehebung
Lösungen
Schlechter
Radioempfang
Überprüfen Sie, ob die
Antenne für maximale
Signalstärke und
besseren Empfang
herausgezogen wurde.
Die Ausrichtung der
Antenne anpassen,
um den Empfang zu
verbessern. Stellen Sie
das Gerät in der Nähe
eines Fensters auf.
Achten Sie darauf, dass
das Gerät nicht zu nahe
an einer Mikrowelle, an
uoreszenten Leuchten
oder anderen Geräten
steht, die Interferenzen
verursachen können.
Kein Ton
Überprüfen Sie, ob die
Lautstärke verringert
wurde. Erhöhen Sie die
Lautstärke.
Prüfen Sie, ob das Gerät
eingeschaltet ist.
Versuchen Sie, einen
anderen Radiosender
zu wählen.
Das Gerät lässt sich
nicht einschalten
Die Batterie ist vollständig
entleert und das Gerät ist
nicht fest mit einem unter
Strom stehenden USB-
Anschluss verbunden.
Schließen Sie das Gerät
an eine unter Strom
stehende USB-Buchse an.
Schließen Sie das Gerät
an eine USB-Buchse
mit einer höheren
Leistung an.
Radio hängt
oder einfriert
Verwenden Sie die Power-Reset-Schalter (16), um das Attune auszuschalten:
1. Stecken Sie einen dünnen Gegenstand, z. B. eine Stecknadel oder eine Büroklammer,
in das Loch der RESET-Schalter (16) auf der Rückseite des Geräts.
2. Kurz drücken Sie die EIN/AUS-Taste (3), um das Attune wieder einzuschalten.
Produktspezifikationen
Spezifikationen
Leistungsaufnahme 5V𝌂1.5A
Audio-Ausgang 3W RMS
UKW-Frequenzbereich 87.0 MHz to 108.0 MHz
DAB/DAB+-Frequenzbereich 174.928MHz (5A) - 239.200MHz (13F)
Wiedergabezeit Bis zu 12 Stunden bei 50% Lautstärke Volumen
Eingebauter aufladbarer Akku Lithium-Ionen-Akku 2200 mAh
Haftungsausschluss
Aktualisierungen der Firmware und/oder Hardwarekomponenten werden regelmäßig durchgeführt. Daher können
einige Anweisungen, Spezikationen und Bilder in dieser Dokumentation geringfügig von Ihrer individuellen
Situation abweichen. Alle in diesem Handbuch beschriebenen Elemente dienen nur Illustrationszwecken und gelten
möglicherweise nicht für Ihre individuelle Situation.
Aus der Beschreibung in diesem Handbuch können keine gesetzlichen Rechte oder Ansprüche abgeleitet werden.
Konformitätserklärung
Philex Electronic Ltd. erklärt hiermit, dass das Funkgerät i-box Attune für den Funkempfang in Wohngebäuden der
Funkgeräterichtlinie 2014/53/EU entspricht. Der vollständige Text der EU-Konformitätserklärung ist unter folgender
Internetadresse abrufbar: www.philex.com/doc
Technischer Support
Weitere Hilfen, Ratschläge, Informationen nden Sie auf www.iboxstyle.com/support
i-box | 19

ES Guía del Usuario
Cuidados del Radio
Información de seguridad importante. Por favor, lea estas instrucciones en su totalidad antes de poner en
funcionamiento su radio.
No coloque fuentes de llamas desnudas, como velas encendidas, sobre la unidad o cerca de ella.
No exponga la unidad a líquidos que goteen o salpiquen. Los objetos que contengan líquido, como vasos, no debe
colocarse sobre la unidad o cerca de ella.
La unidad no debe exponerse a la luz solar directa, temperaturas muy altas o bajas, humedad, campos magnéticos,
microondas o entornos polvorientos.
Deje siempre espacio suciente alrededor de la unidad para su ventilación, no la cubra.
No utilice abrasivos ni disolventes para limpiar este producto. Use únicamente un paño suave, limpio, humedecido.
No intente nunca introducir cables, alleres u otros objetos de este tipo en los oricios de ventilación o en las aberturas
de la unidad, excepto en el oricio para RESET (16), consulte las instrucciones en la página 22 o 28.
No desmonte ni modique la unidad, ya que no hay piezas reparables por el usuario.
Si la unidad se daña en modo alguno o funciona mal, no la utilice. Consulte con un técnico cualicado.
El producto lleva una batería de ion-litio integrada. Un uso inapropiado puede hacer que la batería prenda
fuego o explote, pudiendo causar lesiones graves e incluso la muerte. Cargue siempre la unidad en un
lugar fresco, alejado de la luz solar directa, con una buena circulación de aire en torno al producto. Una
vez que la batería esté totalmente cargada, retírela de la carga. Nunca cargue la batería durante más de
6 horas. Una carga excesiva reducirá la vida útil de la batería y podría causar sobrecalentamiento y un
fallo catastróco.
Contenido Página
Controles y Funciones.................................................................................................................................................................................21
Cargar la Attune ............................................................................................................................................................................................22
Encendido/Apagado de su Attune............................................................................................................................................................22
Navegación por los Menús.........................................................................................................................................................................23
Cambiar el Idioma de Funcionamiento ...................................................................................................................................................23
Audio Selección de Modo...........................................................................................................................................................................23
Modo de Radio DAB .....................................................................................................................................................................................23
Modo de Radio FM .......................................................................................................................................................................................24
Modo Bluetooth.............................................................................................................................................................................................25
Modo de Entrada Auxiliar (AUX IN)...........................................................................................................................................................25
Menú del Sistema.........................................................................................................................................................................................26
Apagado Automático...................................................................................................................................................................................26
Ajustes de la Hora y la Fecha.....................................................................................................................................................................26
Resolución de Problemas...........................................................................................................................................................................28
Especicaciones del Producto..................................................................................................................................................................28
Contenido de la Caja
1x i-box Attune
1x Cable de Carga USB
1x Manual de Usuario
1x Guías de Inicio Rápido
20 | i-box
This manual suits for next models
1
Table of contents
Languages:
Other i-box Radio manuals