i-box Kitchen U10 User manual

EN DAB/DAB+/FM Under Cabinet Kitchen Radio
DE DAB/DAB+/FM Unterbau-Küchenradio
ES Radio de cocina DAB/DAB+/FM para debajo del armario
FR Radio DAB/DAB+/FM de cuisine à suspendre
IT Radio da cucina sottopensile DAB/DAB+/FM
NL DAB/DAB+/FM keukenradio onder bovenkast

02 | Kitchen U10
EN Introduction
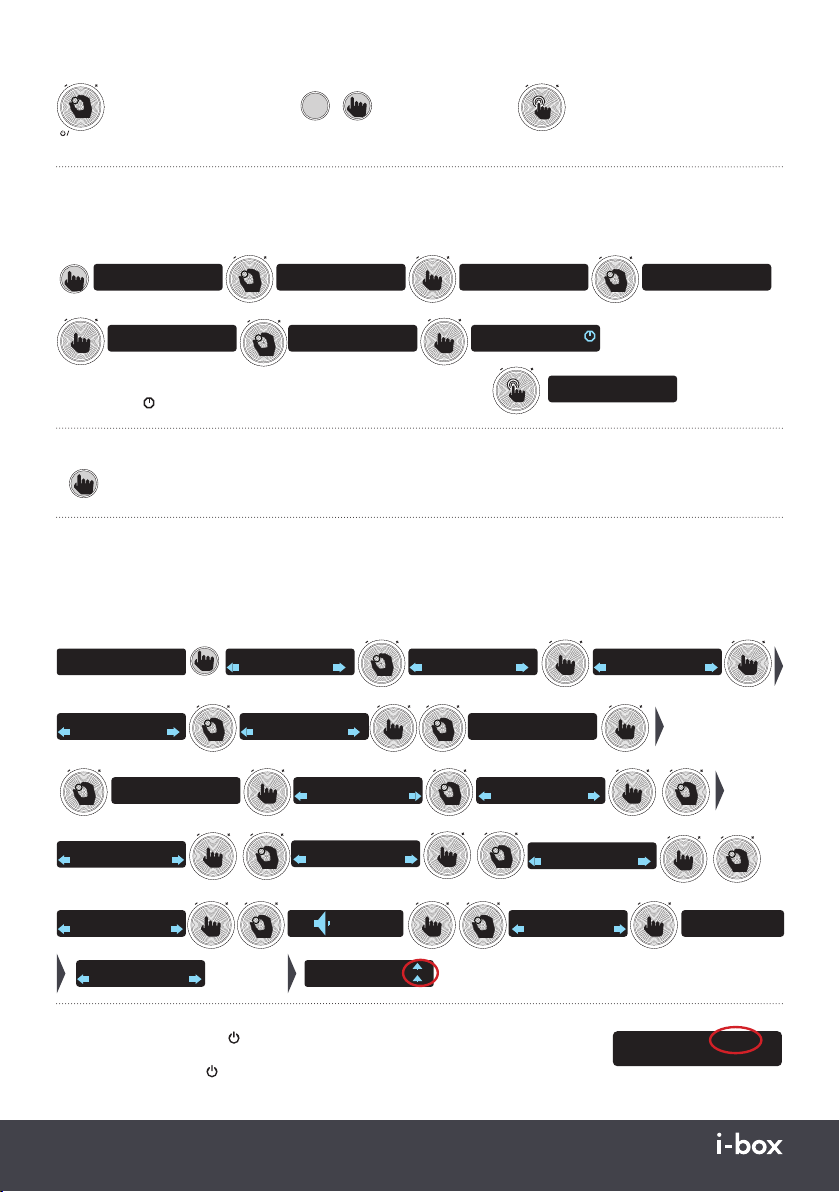
The i-box U10 Kitchen Radio sits neatly underneath your kitchen cabinets or shelving.
With DAB, FM and Bluetooth settings you will have plenty of options to listen to your favourite radio station or playlist.
Kitchens are made for dancing - so pop on some music, enjoy and make cooking dinner more fun.
Features include:
- Built in stereo speakers for a better audio experience
- Easy to use digital tuning
- Dual kitchen timers so you can set different alarms, making cooking easier
DE Einführung
Mit den Einstellungen DAB, FM (UKW) und Bluetooth stehen Ihnen zahlreiche Optionen zur Verfügung, um Ihren
Lieblingsradiosender oder Ihre Lieblings-Playlist zu hören. Küchen sind zum Tanzen da – schalten Sie also Musik ein,
genießen Sie es, das Abendessen zuzubereiten und haben Sie Spaß dabei.
Integrierte Funktionen:
- Eingebaute Stereolautsprecher für ein besseres Klangerlebnis
- Einfach zu bedienende digitale Einstellung
- Duale Küchen-Zeitschaltuhr, damit Sie verschiedene Alarmmeldungen einstellen können, um sich das
Kochen zu erleichtern
ES Introducción
La Radio de cocina i-box U10 se ha diseñado para colocarse bajo un armario de cocina o un estante. Con funciones DAB,
FM y Bluetooth, disfrutará de varias opciones para escuchar su emisora de radio o lista de reproducción favorita. Las
cocinas están hechas para bailar, así que pon música y disfruta, para que hacer la cena resulte más divertido.
Las funciones incluyen:
- Altavoces estéreo integrados para una mejor experiencia sonora
- Sintonización digital fácil de usar
- Temporizadores duales para configurar distintas alarmas y que cocinar sea más sencillo
FR Introduction
La radio de cuisine U10 d’i-box s’installe facilement sous une armoire ou une étagère de votre cuisine. Avec les fonctions
DAB, FM et Bluetooth, vous disposerez de nombreuses options pour écouter votre station de radio ou votre playlist
préférée. Les cuisines sont faites pour danser. Alors, mettez un peu de musique et profitez-en pour vous amuser en
préparent le dîner.
Caractéristiques:
- Enceintes stéréo intégrées pour une meilleure expérience sonore
- Réglage numérique facile à utiliser
- Deux minuteries de cuisine pour régler différentes alarmes et faciliter la cuisine
IT Introduzione
La radio da cucina i-box U10 è facilmente posizionabile sotto i pensili o le mensole della cucina.
Grazie alle
impostazioni DAB, FM e Bluetooth, ci sono diverse opzioni di ascolto per le proprie stazioni radio o playlist preferite. In
cucina è bello ballare: fate partire la musica, divertitevi e preparate la cena col sorriso.
Caratteristiche del prodotto:
- Altoparlanti stereo integrati per una migliore esperienza di ascolto
- Sintonizzazione digitale di semplice utilizzo
- Doppio timer da cucina per impostare diverse sveglie e facilitare la preparazione delle ricette
NL Invoering
De i-box U10 keukenradio zit mooi weggestopt onder een bovenkastje of plank in uw keuken. Met DAB-, FM- en
Bluetooth-instellingen hebt u genoeg opties om naar uw favoriete radiozender of afspeellijst te luisteren. Keukens zijn
gemaakt om in te dansen, dus zet wat muziek op, geniet ervan en maak koken nog leuker.
Functies onder meer:
- Ingebouwde stereoluidsprekers voor een betere audio-ervaring
- Digitaal afstemmen, eenvoudig in gebruik
- Dubbele keuken-timer voor meerdere alarmen, wat het koken gemakkelijker maakt

Kitchen U10 | 03
EN Caring for your Radio
Do not mount over cooking appliances or sinks.
Do not place naked flame sources, such as lighted
candles on or near the U10.
Keep away from dripping or splashed liquids
and steam.
The unit should not be exposed to direct sunlight,
very high or low temperatures, moisture,
strong magnetic fields high frequencies or
dusty environments.
Always leave sufficient space around the unit
for ventilation.
Do not use abrasives, thinner or other solvents to
clean the unit. To clean, wipe with a damp, clean,
soft cloth.
Never attempt to insert wires, pins or other such
objects into the vents or opening of the unit.
Do not disassemble or modify the unit, there are
no user serviceable parts. If the radio is damaged
or malfunctions do not use. Consult a qualified
service engineer.
Do not dispose of this product with household
waste at the end of its life cycle; take it to a
designated collection centre for the recycling of
electrical and electronic appliances with batteries.
Please check with your Local
Authority for recycling advice.
Contents............................................... Page
Safety information........................................................... 3
Controls & features ..........................................................4
Positioning / Mounting................................................... 5
Powering your Radio Alarm Clock.............................. 5
Standby Mode and Mode / Function Select........... 5
DAB Radio Mode .............................................................. 6
Preset Store and Recall.......................................... 6
Scanning for Stations ............................................. 6
FM Radio Mode ................................................................. 7
Bluetooth Connection Mode ...................................7-8
Coundown Timers............................................................8
Setting Alarms...................................................................8
System Menu Functions ................................................ 9
Specifications ..................................................................10
Troubleshooting..............................................................10
Technical Support..........................................................10
Box Contents
1x U10 Radio
1x Antenna
4x 3x15mm Screws
4x 3x45mm Screws 4x 30mm Spacers
1x Mounting Template 1x User Guide

04 | Kitchen U10
Help
Short Press
Long Press
Rotate
AMS MENU/ALARM ENTER/PAIR
FUNCTION MEMORY
TIMER 1/2 INFO LIGHT ON/OFF
SEARCH
PRESET
Kitchen
U10
V
O
L
U
M
E
T
I
M
E
R
17
:
00
1 2 3
4 5 6 7 8
9
ANTENNA
10 11
13 1412 12
Controls & Features
Front View
Back View
Underside
Controls & Features
1. - Volume +/ Power / Function
2. Display
3. - Timer + / Enter / Pair
4. Timer 1/2 / AMS (Autoscan)
5. Info / Menu / Alarm
6. Light On / Off / Memory
7. Preset- / Search-
8. Preset+ / Search+
9. Overhead mounting plate
10. Antenna socket
11. 1.6m AC Power Cord
12. Speakers
13. Fold down stand
14. LED Down light

Kitchen U10 | 05
Selecting Function / Mode
Press the Volume / / Function dial (1)
to select: DAB - FM - Bluetooth. Long
press the dial to return to the standby
time screen.
Powering your Radio
To power the i-box U10 kitchen radio, plug the power plug into a
mains wall socket. The time will appear initially as 00:00, as soon
as you start scanning for DAB stations the correct time will set
automatically.
ANTENNA
FUSED
Positioning and Mounting the U10
The U10 with its downward facing speakers is ideal for mounting underneath a shelf or cabinet using the fixings supplied.
It can also be positioned on a flat stable surface as long as the fold down stand is used.
The radio is fitted with a 1.6m power lead so make sure it is located close enough to a suitable mains socket to plug in
comfortably and for the lead to be run safely.
Under Shelf or Cabinet Mounting
Attach the template supplied to the cabinet or shelf to finalise the mounting position for the radio. Drill 1.5mm diameter
holes as indicated on the template. Slide the mounting plate (9) from the slots in the top of the radio (Fig. A). Mount the
plate with the short screws provided if space is limited (Fig. B) or you can use the longer screws and spacers provided if
the surface is uneven or if you want improved ventillation for the unit. Once the mounting plate is securely fitted, slide
the radio back onto the plate. Please Note: Make sure the radio is positioned so that it will not be affected by heat or
steam from cooking appliances or sinks. Also position away from microwaves, strip lights or other appliances that my
cause interference.
Fig. A Fig. B Fig. C
Table / Counter Top Positioning
You can also position your radio on any flat stable
surface but make sure the the stand (13) on the
bottom of the radio is folded down. So that
the sound from the speakers is not blocked
Fig. D
Getting Started
Before you use your radio for the first
time plug the antenna into the socket
(10) on the back of the aerial and make
sure the antenna wire is
fully unwound.
DAB
FUNCTION
V
O
L
U
M
E
FM Bluetooth
Fig. E
AMS MENU/ALARM
ENTER/PAIR
FUNCTION
MEMORY
TIMER 1/2 INFO LIGHT ON/OFF
SEARCH
PRESET
Kitchen
U10
V
O
L
U
M
E
T
I
M
E
R
17
:
00

06 | Kitchen U10
DAB Radio
Press the Volume / / Function (1) repeatedly until DAB appears. If there is no Station List available (e.g. when switching
on the first time) the radio will autoscan for DAB stations automatically otherwise it will tune to the last station played.
FUNCTION
V
O
L
U
M
E
DAB Scanning 64 Absolute 80s
Playing
Autoscan saves all available stations to a Station List, press Preset/Search- & Preset/Search+ buttons to go to the
previous or next station, press and hold buttons to fast scroll through the list.
- SEARCH
- PRESET
SEARCH +
PRESET +
Absolute 80s
Now Playing
Absolute 90s
Now Playing
Absolute 80s
Now Playing
SEARCH +
PRESET +
Virgin Chilled
Now Playing
Storing Stations to Presets
To store the station playing to a preset, long press the Memory button to access the Preset Store, turn the Timer / Enter
dial to scroll through the 30 available Presets (P1 - P30), long press the Timer / Enter dial to store the station to the
selected preset.
MEMORY
LIGHT ON/OFF
BBC Radio 4
Playing
BBC Radio 4
2: (empty)
ENTER/PAIR
T
I
M
E
R
Preset 4
stored
BBC Radio 4 P4
The Archers
BBC Radio 4
4: (empty)
ENTER/PAIR
T
I
M
E
R
Preset Recall
To recall and play a stored station preset, long press the Memory button to access the Preset Store, turn the Timer /
Enter dial to scroll through the 30 available Presets, short press the Timer / Enter dial to play the selected station preset.
MEMORY
LIGHT ON/OFF
BBC Radio 4
4: BBC Radio 4
ENTER/PAIR
T
I
M
E
R
Radio X P10
Now playing on Rad
ENTER/PAIR
T
I
M
E
R
BBC Radio 4 P4
The Archers
BBC Radio 4 P4
10: Radio X
Scanning for DAB Stations - Full Scan / Automatic Scan
New stations are frequently being launched and frequencies sometimes change, so it‘s a good idea to rescan from time
to time to make sure you don’t miss out on the latest additions. Also it‘s a good idea to rescan if you have relocated
your radio.
AMS
Timer 1/2
or Scanning 64
MENU/ALARM
INFO
DAB
Station scan
ENTER/PAIR
T
I
M
E
R
Scanning 64
DAB
Full scan
ENTER/PAIR
T
I
M
E
R
Manual Scan
If the Full scan doesn’t find a station and you know the frequency you can tune to it manually and save it.
ENTER/PAIR
T
I
M
E
R
MENU/ALARM
INFO
DAB
Station scan
ENTER/PAIR
T
I
M
E
R
DAB
Full scan
DAB
Manual scan
ENTER/PAIR
T
I
M
E
R
Manual tune
5A
174.928MHz
ENTER/PAIR
T
I
M
E
R
Manual tune
12B
225.648MHz
648MHz BBC Nation
ENTER/PAIR
T
I
M
E
R
ENTER/PAIR
T
I
M
E
R
BBC Radio 1 P1
Radio 1s Party Anth
DAB Info
Short press the Info / Menu button to display: Programme or Track Information / Programme Type / Multiplex / Time
and Date / Frequency / Audio signal format / Signal strength / Signal error.

Kitchen U10 | 07
Storing / Changing Station Presets
To store the station playing to a preset or move it, long press the Memory button to access the Preset Store, turn the
Timer / Enter dial to scroll through the 30 available Presets (P1 - P30), long press the Timer / Enter dial to store the
station to the selected preset.
MEMORY
LIGHT ON/OFF
Bedford St
1: 87.80MHz
ENTER/PAIR
T
I
M
E
R
Bedford St P1
Local radio Bedford St P4
25: (empty)
Bedford St P25
Local radio
ENTER/PAIR
T
I
M
E
R
FM Audio setting
Long press the Menu button and use the Timer / Enter dial to select Stereo allowed or Forced mono option
Please Note: If you have a weak signal “Forced mono” may give a clearer, better balanced sound.
ENTER/PAIR
T
I
M
E
R
MENU/ALARM
INFO
FM
Audio setting
ENTER/PAIR
T
I
M
E
R
FM
Stereo allowed
FM
Forced mono
ENTER/PAIR
T
I
M
E
R
FM
Audio setting
MENU/ALARM
INFO
BBC Radio 2 P2
playing: Pump up th
Preset Recall
To find and play stored stations found in the initial autoscan, long press the Memory button to access the Preset Store,
turn the Timer / Enter dial to scroll through the 30 available Presets, short press the Timer / Enter dial to play the
selected station preset.
MEMORY
LIGHT ON/OFF
Bedford St
1: 87.80MHz
ENTER/PAIR
T
I
M
E
R
ENTER/PAIR
T
I
M
E
R
Bedford St P1
Local radio Bedford St P4
8: 93.00MHz
BBC Radio 4 St P8
Womans hour:
FM Radio
Press the Volume / / Function (1) repeatedly until FM appears. When switching on the first time the radio will autoscan
for FM stations automatically otherwise it will tune to the last station played. After the autoscan the first 30 stations wil
be saved to preset positions P1 - P30. Press Preset/Search- & Preset/Search+ buttons to go to the previous or
next station.
FUNCTION
V
O
L
U
M
E
FM Scanning 64 Bedford St P1
Local radio
BBC Radio 2 St P2
playing: Pump up th
- SEARCH
- PRESET
SEARCH +
PRESET +
/
Pairing with Bluetooth Enabled Devices
To connect a compatible Bluetooth device, follow the steps below. Look for “Kitchen U10” in your Bluetooth menu.
Bluetooth SCAN
On
Bluetooth devices have been found
AVAILABLE DEVICES
Kitchen U10
Bluetooth SCAN
On
1 Bluetooth device is connected
PAIRED DEVICES
Kitchen U10
Connected
Bluetooth SCAN
On
Bluetooth devices have been found
AVAILABLE DEVICES
Kitchen U10
FUNCTION
V
O
L
U
M
E
Bluetooth Bluetooth
Pairing
Bluetooth
Connected
Additional Dab Functions - Prune
The Prune function will delete stations that can no longer be received from the station list. This can be useful when you
relocate the radio or a station has gone off air. With DAB selected go to the System menu and set Prune to <Yes>
MENU/ALARM
INFO
DAB
Station scan
DAB
System
ENTER/PAIR
T
I
M
E
R
ENTER/PAIR
T
I
M
E
R
DAB
Time setup
ENTER/PAIR
T
I
M
E
R
DAB
Prune
ENTER/PAIR
T
I
M
E
R
ENTER/PAIR
T
I
M
E
R
Prune?
<No> Yes
Prune?
No <Yes>
ENTER/PAIR
T
I
M
E
R

08 | Kitchen U10
Adjust the volume on the
U10 and Bluetooth device
FUNCTION
V
O
L
U
M
E
Use the controls of your Bluetooth device for all other actions.
For previous and
next tracks
- SEARCH
- PRESET
SEARCH +
PRESET +
/To disconnect the connected
Bluetooth device
ENTER/PAIR
T
I
M
E
R
LED Light ON/OFF
Press the Light On/Off button to switch on the LED light on the underside of the radio.
Press again to switch off.
N.B. Note: If left on the light switches off automatically after 120 minutes.
MEMORY
LIGHT ON/OFF
To Stop or Snooze the Alarm Call Sound
To STOP press the Volume / / Function (1) button. Press the TIMER / ENTER button
once to Snooze/delay the alarm for 5 minutes, 2x for 10mins, 3x for 15 mins, 4x for
30 mins. Press Volume / / Function to cancel Snooze. Remaining Snooze period is
displayed top right.
SNOOZE : 04:50
07 : 30 01 -08 -2022
Setting the Dual Alarms
You can set two independent alarms. Make sure the time is set first, this should happen automatically when you first
receive a DAB signal (see system menu settings). The Alarms can be set using the Info / Menu / Alarm and TIMER /
ENTER buttons in Clock (Standby) mode or in the System Menu if you are listening to the radio or Bluetooth.
Select Alarm 1 or 2 > Set Alarm On or Off > Set Alarm time, Hours then Minutes > Set Days: Daily/Once/Weekdays/
Weekends > Set Mode: choose DAB radio, FM radio or Buzzer for your Alarm call > set Alarm Volume (1-16) > Save Alarm.
MENU/ALARM
INFO
18
:
20
CLOCK MODE
Mode: DAB
Alarm1 ;Off
ENTER/PAIR
T
I
M
E
R
Mode: DAB
Alarm2 ;Off
Select Alarm 1 or 2
ENTER/PAIR
T
I
M
E
R
Alarm detail
Off
ENTER/PAIR
T
I
M
E
R
Alarm detail
On
Select ON/OFF
ENTER/PAIR
T
I
M
E
R
Alarm detail
Time :00:00
Set alarm time
07:00
ENTER/PAIR
T
I
M
E
R
ENTER/PAIR
T
I
M
E
R
Mode
Buzzer
Set Minutes
Set Hours
ENTER/PAIR
T
I
M
E
R
ENTER/PAIR
T
I
M
E
R
ENTER/PAIR
T
I
M
E
R
Select: Daily>Once>
Weekdays>Weekends
Days :
Weekdays
Alarm detail
Mode : DAB
Select: DAB>FM>Buzzer
ENTER/PAIR
T
I
M
E
R
ENTER/PAIR
T
I
M
E
R
ENTER/PAIR
T
I
M
E
R
ENTER/PAIR
T
I
M
E
R
ENTER/PAIR
T
I
M
E
R
Set alarm time
07:30
ENTER/PAIR
T
I
M
E
R
Alarm detail
Days : Daily
ENTER/PAIR
T
I
M
E
R
ENTER/PAIR
T
I
M
E
R
ENTER/PAIR
T
I
M
E
R
Alarm detail
Time : 07: 30
Alarm detail
Volume
Alarm detail
Save
ENTER/PAIR
T
I
M
E
R
08
ENTER/PAIR
T
I
M
E
R
ENTER/PAIR
T
I
M
E
R
ENTER/PAIR
T
I
M
E
R
ENTER/PAIR
T
I
M
E
R
Alarm
Saved
Mode: DAB
Alarm1 : 07: 30 18
:
20 1
2
Indicators show Alarms Set and On
Bluetooth Playback
Countdown Timers
Two coutdown timers are available to help you in the kitchen. You can use these as reminders of when to start or stop
cooking or when to start preparation. TIMER 1 (00:00minutes -3:59hours), TIMER 2 (00:05minutes -3:55hours).
Press the Timer1/2/AMS button to select timer 1 or timer 2, turn the TIMER / ENTER button to set the countdown time.
To cancel/stop a timer press and hold down the TIMER / ENTER button
until the clock disappears and the Time is reset to 00:00
ENTER/PAIR
T
I
M
E
R
Timer 2
00:00
AMS
Timer 1/2
ENTER/PAIR
T
I
M
E
R
Timer 1
00:00
Timer 2
00:00
ENTER/PAIR
T
I
M
E
R
Set Minute
00:00
ENTER/PAIR
T
I
M
E
R
Set Minute
00:25
ENTER/PAIR
T
I
M
E
R
Set Hour
00:25
ENTER/PAIR
T
I
M
E
R
Set Hour
02:25
ENTER/PAIR
T
I
M
E
R
Timer 2
02 : 24 : 58
Countdown starts
immediately

Kitchen U10 | 09
MENU/ALARM
INFO
ENTER/PAIR
T
I
M
E
R
DAB
System
FM
System
DAB
Station scan
FM
Audio setting
ENTER/PAIR
T
I
M
E
R
MENU/ALARM
INFO
System
Time setup
ENTER/PAIR
T
I
M
E
R
Press the Timer / Enter dial
to enter submenus.
Press to confim a selection
ENTER/PAIR
T
I
M
E
R
Rotate the Timer / Enter dial
to select an option
Rotate to select numbers
System
DT
DT *
ON
DT
OFF
System
Alarms
Mode: DAB
Alarm1 ;Off Go to page 8
5. Backlight - Adjusts Display Brightness
6. Factory Reset - Deletes all settings made
7. SW version - Displays the version of software loaded
System
Factory reset
Factory reset ?
<No> Yes
Factory reset ?
No <Yes>
8. Buzzer Volume - Volume of the timer countdown buzzer
System
SW version
SW version
DAB-DE11-Ver03
04
System
Buzzer Volume
System
Backlight Backlight *
Low
Backlight
High
System
Time setup
Time setup
Set clock
Set clock
23:20
Time setup
Set date
Set date
01- 08-2022
Time setup
Auto update
Auto update *
From radio
Auto update
No update
Time setup
Set 12/24 hour Set 12/24 hour *
Set 24 hour
Set 12/24 hour
Set 12 hour
Set sleep time
Sleep 15
Set sleep time
Sleep 30
Set sleep time
Sleep 45
System
Sleep
Set sleep time
Sleep 60
Set sleep time
Sleep off
Set sleep time
Sleep 90
System Menu Options
To access the System Menu in DAB & FM mode:
1. Time Setup
2. DT - Auto Dims Display at Night - 23:00 - 05:00
3. Alarms set - See page 8
4. Sleep Function - allows you to set a time period after which your
U10 will enter standby automatically
Function appears in DAB, FM and Bluetooth System menus.
In Clock and Bluetooth mode:

10 | Kitchen U10
Specifications
Power Rating 230V~50Hz, 7W
Speakers 2x 2.25” (57mm)
FM Frequency 87.5-108 MHz
DAB Frequency 174.928 -239.200 MHz
Bluetooth Version V5.0
Bluetooth Profile A2DP, AVRCP
Bluetooth Range 10m
Dimension (W x D x H) 260 x 165 x 52mm
Weight 0.848 kg
Troubleshooting
Problem Solutions
Radio reception is
poor
Check that the antenna is extended for the maximum signal strength and improved reception.
Adjust the antenna direction to improve the signal.
Check that the radio is not close to microwaves, fluorescent lights or other equipment which
may cause interference.
No sound Check if the volume is turned down. Increase the volume.
Try tuning to another radio station.
Try an autoscan.
The radio does not
turn on Check that the mains plug is plugged in correctly.
Check the mains socket is powered.
No Bluetooth
connection
The Bluetooth® function may be deactivated on the compatible device.
Activate this, if necessary.
Check whether the device to be connected is switched on and is in search mode.
The radio may already be connected to another bluetooth device - if it is disconnect.
Waste electrical and electronic products should not be disposed of with household waste. Please
recycle where facilities exist. Check with your Local Authority for recycling advice.
Disclaimer
Updates to Firmware and/or hardware components are made regularly. Therefore some of the instructions,
specifications and pictures in this documentation may differ slightly from your particular situation. All items described in
this guide are for illustration purposes only and may not apply to your particular situation. No legal right or entitlements
may be obtained from the description made in this manual.
Declaration of conformity
Hereby, Philex Electronic Ltd. declares that the radio equipment: model i-box U10 Kitchen Radio with Bluetooth
function, for wireless reception in domestic premises is in compliance with the Radio Equipment Directive 2014/53/EU.
The full text of the EU declaration of conformity is available at the following internet address:
www.philex.com/doc
Technical support
For further help, advice, information or live chat visit www.iboxstyle.com

Kitchen U10 | 11
Bringen Sie das Gerät nicht über Kochgeräten oder
Spülbecken an. Stellen Sie keine offenen Flammen wie
brennende Kerzen auf oder in die Nähe des Kristalls.
Von tropfenden oder spritzenden Flüssigkeiten
fernhalten.
Das Gerät sollte keiner direkten Sonneneinstrahlung,
sehr hohen oder niedrigen Temperaturen, Feuchtigkeit,
starken Magnetfeldern, hohen Frequenzen und staubigen
Umgebungen ausgesetzt werden.
Lassen Sie immer ausreichend Platz um das Gerät herum
für die Belüftung.
Verwenden Sie keine Scheuermittel, Verdünner oder
andere Lösungsmittel, um das Gerät zu reinigen.
Zum Reinigen mit einem sauberen, weichen
Tuch abwischen.
Versuchen Sie niemals, Drähte, Stifte oder ähnliche
Gegenstände in die Lüftungsschlitze oder Öffnungen des
Geräts einzuführen.
Zerlegen oder modifizieren Sie das Gerät nicht, es gibt
keine vom Benutzer zu wartenden Teile.
Wenn das Radio beschädigt ist oder Fehlfunktionen
aufweist, verwenden Sie es nicht. Wenden Sie sich an
einen qualifizierten Servicetechniker.
Entsorgen Sie dieses Produkt am Ende seines
Lebenszyklus nicht mit dem Hausmüll; Bringen Sie es zu
einer ausgewiesenen Sammelstelle für das Recycling von
Elektro- und Elektronikgeräten mit Batterien.
Bitte erkundigen Sie sich bei Ihrer örtlichen
Behörde nach Ratschlägen zum Recycling.
DE Pflege Ihres Radios
Inhalt....................................................................Seite
Sicherheitsinformationen .............................................11
Bedienelemente und Funktionen .............................12
Positionierung und Montage......................................13
Stromversorgung für Ihren Radiowecker................13
Standby-Modus und Moduswahl..............................13
DAB-Radiomodus.......................................................... 14
Speichern und Abrufen von Voreinstellungen
..... 14
Suchlauf nach Sendern
.............................................
14
FM-Radio-Modus............................................................15
Bluetooth-Verbindungsmodus ............................15-16
Countdown-Timer ..........................................................16
Alarme einstellen ............................................................16
Optionen im Systemmenü..........................................17
Technische Daten .......................................................... 18
Fehlerbehebung.............................................................. 18
Technischer Support..................................................... 18
Lieferumfang
1x U10 Radio
1x Einsteckbare Wurfantenne
4x 3x15mm Schrauben
4x 3x45mm Schrauben 4x 30mm Abstandshalter
1x Montageschablone 1x Benutzerhandbuch

12 | Kitchen U10
Hilfe
Kurz
drücken
Lange
drücken
Drehen
Bedienelemente und Funktionen
AMS MENU/ALARM ENTER/PAIR
FUNCTION MEMORY
TIMER 1/2 INFO LIGHT ON/OFF
SEARCH
PRESET
Kitchen
U10
V
O
L
U
M
E
T
I
M
E
R
17
:
00
1 2 3
4 5 6 7 8
Vorderseite
9
ANTENNA
10 11
Rückseite
13 1412 12
Unterseite
Bedienelemente und Funktionen
1. - Volume (Lautstärke) +/ Power
(Netzschalter) / Funktion
2. Display
3. - Timer + / Enter / Pair (Koppeln)
4. Timer 1/2 / AMS
(Automatischer Suchlauf)
5. Info / Menü /Alarm
6. Licht an / aus / Memory (Speicher)
7. Preset- (Voreinstellung abwärts) /
Search- (Suche abwärts)
8. Preset- (Voreinstellung aufwärts) /
Search- (Suche aufwärts)
9. Montageplatte oben
10. Antennenbuchse
11. 1,6 m AC-Netzkabel
12. Lautsprecher
13. Einklappbarer Standfuß
14. LED-Unterlicht

Kitchen U10 | 13
Funktion / Modus auswählen
Drücken Sie das Einstellrad Volume
(Lautstärke) / / Funktion (1), um
Folgendes auszuwählen: DAB - FM
(UKW) - Bluetooth. Drücken Sie lange
auf das Einstellrad, um zum Bildschirm
Standby Zeit zurückzukehren.
Stromversorgung Ihres Radios
Um das i-box U10 Küchenradio mit Strom zu versorgen, stecken Sie
den Netzstecker in eine Steckdose. Beim erstmaligen Einschalten wird
als Uhrzeit 00:00 angezeigt, sobald Sie aber mit der Suche nach DAB-
Sendern beginnen, wird die richtige Uhrzeit automatisch eingestellt.
Positionierung und Montage des U10
Mit seinen nach unten gerichteten Lautsprechern und dem mitgelieferten Befestigungsmaterial eignet sich das U10 ideal
für die Montage unter einem Regal oder Schrank. Es kann auch auf eine ebene, stabile Fläche gestellt werden, sofern der
herunterklappbare Ständer verwendet wird.Das Radio ist mit einem 1,6 m langen Stromkabel ausgestattet, achten Sie also
darauf, dass es sich nahe genug bei einer geeigneten Steckdose befindet, damit Sie es bequem anschließen und das Kabel sicher
verlegen können.
Montage unter dem Regal oder Schrank
Attach the template supplied to the cabinet or shelf to finalise the mounting position for the radio. Drill 1.5mm diameter Bringen
Sie die mitgelieferte Schablone am Schrank oder Regal an, um die Stelle für die Radiomontage festzulegen. Bohren Sie Löcher
mit einem Durchmesser von 1,5 mm, wie es auf der Schablone angegeben ist. Schieben Sie die Montageplatte (9) aus den
Schlitzen an der Oberseite des Radios (Abb. A). Wenn der Platz begrenzt ist, montieren Sie die Platte mit den mitgelieferten
kurzen Schrauben (Abb. B). Sollte die Oberfläche uneben sein oder Sie eine bessere Belüftung des Geräts möchten, verwenden
Sie die mitgelieferten längeren Schrauben. Sobald die Montageplatte sicher befestigt ist, schieben Sie das Radio wieder auf die
Platte. Bitte beachten Sie: Achten Sie darauf, dass sich das Radio an einer Stelle befindet, an der es nicht durch Hitze oder Dampf
von Kochgeräten oder Spülbecken beeinträchtigt ist. Es sollte sich auch weit genug entfernt von Mikrowellengeräten, Neonröhren
oder anderen Geräten befinden, die Störungen verursachen können.
Fig. A Fig. B Fig. C
Tisch-/Arbeitsplattenpositionierung
Sie können Ihr Radio auch auf jede flache, stabile
Oberfläche stellen, aber achten Sie darauf, dass
der Ständer (13) an der Unterseite des Radios
heruntergeklappt ist. Der sorgt dafür, dass der Ton
aus den Lautsprechern nicht blockiert wird.
Fig. D
Erste Schritte
Bevor Sie Ihr Radio zum ersten Mal
benutzen, stecken Sie die Antenne in
die Buchse (10) auf der Rückseite des
Geräts und achten Sie darauf, dass das
Antennenkabel vollständig abgewickelt ist.
DAB
FUNCTION
V
O
L
U
M
E
FM Bluetooth
ANTENNA
Fig. E
AMS MENU/ALARM
ENTER/PAIR
FUNCTION
MEMORY
TIMER 1/2 INFO LIGHT ON/OFF
SEARCH
PRESET
Kitchen
U10
V
O
L
U
M
E
T
I
M
E
R
17
:
00

14 | Kitchen U10
DAB-Info
Drücken Sie kurz auf die Taste Info/Menü, wodurch Folgendes angezeigt wird: Programm- oder Titelinformationen /
Programmtyp / Multiplex / Uhrzeit und Datum / Frequenz / Audiosignalformat / Signalstärke / Signalfehler.
DAB-Radio
Drücken Sie wiederholt auf Volume (Lautstärke) / / Funktion (1) bis DAB erscheint. Wenn keine Senderliste erscheint (wie etwa
beim erstmaligen Einschalten), sucht das Radio automatisch nach DAB-Sendern, andernfalls schaltet es den zuletzt gespielten
Sender ein.
FUNCTION
V
O
L
U
M
E
DAB Scanning 64 Absolute 80s
Playing
Mit Autoscan (automatischer Suchlauf) werden alle verfügbaren Sender in einer Senderliste gespeichert. Um zum vorherigen
oder nächsten Sender zu wechseln, drücken Sie die Tasten Preset/Search- (Voreinstellung/Suche abwärts) bzw. Preset/Search+
(Voreinstellung/Suche aufwärts). Um schnell durch die Liste zu scrollen, drücken und halten Sie die jeweilige Taste gedrückt.
- SEARCH
- PRESET
SEARCH +
PRESET +
Absolute 80s
Now Playing
Absolute 90s
Now Playing
Absolute 80s
Now Playing
SEARCH +
PRESET +
Virgin Chilled
Now Playing
Sender in Presets (Voreinstellungen) speichern
Um den wiedergegebenen Sender in auf einem Speicherplatz zu speichern, drücken Sie lange die Memory-Taste, um auf den
Speicherplatz zuzugreifen. Drehen Sie das Timer/Enter-Einstellrad, um durch die 30 verfügbaren Speicherplätze (P1 - P30) zu
scrollen. Drücken Sie lange auf das Timer/Enter-Einstellrad, um den Sender auf dem gewählten Speicherplatz zu speichern.
MEMORY
LIGHT ON/OFF
BBC Radio 4
Playing
BBC Radio 4
2: (empty)
ENTER/PAIR
T
I
M
E
R
Preset 4
stored
BBC Radio 4 P4
The Archers
BBC Radio 4
4: (empty)
ENTER/PAIR
T
I
M
E
R
Preset (Voreinstellung) aufrufen
Um einen in der Voreinstellung gespeicherten Sender aufzurufen und abzuspielen, drücken Sie lange auf die Memory-Taste,
um auf den Speicherplatz zuzugreifen. Drehen Sie das Timer/Enter-Einstellrad, um durch die 30 verfügbaren Speicherplätze zu
scrollen. Drücken Sie kurz auf das Timer/Enter-Einstellrad, um den ausgewählten voreingestellten Sender abzuspielen.
MEMORY
LIGHT ON/OFF
BBC Radio 4
4: BBC Radio 4
ENTER/PAIR
T
I
M
E
R
Radio X P10
Now playing on Rad
ENTER/PAIR
T
I
M
E
R
BBC Radio 4 P4
The Archers
BBC Radio 4 P4
10: Radio X
Suchlauf nach DAB-Sendern - Vollständiger Suchlauf / Automatischer Suchlauf
Da oft neue Sender erscheinen und sich manchmal die Frequenzen ändern, sollten Sie von Zeit zu Zeit einen neuen Suchlauf
durchführen, damit Sie immer alle Sender empfangen. Abgesehen davon ist es ratsam, einen neuen Suchlauf durchzuführen,
wenn Sie Ihr Radio an einen anderen Ort bringen.
AMS
Timer 1/2
or Scanning 64
MENU/ALARM
INFO
DAB
Station scan
ENTER/PAIR
T
I
M
E
R
Scanning 64
DAB
Full scan
ENTER/PAIR
T
I
M
E
R
Manuelles Suchen
Wenn der vollständige Suchlauf keinen Sender findet und Sie die Frequenz kennen, können Sie den Sender manuell einstellen
und speichern.
ENTER/PAIR
T
I
M
E
R
MENU/ALARM
INFO
DAB
Station scan
ENTER/PAIR
T
I
M
E
R
DAB
Full scan
DAB
Manual scan
ENTER/PAIR
T
I
M
E
R
Manual tune
5A
174.928MHz
ENTER/PAIR
T
I
M
E
R
Manual tune
12B
225.648MHz
648MHz BBC Nation
ENTER/PAIR
T
I
M
E
R
ENTER/PAIR
T
I
M
E
R
BBC Radio 1 P1
Radio 1s Party Anth

Kitchen U10 | 15
Zusätzliche DAB-Funktionen – Prune
Mit der Prune-Funktion löschen Sie alle Sender, die nicht mehr empfangen werden können. Dies kann nützlich sein, wenn Sie
das Radio an einen anderen Ort bringen oder ein Sender nicht mehr ausgestrahlt wird. Wenn DAB ausgewählt ist, gehen Sie zum
System-Menü und stellen Sie Prune auf <Yes>.
Mit kompatiblen Bluetooth-Geräten koppeln
Zum Koppeln eines kompatiblen Bluetooth-Geräts befolgen Sie bitte die folgenden
Schritte. Suchen Sie in Ihrem Bluetooth-Menü nach „Kitchen U10“.
Vorangestellte Sender speichern/ändern
Um den wiedergegebenen Sender in den Voreinstellungen auf einem Speicherplatz zu speichern oder zu verschieben, drücken
Sie lange die Memory-Taste, wodurch Sie auf den Speicherplatz zugreifen. Drehen Sie das Timer/Enter-Einstellrad, um durch
die 30 verfügbaren Speicherplätze (P1 - P30) zu scrollen. Drücken Sie lange auf das Timer/Enter-Einstellrad, um den Sender auf
dem gewählten Speicherplatz zu speichern.
MEMORY
LIGHT ON/OFF
Bedford St
1: 87.80MHz
ENTER/PAIR
T
I
M
E
R
Bedford St P1
Local radio Bedford St P4
25: (empty)
Bedford St P25
Local radio
ENTER/PAIR
T
I
M
E
R
FM-Audio- (UKW-)Einstellungen
Drücken Sie lange auf die Menütaste und wählen Sie mit dem Einstellrad Timer/Enter die Option „Stereo allowed“ (Stereo
zugelassen) oder „Forced mono“ (Mono erzwungen). Bitte beachten Sie: Bei einem schwachen Rundfunksignal, kann „Forced
Mono“ einen klareren, ausgewogeneren Klang bieten.
ENTER/PAIR
T
I
M
E
R
MENU/ALARM
INFO
FM
Audio setting
ENTER/PAIR
T
I
M
E
R
FM
Stereo allowed
FM
Forced mono
ENTER/PAIR
T
I
M
E
R
FM
Audio setting
MENU/ALARM
INFO
BBC Radio 2 P2
playing: Pump up th
Preset (Voreinstellung) aufrufen
Um die beim ersten automatischen Suchlauf gespeicherten Sender zu finden und abzuspielen, drücken Sie lange auf die Memory-
Taste, wodurch Sie auf den Speicherplatz zugreifen. Drehen Sie das Timer/Enter-Einstellrad, um durch die 30 Speicherplätze zu
scrollen. Drücken Sie kurz auf das Timer/Enter-Einstellrad, um die ausgewählten gespeicherten Sender abzuspielen.
MEMORY
LIGHT ON/OFF
Bedford St
1: 87.80MHz
ENTER/PAIR
T
I
M
E
R
ENTER/PAIR
T
I
M
E
R
Bedford St P1
Local radio Bedford St P4
8: 93.00MHz
BBC Radio 4 St P8
Womans hour:
FM (UKW) Radio
Drücken Sie wiederholt auf Volume / / Funktion (1) bis FM erscheint. Beim ersten Einschalten sucht das Radio automatisch nach
UKW-Sendern, andernfalls schaltet es auf den zuletzt gespielten Sender. Nach dem automatischen Suchlauf werden die ersten
30 Sender auf den Speicherplätzen P1 - P30 gespeichert. Drücken Sie die Tasten Preset/Search- und Preset/Search+, um zum
vorherigen (-) bzw. zum nächsten Sender (+) zu wechseln.
FUNCTION
V
O
L
U
M
E
FM Scanning 64 Bedford St P1
Local radio
BBC Radio 2 St P2
playing: Pump up th
- SEARCH
- PRESET
SEARCH +
PRESET +
/
Bluetooth SCAN
On
Bluetooth devices have been found
AVAILABLE DEVICES
Kitchen U10
Bluetooth SCAN
On
1 Bluetooth device is connected
PAIRED DEVICES
Kitchen U10
Connected
Bluetooth SCAN
On
Bluetooth devices have been found
AVAILABLE DEVICES
Kitchen U10
FUNCTION
V
O
L
U
M
E
Bluetooth
Bluetooth
Pairing
Bluetooth
Connected
MENU/ALARM
INFO
DAB
Station scan
DAB
System
ENTER/PAIR
T
I
M
E
R
ENTER/PAIR
T
I
M
E
R
DAB
Time setup
ENTER/PAIR
T
I
M
E
R
DAB
Prune
ENTER/PAIR
T
I
M
E
R
ENTER/PAIR
T
I
M
E
R
Prune?
<No> Yes
Prune?
No <Yes>
ENTER/PAIR
T
I
M
E
R

16 | Kitchen U10
Die Lautstärke auf dem
U10 und dem Bluetooth-
Gerät anpassen
FUNCTION
V
O
L
U
M
E
Verwenden Sie für alle anderen Aktionen die Bedienelemente Ihres Bluetooth-Geräts.
Zu den vorherigen
und nächsten
Titeln
- SEARCH
- PRESET
SEARCH +
PRESET +
/Das verbundene
Bluetooth-Gerät trennen
ENTER/PAIR
T
I
M
E
R
LED-Licht ein/aus
Drücken Sie die Taste Light On/Off, um das LED-Licht an der Unterseite des Radios einzuschalten.
Drücken Sie erneut, um es auszuschalten.
P.S. Anmerkung: Wenn das Licht eingeschaltet bleibt, schaltet es sich nach 120 Minuten automatisch aus.MEMORY
LIGHT ON/OFF
Einstellung der beiden Alarme
Sie können zwei unabhängige Alarme einstellen. Achten Sie zuerst darauf, dass die Uhrzeit eingestellt ist, was automatisch
geschehen sein sollte, als Sie das erste Mal ein DAB-Signal empfangen haben (siehe Einstellungen im Systemmenü). Die Alarme
können im Modus Clock (Uhrzeit) (Standby-Modus) mit den Tasten Info/Menü/Alarm und TIMER/ENTER oder wenn Sie Radio
oder Bluetooth hören, im Systemmenü eingestellt werden.
Wählen Sie Alarm 1 oder 2 > Set Alarm On oder Off (Alarm ein- oder ausschalten) > Set Alarm time (Alarmzeit einstellen), Hours
(Stunden), dann Minutes (Minuten) > Set Days (Minuten > Tage einstellen): Daily/Once/Weekdays/Weekends (Täglich/Einmal/
Werktags/Wochenenden).
> Einstellmodus: Wählen Sie DAB-Radio, FM-Radio oder Buzzer (Wecker) für Ihren Weckruf > Alarm Volume (1-16) (Alarm-
Lautstärke 1-16 einstellen) > Save Alarm (Alarm speichern).
MENU/ALARM
INFO
18
:
20
UHRMODUS
Mode: DAB
Alarm1 ;Off
ENTER/PAIR
T
I
M
E
R
Mode: DAB
Alarm2 ;Off
Wählen Sie Alarm 1 oder 2
ENTER/PAIR
T
I
M
E
R
Alarm detail
Off
ENTER/PAIR
T
I
M
E
R
Alarm detail
On
Wählen Sie On/Off (Ein/Aus)
ENTER/PAIR
T
I
M
E
R
Alarm detail
Time :00:00
Set alarm time
07:00
ENTER/PAIR
T
I
M
E
R
ENTER/PAIR
T
I
M
E
R
Mode
Buzzer
Minuten einstellen
Stunden einstellen
ENTER/PAIR
T
I
M
E
R
ENTER/PAIR
T
I
M
E
R
ENTER/PAIR
T
I
M
E
R
Auswählen: Daily>Once>Weekdays>
Weekends (Täglich>Einmal>
Wochentage>Wochenenden)
Days :
Weekdays
Alarm detail
Mode : DAB
Auswählen: DAB>FM>
Buzzer (Wecker)
ENTER/PAIR
T
I
M
E
R
ENTER/PAIR
T
I
M
E
R
ENTER/PAIR
T
I
M
E
R
ENTER/PAIR
T
I
M
E
R
ENTER/PAIR
T
I
M
E
R
Set alarm time
07:30
ENTER/PAIR
T
I
M
E
R
Alarm detail
Days : Daily
ENTER/PAIR
T
I
M
E
R
ENTER/PAIR
T
I
M
E
R
ENTER/PAIR
T
I
M
E
R
Alarm detail
Time : 07: 30
Alarm detail
Volume
Alarm detail
Save
ENTER/PAIR
T
I
M
E
R
08
ENTER/PAIR
T
I
M
E
R
ENTER/PAIR
T
I
M
E
R
ENTER/PAIR
T
I
M
E
R
ENTER/PAIR
T
I
M
E
R
Alarm
Saved
Mode: DAB
Alarm1 : 07: 30 18
:
20 1
2
Die Anzeigen zeigen „Alarms Set and On“
(Alarme eingestellt und eingeschaltet)
Bluetooth-Wiedergabe
Countdown-Timer
Um Ihnen in der Küche zu helfen, stehen zwei Countdown-Timer zur Verfügung. Sie können diese verwenden, um sich daran
erinnern zu lassen, wann Sie mit dem Kochen beginnen oder aufhören oder mit der Zubereitung anfangen sollten. TIMER 1
(00:00 Minuten - 3:59 Stunden), TIMER 2 (00:05 Minuten - 3:55 Stunden). Drücken Sie die Taste Timer1/2/AMS, um Timer 1 oder
Timer 2 auszuwählen, drehen Sie die Taste TIMER/ENTER, um die Countdown-Zeit einzustellen.
Um die Zeit eines Timers abzubrechen/anzuhalten, halten Sie die Taste
TIMER/ENTER gedrückt, bis die Uhr-Anzeige verschwindet und die Zeit
auf 00:00 zurückgesetzt wird. ENTER/PAIR
T
I
M
E
R
Timer 2
00:00
AMS
Timer 1/2
ENTER/PAIR
T
I
M
E
R
Timer 1
00:00
Timer 2
00:00
ENTER/PAIR
T
I
M
E
R
Set Minute
00:00
ENTER/PAIR
T
I
M
E
R
Set Minute
00:25
ENTER/PAIR
T
I
M
E
R
Set Hour
00:25
ENTER/PAIR
T
I
M
E
R
Set Hour
02:25
ENTER/PAIR
T
I
M
E
R
Timer 2
02 : 24 : 58
Der Countdown
beginnt sofort

Kitchen U10 | 17
So stoppen Sie den Weckruf oder schalten ihn auf Schlummerfunktion
Zum STOPPEN drücken Sie die Taste Volume (Lautstärke) / / Funktion (1). Drücken Sie die Taste
TIMER/ENTER einmal, um den Alarm für 5 Minuten, 2x um ihn für 10 Minuten, 3x um ihn für
15 Minuten, 4x um ihn für 30 Minuten zu verzögern/in die Schlummerfunktion zu schalten. Drücken Sie Volume / / Funktion,
um die Schlummerfunktion abzubrechen. Die verbleibende Zeit in der Schlummerfunktion wird oben rechts angezeigt.
SNOOZE : 04:50
07 : 30 01 -08 -2022
System
DT
DT *
ON
DT
OFF
Siehe Seite 16
System
Alarms
Mode: DAB
Alarm1 ;Off
04
System
Buzzer Volume
System
SW version
SW version
DAB-DE11-Ver03
System
Factory reset
Factory reset ?
<No> Yes
Factory reset ?
No <Yes>
System
Backlight Backlight *
Low
Backlight
High
System
Time setup
Time setup
Set clock
Set clock
23:20
Time setup
Set date
Set date
01- 08-2022
Time setup
Auto update
Auto update *
From radio
Auto update
No update
Time setup
Set 12/24 hour Set 12/24 hour *
Set 24 hour
Set 12/24 hour
Set 12 hour
Set sleep time
Sleep 15
Set sleep time
Sleep 30
Set sleep time
Sleep 45
System
Sleep
Set sleep time
Sleep 60
Set sleep time
Sleep off
Set sleep time
Sleep 90
1. Zeiteinstellung
3. Alarmmeldungen einstellen – Siehe Seite 16
5. Hintergrundbeleuchtung – passt die Helligkeit des Displays an
6. Factory Reset (Auf Werkseinstellung zurücksetzen) – löscht alle vorgenommenen Einstellungen
7. SW-Version – zeigt die Version der geladenen Software an
8. Buzzer Volume (Wecker-Lautstärke) – Lautstärke des Timer-Countdown-Weckers
4. Schlaffunktion – Damit können Sie einen Zeitraum festlegen, nach dem Ihr
U10 automatisch in den Standby-Modus wechselt
Die Funktion erscheint in den Systemmenüs DAB, FM (UKW) und Bluetooth.
2. DT - Display bei Nacht
automatisch dimmen –
23:00 - 05:00 Uhr
Optionen im Systemmenü
So greifen Sie im DAB- und FM-Modus auf das
Systemmenü zu: MENU/ALARM
INFO
ENTER/PAIR
T
I
M
E
R
DAB
System
FM
System
DAB
Station scan
FM
Audio setting
ENTER/PAIR
T
I
M
E
R
MENU/ALARM
INFO
System
Time setup
ENTER/PAIR
T
I
M
E
R
Drücken Sie das Timer/Enter-
Einstellrad, um in die Untermenüs
zu gelangen. Drücken Sie, um Ihre
Auswahl zu bestätigen
ENTER/PAIR
T
I
M
E
R
Drehen Sie das Timer/Enter-
Einstellrad, um eine Option
auszuwählen. Drehen Sie,
um die Zahlen auszuwählen
Im Modus Clock (Uhr) und Bluetooth:

18 | Kitchen U10
Spezifikationen
Nennleistung 230V~50Hz, 7W
Lautsprecher 2x 2.25” (57mm)
UKW-Frequenz 87.5-108 MHz
DAB-Frequenz 174.928 -239.200 MHz
Bluetooth-Version V5.0
Bluetooth-Profil A2DP, AVRCP
Bluetooth-Reichweite 10m
Abmessungen (B x T x H) 260 x 165 x 52mm
Gewicht 0.848 kg
Fehlerbehebung
Problem Lösungen
Schlechter
Radioempfang
Stellen Sie das Radio näher an ein Fenster.
Stellen Sie sicher, dass das Radio nicht in der Nähe von Mikrowellen, Leuchtstofflampen oder
anderen Geräten ist, die Störungen verursachen können.
No Kein Ton Überprüfen Sie, ob die Lautstärke verringert wurde. Erhöhen Sie die Lautstärke
Überprüfen Sie, ob das Radio eingeschaltet ist.
Versuchen Sie, einen anderen Radiosender zu wählen.
Das Radio lässt sich
nicht einschalten Überprüfen Sie, ob der Netzstecker richtig eingesteckt ist.
Überprüfen Sie, ob an der Steckdose Strom anliegt.
Keine Bluetooth-
Verbindung
Die Bluetooth®-Funktion kann auf dem kompatiblen Gerät deaktiviert sein. Aktivieren Sie
diese ggf.
Prüfen Sie, ob das anzuschließende Gerät eingeschaltet ist und sich im Suchmodus befindet.
Das Radio ist möglicherweise bereits mit einem anderen Bluetooth-Gerät verbunden – falls
es getrennt ist.
Elektrische Altgeräte und elektronische Produkte dürfen nicht imHausmüll entsorgt werden. Geben Sie
sie bei einem Wertstoffhof bzw. einer Recycling-Sammelstelle ab. Bei Fragen zum Recycling können Sie
sich an Ihre örtlichen Behörden oder Ihr Geschäft vor Ort wenden.
Haftungsausschluss
Aktualisierungen der Firmware- und/oder Hardwarekomponenten werden regelmäßig durchgeführt. Daher können
einige Anweisungen, Spezifikationen und Bilder in dieser Dokumentation geringfügig von Ihrer individuellen
Situation abweichen. Alle in diesem Handbuch beschriebenen Elemente dienen nur Illustrationszwecken und
gelten möglicherweise nicht für Ihre individuelle Situation. Aus der Beschreibung in diesem Handbuch können keine
gesetzlichen Rechte oder Ansprüche abgeleitet werden.
Konformitätserklärung
Philex Electronic Ltd. erklärt hiermit, dass das Funkgerät: U10 DAB Radio für den Funkempfang in Wohngebäuden der
Funkgeräterichtlinie 2014/53/EU entspricht. Der vollständige Text der EU-Konformitätserklärung ist unter folgender
Internetadresse abrufbar: www.philex.com/doc
Technischer Support
Weitere Hilfen, Ratschläge, Informationen finden Sie auf www.iboxstyle.com

Kitchen U10 | 19
No montar sobre aparatos de cocción o lavabos.
No coloque fuentes de llamas desnudas, como velas
encendidas, sobre el cristal o cerca de él.
Mantener alejado de goteos o salpicaduras de líquidos.
La unidad no debe exponerse a la luz solar directa,
temperaturas muy altas o bajas, humedad, campos
magnéticos fuertes de alta frecuencia y entornos
polvorientos.
Deje siempre suficiente espacio alrededor de la unidad
para que se ventile.
No utilice abrasivos, diluyentes u otros disolventes para
limpiar la unidad.
Para limpiar, límpielo con un paño suave y limpio.
Nunca intente insertar cables, clavijas u otros objetos
similares en las rejillas de ventilación o la abertura
de la unidad.
No desmonte ni modifique la unidad, no hay piezas
reparables por el usuario.
Si la radio está dañada o funciona mal, no la utilice.
Consulte a un ingeniero de servicio calificado.
No deseche este producto con la basura doméstica al
final de su ciclo de vida; llévelo a un centro de recolección
designado para el reciclaje de aparatos eléctricos y
electrónicos con baterías. Consulte con su autoridad local
para obtener consejos de reciclaje.
ES Cuidando su Radio
Índice............................................................... Página
Información de seguridad............................................19
Controles y funciones.................................................. 20
Posicionamiento / Montaje..........................................21
Encendido de su radio reloj despertador ...............21
Modo En espera y selección del modo....................21
Modo de Radio DAB......................................................22
Almacenamiento y recuperación de preajustes....
22
Búsqueda de estaciones......................................22
Modo de Radio FM.........................................................23
Modo de conexión Bluetooth.............................23-24
Temporizador de cuenta atrás...................................24
Configurar alarmas.........................................................24
Opciones del menú del Sistema...............................25
Especificaciones .............................................................26
Solución de problemas................................................26
Asistencia técnica...........................................................26
Contenido de la caja
1x U10 Radio
1x Antena por cable
4x 3x15mm Tornillos
4x 3x45mm Tornillos 4x Separadores de 30 mm
1x Plantilla de montaje 1x Guía del usuario

20 | Kitchen U10
Ayudar
Pulsación
corta
Pulsación
larga
Girar
Controles y funciones
AMS MENU/ALARM ENTER/PAIR
FUNCTION MEMORY
TIMER 1/2 INFO LIGHT ON/OFF
SEARCH
PRESET
Kitchen
U10
V
O
L
U
M
E
T
I
M
E
R
17
:
00
1 2 3
4 5 6 7 8
Vista frontal
9
ANTENNA
10 11
Vista posterior
13 1412 12
Parte inferior
Controles y funciones
1. - Volumen +/ Potencia / Función
2. Pantalla
3. - Temporizador + / Intro / Vincular
4. Temporizador 1/2 / AMS (Autoscan)
5. Info / Menú / Alarma
6. Luz encendida / Apagada / Memoria
7. Presintonía - / Buscar -
8. Presintonía + / Buscar +
9. Placa de montaje elevado
10. Toma de antena
11. Cable de alimentación de CA, 1,6 m
12. Altavoces
13. Soporte plegable
14. Luz inferior LED
Table of contents
Languages:
Other i-box Radio manuals