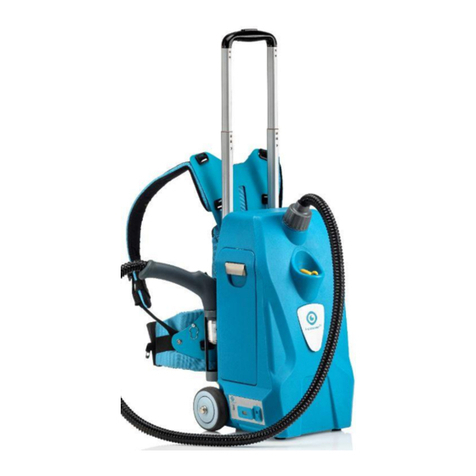
i-team i-fogger User manual

3
Preface
Thank you for purchasing the i-fogger®. The i-fogger disinfects surfaces and entire spaces quickly. The
mobile unit creates and disperses a disinfectant aerosol (mist) to reduce the number of airborne
micro-organisms and viruses. Bonus: it’s also easy to apply disinfectant to surfaces that are difficult
to reach.
Please read this manual carefully for important information and operating instructions before using
the i-fogger. Save this manual for future reference. This i-fogger will provide excellent performance.
The best results will be obtained when the i-fogger is:
•regularly maintained per the i-fogger preventive maintenance instructions in this manual;
•operated with reasonable care and caution;
•maintained with manufacturer-supplied parts.
When this manual refers to “the manufacturer”, this means: Future Cleaning Technologies B.V, an
affiliate company of i-team in Eindhoven, the Netherlands. When this manual mentions “the
partner”, your local i-team resell and support service partner is referred to.
Purpose of the user manual
The purpose of the user manual is to provide the user with information in such a way that during the
life of the i-fogger, the machine is used correctly, efficiently and safely, even in the event of
reasonably foreseeable misuse, as described in section 1.2 of this manual.
The user manual contains instructions regarding:
•personal operator safety;
•intended and non-intended use of the i-fogger;
•instructions for daily use;
•maintenance instructions;
•storage conditions;
•disposal of the i-fogger.
These instructions must be considered to avoid risks that could lead to physical and/or material
damage.
Target audience
This user manual is intended for operators of the i-fogger and their supervisors, as well as partners
and importers.
Operators of the i-fogger
The i-fogger may only be operated by a person who has correctly read and understood the
instructions in this manual or is trained by an experienced operator who has read and understood
the instructions in this manual.

4
Reading guide
The following symbols and terms are used throughout this manual to alert the reader to
safety issues and important information:
Symbol
Term
Explanation
WARNING
Indicates a hazardous situation which, if the safety
instructions are not followed, can lead to injuries of the
operator or bystanders, light and/or moderate damage
to the product or the environment.
CAUTION
Indicates a hazardous situation which, if the safety
instructions are not followed, can lead to light and/or
moderate damage to the product or the environment.
STRONG MAGNET
Indicates the machine contains strong magnets. These
can cause pacemakers to stop or cause electronic data
to be damaged, for instance on information stored on
access passes.
BATTERIES
Indicates a battery-operated machine. Batteries must
be charged according to the instructions in this manual
and the instructions at the charger.
PACEMAKER
Indicates operators and maintenance crew wearing
pacemakers should keep a minimal distance of 6 in / 15
cm. In this specific case operators may not use the
machine.
PROTECTIVE
EYEWEARE
Indicates protective eyewear is advised, for instance
when filling the machine with cleaning solution.
WASH HANDS
Indicates operators are advised to wash their hands, for
instance after filling and/or draining the cleaning
solution.

5
Content
Preface .................................................................................................................................................................... 3
Purpose of the user manual.................................................................................................................................... 3
Target audience ...................................................................................................................................................... 3
Operators of the i-fogger ........................................................................................................................................ 3
Reading guide.......................................................................................................................................................... 4
Content ................................................................................................................................................................... 5
1Introduction.................................................................................................................................................... 7
1.1 Intended use of the product.................................................................................................................. 8
1.2 Non-intended use of the product.......................................................................................................... 8
1.3 Lifespan.................................................................................................................................................. 9
1.4 Modifications......................................................................................................................................... 9
1.5 Specifications....................................................................................................................................... 10
1.6 Warranty.............................................................................................................................................. 11
1.7 Identification ....................................................................................................................................... 11
2Description ................................................................................................................................................... 12
2.1 Control panel ....................................................................................................................................... 13
2.2 Spray gun self reset button ................................................................................................................. 13
2.3 Spray nozzles ....................................................................................................................................... 14
3Safety............................................................................................................................................................ 15
3.1 General safety instructions.................................................................................................................. 15
3.2 Risks during operation......................................................................................................................... 15
3.2.1 The disinfectant solution................................................................................................................. 15
3.2.2 The battery...................................................................................................................................... 15
3.2.3 Strong magnets ............................................................................................................................... 15
3.2.4 Personal protection......................................................................................................................... 16
4Transport and storage.................................................................................................................................. 17
5Assembly and installation............................................................................................................................. 18
5.1 Unboxing.............................................................................................................................................. 18
5.2 Assembly.............................................................................................................................................. 19
5.2.1 Attaching the right spray nozzle for the job.................................................................................... 20
6Operation ..................................................................................................................................................... 21
6.1 Before you start................................................................................................................................... 21
6.1.1 Checking and topping up the disinfectant solution level ................................................................ 21
6.2 Operation procedure........................................................................................................................... 22
6.2.1 After operation................................................................................................................................ 24

6
6.2.2 Removing the disinfectant solution tank ........................................................................................ 24
6.2.3 Removing the spray nozzle.............................................................................................................. 24
6.3 Cleaning and storage ........................................................................................................................... 25
6.3.1 Flushing the spray nozzle ................................................................................................................ 25
6.3.2 Flushing the disinfectant solution tank and cleaning the exterior.................................................. 25
6.3.3 Storage ............................................................................................................................................ 26
7Maintenance ................................................................................................................................................ 27
8Troubleshooting ........................................................................................................................................... 28
9Decommissioning and disposal .................................................................................................................... 29
10 Attachments................................................................................................................................................. 30
10.1 CE Certificate ....................................................................................................................................... 30

7
1Introduction
The i-fogger® is an easy and safe machine to use, this manual helps you get started and explains the
operation and maintenance procedure.
The i-fogger has been designed as a comfortable, ergonomic backpack, allowing complete freedom
of movement and easy usability. An ergonomic spray gun is attached to the unit, which ensures fast,
reliable and easy operation. Centralized controls are located on top of the machine. Everything you
need lies within the reach of your fingertips. The lid of the disinfectant solution tank is available in 4
different colors to easily identify different disinfectants.
This manual is intended for those who work with the i-fogger and perform daily maintenance. The
manual must be read in full before the first actions. This manual describes the correct method of use,
safety measures, maintenance and transport.
i-team Global continuously improves all their products based on user experience and feedback. Any
deviations between the texts and/or images from the manual and your i-fogger can therefore arise
from the difference in model or from possible changes due to continuous development and
innovation.

8
1.1 Intended use of the product
The i-fogger® is a specialized machine for disinfecting surfaces and entire spaces, see Figure 1.
The i-fogger is, for example, suitable to use in cinemas, airplanes, cruise ships and shopping malls.
The i-fogger must be used in a dry environment.
In order to spray different sizes of aerosol (mist) particles, 4 different types of spray nozzles are
provided. These spray nozzles are easy to replace. To select the right spray nozzle, see section 2.3.
1.2 Non-intended use of the product
WARNING
Non-intended use can have consequences for the safety of operators and bystanders
and will void the warranty on the product.
The i-fogger is not intended to be used in moist or wet environments such as saunas and other areas
where fog or moisture is already present in the air.
Do not use the i-fogger in enclosed spaces with little ventilation.
Do not use the i-fogger in spaces were people are present.
Figure 1

9
1.3 Lifespan
CAUTION
To ensure proper and safe operation throughout the life of the i-fogger®, it is
recommended to have an authorised i-team partner check the machine after the first 50
hours of use and then every 125 hours afterwards. To check the used operating hours,
please check the hour meter on the main control panel. See section 2.1.
1.4 Modifications
It is not permitted to make modifications to the design of the i-fogger without consultation and
permission from the manufacturer. This affects the warranty, see section 1.6 of this manual.

10
1.5 Specifications
Product size body unit (L x W x H):
230 x 200 x 600 mm
Weight including battery:
8.2 kg
Weight without battery:
7.9 kg
Hose length:
1.2 m
Tank capacity:
3.5 L
Spray distance:
4 –5 m
Spray volume:
100 –175 ml/min
Droplet size:
20-150 µm
Pump specifications:
DC 24 V, 5 W, 100 ml/min
Material main body:
LDPE
Material spray gun:
Aluminium
Power source:
i-power® 9 or i-power® 14 battery
Battery spec i-power 9:
24 V 8.8 Ah
Battery spec i-power 14:
25.2 V 14 Ah
Run time i-power 9:
≈ 30 min
Run time i-power 14:
≈ 50 min
Figure 2

11
1.6 Warranty
The i-fogger® should only be operated with the materials supplied. Using alternative supplies may
cause damage to the i-fogger and may cause a risk to the operator. The use of alternative supplies
voids manufacturer's warranty.
1.7 Identification
Each i-fogger has a unique identification number that can be found on the bottom of the main body.
Your i-team dealer needs this number when you order parts.
Explanation type plate:
Product type: i-fogger 3.5
Serial number:
Figure 3

12
2Description
The compact lightweight i-fogger® consists of two main parts:
•the body, that contains the disinfectant solution tank, that can be carried as a backpack;
•the spray gun, that disperses a disinfectant aerosol (mist) to reduce the number of airborne
micro-organisms and viruses.
The i-fogger consists of:
Figure 4
Legend
1.
A hook for the spray gun.
8.
A main body.
2.
A spray gun.
9.
A filter cover for the motor air inlet.
3.
A control panel.
10.
An accessory bag.
4.
A carrying handle.
11.
A hook for the accessory bag.
5.
A harness.
12.
A battery compartment.
6.
A hook for the spray gun during operation.
13.
A disinfectant solution tank.
7.
A flexible hose.

13
2.1 Control panel
1. Battery power status display. The green
battery power status LEDs are on during
normal use. When the battery is full, all
green LEDs are on. When the batteries get
empty, the green LEDs will go off one by one.
2. Hour meter. The counter on the right
(Figure 5, pos B). counts in 6 minute cycles.
This means that if the display shows a “1”,
the i-fogger® has run for 6 minutes. After 10
cycles, the second counter from the right
(Figure 5, pos A) will show a “1”, this
indicates 1 hour. The counter on the right
(Figure 5, pos B) starts again at “1”.
3. The ON/OFF switch.
2.2 Spray gun self reset button
1. The self reset button. The self reset button
has a safety function. This means that the i-
fogger will not work if you press it and have
accidentally forgotten to switch off the
ON/OFF switch on the i-fogger main body.
Figure 5
Figure 6

14
2.3 Spray nozzles
Spray nozzle diameter and color
Intended use
0.3 mm x 1 silver ring
Indoor applications, when there is a short time between people
occupying the space. For example cinemas, airplanes, trains,
common transport.
0.5 mm x 1 golden ring
Indoor applications, when there is a long time between people
occupying the space. For example end of day in restaurant or
retail.
0.8 mm x 1 blue ring
Indoor applications, high volume spaces. For example
warehouses and manufacturing floors.
1.0 mm x 1 black ring
Outdoor applications, high volume spaces. For example
amphitheatres and sport event centers.

15
3Safety
Safety comes first. Therefore, please take your time to read and understand these safety
instructions. Improper use can cause harm or void the manufacturer’s warranty.
3.1 General safety instructions
WARNING
•DO NOT push the self reset button on the spray gun when it is on your belt;
•always keep the body of the i-fogger® in an upright position when the tank is full or
the battery is inserted;
•avoid moist or fluid from entering the motor air inlet.
3.2 Risks during operation
3.2.1 The disinfectant solution
WARNING
General safety rules:
•keep locked up and out of reach of children;
•keep away from food, drink and animal feed;
•if disinfectant is ingested, seek medical advice immediately and show the disinfectant
bottle. DO NOT induce vomiting.
3.2.2 The battery
BATTERY
During normal operation the 24 V battery causes no safety hazard on their own. Please
keep in mind the following safety instructions:
•do not crush, pierce or damage in any way;
•do not heat or incinerate;
•do not short-circuit;
•do not dismantle;
•keep the battery dry;
•only charge between 5 °C ~ 40 °C / 41 °F ~ 104 °F;
•only use between 5 °C ~ 45 °C / 41 °F ~ 113 °F;
•only use the original battery from the manufacturer.
3.2.3 Strong magnets
CAUTION
Please be aware of the integrated magnets that hold the fluid tanks in place.
WARNING
Operators and maintenance crew wearing pacemakers should keep a minimal distance
of 6 in/15 cm.

16
3.2.4 Personal protection
ATTENTION
Disinfectants can be irritating to the eyes. Wear eye protection and use caution when
filling the tank. Always keep the spray gun pointed away from your face.
ATTENTION
Clean your hands immediately after filling or draining the disinfectant solution tank.

17
4Transport and storage
•do not store the i-fogger® outdoors;
•store the i-fogger in an upright position, in a dry place;
•in case the i-fogger is stored for a longer period, remove the battery. See section 6.2.1;
•before you ship the i-fogger, remove the battery. See section 6.2.1;
•before you store or transport the i-fogger, it is recommended to drain the disinfectant solution
tank;
•before you store the i-fogger, it is recommended to clean it with a damp cloth.

18
5Assembly and installation
The i-fogger® does not require much assembly, the harness is already attached. You only need to
attach the tank, and insert a battery. A battery and a battery charger can be ordered separately.
5.1 Unboxing
The i-fogger is packed in 1 box.
Legend
1.
1x back harness
6.
1x i-fogger main body
2.
4x spray nozzle
7.
1x disinfectant solution tank
3.
1x nut driver
8.
1x this manual
4.
1x accessory bag
9.
1 x spray gun
5.
1x flexible hose
Figure 7

19
5.2 Assembly
1. Place the i-fogger® on a level surface.
2. Place the disinfectant solution tank
(Figure 8, pos 2) on the i-fogger. Press it
downwards to make sure that the valve
(Figure 8, pos 3) is secured onto the valve
stem (Figure 8, pos 4) on the i-fogger body.
3. Press the top of the disinfectant solution
tank against the i-fogger body. The magnet
(Figure 8, pos 1) locks the disinfectant
solution tank in place.
Figure 8
4. Open the hatch (Figure 9, pos 4) in the body
of the i-fogger.
5. Ensure that the i-fogger is turned off. To do
this check the ON/OFF switch on the
i-fogger body (Figure 9, pos 1).
6. Insert the battery (Figure 9, pos 3) in the
battery slot (Figure 9, pos 2), until you hear a
"click". The battery is now fixated.
Figure 9

20
5.2.1 Attaching the right spray nozzle for the job
ATTENTION
•there are 4 different spray nozzles, with each its specific application. Choose the
right spray nozzle for the specific job. Please see section 2.3;
•use the nut driver from the accessory bag.
1. Turn the spray nozzle clockwise
(Figure 10, pos 1) to attach it to the
spray gun.
Figure 10
Table of contents
Other i-team Paint Sprayer manuals
Popular Paint Sprayer manuals by other brands

Hardi
Hardi FALCON Boom Series Operator's manual

Demco
Demco 1050 Operator's manual

swissmex
swissmex Advanced SP Series Operator's manual

Clas Ohlson
Clas Ohlson T-59-2 instruction manual

Anest Iwata
Anest Iwata WA 200 Installation, use & maintenance instruction manual

Titan Tool
Titan Tool LX60 instruction sheet