To activate and secure access to your camera, you must rst set the
password for the administrative user account (i3admin).
IMPORTANT: Your camera will remain inactive and inaccessible until
administrative password is set.
Activate your Annexxus 78R/98 camera by setting administrative password:
1. Connect your Annexxus 78R/98 camera to the Gigabit switch.
2. On your i3 NVR, launch i3 Annexxus Conguration Tool (ACT) v.1.5 or higher.
You can download and install the latest ACT installation package from i3 website:
https://i3international.com/download
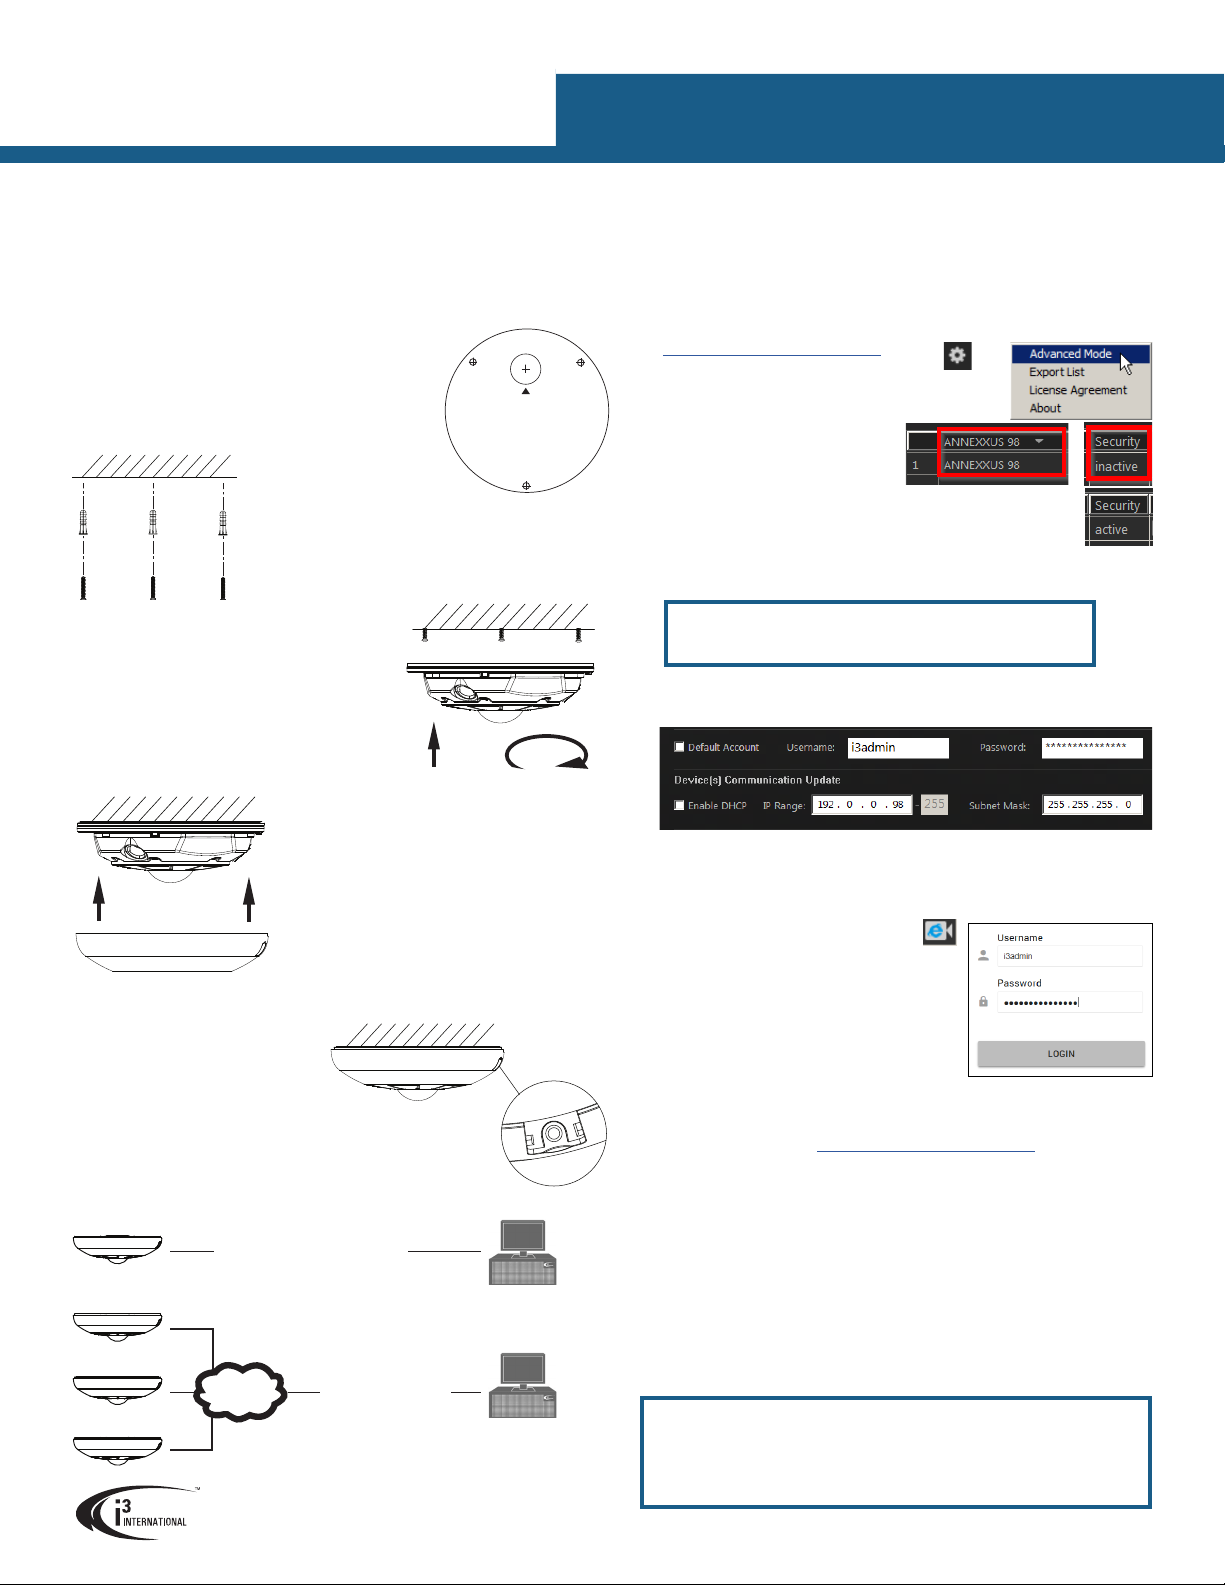
3. In the top right-hand corner, click the gear icon and
select Advanced Mode.
4. In the model drop-down list, select
ANNEXXUS 78 or 98.
Security status will say “inactive”.
5. In the Global Camera Settings, click
Set Password
6. In the Set password window, enter the
new password in the Password and
Conrm elds. Follow secure password guidelines. Click OK.
The new administrative password will be assigned to the camera and
the Security status will change to “active”.
Change your Annexxus 78R/98 camera’s default IP Address:
Note: Your i3 NVR must have a valid IP address (not APIPA)
7. In Annexxus Conguration Tool, select your Annexxus 78R/98 camera in the list.
8. Uncheck “Default Account” and enter “i3admin” into Username eld and the new
administrative password (set in Step 6) into Password eld.
9. Enter the new IP address and Subnet Mask under Device(s) Communication
Update and click Update.
10. Wait a few moments for a “Success” message in the Result eld.
11. Repeat Steps 7-10 for all detected Annexxus 78R/98 cameras in the ACT until
each camera has a unique IP address.
12. To conrm your camera’s new IP address,
click the IE icon next to each camera.
In the IE browser, enter administrative
Username (i3admin) and (new) Password and click
LOGIN.
Annexxus camera interface will be displayed
in the Internet Explorer window. You should be
able to see the camera image on the screen. If
you do not see the camera image on the screen,
call i3 International technical support team for
troubleshooting tips: 1.877.877.7241
ADDING CAMERA TO i3 SRX-PRO SERVER/SERVICE
13. Ensure that the latest version of GiPi updater is installed on your SRX-Pro Server.
Latest GiPi available from https://i3international.com/download
Note: SRX-Pro Server must be closed while GiPi updater is installed. Latest
GiPi installer will automatically stop and re-start SRX-Pro Service during GiPi
installation. After GiPi updater installation, re-start i3 SRX-Pro Server.
14. In SRX-Pro Server software or in SRX-Pro Console, go to Setup > IP Camera
15. Click the Search & Add button to display connected Annexxus cameras.
16. Select the detected camera in the list and click Select.
17. In the Select IP Camera window, enter the camera’s administrative User Name
(i3admin) and the (new) Password set in Step 6. Click Add.
Selected camera will be added to the IP Camera list.
18. Assign the IP camera to the SRX-Pro video channel in the Ch In. column.
19. To control ePTZ channels, go to Hardware tab and select i3 GiPi from the PTZ
Camera Type drop-down menu for the corresponding ePTZ channel.
Your Annexxus 78R/98 camera is now connected to SRX-Pro Server / Service and is
ready to record. Change resolution and frame rate for each video channel in the IP
Camera tab menu or via Web Setup.
Ax78R/98 6/12MP IP Fisheye Camera
QUICK START GUIDE
1.866.840.0004
www.i3international.com
U.S.A 4450 Witmer Industrial Estates, Unit 4
Niagara Falls, NY 14305
Canada 780 Birchmount Road, Unit 16
Scarborough, ON, M1K 5H4
SURFACE MOUNTING
1. Use the Surface Mount Template to drill three (3)
6 mm (0.2”) screw holes at the marked template
positions on the mounting surface.
2. Drill the cable opening at the marked template position.
3. Insert three (3) supplied screw anchors into the drilled
holes in the mounting surface.
• Use sealant at the locations shown on the mounting diagrams to maintain IP66 rating
when installing outside.
• It is the installer’s responsibility to ensure that the mounting surface is suitable for the
chosen installation method.
• Based on installation location and surface type, supplied screws and anchors may not
be adequate; Mounting hardware is site-specic and may need to be supplied by the
installer.
11
1
TOP
Drill Template
Hole A : for cables routed through the ceiling
Screw hole 1 : for Mounting Base
4. Use a Phillips screwdriver
to insert supplied screws
into the screw anchors.
Leave enough screw length
protruding from the each
anchor to allow for the
camera body to be rotated
onto the screws.
5. Remove the camera cover.
Use a Phillips screwdriver to loosen the safety
lock screw, then grip the camera cover and ex
on one side, towards the center.
Lift UP to remove.
6. Feed the camera cabling through the cable
opening drilled in the mounting surface.
7. Slide the protruding mounting screws through
three matching mounting screw holes on the
camera body and rotate the camera clockwise
to secure the camera body on the mounting
surface. Use a Phillips screwdriver to tighten
three mounting screws in place.
8. Replace the camera cover.
Match up the safety lock screw with the screw
hole on the camera body, then push straight
down onto the camera cover to engage the clips.
The camera cover will re-attach.
9. Use a Phillips screwdriver to
re-tighten the safety lock screw.
CONNECT CAMERA TO
i3 SRX-PRO SERVER
i3 SRX-Pro Server
Crossover direct connection
LAN
i3 SRX-Pro Server
Via Gigabit Switch
Connection Type 1: Must use DC 12V Power for this connection type.
Connection Type 2:
Annexxus 78R/98 Channels
Depending on Ax78R/98 conguration, multiple separate video channels/inputs
are added to IP Camera setup tab of the SRX-Pro Server.
Only one (1) IP license is required for all channels.
To switch between modes, use the web browser. Camera must be removed and
re-added to the SRX-Pro Server’s IP Camera tab after a Mode change.
Camera’s default IP address: 192.0.0.16.
Camera’s default Subnet mask address: 255.255.255.0.
Default User name: i3admin
ACTIVATING CAMERA, CHANGING IP ADDRESS in ACT


