iBasso DX200 User manual

Thank you for purchasing the DX200
http://www.iBasso.com
Reference Digital Audio Player

Contents
Package components 1-2
Main Features 3-4
Specifications 5
Names of Parts & Functions 6-10
Basic Operation 11-12
Power on/off; Power on/off the screen;
Reset; Charging; USB-DAC function
Android Basic Features 13-17
Introduction
WiFi Connection; Application Installation;
App, to uninstall; USB Connections; Firmware update;
Power off, reboot, and system switching
Mango Player Application 18-20
Introduction

Package components
DX200 Player
Leather Case
Type-C cable
Coaxial cable
Balanced Burn-in cable
Quick Start Guide
Warranty card

DX200 Player:
DX200 Reference Digital Audio Player.
Leather Case:
Use the leather case to protect the DX200’s
chassisfrom scratches.
Quick Start Guide:
This reviews the basic functions of the DX200.
Warranty card:
The warranty will be requested at the time of
warranty repair. Please retain the warranty card.
Type-C cable:
Connect the Type-C cable to a computer for
Charging, data transfer, and USB-DAC function.
Balanced Burn-in cable:
Plug the burn-in cable into the BAL out socket,
and keep playing music to burn-in the DX200.
The burn-in process helps the DX200's sound
reach its full potential by forming the capacitors
and stabilizing the electronic components used.
Coaxial cable:
Connect the coaxial cable to an external DAC,
to allow the DX200 working as a digital transport.

Main Features
- Dual SABRE ES9028PRO DAC Chips.
- Bit for Bit Playback Support up to 32bit/384
kHz.
- Support of Native DSD up to 512x.
-
XMOS USB Receiver with Thesycon USB Audio
Driver, Easy to use USB DAC.
- Dual Accusilicon Ultra Low Phase Noise
Femtosecond Oscillators.
- 4.2" IPS Screen (768*1280) with Capacitive
Touch Panel, Bonded by OCA.
- Mini Optical Output and Mini Coaxial Output.
- 8-core CPU.
- 2GB LPDDR3.
- 64G of Internal Memory.
- 5G WiFi and Bluetooth4.0.

- Patented User Exchangeable AMP Card.
-
Three Physical Buttons (Previous, Play/Pauses,
Next)
- 150-Steps Digital Volume Control.
- Audio Formats Supported: APE, FLAC,WAV,
WMA, AAC, ALAC, AIFF, OGG, MP3, DFF,
DSF, DXD.
- Support for M3U Playlist
- 4400mAh 3.8V Li-Polymer battery (Play time
vary with AMP card)

Specifications
2.5mm Balanced Output:
Output voltage 6Vrms
Frequency Response: 20Hz-20KHz -0.16dB
Signal to Noise Ratio:125dB
Crosstalk: -122dB
THD+N: < 0.0002%, -114dB (64Ω@3Vrms)
3.5mm HP Output:
Output voltage 3Vrms
Frequency Response: 20Hz-20KHz -0.16dB
Signal to Noise Ratio:122dB
Crosstalk: -118dB
THD+N: < 0.00032%,-110dB (32Ω@1.8Vrms)
Lineout:
Output voltage 3Vrms
Frequency Response: 20Hz-20KHz -0.16dB
Signal to Noise Ratio:122dB
THD+N: < 0.00025%,-112dB
Screen Size: 4.2inch 768*1280
Battery Capacity: 4400mAh
Case Dimension: 5.1L x 2.7W x 0.77H (inch)
128.5L x 69W x 19.5H (mm)
Weight: 240g or 8.5oz

Names of Parts & Functions
a
b
c
d
e

a. Power:
Short Press-Power the LCD screen on and off.
Long Press-To display the pop up window with
three options that are Power off, Reboot, and
To Mango.
b. Volume Control Wheel:
Rotate the wheel upward to increase the volume.
Rotate the wheel downward to decrease the
volume.
c. Next/Fast Forward:
Short Press - Play the next track.
Long Press - Fast forward.
d. Play/Pause:
Short Press - Play/Pause.
On the Mango OS, long press the play button
to lock the screen.
e. Previous/Rewind:
Short Press - Replay previous track.
Long Press - Rewind.

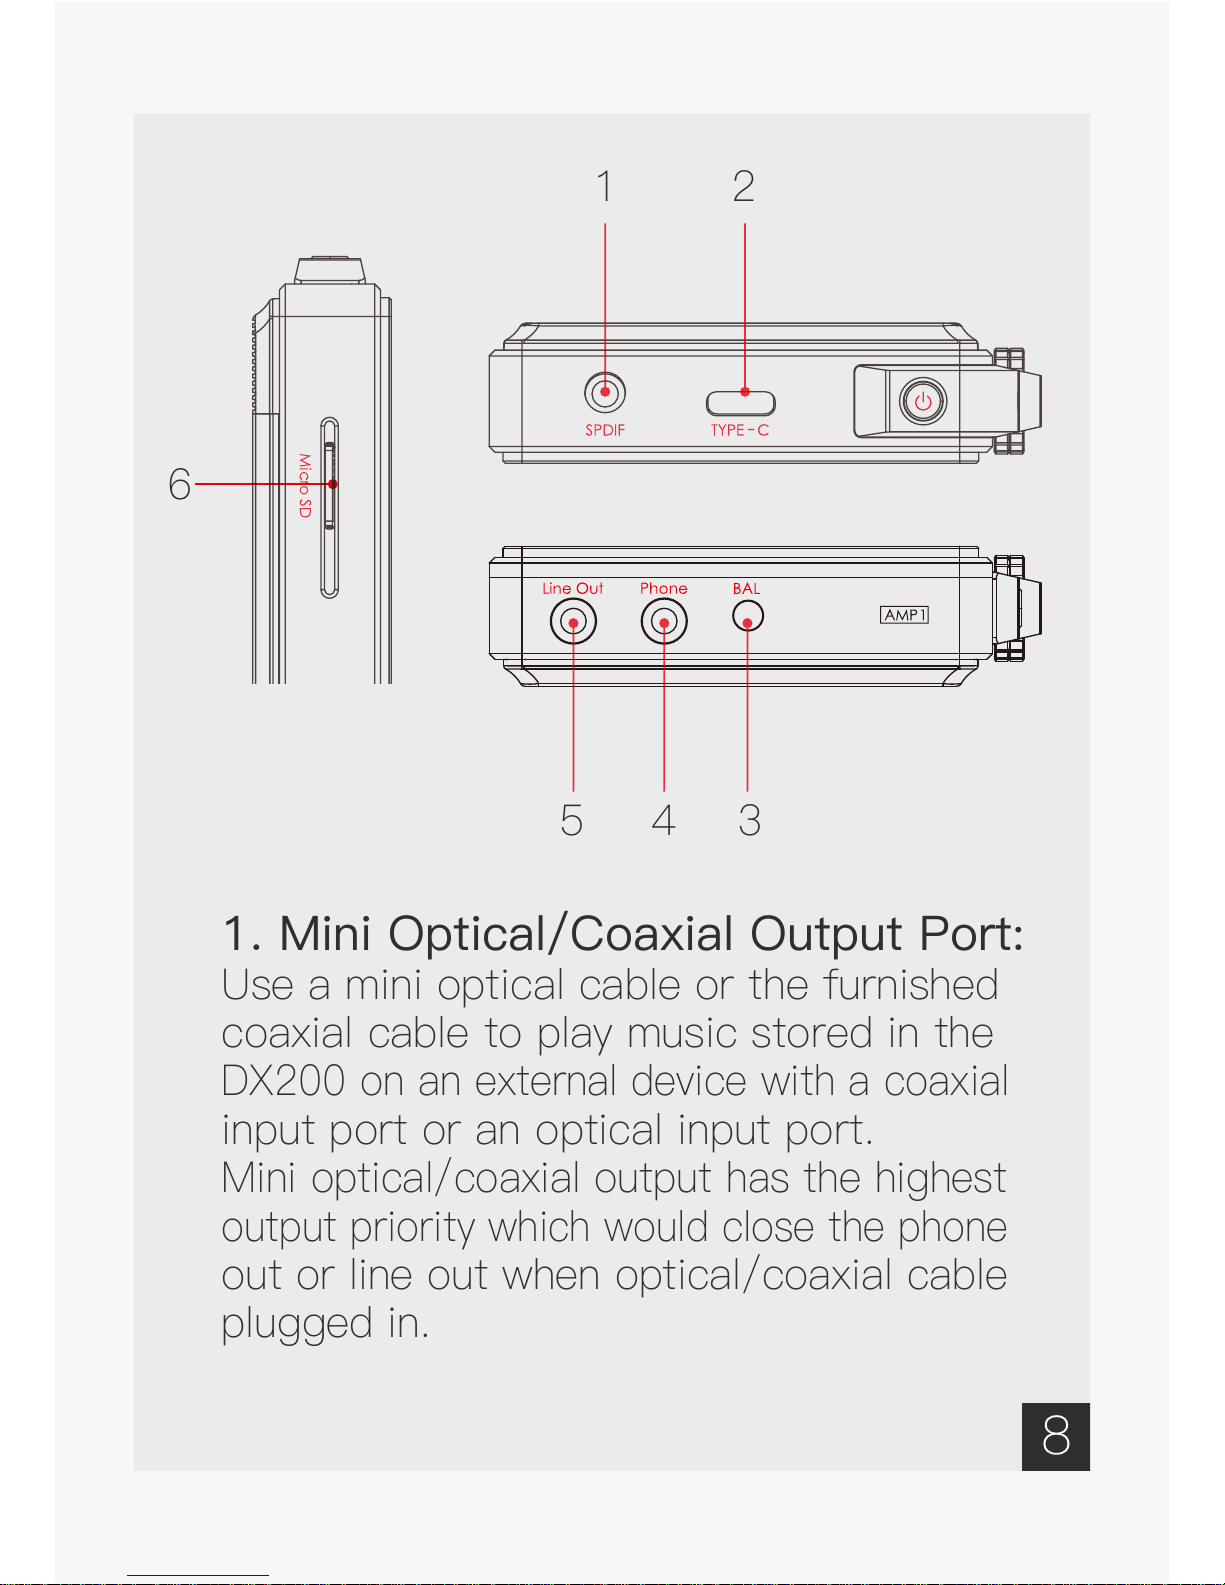
1. Mini Optical/Coaxial Output Port:
Use a mini optical cable or the furnished
coaxial cable to play music stored in the
DX200 on an external device with a coaxial
input port or an optical input port.
Mini optical/coaxial output has the highest
output priority which would close the phone
out or line out when optical/coaxial cable
plugged in.
1
2
3
4
5
6

2. Type-C Port:
Connect the DX200 to a computer or a
USB charger to charge the DX200.
Connect the DX200 to a computer to allow
the DX200 to work as a card reader.
Connect the DX200 to an OTG storage
device to play music files.
Connect the DX200 to a PC or a Mac
computer to work as a USB DAC.
3. Balanced Phone Port:
Plug in the 2.5mm balanced earphone and
output sound through the Balanced phone
port.
4. Phone Port:
Plug in the single-ended earphone and
output sound through the phone port.
5. Line Out Port:
Use a 3.5 to 3.5 interconnect cable to play
music stored in the DX200 on an external
amplifier with a line in port.

6. Micro SD Card Slot:
Insert a Micro SD card into the DX200 to
access its stored files.
The following screen pops up after Micro
SD card inserted.
Scan SD Card: Press “YES” to fully scan
the Micro SD card.
Browse Files: Press “ NO ” to skip media
scanning, and browse the Micro SD card
in folder structure.

Basic Operation
Power on/off:
1. Press and hold the power button to
power on.
2.
After the DX200 is powered on, a long
press of the Power button to display the
pop up window, press Power Off button
to power off the DX200.
Power on/off the screen:
Single press the power button to power
on/off the screen after the DX200 was
powered on.
Reset:
When the DX200 stop unexpectedly during
operation and the keys are no longer
responsive,press and hold the power button
for 10 seconds to reset the DX200.
Charging:
The DX200 can be charged by computer
through the USB port or any USB charger
with 5V output voltage and 1 A or above
output current.
A full charge takes about 3.5 hours with
5V 2A USB AC adapter, when the DX200
is powered off.

Connecting to a computer to work
as a USB DAC:
The DX200 can work as a USB DAC for
Windows PC, Mac computer, and Linux
computer.
It is driver free on Mac computer and
Linux computer. For Windows PC, one
can download the driver from iBasso.com
and install it following the steps, before
using the USB DAC function.
The DX200 supports up to 32bit/384kHz
PCM, and native DSD up to 512x when be
used as a USB-DAC.
The following is the instruction:
1. Power on the DX200.
2. Press the DAC on button on Settings/DAC.
3. The“USB DAC”screen will be shown on the
DX200.
4. Connect the DX200 to a computer via the
furnished type-C Cable.
5.
Select “iBasso Audio HiFi device” as the
audio output device. Then one can play music
on the computer and listen it via the DX200.

Android Basic Features
introduction
WiFi Connection:
① O
n the Android desktop, from the top,
swipe down the screen to display the
notification bar.
②
Press the Wireless local area network
(WLAN) to turn on the WiFi function.
The first time you enter the WLAN ,
you need to choose the hot spot you
will be using and enter the password.
From this point forward your password
f
or this hotspot will be remembered
and you simply press the WLAN icon
to connect to the WiFi internet.

Application (APP) Installation:
① Press the internet browser on the
desktop.
② Enter the website address of the APP.
③
Find the download icon on the website
and start the download.
④ Return to the desktop and open the
download manager.
⑤
Press the downloaded app and install it.
App, to uninstall:
①
Press the Settings icon on the desktop
and scroll down and press APPs.
②
Press the APP that you would like to
uninstall.
③ Press uninstall to delete the APP.

USB Connections:
①
Connect the DX200 to a computer
using the furnished type-C cable.
②
Swipe down the screen from the top
to display the notification bar.
③ Press the USB connection icon to
choose the type of USB use.
Charging: This only charges the DX200.
File Transfers:
Transfer files to Windows
or Mac (MTP).
Photo Transfer (PTP): transfer photos
or files if MTP is not supported.
MIDI: Use device for MIDI input.

Firmware Update:
① Load the firmware update file (ota.zip)
onto a SD card's root folder.
②
On the Android desktop, press Settings
->About DX200->System updates ->
local update->default and tap the zip
file.
③
Press update button to start the update.
④ The whole update will take about 10
minutes. Reboot the DX200 after
update completed.

Power off, Reboot,
and System Switching:
① Long press the power button for 3
seconds.
② There is a pop up window with three
options.
③ When To Mango is selected, system
will be switched to Mango OS.
④ To return to the Android System, go
into the Advanced menu of Mango.

Mango Player Application
Introduction
The DX200 User interface is composed
of four parts:
Music playback screen (homepage), my
music, settings, and advanced.
On the homepage, one can swipe the
screen to right for My Music, or swipe
the screen to left for Settings, swipe
the screen to left from Settings for
advanced. No matter on any sub-
menu of My Music, one can swipe to
left to go back to homepage. When on
any of the Settings sub-menu, swipe
to right to go back to homepage.
Table of contents
Other iBasso MP3 Player manuals