IBEA KRATOS 35 User manual

KRATOS 35
FORBICI ELETTRICHE
PRUNING SHEARS
SÉCATEUR ELECTRONIQUE
ELEKTRISCHE SCHNITTSCHERE
TIJERAS DE PODAR
TESOURAS ELÉTRICAS
Manuale dell’utente
Manuel d’utilisation et d’entretien
User manual
Benutzerhandbuch
Manual de usuario
Manual do utilizador

DICHIARAZIONE DI CONFORMITÀ
(Allegato II A direttiva 2006/42/CE)
Il Fabbricante
IBEA s.r.l.
Via Milano, 15/17
21049 Tradate (VA) - ITALY
Della macchina:
Denominazione
Tipo
Modello
N° serie
Data costruzione
Potatrice elettrica a batteria
Linea Kratos
Kratos 35
210001
07/2021
Dichiara, sotto la propria responsabilità, che la macchina sopraindicata
è conforme alle disposizioni delle seguenti Direttive e successivi emendamenti:
2006/42/CE
2014/30/UE
2011/65/UE
Norme applicate
Direttiva macchine
Direttiva Compatibilità Elettromagnetica
Direttiva RoHS II
UNI EN ISO 12100:2010
Dichiara inoltre che la persona autorizzata a costituire il fascicolo, stabilita nella Comunità Europea,
è: Ing. Alberto Grini, via Milano, 15/17 - 21049 Tradate (VA) - ITALY
Data
19/07/2021
Luogo
Tradate (VA)
ITALY
Firma
Alberto Grini
(Legale rappresentante)
IT - Testo originale
22
22
22
22
23
24
27
27
27
28
29
31
32
32
33
27
37
24
25
26
29
31
34
34
34
34
35
INDEX
Use and maintanance ........................................
Error reports ..........................................................
Blade lubrication .................................................
Notes ...................................................................................................
Before use ..........................................................................................
Operating instructions ..................................................................
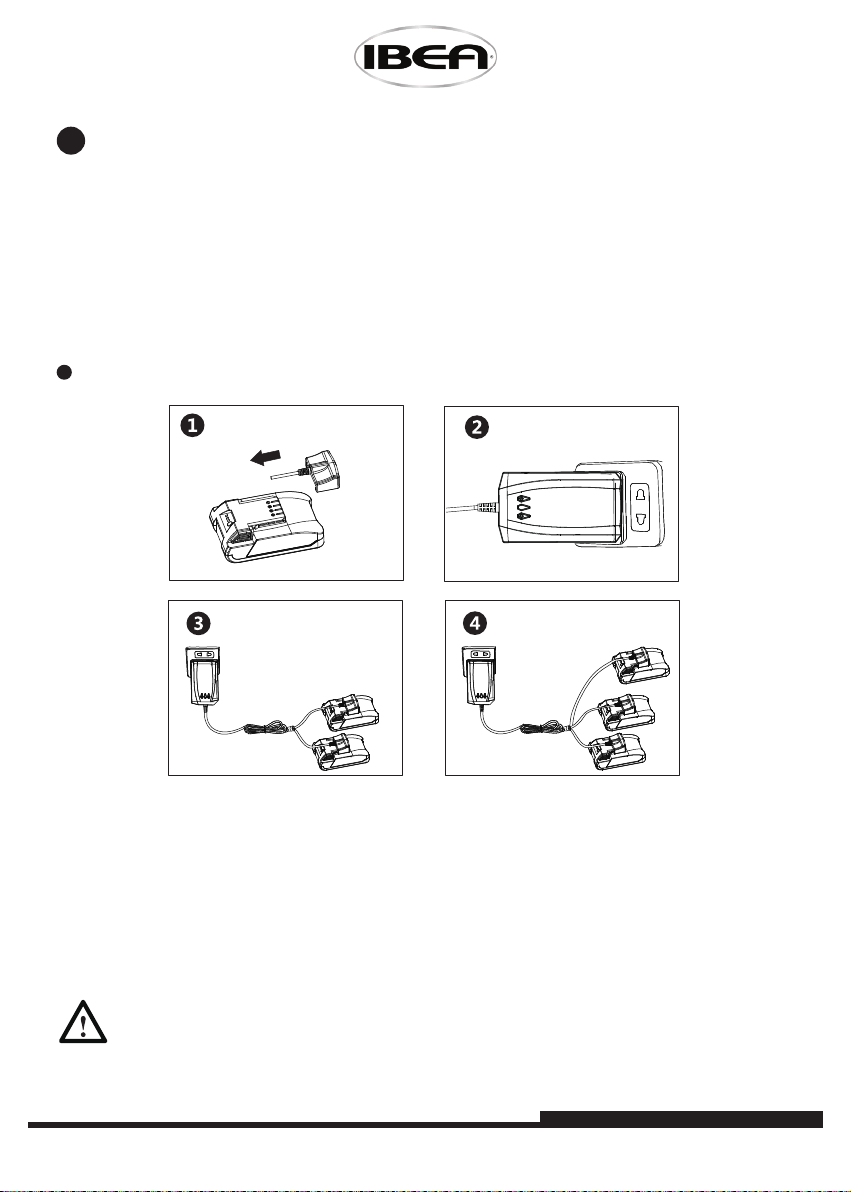
Charging steps .................................................................................
Precautions .......................................................................................
Battery maintenance and precautions ...................................
Blade tightness adjustment ........................................................
Blade replacement .........................................................................
Packing operations ........................................................................
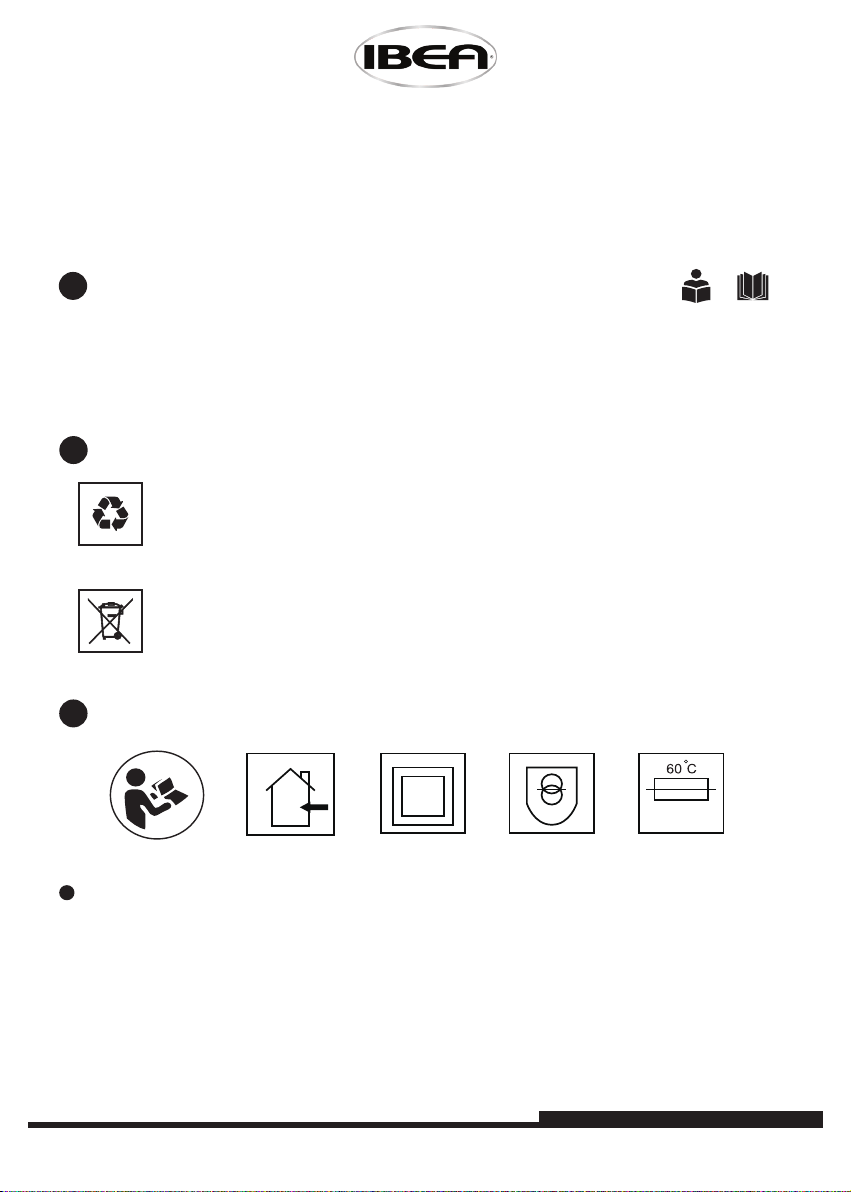
Environmental protection ...............................
Warranty ..................................................................
Warnings ..................................................................
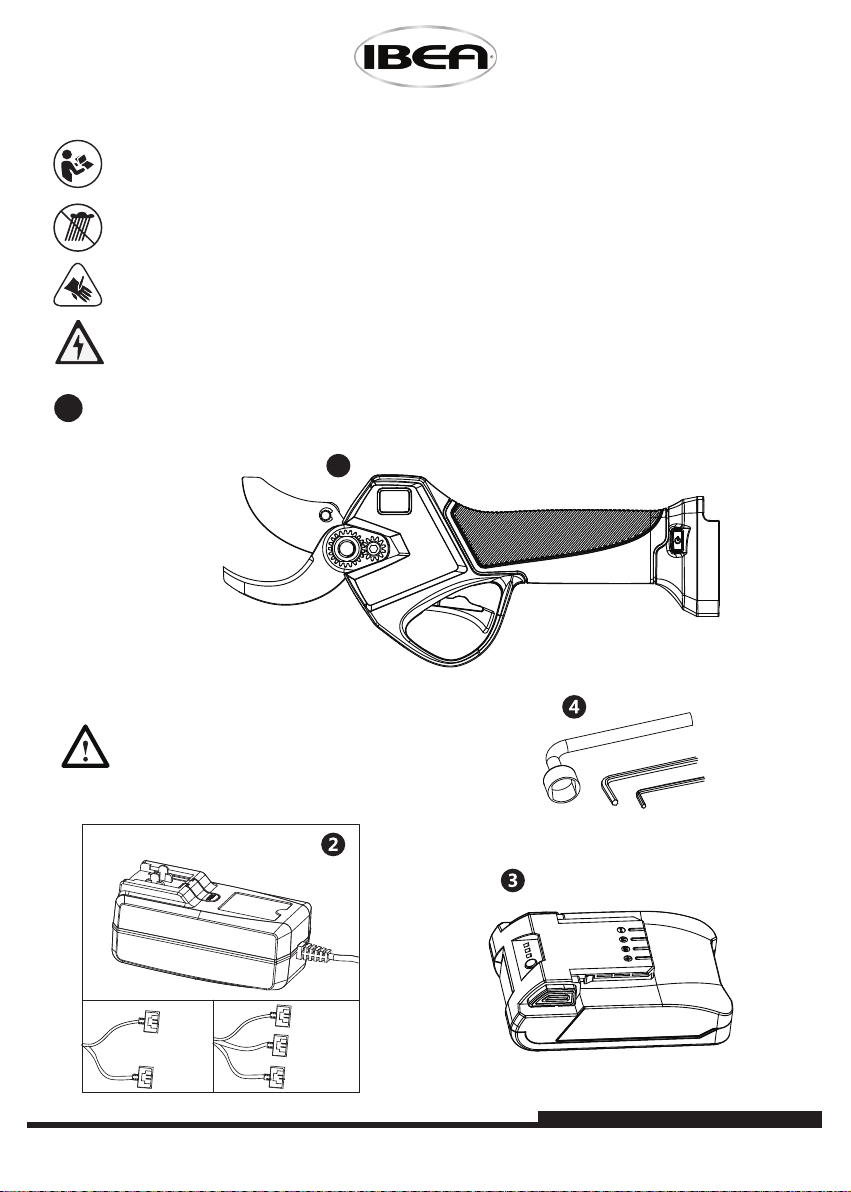
Product overview ................................................
Product description .......................................................................
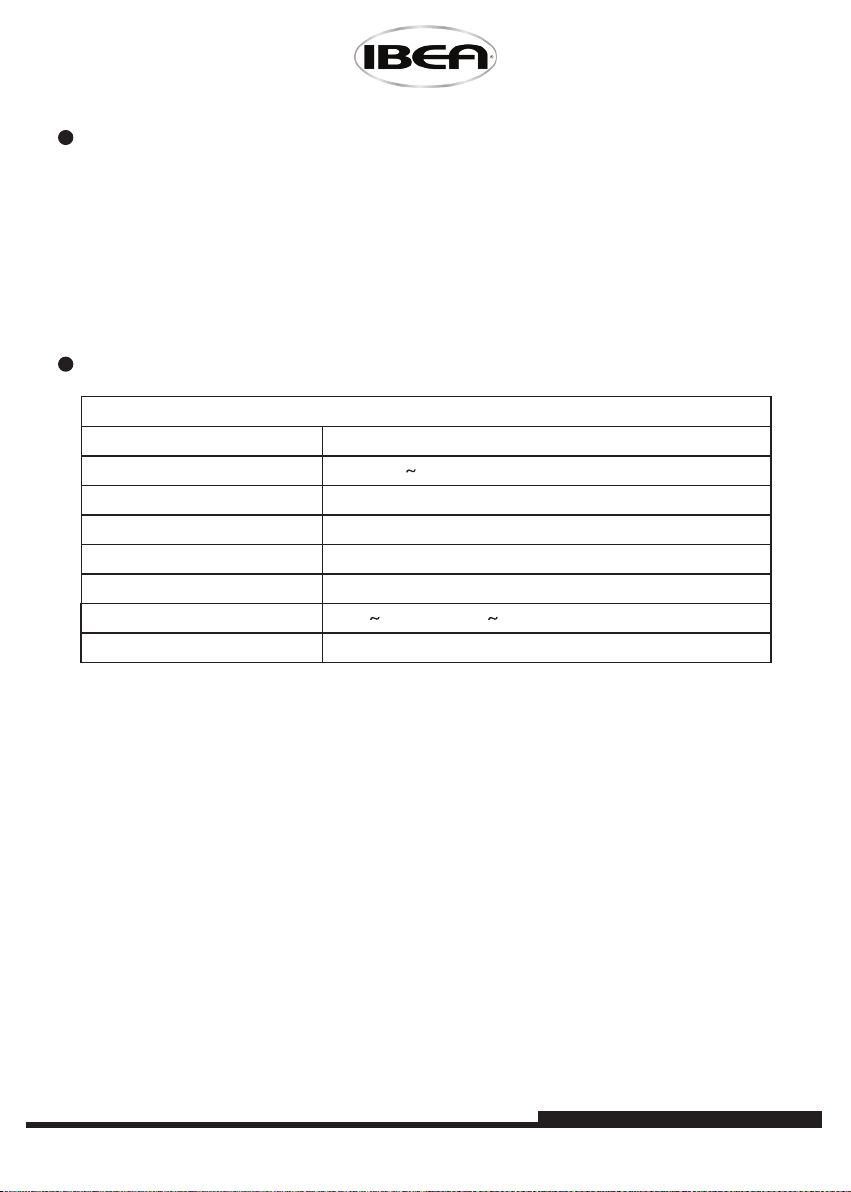
Technical data ..................................................................................
Parts description .............................................................................
AC socket adapter ..........................................................................
Packing list ..............................................................
Battery charging ..................................................
Safety notes ......................................................................................
Workplace safety .............................................................................
Electric safety ...................................................................................
Personal safety .................................................................................
Irregularity measures ........................................ 36
Usage and care for pruning shears .............
Blades sharpening .......................................................................... 36

22
1. Please read the manual carefully.
2. It can only be charged indoors.
3. Double insulation without grounding.
4. Fail safe transformer.
5. When the charger overheats, it will cut o power automatically.
6. Do not dispose the charger with household waste.
7. Do not dispose of batteries with household waste.
Notes
Dear customer, thank you for choosing an Ibea product. In order to use
at best this product, we advise you to read this manual in all its parts and
keep it carefully for future reference. If you nd any anomalies or malfunctions,
do not hesitate to contact Ibea assistance center closest to you.
Warnings
Please read all safety warnings and instructions carefully. Failure to comply with the
relevant warnings and instructions may result in electric shock, re or other serious
injury.
Please keep all warnings and instructions for future reference.
Product overview
Environmental protection
Please comply with the relevant national laws and regulations on waste
disposal. Electronic and electrical appliances should not be treated as
domestic waste. Equipment, accessories and packaging shall be recyclable.
It is forbidden to discard the machine at will.

23
1. Please read the manual carefully.
2. It can only be charged indoors.
3. Double insulation without grounding.
4. Fail safe transformer.
5. When the charger overheats, it will cut o power automatically.
6. Do not dispose the charger with household waste.
7. Do not dispose of batteries with household waste.
Notes
Dear customer, thank you for choosing an Ibea product. In order to use
at best this product, we advise you to read this manual in all its parts and
keep it carefully for future reference. If you nd any anomalies or malfunctions,
do not hesitate to contact Ibea assistance center closest to you.
Warnings
Please read all safety warnings and instructions carefully. Failure to comply with the
relevant warnings and instructions may result in electric shock, re or other serious
injury.
Please keep all warnings and instructions for future reference.
Product overview
Environmental protection
Please comply with the relevant national laws and regulations on waste
disposal. Electronic and electrical appliances should not be treated as
domestic waste. Equipment, accessories and packaging shall be recyclable.
It is forbidden to discard the machine at will.
Please read all safety warnings and instructions carefully.
If the relevant warnings and instructions are not followed, electric shock,
re and severe burns may occur.
Do not use or expose electric trimmer in rain.
When operating the electric trimmer, do not put your hands
near the cutting area to avoid injury.
Do not put the trimmers in contact with live objects to avoid injury.
1
1. Electric pruning shears
2. Charger
3. Lithium battery (x2)
4. Supporting tools
Packing list
Note: This charger will be
equipped with one charger or
two chargers or one charger for
three according to the product
model you purchased.

24
Product description
Technical data
This product is a battery driven electric pruning shears, which is composed of xed
blade, mobile blade, lithium battery, charger, etc. It is mainly used for cutting and
pruning grafting of fruit branches below 35 mm and pruning and harvesting of a large
number of orchards. When used, it is simple and convenient, which is 8-10 times of the
traditional manual pruning eciency, and the pruning quality is obviously higher than
that of the traditional manual trimmers.
Basic information of electric trimmer
Working voltage
Battery charging time
Battery working time
Maximum power
Max. trimmer diameter
Working temperature
Weight (battery included)
21V
1240 g
2 - 2,5 hours
620W
3 - 4 hours (based on usage)
35 mm
14°F 149°F / -10°C 65°C
Input voltage of charger AC 110V 220V

25
Product description
Technical data
This product is a battery driven electric pruning shears, which is composed of xed
blade, mobile blade, lithium battery, charger, etc. It is mainly used for cutting and
pruning grafting of fruit branches below 35 mm and pruning and harvesting of a large
number of orchards. When used, it is simple and convenient, which is 8-10 times of the
traditional manual pruning eciency, and the pruning quality is obviously higher than
that of the traditional manual trimmers.
Basic information of electric trimmer
Working voltage
Battery charging time
Battery working time
Maximum power
Max. trimmer diameter
Working temperature
Weight (battery included)
21V
1240 g
2 - 2,5 hours
620W
3 - 4 hours (based on usage)
35 mm
14°F 149°F / -10°C 65°C
Input voltage of charger AC 110V 220V
Parts description
44
27
Battery charge level.
For 2 sec. appears
total N. of cuts made,
later appears the N. of cuts
from beginning of session.
4
2
1. Moving blade
2. Fixed blade
3. Pin
4. Trigger
5. Display
6. ON/OFF switch
7. Battery release button
8. Power indicator
9. Battery charge/discharge jack
10. Charger plug
11. Charger AC socket
1
3
5
6
7
8
9
10 11

26
Disassemble & assemble the charging plug
Push the charging plug inward in parallel with the socket of the charger to complete the
installation.
Press and hold the disassembly button as shown in Figure 1, and simultaneously push
the charging plug outward.
Supplied adapter.

27
Disassemble & assemble the charging plug
Push the charging plug inward in parallel with the socket of the charger to complete the
installation.
Press and hold the disassembly button as shown in Figure 1, and simultaneously push
the charging plug outward.
Supplied adapter.
1. Please conrm the power of the battery pack before use.
2. When the trimmers are not in use, make sure that the trimmers and the power supply
are disconnected. Please bear in mind that the power supply of the trimmers must be
disconnected in the process of refueling, grinding blade and replacing blade.
3. Please check the tightness of the blade before use (see P11).
Use and maintenance
Instructions before use:
Operating instructions
1. Open the package and insert the battery pack into the insertion interface of the
electric trimmer.
2. Turn on the power control switch, and the power indicator is green. (see P3)
3.When the power is on for the rst time, the buzzer rings twice, and the trigger is pulled
twice continuously to enter the activation state.
4. Normal shearing: press the trigger and the blade closes. Release the trigger and the
blades open. Blade closing: press the trigger continuously, and the long sound of buzzer
is the blade closing state.
5. Before working, please press the trigger intermittently to close the blade without load
for several times to check whether it is normal.
6. Start working after normal operation.
7. In the event that the branches are small in diameter and you want to speed up the cut,
set the opening of the blades at 25 mm instead of 35 mm. For this setting, proceed as
follows: after turning on the machine, press and hold the trigger for 2 seconds, until an
acoustic signal is emitted. To restore the previous setting, repeat the operation.
Packing operations
1. Press and hold the trigger for more than 5 seconds, release the trigger, the blade will
close and no longer open.
2. Turn o the power and remove the battery.
3. Sorting, cleaning and packing.
Pruner
ON/OFF
button
Battery
ON/OFF
button

28
Fault prompt on the display screen:
When using this product, if the following code appears on the screen, repair or handle
it according to the corresponding fault prompt.
In case of any fault, please handle it according to the prompt code on the disply screen.
Alarm content
The board LED
ashes several times
The buzzer of the card
sounds several times
Error code indicated
on the display
No error
0 0 E00
Current sensor error 2 6 E02
MOSFET failure 3 6 E03
Hall blade sensor failure 4 3 E04
Overcurrent protection 5 5 E05
Opening blocked / rotor blocked 6 3 E06
Phase error 7 4 E07
Overcurrent / Undercurrent 8 1 E08
Overheating MOS/chip 9 6 E09
Communication error 10 2 E10
Bit error 10 7 E10
EEPROM error 11 6 E11
Phase detection failure 12 4 E12
Programming error 13 6 E13
Scheduled maintenance 15 5 E15
Battery error 16 9 E16
Communication error between
board and batteries 17 10 E17
Meanings of shears alarms
More
instructions
Error reports

29
Fault prompt on the display screen:
When using this product, if the following code appears on the screen, repair or handle
it according to the corresponding fault prompt.
In case of any fault, please handle it according to the prompt code on the disply screen.
Alarm content
The board LED
ashes several times
The buzzer of the card
sounds several times
Error code indicated
on the display
No error
0 0 E00
Current sensor error 2 6 E02
MOSFET failure 3 6 E03
Hall blade sensor failure 4 3 E04
Overcurrent protection 5 5 E05
Opening blocked / rotor blocked 6 3 E06
Phase error 7 4 E07
Overcurrent / Undercurrent 8 1 E08
Overheating MOS/chip 9 6 E09
Communication error 10 2 E10
Bit error 10 7 E10
EEPROM error 11 6 E11
Phase detection failure 12 4 E12
Programming error 13 6 E13
Scheduled maintenance 15 5 E15
Battery error 16 9 E16
Communication error between
board and batteries 17 10 E17
Meanings of shears alarms
More
instructions
Error reports
Battery Charging
The battery of the new product is not fully charged. Place the battery on the desktop,
insert the charger output jack into the battery socket, as illustrated in Fig. 1 and then
plug the charger plug into the power socket. When the indicator light lights up, charging
starts.
When the indicator light of the charger is red, it indicates that the charger is charging;
when it is green, the charging is done and the battery can be used.
Battery
Charger plug
Charging steps:
1. Place the battery on the desktop and insert the charger plug into the battery, as
shown in Fig. 1;
2. Plug the charger into a power outlet;
3. When the indicator light of the charger is red, it indicates that the charger is charging;
when it is green, the charging is done.
Precautions: Each indicator light represents the charging state of one USB. This
charger has three/two USB ports, as illustrated in Figs. 3-4. Two-port and
three-port chargers are optional based on the model of the product you
purchase.

30
8
Please use the charger included for charging, on which there is an indicator light
corresponding to each charging plug (whether for individual charging or
multiple charging, please refer to the indicator light on the charger to determine
if charging is completed. The charger adopts a sequential charging method
instead of simultaneous charging).
Note: whether the battery is connected or the power supply is not connected, the
indicator light is green.
To charge two batteries with
one charger, as shown in the
gure:
1. Not charging
2. Charging
3. Fully charged
To charge three batteries with
one charger, as shown in the
gure:
1. Not charging
2. Charging
3. Fully charged
Note: In case that two or three batteries are connected, charging will start by the order
from 1 to 2 then to 3, during which the indicator light is red and will turn green when
the battery is fully charged. If the current battery is fully charged, the charger will jump
to the next battery to be charged by the aforementioned order.
Charging indicator sequence
Red Green GreenGreen
Red Green Green Green

31
8
Please use the charger included for charging, on which there is an indicator light
corresponding to each charging plug (whether for individual charging or
multiple charging, please refer to the indicator light on the charger to determine
if charging is completed. The charger adopts a sequential charging method
instead of simultaneous charging).
Note: whether the battery is connected or the power supply is not connected, the
indicator light is green.
To charge two batteries with
one charger, as shown in the
gure:
1. Not charging
2. Charging
3. Fully charged
To charge three batteries with
one charger, as shown in the
gure:
1. Not charging
2. Charging
3. Fully charged
Note: In case that two or three batteries are connected, charging will start by the order
from 1 to 2 then to 3, during which the indicator light is red and will turn green when
the battery is fully charged. If the current battery is fully charged, the charger will jump
to the next battery to be charged by the aforementioned order.
Charging indicator sequence
Red Green GreenGreen
Red Green Green Green
1. It is normal for the charger and battery to heat slightly during charging.
2. If the battery is not used for a long time, it needs to be recharged every three
months to prolong its service life.
3. A new battery or a battery that has not been used for a long time will not reach its
maximum capacity before about ve times of charging and discharging.
4. Do not recharge after a short operation, which may reduce battery life and perfor-
mance.
5. Do neither use a damaged battery pack nor disassemble the charger and the battery
pack.
6. The battery will explode when it is put into re. Do not bake the battery pack.
7. Do not charge the battery in outdoor and humid environments.
8. As the battery power decreases, the shearing capability of diameter will decrease.
9. Be sure to disconnect the electric pruning shears before charging. Do not use it while
charging.
Precautions
Battery maintenance and precautions
1. Do not charge in an environment below 0°C and above 45°C, which may damage the
battery and the charger.
2. Please turn o the switch before connecting the battery. If the switch is on, accidental
connection of the battery to the machine is likely to occur.
3. Charge the battery only with the charger designated by the manufacturer. The use of
other chargers may lead to re and other dangers.
4. When the battery is not in use, keep it away from small metal objects such as paper
clips, coins, keys, nails and screws that will lead to short circuit, for short circuit may lead
to burns or re.
5. Do neither disassemble nor reassemble the battery.
6. Do not use batteries with short circuit.
7. Do not use the battery near any heat source.
8. Do not put the battery into re or water.
9. Do not charge near re or sunlight.
10. Dot not insert any nail into the battery and hit or throw the battery with a hammer or
foot.
11. Do not use batteries that are severely damaged or deformed.
12. Do not weld directly on the battery.
13. Reverse charging, reverse-pole connection and over-discharge of the battery is not
permitted.
14. Do not connect the battery to power sockets or car cigarette lighter socket.
15. Do not use it on non-designated devices.
16. Direct contact with lithium battery is prohibited.
17. Do not place the battery in containers with high temperature and high pressure such
as a microwave oven.

32
18. Do not use any leaky battery.
19. Keep the battery away from children's reach.
20. Do not use or place the battery under the sun (or direct sunlight), other- wise it may
cause the battery to overheat and catch re, which will result in functional failure and
shortened life.
Lubrication
Blade lubrication
The power supply of the trimmers must be disconnected before operation.
The blade should always be lubricated before use or after being used for more than 4
hours. The correct way to lubricate is to open the blade. For lubrication, use lithium
spray grease.
Procedure:
The lubricant inlet hole is indicated by the arrow. Insert the nozzle of the grease nipple
into the lubrication hole and press a few times to obtain a uniform distribution of the
lubricant.
Blade tightness adjustment
The power supply of the trimmers must be disconnected before operation.
Check the tightness of the blade before use. The blade with the correct tightening will
not wobble neither to the left nor to the right. If the tightening of the blade is optimal,
the scissors will save the battery and not unnecessarily strain the engine.
Note: the blade must not swing sideways when closed. Side swinging will produce a gap
between the two blades, resulting in the gear teeth not meshing properly, potentially
causing damage to the mechanical structure.

33
18. Do not use any leaky battery.
19. Keep the battery away from children's reach.
20. Do not use or place the battery under the sun (or direct sunlight), other- wise it may
cause the battery to overheat and catch re, which will result in functional failure and
shortened life.
Lubrication
Blade lubrication
The power supply of the trimmers must be disconnected before operation.
The blade should always be lubricated before use or after being used for more than 4
hours. The correct way to lubricate is to open the blade. For lubrication, use lithium
spray grease.
Procedure:
The lubricant inlet hole is indicated by the arrow. Insert the nozzle of the grease nipple
into the lubrication hole and press a few times to obtain a uniform distribution of the
lubricant.
Blade tightness adjustment
The power supply of the trimmers must be disconnected before operation.
Check the tightness of the blade before use. The blade with the correct tightening will
not wobble neither to the left nor to the right. If the tightening of the blade is optimal,
the scissors will save the battery and not unnecessarily strain the engine.
Note: the blade must not swing sideways when closed. Side swinging will produce a gap
between the two blades, resulting in the gear teeth not meshing properly, potentially
causing damage to the mechanical structure.
Blade replacement
The power supply of the trimmers must be disconnected before operation.
When the upper blade and the lower blade do not coincide well, or the blade is still not
cut clean after grinding, it is recommended to replace the blade. The operation steps are
as follows:
1. To ensure safety, power o and remove the battery before replacement.
2. Change the blade step by step according to the following gure.
3. After the replacement, clean, connect the battery, power on the detection and close
the blade.
5
5
1234
6
5
6
7
6
5
7
8
6
5
8
5
9
6
5
10
6
5
11
12
6
5
12
The xed and movable blades can be replaced separately, you don't need to worry about
the blade opening size when replacing, it will automatically return to the normal opening
size after power on.

34
Usage and care for pruning shears
1. Do not cut branches beyond specied diameter indicated, do not cut hard items
such as metals, stones or any other non-plants materials. If the blades are worn or
damaged, please replace them.
2. Keep the pruning shear clean; use a clean cloth to clean the pruning shear, battery
and charger (do not use any abrasive or solvent-based cleaning agent) use a soft dry
brush to clean the dust o the pruning shear head.
3. Do not immerse the pruning shear, battery or charger in any liquid.
4. Follow instructions as given for proper use of the pruning shear, do not use the
pruning shear when the tool itself, battery or charger are damaged.
5. Do not use the pruning shear if it could not operate or shut down properly. Send for
servicing immediately. It is dangerous to use the pruning shear when the tool could
not operate or shut down properly.
6. Please ensure the pruner is powered o during any adjustment, replacing accessories
or storage. This protective measure aims to reduce the risk of accidental pruner
activation.
7. Please ensure the blades are closed when not in use, storage of the pruning shear
must keep out of reach of CHILDREN, do not allow any person, who is not familiar
with the pruner, to use the tool without instruction. It is dangerous to use the
pruning shear without proper training and understanding.
8. To use the pruning shear must comply with instructions stated in this manual and
methods of use as well as taking in consideration of the working environment and
nature of work undertaken. The use of the pruning shear not within its stated
capability and specications is dangerous.
9. Remove all dirt from the moving and xed blades after each use, thereafter apply
lubricant on the blade side where both moving and xed blade contact. This will
ensurethe blades are maintained in good conditions and reduce resistance during
use, prolonging the pruner and blades lifespan.
10. At the end of the work, always remove the battery and store the machine in a
safe place, out of the reach of children. The company declines all responsibility for
damage to things or people.
11. Having reached 300,000 total cuts, the shears require extraordinary maintenance at
an authorized Ibea service center, otherwise the warranty will be invalidated.
1. Keep work area clean and bright, messy and dimmed workplace may cause accidents.
2. Do not use the pruning shear in explosive, inammable or humid environment.
3. Keep CHILDREN and bystander away before operating the pruning shear to avoid
accidental injury due to distraction.
Workplace safety
Electrical safety
1. Pruning shear battery socket must be compatible with the power cable plug, do not
modify the socket and the plug.
2. Do not expose the pruning shear to rain, humid environment, water or any other
moisture that will risk electrical shock.
3. Do not misuse the power cord. Do not lift or pull up the pruning shear by the power
cord. Keep the pruning shear away from heat, oil, sharp edges or moving parts.
Safety notes
Warning! Please read all instructions carefully, not complying with instructions may lead
to electric shocks, re or other serious damage!

35
Usage and care for pruning shears
1. Do not cut branches beyond specied diameter indicated, do not cut hard items
such as metals, stones or any other non-plants materials. If the blades are worn or
damaged, please replace them.
2. Keep the pruning shear clean; use a clean cloth to clean the pruning shear, battery
and charger (do not use any abrasive or solvent-based cleaning agent) use a soft dry
brush to clean the dust o the pruning shear head.
3. Do not immerse the pruning shear, battery or charger in any liquid.
4. Follow instructions as given for proper use of the pruning shear, do not use the
pruning shear when the tool itself, battery or charger are damaged.
5. Do not use the pruning shear if it could not operate or shut down properly. Send for
servicing immediately. It is dangerous to use the pruning shear when the tool could
not operate or shut down properly.
6. Please ensure the pruner is powered o during any adjustment, replacing accessories
or storage. This protective measure aims to reduce the risk of accidental pruner
activation.
7. Please ensure the blades are closed when not in use, storage of the pruning shear
must keep out of reach of CHILDREN, do not allow any person, who is not familiar
with the pruner, to use the tool without instruction. It is dangerous to use the
pruning shear without proper training and understanding.
8. To use the pruning shear must comply with instructions stated in this manual and
methods of use as well as taking in consideration of the working environment and
nature of work undertaken. The use of the pruning shear not within its stated
capability and specications is dangerous.
9. Remove all dirt from the moving and xed blades after each use, thereafter apply
lubricant on the blade side where both moving and xed blade contact. This will
ensurethe blades are maintained in good conditions and reduce resistance during
use, prolonging the pruner and blades lifespan.
10. At the end of the work, always remove the battery and store the machine in a
safe place, out of the reach of children. The company declines all responsibility for
damage to things or people.
11. Having reached 300,000 total cuts, the shears require extraordinary maintenance at
an authorized Ibea service center, otherwise the warranty will be invalidated.
1. Keep work area clean and bright, messy and dimmed workplace may cause accidents.
2. Do not use the pruning shear in explosive, inammable or humid environment.
3. Keep CHILDREN and bystander away before operating the pruning shear to avoid
accidental injury due to distraction.
Workplace safety
Electrical safety
1. Pruning shear battery socket must be compatible with the power cable plug, do not
modify the socket and the plug.
2. Do not expose the pruning shear to rain, humid environment, water or any other
moisture that will risk electrical shock.
3. Do not misuse the power cord. Do not lift or pull up the pruning shear by the power
cord. Keep the pruning shear away from heat, oil, sharp edges or moving parts.
Safety notes
Warning! Please read all instructions carefully, not complying with instructions may lead
to electric shocks, re or other serious damage!
Personal safety
1. Do not wear loose clothing or jewelry that could get caught in the parts in movement.
2. Maintain attention, do not get distracted, use common sense during use tool. Do not
use the tool if excessively tired or under the eect of drugs, drugs, alcohol or other
substances.
3. Do not use the scissor in rainy weather.
4. The tool is designed for pruning branches, do not use on hard wood or other items.
5. If the blade is stuck, do not try to unlock it before putting the ignition switch in the
OFF position.
6. Before starting the pruning work, make sure that they are not present in the branches
hidden objects or cables of various kinds.
7. During use, rmly grasp the tool with one hand and hold the blade at least 15 cm
away from the other hand and the rest of the body.
8. Do not use the tool near ammable liquids or gases to avoid the risk of re or explo-
sions.
9. The wear of the blade must be checked at regular intervals. Sharpen the blades if
necessary. Blunt blades overload the tool. Damage resulting from use with blades in bad
condition are not covered by warranty.
10. Don't try to repair the tool yourself. Always go to authorized service centers in case of
need for repairs. All maintenance operations and repair, not described in this manual,
must be carried out by a service center.
11. Prevent accidental activation. Make sure that the switch is in OFF position when the
tool is connected to the battery and when the tool comes handled or transported.
Transport the tool with the switch in ON position and your nger on the trigger can
cause danger of accidental actuation.
12. Remove all keys and repair tools before turning on the switch. A wrench attached to
moving parts can cause injury.
13. Don't go out of balance. Maintain the correct body balance in each situation. This
allows better control of the tool in case of unexpected events.
Use protective gloves.
Use suitable clothing and protective shoes with non-slip soles.
Use protective glasses.

36
Irregularity measures
1. In the event the pruning shear is not able to cut through an object, release trigger
immediately, the moving blade will return to its open position automatically.
2. In the event the pruning shear is cutting through a particularly hard branch, release
the trigger immediately, the moving blade will return to its open position
automatically.
3. In the event the battery is not charging properly, please check if the charger is the
one provided with the package during purchase. Next ensure that the supplied
voltage to the charger has the same rating as the specications on the charger.
4. In the event of electrical or mechanical malfunction, power OFF immediately.
5. Operating without following instructions may result in battery uid leakage. Do not
touch the leaked battery uid. In the event of accidental contact with battery uid,
clean with clear water immediately. If the battery uid comes in contact with the
eyes, wash with clear water and ask for medical assistance. Fluid from leaked battery
may cause irritations or burns.
Blades sharpening
Correct sharpening Wrong sharpening
Movable
blade
Fixed
blade

37
Irregularity measures
1. In the event the pruning shear is not able to cut through an object, release trigger
immediately, the moving blade will return to its open position automatically.
2. In the event the pruning shear is cutting through a particularly hard branch, release
the trigger immediately, the moving blade will return to its open position
automatically.
3. In the event the battery is not charging properly, please check if the charger is the
one provided with the package during purchase. Next ensure that the supplied
voltage to the charger has the same rating as the specications on the charger.
4. In the event of electrical or mechanical malfunction, power OFF immediately.
5. Operating without following instructions may result in battery uid leakage. Do not
touch the leaked battery uid. In the event of accidental contact with battery uid,
clean with clear water immediately. If the battery uid comes in contact with the
eyes, wash with clear water and ask for medical assistance. Fluid from leaked battery
may cause irritations or burns.
Blades sharpening
Correct sharpening Wrong sharpening
Movable
blade
Fixed
blade
Warranty
This machine has been conceived and manufactured through the most modern
productive techniques. The manufacturer guarantees its products for a period of
24 months from the date of purchase except for professional continuous service
products, used for work on behalf of third parties, for which the warranty is
12 months from purchase date.
WARRANTY CONDITIONS
The guarantee is recognized from the date of purchase. The construction company
replaces defective parts free of charge in the material, workmanship and
production. The warranty does not cover the replacement of the machine.
The technical sta will take care of the problem within the time limits granted by
organizational needs and, in any case, in the shortest possible time. No delay will give
rise to requests for damages nor to the request for extension of theguarantee itself.
To request warranty service, you must show, to authorized personnel,
the warranty certicate stamped by the dealer, completed in all its parts and
accompanied by the purchase invoice or receipt or other returned document
scally mandatory and proving the date of purchase.
The guarantee lapses in case of:
- No obvious maintenance
- Incorrect use or tampering with the product
- Use of unsuitable lubricants
- Use of non-original spare parts or accessories
- Repair work carried out by unauthorized personnel
The manufacturer excludes from the warranty all parts subject to normal wear
and tear of operation.
Any damage caused during transport must be immediately
reported to the carrier, under penalty of forfeiture of the guarantee.
The manufacturer is not liable for any direct or indirect damages caused to
people or things, from machine failures or resulting from forced suspension
prolonged use of the same.
The images in this manual are for illustrative purpose only
and may dier from the actual appearance of the product. The information
contained in this manual are subject to change without notice.

DECLARATION OF CONFORMITY
(Annex II A directive 2006/42/CE)
The manufacturer
IBEA s.r.l.
Via Milano 15/17
21049 Tradate (VA) - ITALY
Of the machine:
Name
Type
Model
From Serial number
Date of construction
Battery electric pruner
Linea Kratos
Kratos 35
210001
07/2021
Declares, under its own responsibility, that the above mentioned machine
complies with the provisions of the following Directives and subsequent amendments:
2006/42/CE
2014/30/UE
2011/65/UE
Applied standards
Machinery directive
Electromagnetic Compatibility Directive
RoHS II directive
UNI EN ISO 12100:2010
It also declares that the person authorized to compile the le, established in the European Community,
is: Ing. Alberto Grini, via Milano, 15/17 - 21049 Tradate (VA) - ITALY
Date
19/07/2021
Place
Tradate (VA)
ITALY
Signature
Alberto Grini
(Legal representative)
EN - Translation of the original text

DECLARAÇÃO DE CONFORMIDADE
(Anexo II A Directiva 2006/42/CE)
O Fabricante
IBEA s.r.l.
Via Milano, 15/17
21049 Tradate (VA) - ITALY
Da máquina:
Denominação
Tipo
Modelo
Começando do N° de série
Data de construção
Máquina de podar elétrica a bateria
Linea Kratos
Kratos 35
210001
07/2021
Declara, sob a sua própria responsabilidade, que as máquinas acima referidas
está em conformidade com as disposições das seguintes directivas e alterações:
2006/42/CE
2014/30/UE
2011/65/UE
Normas aplicadas
Directiva máquinas
Directiva Compatibilidade Electromagnética
Directiva RoHS II
UNI EN ISO 12100:2010
Declara igualmente que a pessoa autorizada a apresentar o pedido, estabelecida na Comunidade Europeia,
é: Ing. Alberto Grini, via Milano, 15/17 - 21049 Tradate (VA) - ITALY
Data
19/07/2021
Lugar
Tradate (VA)
ITALY
Assinatura
Alberto Grini
(Representante legal)
PT - Tradução do texto original
Notes
Table of contents
Popular Power Tools manuals by other brands

RAPIDTOOL
RAPIDTOOL RT-60 user guide

Far Tools
Far Tools XF-Jig Original manual translation

Silvercrest
Silvercrest SEAS 20 A1 operating instructions

Traditional Tool Repair
Traditional Tool Repair P330 Operation manual & spare parts list

Worx Nitro
Worx Nitro WG330E Original instructions

Thermaltronics
Thermaltronics TMT-9000S user manual