Ripley Technology
You’ve just purchased the finest softtail ever built. The Ripley has numerous
features which combine to give you an extremely comfortable high performance
ride. The Ripley is in a class of its own: the world’s only aluminum Softtail. Its
1.25” of rear wheel travel equals that of typical titanium softtails, and at 4.4
lbs. it weighs the same, yet it costs a fraction of that of a titanium softtail.
In order to attain long travel, superior front end torsion and excellent lateral
rigidity, the Ripley has a highly evolved and integrated system of components
and features. To maximize the performance and pleasure you experience while
riding your Ripley, we recommend you familiarize yourself with the frame and
its features by reading through this guide, and spending an appropriate amount
of time on setup and tuning.
And don’t forget to activate your warranty!
Table of Contents
Key Components pg 3 Reassembly pg 8
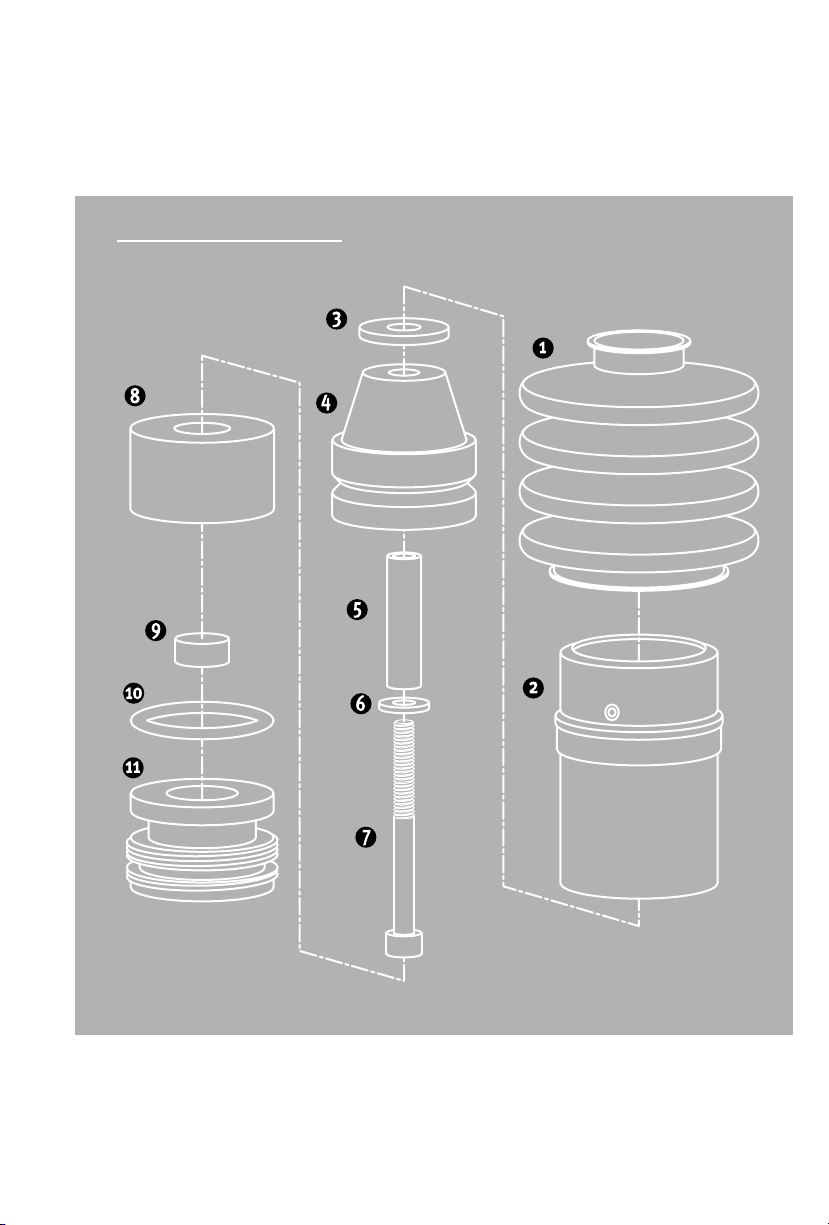
Shock Tuning Guidelines pg 4-5 Shock Diagram pg 9
Lubrication pg 6 Parts List pg 10
Disassembly pg 7 Warranty pg 11
Quick Guide
Impatient are we? Although we recommend you read this manual in its entirety,
here is the quick and dirty tuning guide:
Step 1—Set the sag of the shock (the amount of travel you see when you sit
on the saddle without moving) to 0.3-0.4 inches. Adjust the sag with a
Shimano (TL-UN74S) or Park (BBT-2) BB tool or with either a 19mm or
3/4” socket by turning the preload adjuster (part # 11 pg. 9) at the
bottom of the shock. Righty tighty increases spring force/decreases sag.
Step 2—Ride the bike for a few hours to allow the spring (part #8 pg. 9) to set.
Step 3—Check sag occasionally, as the springs will continue to find their
groove thang.
Step 4—Lube the shock every 20 hours of riding (or as needed) by pulling
up the shock boot and injecting each of the two chamfered holes with
SRAM Jonnisnot®. You’re finished when you see lube coming out of the
non chamfered holes. DO NOT USE ANY OTHER LUBES
Step 5—Ride
2
Ibis Lifetime Warranty
IMPORTANT – PLEASE READ:YOU MUST ACTIVATE YOUR NEW PRODUCT WARRANTY WITHIN 14 DAYS OF
PURCHASE BY CALLING IBIS AT 800-283-0943 OR BY VISITING OUR WEBSITE: www.ibiscycles.com/warranty
11
Subject to the limitations, terms and conditions set forth below, Ibis LLC (“IBIS”) warrants to the original
owner of each IBIS frame (“Frame”) that when new, such Frame is free of defects. This Lifetime Limited
Warranty (“Frame Warranty”) covers IBIS Frame for the lifetime of the Frame1. This Warranty does not
apply to paint/finish or third party components attached to the Frame such as front forks, wheels, drive
train, brakes, seatpost, handlebar and stem or any third party suspension-related parts or components.
Subject to the limitations, terms and conditions set forth below, ibis LLC (“IBIS”) warrants to the original
owner of each IBIS rear shock that is provided with an Ibis soft tail Frame (“Rear Shock”), that when new,
such Rear Shock is free of defects. This Three Year Limited Warranty (“Rear Shock Warranty”) covers
factory installed IBIS Rear Shocks for three years from the date of purchase.
In order to initiate coverage under the Frame Warranty or Rear Shock Warranty, the original owner must
register the Frame2with IBIS within 14 days of purchase. In order to exercise a claim under this
Warranty, the Frame and/or Rear Shock must be presented to IBIS or an authorized IBIS dealer, together
with a receipt, or other proof of purchase, which identifies the Frame by serial number. Should the Frame
and/or Rear Shock be determined by IBIS to be covered by this Warranty, it will be repaired or replaced,
at the sole option of IBIS, which will be conclusive and binding. If repaired or replaced, the original
owner will receive a credit towards the cost of such repair or replacement based on the number of years
since original purchase of the Frame and IBIS’ standard warranty schedule. This Warranty does not include
the cost of travel or shipment to and from an authorized IBIS dealer or IBIS factory. Such costs, if any,
shall be born by the original owner.
This Warranty does not apply to normal wear and tear, nor to claimed defects, malfunctions or failures
that result from abuse, neglect, improper assembly, improper maintenance, alteration, collision, crash or
misuse. This Frame and/or Rear Shock have not been designed, engineered, distributed, manufactured, or
sold for uses in trick riding, ramp riding, jumping, aggressive riding, riding on severe terrain, riding in
severe climates, riding with heavy loads, commercial activities, or any similar activities. Such uses may
damage the Frame and/or Rear Shock, can cause serious injury to the rider, and in all cases will void this
Warranty. This Warranty is made only to the original owner of a new IBIS Frame and/or Rear Shock
purchased from an authorized IBIS dealer and is not transferable.
An authorized IBIS dealer should periodically check IBIS Frame for indicators of stress and/or potential
failure, including cracks, deformations, corrosion, paint peeling, dents, and any other indicators of
potential problems, inappropriate use, or abuse. These are important safety checks that can prevent
accidents, bodily injury and shortened Frame life. This Warranty does not cover malfunctions or failures
caused by delay in bringing a problem or potential problem to the attention of IBIS or an authorized IBIS
dealer.
This is an integrated and final statement of the IBIS Warranty. IBIS does not authorize anyone, including
its dealers, to extend any other warranties, express or implied, for IBIS. No other representation, and no
statement of anyone but IBIS, including a demonstration of any kind by anyone, shall create any warranty
regarding IBIS Frame or Rear Shock. IBIS’s liability under this Warranty shall be no greater than the
amount of the original purchase price of the Frame or Rear Shock and in no event shall IBIS be liable for
incidental or consequential damages.
All other remedies, obligations, liabilities, rights, warranties, express or implied, arising from law or
otherwise, including but not limited to any claimed implied warranty of merchantability, any claimed
implied warranty arising from course of performance, course of dealing or usage of trade, and any claimed
implied warranty of fitness, are disclaimed by IBIS and waived by the original owner of the Frame.
1 Titanium, steel, and aluminum frames are warranted for life to the original owner. Aluminum frames are subject
to a valuation schedule, which governs the value of the repair and/or replacement.
The Ripley chainstay carries a lifetime warranty. Should any other portion of the Ripley frame fail, its repair or
replacement will be based on the terms and conditions above, and this Aluminum Frame Valuation Schedule:
First 5 years from original purchase: Frame replacement or repair at no charge.
Years 6-7: Frame replacement or repair at current prices, with 75% of original frame price credited to original buyer.
Years 8-10: Frame replacement or repair at current prices, with 50% of original frame price credited to original buyer
After Year 10: Frame replacement or repair at current prices, with 25% of original frame price credited to original
buyer.
2 Product must be registered by completing an official Ibis Registration Form (accompanied with Frame, or available
on the Ibis Website or at an Authorized Ibis Dealer).