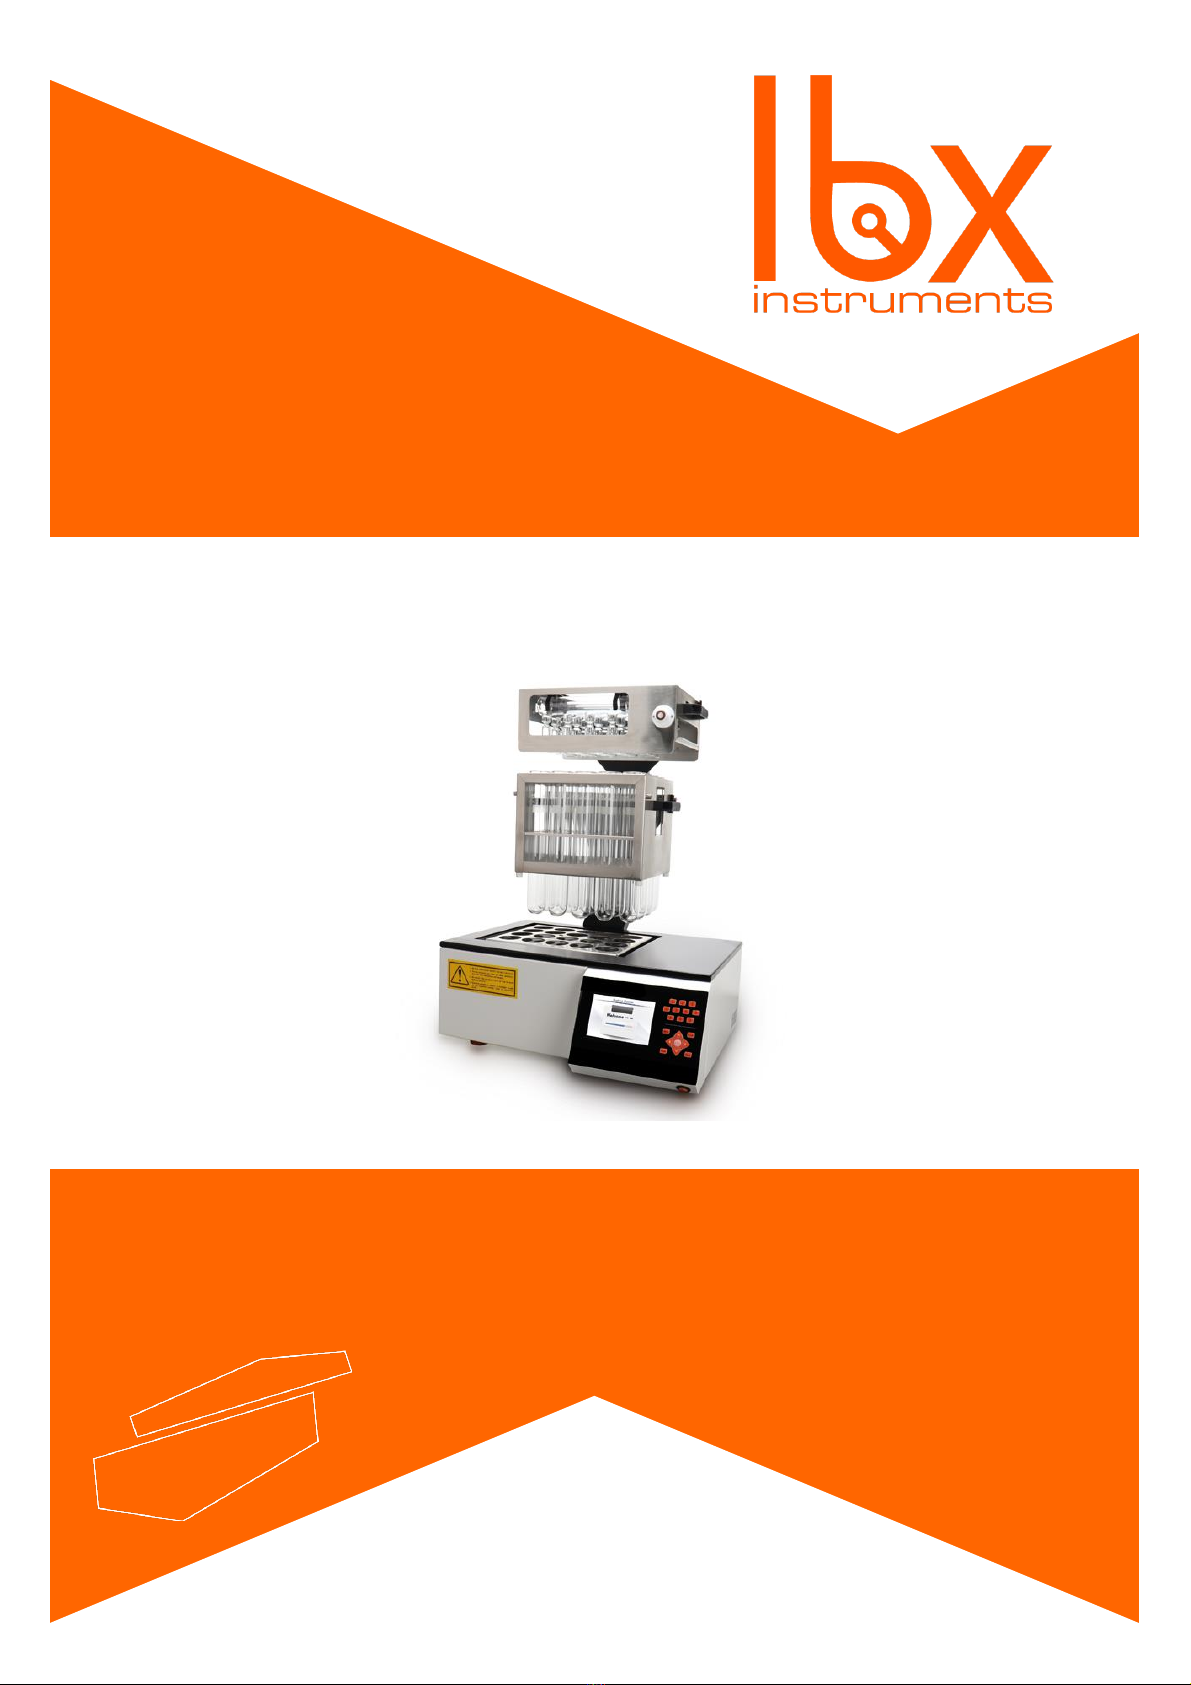
Ibx KJD10 User manual

KJD10 Kjeldahl Digestion System
Please read the User Manual carefully before use, and follow all operating and safety instructions!
user manual
english

2
User Manual
KJD10 Kjeldahl Digestion System
Important notice
This instrument is designed for laboratory usage only. Please read this manual carefully before installing or operating
this equipment. The instrument shall not be modified in any way. Any modification will void the warranty and may
result in potential hazard. We are not responsible for any injury or damage caused by any non-intended purposes and
modifying the instrument without authorization.
Service
In order to guarantee this equipment Works safely and efficiently, it must have a regular maintenance. In case of any
faults, do not try to repair it yourself. If help is needed, you can always contact your dealer or Labbox via
www.labbox.com
Please provide the customer care representative with the following information:
• Serial number
• Description of problem
• Your contact information
Warranty
This instrument is warranted to be free from defects in materials and workmanship under normal use and service, for a
period of 12 months from the date of invoice. The warranty is extended only to the original purchaser. It shall not apply
to any product or parts which have been damaged on account of improper installation, improper connections, misuse,
accident or abnormal conditions of operation.
For claim under the warranty please contact your supplier.

3
Warning: The instrument cannot provide the designed protection for operators who do not follow
the right procedures and requirements given by themanufacturer.
Warning: All solutions must be handled with care according to the lab’s safety regulation. Please
make a reference to the related material safety data sheet. Wear the lab-gown, goggle and rubber gloves
all the time. Be care of hotreagents.
Warning: Be aware of the risk of electric shock. Only trained professionals are permitted to open the
face panel or back cover
Notes: Please make sure that the water, electricity and gas sources of the instrument are turned
off after the experiment is completed.(Please operate according to the actual situation! )
Notice:
1. Do not heat the dry digestion tube.
2. If the sample is less than 20, use 100ml blank tubes for the empty positions.

4
1. Summary
Kjeldahl Digestor, adopted with globally advanced high temperature infra-red duct radiant heating
technology and MPU control platform, is characterized by its accurate temperature control and fast
temperature rise. The temperature rise, divided into linear temperature rise mode and curved
temperature rise mode, allows storage of 500 groups of digestion solutions. Each digestion solution has
25 temperature spots at most for control of temperature curve and even more provides PID (Proportion-
Integration-Differentiation) control for more stable and accurate temperature control. The waste gas
disposal system enables absorption of noxious gas, including acid and alkaline smog and the like. The
product provides attractive appearance and large screen liquid crystal display. The automated design,
allows safer, easier, faster and more reliable, convenient operation, making the digester ideal device for
high temperature digestion.
Definition of digestion: Digestion, which is also called “wet digestion” is the decomposition of the organic
matter or reducing substances in the sample by the addition of acid or alkaline liquid reagents with
heating.
Principles: Put the sample and liquid reagent in the digestion tubes, and the infrared heating pipes send
the heat in the form of electromagnetic wave to the graphite block, which further passes on the heat to
the digestion tubes. The molecules of the sample and liquid reagent absorb the heat and move faster with
increased internal energy, thus generating more heat as the molecules collide with each other. The
additional heat coupled with the reagent can accelerate the digestion process and make a more effective
and complete digestion.

5
1.1 Features:
⚫The heating efficiency is greatly improved by the infrared radiation and graphite block, which
guarantees uniform temperature.
⚫Mass storage: 500 groups of digestion solution, each of them has 25 temperature spots at most.
⚫Two modes of heating: straight line and curve; twenty heating programs in total; 1-99 intervals are
selective in each program.
⚫The uniform temperature across the block can guarantee a consistent result.
⚫High accurate temperature sensor monitors and records the heating temperature.
⚫The PID temperature controlling platform improves the accuracy and stability of the temperature.
⚫Large LCD screen.
⚫The acidic or alkaline gases generated in the experiment can be eliminated by the environmental-
friendly Scrubber (KJDF1), which can be connected to the Kjeldahl Digestor.
⚫Offers the multiple protections against overvoltage, over current and overheat; the overheating
alarm system is incorporated.
⚫Outstanding anti-corrosion performance.
⚫Cooling frame with standard configuration

6
1.2 Operating procedures:
•Power on the instrument
•Put the digestion tubes loaded with sample in the rack, and install the rack on the Graphite
Digester, which connects the Exhaust System. Connect and start the Exhaust System to the
Kjeldahl Digestor and open the condensate water switch. Check the connection and condensate
water.
•Set up the instrument by choosing the heating type and the corresponding parameters.
•The tubes rack will go down automatically after the input is confirmed. Each tube will be inserted
in the corresponding heating well in the graphite block.
•The heating will automatically stop when the preset time is reached. The tubes will rise
automatically, and the electronic fan will cool down the tubes.
•When the temperature of the tubes falls to room temperature, open the Exhaust System and
remove the tube rack.
•Check the data automatically saved in the digestion system.

7
2.Main performance
2.1 Technical Specifications
•Temperature range: room temperature + 5 ℃ to 450 ℃;
•Controllable accuracy: ±1℃
•Heating method: infrared radiation heating and graphite conduction
•Insulation material: environmental protection fiber and unique duct insulation technology
•Digestive tube: 300 mL
•Digestion capacity: 20 samples per time
•Power supply: 220 VAC ±10% 50Hz
•Power: 3.6 KW
•Dimension:515mmX458mmX730mm Weight: 40 kg
2.2 Use conditions
•Input voltage: 220V 50Hz;
•The device shall be installed at places adjacent to water source and drain tank and provided with
power sockets.
•Power supply should meet the requirements of the device to avoid electric over stress; an independent
switch, safety device and reliable grounding are required.
•The device should be placed away from big electric equipment to avoid strong magnetic field.
•Ensure the beneficial ventilation of the laboratory.

8
3.Structure
Fig. 2
1. Battery main switch 2. Shell 3. Stainless steel decorative sheet 4. Digestion duct
5. Gas collection hood 6. Cooling frame 7. Waste discharge outlet 8. Test tube rack
9. Graphite heating block 10. Operation panel
3.2 Gas collection hood
3.2.1 Operation procedure
Fix the Gas collection hood prior to digestion: Place the test-tube rack in a proper position, match the
digestion duct and the seal cover with one-to-one correspondence, and put Gas collection hood on the
digestion duct stand (See Fig.3).
After completion of the digestion, hold the grip on both ends of the test tube with hands, and take it out
along with the Gas collection hood, then hang them on the cooling frame by the fixing leg on both ends
of the test tube (See Fig.4). Hold the grip on both ends of the Gas collection hood after complete cooling
and hang the cover on the clamping position of the cooling frame. At the same time, insert the dip tray in
case digestion fluid drops down.
Fig. 3 Fig. 4 Fig. 5

9
Dip tray mated for Gas collection hood. The mated dip tray is shown in Fig. 5.
3.3 Corollary Equipment
There are two solutions for waste gas absorption:
3.3.1 KJDF1 Exhaust System (must purchase separately) is selective to the Kjeldahl Digestor
Being environmental-friendly, KJDF1 Exhaust System is used to condensate and neutralize the acidic or
alkali waste gas generated in the experiment. Kjeldahl Digestor can reach the best effect with the KJDF1
Scrubber.
Fig. 6
3.3.2 Direct connection with running water jet vacuum pump
In addition to connection with the waste gas absorption system of KJDF1, Kjeldahl Digestor can also be
connected to water jet vacuum pump for waste gas disposal. (The waste discharge outlet is required to be
inserted into the PTFE adapter in advance) (See Fig. 7)
Fig. 7

10
4.Installation
4.1 Installation
4.1.1 Check before Installation
Open the package and check the device and its parts according to the packing list. If there is any damage,
please keep the damaged parts and contact us immediately.
4.1.2 Installation steps
1. The device shall be installed at places adjacent to water source and drain tank and provided with power
sockets and grounded line.
2. Connect one side of rubber pipe with the waste air discharge opening, the other side with water jet
vacuum.
4.2 Operation
4.2.1 Introduction of the operation panel
a. Picture of the operation panel
Fig. 8 Operation panel
Features: Membrane keypads, 5.6 inches True-Color screen
b. Function of the Keys:
【Stop 】: If an emergent stop is needed due to operation error or system failure, press this key to end
heating, and then the system returns to the former interface.
【Enter】:Confirm the task or operation
【Back】:Return to the former interface
【Menu】:Return to the main interface on any condition (except interface of heating)
【←】:Cursor moves leftwards
【→】:Cursor moves rightwards
【↑】:Cursor moves upwards
【↓】:Cursor moves downwards
【0-9】:These keys are used for setting in parameters
【Pause】:Stop the heating process temporarily. Press again to restart.

11
The additional Function icon indication:
Indication of heating state: enlarging (heating on), normal (heating off).
Indication of the heating duct state.
Indication of timing state: enlarging (timing on), normal (timing off).
Indication of reaching the set temperature: enlarging (already reached), normal (not reached yet).
Indication of the overheating state: enlarging (overheating by 10 degrees), normal (no overheating).
Indication of the heating suspension state: enlarging (heating suspended), normal (heating continued).
4.2.2 Sample Digestion Process
1 Put the sample, chemical catalyst and liquid reagent into the tube; put the tube into the digestion rack.
2. Put the digestion rack on the device; put the Scrubber in the right place and open condensate water
valve.
3. Time, heating mode and PID parameters can be set up firstly. If there is no need, choose the saved
heatingsolution.
4. Linear heating for common samples and curve heating for bubbling samples
5. Digestion process will be done automatically according to the selective mode. After digestion, the
heating process will follow to stop.
6. After the sample cools down to room temperature, turn off the condensate water valve, disconnect the
Scrubber upper cover and remove the digestion tube rack.
Note: Clean the digestion liquid reagent left on the tap of the tube; get everything ready for the next
test.

12
4.2.3 Detailed Explanation of each interface
4.2.3.1. The waiting interface will be shown on the first page. See Fig.9.
Fig.9
4.2.3.2 Enter the main interface in 5 seconds, include linear heating and curve heating as Fig.10.
Fig. 10
1) Linear heating:
Press 【Enter】to enter the setup interface, setting temperature and time and press
【Enter】start heating and timing.
Fig. 11

13
2)Curve heating:
Select curve heating (shown in the figure 12), press Enter key and enter curve heating interface.
The system has automatic memory of the last setting. Press Enter key for heating according to the
curve set last time.
Fig. 12
The interface comes as follows on completion of heating:
Fig. 13
Heating is forced to stop: press stop key when heating is on, and the interface comes as follows:
Fig. 14

14
4.2.3.3 Press the Menu key on the main interface for setting module, including system parameter setting
and heating curve setting.
Fig. 15
Press 【←】【→】key for selection of system parameter setting or curve setting, and press Enter key for
setting interface.
1) Setting for heating curve:
Fig. 16
2) Setting for system parameters:
Fig. 17

15
Function introduction
Actual temperature: input the measured standard temperature (temperature stable). Sensor
temperature: temperature measured by the sensor.
Timing mode: count up timing and count down timing. Timing point: start of heating
and reaching set temperature.
Restore factory setting: restore parameter setting for delivery, wipe customer storage schemes.
4.2.3.4 Press Enter key on the main interface for help module:
Fig. 18
5.Maintenance and Repair
5.1. Maintenance:
5.1.1. Check the power cord and power supply regularly. Replace the damaged and aging components
timely.
5.1.2 Check the air pipelines, valves and connectors regularly. If air leakage or loose connection occur, or
any damaged or aging components are found, replace them timely.
5.1.3 Clean the Scrubber upper cover regularly (once a week will be the best). The specific cleaning steps:
5.1.3.1 Feed about 100ml distilled water into the digestion tube.
5.1.3.2 Put the digestion tube on the rack. Set up the exhaust receiver. Open the condensed water.
5.1.3.3 Choose the linear heating mode. Set the temperature between 120℃-150℃.
(The temperature may vary with the altitude and atmospheric pressure. It should make sure that the
water does not boil intensely.)
5.1.3.4 It should distill about 30 minutes. This process may repeat several times according to the degree
of contamination.

16
5.2. Common Faults Treatment
Number
Source of
trouble
Causes
Solutions
1
No power
a.The fuse is burnt
b. Power line not properly
connected
a. Replace the fuses
b. Properly connect the power line
2
Slow heating
a. The infrared radiation
heating pipe is damaged
b. Low or instable
voltage
a. Replace the infrared radiation heating
pipe
b. Use stable AC220V voltage
3
Gas leakage
a. The digestion duct orifice is
not sealed tight by the annular
cover at the bottom of the Gas
collection hood.
b. Suction of the water jet
vacuum
pump reduces
a. Adjust the annular cover and seal the
digestion duct orifice
b. Increase flow of the running water
4
The LCD
screen does not
work
a. The screen is damaged
b.The fuse is burnt
Replace the fuses
5
Unrecognizable
code on the
screen
The sensor is interfered or
damaged
Professionals to solve
6.Appendix
6.1. Common Acidic and Alkaline Liquid Reagents
Acidic liquid system: Nitric-Sulphuric acid, Nitric-Perchloric acid, Hydrofluoric acid and Peroxide, etc.
These chemicals can completely destroy the organics and reducing substances, such as cyanide, nitrite,
sulphide, sulphite, thiosulfate and the thermally labile thiocyanate.
Alkaline liquid system: caustic soda, etc.
6.2. Problems to be noted in the digestion
6.2.1 The component of sample under test should not suffer losses.
6.2.2 Introduce the interfering substance is not allowed.
6.2.3 The process must be safe and fast.
6.2.4 The liquid made from the digestion must suit the selected monitoring method.

17
7.Experiment Example
Oxidizing acid and mixed acid are often used in wet digestion, such as concentrated sulfuric acid, nitric-
sulphuric acid, nitric-perchloric acid and hydrofluoric acid, etc.
The following example shows how to determine the protein in food with sulphuric acid.
7.1 Measure 0.2-2.00g pre-processed solid sample and put the sample in a tube; add 0.2g CuSO4, 3gK2SO4
and 20ml concentrated H2SO4.
7.2 Put the digestion rack in the device, cover the exhaust hood and set in the
parameters.
7.3 Connect the Scrubber to the device and start the Scrubber or water jet vacuum.
7.4 After finishing the above mentioned steps, choose linear heating or curve heating.
The linear heating mode is often used for common samples. Put in the preset temperature at 380 ℃
and digest for 2h.
For sparging samples the curve heating mode is often used. In this case, the following parameters can
be a reference.
1) 160℃~200℃heating temperature between this interval 20min
2) 260℃~300℃heating temperature between this interval 25min
3) 380℃~390℃heating temperature between this interval 90min Different samples also require
different parameters.
7.5 The digestion rack rise automatically and the tube falls to room temperature.
7.6 When the samples have cooled down, open the upper board, remove the digestion rack and move
the samples to the next experiment.
8.Announcement and Safety
8.1. Announcement
The one-year warranty for the whole device is valid from the purchase date, the following cases do not
contain:
1.Any damage if the warranty expires.
2.Any damage caused by inappropriate operation.
3.Any damage caused by the unauthorized disassembly.
4.Any damage caused by the improper transportation or storage.

18
8.2. Safety Tips
This section is about the safe use of the device, including the safe operation and warning.
The following instructions must be read carefully by all persons who have or will have the responsibility
for using or serving the device. Any consequence caused by misuse of the device should be taken by the
user.
8.2.1 Requirements for the Operator
The shell of the device will be hot during the process and the strong acids and highly-corrosive liquid
are dangerous, so the device should only be operated by the professionals in the laboratory or
experienced staff with training. The operator must follow the instructions.
8.2.2 Cautions in Operation
1. When the automatic motion of the tube rack is on, please stop any further operation to avoid injury
of the hands.
2. During digestion, the temperature of the digestion tubes is very high, so be careful not to burn the
hand or any parts of the body.
3. Be cautious with the flammable reagents in the tubes.
4. Protective clothing and eye protection must be worn.
5. If there is any problem during the operation, the electricity must be cut off immediately. No further
operation.
8.2.3 For the device safety
1. Keep the electric parts of the device (such as electricity socket and main switch) dry.
2. Don’t remove the insulation cover on the surface of the device.
3. Don’t use damaged or broken digestion tubes.

19

www.labbox.com
Table of contents
Other Ibx Laboratory Equipment manuals
Popular Laboratory Equipment manuals by other brands

RIGGTEK
RIGGTEK DissoPrep X8 maintenance

Roth
Roth BA-UAK-ASME-EN Operating instruction

Aqua Ultraviolet
Aqua Ultraviolet Advantage 2000 installation manual

Genevac
Genevac EZ-2 Series user manual

Safe Fleet
Safe Fleet FoamPRO AccuMax 3020 Installation and operation manual

Teledyne Cetac Technologies
Teledyne Cetac Technologies ASX-500 Alignment procedure