Iclebo OMEGA User manual

Cleaning Robot iCLEBO OMEGA
YCR-M07
User manual
■ The following Safety Precautions must be read before using the product.
■ Product warranty is included in this User Guide
A/S and Customer Center
Model Name
Voltage
Standby Power
Battery Type
Size
Height
Weight
Speed
Filter
Sensors
Charging Time
Working Time
Noise
iCLEBO OMEGA (YCR-M07)
220 V
Less than 0.6W
53 W
Lithium ion (Li-ion)
34.6 (width) x 35.4 (length) cm
8.7 cm
3.1 kg
350 mm/s (Max)
HEPA filter
Camera, PSD, Bumper, Dust detection,
Floor carpet detection, IR
80 min. (In Turbo Mode: 60 min.)
Approx. 180 min.
68.5 dB[A] (In Turbo Mode: 70dB[A])
iOMN.USA.EN.V1 www.yujinrobotinc.com
Main Body Power
Consumption
Yujin Robot Customer Support : +1 714 880 6036
MADE IN KOREA
17517 Fabrica Way, Suite K, Cerritos, CA 90703
T+1 714 880 6036 F+1 714 880 6039
www.yujinrobotinc.com
One-Year Limited Warranty.
Specifications and features are subjected to change without notice.
ㆍMonday-Friday 9 am to 6pm PST
ㆍSaturdays
ㆍSundays
Closed
Closed

Contents
Components and
Part Names
Installation
Using the Robot Cleaner
Components
Part Names
6
7
9
9
9
9
10
10
10
10
11
11
12
12
12
13
13
14
14
15
15
15
16
16
16
17
18
19
20
Product Warranty
Open Source Software
Actions for Display
Error Messages
Display Error Messages
Checklist Before Repair Report
Consumables Replacement Cycle
to Maintain High Performance
Accessories
Emptying dust bin and cleaning HEPA filter
Cleaning Side Brush
Cleaning Sensors
Cleaning the Main Blade
Cleaning the Front Wheel
Storage
Maintenance
Power On / Off
Start / Stop cleaning
Moving / Manual Cleaning
Cleaning modes
Special Features
Timer Mode
For Effective Cleaning
How a Cleaning Robot Operates
Before Use
Assembling Side Brush
Installing Charging Station
Mounting Mop Pad
Initial Power On / Off
Charging
Applying Blocking Tape
Setting Time
1
Safety Precautions Checklist before Use
Checklist after Use
2
6

Safety Precautions
Checklist before Use
Do not dissemble or
modify a robot cleaner
unless you’re a repairman.
▶It may cause fire or
electric shock.
Do not place a charging
station and a robot cleaner
near burning objects.
▶It may change shape,
cause fire, or damage a
product due to collision.
The following instruction is to guarantee user safety and prevent any property loss.
Read the below carefully and use the product with care.
Users must follow the instructions to avoid serious injury or death.
Users must follow the instructions to avoid light injury or product damage.
Warning
Caution
Warnings
Keep adapter pins and an
interface clean from dust
or water.
▶It may cause malfunction
or electric shock.
Do not insert or disconnect
an unfit adapter into a
socket with excessive force.
▶It may cause fire or
electric shock.
2
Do not vacuum flammable
objects, surfactant, or
beverages or spray them
nearby a product.
▶It may cause fire or
damage of a product.
If water enters a product,
you must contact the
service center for a checkup
even if the product was
dried thoroughly.
▶It may cause malfunction
or damage of a product.
Do not touch an adapter
with wet hands.
▶It may cause electric
shock.
Arrange cables and tables
before use to prevent a
product from being caught.
▶It may cause malfunction
or electric shock.
1. This power unit is intended to be correctly orientated in a vertical or or horizontal or floor mount position.
2. IMPORTANT SAFETY INSTRUCTIONS – SAVE THESE INSTRUCTIONS” and “DANGER – TO REDUCE THE RISK OF FIRE OR ELECTRIC
SHOCK, CAREFULLY FOLLOW THESE INSTRUCTIONS.
3. For connection to a supply not in the U.S.A., use an attachment plug adapter of the proper configuration for the power outlet.

Remove small or fragile objects from cleaning area before use.
- Fragile pottery, ceramics, or glass product.
- Coins, hair pins, or jewelries.
- Obstacles such as tablecloth, power cords, towels, or toys.
▶It may cause fire or malfunction.
Do not use the product
battery and charging
station for other products.
▶It may cause fire or
malfunction.
Please use a single outlet
(5A or above) when using
a robot cleaner, or
disconnect other cables.
▶Connecting several
cables into a single outlet
may cause fire from
electrical overheating.
Do not repeatedly insert
and disconnect a power
plug.
▶It may cause fire or
electric shock.
When charging a product
with an adapter, please
make sure that the adapter
is properly connected to
a socket.
▶It may cause fire or
electric shock.
3
Hold a plug and avoid
contacting adapter pins
with your fingers when
disconnecting the plug
from a socket.
▶It may cause fire or
electric shock.
Please alert others when
using a product or setting
a timer mode.
▶People unaware of an
operating robot cleaner
may collide and get
injured, especially
children and the elderly.
Do not put children or
place objects on a robot
cleaner. Do not attach any
object to the product.
▶It may cause injury or
damage of a product.
Please turn off the power
and do not leave a product
unattended with a baby or
a family pet.
▶Spinning brushes may
injure the baby or pet’s
finger, hair, foot, or fur.
▶A baby or a pet may
hinder product operation.
Getting caught in running
wheels may cause injury.
▶A robot cleaner followed
and blocked will leave
dirty spaces unclean
because it will skip areas
with obstacles.
Do not put body parts such
as hands or feet under the
wheels or brushes while in
use.
▶It may cause injury or
damage of a product.
Caution required when
using a robot cleaner in a
room with a sleeping baby
or a family pet.
▶It may cause injury or
damage of a product.
Please prevent children
from playing with a
cleaner.
▶It may cause injury of
damage of a product.
Safety Precautions

5cm
5cm or
less
5cm or
more
Blocking
tape
If a product makes weird
noise, smell, or smoke,
then stop using the
product immediately. Turn
the product off and
contact the service center.
▶It may cause fire or
electric shock.
Do not use a product in
areas with stairs that are
5cm in height or above.
(e.g.: terrace, bathroom,
porch, etc.)
▶Blocking tape must be
applied when using
the product in these
areas
Caution required when
using a robot cleaner in
areas with steps that are
up to 5cm in height.
▶Blocking tape must be
applied when operating
a product in these areas.
Do not apply excessive
force or drop a product.
▶It may cause damage or
malfunction of the
product.
A cleaning robot cannot
be used on a thick carpet
or a carpet woven with
thin thread. The cleaning
blades may damage such
types of carpet.
A cleaning robot may leave
scratch marks on a certain
type of wooden floor.
▶Please refrain from using
the robot cleaner on such
floors.
▶Please refrain from using
the robot cleaner on
such types of carpet.
Caution
▶Blocking tape must be
applied when operating
a product in these areas.
Refrain from using a
product in dangerous
areas.
Do not use a product in a
10 degree slope or higher.
▶Product may not
operate properly.
10 or
more
4
Please fold long fringes
inside a carpet.
▶Long fringe may
entangle wheels and
cause malfunction or
defect of the product.
Front door sill, terrace
door sill, or bathroom
door sill may stop a robot
cleaner.
▶Turn off the power,
move the robot cleaner
to an open area and
restart the operation.
If a product was stored in
a cold space (below -10°C),
then thaw or charge it in a
room temperature for at
least 2 hours before using
the product.
▶Running on a frozen
product may cause
malfunction.
Running on a frozen
product may cause
malfunction.
▶The product may fall,
causing its damage or
malfunction.
-10°c
Safety Precautions

A cleaning robot may run
into furniture parts such as
chair legs or table legs.
▶Please place chairs on
the table to enable faster
and more effective
cleaning.
If shoes are adjacent to
elevated spots (see picture),
a cleaning robot may not
recognize the elevation.
▶Please put shoes away
from raised spots.
▶It may cause critical
damage or malfunction
of the product due to
overheated motor.
This cleaning robot is a
household cleaning
appliance. Please avoid
using it in the following
areas: attic, basement floor,
industrial buildings, hallway
, storage room, or in
outdoor.
Please empty the dust bin
first before using a robot
cleaner.
▶ A robot cleaner with a
full dust bin may not
operate properly.
Do not vacuum liquid,
knife blades, pins, or
embers.
▶It may cause damage,
malfunction or fire.
Please wipe out water, oil,
or animal excretion on the
floor before using a robot
cleaner.
▶It may cause damage or
malfunction.
Please check if filter, brush,
dust bit, or other parts are
in place before using a
product.
▶Improperly assembled
product may not operate
properly or cause
damage.
Do not contact any
magnetic materials to the
product body or charging
terminal.
▶It may cause damage or
malfunction.
Do not scrape product
charging pins or sensors
with chopsticks or pins.
▶It may cause damage or
malfunction.
Do not apply excessive
force on the bumper.
▶It may cause malfunction.
If a robot cleaner vacuums
a plastic bag or other
foreign substances, please
remove them immediately.
▶If the product operates
for a duration of time
with foreign substances
blocking the suction part,
it may cause critical
damage of the product.
5
Please open all doors in the
house when using a robot
cleaner.
▶The cleaning robot
cannot enter rooms with
closed doors.
▶However, exceptions
apply to the front door,
terrace door, or
bathroom doors that may
cause the product to fall
and be damaged.
Safety Precautions

Cleaning Robot iCLEBO OMEGA
YCR-M07
User Guide
■ The following Safety Precautions must be read before using the product.
■ Product warranty is included in this User Guide www.iclebo.com
Do not spray water directly to the product or wipe it with flammable objects
such as benzene, thinner, or alcohol.
Dust collected on the product
sensor may cause malfunction.
▶Please clean the sensors
regularly.
Caution
When maintaining a
charging station, pull
out the plug first.
When removing dust on the main blade and side brushes, please turn off the
power switch (on the side of the robot cleaner) first.
▶Otherwise, the product may suddenly start and cause injury of the user or
serious damage of the product.
6
Robot Cleaner
Remote Control
(Battery included)
Side Brush-RSide Brush-LBlocking tape
Mop plate
Wet mop (2EA) User manual
Charging Station
Components
Cleaning Brush
Warnings
Checklist after Use
Batteries are explosive,
so do not discard
them in fire.
If a cleaning robot or its parts are
damaged, please call the
manufacturer or the service center
for check and repair.
▶Using a damaged product may
cause fire or electric shock.
Adaptor
The plug must be
assembled tightly.
Otherwise, it may
cause fire.
Please install a charging station in an open surface like a living room. Clear
objects around the station, with a radius of 1.5m from the center of the station.
Side parameter can be as short as 0.5m.
▶The indicated cleared space is needed for a robot cleaner to find its charging
station without interferences.
Safety Precautions Components and Part Names

Main Sensor
Front Wheel
Charging
Pin Side Brush
Lithium-ion battery
Manual charging jack
Power Switch
On Off
Front Wheel
Cover
Main
Blade
Main Blade Cover
Mop plate
Part Names
TopPart
Cleaningrobotsensors
BottomPart
Wheel
Bumper
Dust bin
Camera
Air vent
Display window
7
Wheel lift detection sensor
Left/Right wheel speed
detection sensor
PSD sensor, IR sensor
Main sensor
ㆍBumper sensor
ㆍCharging station detection sensor
ㆍPSD sensor, IR sensor
ㆍDust bin and filter detection sensor (internal)
ㆍDust detection sensor (internal)
Camera sensor
PE(Passive Encoder) sensor
Gyro sensor (internal)
Floor carpet detection sensor
(internal)
Components and Part Names

Charging Station
Display window
Auto
mode
Max
mode
Camera Spot
mode
Climb
mode
Turbo mode
Timer
Battery
Warning indicator
Time
Select Mode
Clock setting
Timer mode
Cursor Keys
Max mode
OK button
Charging
Power
Power
Climb mode
Start/Stop
Mode
selection
Start/Stop
Spot mode
Turbo mode
Insert 2 AAA batteries included in the product
packaging in a remote control before using a product.
Status Display
Buttons
Insert 2 AAA batteries included in the product
packaging in a remote control before using a
product.
1. Slide down the battery cover to
insert batteries.
2. Check (+) (-) parts to accurately
place batteries.
3. Slide the battery cover up to close
until it makes a clicking sound.
Inserting Remote Control Batteries
Anti-slip
pad
Inductive
charging sensor
Charging Jack
Charging
display LED
Charging
terminals
HEPA filter Mesh filter Dust bin
Dust bin
Remote Control
8
Components and Part Names

For effective cleaning
How a Cleaning Robot Operates
Before Use
Please read the followings to increase cleaning efficiency.
How it operates
ㆍPlease empty dust bin after using a robot cleaner.
ㆍPlease apply entrance prevention tape or close doors to indicate non-cleaning areas.
how to apply entrance prevention tape P11
ㆍPlease clear unfixed objects such as toys, magazines and shoes before cleaning.
ㆍDo not lift or force moving a robot cleaner in operation.
▶It may delete cleaning routes or make the cleaning robot skip some areas.
A cleaning robot first acknowledges a cleaning space using its camera and multiple sensors. The
robot vacuum then cleans the area while drawing a virtual map with its CPU—it autonomously
distinguishes areas that are finished cleaning verses areas to clean, making the most efficient virtual
map. Multiple sensors also minimize the chance of collision of the robot cleaner with other objects
such as wall, a chair, a flower vase, and so on. The robot cleaner can climb over a door sill up to
15mm in height, and its floor detection sensor prevents the cleaner from falling off the stairs. If the
climb mode is disabled, however, the robot cleaner will only pass a sill up to 5mm or less in height.
Vacuum Function
This cleaning robot is a blade-type, equipped with a vacuum suction.
Side brushes gather dust on the floor to the center, and a spinning main blade and suction vacuums
dust to the dust bin.
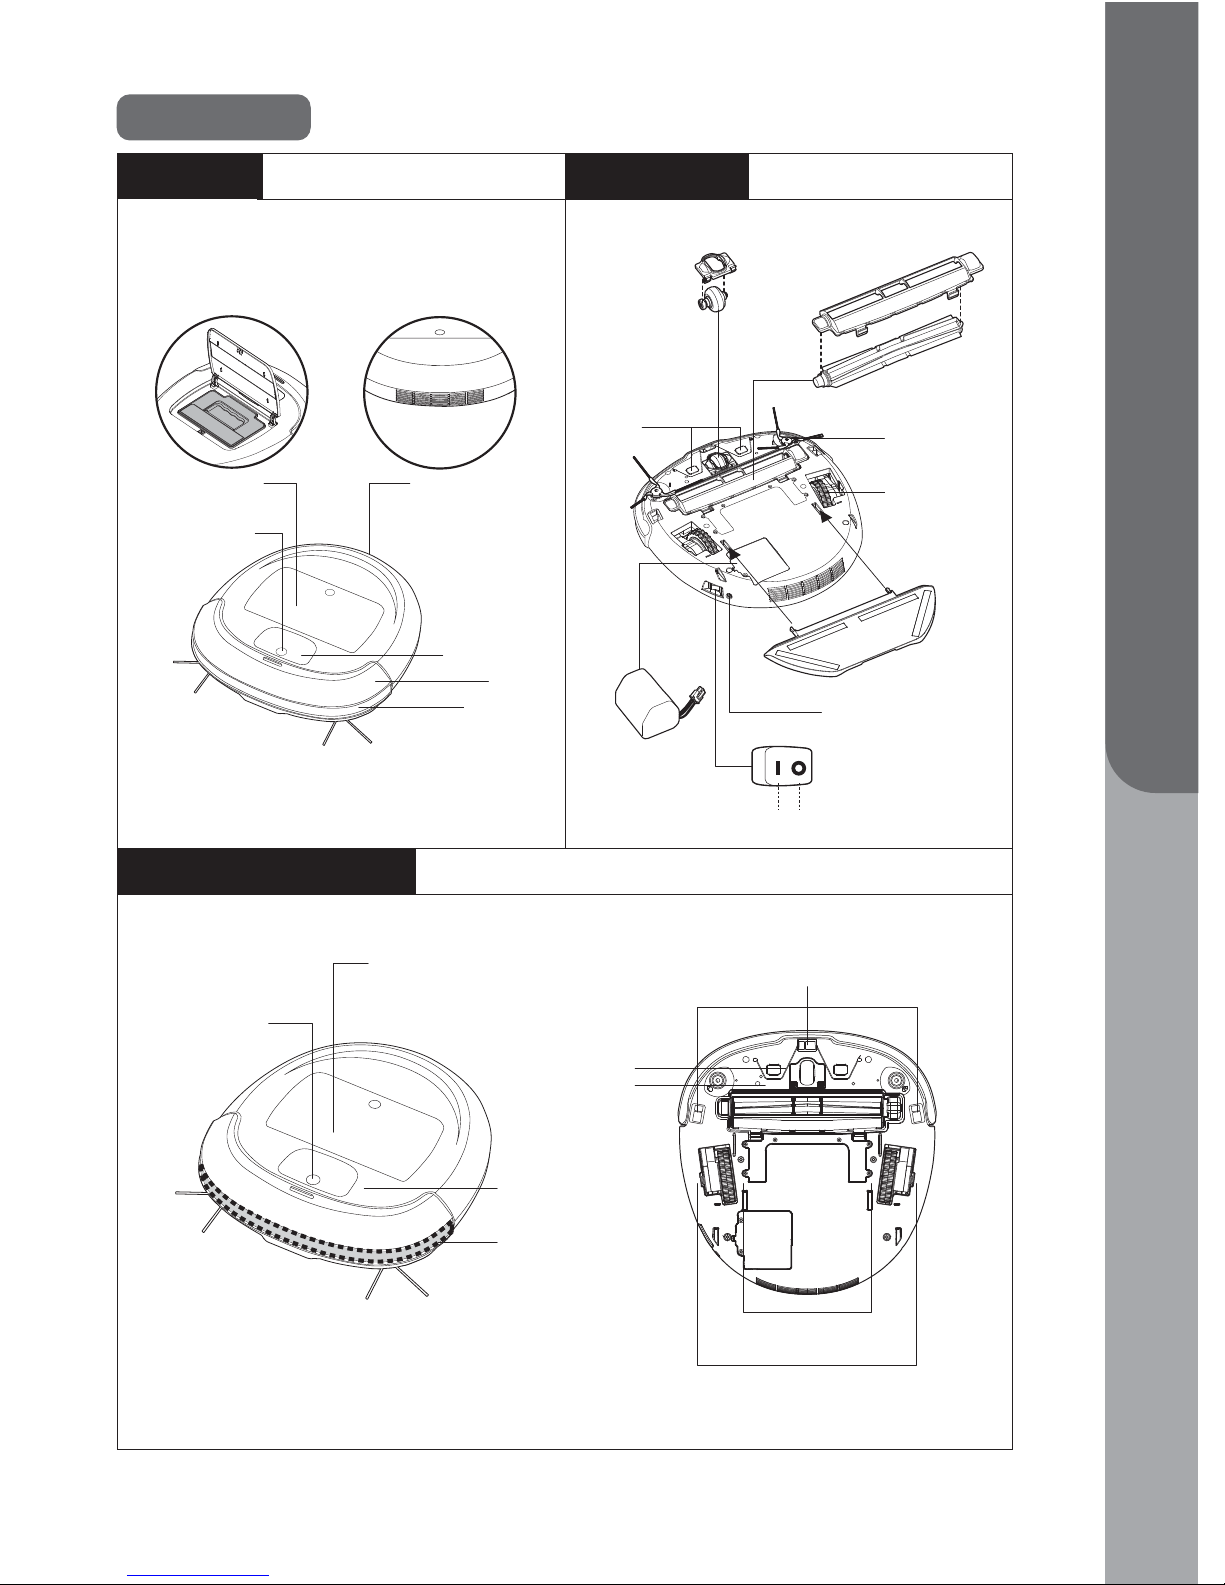
1. Flip the robot cleaner over and identify left and right brush grooves.
2. Place the left side brush on the left side. Match prints on the bush and groove,
and push the brush into the groove.
3. Place the right side brush on the right side. Match prints on the bush and groove,
and push the brush into the groove.
place a soft cloth under the robot cleaner when mounting side brushes to prevent floor
scratches.
Match prints on side brush pin and side brush groove to
mount the brushes.
Side brush pin Side brush groove
+
AssemblingSide Brush
9
Installation

1. Connect an adapter jack to the back
charging hole of the station.
2. Clear objects around the station,
with a radius of 1.5m from the
center of the station. Side parameter
can be as short as 0.5m.
InstallingChargingStation
Mounting Mop
Mop plate
Mop
10
Charging
1. Turn on the side power switch.
2. Place the charging pins (on the bottom of the cleaner) on charging terminals to start charging.
Battery sign on a display window blinks to indicate that it is charging.
The battery sign will change from green, orange, to red, depending on remaining capacity.
3. A green battery sign will show once the cleaner is fully charged.
Charging display LED
Charging terminals
Charging
pins
Mounting a mop pad will automatically disable a climb mode, and the robot cleaner will not
climb over a door sill and floor mat.
1. Put mop pad tips on two mounting pins at the bottom of the cleaning robot’s back side.
2. Slide the pad up to assemble it.
3. Mount a mop on the mop pad.
Place a soft cloth under the robot cleaner when mounting a mop pad to prevent floor scratches.
Charging sign on the display screen will be turned off during charging.
When battery runs low, “Lo” will appear on the display screen.
Initial PowerOn / Off
Turn the power switch (on the side of the cleaner) to “on” (I).
Turning the switch to (O) will turn off the power.
Mounting
tip and pin
1 2
Installation

Floor
side
ㆍPlease connect the adapter jack directly to the
product in case of manual charging.
Manual Charging
ApplyingBlockingTape
Time must be set in advance for a timer mode.
1. Please apply the tape to areas of danger such as banisters, restroom entrance, or in front of stairs.
▶Dust on anti-fall sensors may block the sensors to
detect entrance block areas. Please clean the sensors
on a regular basis.
2. Please apply the tapes with the grooved surface facing the floor. To fix the tape, please use a
double-sided tape enclosed in the box.
Please apply the tape to indicate no entrance areas.
Setting Time
Display Operation
1. Press “CLOCK” on the cleaner.
Unfixed tape may hinder it from properly recognizing blocked areas.
If it returns to a starting point that is not the station,
“Strt” (Start) will appear on the display screen.
anti-fall sensors
11
▶“BASE” will appear on the display screen, and the
battery sign will blink once it docks in the
charging station.
Click the “BASE” button on the remote control to
charge while the robot cleaner is in operation.
it will find the station and be docked in.
Remote Control
Remote Control
Display Operation
Charging while in Use
ㆍThis robot cleaner will automatically move to a charging station once its battery runs too low to
continue cleaning. After fully charged, it will start cleaning the remaining areas again and
come back to the charging station once finished (except for the manual mode)
ㆍThis product is designed to go back to the starting point once its battery runs low. This means if
the robot cleaner started cleaning somewhere other than the charging station, it will return to
that starting point instead of the station. However, if the robot cleaner’s cleaning area includes a
charging station within 3m in radius, it will automatically find the station and will be
docked in there.
Installation

Start/StopCleaning
2
1. Click the cursor keys on the remote control to move
the robot to a certain location.
2. Click the cursor after it starts cleaning to
move the cleaner to a certain direction.
ㆍClicking ④ button will make it to rotate in
180 degrees.
ㆍPressing the power button and the cursor keys right
away will make it move without vacuuming.
Remote Control
1. Press the power button.
Basic
Mode
Changing
Mode
2.Press Start / Stop button.
Remote Control
Move/ ManualCleaning
1.Press the power button.
2.Press the desired mode.
Refer to the P.13 for details.
1 3
2
4
3
1
4
1. Press the power button. Press again to turn off.
Remote ControlDisplay
Display
Power On /Off
Operation
Operation
Display Operation
12
3. Set “MINUTE” by pressing the cursor keys and
press “OK”.
4. A beeping sound means that the time is set.
Using the Robot Cleaner
2. Set “HOUR” by pressing the cursor keys and
press “OK”.
Up
Down
Up
Down
Installation Using the Robot Cleaner

CleaningModes
Special Features
Camera navigation cleaning ㆍPress “MODE” to select or change a
mode on a remote control
ㆍ“MODE” to select or change a mode on
a display screen
After AUTO cleaning, rotate 90°
and AUTO cleaning again.
It works until battery allows.
Intensively clean within 1㎡
Mop cleaning after suction.
ㆍPress “MAX” on a remote control to start
a MAX mode
ㆍPress “MODE” to select or change a
mode on a display screen
ㆍPress “SPOT” on a remote control to start
a SPOT mode
ㆍPress “MODE” to select or change a
mode on a display screen
ㆍMount a mop pad to the cleaner robotMOP
AUTO
MAX
SPOT
Description OperationDisplay
Use in a house with carpet or
doorsill
It is set to ‘ON’ by default.
It is not available when the mop
plate is attached.
ㆍ“CLIMB” ( )on a remote control to set
or to unset a climb mode.
Maximize the suction for effective
cleaning
ㆍPress “TURBO” on a remote control to
start
CLIMB
TURBO
Operation
To unset a preset climb mode, press
“CLIMB” on a remote control. Press
“CLIMB” again to reset.
Deactivating a climb mode while
OMEGA cleans on a carpet may hinder
OMEGA from coming down from the
carpet.
The climb mode is set to on by default.
(it climbs a door sill up to 15mm in height) Deactivate
the climb mode to prevent the cleaning robot from
going over a door sill, carpet, or mat with 5mm in height.
Climb mode cannot be activated if mop is mounted.
P10 Mounting Mop
It does not work when robot is
located in docking station.
13
Deactivating the climb mode is recommended for a
carpet with long fringes or unique threads.
▶The carpet may be damaged or be ripped.
Using the Robot Cleaner
Display Description

1. Take out a dust bin from the robot.
2. Open a dust bin as seen in the picture above and empty out the bin. Hold the bin with its door
facing upside so that dust won’t come out when it is opened.
HEPA
Filter
Mesh
Filter
Dust
Bin
TimerMode
Emptying Dust BinandCleaning HEPA Filter
Press “TIMER” on a remote control to check the starting time of a TIMER mode.
TIMER mode can be activated after present time is set first.
Press “TIMER” on a remote control twice and press “OK” to cancel a TIMER mode.
Remote Control
Display
1. Press “TIMER” on a remote control.
If a TIMER mode is preset, the screen indicates a
time set. Pressing “TIMER” again will reset the time.
2. Set “HOUR” with a cursor key and press “OK”.
3. Set “MINUTE” with a cursor key and press “OK”.
4. When a cleaning mode icon blinks, click the
desired mode and press “OK”.
Press “CLIMB” to deactivate a CLIMB mode if
necessary.
5. Once a TIMER mode is set, a clock symbol will
appear on the screen.
P11 Setting Time
14
cleaning mode icon
Operation
TURBO
Cleaning time may be decreased.
(About 60 minutes)
From normal mode, it
automatically change to TURBO
mode when it detects lots of
dust or climbs on a carpet.
MaintenanceUsing the Robot Cleaner
Up
Down
Up
Down

5. After cleaning, properly mount
the main blade again.
CleaningSideBrush
2. Pull the main blade
clips down to remove
the main blade cover.
1. Flip the robot to show the
bottom side.
Placing a soft cloth under
the robot cleaner will
decrease any chance of
scratch.
1. Use a soft cloth or cotton bud to gently
wipe the main sensor.
2. Use a soft cloth or cotton bud to gently
wipe floor sensors.
1. Hold a side brush with two hands to dissemble it.
2. Use a cleaning brush to clean dust and dirt.
Placing a soft cloth under the robot cleaner will
decrease any chance of scratch.
The side brushes may be
caught in the blade groove
when mounting the main
blade. It is recommended to
remove the side brushes when
mounting the main blade.
CleaningSensors
CleaningtheMain Blade
CLICK
15
3. After removing the main blade
cover, dissemble the main blade.
4. Clean dust and dirt on the main
blade.
Clean the main blade with caution to avoid the blades from falling off.
3. Use a cleaning brush to clean dust in the filters.
The dust bin can be cleaned with water, but it needs to be dried thoroughly
before being assembled again.
HEPA filter is NOT washable.
Use a regular vacuum machine to clean the filters. However, vacuum in a
distance with a weak power to avoid damaging the filters.
Maintenance

1. Turn off the side power switch of the main body if the robot cleaner
is not used for a duration of time.
Even if the side power switch is off, the battery may die naturally
when the robot cleaner is stored for a long period.
(Battery warranty: 6 months)
2. Keep this product in a cool and airy place.
Please contact our customer Service Center (+1 714 880 6036) for purchasing accessories.
HEPA Filter
Mop
Main Blade
Side Brushes
Battery Pack
ㆍThe recommendation above is based on a premise that the robot cleaner is used once a day.
ㆍReplacement cycle may change depending on a size of a cleaning area or frequency of use.
ㆍIt is recommended to keep the replacement cycle above to maintain high performance, which is not a
mandatory recommendation.
ㆍAll consumables must be replaced immediately when damaged or when its shape changes, regardless
of what was recommended.
3 – 4 weeks It is consumable and cannot be reused.
Replace it when it is worn or too dirty.Every 3 months
As needed Replace a blade or a brush when worn out to
avoid weak performance.
If charging time or working time is significantly
decreased, replace the battery pack.
(Battery warranty: 6 months)
12 – 18 months
Item Image
Recommended
Replacement Cycle
Note
Do not place other objects on the robot cleaner. This may cause
damage or malfunction of the product.
Consumables Replacement Cycle to Maintain High Performance
Please keep the robot charged on a charging station when not in use.
Turn off the side power switch and pull the plug off if a house is unoccupied for a long period
from travel or business trips.
1. Pull the front wheel
cover clips down to
remove the cover.
Magnet Front
Wheel
If a magnet was also
removed, insert it by
sliding in on a pin side
of the wheel.
(See picture on the left)
2. Use a cleaning brush or
cotton bud to clean
dust and dirt from the
wheel.
3. Put the front wheel
back.
The magnet goes on
the left.
(See picture on the left)
CleaningtheFrontWheel
Storage
+
16
AccessoriesMaintenance

FAQs Cause of Problem Solution
Below is a list of FAQs that shows the most commonly occurred problems while using the
product. If you can’t solve a problem with information below, please contact our Service
Center. (+1 714 880 6036)
It is not cleaning
well.
▶Dust bin is too full.
▶Filters are covered in dust,
blocking air.
▶Main blade does not work
due to too much hair caught
in the blade.
▶See <Maintenance> and empty the dust
bin.
▶See <Maintenance> and clean the filters.
▶See <Maintenance> and clean the main
blade.
When I turn on
the power
button, the robot
cleaner turns off
automatically.
▶Remaining battery power is
too low.
▶Please charge the robot cleaner.
The robot cleaner
is non-responsive
or it does not
move around.
▶Battery switch is turned off.
▶ Remaining battery power is
too low.
▶Battery power on a remote
control is too low.
▶Infrared sensors and beam
projector on the main sensor
is blocked or dirty
▶The robot cleaner’s bumper is
pressed down.
▶Check the side power switch.
▶Recharge the robot cleaner.
▶Replace the remote control batteries.
▶Wipe the infrared sensors or beam
projector with a soft cloth.
▶Press the bumper several times.
The robot cleaner
is not charging.
▶Charging station or robot
cleaner is not connected
properly to the plug.
▶Connect the power of charging station
and robot cleaner properly.
After cleaning,
the robot cleaner
is not returning
to the charging
station.
▶ Power of the charging station
is not connected properly.
▶ Charging station is not
properly installed.
▶ The robot cleaner started
cleaning somewhere other
than the charging station.
▶ Connect the power of the charging station
properly.
▶ Move the charging station. No objects
must be placed within a 0.5m radius on
the left or right, and 1.5m in radius from
the front side of the charging station. This
is to enable the robot cleaner to return to
the charging station automatically after
cleaning.
▶ The robot cleaner must start cleaning from
the charging station to return to the
charging station after cleaning.
Noise of the
robot cleaner is
getting worse.
▶Dust bin is too full or the filters
are dirty.
▶Main blade is dirty.
▶Empty and clean the dust bin.
▶See <Maintenance> and clean the filters.
▶See <Maintenance> and clean the main
blade.
P14
P14
P15
P14
P15
17
Checklist Before Repair Report

Display Error Messages
Lifted wheel Move the robot to an even place.
Blade and brush motor
overload
Check if a foreign material such as hair or lint is
caught in the main brush, and remove it.
Suction motor overload Clean the filter and empty the dust bin.
Internal system error Turn off the power switch of the robot, then turn
it on again.
Turn off the power switch of the robot, then turn
it on again.
Magnetic sensor (adjacent
to the front wheel) error
Check if the front wheel and magnetic sensor are
clean, and properly installed.
Gyro sensor error
CauseDisplay Solution
Dust bin error Dust bin is not properly installed. Refer to
Maintenance part in the user manual.
Wheel motor overload Check if a foreign material such as hair or lint is
caught in the wheel, and remove it.
Cannot detect floor Move the robot to an even place in case the wheels
are stuck on an obstacle.
18
Actions for Display Error Messages
NOTE: This equipment has been tested and found to comply with the limits for a Class B digital device, pursuant to
part 15 of the FCC Rules. These limits are designed to pro-vide reasonable protection against harmful interference
in a residential installation.
This equipment generates, uses and can radiate radio frequency energy and, if not in-stalled and used in
accordance with the instructions, may cause harmful interference to radio communications. However, there is no
guarantee that interference will not occur in a particular installation. If this equipment does cause harmful
interference to radio or television reception, which can be determined by turning the equipment off and on, the
user is encouraged to try to correct the interference by one or more of the following measures:
-Reorient or relocate the receiving antenna.
-Increase the separation between the equipment and receiver.
-Connect the equipment into an outlet on a circuit different from that to which the receiver is connected.
-Consult the dealer or an experienced radio/TV technician for help.
CAUTION : Changes or modifications not expressly approved by the manufacturer responsible for compliance could
void the user’s authority to operate the equipment.

Product Warranty
Customer Compensation Policy
Cost charged service
iCLEBO OMEGA
Naturally
occurred
performance or
function-related
defects during
a normal use
(within the
mandatory part
availability
period)
Performance for
feature defects
due to fault on
customer
Product exchange or
refund
Product exchange or
refund
N/A
Repair needed on a major part within 1 month from
date of purchase
Product exchange
or free repair
Refund
Product exchange
Free repair Repair fee charged
Repair fee charged
Subtract the depreciated
amount then add 10% to
calculate the refund amount
Subtract the depreciated
amount then add 5% to
calculate the refund amount
Subtract the depreciated
amount to calculate the
refund amount
Repair fee charged and
depreciated product
exchange
Major repair needed on an exchanged product
within 1 month from date of purchase
Product cannot be exchanged
Defect or damage caused during product shipping
or installation process
Same defect occurs twice or less
Same defect occurs three times or less, or other
defect occurs up to 5 times
Major repair needed within 10 days from date of purchase
※Product warranty period is 1 year, and battery warranty is 6 months.
※A fee is charged for requesting a service when product is not defective, so please follow the user guide first.
※Unstated consumer compensation case follows Consumers Dispute Settlement standards.
1. Damages by cleaning, adjustment, instruction and installment
2. Customer’s carelessness
3. Force majeure (fire, thunder stroke, earthquake, flood damage, salt damage)
4. End of consumable parts life (battery, lamps, drum, filters)
YCR-M07
Product Name Model Name Color
Product Number TelephoneCustomer Name
Address
Date of Purchase
Type
Description
Compensation Policy
Within Warranty Period
(1 year)
After Warranty Expired
Where it was Purchased
Warranty Period: 1 Year
(Battery: 6 months)
Repair fee charged
and product exchange
Repair fee charged
If the company loses customer’s product ordered for repair
The product cannot be repaired due to part
unavailability although it is still within the mandatory part
availability period
The product cannot be repaired despite parts are available
The product cannot be repaired
The product can be repaired
Yujin Robot Customer Support : +1 714 880 6036
ㆍMonday-Friday 9 am to 6pm PST
ㆍSaturdays / Sundays Closed
This manual suits for next models
1
Table of contents
Other Iclebo Vacuum Cleaner manuals

Iclebo
Iclebo Arte YCR-M05-02 User manual

Iclebo
Iclebo YCR-M04-02 User manual

Iclebo
Iclebo POP YCR-M05 User manual

Iclebo
Iclebo O5 User manual

Iclebo
Iclebo YCR-M05 User manual

Iclebo
Iclebo YCR-M05 User manual

Iclebo
Iclebo YCR-M05 User manual

Iclebo
Iclebo YCR-M05 User manual

Iclebo
Iclebo YCR-M04-01 smart User manual

Iclebo
Iclebo YCR-M05 User manual