Iclebo YCR-M05 User manual

YCR-M05
User Guide
Vacuum Cleaning Robot iClebo Arte
■Please be sure to read the Safety Precautions before use.

1
For eective cleaning
Operating principles of robot cleaner
Pre operation check list
• Assemble side-brush
• Insert remote control baery
• Assemble ultra microber mop
Pre cleaning check list
• Install base(charging) station
• Charging
• Current time seing
• Install area boundary tape
Using the robot cleaner
• Power On/Off
• Start / Stop cleaning
• Using move, charge function
Cleaning mode
Timer cleaning
Emptying dust bin and servicing the antibacterial lter
Cleaning side brush
Cleaning sensor
Cleaning main brush
Cleaning front wheel
2
5
7
8
9
10
12
13
16
15
17
●contents
Safety precautions
Components
Reference
Installing the robot cleaner
Usage of robot cleaner
iClebo care & maintenance
Storage
Check before repair report
Display error message

Please read this manual carefully and follow all warnings and instructions.
- Do not wrap the power cord tightly or place heavy objects on it.
→ It may cause electric shock or re.
- Keep the pin and interface of the power plug clean from dust or water.
→ It may cause malfunction or electric shock.
- Do not pull the power cord or touch the power plug with wet hands.
→ It may cause electric shock or re.
- Do not use a damaged power plug or power cord, or insert the power plug into a
loose outlet.
→ It may cause electric shock or re.
- In the event water enters the internal part of the cleaner, the product should be sent
for service even though the product was dried.
- Do not repeatedly plug and unplug the product.
→ It may cause electric shock or re.
- Caution should be taken when plugging when plugging the adapter directly into
the charging socket.
→ It may cause electric shock or re.
Users must be aware of prohibited operation
of this product.
Users must follow the instructions to avoid serious
injury or death.
Users must follow the instructions to avoid injury
or product damage.
Prohibition
Warning
Warning
Caution
Electric and power cord precautions
2
●Safety precautions

- Do not touch the charger's power cord with wet hands.
→ It may cause electric shock.
- Arrange cables or wires before use to avoid entangling with the robot
→ It may cause re or electric shock due to damaged cable.
- Remove light objects or clothes before use.
→ It may damage the object or clothing while robot is in use.
- Remove small or fragile objects from the cleaning area before use.
→ Fragile objects may be damaged.
→ Remove coins or expensive jewelries before cleaning.
- Clear the oor of objects that may get in the way.
→ in towels. pads, power cords, table clothes, etc., may get tangled with the wheels.
Also objects on a table may fall o if the robot bumps a table.
- Empty the dust bin before operating the robot cleaner.
→ Suction function may not perform well if dust bin is full.
- Check that the main components such as antibacterial lter, brush
and dust bin are assembled properly before cleaning.
→ In the event you use the robot cleaner without the main components, such as the
antibacterial lter or brush, the product will not clean properly and such operation
may damage the product. Also, children and pets may be deemed as a barrier by
the robot cleaner resulting in certain areas not being cleaned.
- Do not operate robot cleaner when children or pets are present and le alone.
→ e children or pets may be aracted to the robot cleaner and may hurt themselves aempting
to play with the product.
- Do not place the power cord on the oor when installing charging station.
→ Robot cleaner may drag the power line while auto-charge or cleaning.
- Keep the top of the charging station away from water.
→ It may cause electric shock or re.
Warning
Warning
Warning
Prohibition
Caution
Caution
Caution
Caution
Caution
Caution
Precautions before using
3
●Safety precautions

- In the event of an unusual sound, smell or smoke emanates from the product, immediately
turn o the robot cleaner and place it a safe distance away from anything ammable.
→ It may cause electric shock or re.
- Do not use the robot cleaner on a table or any high surface.
→ It may damage the product.
- In rare instances the robot cleaner may scratch or otherwise damage particular ooring.
In this event, discontinue use.
- In the event a large piece of plastic or other substance is suctioned up, remove it immediately.
→ Serious damage to the robot cleaner can occur when it is used for a period of time with its suction
duct clogged.
- Tranport the robot cleaner to another area when it is blocked by a threshold of the entrance
or porch.
- Prevent the robot cleaner from suctioning liquid materials.
- Donotusethe robot cleanernear ammablessuch as cigarees, hot materialsorgasoline.
→ It may cause re.
- Do not use use the robot cleaner outdoors.
-Inthe event a foreignsubstanceisstucktothesensor mechanism, the robotcleanermaymalfuction.
-
Prior to cleaningo foreign substances, turnOFFthe powerswitch and then use the provided cleaning
brushtoremove.
→Iftherobotcleaneroperatesallofthesudden,itmaycauseinjuryorseriousdamagetotheproduct.
-Inthe event the robotcleaneror components aredestroyed, contact themanufactureror service
center for repair.
→Itmaycauseelectricshockorre.
- Prior to cleaningthe chargingstation, rstpull outthepowerplug for safetyreasons.
- Mishandlingof the baerymay causeanexplosionor re.Attheend of the baery's service
lifedispose thebaeryinalawfulmanner.
→Itmaycausere.
-Donotspray waterdirectlyor wipe the robotcleanerwith volatilematerials such asbenzene,
thinneror alcohol when cleaningthe product.
-Donotapplyunduepressure to the bumper.
→Incasethebumpersensorisdamaged,itmaycrashonthewallorwithfurniture.
-Donotdisassemble,repair orconvertthe product exceptexcept by an authorized serviceprovider.
→Itmaydamagetheproduct.
Precautions while using
Warning
Warning
Warning
Warning
Warning
Warning
Caution
Caution
Caution
Caution
Caution
Caution
Caution
Caution
Caution
Precautions after using
4
●Safety precautions

5
Side-Brush
Dust Bin Mop plate
●Components●Components
Components
Robot Cleaner Charging
Station
Remote Control
(included battery)
Side-Brush(R) Side-Brush(L)
Antibacterial Filter
Cleaning Brush
Area Boundary
Tape
(virtual wall)
Adapter Mop Plate
Ultra Microfiber
Wet Mop
Detailed names of each parts
● Top of the robot cleaner ● Bottom of the robot cleaner
Power Button
Camera
Mode Button
Start/Stop Button
Bumper
Barrier
Sensor
Manual Charging Jack
Main Brush
Fixing Clip
Main
Brush
Wheel
Main
Brush
Cover
Front Wheel
Position
Front Wheel
Lithium Ion Battery
Charging
Terminal
Fixed Pin for
Side-Brush
On/Off Switch
Front Wheel
Fixed Cover
MODE
CLOCK TIMER
MAX
Quick Guide
UserGuide
YCR-M05
User Guide
Vacuum Cleaning Robot iClebo Arte
■Please be sure to read the Safety Precautions before use.
YCR-M05-02
Quick Guide
Vacuum Cleaning Robot

Remote controller
1. Press Power Buon of the remote controller.
2. Press Start/Stop ( ) Buon of the remote controller.
3. Press Power Buon to stop the operation.
4. To change mode, press power buon, and use mode buon to select desired cleaning method,
and then press Start/Stop ( ) buon.
5. Default mode is Auto + Climb.
If you want only oor cleaning, press Climb buon of the remote controller to change to general mode
and then proceed with the cleaning.
6. Additional information for Max Mode and Spot Mode
If you want to use the cleaner as long as possible, clean in Max Mode. In Max Mode, it starts in Auto
(Mapping) mode to perform overall cleaning, and when it is completed, it changes to Random Mode for
additional cleaning. (Cleaning of about 120~160 min. is possible according to indoor environment.)
※In the oor environments such as carpet, rug, or paerned tiles or marble, set to Climb Mode for cleaning.
6
Dust Bin
Blade
Filter
Antibacterial
/Blackout Filter
Filter Case
Set-Time
Status
Power
Mode
Button
Non-Slip
Pad
Infrared Generator
Charging Display
Charging Terminal
●Components ●Reference
● Charging Station ● Dust Bin
● Remote Control ● Display Screen
Start/Stop
Button
Random
Mode
Auto
(Navigation)
Mode
Clock/
Cleaning
Time
Climb
Mode
Mopping
Mode
Battery
Status
Mode Button
Time Setting
Button Timer
Button
Direction Button
OPEN
Enter Button
Charge Button
Power Button
Door Sill
Height
Button
Cleaning
Mode
Button
Start/Stop
Button
Time
Setting
Button
Cleaning
Mode Button

7
Operating principles of robot cleaner
Principles of Vacuum Cleaning Robot
is product recognizes the ceiling and obstacles with camera and various sensors, and cleans by making a virtual
map in CPU installed in the main body. It operates by drawing the most ecient map with self-decision of the nished
cleaning area and the area to clean. (Camera navigation is disabled in random mode.) With about 20 detection sensors,
it can avoid wall or objects (chair, vase, etc)
It climbs a door sill of up to 18mm, and And oor sensors help it to avoid falling down stairs. Be careful that pets or
children do not force the robot to fall by playing with it.
Suction of robot cleaner
is product has one main brush, two side-brushes and vacuum suction dust. e dust on the oor is gathered by the
rotating side brush, and is swept into the dust bin by the rotating main brush.
For effective cleaning
Please follow the instructions below for high cleaning eciency.
- Empty the dust bin aer each use of the robot cleaner.
- Use Magnetic strip to conne the robot to an area or by closing the door.
(Refer to P.10 How to install entrance prevention tape)
- Fix up the magnetic strip not to apart from the oor.
- Remove all the non-xed objects such as toys, magazines or shoes before cleaning.
- Do not li up or move the robot cleaner manually while operating.
( If you do this, the robot loses its way and skips areas.)
- Make sure to charge with manual charging for at least 1 hour before using the vacuum cleaning robot
for the rst time. (Refer to P.9 How to charge manually)
●Reference

OPEN
8
1. Aer turning over robot vacuum, identify the position of
the le and right side brushes.
2. Match the L side brush to the L marked part in the direction
as the groove, then push in rmly.
3. Match the R side brush to the R marked part in the direction
of the groove, then push in rmly.
1 2
Mop Plate
ere are no baeries inside the remote controller at the time of purchase.
Install 2 x AAA baeries before using the remote contol.
1. Push the cover of the backside of the remote controller downward to open.
2. Check (+)(-) of the baeries and install.
3. Match the cover to the groove, and close until “click” sounds.
1. Turnovertherobotvacuum,andinstalltheMopPlatebycombiningittothexingpartofthemainbody.
2. If Mopping mode is not used, separate and keep the Mop Plate saperate from the Main Body.
※In Mopping mode with mop plate aached, there may be cases that it is blocked by carpet, rug, or doorsill, and
cannot go forward normally, so be careful. In such cases, moving the rug or carpet to one side and using Mopping
mode is recommended.
※In some oor environments, there may be cases of not being able to go forward normally. If it cannot go forward
normally in the oor environment of marble oor or certain paerns, then also set Climb mode for cleaning.
Ultra Microfiber Mop
●Installing the robot cleaner
Check list before using
Assemble side-brush
Insert remote control battery
Assemble Ultra Microfiber Mop
Fit the side brush into the protruding part of the robotic
vacuum cleaner matching the same shape.
CAUTION

2 3
9
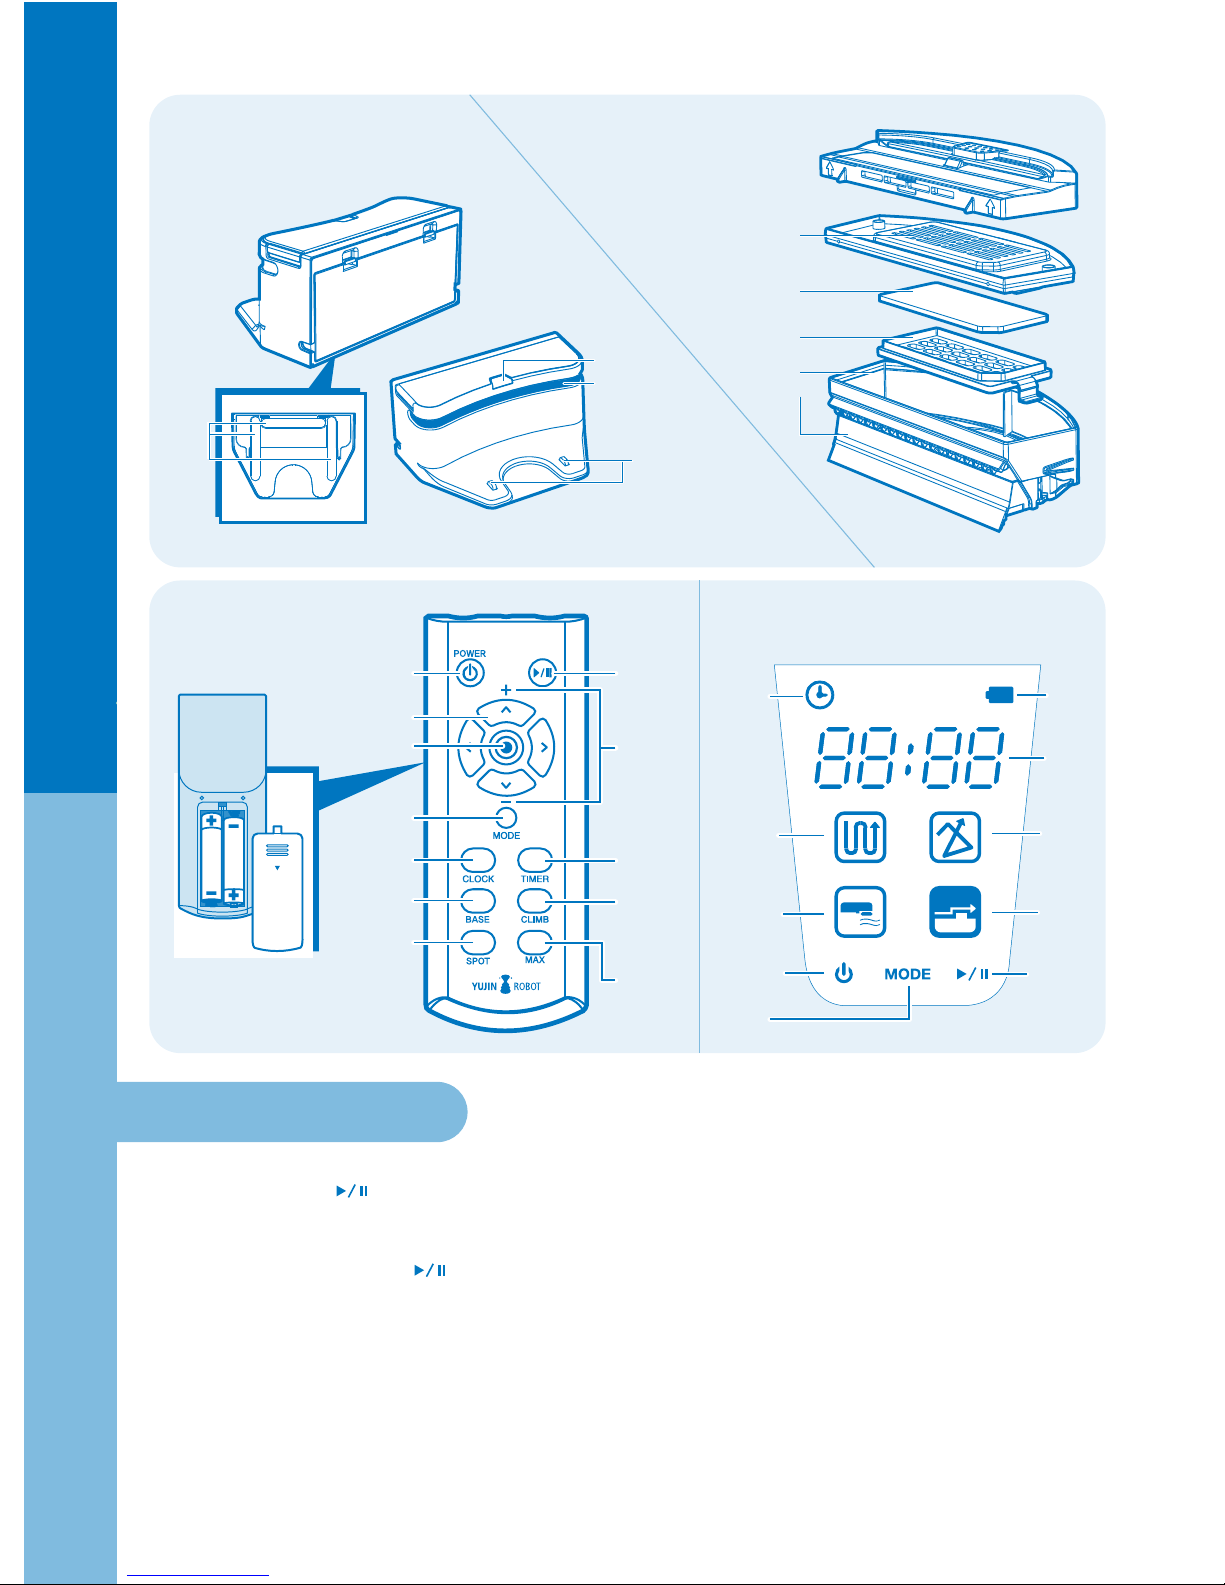
1. Openthebackcoverof theChargingStation,andinstall
theadapterwithconnectedpowerplugasshowninthegure2above.
2. Completely connect the charging jack of the adapter to the
jack inside the charging station.
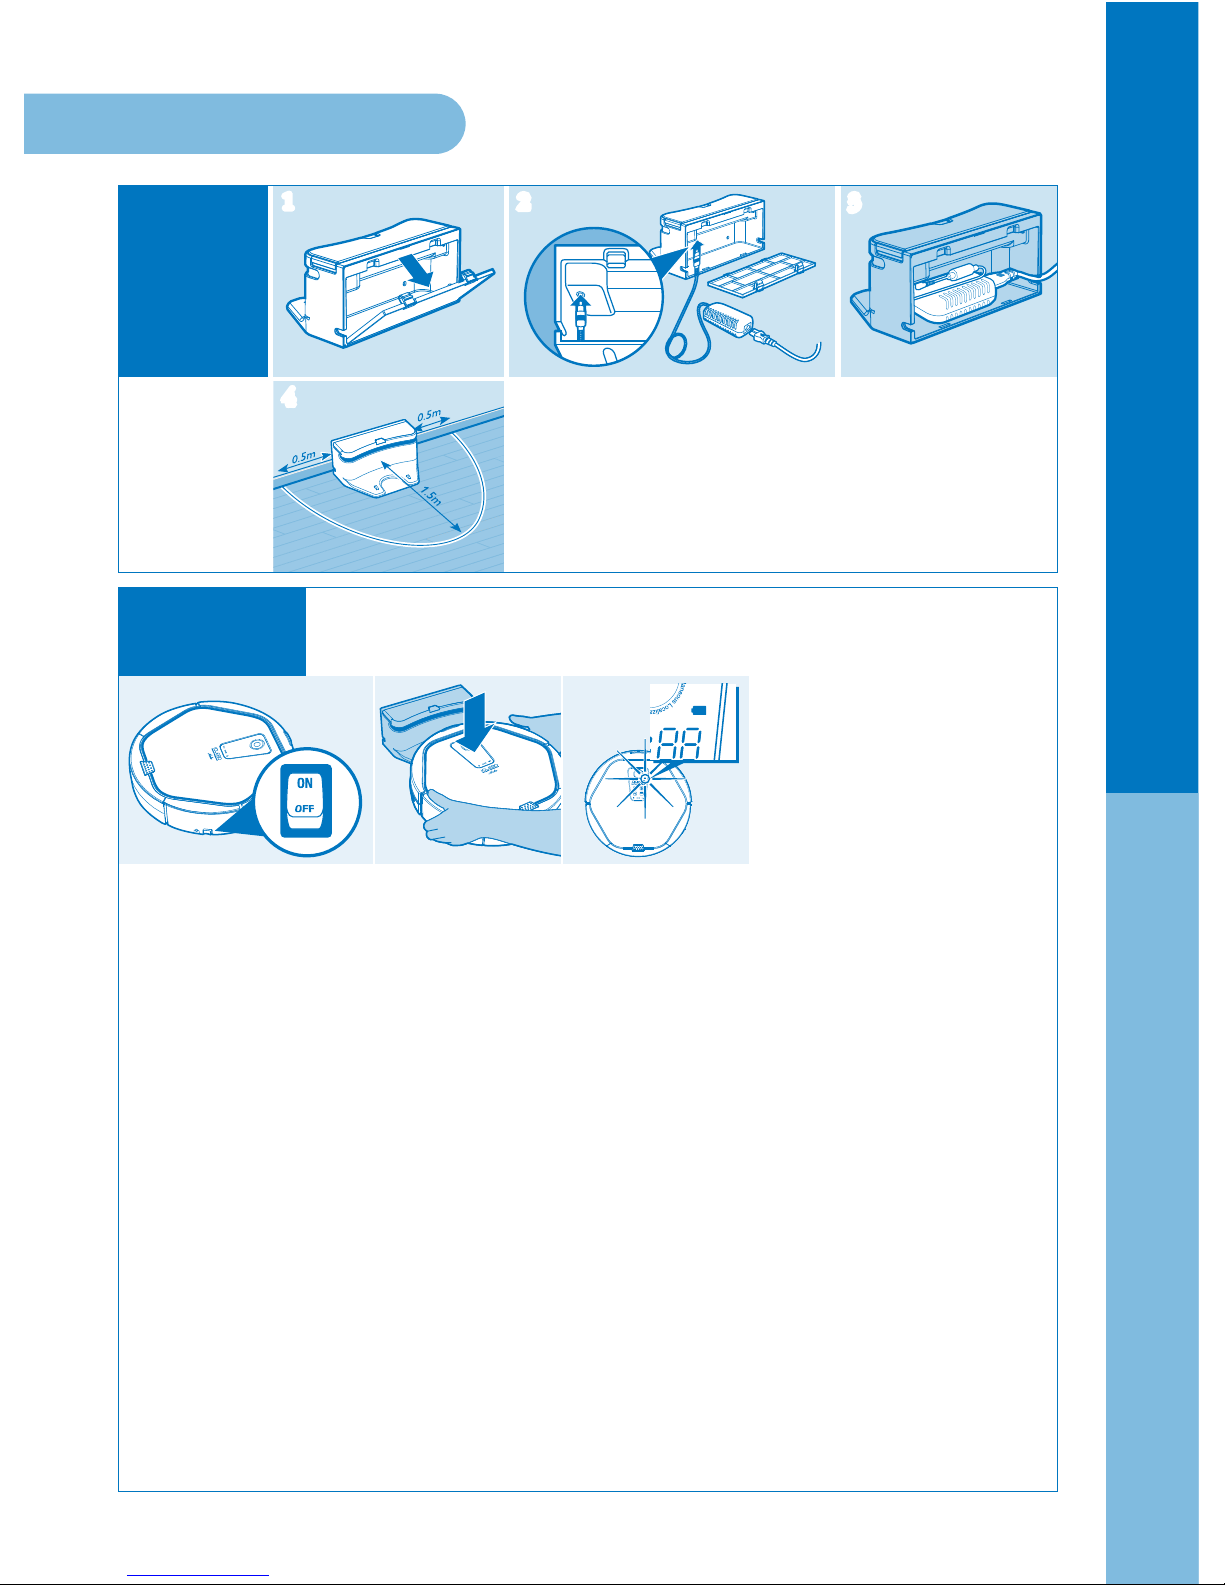
1. Turn on the Power Switch on the side of the product.
2. Correctly match the Charging Pin on the boom of the Main Body to the socket of the Charging Station,
and start the charging.
>> e baery status in the display window blinks and charging starts.
If baery is completely discharged, “Lo” is displayed in the display window.
3. Red, Yellow and Green light will be blinking in order (consequently) on the display window according to
baery charging condition while robot charging and green light is changed to keep on the display window
when the baery is full.
※Baery colour change on
the display
- Green: Baery is fully charged
- Yellow: Remaining baery is
50% or less
- Red: Remaining baery is
20% or less
[Auto-charge during use]
※Whenthebaeryislowduringanoperation,thisproductmovestothechargingstationandperformsautocharging.
Aer the charging is completed, it nishes cleaning the remaining space, and returns to the charging station.
※When the baery is low, this product is set to return to the starting place of the cleaning.
So if it started from a place other than the charging station, it returns to the place near
the starting place of the cleaning.
※Change of the Charging Indicator colour on Charging Station
- Red:robotcleanerisinoperationawayfromthedockingstation,orthechargingconnectorbetweenthecleanerand
dockingstationisnotproperlyconnected.
- GreenBlinking:Recharging
- Green:Rechargecompleted
e baery is not charged at the time of product purchase.
so it must be fully charged before rst use.
1
4
1 2 3
●Installing the robot cleaner
Check list before cleaning
Install base
(Charging)
Station
Charging

1 2 31 2 3
Using the robot cleaner
10
※Make sure to set time for timer cleaning.
1.Press the Clock buon on the remote
control. Time display of the display
screen will ash.
3. Press Enter buon to conrm the seing.
4. Set “minute” with (+)(-) buon of the remote controller, and press Enter buon
5.Press Enter buon to conrm the seing.
6. When the time is set, it conrms the seing with beep sound.
2. Set “hour” with (+)(-) buon of the
remote controller, and press Enter
buon.
Aach the tape at the top of stairs where there is a danger of falling.
→ If dust accumulates on the fall prevention sensors they may not “see downwards” & not prevent the robot
from falling.
※Aach it on the space to prevent the vacuum
cleaning robot from entering.
Install area boundary tape
Bottom
side
Bottom
side
●Installing the robot cleaner
Current Time setting
●Usage of robot cleaner
Press Power Buon ( ).
If you press it one more time,
it is turned o.
Basic cleaning
: AUTO+ CLIMB
1. Press the Power Buon ( ).
※Check if lights come on
AUTO and CLIMB Mode
in the display window.
2. Press Start Buon ( ).
※You can click CLIMB Buon on the remote
controller to cancel Climb Mode. (If CLIMB
mode is o, the robot does not go over doorsills or
climb onto the carpet or rugs over 5mm in height.)
Start / Stop cleaning
Power On / Off

3
1
2
1 3
2
3
1
2
1 3
2
11
1. Use the direction buon
of remote control to send
the robot cleaner to
specic area.
3. If charging ( ) buon
of the remote controller is
pressed, it nds and moves
to the charging station
and starts charging.
2. Aer the vacuum
cleaning robot started
the cleaning, if direction
buon is pressed,
itmovestothedesired
directionwhile cleaning.
- When backwardbuonis pressed,itturns180 degree
to make the direction change.
- If the direction buon is pressed right aer pressing
powerbuon,itmoveswithoutcleaning(suction)function.
BASE message is displayed
on the display window of the
main body, and aer
returning to the charging
station, baery mark blinks.
※During the basic cleaning, robot performs the
cleaning in vision mapping method, and the robot
decides when to nish the cleaning. When the
robot decides that the cleaning is nsihed, it
returns to the starting point.
Selected Cleaning
: NDOM, SPOT(blinking)
, MAX, Wet Mop
A. NDOM mode
It cleans with a random
method for the time set by
the user.
1. Press power buon
2. Press MODE buon to select NDOM.
3. Set the cleaning time for robot in the display
window. (Default is 60 min. Adjust time with +, -
on remote controller.)
4. Check if light comes on NDOM mode in the
display window.
5. Press START buon.
B. SPOT mode
It uses AUTO mode to perform focused cleaning
within radius 1m area in zigzag mode.
1. Press POWER buon.
2. Press SPOT buon on the remote controller.
3. Check if AUTO mode is blinking in the display
window. Check display AUTO mode blinking
(SPOT mode seing is completed.)
4. Press START buon.
- Robot completes the cleaning in SPOT mode and
returns to the starting point.
C. MAX mode
It starts the cleaning in AUTO mode, nishes the
cleaning in AUTO mode, then changes to
NDOM mode, and cleans until the baery runs
out.
1. Press POWER buon.
2. Press MAX buon on the remote controller.
3. Check if lights come on AUTO mode and
NDOM mode in the display window.
(MAX mode seing is completed.)
4. Press START buon.
- Robot cleans until the baery runs out, and returns
to the starting point.
D. WET MOP mode
1. Aach wet mop on the robot.
2. Check if light comes on WET MOP buon in the
display window. Deselecting CLIMB is
recommended.
3. Use MODE to select AUTO or NDOM.
(During the seing of NDOM mode, set
cleaning time using +,- buon: Default is 60 min.)
※Spot mode(partial cleaning) and Max mode
(until baery runs out) are selected by a separate
buon on the remote controller.
※In all mode selections, CLIMB is the default value.
If you want to turn it o, click CLIMB buon on
the remote controller to turn o CLIMB mode.
(If you turn o CLIMB mode, robot will not go
over doorsills or climb on the carpet.)
●Usage of robot cleaner
Using move, charge function

1. Press Timer buon of the remote control.
→ Time indicator blinks in the display window.
If timer cleaning is set, it displays the set time.
At this time, to set new timer cleaning, press it one more time.
2. Use (+)(-) to set “hour” for timer cleaning and press Enter buon.
→ e set time is displayed in the display window.
3. Use (+)(-) to set “minute” for timer cleaning and press Enter buon.
→ e set time is displayed in the display window, and reserved icon ( ) appears.
※To cancel the reservation, press timer buon of the remote controller,
and press Enter buon to cancel the reservation.
※When a TIMER cleaning reservation is set in AUTO mode, robot starts cleaning at the set time, completes
all the cleaning, and then returns to the charging station.
※When a TIMER cleaning reservation is set in NDOM mode, robot starts cleaning at the set time
everyday, cleans in NDOM mode for the set min., and returns to the charging station.
12
●Usage of robot cleaner
Cleaning
mode
Timer
cleaning
※Refer to page 10 for setting the current time.
Cleaning
mode
Set the
mode Cleaning
mode
Explanation Explanation
Status StatusExplanation Explanation
Cleans with camera
navigation mapping method
Randomly cleans during the
set time. Set the time with +, -
button on remote control
After navigation cleaning,
it converts to random mode and
cleans until battery runs out
AUTO RANDOM
Door sill
adjust
Mopping
Zigzag part cleaning
within 1m diameter
The cleaning mode is
automatically converted to
Mopping mode once the
mop plate mounted
on the bottom
If you press door sill (CLIMB) button of the
remote controller, the Performance of the
climbing can be increased up to 18mm.
(But, there may be differences according to the
environment, Such as the structure of the door
sill, etc.)
Remote
control &
cleaning
robot
Only with
remote
control
※ The default climbing height of obstacles for the robotic vacuum
cleaner is up to about 18mm.
※ If you wish to set the robot not to go over obstacles over 5mm or
doorsill, etc., click CLIMB button to turn off CLIMB mode!
: Please turn off CLIMB mode if you wish to protect carpet, etc.
※When TIMER is set for cleaning, robot starts the cleaning at the set time everyday.
※ During the cleaning of carpet or marble floor & patterned tile floors usage of AUTO + CLIMB mode is
recommended.
1 2 31 2 3

13
Cleaning Sensor
●iClebo care & maintenance
Cleaning Side Brush
1. Separate the side-brush with both hands.
2. Clean dust and foreign substance using the cleaning brush.
1.Wipe the sensors on the Front Bumper of the robot cleaner
using q-tips.
2. Wipe the sensors on the boom of the robot cleaner
using q-tips.
1. Hold the dust bin as in the gure and separate sterilization lter cover.
2. Clean the lter using cleaning brush.
※Dust bin can be washed with water.
However, completely dry them before assembling and using them again.
Emptying dust bin and servicing the antibacterial filter

Cleaning Front Wheel
14
●Product control & maintenance
Cleaning Main Brush
4. Separate the brush cover then remove the main brush.
Furrow
CLICK
CLICK
6. Aer cleaning, put the
pyramid-shaped bump on the side
of the main brush to the
pyramid-shaped recess on the drive
cam. (Insert rmly to ensure there is
No gap between the brush and the
cam.)
1. Press the front-wheel x clip with both hands and li up to seperate.
2. Remove foreign substance on the front brush using the cleaning brush.
5. Clean hair, carpet ber and other substances substances stuck on the main
brush using the cleaning brush. Over time, hairs and bers accumulate
between the main brush and the bearing. is extra friction which will causes
less ecient cleaning, more baery strain leading to shorter running time and
may ultimately stop the Robot Vacuum Cleaning.
※Use scissors or a knife along the main brush furrow to remove the hair.

15
1. If the Vacuum Cleaning Robot is not used for a long period of time,
turn o the Power Switch on the side of the Main Body.
※Please be aware that the baery could be discharged aer an extended
period of non-use.
●Stora ge
Storage
2. Keep the Vacuum Cleaning Robot away from direct sunlight.
Store the Vacuum Cleaning Robot in a well ventilated location.
※Please do not store any objects on top of the Vacuum Cleaning Robot as it may cause a malfunction

16
●Check before repair report
Below is the explanation about the most occurred ‘breakdowns’
when using this product.
If you can’t solve the problem with information below,
please call your Customer service center.
Problem Cause Solution
It is not
cleaning well.
▶Dust Bin is full.
▶Main Brush is dirty.
▶Filter is contaminated.
▶Power switch is turned o.
▶Remote Control baeries not
working.
▶Infrared sensor or beam part
of the remote control are
blocked or dirty
▶Remote control is too close
to the charging station.
▶Charging station or Robot
Vacuum Cleaning is not
connected properly to the plug.
▶Move farther away from the Charging
Station and press the buon again while
pointing at the Robot Vacuum Cleaning.
▶Connect the power of the Charging Station
properly.
▶Move the Charging Station. No objects
should be placed within 20 inches le/right,
5 feet in front of the home station.
is is to enable the robot cleaner to return
to the home station automatically aer
cleaning.

17
●Check before repair report ●Display error message
Noise of the
robot cleaner is
geing worse.
▶Dust bin is full or lter is
dirty.
▶Main brush is dirty.
▶Main brush is dirty or hairs
are accumulating between the
main brush and the bearing.
▶Empty and clean the dust bin.
▶See <Product control & maintenance>
(page 13) and clean the lter.
▶See <Product control & maintenance>
(page 14) and clean the main brush.
Error display
Cause Solution
Lied wheel
Move the robot cleaner to at area in case
the wheel is stuck on the threshold or porch.
Cannot detect oor
Move the robot cleaner to at area.
Dust bin error Dust bin is not properly assembled.
See<Productcontrol&maintenance>andinstallproperly.
Wheel motor overload
Check if foreign substance such as hair or lint exists
on the wheel.
See <Product control & maintenance> and remove
the foreign substance.
Brush motor overload
Check if foreign substance such as hair or
lint exists on the main brush or side-brush.
See <Product control & maintenance> and remove
the foreign substance.
Suction motor overload See <Product control & maintenance>
and clean lter, empty the dust bin.
Internal system error Turn o the power switch of the robot cleaner
then turn it on again.
Display error message
C 1
C 2
C 3
C 4
C 5
C 6
C 7
Magnetic Encoder Check the front wheel & magnetic sensor are clean &
correctly inserted
C 8

iAMN.USA.V0
Model Name
Power
Charging Energy Consumption
Main Body Energy Consumption
Battery
Diameter
Height
Weight
Speed
Filter
Sensor
Charging Time
Usage Time
Noise
iClebo Customer Support : 1.855.926.1601
MADE IN KOREA
©2014 Yujin Robot Inc.
16410 Manning Way, Cerritos, CA 90703
T562.926.1601 F562.926.1629
www.iclebo.com
One-Year Limited Warranty.
Specifications and features are subjected to change without notice.
ㆍMonday-Friday 9 am to 6pm PST
ㆍSaturdays
ㆍSundays
Closed
Closed
iCLEBO POP (YCR-M05-P)
100 V ~ 240 V
Below 1.4 W
10 W
Lithium lon Battery
14 inches
3.5 inches
12 inches
6.06 LBS
Antibacterial filter
IR, PSD, Encoder, Bumper
110 min.
120 min. (based on normal floor)
58 dB[A]
Other manuals for YCR-M05
6
Table of contents
Other Iclebo Vacuum Cleaner manuals

Iclebo
Iclebo YCR-M05 User manual

Iclebo
Iclebo O5 User manual

Iclebo
Iclebo YCR-M05 User manual

Iclebo
Iclebo YCR-M04-02 User manual

Iclebo
Iclebo POP YCR-M05 User manual

Iclebo
Iclebo YCR-M04-02 User manual

Iclebo
Iclebo YCR-M05 User manual

Iclebo
Iclebo Arte YCR-M05-02 User manual

Iclebo
Iclebo YCR-M05 User manual

Iclebo
Iclebo YCR-M05 User manual