Icom IC-M400BB User manual

REMOTE-CONTROL MICROPHONE
INSTRUCTIONS q
HM-195B
HM-195SW
Thank you for purchasing the HM-195B/HM-195SW
r e m o t e -c o n t r o l m i c r o p h o n e . The COMMANDMICIV™ is
a remote control microphone for use with the IC-M423/
IC-M424, IC-M400BB, and future products.
Carefully read the instruction manual of the transceiver
you will use, before connecting and operating. These in-
structions describe only the remote-control operations.
Accessories included with the HM-195: Qty.
qConnection cable (OPC-1540*: 6 m; 20 ft) ....................... 1
wMounting base ................................................................. 1
eConnector cap ................................................................. 1
rMicrophone hanger .......................................................... 1
tScrews (M3 ×16 mm; self-tapping) ................................. 5
*The OPC-1540 has external speaker leads, as illustrated to the right.
(Yellow: Speaker (+), Black: Speaker (–))
zSupplied accessories
qwe
r
t
Yellow Black
!8
!4
!6
!7
!5
qw ietr!0you
!1
!2
!3
qBUSY/TRANSMIT ICON (See n)
“➥” appears when receiving a signal or when the
squelch is open.
“➥” appears while transmitting.
wPOWER ICON (See n)
“25W” appears when high power is selected.➥
“1W” appears when low power is selected.➥
eRX SPEAKER ICON (See ¤7)
Appears while in the RX Speaker mode.
rCHANNEL GROUP ICON (See b)
Selected channel group icons, U.S.A. “USA,” Interna-➥
tional “INT,” Canadian “CAN,” ATIS “ATIS” or DSC “DSC”
appears, depending on the transceiver version.
“WX” appears when the weather channel is selected.➥
tCALL CHANNEL ICON (See b)
Appears when the Call channel is selected.
yDUPLEX ICON (See b)
Appears when a duplex channel is selected.
uFAVORITE CHANNEL ICON (See ⁄3)
Appears when a Favorite (TAG) channel is selected.
iMAIL ICON (See ¤3)
Blinks when there is an unread message.
oGPS ICON
Stays ON when the GPS receiver is activated and valid➥
position data is received.
Blinks when invalid position data is being received.➥
!0 SWITCH ICON (See ¤5)
Appears when the “CH 16 SWITCH” in DSC Settings is set
to ‘OFF.’
!1 LOW BATTERY ICON
Blinks when the battery voltage drops to approximately 10 V
DC or less.
!2 CHANNEL NUMBER READOUT
Shows the selected operating channel number.
•Whenasimplexchannelisselected,“A”appears.
!3 CHANNEL NAME FIELD
The channel name appears, if programmed. (See ,)
!4 KEY ICONS (See v)
Shows the programmed function of the softkeys on the front
panel.
!5 TIME ZONE INDICATOR
Shows the current time when a GPS receiver is connect-➥
ed, or the time is manually programmed.
•WhentheGPScurrenttimeisinvalid,“??”willblinkevery
2 seconds instead of the current time. After 23.5 hours has
passed, “NO TIME” will appear.
•“??”willblinkevery2seconds,instead of the current time, 4
hours after the time was manually programmed. The manually
programmed time is held for only 23.5 hours, and after that,
“NO TIME” will appear.
“LOCAL” appears when the offset time is set.➥
“MNL” appears when➥
the time is manually programmed
.
“UTC” appears when➥
the GGA, GLL or GNS GPS sen-
tence format is included in the GPS signal.
The date information appears when➥
the RMC GPS sen-
tence format is included in the GPS signal.
“NO TIME” appears when no GPS receiver is connected,➥
and no time is manually input.
!6 POSITION INDICATOR
➥ Shows the current position when a GPS receiver is con-
nected, or the position is manually programmed.
•WhentheGPSpositionisinvalid,“??”may blinkevery 2
seconds instead of position.The last position is held for only
23.5 hours, and after that, “NO POSITION” will appear.
•“??” will blink every 2 seconds, instead of position, 4 hours
after the position is manually programmed. The manually pro-
grammed position is held for only 23.5 hours, and after that,
“NO POSITION” will appear.
➥ “NO POSITION” appears when no GPS receiver is con-
nected, and no position is manually input.
!7 SCAN INDICATOR
“SCAN 16” appears during a Priority scan; “SCAN” ap-➥
pears during a Normal scan. (See ⁄4)
“DUAL 16” appears during Dualwatch; “TRI 16” appears➥
during Tri-watch. (See ⁄5)
!8 LOCAL ICON (See n)
Appears when the Attenuator function is turned ON. (Only
U.S.A. and Australian version transceivers.)
xFunction display
The HM-195 remotely controls the transceiver and provides an
Intercom function.
qDISTRESS KEY [DISTRESS] (See ⁄9)
Hold down for 3 seconds to transmit a Distress call.
wPTT SWITCH [PTT]
Hold down to transmit, release to receive. (See n)
eMENU KEY [MENU]
(
See ‹0
)
Push to enter or exit the Menu screen.
rLEFT AND RIGHT KEYS [Ω]/[≈]
Push to switch to the previous or next key function that is➥
assigned to the softkeys. (See v)
Push to select the desired character or number in the➥
table while in the channel name, position programming
mode, and so on. (See ,, ⁄6, ⁄7)
tENTER KEY [ENT] (See ,, ⁄0, ⁄6)
Push to set the input data, selected item, and so on.
y
UP AND DOWN/CHANNEL SELECT KEYS [∫•CH]/[√•CH]
Push to select the operating channels, Menu items, Menu➥
settings, and so on. (See b, ‹0)
➥
Push to check Favorite channels, change the scanning
direction or manually resume a scan. (
See ⁄4
)
uCHANNEL 16/CALL CHANNEL KEY [16/C]
Push to select Channel 16. (See➥b)
Hold down for 1 second to select the Call channel. (➥
See
b
)
•“CALL”appearswhentheCallchannelisselected.
➥
When the Call channel is selected, hold down for 3 sec-
onds to enter Call channel programming mode . (
See m
)
iCLEAR KEY [CLEAR]
(
See ,
,
⁄6
,
‹0
)
Push to cancel the entered data, or to exit the Menu screen.
oSOFTKEYS
Desired functions can be assigned in the Menu screen.See
the transceiver’s manual for details.
!0 VOLUME AND SQUELCH SWITCH/POWER SWITCH
[VOL/SQL•PWR]
When the power is OFF, hold down for 1 second to turn➥
ON power. (See n)
Hold down for 1 second to turn OFF power.➥
When the power is ON, push to enter the volume level➥
adjustment mode.* (See ⁄0)
•Eachpushofthisswitchtogglesthemodebetweenthevol-
ume level adjustment, squelch threshold level adjustment,
operating channel selection and the LCD and key backlight
brightness adjustment, if assigned.
Rotate to adjust the volume level.* (See➥⁄0)
*The desired function can be assigned in the Menu screen.
cPanel description
w
y
t
r
e
q(Back side) !0
o
i
y
r
u
Various functions can be assigned to the softkeys.
When a key function is assigned, the key icon is displayed
above the softkey, as shown below.
Consult your Icom dealer for details concerning which func-
tions are preprogrammed into the keys.
Softkey function selectionD
When “Ω” or “≈” is displayed beside the key icon, pushing [Ω]
or [≈] sequentially shows the previous or next key function that
is assigned to the softkey.
Push Push
*
*Push this key to start
and stop scan.
The order of the key icons may differ depending on the pre-
programming, and the contents may differ, depending on
the transceiver version.
Except for a U.S.A. and Australian version transceiver:
•[ ] appears instead of [ ].
•[ ] does not appear.
vSoftkey function bChannel selection
Channel 16D
Push [16/C] to select Chan-q
nel 16.
Push [CH/WX]* to return tow
the screen displayed before
you selected Channel 16,
or push [
∫
](CH) or [
√
](CH)
to select an operating channel.
Call channelD
Hold down [16/C] for 1 sec-q
ond to select the Call chan-
nel of the selected channel
group.
Push [CH/WX]* to return tow
the screen displayed before
you selected Call channel, or push [
∫
](CH) or [
√
](CH) to
select an operating channel.
*[CHAN] appears except for a U.S.A. and Australian version trans-
ceiver.
Weather channelsD
(U.S.A. and Australian version transceiver only.)
Push [CH/WX] once or twice to select a weather channel.q
•“WX”appearswhenaweatherchannelisselected.
•“WX ” appears when the Weather Alert function is in turned
ON.
Push [w
∫
](CH) or [
√
](CH) to select a channel.
Icom, Icom Inc. and the Icom logo are registered trademarks of Icom Incorporated (Japan) in Japan, the United States, the United Kingdom, Germany, France,
Spain, Russia and/or other countries. COMMANDMIC is a registered trademark of Icom Incorporated (Japan) in Japan and the United States.

1-1-32 Kamiminami, Hirano-ku, Osaka 547-0003, Japan A-7022D-1EX-qPrinted in Japan
© 2012 Icom Inc.
bChannel selection (Continued) mCall channel programming
Channel group selectionD
Push [MENU].q
Rotate Dial or push [w
∫
]/[
√
]
to select “Radio Settings,”
and then push [ENT].
Rotate Dial or push [e
∫
]/[
√
]
to select “CHAN Group,”
and then push [ENT].
Rotate Dial or push [r
∫
]/[
√
]
to select the desired chan-
nel group, and then push
[ENT].
•
The selectable channel
groups may differ, depending
on the transceiver version.
Push [EXIT] to exit.t
Push [y
∫
](CH) or [
√
](CH) to
select a channel.
•“DUP”appearswhenaduplexchannelisselected.
•“A”appearswhenasimplexchannelisselected.
Select the desired channel group to be programmed. (Seeq
b)
Hold down [16/C] for 1 second to select the Call channel ofw
the selected channel group.
•“CALL”andtheCallchannelnumberappear.
Hold down [16/C] again for 3 seconds (until a long beepe
changes to 2 short beeps) to enter the Call channel pro-
gramming mode.
Rotate Dial or push [r
∫
](CH) or [
√
](CH) to select a channel.
Push [ENT] to program the displayed channel as the Callt
channel.
•Push[CLEAR]tocancel.
Hold down [PWR] to turn ON the power.q
Set the audio and squelch levels. (Seew⁄0, ⁄1)
First, open the squelch. Then, adjust the audio output➥
level. After that, adjust the squelch level until the noise
just disappears.
Change the channel group. (Seeeb)
Push [r∫](CH) or [√](CH) to select a channel. (See b)
•When receiving a signal, “ ” appears and audio is
heard.
•Furtheradjustmentofthevolumelevelmaybenecessary.
Push [LO/DX] to turn the receive Attenuator function ON ort
OFF, if necessary.
•OnlyU.S.A.andAustralianversiontransceivers.
•“LOCAL” appears when the receive Attenuator function is
ON.
Push [HI/LO] to select the output power, if necessary.y
•“25W” appears when high power is selected, and“1W” ap-
pears when low power is selected.
•Choose low powerfor short rangecommunications,choose
high power for longer distance communications.
•Somechannelsareforonlylowpower.
Hold down [PTT] to transmit, then speak at your normalu
voice level.
•“ ” appears.
•Channel70cannotbeusedfortransmissionotherthanDSC.
Release [PTT] to receive.i
Information✓
The Noise Cancel function reduces random noise components
in the transmit and/or receive signal. See the transceiver’s
manual for details.
Simplex channels, 3, 21, 23, 61, 64, 81, 82 and 83 CAN-
NOT be lawfully used by the general public in U.S.A. wa-
ters.
IMPORTANT: To maximize the readability of your transmit-
ted signal, pause a few seconds after pushing [PTT], hold
the microphone 5 to 10 cm (2 to 4 inches) from your mouth
and speak at a normal voice level.
NOTE for the TOT (Time-out Timer) function✓
The TOT function inhibits continuous transmission beyond a
preset time period after the transmission starts.
10 seconds before transmission is cutoff, a beep sounds to
indicate the transmission will be shut down and “TOT” appears
in the channel name field. Transmission is not possible for 10
seconds after this shut down.
nReceiving and transmitting
,Channel name programming
Each channel can be assigned a unique alphanumeric ID of up
to 10 characters.
Capital letters, 0 to 9, some symbols (! " # $ % & ' ( ) * + , – . / [
\]^_:;<=>?)andaspacecanbeinput.
Push [q
∫
](CH) or [
√
](CH) to select a channel.
•First,canceltheDualwatch,Tri-watchorScanfunction,ifacti-
vated.
Push [NAME] to open the channel name programmingw
screen.
•Ablackboxisdisplayedontherstcharacter.
Enter the desired channel name in the following manner:e
•SelectadesiredcharacterusingDial,or[
∫
]/[
√
]/[
Ω
]/[
≈
].
•Push[ENT]tosetit.
•Tomovethecursor,selecteitherarrow,“←” or “→,” then push
[ENT].
•Select“SPACE,”thenpush[ENT]toinputaspace.
•Select“DELETE,”thenpush[ENT]todeleteacharacter.
•Push[CLEAR]tocancelandreturntothepreviousscreen.
Repeat stepr e to input all characters.
Push [tΩ], [≈], [∫] or [√] to select “FINISH,” then push [ENT]
to set the name and return to the previous screen.
.AquaQuake water draining function
The AquaQuake water draining function clears water away
from the speaker grill. Without this function, water may muffle
the sound coming from the speaker. A buzzing sound is heard
when this function is activated.
While holding down [AQUA], the AquaQuake function is ac-➥
tivated to clear water away from the speaker grill.
•While holding down [AQUA], a low buzzing sounds to drain
water, regardless of the volume level setting.
•TheHM-195’skeysaredisabledwhiletheAquaQuakefunc-
tion is activated.
⁄0 Adjusting the volume level
Rotate [VOL/SQL](Dial), or push [VOL/SQL](Dial) one orq
more times to display the volume adjustment screen.
Rotate [VOL/SQL](Dial) to adjust the volume level.w
•TheHM-195has20volumelevelsandOFF.
•Ifnokeyoperationisperformedforabout5seconds,theHM-
195 sets the selected volume level, and returns to the normal
mode.
Push [ENT] to set the level, and exit the volume adjustmente
mode.
•Push[CLEAR]tocancel.
The desired function can be assigned to [VOL/SQL](Dial).
See the transceiver’s manual for details.
⁄1 Adjusting the squelch level
Push [VOL/SQL](Dial) one or more times to display theq
squelch adjustment screen.
Rotate [VOL/SQL](Dial) to adjust the squelch level.w
•The squelch is adjustable in 11 levels. OPEN is completely
open; 10 is tight squelch; 1 is loose squelch.
•Ifnokeyoperationisperformedforabout5seconds,these-
lected squelch level is set, and returns to the normal mode.
Push [ENT] to set the level, and exit the squelch adjustmente
mode.
•Push[CLEAR]tocancel.
The desired function can be assigned to [VOL/SQL](Dial).
See the transceiver’s manual for details.
Select Priority scan or Normal scan in the Menu screen.q
•Seethetransceiver’smanualfordetails.
Select the desired channel group. (Seewb)
Set theeFavorite channels. (See ⁄3)
Make sure the squelch is closed to start a scan.r
Push [SCAN] to start a Priority or Normal scan.t
•“SCAN16”appearsduringaPriority scan;“SCAN”appears
during a Normal scan.
•Whenasignalis detected, the scanpausesuntilthesignal
disappears, or resumes after pausing 5 seconds, depending
on the Set mode setting. (Channel 16 is still monitored during
a Priority scan.)
•Push[Y]/[Z] to check the scanning Favorite channels, change
the scanning direction or manually resume the scan.
•Abeeptonesoundsand“16”blinkswhenasignalisreceived
on Channel 16 during a Priority scan.
To stop the scan, push [CLEAR], or repeat stepy t.
⁄5 Dualwatch/Tri-watch operation
⁄3 Setting Favorite channels
⁄4 Starting a scan
Select Dualwatch or Tri-watch in the Menu screen.q
•Seethetransceiver’smanualfordetails.
Push [w
∫
](CH) or [
√
](CH) to select the desired operating
channel.
Push [DW] to start a Dualwatch or Tri-watch scan.e
•“DUAL16”appearsduringDualwatch;“TRI16”appearsduring
Tri-watch.
•A beep tone sounds when a signal is received on Channel
16.
To cancel Dualwatch or Tri-watch, push [DW] again.r
Select the desired channel group. (Seeqb)
Select the desired channel to be set aws a Favorite channel.
Push [e] to set the displayed channel as a Favorite chan-
nel.
•“” appears on the display.
To cancel therFavorite channel setting, repeat step e.
•“” disappears.
Clearing (or setting) all tagged channels✓
Hold down [] for 3 seconds (until a long beep changes to 2
short beeps) to clear all Favorite channel settings in the se-
lected channel group.
• Repeat above procedure to set all channels as Favorite chan-
nels.
⁄2 Adjusting the display backlight level
The function display and keys can be backlit for better visibility
under low light conditions.
The backlight is adjustable in 7 levels and OFF.
Push [BKLT] to show the backlight adjustment screen. Ro-➥
tate Dial to adjust the brightness of the LCD and key back-
light, and then push [ENT].
•Ifnokeyoperationisperformedforabout5seconds,theHM-
195 sets the selected backlight level, and returns to the nor-
mal mode.
When the International
channel group is selected.
+See “Instructions w” (⁄6 to ¤1)or “Instructions e” (¤2 to ‹0)for other functions.
CLEAN THE HM-195 THOROUGHLY WITH FRESH WATER after exposure to saltwater, otherwise, the keys and switch may
become inoperable due to salt crystallization.

REMOTE-CONTROL MICROPHONE
HM-195B
HM-195SW
INSTRUCTIONS w
⁄6 Programming Individual/Group ID
Enter “INDIVIDUAL ID” or “GROUP ID” in the DSC SET-q
TINGS menu.
Push [ADD].w
•The“INDIVIDUALID”or“GROUPID”programscreenisdis-
played.
EnteradesiredIDinthefollowingway:e
•SelectadesirednumberusingDial,or[∫]/[√]/[Ω]/[≈].
•Push[ENT]orDialtosetit.
•Tomovethecursor,selecteitherarrow,“←” or “→,”thenpush
[ENT]orDial.
Therstdigitisspeciedas‘0’foraGroupID.
Thersttwodigitsare‘0’foranyCoaststationID.
Repeatstepr etoenterall9digits.
Afterentering,push[ENT]orDialtosetit.t
•TheIDnameprogrammingscreenisdisplayed.
Enteradesired10digitIDnameinthefollowingway:y
•SelectadesiredcharacterusingDial,or[∫]/[√]/[Ω]/[≈].
•Push[ENT]orDialtosetit.
•Tomovethecursor,selecteitherarrow,“←” or “→,”thenpush
[ENT]orDial.
•Push[123]then[!$?]then[ABC]toselectacharactergroup.
AfterenteringtheIDname,select“FINISH”usingDial,oru
[∫]/[√]/[Ω]/[≈],thenpush[ENT]orDialtoprogramit.
•The“INDIVIDUALID”or“GROUPID”listscreenisdisplayed.
Push[MENU]toexittheMENUscreen.i
⁄8 Position and time programming
Enter “POSITION INPUT” in the DSC SETTINGS menu.q
EdityourlatitudeandlongitudepositionusingDial,or[w∫]/
[√]/[Ω]/[≈].
•SelectadesirednumberusingDial,or[∫]/[√]/[Ω]/[≈].
•Push[ENT]orDialtosetit.
•Tomovethecursor,selecteitherarrow,“←” or “→,”thenpush
[ENT]orDial.
•SelectN(Northlatitude)orS(Southlatitude)whenthecursor
isonthe‘N’or‘S’position.
•SelectW(Westlongitude)orE(Eastlongitude)whenthecur-
sorisonthe‘W’or‘E’position.
Afterenteringtheposition,push[ENT]toprogramit.e
TheUTCtimeprogrammingscreenisdisplayed,enterther
UTCtimeinthefollowingway:
•SelectadesirednumberusingDial,or[∫]/[√]/[Ω]/[≈].
•Push[ENT]orDialtosetit.
•Tomovethecursor,selecteitherarrow,“←” or “→,”thenpush
[ENT]orDial.
Push[ENT]orDialtoprogramyourpositionandtime.t
•Returntothe“DSCSETTING”screen.
⁄7 Deleting Individual/Group ID
Enter “INDIVIDUAL ID” or “GROUP ID” in the DSC SET-q
TINGS menu.
•WhennoaddressIDisprogrammed,“NoID”isdisplayed.In
thiscase,push[MENU]toexittheMENUscreen.
Rotate Dial or push [w∫]/[√] to select a desired ID name,
thenpush[DEL].
Push[OK]todeletetheID,andreturntothe“INDIVIDUALe
ID”or“GROUPID”listscreen.
•Push[CANCEL]tocancelit.
Push[MENU]toexittheMENUscreen.r
⁄9 Distress Call
TheDistresscallisautomaticallytransmittedevery 3.5 to
4.5minutes,untilanacknowledgementisreceived(‘Callre-
peat’mode),oraDSCCancelcallismade(See¤0).
Simple CallD
ConrmnoDistresscallisbeingreceived.q
Whileliftingupthekeycover,holddown[DISTRESS]for3w
secondstotransmittheDistresscall.
•While holding down [DISTRESS], count down beeps sound
andboththekeyanddisplaybacklightingblink.
•DSCchannel(Channel70)isautomaticallyselectedandthe
Distresscallistransmitted.
After transmittingthecall,thetransceiver waitsforan ac-e
knowledgmentcall.
•Push[RESEND]tomanuallytransmittheDistressrepeatcall.
•Push[Ω]/[≈]thenpush[INFO]todisplaythetransmittedDis-
tresscallinformation.
•Push [Ω]/[≈] then push [PAUSE] to pause the ‘Call repeat’
mode;push[RESUME]toresumeit.
After receiving the acknowledgment, push [ALARM OFF]r
thenreplyusingthemicrophone.
Adistressalertdefaultcontains:➥
•Natureofdistress :Undesignateddistress
•Positioninformation:ThelatestGPSormanualinputposition
isheldfor23.5hours,oruntilthepower
isturnedOFF.
Regular CallD
Enter “DISTRESS CALL” in the DSC CALLS menu.q
SelectthenatureofthedistressusingDialor[w∫]/[√],then
pushDialor[ENT].
•‘Undesignated,’‘Fire,’‘Explosion,’‘Flooding,’‘Collision,’‘Ground-
ing,’‘Capsizing,’‘Sinking,’‘Adrift,’‘Abandoningship,’‘Piracy’or
‘ManOverboard’isselectable.
•Thenatureofthedistressisstoredfor10minutesafterase-
lectionismade.
TheDistresscallconrmationscreenisdisplayed.e
•RotateDialorpush[Y]/[Z]toseethehiddenlines.
Holddown[DISTRESS]for3secondstotransmittheDis-r
tresscall.
•While holding down [DISTRESS], count down beeps sound
andboththekeyanddisplaybacklightingblink.
•Theselectednatureofthedistressisstoredfor10minutes.
After transmittingthecall,thetransceiver waitsforan ac-t
knowledgmentcall.
•Push[RESEND]tomanuallytransmittheDistressrepeatcall.
•Push[Ω]/[≈]thenpush[INFO]todisplaythetransmittedDis-
tresscallinformation.
•Push [Ω]/[≈] then push [PAUSE] to pause the ‘Call repeat’
mode,push[RESUME]toresumeit.
After receiving an acknowledgment call, push [ALARMy
OFF],thenreplyusingthemicrophone.
Adistressalertcontains:➥
•Natureofdistress :Selectedinstepw.
•Positioninformation:ThelatestGPSormanualinputposition
isheldfor23.5hours,oruntilthepower
isturnedOFF.
WhennoGPSreceiverisconnected,andbothposition
andtimehavebeenmanuallyprogrammed,thescreen
shownbelowappears.Edityourlatitudeandlongitude
positionandUTCtimeasfollows:
Push[CHG],thenedityourlatitudeandlongitudeposi-➥
tionandUTCtime.
•SelectadesirednumberusingDial,or[∫]/[√]/[Ω]/[≈].
•Push[ENT]orDialtosetit.
•Tomovethecursor,selecteitherarrow,“←” or “→,”then
push[ENT]orDial.
•Select N (North latitude) or S (South latitude) when the
cursorisonthe‘N’or‘S’position.
•SelectW(Westlongitude)orE(Eastlongitude)whenthe
cursorisonthe‘W’or‘E’position.
¤0 Distress Cancel Call
Whilewaitingforanacknowledgmentcall,push[CANCEL].q
Push [CONTINUE].w
•Push[BACK]toreturntowaitingforanacknowledgementcall.
Push[FINISH].e
•Push[EXIT]toreturntowaitingforanacknowledgementcall.
TheDistresscancelcallistransmitted.r
Channel16isautomaticallyselected.t
•Reportyoursituationusingthemicrophone.
•Afterthereport,push[EXIT]toreturntothenormaloperating
mode.

1-1-32Kamiminami,Hirano-ku,Osaka547-0003,Japan A-7022D-2EX PrintedinJapan
©2012IcomInc.
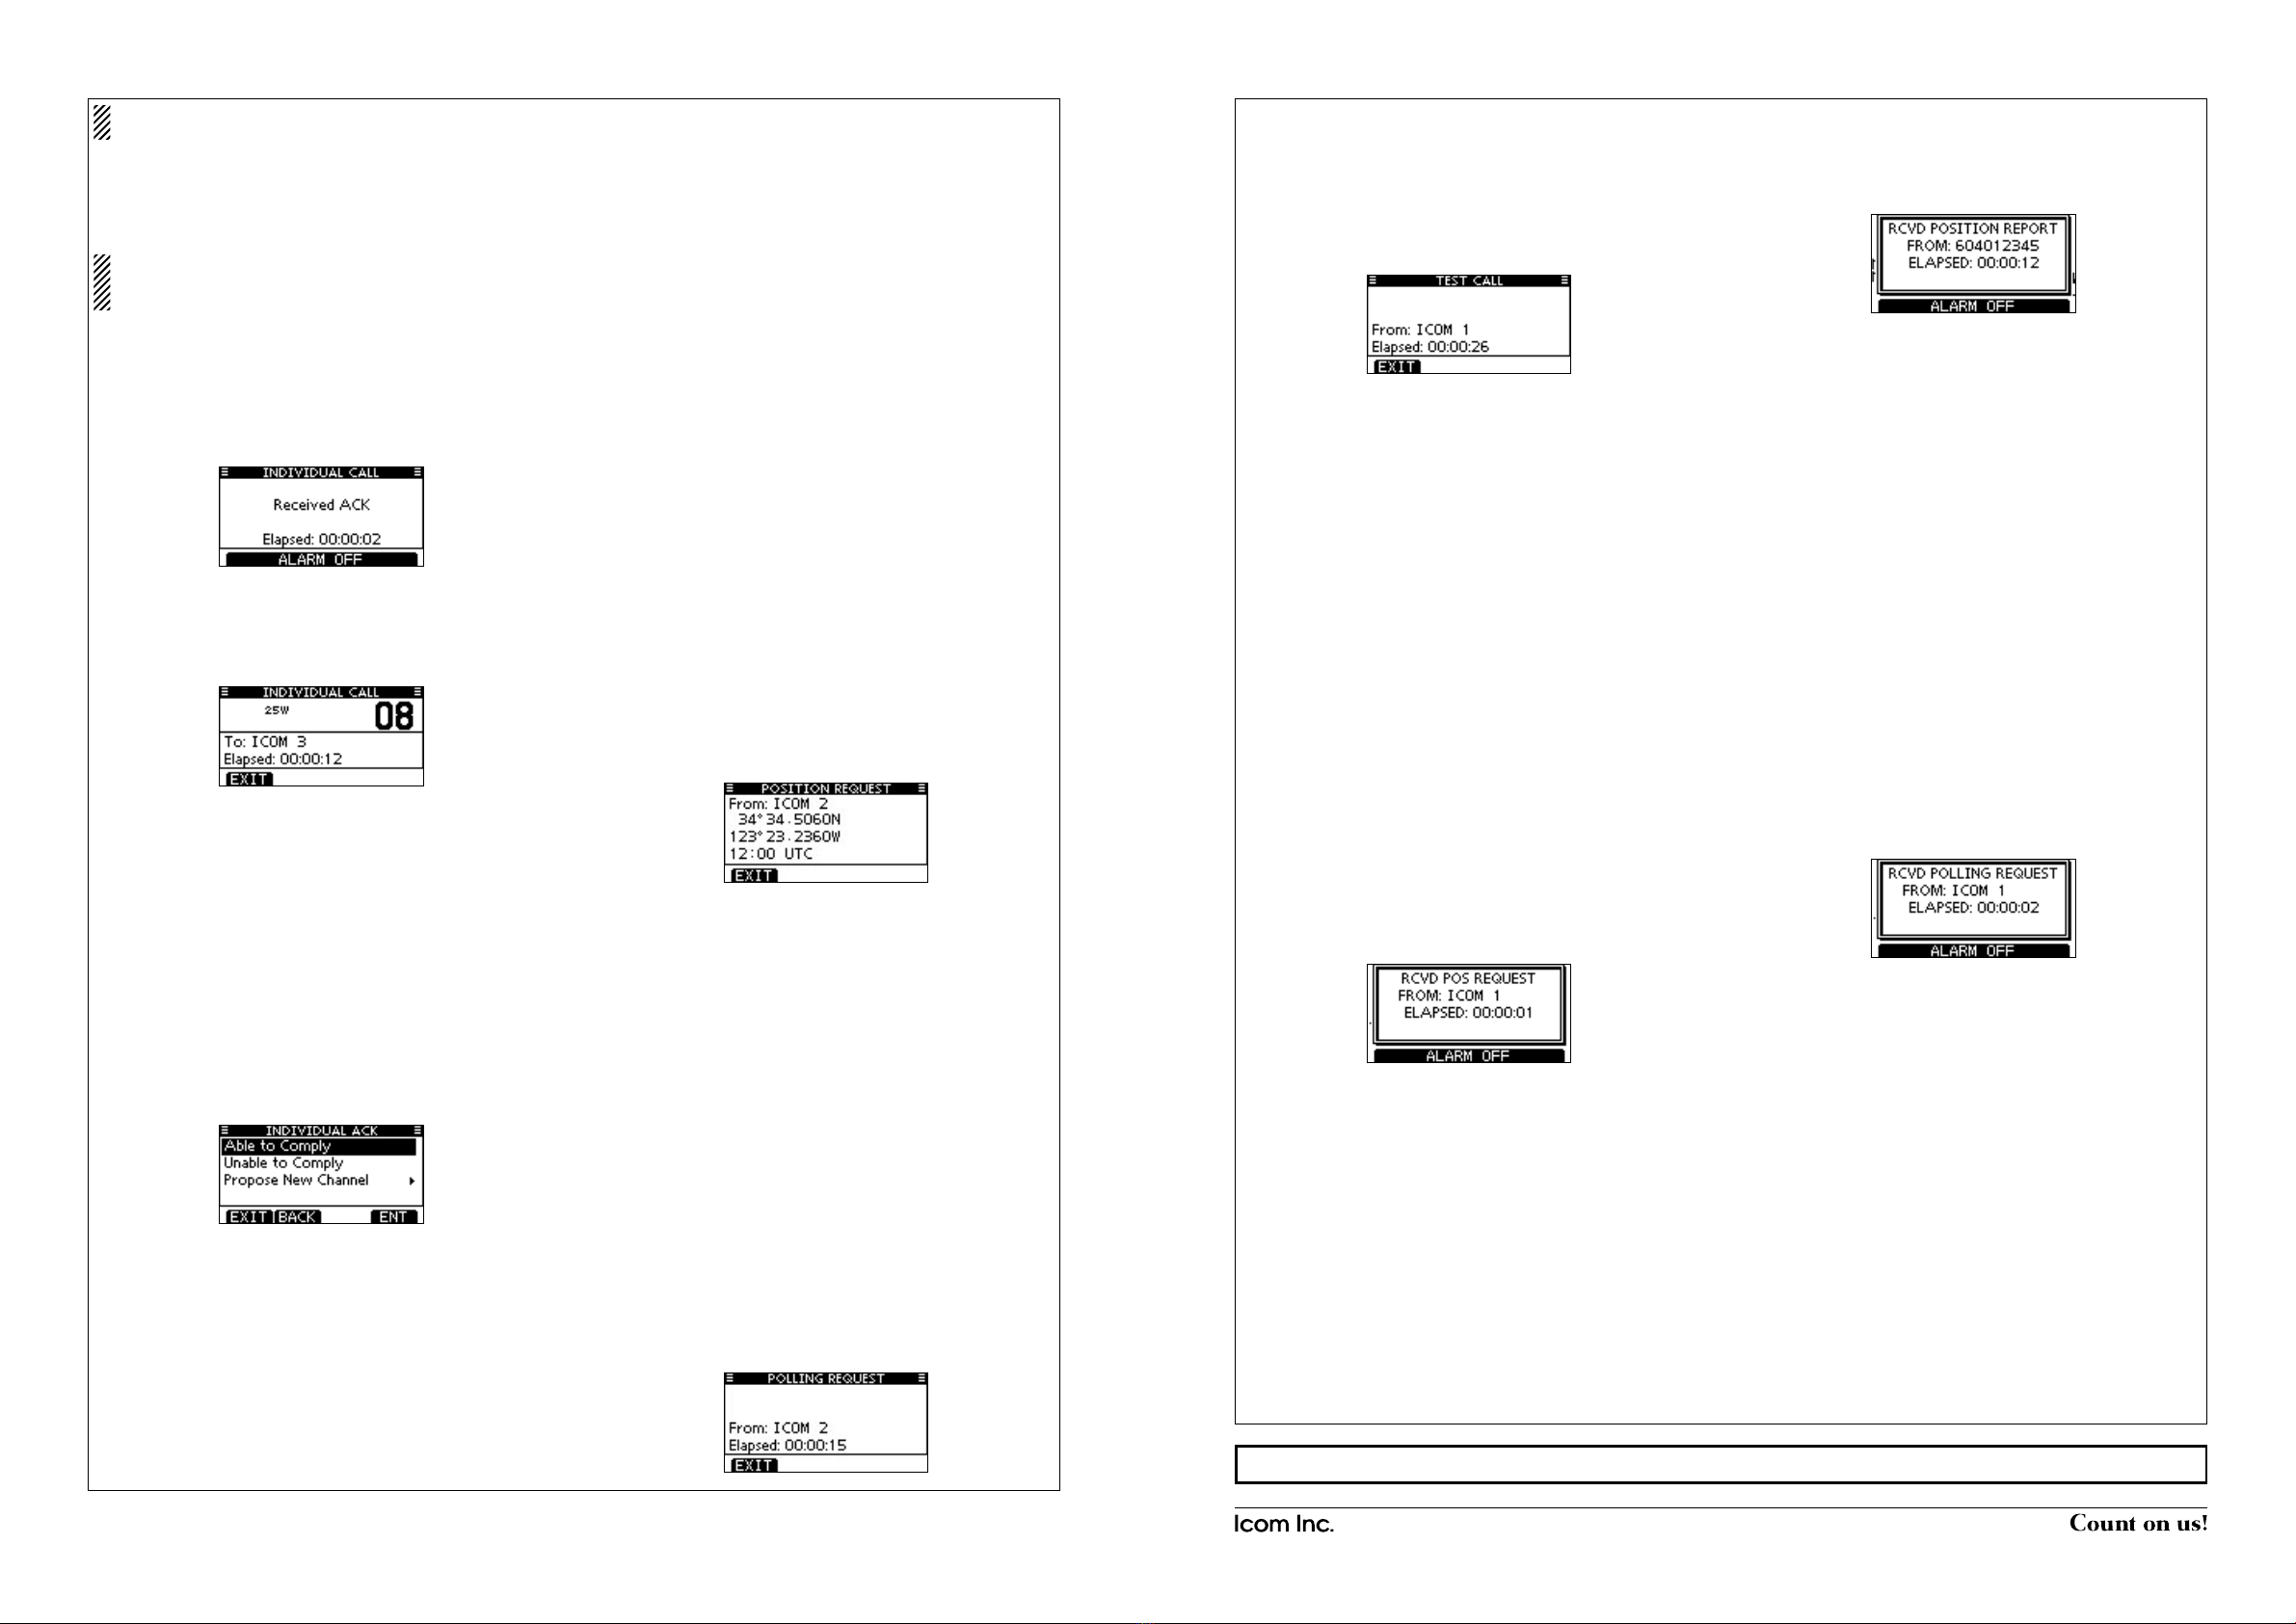
Transmitting a Test CallD
Enter “TEST CALL” in the DSC CALLS menu.q
Selectorenterthedesiredindividualaddress.w
Aconrmationscreenappears.e
Push[CALL]totransmittheTestcall.r
Whentheacknowledgementcallisreceived,beepssound.t
Push[ALARMOFF]tostopthebeeps,andthenpush[EXIT]y
toreturntothenormaloperatingmode.
Transmitting a Test Acknowledgement CallD
Quick ACK:
WhenqaTestcallisreceived,beepssound.
Push[ALARMOFF]tostopthebeeps.
Push [ACK].w
•Push[INFO]todisplaytheTestcallinformation.
Push[BACK]toreturntothepreviousscreen,orpush[ACK].
TheTestACKconrmationscreenisdisplayed.e
Push[CALL]totransmittheacknowledgementcall.
Aftertransmittingtheacknowledgementcall,thetransceiverr
returnstothenormaloperatingmode.
Manual ACK:
Enter “TEST ACK” in the DSC CALLS menu.q
•IfnoTestcallhasbeenreceived,the“TESTACK”itemwillnot
bedisplayed.
SelectadesiredTestcallto replyto,usingDialor[w∫]/[√],
thenpushDialor[ENT].
TheTestACKconrmationscreenisdisplayed.e
Push[CALL]totransmittheacknowledgementcall.
Aftertransmittingtheacknowledgementcall,thetransceiverr
returnstothenormaloperatingmode.
Transmitting a Position Reply CallD
Quick Reply:
WhenqaPositionRequestcallisreceived,beepssound.
Push[ALARMOFF]tostopthebeeps.
Push [ACK].w
•Push[INFO]todisplaythePositionRequestcallinformation.
Push[BACK]toreturntothepreviousscreen,orpush[ACK].
ThePositionReplyconrmationscreenisdisplayed.e
Push[CALL]totransmitthereplycall.
Aftertransmittingthereplycall,thetransceiverreturnstother
normaloperatingmode.
Manual Reply:
Enter “POSITION REPLY” in the DSC CALLS menu.q
•IfnoPositionRequestcallhasbeenreceived,the“POSITION
REPLY”itemwillnotbedisplayed.
SelectadesiredPositionRequestcalltoreplyto.w
ThePositionReplycallconrmationscreenisdisplayed.e
Push[CALL]totransmittheacknowledgementcall.
Aftertransmittingthereplycall,thetransceiverreturnstother
normaloperatingmode.
Transmitting a Position Report Reply CallD
Quick Reply:
WhenqaPositionReportRequestcallisreceived,beeps
sound.
Push[ALARMOFF]tostopthebeeps.
Push [ACK].w
•Push[INFO]todisplaythePositionReportRequestcallinfor-
mation.
Push[BACK]toreturntothepreviousscreen,orpush[ACK].
ThePositionReportReplyconrmationscreenisdisplayed.e
Push[CALL]totransmitthereplycall.
Aftertransmittingthereplycall,thetransceiverreturnstother
normaloperatingmode.
Manual Reply:
q
Enter
“POSITION REPORT REPLY” in the DSC CALLS
menu.
•IfnoPositionReportRequestcallhasbeenreceived,the“PO-
SITIONREPORTREPLY”itemwillnotbedisplayed.
SelectadesiredPositionReportRequestcalltoreplyto,us-w
ingDialor[∫]/[√],thenpushDialor[ENT].
The Position Report Reply call conrmation screen is dis-e
played.
Push[CALL]totransmittheacknowledgementcall.
Aftertransmittingthereplycall,thetransceiverreturnstother
normaloperatingmode.
Transmitting a Polling Reply CallD
Quick Reply:
WhenqaPollingRequestcallisreceived,beepssound.
Push[ALARMOFF]tostopthebeeps.
Push [ACK].w
•Push[INFO]todisplaythePollingRequestcallinformation.
Push[BACK]toreturntothepreviousscreen,orpush[ACK].
TheePollingReplyconrmationscreenisdisplayed.
Push[CALL]totransmitthereplycall.
Aftertransmittingthereplycall,thetransceiverreturnstother
normaloperatingmode.
Manual Reply:
Enterq
“POLLING REPLY” in the DSC CALLS menu.
•If no Polling Request call has been received, the “POLLING
REPLY”itemwillnotbedisplayed.
SelectadesiredPollingRequestcalltobereplied.w
e
ThePollingReplycallconrmationscreenisdisplayed.Push
[CALL]totransmittheacknowledgementcall.
Aftertransmittingthereplycall,thetransceiverreturnstother
normaloperatingmode.
¤1 Transmitting DSC calls
ToensurecorrectoperationoftheDSCfunction,makesure
yousetthesquelchcorrectly.
Transmitting an Individual CallD
Enter “INDIVIDUAL CALL” in the DSC CALLS menu.q
Selectorenterthedesiredindividualaddress.w
SelectRoutine,SafetyorUrgencyasthedesiredcalltype.e
NOTE:Whenacoaststationisselectedinstepw,thevoice
channel is automatically specied by the coast station.
Therefore,skipsteprandgodirectlytostept.
Selectadesiredintershipchannel.r
Aconrmationscreenappears.t
Push[CALL]totransmittheIndividualcall.y
Standby on Channel 70 until an acknowledgement is re-u
ceived.
When the acknowledgement‘Able to comply’ is received,i
beepssoundandthescreenbelowisdisplayed.
Push[ALARMOFF]tostopthebeeps,andthenselectthe
intershipchannelspeciedinstepr.
•Adifferentintershipchannelwillbeautomaticallyselectedifthe
stationyoucalledcannotusethechannel.
•Replyusingthemicrophone.Andgotostepo.
Or, when the acknowledgement ‘Unable to comply’ is re-
ceived,beepssound.
Push [ALARM OFF] to stop the beeps. Then push [EXIT]
toreturntothe operatingchannel (beforeyou entered the
MENUscreen).
Aftercommunicating,push[EXIT]toreturntothenormalop-o
eratingmode.
Transmitting an Individual AcknowledgementD
Quick ACK:
WhenqanIndividualcallisreceived,beepssound.
Push[ALARMOFF]tostopthebeeps.
Push [ACK].w
Selectoneofthreeoptions,AbletoComply,UnabletoCom-e
plyorProposeNewChannel,andthenpush[ENT].
TheIndividualACKconrmationscreenisdisplayed.r
Push[CALL]totransmittheacknowledgementcall.t
Replytothecallusingthemicrophone.y
Push[EXIT]toreturntothenormaloperatingmode.u
Manual ACK:
Enter “INDIVIDUAL ACK” in the DSC CALLS menu.q
•WhennoIndividualcallhasbeenreceived,the“IndividualACK”
itemwillnotbedisplayed.
Select a desired individual addressorIDcode to reply to,w
usingDialor[∫]/[√],thenpush[ENT].
Performstepse e to u,asdescribedin“QuickACK:”above.
Transmitting a Group CallD
Enter “GROUP CALL” in the DSC CALLS menu.q
Selectorenterthedesiredgroupaddress.w
Selectadesiredintershipchannel.e
Aconrmationscreenappears.r
Push[CALL]totransmittheGroupcall.t
Announcetheinformationusingthemicrophone.y
Aftertheannouncement,push[EXIT]toreturntothenormalu
operatingmode.
Transmitting an All Ships CallD
Enter “ALL SHIPS CALL” in the DSC CALLS menu.q
Selectadesiredcategory.w
•Theselectablecategorymaydifferaccordingtotheconnected
transceiversetting.
Selectadesiredtrafcchannel.e
Aconrmationscreenappears.r
Push[CALL]totransmittheAllShipscall.t
Announcethemessageusingthemicrophone.y
Aftertheannouncement,push[EXIT]toreturntothenormalu
operatingmode.
Transmitting a Position Request CallD
Enter“POSITIONREQUEST”intheDSCCALLSmenu.q
Selectorenterthedesiredindividualaddress.w
Aconrmationscreenappears.e
•Conrmthecallcontents.
Push[CALL]totransmitthePositionRequestCall.r
•If Channel 70 isbusy, the transceiverstandsbyuntilthe
channelbecomesclear.
Whentheacknowledgementcallisreceived,beepssound.t
Push[ALARMOFF]tostopthebeeps,andthenpush[EXIT]y
toreturntothenormaloperatingmode.
Transmitting a Position Report CallD
Enter “POSITION REPORT” in the DSC CALLS menu.q
Selectorenterthedesiredindividualaddress.w
Aconrmationscreenappears.e
•Conrmthecallcontents.
Push[CALL]totransmitthePositionReportCall.r
•If Channel 70 isbusy, the transceiverstandsbyuntilthe
channelbecomesclear.
AfterthePositionReportCallhasbeentransmitted,thetrans-t
ceiverautomaticallyreturnstothenormaloperatingmode.
Transmitting a Polling Request CallD
Enter“POLLINGREQUEST”intheDSCCALLSmenu.q
Selectorenterthedesiredindividualaddress.w
Aconrmationscreenappears.e
•Conrmthecallcontents.
Push[CALL]totransmitthePollingRequestCall.r
•If Channel 70 isbusy, the transceiverstandsbyuntilthe
channelbecomesclear.
Whentheacknowledgementcallisreceived,beepssound.t
Push[ALARMOFF]tostopthebeeps,andthenpush[EXIT]y
toreturntothenormaloperatingmode.
+See “Instructions q” (zto ⁄5)or “Instructions e” (¤2 to ‹0)for other functions.
¤1 TransmittingDSCcalls(Continued)

REMOTE-CONTROL MICROPHONE
HM-195B
HM-195SW
INSTRUCTIONS e
¤2 Receiving DSC calls
Receiving a Distress CallD
Push [ALARM OFF] to stop the alarm and the blinking back-q
light.
Push a softkey to select your desired action.w
[IGN]
Push to ignore the call and return to the normal operating
mode.
[INFO]
Push to display the Received Call information. (See ¤3)
[ACPT]
Push to accept the call, then push [CH 16] to switch the oper-
ating channel to Channel 16. After that, monitor it, as a coast
station may require assistance.
Receiving a Distress AcknowledgementD
Push [ALARM OFF] to stop the alarm and the blinking back-q
light.
Push a softkey to select your desired action.w
[IGN]
Push to ignore the call and return to the normal operating
mode.
[INFO]
Push to display the Received Call information. (See ¤3)
[ACPT]
Push to accept the call, then push [CH 16] to switch the oper-
ating channel to Channel 16. After that, monitor it, as a coast
station may require assistance.
Receiving a Distress Relay CallD
Push [ALARM OFF] to stop the alarm and the blinking back-q
light.
Push a softkey to select your desired action.w
[IGN]
Push to ignore the call and return to the normal operating
mode.
[INFO]
Push to display the Received Call information. (See ¤3)
[ACPT]
Push to accept the call, then push [CH 16] to switch the oper-
ating channel to Channel 16. After that, monitor it, as a coast
station may require assistance.
Receiving a Distress Relay AcknowledgementD
Push [ALARM OFF] to stop the alarm and the blinking back-q
light.
Push a softkey to select your desired action.w
[IGN]
Push to ignore the call and return to the normal operating
mode.
[INFO]
Push to display the Received Call information. (See ¤3)
[ACPT]
Push to accept the call, then push [CH 16] to switch the oper-
ating channel to Channel 16. After that, monitor it, as a coast
station may require assistance.
Receiving an Individual CallD
Push [ALARM OFF] to stop the alarm and the blinking back-q
light.
•If[ALARMOFF]isnotpushedwithin2minutes,thenextscreen
may appear, depending on the call Category.
Push a softkey to select your desired action.w
[IGN]
Push to ignore the call and return to the normal operating
mode.
[INFO]
Push to display the Received Call information. (See ¤3)
[ACK]
Push to display the “INDIVIDUAL ACK” screen to reply to the
call, and select the channel specified by the calling station
for voice communication, depending on your situation. See
¤1 for details of the Individual Acknowledgement procedure.
When “INDIVIDUAL ACK” is set to “Auto ACK (Unable),” the
transceiver automatically replies to the call. In that case, both
the TX and RX calls are stored in the Transmitted and Re-
ceived Call Logs.
Receiving a Group CallD
Push [ALARM OFF] to stop the alarm and the blinking back-q
light.
•If[ALARMOFF]isnotpushedwithin2minutes,thenextscreen
may appear, depending on the call Category.
Push a softkey to select your desired action.w
[IGN]
Push to ignore the call and return to the normal operating
mode.
[INFO]
Push to display the Received Call information. (See ¤3)
[ACPT]
Push to monitor the channel specified by the calling station for
its announcement.
Receiving an All Ships CallD
Push [ALARM OFF] to stop the alarm and the blinking back-q
light.
•If[ALARMOFF]isnotpushedwithin2minutes,thenextscreen
may appear, depending on the call Category.
Push a softkey to select your desired action.w
[IGN]
Push to ignore the call and return to the normal operating
mode.
[INFO]
Push to display the Received Call information. (See ¤3)
[ACPT]
Push to monitor the channel specified by the calling station for
it’s announcement.
Receiving a Geographical Area CallD
Push [ALARM OFF] to stop the alarm and the blinking back-q
light.
•If[ALARMOFF]isnotpushedwithin2minutes,thenextscreen
may appear, depending on the call Category.
Push a softkey to select your desired action.w
[IGN]
Push to ignore the call and return to the normal operating
mode.
[INFO]
Push to display the Received Call information. (See ¤3)
[ACPT]
Push to monitor the channel specified by the calling station for
it’s announcement.
When no GPS receiver is connected, or if there is a problem
with the connected receiver, all Geographical Area Calls are
received, regardless of your position.
Receiving a Position Request CallD
Push [ALARM OFF] to stop the alarm and the blinking back-q
light.
•If[ALARMOFF]isnotpushedwithin2minutes,thenextscreen
may appear, depending on the call Category.
Push a softkey to select your desired action.w
[IGN]
Push to ignore the call and return to the normal operating
mode.
[INFO]
Push to display the Received Call information. (See ¤3)
[ACK]
Push to display the “POSITION REPLY” screen and send a
reply to the call. (See ¤1)
When “POSITION ACK” is set to “Auto TX,” the transceiv-
er automatically replies to the call. In that case, both the
TX and RX calls are stored in the Transmitted and Re-
ceived Call Logs.
Receiving a Position Report CallD
Push [ALARM OFF] to stop the alarm and the blinking back-q
light.
•If[ALARMOFF]isnotpushedwithin2minutes,thenextscreen
may appear, depending on the call Category.
Push a softkey to select your desired action.w
[EXIT]
Push to ignore the call and return to the normal operating
mode.
[INFO]
Push to display the Received Call information. (See ¤3)
Receiving a Polling Request CallD
Push [ALARM OFF] to stop the alarm and the blinking back-q
light.
•If[ALARMOFF]isnotpushedwithin2minutes,thenextscreen
may appear, depending on the call Category.
Push a softkey to select your desired action.w
[IGN]
Push to ignore the call and return to the normal operating
mode.
[INFO]
Push to display the Received Call information. (
See ¤3
)
[ACK]
Push to display the “POLLING REPLY” screen to reply to the
call. (
See ¤1
)
When “POSITION ACK” is set to “Auto TX,” the transceiv-
er automatically replies to the call. In that case, both the
TX and RX calls are stored in the Transmitted and Re-
ceived Call Logs.
¤2 Receiving DSC calls (Continued)

1-1-32Kamiminami,Hirano-ku,Osaka547-0003,Japan A-7022D-3EX-q PrintedinJapan
©2012IcomInc.
¤3 Received Call Log
The transceiver automatically stores up to 50 distress mes-
sages and 50 other messages, and they can be used as a
supplement to your logbook.
•Whileinthenormal operatingmode,“ ” blinks in the upper
right corner of the LCD when there is an unread message.
Push [LOG] to enter “RCVD CALL LOG” in the DSC CALLSq
menu, or you can enter it through the Menu screen.
Select “Distress” or “Others.”w
•TheDistressmessagesarestoredin“Distress.”
•ThemessagesotherthantheDistressarestoredin“Others.”
•“ ” appears when there are unread messages.
•“ ” appears when there are no unread messages.
•Noiconappearswhentherearenomessages.
Select the desired message.e
•Themessageintheunopenedlehasnotbeenread.
Rotate Dial to scroll the message contents.r
To delete the displayed message, push [DEL].t
•Aconrmationscreenappears,thenpush[OK]todelete.
Push [EXIT] to return to the normal operating mode.y
¤5 DSC Settings
Automatic AcknowledgementD
Enterq
either “INDIVIDUAL ACK,” “POSITION ACK” or “TEST
ACK” in the DSC Settings menu.
Rotate Dialw
to select “Auto TX” or “Manual TX,” then push
[ENT].
•Push[BACK]tocancelandreturntotheDSCSettingsmenu.
Push [EXIT] to return to the normal operating mode.e
Channel 16 Switch functionD
Enter “CH 16 SWITCH”q
in the DSC Settings menu
.
Rotate Dial to set the Channel 16 Switch function to “Autow
(NoDelay),”“10SecondDelay”or“OFF
,” then push [ENT].
•Push[BACK]tocancelandreturntotheDSCSettingsmenu.
Push [EXIT] to return to the normal operating mode.e
DSC Data OutputD
Enter “DSC DATA OUTPUT”q
in the DSC Settings menu
.
Rotate Dial to set the DSC Data Output function to “All Sta-w
tion,” “List Station” or “OFF
,” then push [ENT].
•Push[BACK]tocancelandreturntotheDSCSettingsmenu.
Push [EXIT] to return to the normal operating mode.e
AlarmD
Enter “ALARM”q
in the DSC Settings menu
.
Rotate Dial to selectw
the status, then push [ENT].
•Push[BACK]tocancelandreturntotheDSCSettingsmenu.
•“Safety,”“Routine,”“Warning,”“Self-Terminate”and“Discrete”
are selectable. (default: ON )
Rotate Dial to set the Alarm setting to “ON” or “OFF.”e
Push [EXIT] to return to the normal operating mode.r
Channel 70 Squelch levelD
Enter“CH70SQLLEVEL”q
in the DSC Settings menu
.
Rotate Dial to adjust the squelch level until the noise justw
disappears, then push [ENT].
•Push[BACK]tocancelandreturntotheDSCSettingsmenu.
Push [EXIT] to return to the normal operating mode.e
DSC Loop TestD
Enter “DSC LOOP TEST”q
in the DSC Settings menu
.
Push [ENT] to start the DSC loop test.w
•Push[BACK]tocancelandreturntotheDSCSettingsmenu.
•WhenthetransmitDSCandreceiveDSCsignalsarematched,
“OK” appears.
Push [EXIT] to return to the normal operating mode.e
If “NG” appears in step w, either or both TX and RX DSC
circuits has a problem. In that case, you will have to send
the transceiver to your nearest dealer for repair.
¤4 Transmitted Call Log
Thetransceiverautomaticallystoresupto50transmittedcalls,
and the logs can be used as a supplement to your logbook.
Enter “TX CALL LOG” in the DSC CALLS menu.q
Select the desired message.w
Rotate Dial to scroll the message contents.e
To delete the displayed message, push [DEL].r
•Theconrmationscreenappears,thenpush[OK]todelete.
Push [EXIT] to return to the normal operating mode.t
Receiving a Test CallD
Push [ALARM OFF] to stop the alarm and the blinking back-q
light.
•If [ALARM OFF] is not pushed within 2 minutes, the next
screen may appear, depending on the call Category.
Push a softkey to select your desired action.w
[IGN]
Push to ignore the call and return to the normal operating
mode.
[INFO]
Push to display the Received Call information. (
See ¤3
)
[ACK]
Push to display the “TEST ACK” screen to reply to the call.
(
See ¤1
)
When “TEST ACK” is set to “Auto TX,” the transceiver
automatically replies to the call. In that case, both the TX
and RX calls are stored in the Transmitted and Received
Call Logs.
Receiving a Test Acknowledgement CallD
Push [ALARM OFF] to stop the alarm and the blinking back-q
light.
•If [ALARM OFF] is not pushed within 2 minutes, the next
screen may appear, depending on the call Category.
Push [EXIT] to return to the normal operating mode.w
¤2 Receiving DSC calls (Continued) ¤6 Intercom operation
ThisfunctionisnotavailablewiththeIC-M400BB.
Push [INCM] to enter the Intercom mode.q
Hold down [INCM CALL] to sound the intercom beeps.w
•Thetransceiverandthecommandmicrophonesoundbeeps
while holding down [INCM CALL].
•“CALL”appears.
After releasing [INCM CALL], hold down [PTT] and speake
into the microphone at a normal voice level.
•“TALK”appearsonthecaller’sdisplay,or“LSTN”appearson
the listener’s display.
•To adjust the HM-195’s intercom volume level, rotate [VOL/
SQL](Dial)ontheHM-195.
After releasing [PTT] you can hear the response throughr
the speaker.
To return to the normal operating mode, push [EXIT].t
¤7 RX Speaker function
Push [RXq] to enter the RX Speaker mode.
•TheRXSpeakervolumeleveladjustmentscreenisdisplayed.
Rotate Dial or push [wY]/[Z]/[Ω]/[≈] to adjust the RX Speak-
er volume level, and then push [ENT].
•“RX ” appears.
To return to normal operating mode, push [RXe].
•“RX ” disappears.
¤8 PA (Public Address) function
Push [PA] to enter the Public Address mode.q
Hold down [PTT] and speak at a normal voice level.w
•Whileholdingdown[PTT],thescreenbelowisdisplayed.
•ToadjustthePAvolumelevel,rotateDial.
Push [EXIT] to return to normal operating screen.e
¤9 Horn function
Push [HORN] to enter the Horn mode.q
Hold down [HORN] to sound a horn.w
•Whileholdingdown[HORN],thehornsounds,andthescreen
below is displayed.
•Toadjustthehornvolumelevel,rotateDial.
Push [EXIT] to return to the normal operating screen.e
‹0 Menu screen operation
The Menu screen is used to change the transceiver’s functions
and the microphone’s own functions, send DSC calls or show
the programmed MMSI and ATIS*1codes and GPS informa-
tion*2.
*1Appears only when the transceiver is the Dutch or German ver-
sion.
*2AppearsonlywhenaGPSreceivercompatiblewithNMEA0183
ver.2.0or3.01isconnectedtothetransceiver.
These instructions are for only the microphone’s own func-
tions. Refer to the transceiver’s manual for the settings of
the other functions. (Some functions cannot be selected
fromtheHM-195.)
DEntering the Menu screen and operation
Push [MENU].q
Rotate Dial or push [w∫]/[√] to select the root item, and then
push [ENT].
Rotate Dial or push [e∫]/[√] to select the desired item, and
then push [ENT].
Rotate Dial or push [r∫]/[√] to select the option, and then
push [ENT] to set it.
t
Push[EXIT]toexittheMenuscreen.
•Push[CLEAR]or[BACK]toreturntothepreviousscreen.
•Backlight
ThefunctiondisplayandkeysoftheHM-195canbebacklitfor
better visibility under low light conditions.
Thebacklightcanbesetto7levelsandOFF. (Default:7)
•Display contrast
ThecontrastoftheHM-195’sfunctiondisplaycanbeadjusted
in8steps.
Level1isthelowestcontrast,andlevel8isthehighestcon-
trast. (Default:5)
•Key Beep
You can turn OFF beep tones for silent operation, or you can
turn ON the tones to have confirmation beeps sound when a
key is pushed. (Default: ON)
•COMMANDMIC Speaker
TheHM-195’sexternalspeakercanbeusedinsteadofthein-
ternal speaker. (Default: Internal Speaker)
Regardless of this setting, the transceiver’s microphone
speaker is ON.
On the caller’s display
On the listener’s display
When “Distress” is selected in step w.
+See “Instructions q” (zto ⁄5)or “Instructions w” (⁄6 to ¤1)for other functions.
Other manuals for IC-M400BB
2
This manual suits for next models
3
Table of contents
Other Icom Microphone manuals