iFootage Seastars Q1S User manual

Schnellwechselplatten-System
Quick Release System
Bedienungsanleitung | User Manual

– 2 –
Vielen Dank, dass Sie sich für dieses iFootage-Produkt entschieden ha-
ben. Das Seastars-Schnellwechselplattensystem kann mit den meisten
Kameraträgern, Ausrüstung und Kameraköpfen verwendet werden. Um
das Beste aus Ihrem Quick Release System herauszuholen, lesen Sie
bitte die folgenden Anweisungen sorgfältig durch, bevor Sie das Gerät
in Betrieb nehmen. Bitte bewahren Sie das Handbuch zum späteren
Nachschlagen gut auf.
Eigenschaften
1. Schnelles Aufsetzen und automatische Verriegelung. Zum Entriegeln
einfach drehen.
2. Entwickelt für eine Vielzahl von Kameras und Equipment. Kompakt,
schnell und einfach zu bedienen.
3. Dieses Produkt umfasst die Schnellwechselplatte (Top Plate) und die
Schnellwechselbasis (Base Plate).
Die Schnellwechselplatte mit 1/4“- und 3/8“-Konvertierungsschraube
ist mit den meisten Kamera- und Stativköpfen kompatibel.
4. Ideal für Stative, Schieberegler und andere Kamerahalterungen.
3/8“-Gewinde auf der Rückseite der Schnellwechselplatte / Top Plate
und 1/4“-Umbauschraube im Lieferumfang enthalten.

– 3 –
Seastars
Q1S
Garantiekarte
2,5 mm Inbus-
schlüssel
Bedienungs-
anleitung
4 mm Inbus-
schlüssel
Produktzerti-
zierung
Konvertierungs-
schraube
Lieferumfang
Verlieren Sie keinen
der hier aufgeführten
Artikel.
Hinweis: Alle hier aufgeführten
Bilder dienen der Illustration
Technische Daten
Größe 111 x 32,5 mm +/- 0,6 mm
Gewicht 248 g +/- 10g g
Traglast 9 kg
Material Aluminium-Magnesium-Legierung, rostfreier Stahl
– 4 –
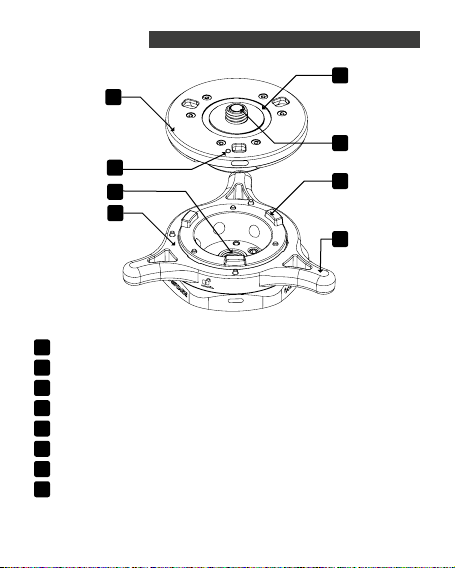
Komponenten
Schnellwechselplatte (Top Plate)
1/4“- und 3/8“-Konvertionsschraube
Anti-Rutsch-Ring
Schnellwechselplatte-Basis (Base Plate)
Entriegelungsgriff
Fixierung
Madenschraube
3/8“-Gewinde
1
2
3
4
5
6
7
8
1
4
3
8
7
6
5
2

– 5 –
Bedienung und Funktionen
n Montage des Schnellwechselpattensystems
1. Drehen Sie die Base Plate im Uhrzeigersinn, um sie auf dem Stativ
zu montieren.
2. Drehen Sie die Base Plate vorsichtig in Richtung des Pfeils unter dem
Entriegelungssymbol bis ein Klicken zu hören ist. Sie ist nun entriegelt.
Hinweis: Die Top Plate kann nur montiert werden wenn die Base
Plate auf der „Entriegelt“-Position steht.
n Befestigungs-Schraube
Wenn Sie die Base Plate anbringen, vergewissern
Sie sich bitte, dass sie in der verriegelten Position
ist und ziehen Sie die zwei Befestigungsschrau-
ben am Sockel mit einem 2,5 mm-Sechskant-
Inbusschlüssel an. Beim Entfernen der
Base Plate lösen Sie bitte zuerst die
Befestigungsschrauben und
schrauben dann die Base
Plate separat ab.
Hinweis: Wenn Sie das iFootage
Seastars Q1S abnehmen, vergewissern Sie sich, dass Sie
Ihre Kamera gesichert haben, um Schäden zu vermeiden.
Verriegelte Position
Entriegelte Position
12

– 6 –
Bedienung und Funktionen
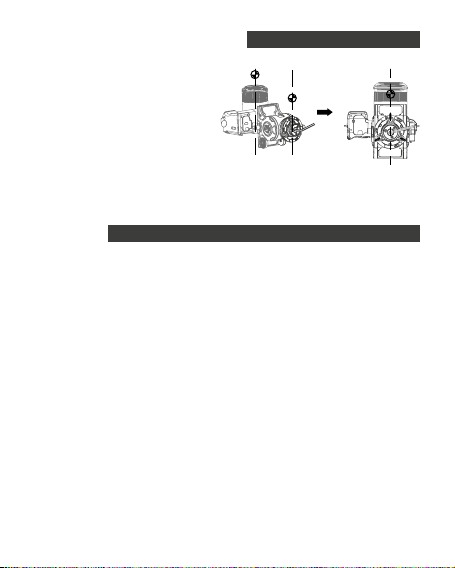
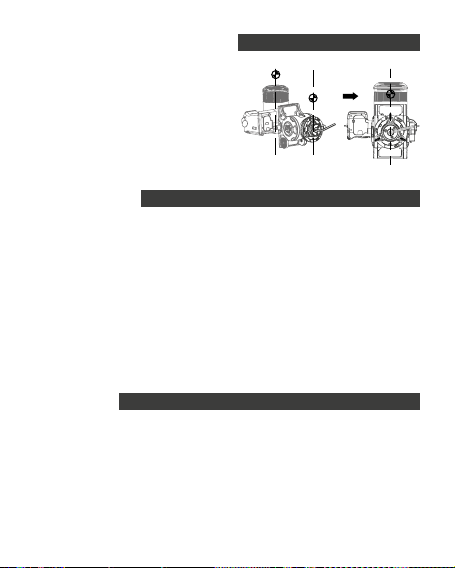
nAnwendung des Quick Release Systems
Montieren Sie die den Stativkopf
mit Ihrer Kamera auf dem Quick
Release System.
Stellen Sie sicher, dass die Top
Plate verriegelt ist und ziehen Sie
dann die Schraube mit dem 4mm
Inbusschlüssel fest.
Setzen Sie die Top Plate vorsich-
tig in die Base Plate indem Sie
die Top Plate auf die Base Plate
drücken und in eine beliebige
Richtung drehen bis ein Klick-
Geräusch anzeigt, dass das
Quick Release System in der
Position verriegelt ist.
+
– 7 –
Bedienung und Funktionen
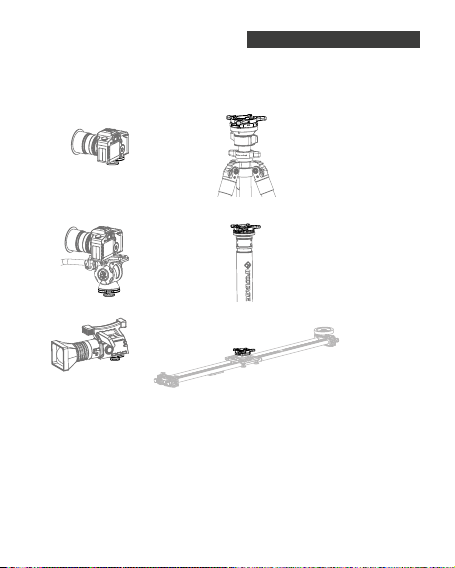
nVielseitige und zeitsparende Anschlussmöglichkeiten – montieren Sie
schnell und einfach Ihre Kamera auf unterschiedlichem Equipment.
Für eine Vielzahl an Kamera-Equipment entwickelt – für einen schnellen
Wechsel zwischen Kamera-Setups und Equipment.
Montage
auf einem Stativ
Montage
auf einem Einbeinstativ
Montage
auf einem Slider
+
+
+
– 8 –
Bedienung und Funktionen
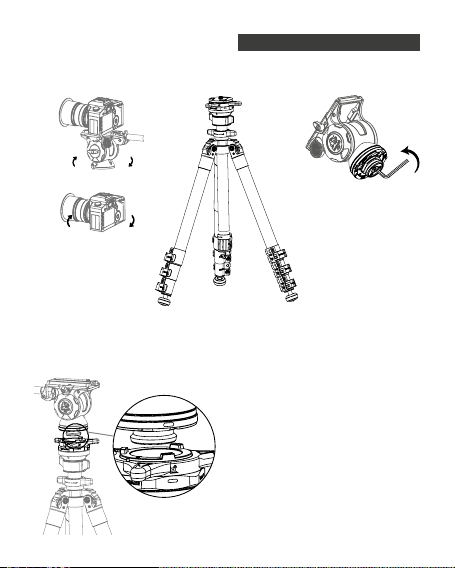
nMontage Ihrer Kamera
Stellen Sie sicher, dass Sie
die Mitte des Objektivs mit
der Markierung auf der Top
Plate ausrichten um eine
konsistente Ausrichtung der
Kamera bei Equipmentwechseln zu gewährleisten.
Wartung
1. Wenn sich Sand oder Sandkörner im Inneren des Quick Release
Systems benden, reinigen Sie es bitte mit einer kleinen Bürste oder
einem sauberen Tuch.
2. Reinigen Sie das Gerät nach dem Gebrauch bei Regen, Schnee
oder anderen nassen Bedingungen mit einem feuchten Tuch.
Lassen Sie die gesamte Feuchtigkeit verdunsten, bevor Sie das
Quick Release System wieder verstauen.
3. Behandeln Sie alle Teile mit Vorsicht und vermeiden Sie während der
Lagerung Druck von außen.
• Bitte beachten Sie, dass die Kamera und das Stativ nicht im Lieferumfang ent-
halten sind und nur für illustrative Zwecke verwendet werden.
• iFootage behält sich das Recht vor, alle Hardware- und Software-Spezikationen
jederzeit und ohne Vorankündigung zu ändern oder zu korrigieren. Sollte es zu Ab-
weichungen zwischen dem Inhalt der Bedienungsanleitung und dem tatsächlichen
Produkt geben, beziehen Sie sich bitte auf das Produkt selbst.

– 9 –
Erklärung
iFootage und seine Mitarbeiter haften nicht für die Verwendung oder den
Missbrauch der iFootage-Produkte oder für direkte, indirekte, kriminelle,
zufällige, besondere Folgeschäden oder für die Haftung für Schäden
am Leben. Das Risiko, dass Benutzer oder andere Personen dieses
Produkt verwenden, trägt der Benutzer Dies hat keine Auswirkungen auf
die Benutzerrechte.
Rollei GmbH & Co. KG
In de Tarpen 42
22848 Norderstedt
Deutschland
Service-Hotline:
+49 40 270750277

– 10 –
Thank you for purchasing this iFootage product. The Seastars quick
release system can be used with the majority of camera support equip-
ment and camera heads. To get the most out of your quick release sys-
tem please read the manual carefully prior to operating the equipment.
Please keep the manual in a safe place for future reference.
Features
1. Rapid deployment, drop-in, auto locking. Simply rotate to unlock.
2. Designed for a variety of camera support equipment. Compact,
portable, quick and easy to use.
3. This product includes the quick-release top plate and quick-release
base.The quick-release top plate with both 1/4” & 3/8” screw is
compatible with most camera and tripod heads.
4. Ideal for tripods, sliders and other camera support. 3/8“ screw thread
located on rear of quick release base and 1/4“ conversion screw
supplied.
List of Items
Do not lose any of
the articles listed
above.
Note: All diagrams shown in
this instruction manual are
for illustration
Seastars
Q1S
Warranty
card
2.5 mm
Hex wrench
User mnual
4 mm
Hex wrench
Product
certication
Conversion
screw

– 11 –
Technical Data
Size 111 x 32.5 mm +/- 0.6 mm
Weight 248 g +/- 10g g
Load 9 kg
Material Aluminium-magnesium alloy / Quenched stainless steel
Component Description
Quick-release head
1/4” & 3/8” screw
Non-slip rubber ring
Quick-release base body
Unlock handle
Boss
Grub screw
3/8“ screw thread
1
2
3
4
5
6
7
8
1
4
3
8
7
6
5
2

– 12 –
User Guide and Functions
n Mounting and debugging the quick release system
1. Turn base clockwise to install on tripod.
2. Gently turn in the direction of the arrow below the unlocking symbol
until a click is heard, indicating that the quick release head has now
released.
Note: The quick release head can only be inserted when the quick
release base is in the unlocked position.
n Locking screw
When installing the quick release base please
ensure that it is in the locked position and tighten
the 2 xing screws on the base with a 2.5 mm hex
wrench. When removing the quick release base
please loosen the xing screws rst, and then
unscrew the base manually.
Note: When removing the Seastars
Q1S please ensure you have
secured your camera to
avoid damage.
1
Locked position
Unlocked position
2
– 13 –
User Guide and Functions
nUsing the quick release system
Install the head/camera on the
quick release system.
Ensure top plate is locked and
then tighten using the 4 mm hex
wrench.
Gently insert the quick release
top plate into the quick release
base, push down and rotate
either direction until click sound
indicates that it is now locked in
position.
+

– 14 –
User Guide and Functions
nVersatile, time saving connectivity-quickly and easily switch your
camera to a variety of camera support equipment.
Designed to function with the majority of camera support equipment –
allowing you to easily move your camera set up from one camera
support to another.
Connect
to a tripod
Connect
to a monopod
Connect
to a slider
+
+
+
– 15 –
User Guide and Functions
nInstalling your camera
To ensure consistency of camera
direction when moving to other
support equipment, when installing
the camera, please ensure you align
the midway point of the lens with the
line mark on the quick release plate.
Maintenance
1. If there is sand or grit inside the quick release base, please clean
using a small brush or a clean cloth.
2. After use in rain, snow or other wet conditions, clean with a damp
cloth. Allow all moisture to evaporate prior to packing away.
3. Handle all parts with care and avoid external pressure during storage.
• Please note that the camera and tripod are not included in the package and are
used for illustrative purposes only.
• iFootage reserve the right to amend or rectify all hardware and software specications
at any time without notice. If there appears to be any difference between the contents
of the instruction manual and the actual product, please refer to the product itself.
Statement
iFootage and its associates will not be held responsible for the use or
misuse of any of the iFootage products or any direct, indirect, punitive,
incidental, special consequential property or life damage responsibility.
The risk of users or any other person using this product shall be borne
by the user. This will not affect your legal rights.
Rollei GmbH & Co. KG, In de Tarpen 42, 22848 Norderstedt, Germany
Service-Hotline: +49 40 270750277

Rollei GmbH & Co. KG
In de Tarpen 42, D-22848 Norderstedt, Germany
www.rollei.de
Service Hotline: +49 40 270750277
Table of contents
Languages:
Other iFootage Camera Accessories manuals


